
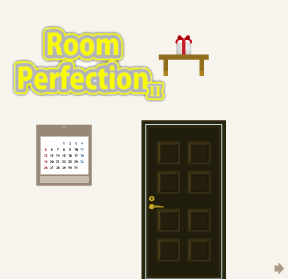
Room Perfection 2

![]() One of the things I've often mentioned about the Dismantlement series of games by gam.ebb.jp is that they are something that you would find in a bigger game, perhaps an adventure game or a hidden object hybrid, or even a room escape game. Then gam.ebb.jp went and created an actual room escape game, which was pretty fun and tricky. Now, they've come out with a sequel, Room Perfection 2, just in time to drive the casual gamer nuts before the weekend. Welcome to Weekday Escape!
One of the things I've often mentioned about the Dismantlement series of games by gam.ebb.jp is that they are something that you would find in a bigger game, perhaps an adventure game or a hidden object hybrid, or even a room escape game. Then gam.ebb.jp went and created an actual room escape game, which was pretty fun and tricky. Now, they've come out with a sequel, Room Perfection 2, just in time to drive the casual gamer nuts before the weekend. Welcome to Weekday Escape!
 Room Perfection 2 isn't what you'd call a complete room escape, more of a two walls and out type of scenario. However, packed within those two walls are a lot of tricky puzzles and games worthy of gam.ebb.jp's reputation. Visual puzzles, letter puzzles, just about everything you can think of makes an appearance, including a tricky bit of point and shoot. That's a lot to pack into a room escape, much less just two walls.
As with all room escapes you click on objects to examine them, to pick them up, to put them together, or to blow the space completely to smithereens. Okay, you won't find so much of that last item in your standard room escape. You start in the space armed only with a button that you are told to under no circumstances push until you make it out of the house. So, let's see how long it takes you to defy that restriction. Of course, if you've played the first Room Perfection, you know exactly what happens. It's nice, though, when you're slamming your head against the desk trying to figure out one of the many puzzles to have that option as a kind of stress relief.
There seems to be fewer puzzles this time around, and nothing that is reflex-based (unlike that maze in the first game). However, it's nice to see such a variety of games and puzzles not often found in your standard room escape. There is one that is color based, so if you have visual problems be warned. And a changing cursor to indicate the hot-spots would have been nice, along with the ability to save and come back later.
Is this, as the title implies, the perfect room escape? No, but not for lack of trying. Room Perfection 2 is fun, engaging, challenging, and frustrating in turn. The simple graphics, the lack of music, and the lack of the changing cursor or save option do not diminish what is a rollicking good escaping time. With the Room Perfection series gam.ebb.jp proves that they can do more than just create a simple dismantlement puzzle and blow up a common household object. Now, you can blow up a whole house! What will they blow up next?


Walkthrough Guide
(Please allow page to fully load for spoiler tags to be functional.)
Room Perfection 2 Walkthrough
General Information
There is only one end to this escape.
Don't push the button until you are out of the house.
There will be directions for the colorblind.
You pushed the button, didn't you? Don't do it again!
Good luck!
Exploration (This shouldn't take long)
You start facing a nice flat-screen television. There's a shelf to the left of it with a picture above it.
Click on the picture for a close up.
Okay, a nice geometric pattern in four colors, red, blue, green, and yellow. Maybe it's a clue?
Back out of the close up.
There's a bottle of wine on the shelf but you can't do anything with it.
Underneath the television are three drawers. The left and center drawer need keys, the right drawer has a code key that has nine buttons and four colors, red, blue, green, and yellow. Hmmm, where have we seen that before?
Go right.
Now we've got the door out (locked, of course).
Above the door is a present that we can't reach.
To the left of the door is a series of shelves with boxes on them. On the center shelf in the middle is a gold box, all of the other boxes are blue.
Below the shelves is a safe with some sort of a combination lock.
On the wall between the shelves and the door is a calendar. Pity it doesn't tell us what month it is.
To the right of the door, near the floor, is a panel. Click on the little arrow to the lower right of the screen to see the panel in a close up.
Looks like we need a screwdriver. Back up.
Okay, that's the extent of the exploring. Let's solve some puzzles!
The Colored Button Drawer
Go left to face the television.
Click on the right drawer for a close up of the puzzle.
Notice that the colors on the buttons matches the colors on the picture on the wall.
Also notice that the number of colored buttons matches the number of colored shapes on the picture.
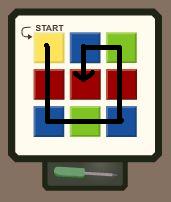
The keypad gives you the first clue: start with yellow.
If you look closely you will see that each shape is on top of another shape. From top layer to bottom those colors are: red, blue, green, red, blue, green, blue, red, yellow.
According to the keypad, though, you need to start from yellow, so the colors go in the reverse order, from bottom to top: yellow, red, blue, green, blue, red, green, blue, red.
Those colors are also next to each other.
You need to click the buttons on the keypad that correspond with the colors in the picture, from the bottom layer to the top.
Yes, there is more than one red button, etc. As in the picture, they have to be next to each other.
The pattern of color is yellow, red, blue, green, blue, red, green, blue, red.
The only way to get that pattern with the buttons next to each other is to click in a spiral pattern, starting with the yellow button. Here's a screenshot of the pattern.
Or, if you number the keypad like a telephone keypad, click the 1, 4, 7, 8, 9, 6, 3, 2, and 5 buttons.
Once you push the buttons in the correct order a slot opens and you get a screwdriver.
Take the screwdriver and back up out of the close up.
The Low Panel
Go right to the door view.
Click on that arrow at the lower right of the screen to get a close up of the panel on the wall.
Use the screwdriver on the screws to remove the panel.
Once the screws are gone click on the panel to remove it.
A tank! Click on the tank.
Once the tank is out of the cubby close down the close up of the cubby.
Okay, now we have a toy tank. What next?
The Blue Boxes
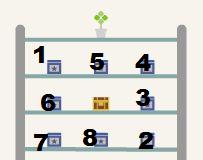
Let's turn our attention to the blue boxes on the shelves to the left of the door.
Notice when you click on a box, a little bird (or something) pops up out of the box you clicked, as well as another box.
Click on the gold box in the middle. Looks like we have some buttons in a pattern suspiciously like the pattern of the blue boxes on the shelves.
So we just need to figure out the pattern of buttons to click so that each button is pushed only once.
Perhaps the boxes will give us a clue?
Start with the box at the upper left. Notice that when you click on it the box in the lower right pops open.
If you click on the box in the lower right that opened, it opens the box above it.
Continue in this fashion (starting at the box in the upper left) and click first the box, then the box that it opens, until you see the pattern that emerges.
This is the pattern you will use on the buttons on the gold box.
Here's a screenshot of the pattern on the boxes.
Reproduce that pattern on the gold box buttons.
If you click on the buttons in the correct order, the buttons will turn orange and you will hear a click.
Back out of the close up of the box, then click on the box to open it.
Click on the open box and you will get a gold key.
The Middle Drawer
Go left to the television view.
Use the gold key on the middle drawer beneath the television.
Click on the middle drawer to open it and you will find two things: A corkscrew and a four letter code.
Take the corkscrew.
Notice that above each letter of the code, from left to right, is a number in a circle.
Close down the close up of the drawer.
Use the corkscrew on the wine bottle sitting on the low table to the left.
Once the red cork plastic is gone you will see some paper poking out of the bottle. Take it.
When the paper is in your inventory click on it and hold to see the clue.
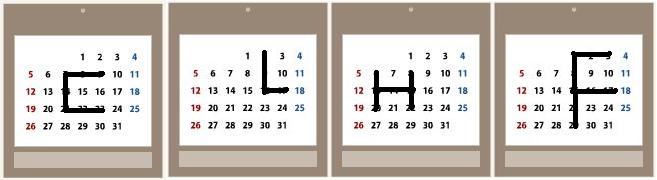
There are four numbers in circles, and each one has a series of numbers underneath.
1 has 7-9, 7-21, and 21-23.
2 has 2-16 and 16-17.
3 has 6-20, 8-22, and 13-15.
4 has 1-3, 15-17, and 1-29.
This must be a clue to the letter code.
Where in the room would we see the numbers 1 through 29?
That's right, the calendar.
Go right and look at the calendar in close up.
For each number, 1 through 4, draw a line between the dates that correspond to the numbers underneath them in the note.
Drawing these lines will get you the boxy shape of a letter.
Here is a screenshot of the four letters.
The letters are C, L, H, and F.
Once you've figured out the code, go back to the television view and click on the middle drawer.
Enter the four letter code and a smaller drawer will pop out with another key. Take the key.
Back up from the close up.
The Left Drawer
Use the key that you got from the middle drawer on the left drawer.
Click on the drawer to open it and you will find the television remote.
Back out of the close up.
The Television/The Safe
Use the remote on the television and you will get a strange picture.
Here's a screenshot of the picture.
This might be a clue for the dial on the safe.
Back out of the close up and go right to the door view.
Click on the safe for a close up.
Well, we have a dial that can turn either clockwise or counter-clockwise using the arrows above it.
Notice that there are no numbers on the dial.
So how does the picture from the television correspond to the dial?
Look at the circles from the television picture. Each one has an area grayed out.
If you used the arrows on the safe dial, you could make the dial reproduce these areas.
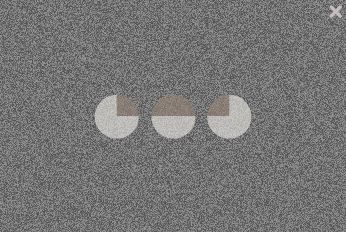
First click the right arrow three times so that the dial moves to the 3 o'clock position. This reproduces the first circle.
Now use the left arrow and click six times so that the dial moves backwards to the 9 o'clock position. This reproduces the second circle.
Use the right arrow three times to move the dial back to the top (12 o'clock position). This reproduces the third circle.
If you get the combination correct you should hear a click and a little green light will come on below the dial.
Back out of the close up, then click on the safe door to open it.
Take the object from inside the safe (remote control).
Getting Out
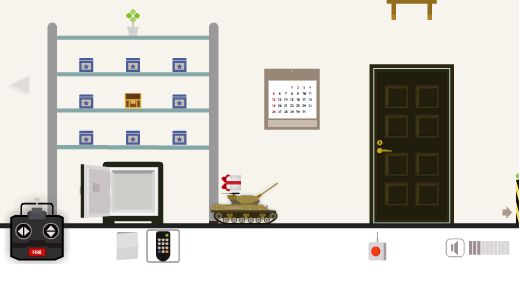
Well, we have a remote control, a toy tank, and a present above the door that we can't reach.
Let's do some shooting, shall we?
Use the left control on the remote to move the tank slightly to the left of the calendar.
Use the right control just slightly to turn the tank cannon to face the right wall.
Now use the up/down control to raise the cannon. You don't want it necessarily all the way up, just most of the way up.
Click the red button to fire a test shot. You are trying to ricochet off of the right wall and hit the present. Adjust the attitude of the cannon and try again if you miss the first time.
Here's a screenshot of the cannon in the position I used. Note the present has been knocked off of the shelf by the shot.
Once you've knocked down the present click on it to open it.
Click on the open present to get a black key.
Use the key to unlock the door then click on the door to escape.
Now you can push the red button to blow up the house.
Posted by: grinnyp |
February 16, 2011 2:49 AM
|
February 16, 2011 2:49 AM