
Sacra Terra: Angelic Night

![]() Angels and demons both permeate and fascinate western culture. Alawar Games has taken this allure and poured it into their epic new adventure and hidden object hybrid, Sacra Terra: Angelic Night, and wow, did they ever deliver a fantastic game!
Angels and demons both permeate and fascinate western culture. Alawar Games has taken this allure and poured it into their epic new adventure and hidden object hybrid, Sacra Terra: Angelic Night, and wow, did they ever deliver a fantastic game!
 Sacra Terra: Angelic Night begins as you wake up in an insane asylum, unsure of why you are there or how you arrived. Pretty soon it becomes obvious that (a) this is not your standard psychiatric hospital, and (b) something extremely bad has gone down, as there appears to be no living soul in the complex besides yourself. As you wander through the nightmarish scenery you gather hints as to what has happened from notes, newspaper articles, and a sad angelic presence who pops up every now and then to point you towards another clue. Once again mankind has been meddling where they shouldn't have and has unleashed demons in the form of the seven deadly sins, poised to take over the world unless you can stop their dastardly plan in its tracks.
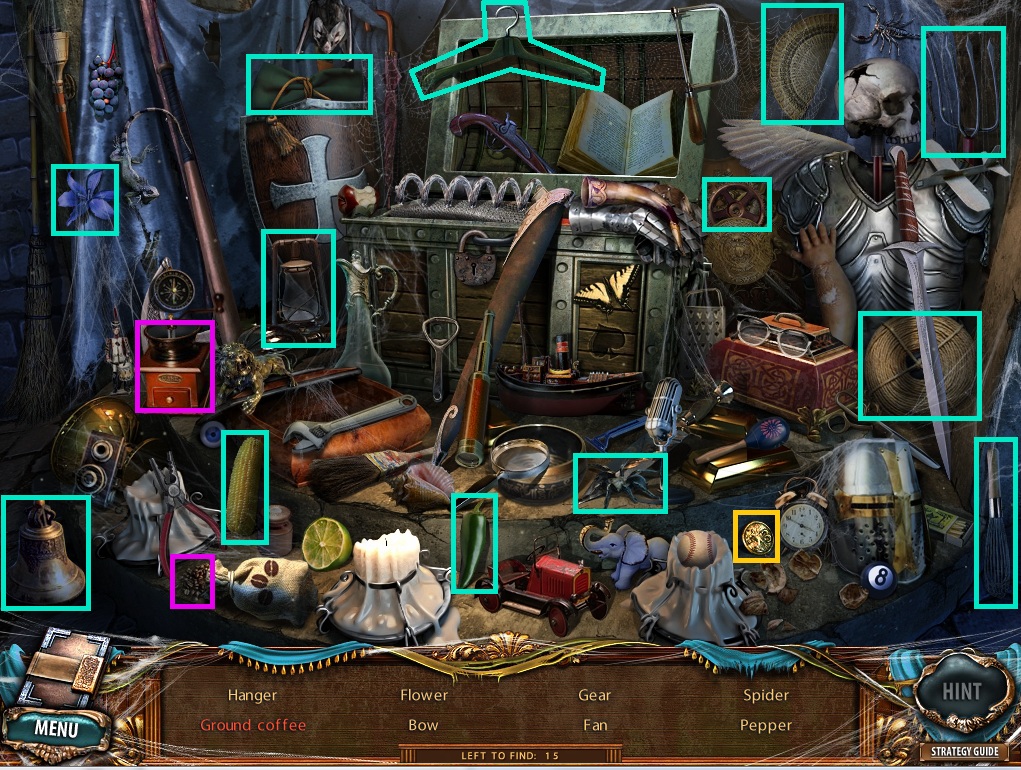
As you wander around you begin to realize both the scope of the madness that has been unleashed and the size of the asylum, which is not one building but a whole complex that requires a lot of ingenuity to explore. The standard adventure/hidden object hybrid trope of a changing cursor allows you to distinguish between areas that demand a closer look, items that can be picked up, locations where you can travel, and just interesting scenery that can be remarked upon. Items found either in the locations or in the hidden object scenes go into a large inventory until you can find a use for them later. Articles, clues, and the like will go into your handy notebook to allow you to keep track of the ever expanding story as well as information that may become important later. Sparks of light (and cascading sparkles) point out areas of interest or hidden object scenes, at least in the easy mode of the game, and a handy refilling hint timer points out both unseen hidden objects and adventure objectives.
 Along the way you will encounter your angelic friend, the demons portraying the seven deadly sins, as well as a lot of hidden object scenes, mini-games, mini-puzzles, and problem solving. Each puzzle solved and each scene decoded leads you deeper in the heart of darkness and the mystery that surrounds this surreal, nightmarish facility. With only the hints and clues to guide you (there is no voice acting and very little dialogue present) you must fight to the end, whatever the cost, to save both the world and the poor angel who is guiding you.
Analysis: Wow. Just wow. This is one of the best, most elaborate adventure hybrids to come out this year. With the emphasis squarely on the point-and-click adventuring Sacra Terra: Angelic Night is a mind-blowing throwback to the days of yore in adventure gaming with its engrossing story, stunning visuals, and — most importantly — depth of gameplay.
 Alawar has created a world which is fascinating to explore and difficult to leave, and the combination of beautiful, otherworldly scenes juxtaposed with the grim, haunting asylum proper makes the entire experience surreal. So much attention has been paid to the details, from the torn-apart, blood spattered hospital rooms to the ethereal cathedral, and from the grim character design of the deadly sins to the haunting angel, the player is tempted to slow down even further just to bask in the glory of it all. The atmosphere is enhanced by the haunting background music and the faint incidental shrieks, groans, and pleas of the damned that echo throughout the facility. With no cheesy voice-overs to break the mood, this is one game that will suck you right into the story and never let go until the final curtain has fallen.
What sets Sacra Terra: Angelic Night apart, though, is the fantastic gameplay to be found within. So many hybrids on the market today tend to pad with either tons of hidden object scenes, tons of puzzles, or both. Not so here, as the bulk of the gameplay is squarely centered on the adventuring side of things, with hidden objects and mini-games being more of a side dish than the main course. Just wandering around and exploring, the heart of the classic adventure game, is the main draw here and depending on the mode of play you choose (easy or advanced) and how much you take advantage of the hint system (and the built-in strategy guide in the Collector's Edition), you may be looking at a whopping six to ten hours of gameplay, not including the "extra" adventure available in the CE. For any causal adventure hybrid these days that is pretty stunning. What makes it even better is that it is almost all meat, no filler.
There are a few minor items in the game that may bug dedicated hybrid fans. The translation of some hidden object list items is a bit chancy (using "toy truck" for "toy car" and the like), and there is some minor repetition of the same items in different hidden object scenes (like the spool of thread being used over and over again). Another problem is some questionable use of found items, most especially needing to find a video tape (and a VCR) to use with an old film-reel camera. However, this is a very small complaint and many players might not even notice if they get caught up in this epic story of good and evil. The only other warning would be this: despite the different modes and difficulties, this is not a game for the entire family. From the opening scene with a bloody teddy bear stabbed with a hypodermic to the name-checking of Sacher-Masoch, Sacra Terra: Angelic Night is definitely not a game for the under 8 set, unless you really want them having both nightmares and questions about "Venus in Furs".
Alawar has done fantastically well with Sacra Terra: Angelic Night. The game is engrossing, gorgeous, atmospheric, and most importantly hefty beyond belief. This is one adventure hybrid that lives up to the grand old games of yesteryear in terms of both visuals and gameplay. Definitely worth checking out, but make sure you have a bit of time first because you're not going to want to stop once you begin the adventure.
Play Sacra Terra: Angelic Night
(free browser version)
A Collector's Edition is also available. It includes wallpapers, concept art, an extra adventure, and a built-in strategy guide. Remember that Big Fish Game Club Members pay only $13.99 for Collector's Editions (or 2 club credits), and collector's editions count 3 card punches of 6 total needed for a free game.
![]() Windows:
Windows:
Download the demo
Get the full version
Also available: Collector's Edition
![]() Mac OS X:
Mac OS X:
Not available.
Try Boot Camp or Parallels or CrossOver Games.


Walkthrough Guide
(Please allow page to fully load for spoiler tags to be functional.)
Sacra Terra: Angelic Night (Collector's Edition) Walkthrough
General Information
At the start of every new game, you have a choice between two difficulty modes: Casual or Expert.
Casual mode includes a beginners' tutorial at the start of the game, hints take 1 minute to recharge, and interactive zones are highlighted.
Expert mode has no tutorial, hints take 2 minutes to recharge, and interactive zones are not highlighted.
The mouse is the only tool used to interact with the environment throughout the entire game.
When the cursor changes to a pointing finger, you can interact directly with an area.
When the cursor changes to a grabbing hand, you can pick up an item, which is added to your inventory.
The grabbing hand also indicates Beyond objects, which are bonus items that morph in appearance. There is one Beyond object in every scene, for a total of 42 objects.
When the cursor changes to a magnifying glass, you can zoom in on an area for a closer look.
The cursor also changes to a magnifying glass when hovered over a glittering hidden object scene area. Clicking the glittering area starts the hidden object scene.
In every hidden object scene is a list of items at the bottom that indicated which objects you need to collect.
In screenshots, these objects are indicated by a light blue border.
In each hidden object scene, there is one item that you will need to interact with to complete the final item.
These interactable hidden objects are indicated in red at the bottom list and in screenshots are surrounded by a purple border.
At the end of scene, one of the items you collected will be added to your inventory.
In screenshots, the item added to your inventory is indicated by an orange border.
The inventory is the space used to manage the objects you collect along your adventure and is located at the bottom of the toolbar.
Click an item in your inventory and then click an interactable area of the environment to use the item.
On the left and right sides of the inventory are arrow buttons that can be clicked on to cycle through your items.
To the right of the inventory bar is the Hint button.
The Hint button can be used to reveal an item in a hidden object scene or indicate the next step in your adventure.
While solving a puzzle, the Hint button changes to the Skip button, allowing you to skip a puzzle completely.
On the left side of the toolbar is the Journal.
The Journal keeps track of relevant plot points and notes important information that can be helpful to solving puzzles.
Click the left and right arrows at the bottom of the Journal to turn through the pages.
At the upper left side of the journal page is the Map tab.
The map shows a complete map of the area. Scenes you have already visited are labelled, and places you have not yet seen are faded on the map.
The moving feet icon indicates your current location on the map.
The exclamation mark icon indicates a location where you still have available actions needed to progress through the game.
The number of Beyond objects found is also noted at the top of the map.
Below the Journal on the toolbar is the Menu button.
Clicking the Menu button pauses the game and allows you access to the Options menu, where you can change the in-game volume, screen resolution, or cursor.
Clicking Save And Exit in the menu will save your progress and return you to the title screen.
Chapter 1 - Morbile Hospital
Ward
Click the Poster on the wall to add it to your inventory.
Click the teddy bear on the bed to zoom in.
Take the Syringe from the bear's chest.
Click the bottom of the door for a closer look.
Place the Poster through the space under the door.
Click the door handle to zoom in.
Use the Syringe from your inventory to push the key out of the keyhole.
Click the bottom of the door again.
Click the poster to pull it back, revealing the Key.
Click the door knob again, then use the Key on the keyhole to open the door.
Go through the open door to the hospital corridor.
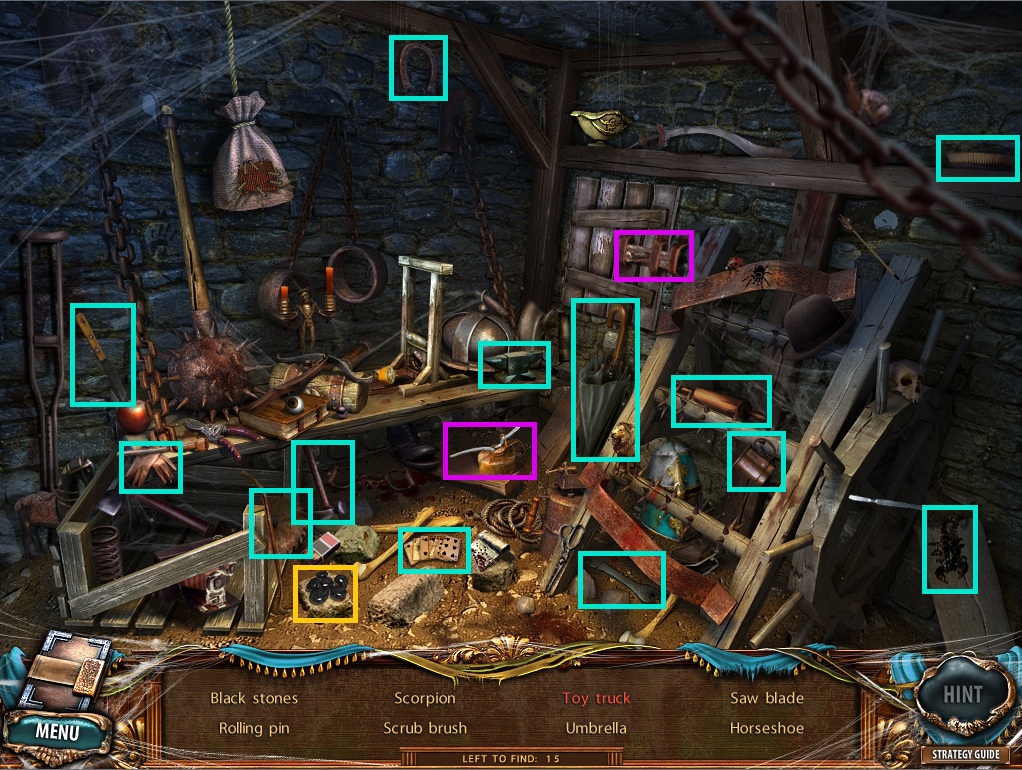
Hospital Corridor
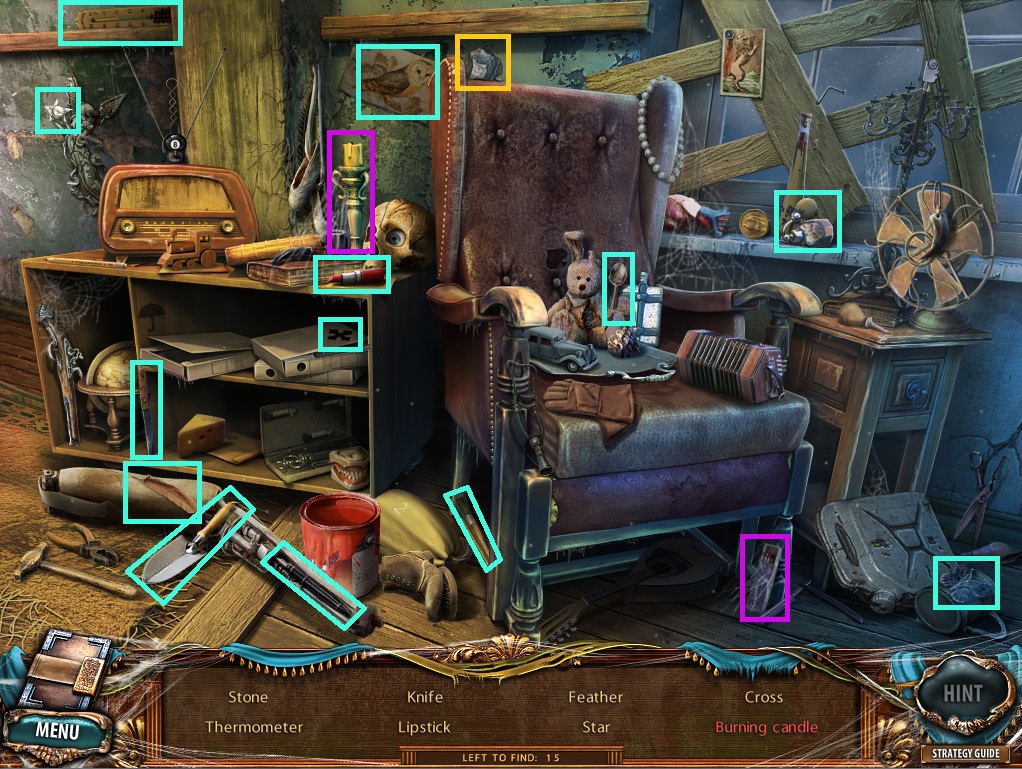
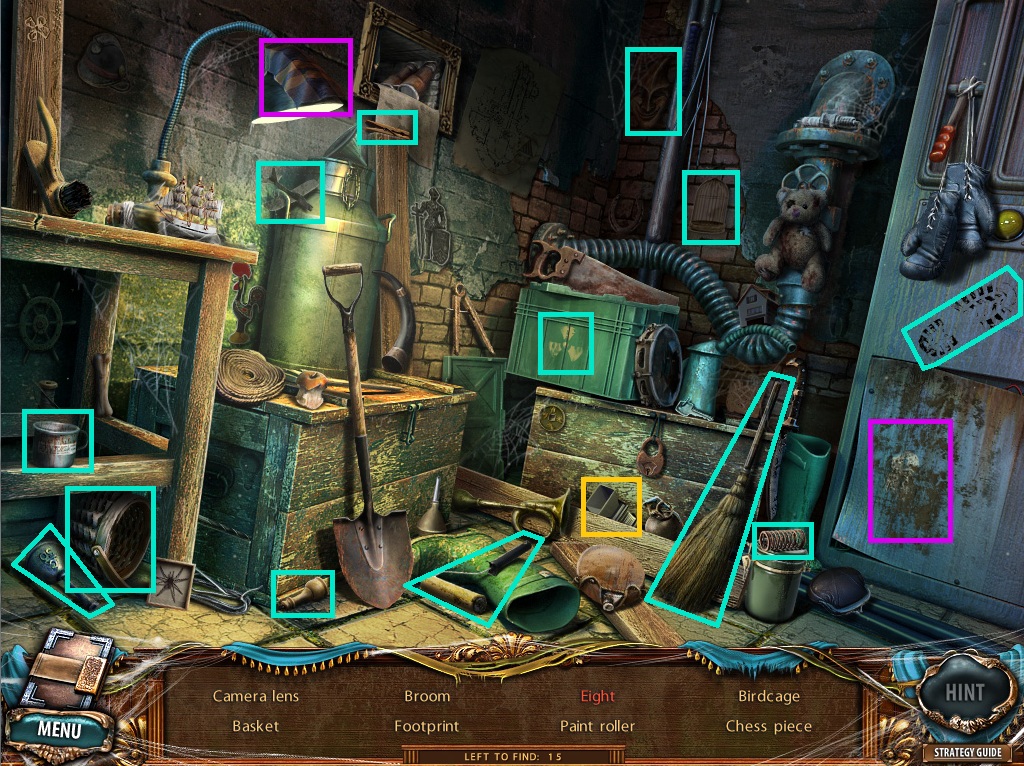
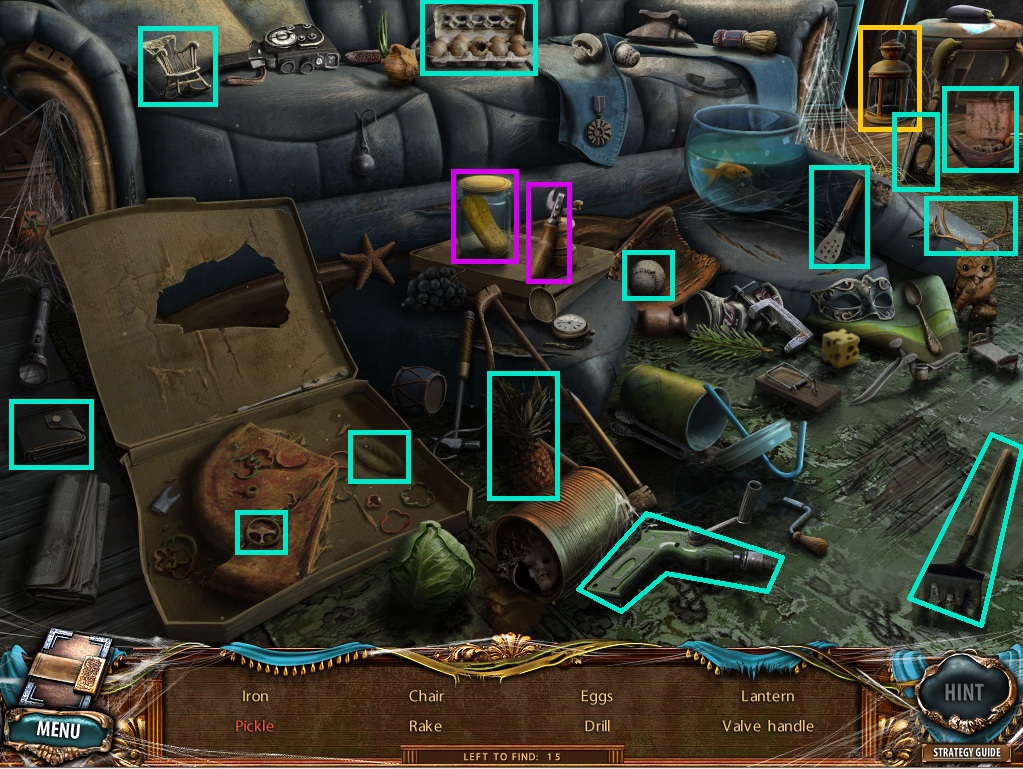
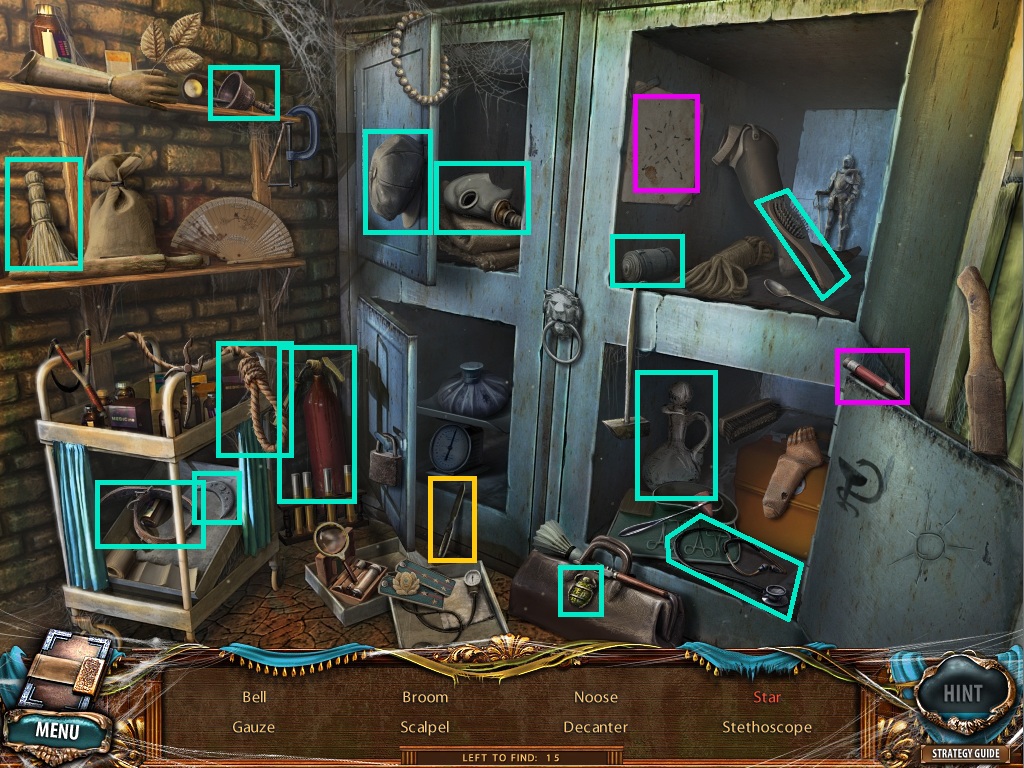
Click the sofa chair to start the hidden object scene.
Click the matchbox beside the leg of the chair to strike a match, then light the candle on top of the cabinet to make the Burning Candle.
Screenshot.
Once the hidden object scene is complete, you will receive a Stone.
Take the morphing Beyond object (1/42) in the lower right corner of the boarded up window.
Take the Fire Extinguisher against the left wall, beside the wooden door.
Click the door at the end of the hall to zoom in.
Use the Stone from your inventory to smash through the glass of the door.
Move forward to the hospital reception.
Hospital Reception
Click the mirror on the right wall to zoom in, then click the mirror again to reveal the Molecule Part.
Click the book on top of the left wooden chair for a closer look.
Take the Wings in front of the pages.
Click the large disk on the counter top to zoom in.
Take the Figurine on the stack of books.
Take the morphing Beyond object (2/42) underneath the bottom of the right window.
Click the space on the left side of the large double doors.
Place the Figurine and the Wings from your inventory inside the space to unlock the door.
Go through the open door to Central Square.
Chapter 2 - Central Square
Exit to the Square
Take the morphing Beyond object (3/42) at the bottom of the railing to the right of the cannon.
Go down to the monument of Dr. Morbile at the center of the square.
Morbile Monument
Click the note at the bottom of the left stairs to read it.
Take the morphing Beyond object (4/42) in the bushes to the right of the stairs.
Click the raven on the statue's shoulder to shoo it away.
Go left towards the administration building entrance.
Administration Building Entrance
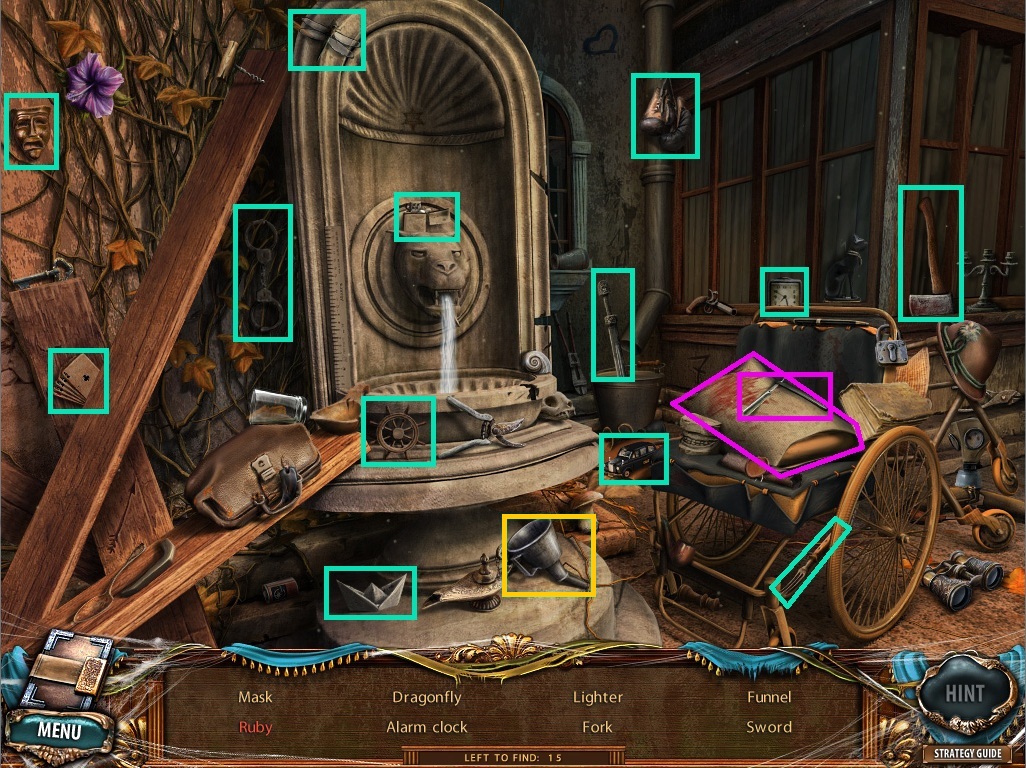
Click the fountain to start the hidden object scene.
Use the razor on the wheelchair to slice open the bloody pillow, revealing the Ruby.
Screenshot.
Once the hidden object scene is complete, you will receive a Funnel.
Click the book on the steps to zoom in.
Note the picture of the three students on the right page, then take the Orb on top of the book.
Click the glowing red grate for a closer look.
Take the Sword from the ground.
Take the morphing Beyond object (5/42) in vines at the top right corner above the gate archway.
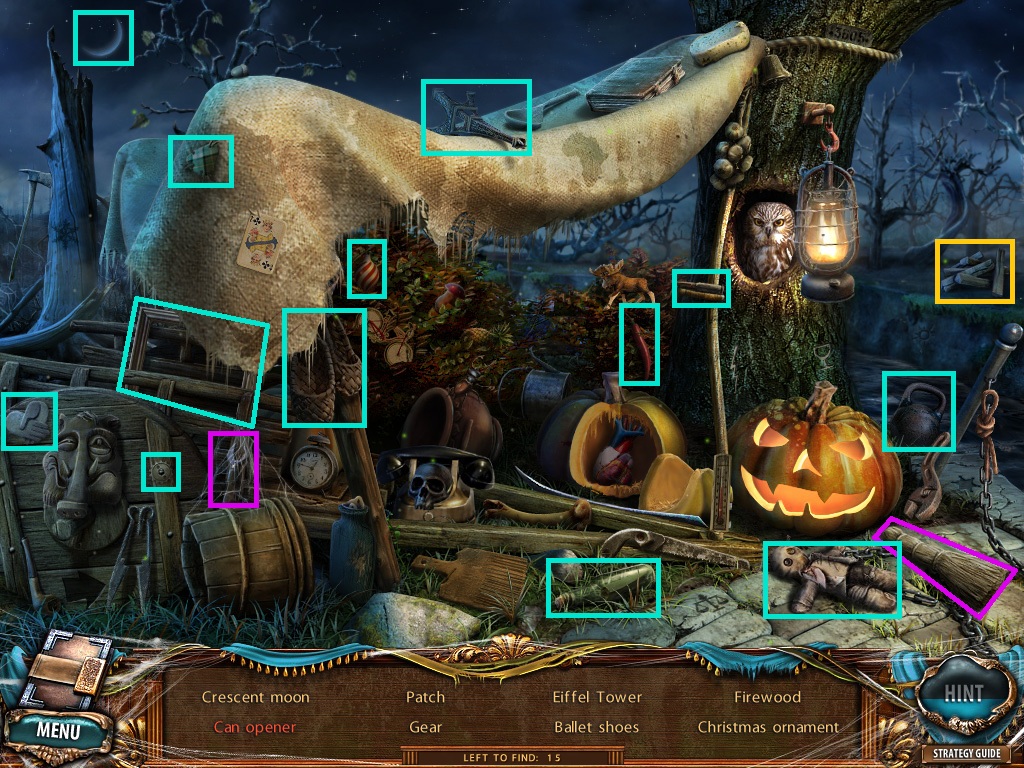
Go forward to the bridge.
Bridge
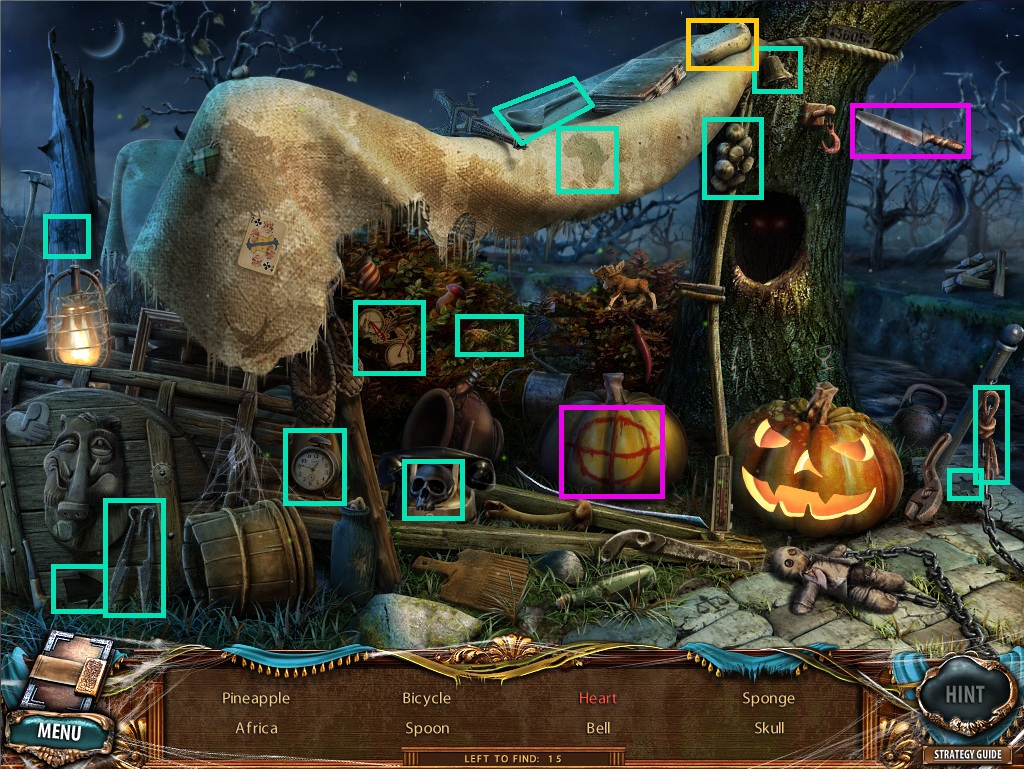
Click the tree to start the hidden object scene.
Use the knife stuck in the tree to carve the pumpkin, revealing the Heart.
Screenshot.
Once the hidden object scene is complete, you will receive a Sponge.
Take the Book from the statue's arms.
Take the morphing Beyond object (6/42) on the right branch of the tree.
Return to the reception area at the hospital.
Hospital Reception
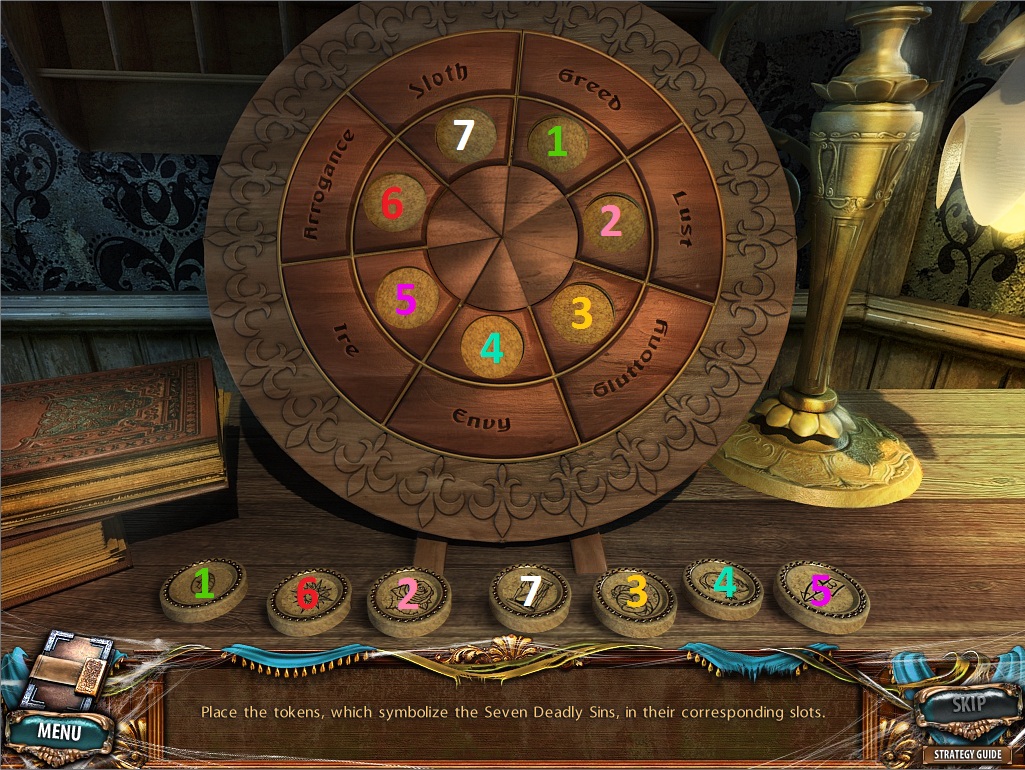
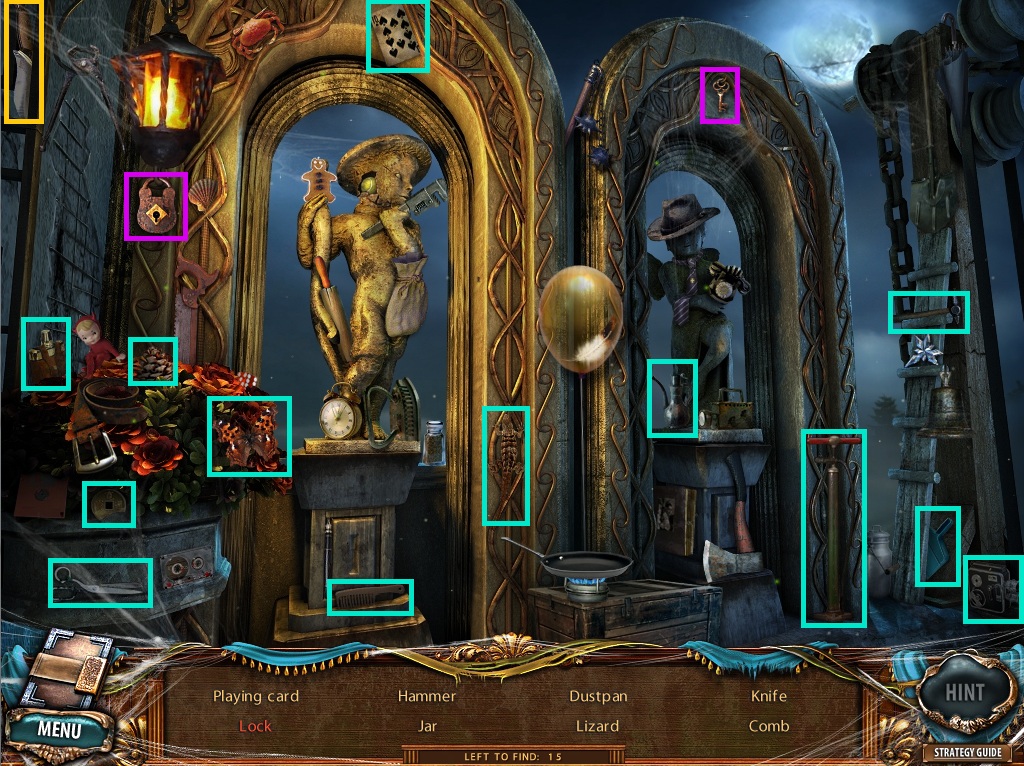
Click the circle on top of the reception desk to zoom in.
Use the Sponge from your inventory on the grime covering the circle to start the puzzle.
To solve this puzzle, place the coin with the image that matches the sin on the panel of the circle.
Click a coin to select it, then click a place on the round board to attempt to set it.
If correctly placed, the coin will sparkle and then glow.
Solution.
Once the puzzle is solved, the circular panel will open, revealing the Locket.
Return to the monument in the central square, then go right towards the cathedral entrance.
Cathedral Entrance
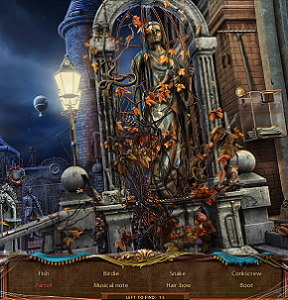
Click the vine covered statue to start the hidden object scene.
Use the saw at the base of the statue to open the birdcage, revealing the Parrot.
Screenshot.
Once the hidden object scene is complete, you will receive a Corkscrew.
Take the morphing Beyond object (7/42) in the vines above the right banister.
Take the Crown on the book at the left side of the staircase.
Click the statues of the cathdral door to zoom in.
Place the Crown from your inventory on the head of the first figure on the far left.
Place the Sword in the hand of the second figure.
Place the Orb in the hand of the third figure.
Place the Locket around the neck of the fourth figure.
Go through the open door into the cathedral.
Chapter 3 - Cathedral
Cathedral
Take the morphing Beyond object (8/42) on the ground between the pews on the left.
Click the book at the altar to zoom in.
Take the Rune on the left page.
Click the glowing summoning circle on the aisle for a closer look.
Place the Rune from your inventory into the space on the upper right of the inner circle.
Take the floating Snake Head.
Go back outside to the cathedral entrance.
Cathedral Entrance
Click the glowing scroll on the right side of the staircase to zoom in.
Click the scroll again to read it.
Take the Fishing Rod behind the railing to the right of the scroll.
Return to the bridge.
Bridge
Use the Fishing Rod from your inventory to reel in the Slingshot lying on top of the bridge.
Click the Slingshot on the ground to add it to your inventory.
Go back to the monument.
Morbile Monument
Use the Slingshot from your inventory on the raven in the tree branches.
Click the paper on the stairs and take the Planet dropped by the raven.
Return to the hospital corridor.
Hospital Corridor
Click the sofa chair to repeat the hidden object scene.
Place the toy train on top of the shelves into the can of red paint to make it a Red Train.
Screenshot.
Once the hidden object scene is complete, you will receive a Gas Can.
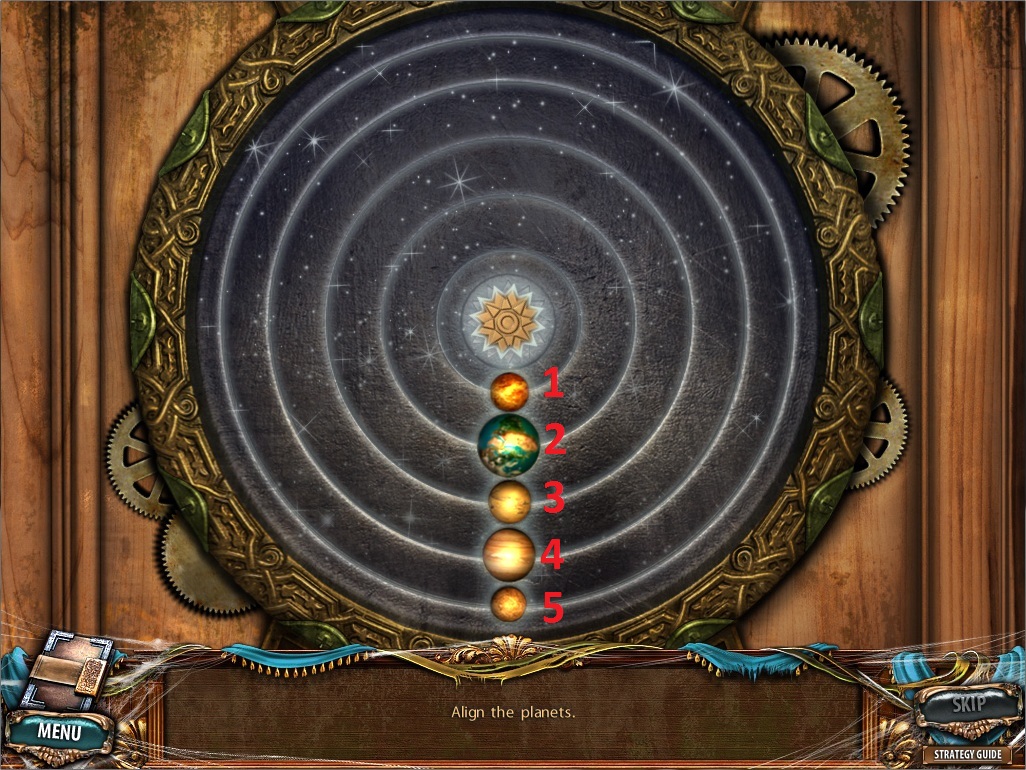
Click the left door to zoom in.
Add the Planet from your inventory to the lock to start the puzzle.
To solve this puzzle, align all the planets into the spaces at the bottom of the circle.
Click a planet to select it, then move the cursor clockwise or counter clockwise to rotate the planet along the ring in the corresponding direction.
If the innermost planet is #1, moving out from each planet to #5, align the planets into the appropriate spaces in this order:
Align Planet #2
Align Planet #4
Align Planet #3
Align Planet #1
Align Planet #5
Solution.
Go through the open door into the laboratory.
Laboratory
Take the morphing Beyond object (9/42) underneath the desk cabinets.
Take the Crowbar standing on top of the stool.
Click the desk to zoom in.
Click the note to read it and take the poison Flask.
Return to the administration building entrance.
Administration Building Entrance
Click the boarded up door to zoom in.
Use the Crowbar from your inventory to remove all the planks in front of the door.
Take the Hacksaw between the door handles.
Click the glowing red grate for a closer look.
Use the Hacksaw to cut through the bars.
Go through the grate into the cellar.
Cellar
Take the morphing Beyond object (10/42) on the shelf in the top left corner of the room.
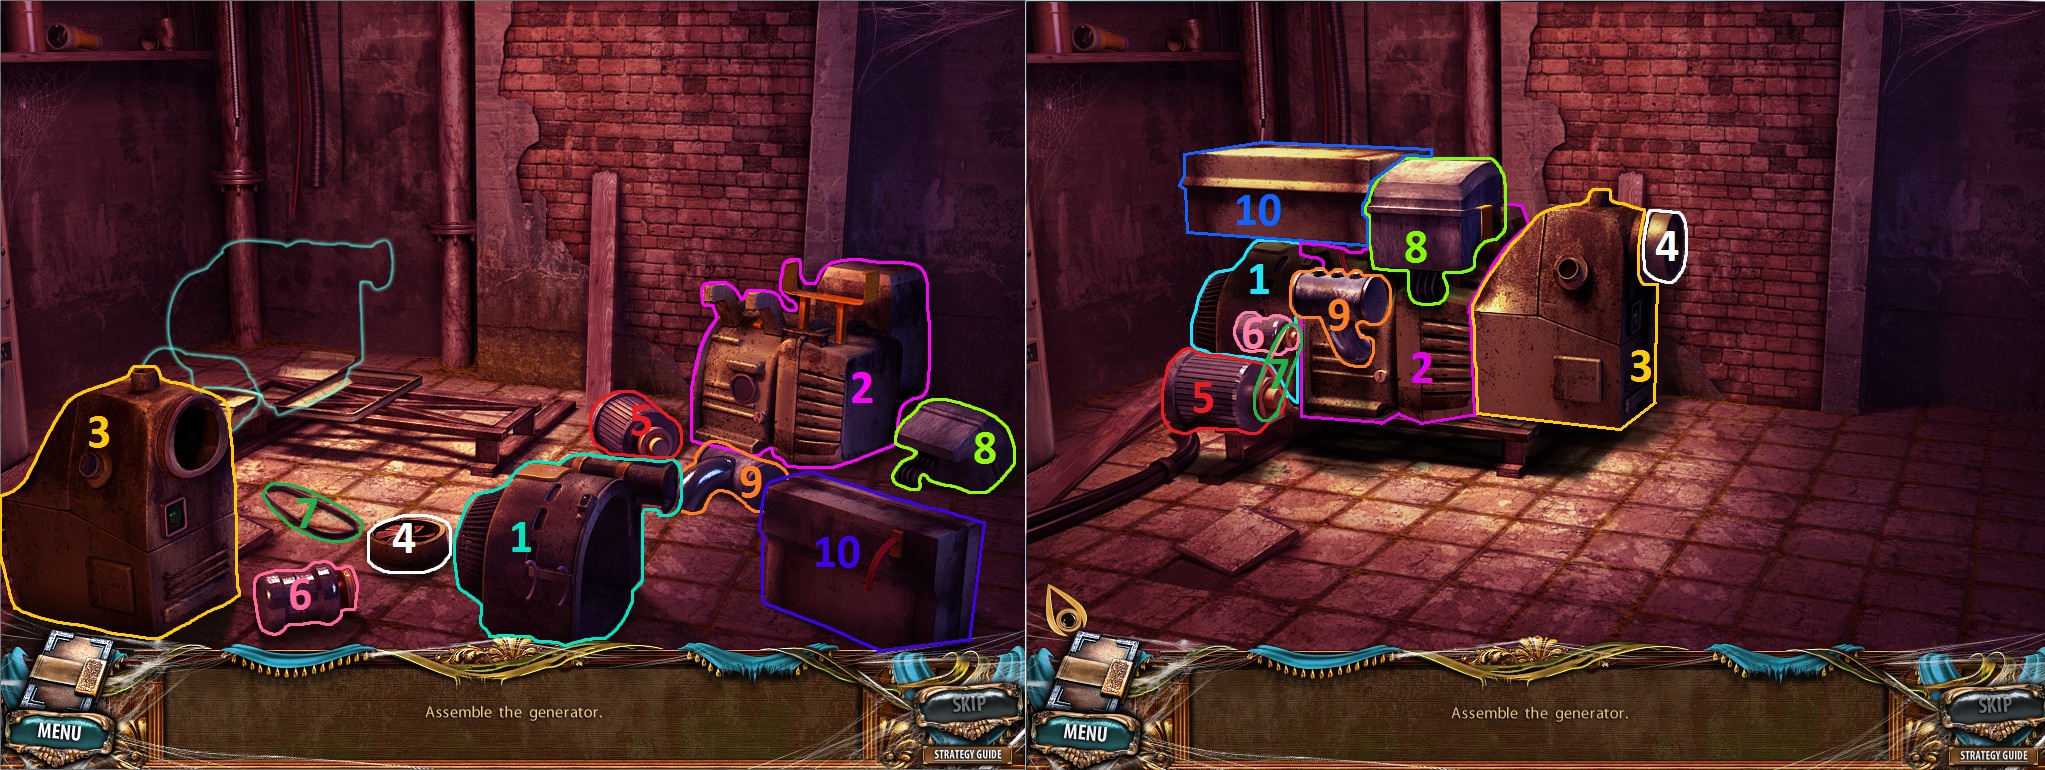
Click the generator parts on the ground to start the puzzle.
To solve this puzzle, assemble the parts in the correct order to complete the generator.
The blue outline around the generator shows the shape of the next required part.
Click the part that matches the outline to select it, then place it inside the outline to set it.
Solution.
Use the Funnel from your inventory on the fuel tank of the completed generator.
Add the Gas Can to the Funnel to pour in the gas.
Push the small green button under the fan to start the generator.
Pull the lever at the power box in the center of the room to turn on the power.
Click the table to start the hidden object scene.
Use the box cutter on top of the crate to slice the painting hanging on the wall, revealing the Binoculars.
Screenshot.
Once the hidden object scene is complete, you will receive a Rope.
Exit the cellar, then go through the open doors into the administration building.
Chapter 4 - Administration Building
Administration Foyer
Take the morphing Beyond object (11/42) at the bottom of the broken column on the left wall.
Go through the open double doors into the corridor.
Administration Corridor
Click the seat of the wheelchair to zoom in.
Take the Stethoscope on top of the newspaper.
Take the morphing Beyond object (12/42) above the top drawer of the right cupboard.
Go back to the hospital corridor.
Hospital Corridor
Click the sofa chair to repeat the hidden object scene.
Use the pliers on the ground to pull out the nail on in the board covering the window.
Click the Nail that falls to the windowsill.
Screenshot.
Once the hidden object scene is complete, you will receive a Glass Cutter.
Enter the laboratory.
Laboratory
Click the safe on the right table to zoom in.
Add the Stethoscope from your inventory to the safe to start the puzzle.
To solve this puzzle, find the combination by listening to the dials for a click.
Click each of the three dials to turn them counterclockwise.
When the dial is at the correct number, it will make a loud clicking sound.
For the hearing impaired, the correct number is also indicated by white shockwaves that ripple from the stethoscope.
Solution.
Once the puzzle is solved, the safe will open; click the safe to zoom in.
Click the rolled up paper to read it and take the Rune.
Return to the cathedral.
Cathedral
Click the summoning circle to zoom in.
Add the Rune from your inventory to the space at the upper right of the outer circle.
Take the floating Painting.
Go back to the corridor of the administration building.
Administration Corridor
Click the wall to the left of the dining hall door to zoom in.
Place the Painting from your inventory to the space on the wall next to the left painting to start the puzzle.
To solve this puzzle, find the matching images between the two paintings.
Click an image in one of the paintings to select it.
If correct, the image and its matching twin in the second painting will both flash check marks and then remain highlighted.
Solution.
Once the puzzle is solved, the left painting will open, revealing a secret compartment.
Click the compartment to zoom in and take the Minute Hand inside.
Return to the administration foyer.
Administration Foyer
Click the large clock above the doorway to zoom in.
Add the Minute Hand from your inventory to the clock face.
According to the note on the dining room door, the hall is open from 9:10 a.m. - 10:00 a.m, 1:10 p.m. - 2.00 p.m., and 5:10 p.m. - 6:00 p.m.
Click the minute hand to select it then rotate it clockwise to wind the clock to any of the three opening times: 9:10, 1:10, or 5:10, then click the mouse again to release the minute hand
Go forward into the corridor, then through the right door into the dining hall.
Dining Hall
Take the morphing Beyond 0bject (13/42) leaning against the bowl of fruit on the table.
Read the note on the floor to learn about the Demon of Gluttony.
Go through the open door to the left into the kitchen.
Kitchen
Click the note on the ground to zoom in.
Read the note to learn how to defeat the demon, then take the Refidgerator Handle.
Take the Wormwood on the ground beside the left leg of the table.
Take the morphing Beyond object (14/42) on the left side of the middle shelf on the back wall.
Click the cake on the table to zoom in.
Take the Black Pepper on the table beside the tray.
Click the open cupboard on the right side of the room to zoom in.
Take the Oil and Cinnamon from the bottom shelf.
Go back to the dining hall.
Dining Hall
Use the Refidgerator Handle from your inventory on the top door of the fridge.
Click the open fridge door to zoom in.
Take the Key and the Garlic.
Go back to the administration foyer.
Administration Foyer
Click the book on the green chair beside the stairway to zoom in.
Use the Key from your inventory on the padlock blocking the book, then pick up the book.
Go forward into the administration corridor.
Administration Corridor
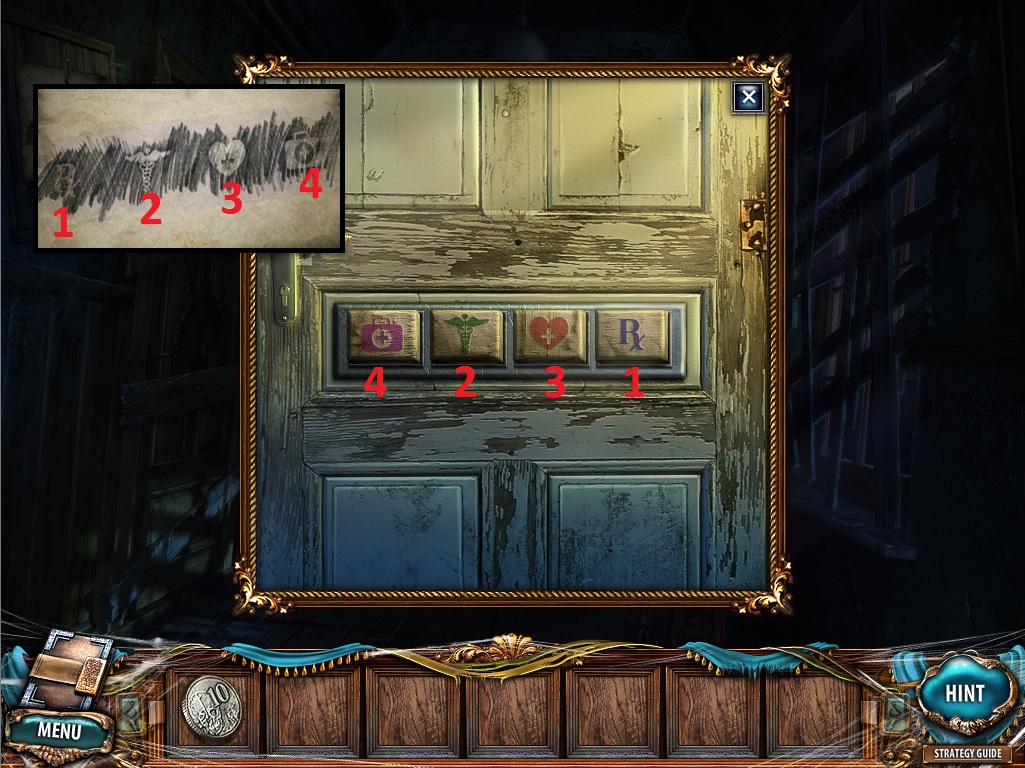
Click the double doors with the large round lock to zoom in.
Place the first Book in the empty space on the bottom and the second book in the empty space on the top to start the puzzle.
To solve this puzzle, click the books in the correct order to open the lock.
Finding the solution is a matter of trial-and-error, so click any book to start.
If the book stays pressed down, it has been clicked in the correct order, but if it raises back up, then it is incorrect.
Click the books in the precise order so that all of them stay pressed down.
Solution.
Once the puzzle is solved, the doors will open; go forward into the library.
Library
Take the morphing Beyond object (15/42) on the bottom book shelf to the left of the fireplace.
Click the angel statue on the fireplace mantle to zoom in.
Take the Nuts behind the statuette.
Click the fireplace for a closer look.
Use the Fire Extinguisher from your inventory to douse the flames, then take the revealed Dragon figurine.
Click the rocking chair to zoom in.
Take the Elephant figurine on the seat of the chair.
Click the large, opened tome on the ground next to the cardboard box.
Take the Frog figurine by the upper right corner of the book.
Click the desk for a closer look.
Take the Crocodile figurine beside the book.
Return to the kitchen.
Kitchen
Click the stove and counter area on the left for a closer look.
Click the paper leaning against the wall behind the boiling pot to read the recipe for preparing poison.
Place the Wormwood on the chopping tray, pick up the knife, and click the Wormwood again to chop it.
Pour the green bowl full of Wormwood into the pot.
Place the Black pepper in the grinding machine, then click the handle to grind the Black Pepper into powder.
Pour the green bowl full of Black Pepper into the pot.
Place the Cinammon into the mortar, pick up the pestle, then click the Cinnamon to crush it.
Pour the green bowl full of Cinnamon into the pot.
Place the Garlic on the chopping tray, pick up the knife, and click the Garlic again to chop it.
Pour the green bowl full of Garlic into the pot.
Put the Nuts into the nutcracker, then click the jaw to crush the nuts.
Pour the green bowl full of Nuts into the pot.
Place the Snake Head directly into the pot.
Use the Corkscrew from your inventory to remove the cork of the glass jar.
Pour the glass jar into the pot.
Pick up the ladle and use it to stir the contents of the pot.
Use the Syringe from your inventory on the pot to make it a Syringe with Poison.
Click the cage on the kitchen table to zoom in.
Use the Syringe with Poison on the cake, then click the poisoned Cake to add it to your inventory.
Go back to the dining hall.
Dining Hall
Give the Cake from your inventory to the Demon of Gluttony.
Take the Scalpel on the seat of the chair.
Go back to the administration corridor.
Administration Corridor
Use the Scalpel from your inventory on the bright square under the carpet.
Click the revealed panel to zoom in.
Take the Tweezers at the bottom right corner of the square.
Return to the administration building entrance.
Administration Building Entrance
Click the fountain to repeat the hidden object scene.
Use the garden shears on the fountain to clip the Flower from the vines on the left wall.
Screenshot.
Once the hidden object scene is complete, you will receive Wire Cutters.
Go to the bridge.
Bridge
Click the tree to repeat the hidden object scene.
Use the lantern on the hollow of the tree to reveal the Owl.
Screenshot.
Once the hidden object scene is complete, you will receive a Wrench.
Click the birdhouse for a closer look.
Use the Tweezers from your inventory on the hole to pull out the Penguin figurine.
Click the neck of the angel statue to zoom in.
Use the Wire Cutters from your inventory on the Locket to add it to your inventory.
Return to the library.
Library
Click the angel statuette on the fireplace to zoom in.
Place the Locket from your inventory into the heart-shaped space on the statuette to reveal the Kangaroo figurine.
Click the map above the desk to zoom in.
Place the Penguin figurine at the space in Antarctica.
Place the Dragon figurine at the space in Asia.
Place the Kangaroo figurine at the space in Australia.
Place the Elephant figurine at the space in Africa.
Place the Frog figurine at the place in Europe.
Place the Crocodile figurine at the space in South America.
Screenshot.
Go through the revealed door into the secret room
Secret Room
Take the morphing Beyond object (16/42) on the ground underneath the desk.
Take the Molecule Part on the seat of the chair.
Click the top of the cupboard to zoom in.
Click the note to read it and take the Stone Mask.
Click the poser on the wall to zoom in.
Take the second Stone Mask.
Click the dress mannequin for a closer look.
Use the Scalpel from your inventory to slice down the middle of the mannequin, revealing the Rune.
Click the vent above the cupboard to zoom in.
Use the Wrench from your inventory on the four bolts at the corners of the vent to reveal the third Stone Mask and the angry letter.
Go back to the administration corridor.
Administration Corridor
Click the square panel in the carpet to zoom in.
Add the three Stone Masks from your inventory to the spaces on the bottom.
Click the panel to start the puzzle.
To solve this puzzle, move the three mask tiles to their matching mask at the bottom of the board.
Click a tile to move it to the nearest adjacent empty space.
Tiles cannot move through obstacles or diagonally.
Steps 1-2-3.
Steps 4-5-6.
Solution.
Once the puzzle is solved, the panel will open.
Click the revealed compartment to zoom in and take the Shield.
Go back to the cathedral.
Cathedral
Click the summoning circle to zoom in.
Place the Rune from your inventory in the space at the bottom of the circle.
Take the floating Gem.
Return to the bridge.
Bridge
Place the Shield from your inventory into the open hand of the angel statue.
Click the shield to rotate the bridge until it is aligned with the riverbanks.
Cross the bridge to reach the well.
Near the Well
Take the morphing Beyond object (17/42) at the front of the pointed roof of the well.
Use the Rope from your inventory on the crank mechanism.
Go down to the bottom of the the well.
Chapter 5 - Underground
Well
Take the morphing Beyond object (18/42) on top of the tank in the lower right corner.
Go back up the rope to the surface area near the well.
Near the Well
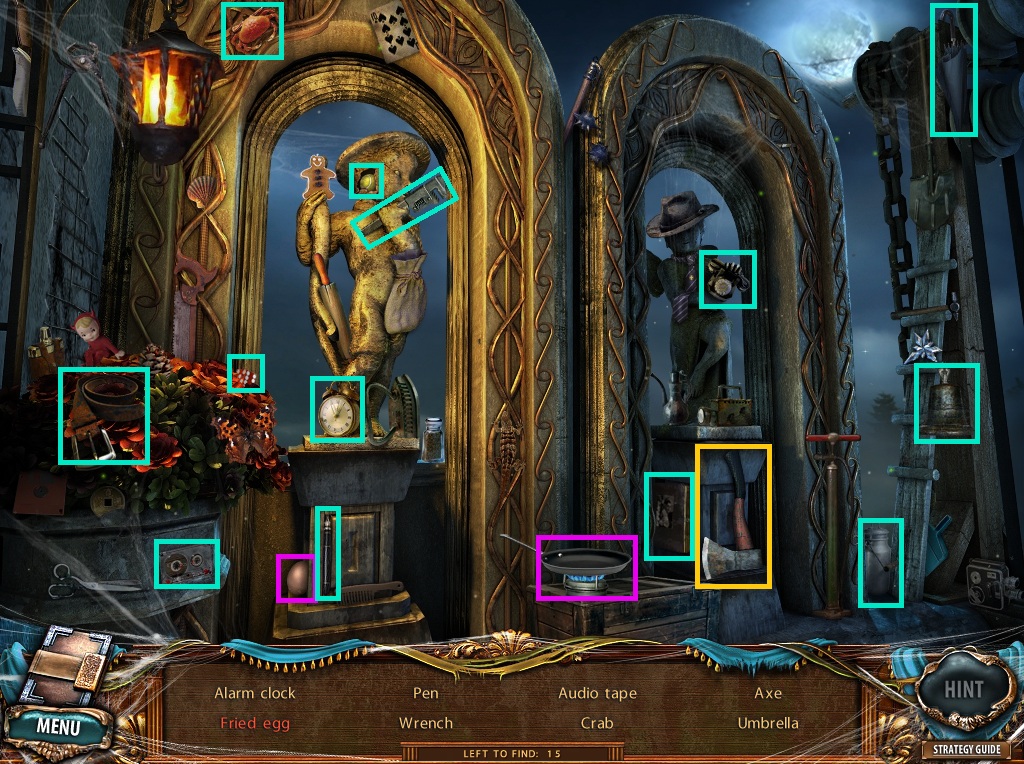
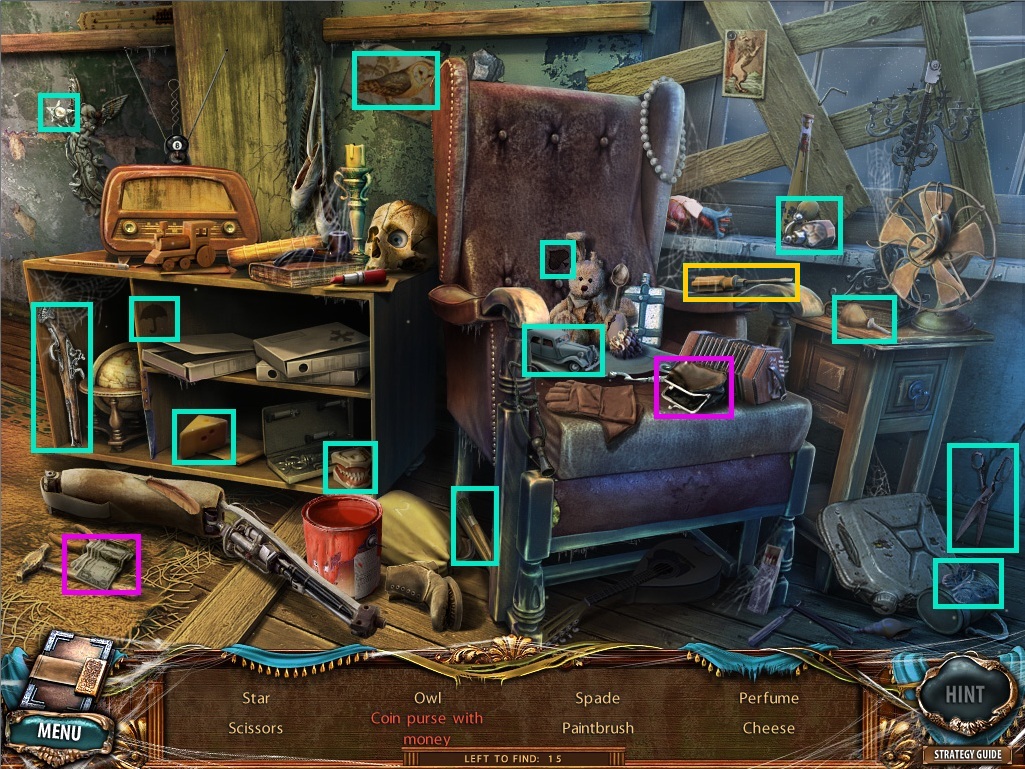
Click the bench to start the hidden object scene.
Use the screwdriver on the doll's chest to reveal the Battery.
Screenshot.
Once the hidden object scene is complete, you will receive a Lever.
Go back to the cellar under the administration building entrance.
Cellar
Click the table to repeat the hidden object scene.
Use the hammer on the glass bottle to reveal the Ship.
Screenshot.
Once the hidden object scene is complete, you will receive a Shovel.
Place the Lever from your inventory into the middle space of the power box, then click the lever to start the power.
Return to the bottom of the well.
Well
Use the Shovel from your inventory on the pile of dirt on the floor.
Click the revealed pile of gold to zoom in.
Take the Bag with Gold and read the note underneath.
Go forward to the dungeon.
Dungeon
Take the morphing Beyond object (19/42) at the top of the right water pipe.
Click the right door to zoom in.
Use the Gem from your inventory on the lock at the center of the door.
Go through the open door into the alchemist's room
Alchemist's Room
Take the morphing Beyond object (20/42) in front of the pile of books on the shelf between the two pillars.
Click the book on the sofa chair for a closer look.
Click the right page to read through the diary.
Click the pan on the ground to zoom in and take the Coins.
Click the desk to zoom in.
Take the Guillotine Blade and read the note to learn about the mirror.
Click the top of the right cupboard to zoom in.
Place the Flask from your inventory under the vat, then click the tap to fill the flask to receive the Acid.
Go back to the dungeon.
Dungeon
Click the middle door to zoom in.
Use the Guillotine Blade from your inventory at the top of the door.
Pull the lever on the left to cut through the lock.
Go through the open door into the torture chamber.
Torture Chamber
Take the morphing Beyond object (21/42) on the bloody tabletop to the left.
Click the hatch to start the hidden object scene.
Use the oil can on the rusty lock to reveal the Toy Truck.
Screenshot.
Once the hidden object scene is complete, you will receive Black Stones.
Click the spiked chair to zoom in and take the Molecule part.
Go down the tunnel into the winery.
Winery
Click the large cloth to pull it down.
Click the broken barrel to zoom in and take the Rune.
Take the morphing Beyond object (22/42) on the ground in front of the smashed barrel.
Click the wine cabinet to zoom in.
Use the Glass Cutter from your inventory to cut out the Glass pane, then take the bottles of White Wine and Red Wine.
Go back outside near the well.
Near the Well
Click the bench to repeat the hidden object scene.
Use the key to open the suitcase, revealing the Rolling Pin.
Screenshot.
Once the hidden object scene is complete, you will receive a Pot.
Go back to the bridge.
Bridge
Click the base of the tree to repeat the hidden object scene.
Use the broom on the cobwebs to reveal the Can Opener.
Screenshot.
Once the hidden object scene is complete, you will receive Firewood.
Go back to the cathedral.
Cathedral
Click the summoning circle to zoom in.
Place the Rune from your inventory in the space at the bottom of the inner circle.
Take the floating Coin.
Return to the dungeon.
Dungeon
Click the grate on the ground in the center of the room to zoom in and take the Matches.
Click the left door to zoom in.
Place the Coin from your inventory in the space at the center of the door.
Go through the open door into the treasury.
Treasury
Take the morphing Beyond object (23/42) in the drapes above the cage.
Click the treasure chest to start the hidden object scene.
Use the cheese on the mousehole to reveal the Mouse.
Screenshot.
Once the hidden object scene is complete, you will receive White Stones.
Go back outside the well and then left towards the graveyard gate.
Chapter 6 - The Graveyard
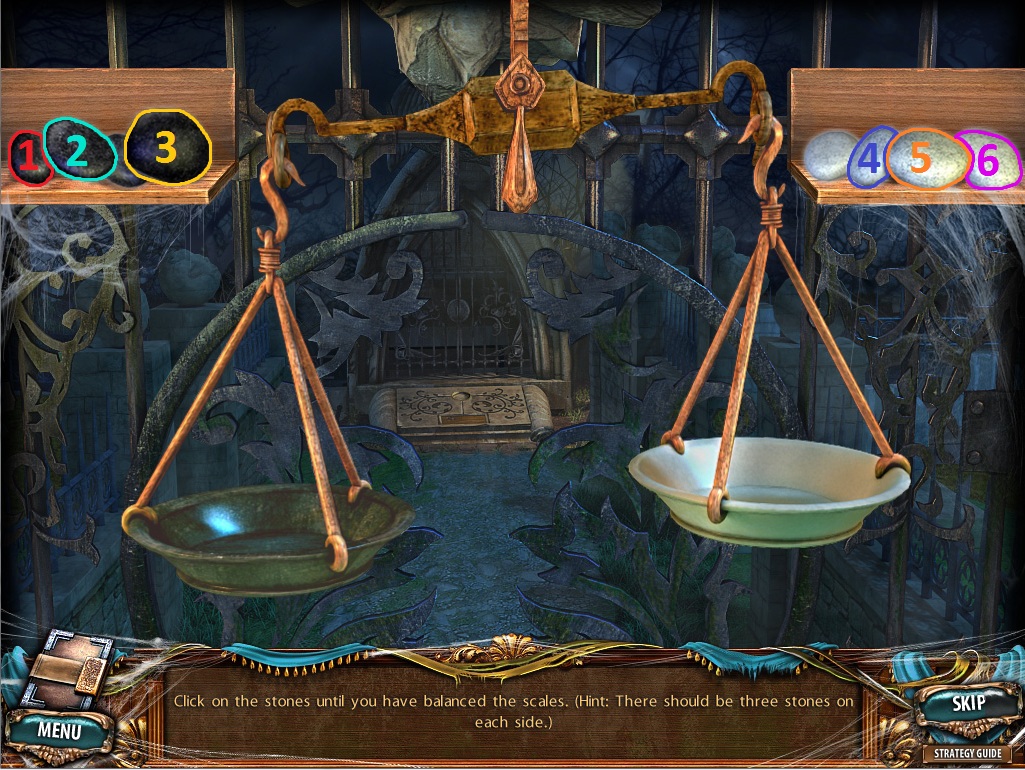
Graveyard Gate
Take the morphing Beyond object (24/42) at the base of the right angel statue.
Click the scales above the gate to zoom in.
Place the White Stones from your inventory into the white scale.
Place the Black Stones from your inventory into the black scale to start the puzzle.
To solve this puzzle, place the stones in the scales until both sides are at an even height.
Click one side of the scale to place a stone from that scale onto the shelf above it.
Start by taking all of the stones out of the scale and onto the shelf.
Notice that each of the four stones is a different size and weight.
Place three of each colored stone into the scales until it is balanced.
Solution.
Go through the open gate to the graveyard.
Graveyard
Take the morphing Beyond object (25/42) between the upper right branches of the tree.
Take the Rune in front of the small fence railing.
Go back to the cathedral.
Cathedral
Click the summoning circle to zoom in.
Place the Rune from your inventory in the upper left space of the outer circle.
Take the floating Silver Figurines.
Return to the torture chamber.
Torture Chamber
Click the fireplace to zoom in.
Place the Firewood from your inventory inside the fireplace.
Use the Matches on the wood to light a fire.
Place the Pot on the grate above the fire.
Pour the Acid into the pot.
Use the Silver Figurines on the pot of boiling acid to melt them down into a Pot with Silver.
Return to the alchemist's room.
Alchemist's Room
Click the tray on the ground to zoom in.
Use the Pot with Silver from your inventory on the tray.
Place the Glass from your inventory into the tray of melted silver, then click the glass to receive the Mirror.
Return to the winery.
Winery
Place the Mirror from your inventory into the frame in front of the Demon of Anger.
Take the Lever left on the stool.
Go back to the torture chamber.
Torture Chamber
Click the hatch to repeat the hidden object scene.
Use the Scalpel on the patch of the hanging sack to reveal the Egg.
Screenshot.
Once the hidden object scene is complete, you will receive a Vase.
Place the Lever from your inventory on the gear at the right side of the large wooden torture device.
Click the lever to open the device and take the Molecule Part at the bottom.
Go back to the alchemist's room.
Alchemist's Room
Click the panel on the wall to zoom in.
Place the four Molecule Parts from your inventory into the four spaces at the corners of the panel.
Take the revealed Rose and click the note to read it.
Return to the graveyard.
Graveyard
Place the Rose from your inventory into the hand of the statue above the gate.
Click the plaque on the ground in front of the gate to zoom in.
Put the Vase at the round space of the plaque to catch the angel statue's tears and take the revealed Key.
Click the gate doors to zoom in, then use the Key to open the lock.
Go through the open gate into the family crypt.
Crypt
Take the morphing Beyond object (26/42) on the middle stone step.
Click the right coffin to zoom in and take the Wings.
Click the left coffin and take the Rune.
Go back to the cathedral entrance.
Cathedral Entrance
Click the statue to repeat the hidden object scene.
Use the gold coin on the coinslot of the glass case to reveal the Towels.
Screenshot.
Once the hidden object scene is complete, you will receive a Rake.
Go forward to the cathedral.
Cathedral
Click the summoning circle to zoom in.
Place the Rune from your inventory in the space at the upper left side of the inner circle.
Take the floating Special Lamp.
Return to the crypt.
Crypt
Click the light at the altar to zoom in.
Use the Special Lamp from your inventory on the blue light to receive the Eternal Flame
Return to the treasury.
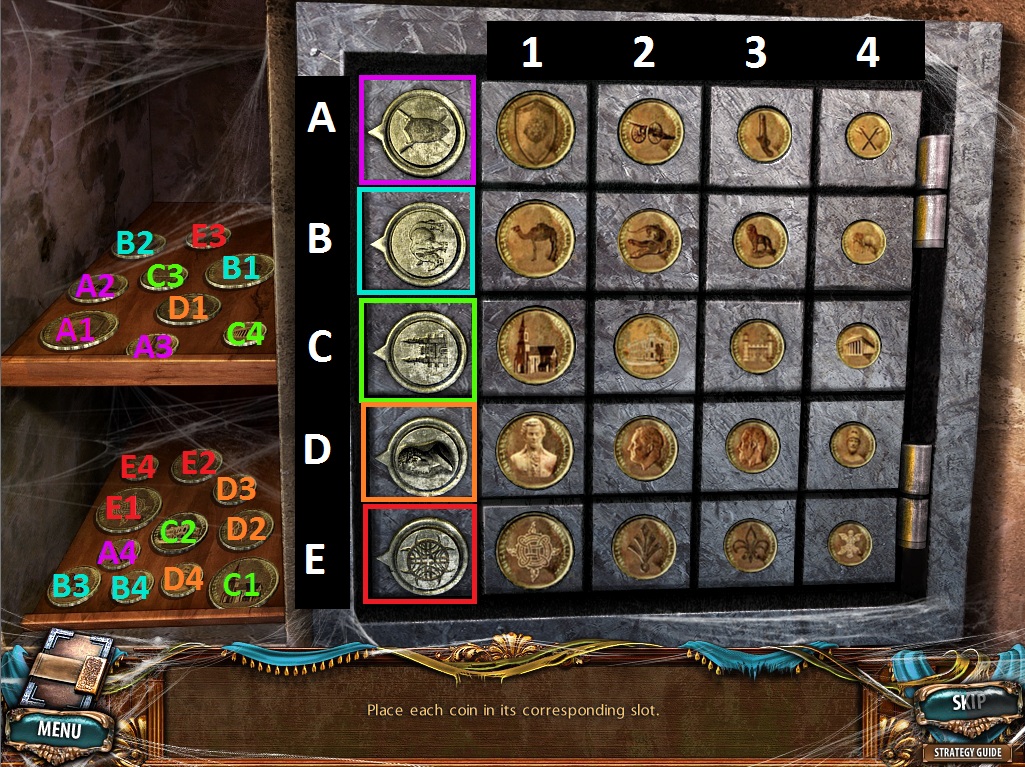
Treasury
Click the cage to zoom in.
Place the Bag with Money from your inventory on the seat inside the cage.
Use the Eternal Flame to light the bag on fire.
Click the revealed wall safe to zoom in.
Place the Coins from your inventory on the upper shelf to start the puzzle.
To solve this puzzle, place the coins into their appropriate spaces, according to size and type.
Click a coin to select it, then click the slot to place it.
The first row is for weapons, the second row is for animals, the third row is for buildings, the fourth row is for people, and the fifth row is for symbols.
If a coin is placed correctly, the dial on the left side of the row will move one notch clockwise.
Solution.
Once the puzzle is solved, the safe will open, revealing the Rune and the Oil Candles.
Click the treasure chest to repeat the hidden object scene.
Use the crowbar on the loose floorboard to reveal the Playing Card
Screenshot.
Once the hidden object scene is complete, you will receive an Umbrella.
Go back to the bottom of the well.
Well
Click the grate at the bottom of the wall to zoom in.
Use the Umbrella from your inventory to hook in the Lever, then click it to add it to your inventory.
Go back to the administration building entrance.
Administration Building Entrance
Click the fountain to repeat the hidden object scene.
Use the cup on the fountain to make a Glass of Water.
Screenshot.
Once the hidden object scene is complete, you will receive a Window Handle.
Go down into the cellar.
Cellar
Click the table to repeat the hidden object scene.
Use the rag on the dirty panel to reveal the Eight.
Screenshot.
Once the hidden object scene is complete, you will receive a camera Lens.
Put the Lever from your inventory into the last empty space in the power box, then click the lever to turn on the power.
Return to the cathedral.
Cathedral
Click the summoning circle to zoom in.
Place the Rune from your inventory into the upper right space of the outer circle.
Take the floating Crystal Ball.
Go inside the administration building and then up the stairs to the 2nd floor.
Chapter 7 - Administration Building 2nd Floor
2nd Floor Entranceway
Take the morphing Beyond object (27/42) on right wall beside the peeling wallpaper.
Click the portrait on the left wall to read the note.
Go right to the bridge to the small tower.
Bridge to the Small Tower
Take the morphing Beyond object (28/42) on the leg of the broken statue to the right.
Click the left statue to start the hidden object scene.
Use the key on the padlock to release the Lock.
Screenshot.
Once the hidden object scene is complete, you will receive a Knife.
Go back to the entranceway and then left to the 2nd floor corridor.
2nd Floor Corridor
Take the morphing Beyond object (29/42) above the suitcase on the broken sofa chair.
Go through the open door to the left to reach the balcony.
Balcony
Take the morphing Beyond object (30/42) at the bottom of the left wall between the railings.
Click the bookstand to zoom in and take the Key from the right page.
Go back to the 2nd floor corridor.
2nd Floor Corridor
Click the right door to zoom in.
Use the Key from your inventory on the lock.
Go through the open door into the Living Room
Living Room
Take the morphing Beyond object (31/42) on top of the grandfather clock.
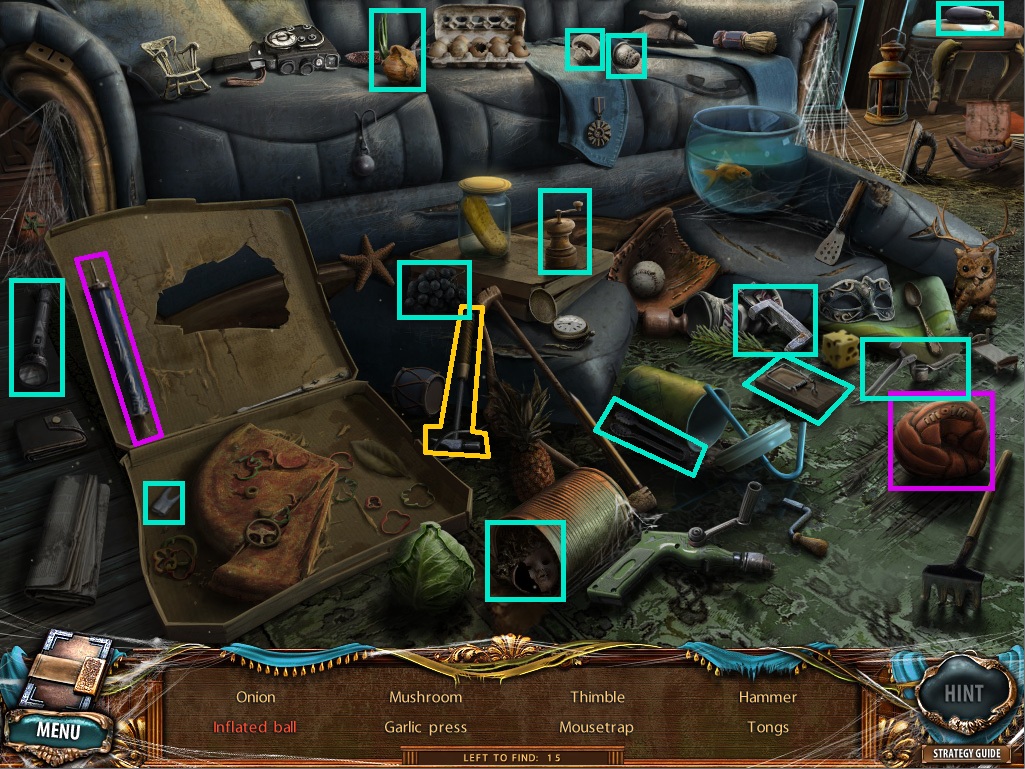
Click the pile of junk at the bottom of the sofa to start the hidden object scene.
Use the pump on the ball to make the Inflated Ball.
Screenshot.
Once the hidden object scene is complete, you will receive a Hammer.
Go back to the 2nd floor corridor.
2nd Floor Corridor
Click the emergency supplies box to zoom in.
Use the Hammer from your inventory to break through the glass.
Use the Knife to cut the hose, then click the Hose to add it to your inventory.
Enter the living room.
Living Room
Click the window to zoom in.
Place the Window Handle from your inventory on the empty latch.
Click the window again, then attach the hose to the hanging rings as a makeshift rope.
Go down the hose to the area outside the armory.
Outside the Armory
Take the morphing Beyond object (32/42) against the bottom of the right wall beside the hose.
Take the Key on the ground next to the short wooden fence.
Take the Belt hanging from the lantern.
Go back to the bridge to the small tower.
Bridge to the Small Tower
Use the Belt from your inventory to repair the broken pulley.
Click the lever to lower the bridge.
Go across the bridge and into the tower.
Chapter 8 - Small Tower
Small Tower
Take the morphing Beyond object (33/42) between the beams on the right side of the wall.
Click the red curtain to draw it back, revealing an antechamber.
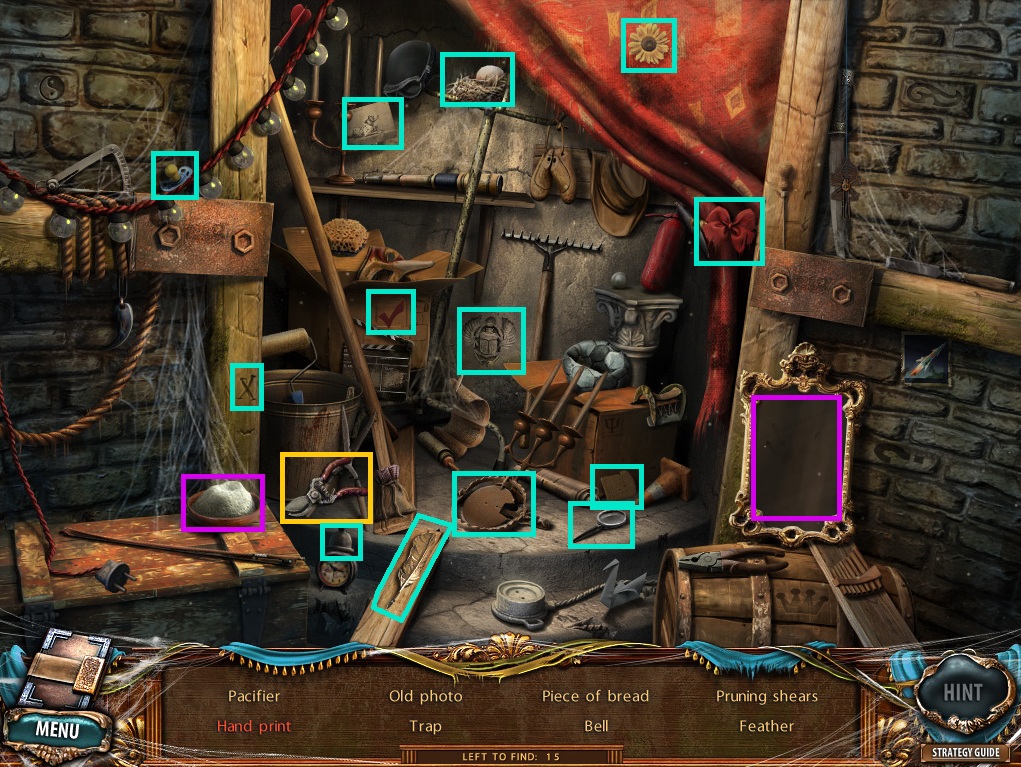
Click the antechamber to start the hidden object scene.
Use the chalk powder on the mirror to reveal the Handprint.
Screenshot.
Once the hidden object scene is complete, you will receive Pruning Shears.
Go right to the garden.
Garden
Take the morphing Beyond object (34/42) on top of the vine-covered fence to the right of the statue.
Click the fountain base of the statue to zoom in.
Click the bottle to reveal the succubus note and take the Heart.
Use the Rake from your inventory on the pile of leaves to reveal the Bag.
Click the ladder leaning against the tree to zoom in.
Use the Pruning Shears to remove the vines, then click the Ladder to add it to your inventory.
Go back to the small tower.
Small Tower
Use the Ladder from your inventory on the broken staircase.
Go up the stairs to Avidus's office.
Avidus's Office
Take the morphing Beyond object (35/42) on top of the left cupboard.
Take the Sledgehammer on top of the desk chair.
Return to the living room.
Living Room
Click the junk at the bottom of the sofa to repeat the hidden object scene.
Use the can opener on the jar to reveal the Pickle.
Screenshot.
Once the hidden object scene is complete, you will receive a Lantern.
Click the base of the grandfather clock to zoom in.
Use the Key from your inventory on the lock, revealing the Videotape.
Go down to the area outside the armory.
Outside the Armory
Click the bricked up archway to zoom in.
Use the Sledgehammer from your inventory to smash through the bricks.
Go through the open doorway into the armory.
Armory
Take the morphing Beyond object (36/42) hanging from the right candle of the chandelier.
Place the Lantern from your inventory on the hook above the barrels.
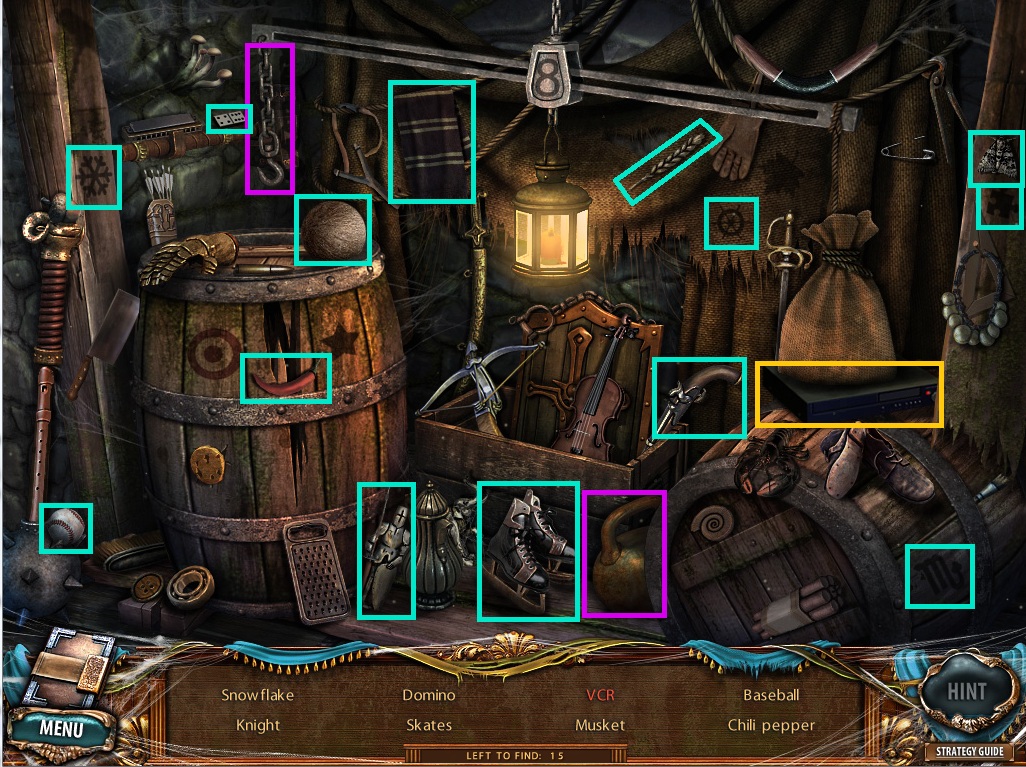
Click the barrels to start the hidden object scene.
Use the weight on the chain hanging on the left side of the scale to lift the sack, revealing the VCR.
Screenshot.
Once the hidden object scene is complete, you will receive the VCR.
Return to the balcony.
Balcony
Place the Crystal Ball from your inventory on the stand in the center of the red plates.
Put the Oil Candles into the red plates.
Add the Oil to the candles.
Light the candles with the Matches.
Put the Lens on the front of the camera.
Place the Videotape on the side of the camera.
Once the ritual is complete, you will receive a Videotape with the recording.
Return to the living room.
Living Room
Click the cupboard under the television to zoom in.
Place the VCR from your inventory under the TV.
Put the Videotape inside the VCR.
Click the broken television to zoom in and take the Screwdriver inside the screen.
Go back to the bridge to the small tower.
Bridge to the Small Tower
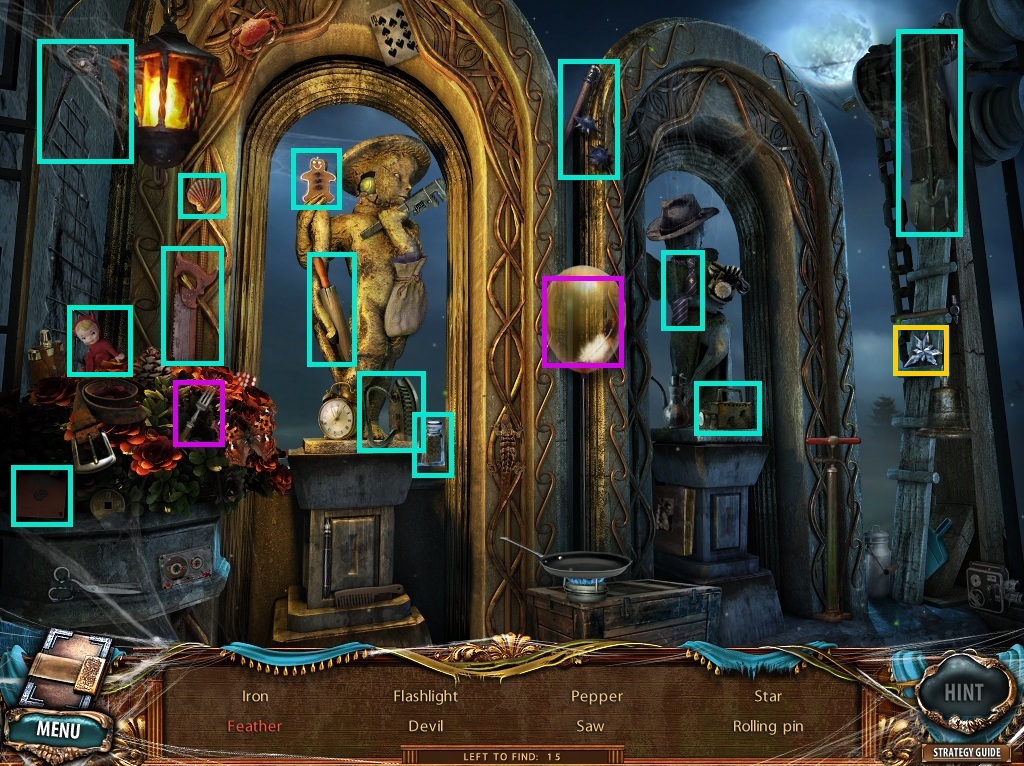
Click the statue to repeat the hidden object scene.
Use the fork to pop the balloon, revealing the Feather.
Screenshot.
Once the hidden object scene is complete, you will receive a Star.
Go forward into the small tower.
Small Tower
Click the antechamber to repeat the hidden object scene.
Put the plug inside the socket to reveal the Green Light.
Screenshot.
Once the hidden object scene is complete, you will receive the Pliers.
Go upstairs to Avidus's office.
Avidus's Office
Click the fusebox to zoom in.
Use the Screwdriver from your inventory to remove the four screws from the panel, revealing the Fuse.
Click the wooden panel on top of the fireplace to zoom in.
Click the panel again to open the compartment, revealing the Rune and the creeping death recipe.
Click the desk to zoom in.
Use the Pliers to remove the nail and take the Cupid.
Go back to the cathedral.
Cathedral
Click the summoning circle to zoom in.
Place the Rune from your inventory to the space on the lower right side of the outer circle.
Take the floating Star.
Return to the 2nd floor corridor.
2nd Floor Corridor
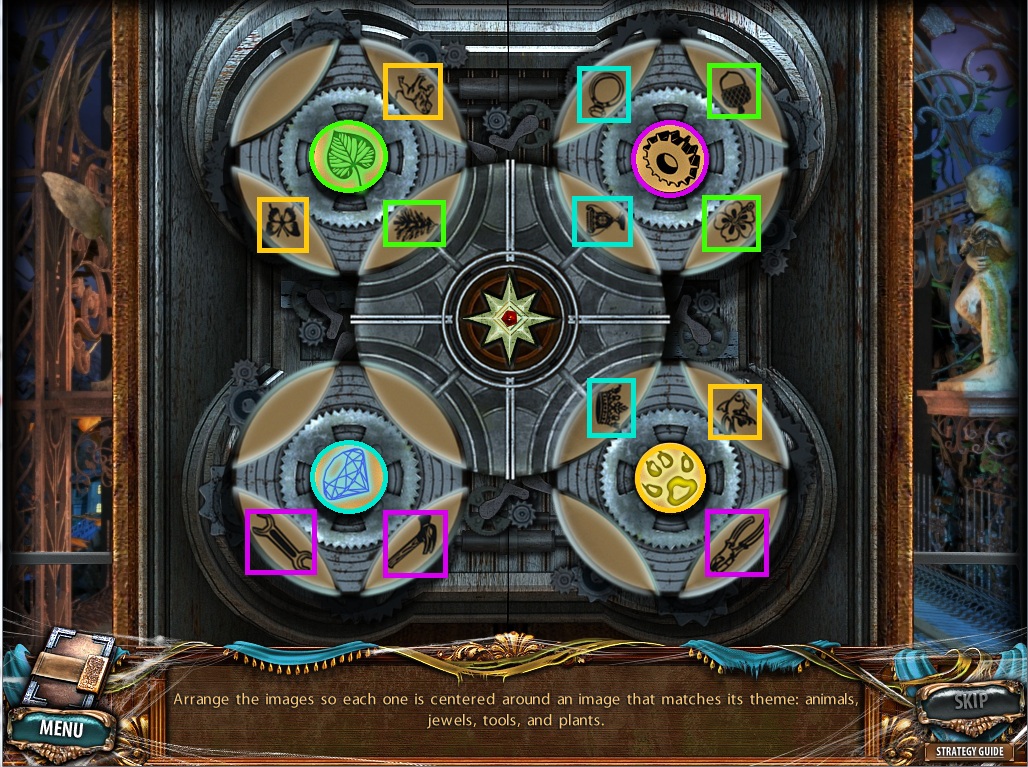
Click the double doors at the end of the hall to zoom in.
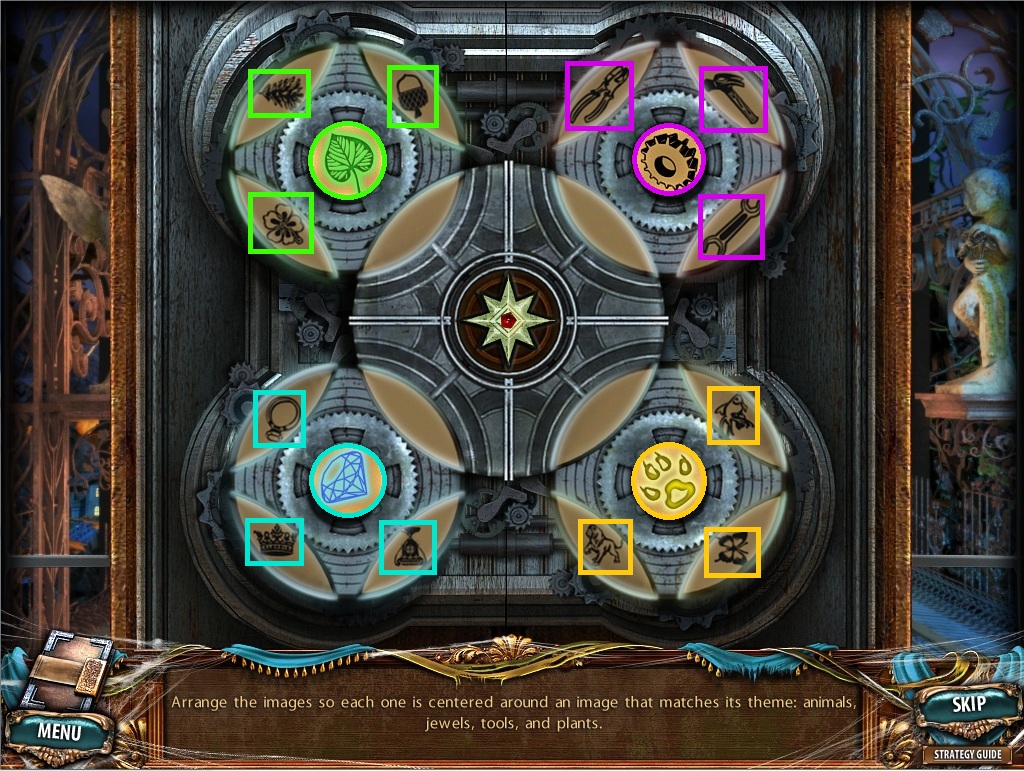
Place the second Star from your inventory into the center of the lock mechanism to start the puzzle.
To solve this puzzle, rotate the discs so the images around each disc match its respective category.
Screenshot.
Click the disk to select it, then drag it clockwise or counterclockwise to rotate it in that direction.
All three plant icons should be in the upper left plant disc.
All three jewel icons should be in the lower left jewel disc.
All three animal icons should be in the lower right animal disc.
All three tool icons should be in the upper right tool disc.
All blank tiles should be in the center disc.
Solution.
Go through the open door to the bridge to the big tower.
Bridge to Big Tower
Take the morphing Beyond object (37/42) by the rubble on the ground at the left side of the walkway.
Take the Goblet from the right pile of rubble on the ground.
Return to the garden.
Garden
Click the door to zoom in.
Place the Goblet from your inventory into the round space on the right side of the gold lock.
Pour the White Wine bottle into the left goblet and the Red Wine bottle into the right goblet.
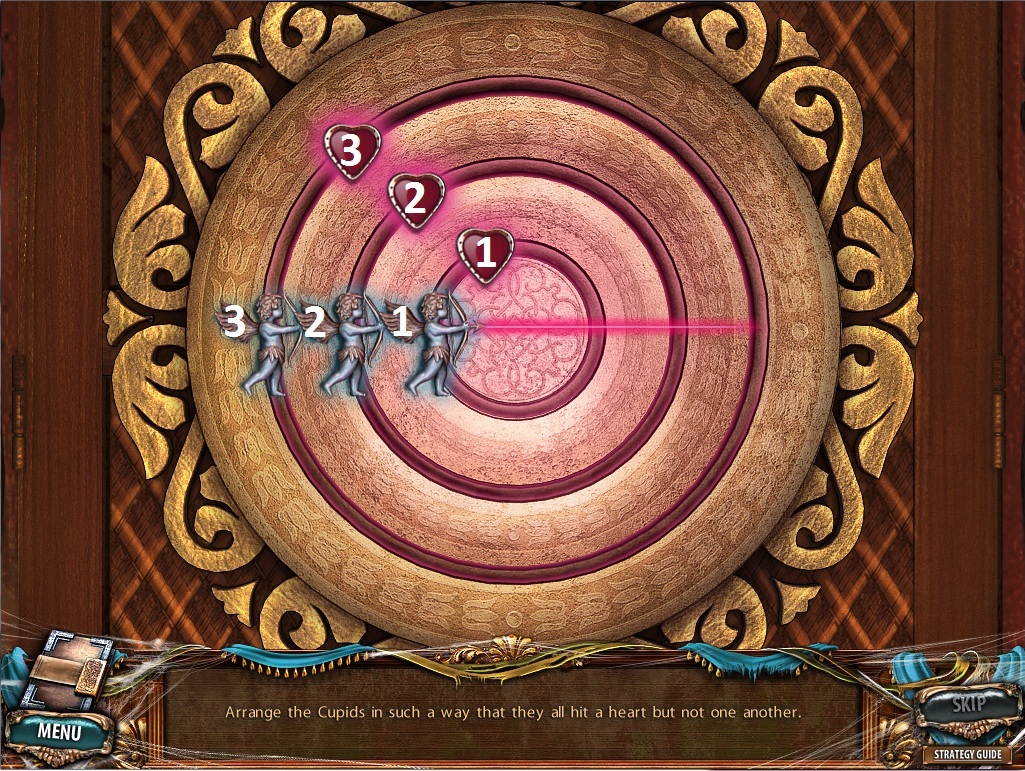
Add the Cupid and the Heart to the lock to start the puzzle.
To solve this puzzle, rotate the dials so that each Cupid's arrow strikes one of the three hearts without hitting another Cupid.
Screenshot.
Click each of the cupids to select it, then hold and drag it to move it along the path of its ring.
If a Cupid's arrow intersects another cupid, the path of light from its bow will become faded.
When all three Cupids are correctly placed, the path will glow brightly.
Solution.
Go through the open door into the house.
House in the Garden
Take the morphing Beyond object (38/42) on the lower left corner of the windowsill.
Take the Star on the ground under the window.
Return to Avidus's office.
Avidus's Office
Click the framed painting on the left window to zoom in.
Place the two Stars from your inventory into the spaces underneath the painting.
Take the Ballet Dancer and the Rune from the opened secret compartment.
Go back to the cathedral.
Cathedral
Click the summoning circle to zoom in.
Place the Rune from your inventory on the space at the upper right side of the inner circle.
Take the floating Rose Wine.
Return to the house in the garden.
House in the Garden
Click the music box on the table beside the bed to zoom in.
Place the Ballet Dancer from your inventory on the ring on top of the box.
Open the box and take the Harp.
Return to the bridge to the big tower.
Bridge to the Big Tower
Click the left angel statue to zoom in.
Place the Harp from your inventory into the angel's hands.
Take the revealed Candles from the open box under the statue.
Go back to the house in the garden.
House in the Garden
Click the ring of rose petals on the floor to zoom in.
Place the Candles from your inventory to the stands in the ring.
Pour the Rose Oil into the center.
Light the candles with the Matches to summon the Succubus.
Once the ritual is complete, take the Rune from the center of the ring.
Go back to the bridge to the small tower.
Bridge to the Small Tower
Click the statue to repeat the hidden object scene.
Use the egg on the skillet to make a Fried Egg.
Screenshot.
Once the hidden object scene is complete, you will receive an Axe.
Return to the cathedral.
Cathedral
Click the summoning circle to zoom in.
Place the Rune from your inventory on the lower right side of the inner circle.
Take the floating Disc.
Go to the living room.
Living Room
Click the junk at the bottom of the couch to repeat the hidden object scene.
Use the small net on the fishbowl to remove the Fish.
Screenshot.
Once the hidden object scene is complete, you will receive the Handle.
Return to the armory.
Armory
Click the barrels to repeat the hidden object scene.
Use the corkscrew on the barrel to pull out the Cork.
Screenshot.
Once the hidden object scene is complete, you will receive the Crossbow.
Click the crate on the bench to zoom in.
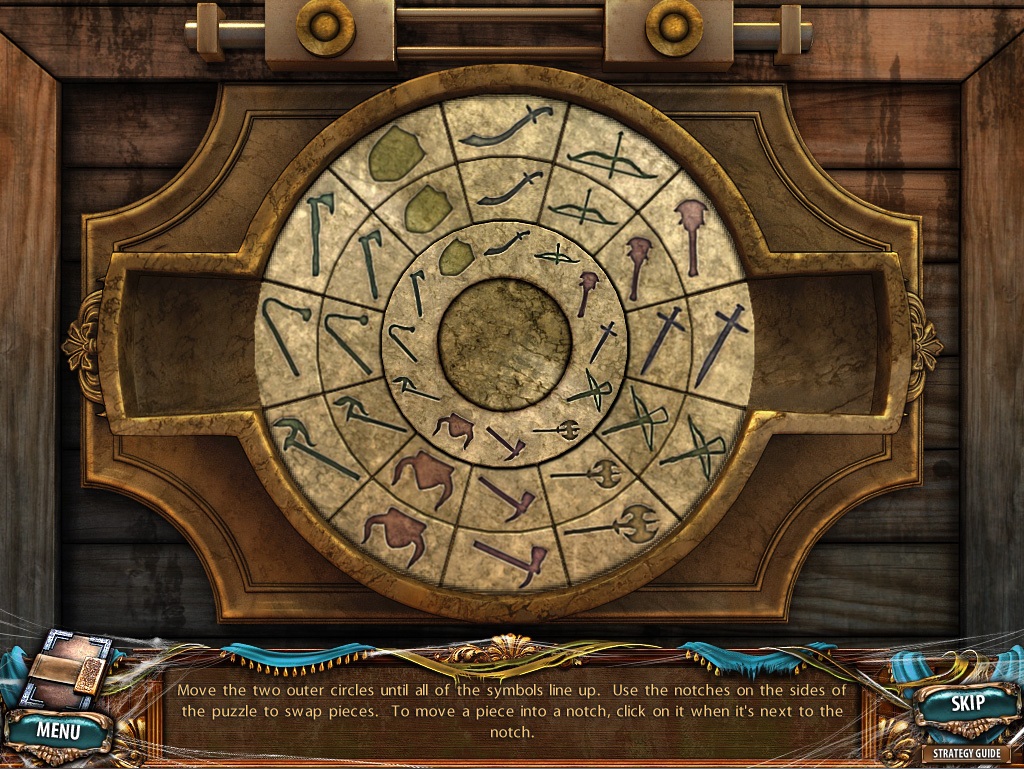
Put the Disc from your inventory in the center of the ring to start the puzzle.
To solve this puzzle, rotate the two outer rings so the symbols match up with the inner ring.
Click the ring to select it, then hold and drag it clockwise and counterclockwise to rotate the ring in that direction.
Click and drag a tile into the empty space on the side of the circle to remove it from the ring.
Solution.
Click the open box to zoom in and take the Trophy.
Use the Bag from your inventory on the gunpowder to receive a Bag with Gunpowder.
Go to the bridge to the big tower.
Bridge to the Big Tower
Click the boarded up doorway at the end of the bridge to zoom in.
Take the morphing Beyond object (39/42) at the lower left side of the wall beside the vine.
Use the Axe from your inventory to chop through the boards.
Click the locked gate for a closer look into the room.
Use the Crossbow to shoot the table, then take the Key on top of the table.
Use the Key to on the lock.
Go through the open gate into the big tower.
Chapter 9 - Big Tower
Big Tower
Take the morphing Beyond object (40/42) at the top of the broken stairway on the left.
Click the elevator to zoom in.
Place the Fuse from your inventory into the right space on the fuse box.
Go into the elevator and up to Morbile's office.
Morbile's Office
Take the morphing Beyond object (41/42) in the pile of debris at the lower left side of the steps to the throne.
Take the Record on the table to the right, beside the plank of wood.
Click the pedestal to zoom in.
Place the Trophy from your inventory on top of the pedestal.
Take the revealed Sword from the raised platform.
Return to the armory.
Armory
Place the Sword from your inventory on the lock mechanism of the door.
Click the open closet to zoom in.
Take the two Runes and the Cannonball.
Return to the cathedral.
Cathedral
Click the summoning circle to zoom in.
Place the two Runes from your inventory into the spaces in the upper left side of the inner and outer circle.
Take the Green Gem and the Star Powder.
Go back to the exit to the square.
Exit to the Square
Click the cannon to zoom in.
Load the cannon with the Bag of Gunpowder from your inventory.
Place the Cannonball into the barrel of the cannon.
Light the fuse with the Matches.
Return to the Morbile monument, then go down the step ladder into the alchemist's secret chamber.
Alchemist's Secret Chamber
Take the morphing Beyond object (42/42) on the seat of the lounge chair.
Click the gramophone to zoom in.
Place the Record and Handle from your inventory on to the gramophone.
Take the revealed Rune from the cache.
Return to the cathedral.
Cathedral
Click the summoning circle to zoom in.
Place the Rune from your inventory into the empty space at the lower left side of the outer circle.
Take the floating Blue Gem.
Go back to the alchemist's secret chamber.
Alchemist's Secret Chamber
Click the altar to zoom in.
Put the Wings from your inventory on top of the altar.
Place the Green Gem in the left slot and the Blue Gem in the right slot.
Pour the Star Powder on the wings.
Take the Live Wings from the altar.
Go outside to the central square.
Central Square
Give the Live Wings to Avidus.
Go to the cathedral.
Cathedral
Click the summoning circle to zoom in.
Place the Rune in the last empty space of the circle.
The End
Posted by: Trinn |
August 11, 2011 6:17 PM
|
August 11, 2011 6:17 PM
Collector's Edition Bonus Chapter
Corridor
Click the sofa chair to start the hidden object scene.
Put the dollar bills into the coin purse to make the Coin Purse with Money.
Screenshot.
Once the hidden object scene is complete, you will receive a Screwdriver.
Take the Coin in the bottom right corner of the windowsill.
Go back to Ward 1.
Ward 1
Click the teddy bear to zoom in and take the Button.
Click the vent at the top of the wall to zoom in.
Use the Screwdriver on the screws at the four corners of the vent.
Take the second Button from behind the removed vent.
Click the table to zoom in and take the third Button and the Tweezers.
Return to the corridor.
Corridor
Click the papers on the floor to zoom in.
Take the Sheet of Paper on the floorboards.
Use the Tweezers from your inventory to remove the Pencil.
Click the wooden panel on the wall to the left of the barricaded door to zoom in.
Place the Sheet of Paper on the wood, then use the Pencil on the paper.
Note the order of the four symbols.
Click the unblocked door on the left to zoom in.
Add the three Buttons from your inventory to the empty spaces on the door.
Click the buttons according to the order of the symbols on the wooden board.
Solution.
Go through the open door into Ward 2.
Ward 2
Click the curtains to draw them back.
Click the hospital bed to start the hidden object scene.
Use the tape to repair the torn Dollar.
Screenshot.
Once the hidden object scene is complete, you will receive a Knife.
Click the radio on the table to zoom in.
Take the Coin at the lower right corner of the radio.
Use the Knife to remove open the panel, revealing the Battery.
Click the desk to zoom in.
Read the note to the alchemist and the experimental acid instructions, then take the Key.
Go back to Ward 1
Ward 1
Click the desk to zoom in.
Use the Key from your inventory on the locked drawer.
Take the Coin and the Puzzle Piece inside the opened drawer.
Return to Ward 2
Ward 2
Click the closet to open it, then click the surgical coats to move them aside, revealing a cache.
Click the cache to zoom in.
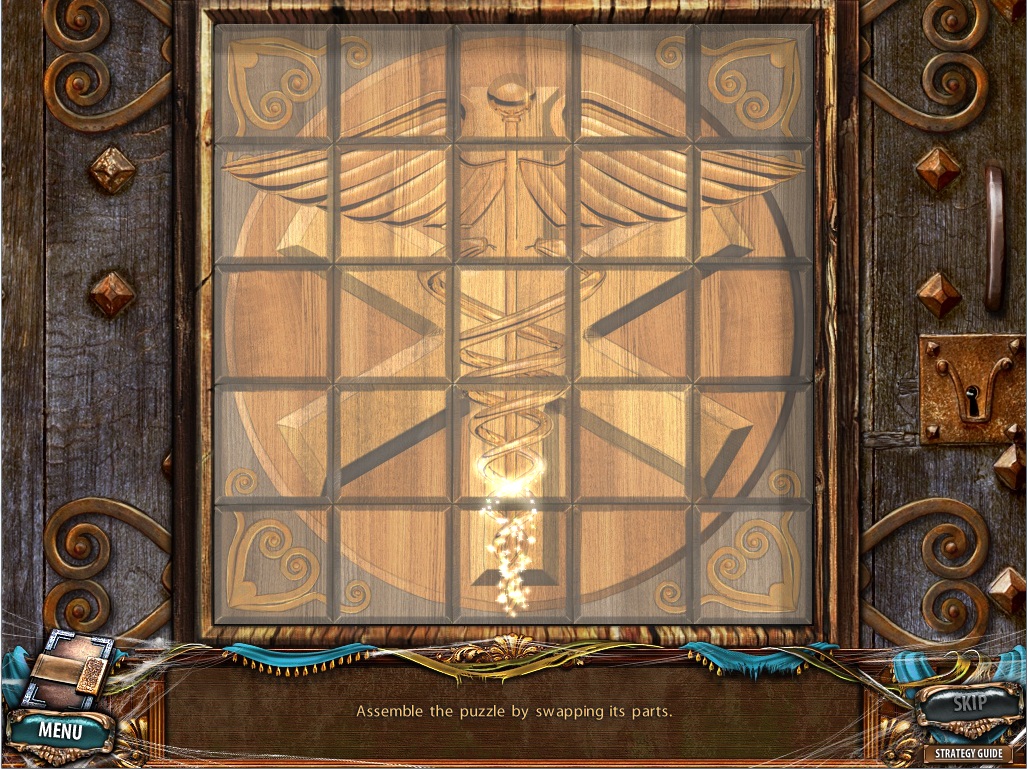
Add the Puzzle Piece from your inventory to the board to start the puzzle.
To solve this puzzle, arrange the tiles to complete the image.
Click a tile to select it, then click a different tile to switch their positions.
When a tile is correctly positioned, it will become faded.
Solution.
Go through the open door into the cellar.
Cellar
Click the mouth of the pipe in the upper right side of the room to zoom in and take the Coin.
Go through the door on the right into the operating room.
Operating Room
Note the four digits etched on the doors of the closed supply closet.
Click the red power box to the left of the closet to zoom in.
Take the Sticky Tape attached to the front of the box.
Go back to the cellar, then go through the left door to the mortuary.
Mortuary
Click the trolley cart to zoom in and take the X-ray.
Click the bottle on top of the operating table.
Click the smashed bottle to zoom in and take the Coin.
Take the Cryogenic Nitrogen leaning against the rolling cart on the right.
Click the large green curtain to draw it back.
Click the body boxes to start the hidden object scene.
Use the pencil on the paper to draw the Star.
Screenshot.
Once the hidden object scene is complete, you will receive a Scalpel.
Click the broken pipe on the upper right side of the wall to zoom in.
Click the Pipe to add it to your inventory.
Return to the cellar.
Cellar
Click the top of the pole to zoom in.
Place the Scalpel from your inventory on the ground next to the pole.
Add the Sticky Tape to the end of the pole to attach the scalpel, then click the Pole with Scalpel to add it to your inventory.
Use the Pole with Scalpel to cut through the wire on top of the rotating water turbine.
Click the turbine to zoom in.
Place the Pipe in the turbine blades to stop its rotation.
Go through the tunnel into the monastic cell.
Monastic Cell
Click the map on the left wall to zoom in and take the Lever.
Click the desk to zoom in.
Take the Book and read the paper with the order of the zodiac symbols.
Return to the operating room.
Operating Room
Click the red power box to zoom in.
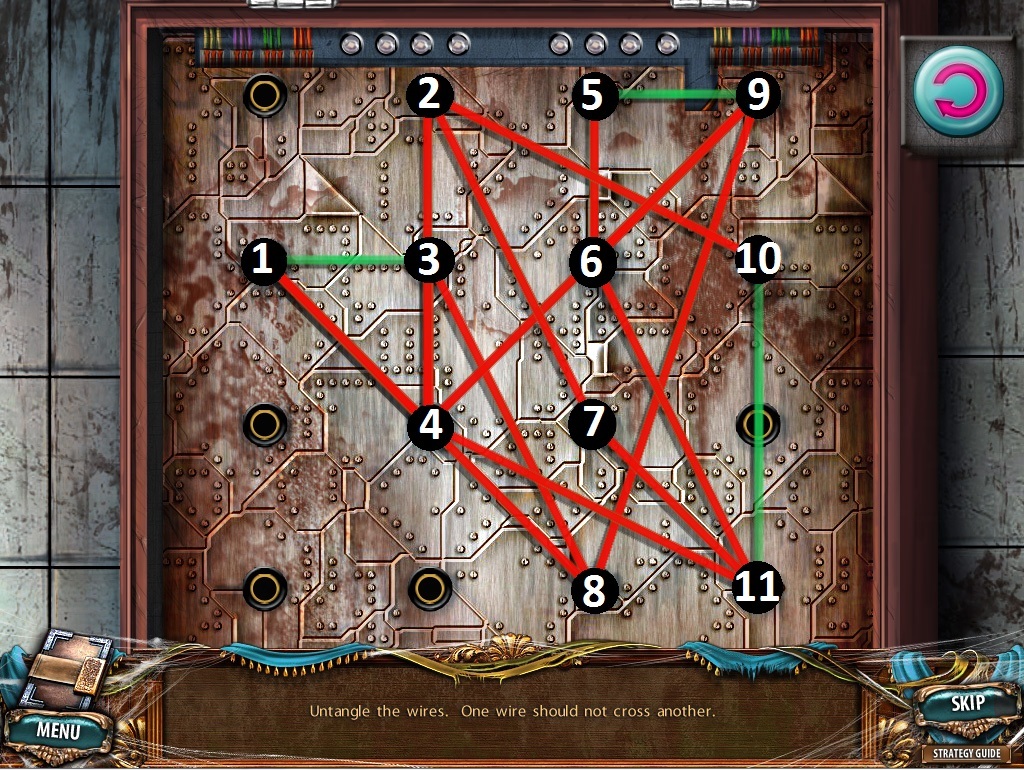
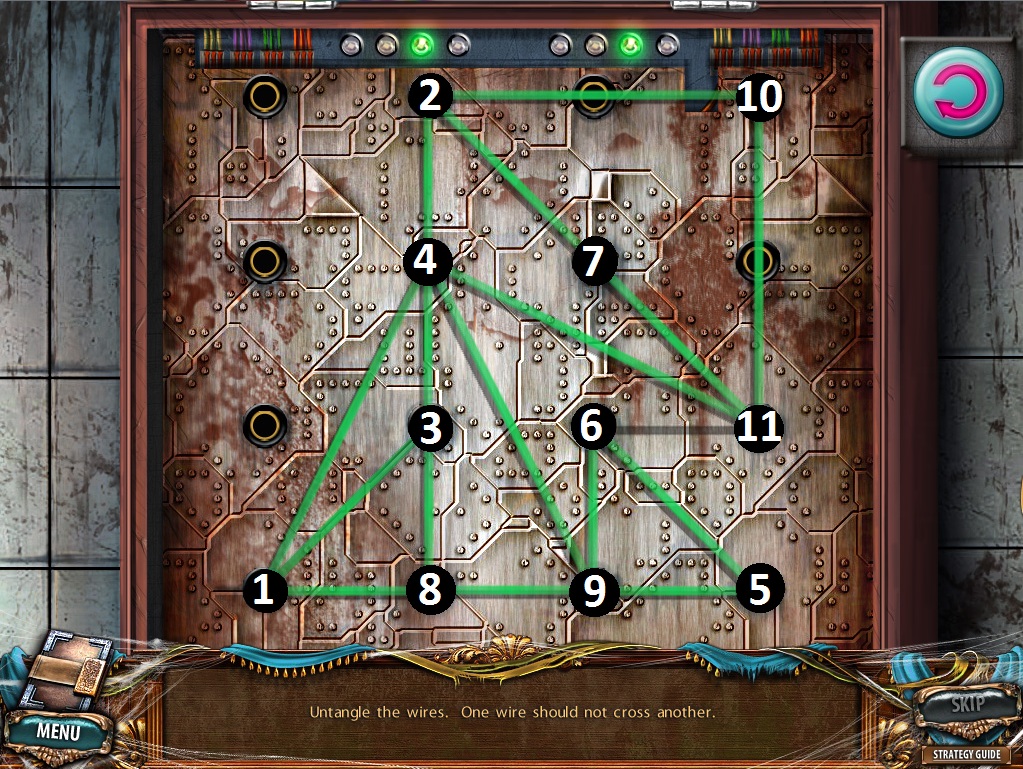
Add the Lever from your inventory to the side of the box, then click the lever.
Open the lid, then click the panel to start the puzzle.
To solve this puzzle, attach the wires to the socket so that none of the lines intersect.
Click a point to select it, then click a socket to place the wire.
If any of the wires cross paths, they will glow red.
If no lines are intersected, then the wire will glow green.
Screenshot.
Solution.
Click the power box again, then pull the lever to turn on the power.
Pull off the shroud to reveal the mannequin.
Click the mannequin's leg for a closer look and take the Syringe and Rubber Strap.
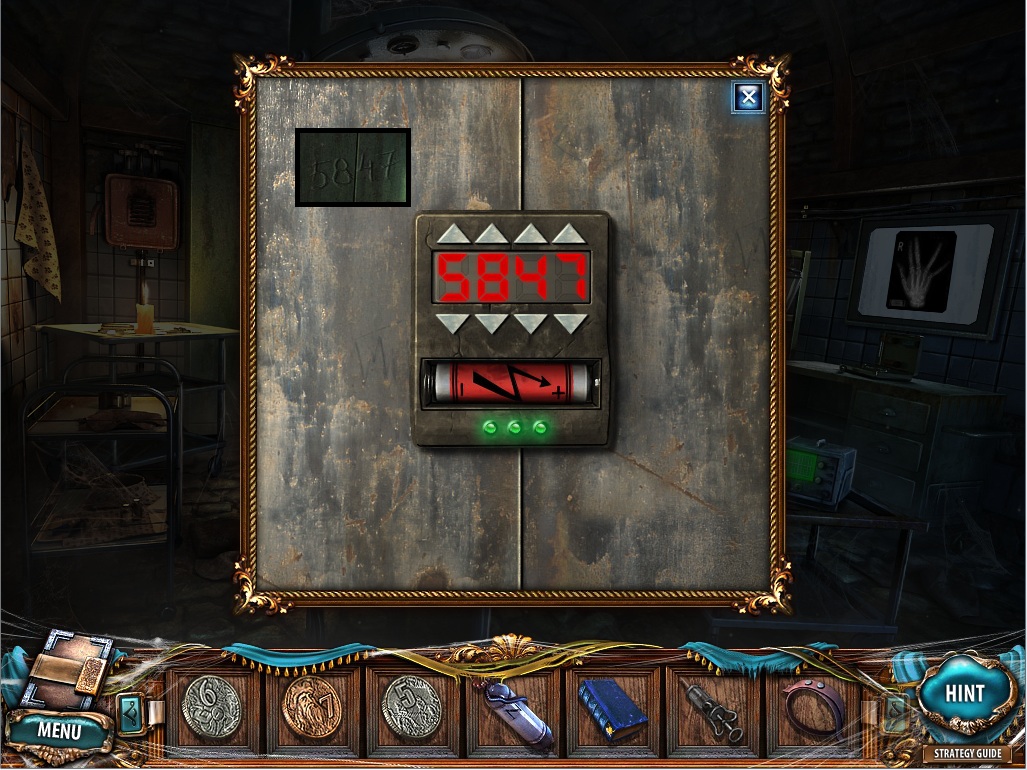
Click the grey box to the right of the closet to zoom in.
Place the Battery from your inventory inside the bottom of the combination lock device.
Wait for the lock to flash momentarily, then take the Dead Battery.
Click the defibrillator to zoom in.
Use the Dead Battery from your inventory on the defibrillator to receive the Recharged Battery.
Click the film viewer screen to zoom in.
Place the X-ray onto the film viewer and note the position of the fingers on the hand.
Click the grey box to the right of the closet to zoom in.
Place the Recharged Battery in the bottom of the lock device.
Enter the four digit combination scratched on the door of the closet.
Screenshot.
Click the opened cabinet to look inside and take the Coin.
Return to the mortuary.
Mortuary
Click the green curtain on the cupboard to draw it back, revealing the hand device
Click the hand device to zoom in.
Arrange the fingers according to the picture from the x-ray film viewer in the operatiing room.
Screenshot.
Click the open cupboard to zoom in and take the Book and the Tablet.
Click the body boxes to repeat the hidden object scene.
Add the blade to the handle to make the Axe.
Screenshot.
Once the hidden object scene is complete, you will receive a Hammer.
Return to the monastic cell.
Monastic Cell
Click the bookshelf to zoom in.
Add the two Books frmo your inventory to the empty spaces on the shelves to begin the puzzle.
To solve this puzzle, arrange the books according to the order of the Zodiac.
Click a book to select it, then click a different book to swap their positions.
The order is the same as the one shown from the note on the desk.
The top row is Aries the ram, Taurus the bull, Gemini the twins, Cancer the crab, Leo the lion, and Virgo the maiden.
The bottom row is Libra the man with the scales, Scorpio the scorpion, Saggitarius the centaur archer, Capricorn the sea goat, Aquarius the water bearer, and Pisces the two fish.
Solution.
Go through the secret passageway into the storeroom.
Storeroom
Click the gate to zoom in and take the Coin.
Click the wooden door for a closer look.
Use the Cryogenic Nitrogen from your inventory on the padlock.
Break the frozen padlock with the Hammer.
Click the door to open it, then go through the doorway into the armory.
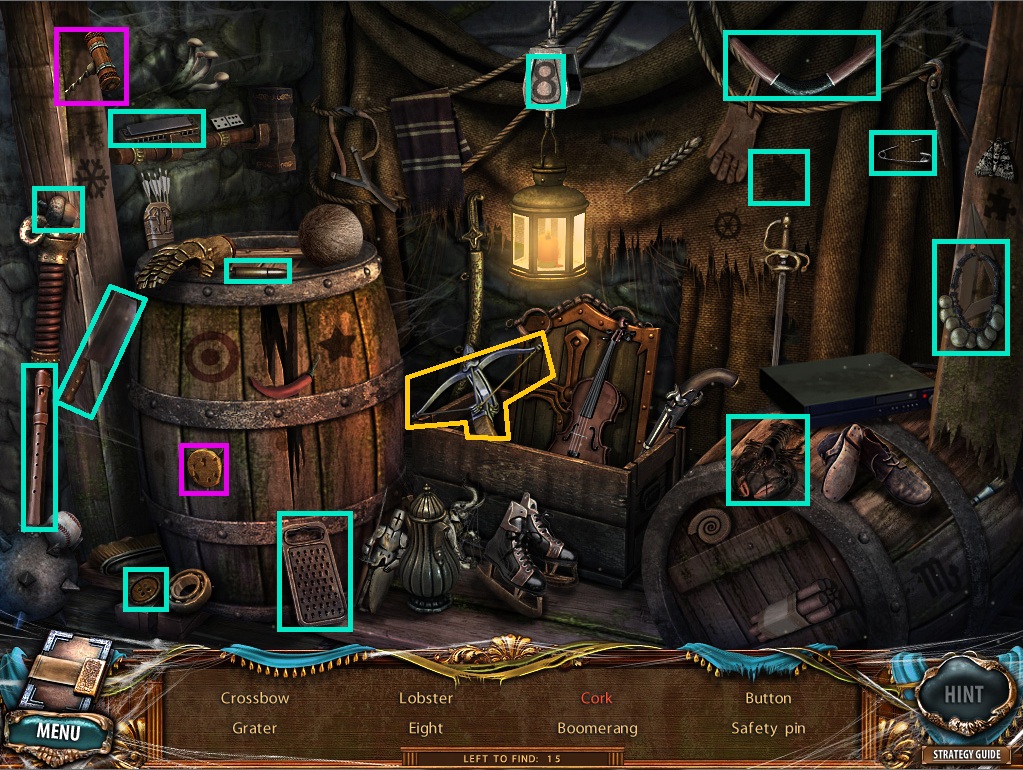
Armory
Click the open chest to start the hidden object scene.
Use the nutcrack on the walnut to make a Cracked Walnut.
Screenshot.
Once the hidden object scene is complete, you will receive a Glass Coil.
Click the round table to zoom in.
Read the scroll and take the Branch and the Broken Sword.
Go back to the storeroom.
Storeroom
Click the hole in the floor to zoom in.
Place the Branch from your inventory inside the round hole.
Attach the Rubber Strap to the branch.
Pick up the large stone from the ground and place it in the makeshift slingshot.
Click the base of the pillar to zoom in and take the Reel.
Click the rowboat to zoom in.
Use the Broken Sword on the fishing net to reveal the Matches.
Add the Reel to the fishing rod.
Click the reel to raise the boot, revealing the Eye.
Return to the operating room.
Operating Room
Click the mannequin's head to zoom in.
Place the Eye from your inventory into the empty eye socket.
Take the Test Tube with Reagent from the mannequin's open mouth.
Go back to Ward 2
Ward 2
Click the hospital bed to repeat the hidden object scene.
Use the magnet on the bottle to retrieve the Key.
Screenshot.
Once the hidden object scene is complete, you will receive an Oiler.
Click the table to zoom in.
Pour the Test Tube with Reagent from your inventory into the funnel.
Add the Glass Coil to the two beakers.
Put the Tablet on the round plate, then light it with the Matches.
Use the Syringe on the flask to fill it with the Acid.
Return to the monastic cell.
Monastic Cell
Click the large square stone to zoom in.
Use the Acid from your inventory on the symbol carved into the stone.
Click the broken stone to zoom in and take the coin.
Go to the armory.
Armory
Click the hatch above the ladder to zoom in.
Use the Oiler from your inventory on the rusted lock, then click the lock to open the hatch.
Go up the ladder to the bell tower.
Bell Tower
Click the crow to shoo it away from the skeleton.
Click the note between the skeleton's legs to zoom in and take the Coin.
Click the rope to ring the bell.
Go back to the armory.
Armory
Click the chest to repeat the hidden object scene.
Use the coffee beans on the coffee grinder to make Ground Coffee.
Screenshot.
Once the hidden object scene is complete, you will receive a Coin.
Go back to the mortuary.
Mortuary
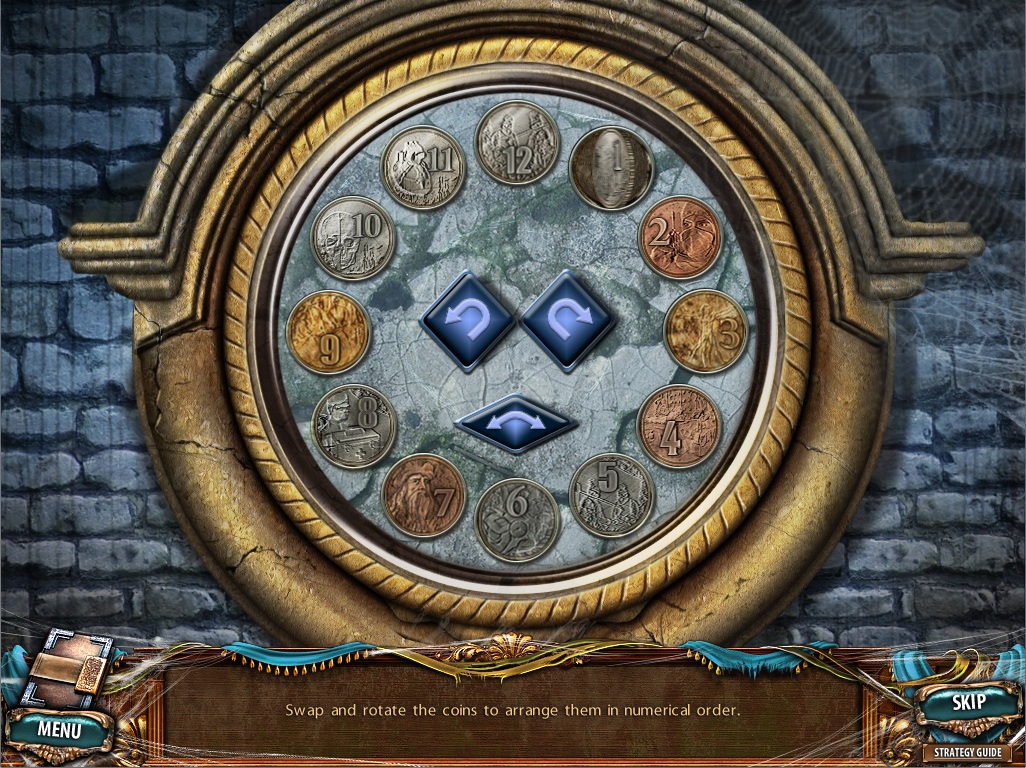
Click the round plate in the arch of the right wall to zoom in.
Add all the coins from your inventory to the plate to start the puzzle.
To solve this puzzle, arrange the coins clockwise in numerical order from 1 to 12.
Clicking the right or left arrows rotates the numbers on the plate clockwise or counterclockwise, respectively.
Clicking the button with the double arrow swaps the two coins on the bottom left and bottom right.
Rotate the plate so that Coin 11 is on the bottom.
Swap Coin 12 and Coin 2.
Rotate the plate so that Coin 1 is on the bottom.
Swap Coin 6 and Coin 2.
Rotate the plate so that Coin 11 is on the bottom.
Swap Coin 6 and Coin 12.
Rotate the plate so that Coin 3 is on the bottom.
Swap Coin 4 and Coin 10.
Rotate the plate so that Coin 5 is on the bottom.
Swap Coin 6 and Coin 10.
Rotate the plate so that Coin 8 is on the bottom.
Swap Coin 7 and Coin 9.
Rotate the plate so that Coin 4 is on the bottom.
Swap Coin 3 and Coin 9.
Rotate the plate so that Coin 8 is on the bottom.
Swap Coin 3 and Coin 7.
Rotate the plate so that Coin 7 is on the bottom.
Swap Coin 4 and Coin 8.
Rotate the plate so that Coin 6 is on the bottom.
Swap Coin 5 and Coin 9.
Rotate the plate so that Coin 5 is on the bottom.
Swap Coin 6 and Coin 8.
Rotate the plate so that Coin 6 is on the bottom.
Swap Coin 5 and Coin 7.
Solution.
Once the puzzle is solved, the plate will open, revealing a secret compartment.
Click the compartment to zoom in and take the Lever.
Return to the bell tower.
Bell Tower
Click the gate mechanism to zoom in.
Add the Lever from your inventory to the empty space on the mechanism.
Click the lever to open the gate.
The End
Posted by: Trinn |
August 11, 2011 6:19 PM
|
August 11, 2011 6:19 PM