
![]() The tradition of escape-the-room games has brought us into many circumstances of being trapped and needing to wile our way through the exit. Our reward? Usually it's merely the deep gratification of outwitting the savvy programmer who locked us up in the first place. Every now and again, though, one of our favorite game designers brings us something more: a room that is truly satisfying to explore and an exit scene that is magnificant to behold. Robamimi is just such a designer and Station is a prime example of why.
The tradition of escape-the-room games has brought us into many circumstances of being trapped and needing to wile our way through the exit. Our reward? Usually it's merely the deep gratification of outwitting the savvy programmer who locked us up in the first place. Every now and again, though, one of our favorite game designers brings us something more: a room that is truly satisfying to explore and an exit scene that is magnificant to behold. Robamimi is just such a designer and Station is a prime example of why.
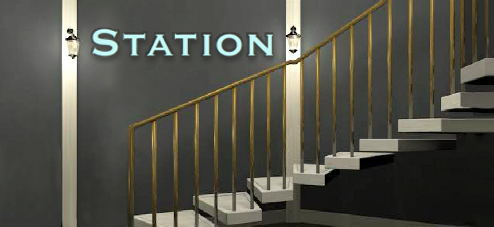
 Much like all of Robamimi's creations, Station is attractively furnished and user friendly. You begin inside a hexagonal room, following a changing cursor to pick up tools or interact with puzzles and clues, and must employ problem solving skills as well as deductive reasoning to make your way through the door—only to learn, with a grin, that you've only just begun. Although the game itself has just one ending, the use of multiple rooms to "break into" makes it feel like more.
Because of its scope, Station is higher on the Robamimi difficulty scale; figuring out solutions takes extra work and quite a bit of back-and-forth, running up and down stairs, as well as some doodling in your notes. The non-standard layout also means more to contemplate and put together, and a greater likelihood you'll overlook an important bit of information or miss looking in a tucked away corner. It takes a while to get oriented, understand what's going on, and make sense of the riddles presented. Along those lines, the "Hint" function is helpful yet hints are more obscure this time, pointing you in a general direction without giving away all the signposts for the solution. You're likely to recollect Hermit Rabi and Wonder Fountain during this venture because of the puzzle types as well as the maze-esque navigation (by the way, if you enjoy this one, you're sure to like that one, and vice versa). Due to its length and a few reported quirks late in the game, using "Save" before starting a puzzle is also recommended.
When you're ready to escape the ordinary milieu of the weekday in the great JIG custom of being locked up, to challenge your thought processes even as your aesthetic sensibilities are serenaded, and treating yourself to a game that's diametrically challenging and relaxing, click the button below. It's a wonderful ride from beginning to end!
Not loading? Try the alternative link: Station.
Thanks to Itt and Cyberjar88 for suggesting this one!


Walkthrough Guide
(Please allow page to fully load for spoiler tags to be functional.)
Station Walkthrough
First Room
You begin inside a hexagonal (6-cornered) room, facing a blank wall and a small podium. Click on the podium to inspect it.
On its front is a symbol. Make a note of what it looks like.
Click again on its top to see a hole where something appears to be missing and the words "open" and "close."
Turn left. Now you see a desk. Maybe it contains some helpful information; give it a look.
Pick up the MANUSCRIPT PAPER from the desktop.
Make a note of the two books stacked here.
Open the drawer...
Get the CAT PANEL and examine it for a clue:
"The cat sat down opposite to the king."
It sounds like part of a riddle.
Turn left again and you'll see a strange clock-thing on the wall along with two pictures. Zoom in...
The clock-thing has twelve buttons and the single pointer will move to where you click.
Each of the pictures have something written on them:
Flowers = 11 23 05:00
Subway Car = 04 12 09:00
Turn left again to face the door.
You need a 5-digit code to unlock the door.
From this position, you can click down to look at the floor of this room:
Note the hexagon design and the white triangle in relation to the door.
When you turn left from the door, you see window shutters.
A key is needed to unlock them.
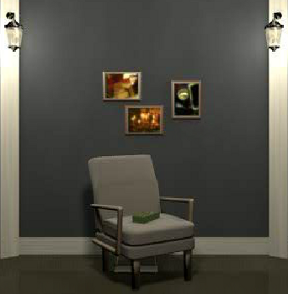
Turning left after that brings you before a chair and three more pictures. Look over it all very closely.
Each of the three pictures have writing on them:
Stairs = 06 18 15:00
Chandelier = 03 20 23:00
Headlight = 07 30 20:00
A note on the wall says "MONTH DATE TIME"
On the chair is a box:
A 3-digit code is needed to open it.
There's also something under the chair:
A BOOK. Get it.
Now it's time to solve some puzzles and get out of this room...
Green Box
Take the BOOK you found under the chair and turn left twice.
Add your BOOK to the stack already on the desk. Now you have another clue.
Turn around to face the chair and zoom in on the green box again...
Enter the correct code to unlock the box.
SOLUTION:
When the books are stacked, they spell out three numbers vertically...TWO - ONE - SIX
So put 2 1 6 into the code box and click "OK".
When you open the box, get the DART.
Clock Buttons
After examining all the pictures in the room, you'll have the information needed to work the Clock-Thing.
Turn around until you're facing the clock-thing and zoom in on it...
Click the correct sequence of buttons to open a hidden panel on the clock-thing.
SOLUTION:
Each picture has a month, date and time on it. The times (written in 24 hour increments) correlate to buttons on the clock-thing. Put these in order from earliest date to latest date...
March 20, 11 pm (3 20 23:00)
April 12, 9 am (4 12 09:00)
June 18, 3 pm (6 18 15:00)
July 30, 8 pm (7 30 20:00)
November 23, 5 am (11 23 05:00)
...and you know to push the buttons in this order (imagine the numbers as if an analog clock):
11 - 9 - 3 - 8 - 5
When the clock-thing's drawer opens, you can get...
a KEY to the window shutters.
First Room's Exit Code
Once you get the KEY from the clock-thing's drawer, turn around the face the shuttered window. Use the KEY to unlock and open the windows.
There is something on the right shutter; check it out:
Yellow and blue tiles. Note their order:
YBYBBYYB
Now, through the open window, you can see a green balloon on the opposite wall.
Use the DART to pop the balloon and reveal a new clue:
Flower - 0 :
Back up and inspect the Flower picture again if necessary.
Turn to the door and examine its lock.
Use the clues you gathered to enter the correct code then click "E".
SOLUTION:
Subtract the 0s and : from the numbers on the flower picture. That gives you this code...
1 1 2 3 5
The lock panel will read "OPEN" when the code is correct.
Back up and open the door. Step through to the stairwell.
The Stairwell
Robamimi likes to test your observation skills. So, before you go downstairs, make sure you inspect this landing.
Click on the door to look at it from this new angle.
Then, click the door again to close it.
Ahaha! Look what's behind the door:
a KNIFE PANEL! Pick it up and read it for another clue.
"King had a weapon in his right hand."
Back up to head down the stairs. Now you are facing another door with three knockers on it. To its left is another podium.
This podium has two buttons "B" and "Y". That should look familiar to you...
SOLUTION:
There were similar tiles on the window shutter. Click on the "B" and "Y" buttons in the same order...
Y B Y B B Y Y B
When correct, the blue light comes on.
Put the MANUSCRIPT PAPER on the blue light for another clue:
Zoom in on the clue and make a note of the pattern that appears...
- X -
- - X
X - -
X - -
- - X
- X -
- X -
You're ready to open the door, but before you do, turn around to inspect the room...
Under the stairs you'll find a FISH PANEL.
It's clue: "The cat got a favorite food in its right hand."
You can also see there's something on the floor, but it's too hard to see clearly from this angle.
The 3 Door Knockers
Examine the three knockers on the door at the bottom of the stairs.
Click on the knockers in the correct sequence to open this door.
Use the clue from the MANUSCRIPT PAPER to derive the answer.
SOLUTION:
The pattern of darkened squares indicates the order you must click on the knockers...
- X -
- - X
X - -
X - -
- - X
- X -
- X -
...so click them in this order:
middle-right-left-left-right-middle-middle
When you get the door open, don't enter yet. Instead, note the pattern on the floor in the next room:
From where you're standing, sketch the hexagon design on the floor and then note where the white triangle is located on it.
Second Downstairs "Bell" Room
When you first step inside the second downstairs room, you face a bell hanging over a sign. Zoom in to read it.
The sign says "Never Give Up" and you can ring the bell.
Keep ringing the bell. Don't stop until something happens.
Eventually, the panel opens...
get the DIAMOND PANEL.
Turning left from the bell, you see a walled-off archway. So, turn left twice more. Now you're facing the door. Open it.
Note that the stairwell's room also has a hexagon design with a white triangle on it.
Paying attention to where you're standing, make a note of where it is in relation to this room's own hexagon/white triangle.
When you turn left from the door, you'll see another walled-off archway. There's also something on the floor:
Pick up the DART.
One more left turn and you'll face a hexagonal podium. Give it a closer inspection...
Hexagonal Podium Puzzle
Inside the control room, to the right of the bell, is a hexagonal podium.
If you've followed this walkthrough exactly until now, you have 4 PANELS to use in this puzzle. You need one more.
RIDDLE PANELS/WEDGES LOCATIONS:
CAT = inside the desk drawer
KNIFE = behind the door, on the upstairs landing
FISH = bottom of the stairwell, under the stairs
DIAMOND = behind the bell's sign, in the second downstairs room
LION = inside the hexagonal podium, use the dart to open it
You can open the front of this podium with something in your possession:
Insert the DART into the hole in the podium's front. Then, click on the dart like it's a handle to pull open the podium's front panel.
When it's open, get the LION PANEL. Read it for the last clue:
"King got a diamond at last."
Now, examine the top of the hexagonal podium:
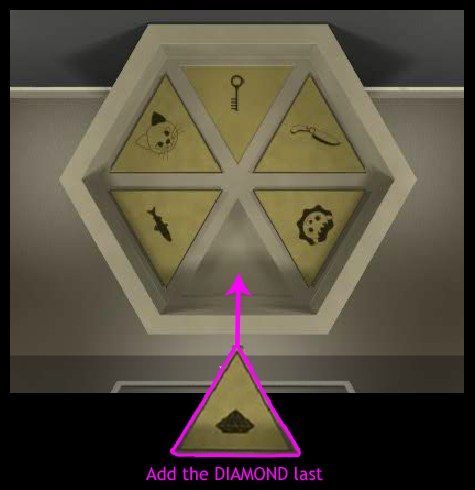
You need to insert each of the 5 triangular PUZZLE PANELS in the correct order.
Solve the riddle given on the back of cat, knife, fish and lion pieces to determine the proper arrangement.
SOLUTION:
Remember to add the diamond LAST. Also consider the clues "on his right" to put yourself in that character's perspective ( When you look at someone, their right is on your left).
Going clockwise, starting with the first space after the key, the pieces go in this order...
Knife - Lion - Diamond, added last - Fish - Cat
Screenshot: hexagonal podium wedges solution
When you have the 5 wedges in their proper places on the hexagonal podium, the two walled-off archways open up. In one, is a train (yay!)...
Take the WHEEL ("Part of the SL") off the front of the train.
Accessing the Control Room
After taking the WHEEL ("Part of the SL") from the front of the train, go back to the podium in first room:
turn right and go through the door. Turn left and click on the bottom of the stairs.
Then click the stairs again to go up to the second floor.
Click the doorway to enter the first room. Turn three times to face the little podium with the spoked-wheel design on its front.
Inspect the top of the podium— this must open and close the control room somehow:
Insert the WHEEL ("Part of the SL") into the top of this podium.
Click once to turn the red spoke to the "OPEN" position.
Return to the second downstairs room:
Back up twice, turn around, and go out the door. Go downstairs, open the 3-knockers door and enter the second downstairs room. Turn left twice.
The words "CONTROL ROOM" are replaced with a hallway. Go down the hallway one time toward the control panel.
To the left of the control panel, you'll see something on the floor:
it's a MAGNIFYING GLASS. Pick it up.
Examine the magnifying glass to break it into two pieces:
a HANDLE
and the main MAGNIFYING GLASS piece.
Now back up and look at the top of the train control panel:
Inspect the MAP of the rooms to get a sense of how they relate to each other.
Now you're ready to get a ticket...
Getting a Ticket
To get a train TICKET, examine the top of the control panel.
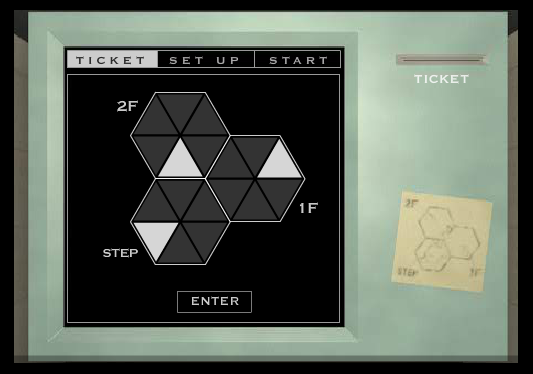
On the monitor is a design: three connecting hexagons. You can click a segment of each hexagon to change where the triangles are located.
Using the information from the map, as well as the patterns on the floors of each room, put the triangles in the correct positions.
SOLUTION:
Screenshot: ticket pattern
When done correctly, the screen will change to "SET UP" and a ticket will be issued out of the top right corner of the control panel.
Get the TICKET.
The Set Up, Start and Escape
After getting your ticket, turn it over. There is tiny writing on the back that you can't read...
Use the MAGNIFYING GLASS to read it.
To SET UP the train for departure, you need to enter the correct code and click "ENTER".
SOLUTION:
The word on the back of your ticket, as seen with your magnifying glass, is the code:
RAIL
Entering the proper code will make the train rails appear across the floor.
The control moniter now indicates you need to add the WHEEL "Part of the SL" back to the front of the train.
Back out of the control room, turn left, go through the door, then up the stairs into the first room. Turn to the podium:
Zoom in on the top of the wheel podium and click "Demount" to take back the WHEEL ("Part of the SL").
But, without the wheel there, the control room will be closed up again.
Insert the HANDLE from the magnifying glass and click to turn it back to "OPEN".
Back up twice, turn around, through the door, downstairs, and back into the second room. Examine the front of the train:
Replace "The part of the SL" WHEEL on the front of the train.
Turn around and go back to the control panel.
Now you need to a 6-digit number code.
SOLUTION:
Look on your TICKET for the number...
0 2 0 6 3 4
When you input the correct number,click "E" to enter it.
Congratulations! Enjoy your ride!
Posted by: elle |
February 20, 2013 3:13 AM
|
February 20, 2013 3:13 AM