

![]() The great challenge in designing room escapes is working within the restrictions of the genre, i.e. how interesting can you make solving your way out of a simple room. Some designers get around this by creating more than one room, some go for bizarre humor (yes, Detarou amongst others), some go for whacky scenarios (Tesshi-e), some create whole point-and-click adventures, some forego the room altogether and strip it down to the basics of puzzle solving (the Dismantlement series, for instance). What Robamimi has done in this latest effort, Tamago, is to create a fantastic escape by working within the constraints of the single room and simply packing it with tons of logical and tricky puzzles.
The great challenge in designing room escapes is working within the restrictions of the genre, i.e. how interesting can you make solving your way out of a simple room. Some designers get around this by creating more than one room, some go for bizarre humor (yes, Detarou amongst others), some go for whacky scenarios (Tesshi-e), some create whole point-and-click adventures, some forego the room altogether and strip it down to the basics of puzzle solving (the Dismantlement series, for instance). What Robamimi has done in this latest effort, Tamago, is to create a fantastic escape by working within the constraints of the single room and simply packing it with tons of logical and tricky puzzles.
 Move around with the arrows at the sides of the screen, pick up anything not nailed down, examine everything, and eventually work your way out of the space. Robamimi makes the escaping chore entertaining with elegant puzzles and solutions, along with top-notch controls that include the easy to use inventory and fantastic hint feature. Robamimi has even gone one step beyond and included text overlays on the color-based puzzles, making Tamago easily accessible for everyone.
With this latest game, Robamimi moves to the top of the class with involved, logical, elegant designs, a lofty category populated by designers such as Neutral and Kotorinosu. Resembling the Japanese omelet this game is named for, Tamago is a wonderful, sweet, multi-layered joy to consume. Dive in and take a bite!


Walkthrough Guide
(Please allow page to fully load for spoiler tags to be functional.)
Tamago Walkthrough
General Information
In case you were wondering, Tamago is a rolled, sweet Japanese omelet.
Make sure the correct language is selected at the beginning.
Remember to examine every object you pick up, it may be hiding a clue.
The colorblind should need no special directions due to the floating text in the game.
Good luck!
Exploration
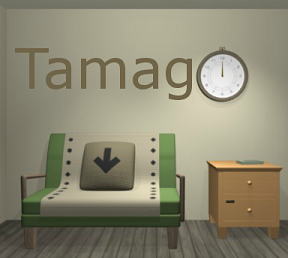
You begin facing a couch. On the wall is a clock, and to the right of the couch is an end table. Click on the couch for a close up.
Gee, that pattern on the blanket on the couch is interesting, as is the arrow on the pillow. Click on the pillow to lift it and get a bookmark.
Back up.
Click underneath the couch for a close up.
Take the item from beneath the couch (cell phone) and back up.
Examine the cell phone. Looks like the battery is dead.
Turn the cell phone around and see the word "walk".
You can click on the clock on the wall for a close up. Note that you can set the hour and minute hands. Back up.
Click on the table for a close up.
Open the top drawer and take the lock-box. Note it needs a 4 digit clue.
Underneath the box in the drawer is a note. Click on it to read it. Looks like a clue that indicates small to large.
The bottom drawer needs a 4 letter code. It also has a clue, "call back".
On top of the table is a box labeled "pastel", click on it.
Once the box is in close up click on it again to open it. Looks like a set of artists pastels of different colors.
If you click on the pastels they move out of the box and you can see the writing underneath each color.
Each color has a number, so brown is 6, orange is 9, white is 2, blue is 4, and green is 5.
Back up and turn right.
You are now facing the door out, which is locked (of course). On the door is a mail slot.
To the left of the door is a strange contraption with a blue handle. Click on the contraption for a close up.
Click on the handle to turn it and the strange contraption opens. Looks like we need a code involving 5 colors.
Back up and turn right.
On this wall is a long shelf with an entertainment unit on it. Below the shelf is a strange small door. Click on the door for a close up.
Looks like a face, doesn't it? It also looks like a two button left/right puzzle. Back up.
On the shelf to the right is a CD player, click on it.
Hmmm, no disk in the player. Back up.
Above the shelf to the left is an electrical outlet. Maybe we could charge the phone if we could find a cord?
Back up and turn right.
On this wall is a strange egg sculpture and a small pet door with a picture of a bird on it. Click on the pet door for a close up.
If you click on the pet door it opens, but immediately closes again. Back up.
Click on the egg twice for a close up. Looks like we need another 4 letter code.
Back up and turn right.
You should now be back facing the couch again. Time to solve some puzzles!
The End Table Drawer
Click on the end table for a close up, then click on the bottom drawer for a close up.
The operative clue here is "call back".
It literally means the back of the cell phone that you picked up. Nice pun.
On the back of the cell phone is the word "walk", which is the 4 letter answer for the code.
Put in the code then push the "enter" button below.
Inside the drawer you will find a USB cell phone charger, take it.
Back up.
The Cell Phone (Part 1)
Pull up the cell phone from your inventory.
Use the charger on the cell phone.
Turn left (or right) twice to face the wall with the shelf and the CD player.
Click on the electrical outlet for a close up, and place the phone there.
Back up and wander around the room. Go back and the phone should be charged. Remove the phone from the socket.
When you pick up the phone you will see that it is charged. One of the four icons on its screen, the e-mail icon, is now blue. Click on it.
There's a lot of clues in this e-mail.
To the right of the date is a symbol clue, a triangle and a square, a colon, then a circle and a star.
The body of the message is also a clue: Today * 100.
Click "back" on the screen to go to the main icon menu.
You can click on the other icons as well. The signal icon indicates no service. The lower left icon appears to need a flash drive to work. And of course there's no service to make a call.
Close down the cell phone and back up.
Opening the Lock Box
Pull up the lock box from your inventory.
Looks like we need a 4 digit clue to open this one.
Where have we seen a number clue?
The number clue is in the e-mail on the phone.
Part one of the clue is the date: 2011/10/10.
Part two of the clue is the message: Today * 100.
Since today is the date (2011/10/10) you should multiply it by 100.
This only works if you treat the date as a math puzzle. / means to divide.
So the equation would be 2011/10/10 * 100, which equals 2011.
So 2011 is the code for the box.
Enter the code into the box to open it and get a USB flash drive.
The Cell Phone (Part 2)
Pull up the cell phone from your inventory.
Use the USB flash drive on the phone to activate the lower left icon. It's a game!
This is a game of concentration (hidden match 2).
Play the game by matching pairs of cards.
When you complete the game you will see 4 pairs of cards, an ace of clubs, a 2 of diamonds, a 3 of hearts, and a 5 of spades.
The Door Below the Shelf
Click on the strange door below the shelf for a close up.
The clue for which button to push is in the pattern on the blanket on the couch.
Note that the pattern is circles and diamonds running down both sides of the blanket.
There is a circle either on the right or left pattern.
The arrow on the pillow indicates that you should start at the top and work your way down.
From top to bottom, the circles are: left, left, left, right, right, right, left, right, right.
Push the buttons on the door in that order.
Once you push the buttons in the proper order the door opens. There's a symbol for a cell signal inside, and a small blue circle.
Back up.
The Blue Handle
Turn left to face the out door.
Click on the device to the left of the door for a close up.
Looks like we need to solve a color puzzle.
The clue for the 5 color puzzle is the set of pastels on the end table.
Each pastel was a color that is represented in this lock, and each one was a different size.
The second clue is the note found in the top drawer, which indicates smallest to biggest.
Going by the size of the pastels, the code is: green, orange, brown, white, blue.
Enter the color code into the device and click the enter button.
You can now take the handle.
Take the handle, back up, and turn right to the shelf.
Click on the door below the shelf for a close up.
Click on the door to open it, and place the handle in the small blue circle in the center.
Now you have another left/right puzzle, this one is about which way to turn the handle, clockwise or counter-clockwise.
How do we figure this one out?
The clue is in the completed mini-game on the phone. Not the cards, but the word "complete" above the cards.
Notice that each letter in the word is rotating, some clockwise, some counter-clockwise.
Note that the buttons above the handle are: clockwise on the right, counter-clockwise on the left.
Combining the rotation of the letters with the positions of the buttons, you get the order in which to push them: right, right, left, left, right, right, right, left.
Push the buttons in the correct order to turn the handle.
Enjoy the cut-scene of the satellite dish turning.
Back up.
The Cell Phone (Part 3)
Pull up the phone from your inventory.
Note that the signal button and the call button are now blue. You have service!
But who do we call? (Don't suggest "Ghostbusters". Seriously.)
Looks like we need to figure out a number to call.
Click on the call icon and we see a clue, "pastel".
The number we need to call is indicated once again by the pastels in the box on the end table.
This time instead of colors we're looking at the numbers associated with the colors.
Remember, brown was 6, orange 9, white 2, blue 4, and green 5.
Once again place them in the order indicated by the note, smallest pastel to largest (not the numbers but the size of the pastels).
That would make the code green (5), orange (9), brown (6), white (2), and blue (4).
Thus we need to call 59624.
Type in the number we discovered and push the "call" button.
Yay, we apparently ordered something. Hopefully on someone else's credit card.
Open the mail slot on the door and get the package.
The Package
Click on the package to open it and remove the item inside.
Looks like we have a CD.
Click on the CD to open it.
Remove the CD from the case, then pull up the case into close up again.
Open the case and remove the insert on the left.
Click on the insert for a close up. Looks like the old "Humpty Dumpty" Rhyme.
Close down the insert and back up from the mail slot.
The CD
Turn right to face the shelf.
Click on the CD player for a close up.
Open the CD shelf (the button on the right), place the CD in the tray, then close it.
Push the play button (the left triangular button).
Watch the lyrics on the display.
Back up.
The Egg
Turn right to face the egg.
Click on the egg twice for a close up.
Now we just need the 4 letter clue to open the egg.
Perhaps it was in the Humpty Dumpty rhyme?
When the CD was playing, did you notice that one word in the rhyme was in all caps and in red?
The word was "Fall", which is the clue.
Enter the code and click on the "enter" button.
Surprisingly, a panel in the ceiling will open up and something heavy will fall on the egg.
Great, you broke Humpty Dumpty again!
Click on the open egg for a close up.
Inside is a cute wind-up bird, take it and back up.
The Wind-Up Bird
Okay, now we have a wind-up bird. But the bird is missing something.
Yes, it's missing a wind-up key.
Have we seen anything like that in the room?
There's something that looks like a wind-up key on top of the clock, but how do we get it?
Maybe if we set the clock to the correct time, we can get the key?
There are four clues to combine here to get the correct time: the CD insert, the bookmark, the e-mail clue on the phone, and the card game on the phone.
Notice that the bookmark has cut-outs?
Pull up the CD insert from your inventory and click on it again for a close up.
Use the bookmark on the insert. Notice that the four shapes reveal 4 letters.
The circle is a C, the square is an H, the triangle is a D, and the star is an S.
Those four letters must mean something, but what?
They are the four card suits: C is clubs, H is hearts, D is diamonds, and S is spades.
The third clue are the cards in the card game.
Remember that there were four pairs of cards. Each was a different suit and a different number.
There was an ace of clubs (1), a 2 of diamonds, a 3 of hearts, and a 5 of clubs.
So now we have four numbers associated with the four symbols. But what's the order?
Remember the e-mail on the phone? To the right of the date was a symbol clue.
The clue was triangle, square : circle, star. The colon between them is the clue, as that is how you see time represented.
The triangle (D) is diamonds, so it is 2, the square (H) is hearts, so it is 3, the circle (C) is clubs, so it is 1, and the star (S) is spades, so it is 5.
Therefore the time should be 23:15. For those who don't recognize it, that is 24-hour time, or military time. It stands for 11:15.
Turn right to face the couch.
Click on the clock for a close up.
Set the clock to the correct time and the wind-up key pops up. Take it and back up.
Getting Out
Turn left to face the egg.
Pull up the wind-up bird from your inventory.
Use the key on the bird (on its back).
Close down the bird and click on the small pet door in the wall for a close up.
Use the bird on the door and enjoy the little animation.
Wait patiently and the bird will come back with a key in its beak. Take the key.
Back up, then turn left (or right) twice to face the out door.
Click on the door for a close up, then use the key on the lock.
You and the cute birdies have escaped!
Posted by: grinnyp |
November 9, 2011 2:44 AM
|
November 9, 2011 2:44 AM
TAMAGO HINT-O-RAMA
Caveat: Not a walk-through! This doesn't address every aspect of the game, nor does it give answers. I'm trying to give the smallest possible helpful nudges, as spoiler-free as possible. Feedback welcome.
After your first circuit of the room, you should have 3 things in inventory.
pink bookmark
grey lockbox
cell phone
Combining them with a good look around, you can solve 3 puzzles right now.
One involves the 2 buttons on the white box.
The two round buttons.
Left, right… What order to push them in???
One involves looking closely at your inventory.
And looking closely at the places that want an ABCD code.
One involves combining two clues from the same corner of the room as their puzzle object.
The corner nearest the clock.
Thoroughly explore the pastels, the not-locked drawer, and the grey mailbox-looking gizmo.
After solving those 3, you should have 2 more objects in inventory.
Using the electronic one is pretty obvious
but the game can be fussy about order.
A watched pot never boils.
For the other one,
the clue to how to use it, is its color.
The white box:
Did opening it seem utterly pointless?
The color of the dot inside is a clue to what's needed.
You found what was needed, and you're STILL stumped?
Chill. You won't solve this until you get the bottom drawer open.
and then the code for the grey box.
and use the USB.
and get playful.
Why on earth is there a line over the O?
You figured out the right way to twiddle with it (FINALLY) and can't figure out what good it did you?
There was a symbol inside (which has now vanished).
You've seen that symbol elsewhere.
The mail message:
Note: There's more than one thing going on here.
Also note: If you've resorted to the game's hint here, don't let fuzzy pixels mislead you (I did). It really is pretty basic.
The slash is a division symbol.
The bookmark:
It says Mail Time. Contemplate possible meanings for the phrase "Mail Time".
Have you fully explored your mail?
Actually, there's nothing to be done with the bookmark until a few steps past the USB.
If you're trying to combine the bookmark with something, try one more click.
You've got 4 letters, now what?
Each one stands for something.
Posted by: MrsRavoon |
November 10, 2011 7:11 PM
|
November 10, 2011 7:11 PM