
The Jolly Gang's
Spooky Adventure
Platform: Windows

![]() The Jolly Gang's Spooky Adventure is a point-and-click adventure game that doesn't take place in a near-fantasy world, a scary haunted mansion, or a series of dream worlds connected by a magical portal. It also doesn't involve anyone's family member heading off to investigate a long-lost artifact. It does contain cheesy visuals and a bit of an adult sense of humor, making it one of the few casual games to target an older crowd. Think of it as a casual version of Ben There, Dan That! mixed with your favorite browser-based room escape game.
The Jolly Gang's Spooky Adventure is a point-and-click adventure game that doesn't take place in a near-fantasy world, a scary haunted mansion, or a series of dream worlds connected by a magical portal. It also doesn't involve anyone's family member heading off to investigate a long-lost artifact. It does contain cheesy visuals and a bit of an adult sense of humor, making it one of the few casual games to target an older crowd. Think of it as a casual version of Ben There, Dan That! mixed with your favorite browser-based room escape game.
 It all starts with a job. A job working for a tabloid, to be more precise, where you're sent on a quest to photograph a ghost haunting a psychic's house. A few locked boxes, a difficult secretary and a disgusting herbal potion later, you receive your first paycheck and head off to celebrate. The party has barely begun when you receive a call from your boss sending you out to investigate another spooky incident. But, hey, if one photo can fund a party, think what kind of a party several photos can throw!
Get your mouse hand ready, as it's all you'll need in this game. Each room is stocked with a number of items and puzzles that must be solved before you can move on. A handy "objectives" space on the menu tells you what needs to be done next, while an optional items list at the top of the screen helps you stock your inventory with the right things. Solving puzzles is a lot like a room escape game and involves unlocking cabinets, digging through trash cans, finding combinations to unlock a safe, and the occasional mini-game or two.
Analysis: When playing The Jolly Gang's Spooky Adventure, you can't help but think of Ben There, Dan That! and its sequel Time Gentlemen, Please!. The games share a similar flavoring of humor, a purposefully sloppy-looking cartoon-like visual style, and irreverent situations around every corner. Jolly Gang is very much a casual game, though, so expect a shorter experience with much easier puzzles to solve. It also doesn't push the humor button quite so far.
Games like The Jolly Gang's Spooky Adventure have a tendency to polarize gamers. In other words, you'll either run away screaming or absolutely love it. Some will enjoy the exaggerated visual style, odd sense of humor and simpler puzzles. Others won't see beyond five minutes into the demo. Here's a protip from your ole game-reviewing pal: turn the voice volume all the way down, otherwise you'll be "treated" to the constant babbling of what sounds like Gilbert Gottfried with a lungful of helium screaming from inside a tin can. The game plays so much better with quiet text reading in your head.
It's easier and shorter than most adventure games, but you'll enjoy every minute and hate when the game is over. Take a break from the usual casual adventure game and enjoy something very, very different.
![]() Windows:
Windows:
Download the demo
Get the full version
![]() Mac OS X:
Mac OS X:
Not available.
Try Boot Camp or Parallels or CrossOver Games.


Walkthrough Guide
(Please allow page to fully load for spoiler tags to be functional.)
The Jolly Gang's Spooky Adventure Walkthrough
General Tips and Strategies
You can play in either expert or novice mode, the only difference being that novice mode will give you a specific list of tasks and has a built-in hint system. You will earn more points playing in expert mode.
Periodically you'll be given mini-games and puzzles which you can skip in novice mode.
Get Ready for Work
Answer the phone for your first list of tasks.
Find the list on a piece of paper on the floor. These are things you need to bring to the office - a pen, a notebook, your passport, money, and a camera.
Pen - Pick up the pen on the floor near the list.
Notepad - Open the left wardrobe door and notice the jewelry box on the top shelf. Pick up the key from the ground and use it on the jewelry box. Pick up the notepad from the opened jewelry box.
Your alarm clock will start ringing. Open the blinds in front of the window to turn off the alarm clock.
Camera - Pick up the umbrella in the basket next to the wardrobe. Use it to knock the chest off the top of the wardrobe. You need a code for the chest. Click the bottom drawer of the nightstand - inside, grab the hammer and move the magazine. Under it is a scrap of paper with the code. Now open the chest and get the camera.
265
Passport - under the carpet in the top right corner.
Money - Use the hammer from the nightstand to break the piggy bank on the windowsill. Pick up the coins that have fallen to the ground.
Click the bag on the chair and match all the items to their correct location.
Open the right wardrobe door and grab the key from the coat pocket.
Use the key to open the door to your bedroom.
Help Granny
Talk to the woman outside on the street - help her find her coins. Coin locations screenshot.
There is a red brick to the left of the car propping up a triangle, pick it up.
Zoom in on the square garbage can to the left of the door. Use the brick to smash the bottle on the right. Pick up the saw blade.
Notice the potato blocking the tailpipe of the car in the foreground. Click the potato to remove it - the car takes off.
Click the garbage can again and pick up the coin on the rim and grab the branch from inside.
Use the branch on the toy boat in the puddle to get the coin.
Click the paper on the windowsill and grab the exposed coin.
Click the toolbox to zoom in and take the saw handle and crowbar.
Use the crowbar to pick up the manhole cover and get a coin.
Use the completed saw to cut the bars off the sewer grate. This opens a scene where you are fishing coins out of the sewer. Arrange the line at the top of the screen above the coins and click to grab them. Start at the top of the screen and work your way down until you've collected all the gold coins.
Click the newspaper on the ground for the last coin.
Give the coins to Granny to exit the scene.
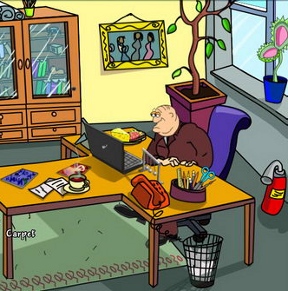
First Trip to the Office
Pick up the cheese on the plate next to the boss. Put it in front of the mouse hole. When the mouse comes out, take the key from its tail.
Click the left door of the glass cabinet. Click the picture of a telephone and take the disk.
Use the key to open the drawer below the cabinet. Take the map (access card) and duct tape.
Pick up the fire extinguisher near the desk and a golf club next to the door.
There are three pieces of a note around the room - one on the bulletin board on the left, one on the right side of the glass cabinet, and one inside the blue magazine on the desk.
Once you have all the pieces, place the note on the window to find a code.
62-92
Click the painting on the back wall on the right to expose the safe. Use the map (access card) to open the safe. Use the code from the note to pull the handle. Use the golf club to reach through the lasers, and the fire extinguisher to put out the subsequent fire.
You'll get the number 641 9 from the documents in the safe.
You need to call the woman you will interview. Click the boss's laptop. Hit the power button and open the cd drive. Place the disk from the cabinet in the laptop.
Meredith's number is the one from the list starting with 641 9. The rest is
641 96 40
Click the red phone on the desk and dial the number.
Haunted House - First Assignment
After talking to the lady, click the basket of yarn on the floor next to her for a puzzle. Yarn puzzle screenshot. Afterwards you will receive a key.
Use the key on the bottom drawer of the table near the left door. Take the duct tape from the drawer.
Use the tap on the broken electrical wire on the lamp. Now you can draw the string on the lamp to turn it on, and see a silhouette inside. Click it to get a cookie.
Give the cookies to the parrot to have it scare away the cat. Grab the knife from the cat bed.
Use the knife on the portrait on the wall to get the key for the ancient book.
Click the black book on the shelf on the right wall. Use the key on the book.
The herbs you need for the lock opening potion and listed on the page, and are kept in the pages of the book. Flip through the book and take the five herbs you need for the potion.
You must mix the herbs in the order shown in the book - pink leaf, green flower, blue spiky flower, orange flower, and green leaf.
Drop the herbs in the above order into the vial of liquid on the top shelf.
Pick up the completed potion and use it on the lock of the left door to exit the scene.
Office - Second Trip
Click the box of photos for a memory matching game.
Afterwards, take the empty cup from the table. Move all the cookies from the tray to get a coin. Move the pillow on the sofa to find scissors.
Click the water cooler to find a screwdriver.
Knock the papers off the desk and clean them up to get a card with a phone number.
659 2275
Click the panel on the wall with the lightning bolt to zoom in, then use the screwdriver to unfasten it. Use the scissors on the cords to turn off the fan.
Click the blue phone on the back wall and call the number on the card. You'll get the name of a sleeping pill, Som Num, from her doctor.
Click the first aid cabinet and take the Som Num bottle. Click the water cooler and use the cup to get water.
Put the Som Num in the cup of water and give it to Meredith.
Once she's asleep, look in her purse on her chair and take the door handle. Put the door handle in the door to exit the scene.
Clean Your Room
Pick up all the bottles from around the room - there should be eleven in total. Move the blinds in front of the window to take the two back there, and find one in the wardrobe. Click the pile of socks at the bottom of the wardrobe for a matching game.
Pick up the hat on the floor and the clothes on the chair. Pick up the sponge under the wardrobe on the right.
Put the hat on the hat rack by the front door and the clothes in the wardrobe.
Put the bottles in the trash can and dump the ashtray in there as well.
Put the sponge into the fish tank and clean the dusty picture on the back wall.
Pour the remaining bottle of beer in your inventory into the plant to water it.
Pick up the cell phone from the pocket of the coat in the wardrobe. Pick up the sim card from the jewelry box on the left side of the wardrobe, and the battery in the box below the coat in the wardrobe.
Vampire Graveyard - Second Assignment
In your room, answer the phone for your next assignment.
Click the hollow of the tree for the yellow gem (you'll eventually need four of these gems). Examine the trash on the ground for a puzzle where you collect unlit matches, similar to the coin collection puzzle earlier.
Click the bushes to the left of the tree and examine trash to find a matchbook to light your matches.
Enter the shed door on the left.
Use the matches to light the candles on the left.
Lift all the rocks from the stretcher in the center of the room. Move the stretcher. Take the tiny shovel on the floor near the door.
Pick up the handcuffs on the left on the tire. Pick up the magnifying glass on the shelf nearby. Pick up the hammer on the floor to the left of the boot.
Lift the fabric off the globe on the shelf. Use the hammer on the globe to get the blue gem.
Pick up the dog bone in the bucket on the shelf.
Notice the tiny plate behind the candelabra on the shelf. Use the magnifying glass on the plate and zoom in to see a number - 2611.
Click the chest on the floor behind the boot and use the code you found to open it and get the green gem.
Return outside and give the bone to the green dog. Take the magnet and flashlight from the exposed box. Use the shovel on the patch of dirt that was in front of the dog. You need a key to get into the chest.
Take the gold key from the hook between the two shelves. It will fall into a crack in the floor. Click the crack to zoom in and use the magnet to get the key.
Return outside and use the key on the chest to get a red gem. Take the oiler from the ground near the chest.
Go inside and use the oiler on the hatch. Use the handcuffs on the latch (pen).
Move the large cardboard box on the shelf to reveal molds for four gems. Zoom in and place the four gems in the correct spots to trigger a Simon Says game. Solution:
Green, yellow, green. Green, yellow, green, purple. Green, yellow, green, purple, yellow. Green, yellow, green, purple, yellow, red. Green, yellow, green, purple, yellow, red, green, purple.
The hatch is now unlocked - click it to open it. Take the batteries from the bottom left corner. Click the hatch again to trigger a mouse path game.
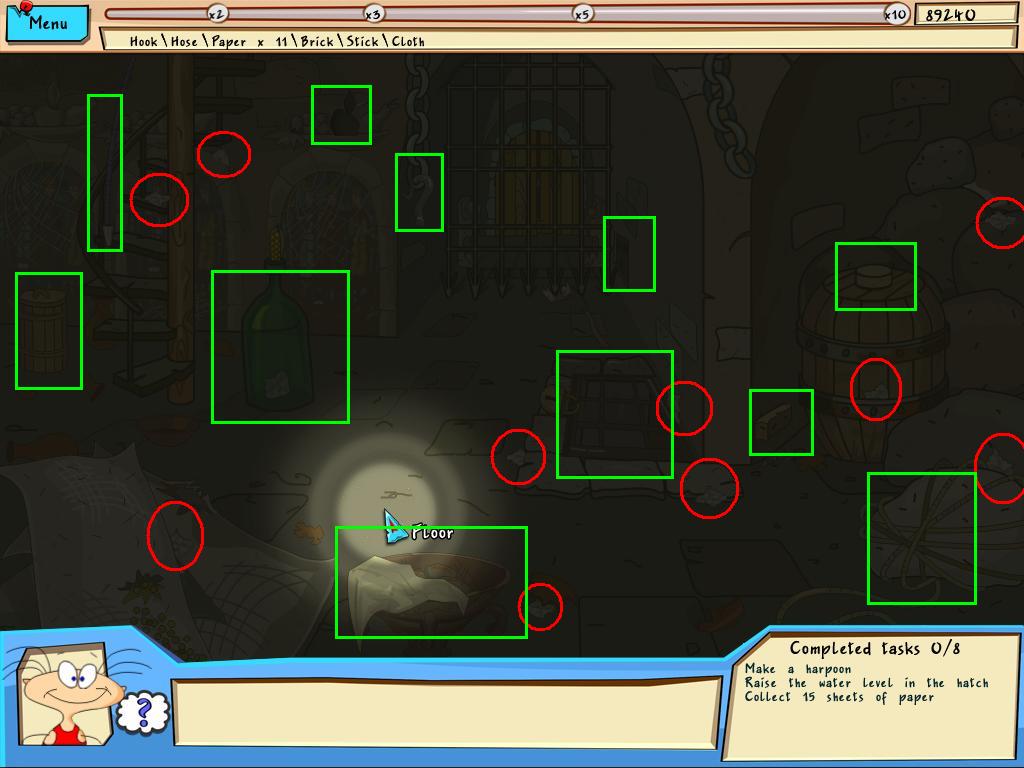
Vampire Basement
In the basement, you must find 15 pieces of paper.
Take the cloth off the bowl in the foreground.
Move the plate near the stairs to find a piece of paper under it.
Try to take the piece of paper from the staircase on the left - it will collapse. Take the paper from the ruins and also the blue hose which is hanging down.
Pick up the brick on the wall near the barrels. Take the piece of paper behind it.
Use the brick on the bottle containing the paper for another piece. Also pick up a piece of broken glass.
Examine the barrel in the back left corner. Use the cloth to pick up the gimlet (corkscrew).
Use the corkscrew to remove the cork from the large barrel on the right. Put the hose into the hole in the barrel.
Pick up the hook from the ceiling, the stick on the floor, and use the broken glass on the rock with rope around it on the right. This will create a harpoon.
Zoom into the grate on the ground and use the harpoon to grab the keys.
Use the keys on the gate in the back. You have to use the keys with the matching symbols in the correct order to open the gate. Solution:
Screenshot
Pick up the piece of paper, the lighter, and the stone apple. You should now have all 15 pieces of paper.
Place the stone apple in the space above the door on the left side of the room. Notice the symbols above the doorway.
Place the papers in the bowl (censor) in the foreground. Use the lighter to set them on fire. The rising smoke reveals the order in which to hit the symbols to open the door.
Numbering the symbols from left to right 1 to 5, hit 4, 3, 5, 2, 1.
Now you can exit the room using the secret passageway
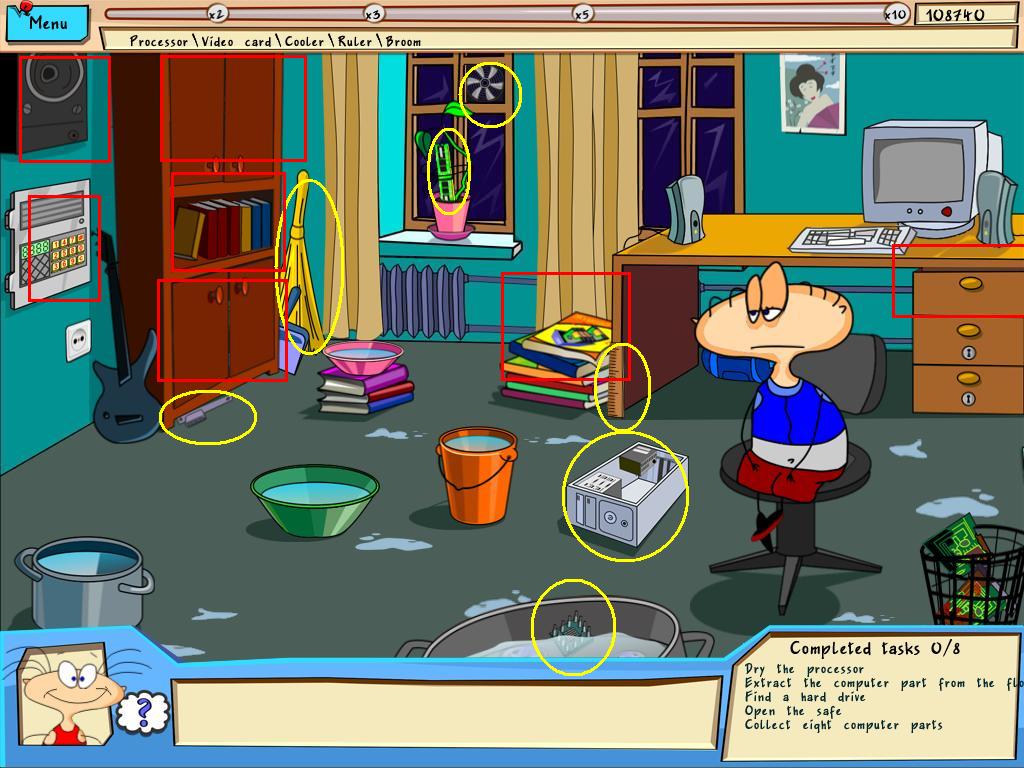
Assemble Computer
Click the top magazine on the stack on the floor to find the memory. Take the ruler next to the magazines. Screenshot
Notice the plant in the window is propped up by a memory stick. Use the ruler on the memory to switch them out.
Move the right blinds to expose the umbrella, and take it.
Get the video card from under the cabinet on the left.
Take the processor from the basin of water in the foreground.
Click the safe on the left wall. The code is
314
Take the motherboard inside.
Examine the books on the left wall. The detective book contains the hard drive.
Take the broom in the back left corner of the room. Now click the top cabinet on the left wall. Use the broom to clear the cobwebs - you'll receive a hair dryer which dries your processor. Pick up the dry processor from the floor.
Examine the top drawer of the desk on the right to get a screwdriver and scissors.
Use the screwdriver on the speaker on the left wall to get a sound card.
Open the bottom compartment of the cabinet on the left wall and notice the box covered in tape. Use the scissors on the box to get the network card. You should now have all the pieces.
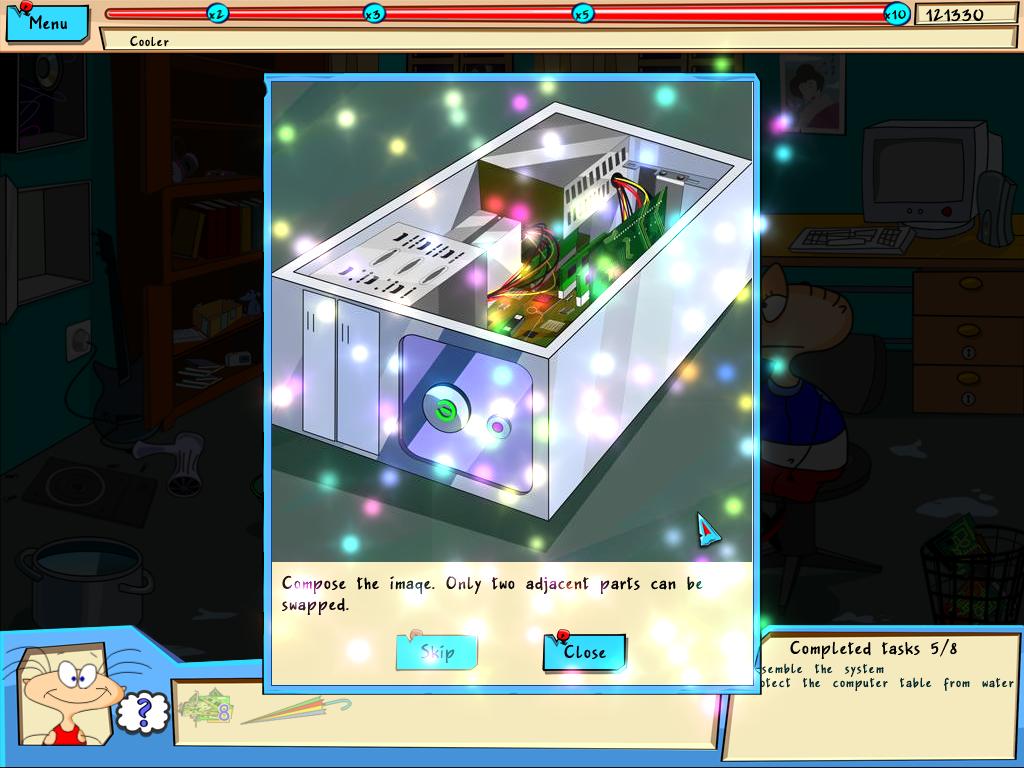
Use the components on the empty chassis on the floor for a slider puzzle. Solution:
Screenshot
Take the cooler from the window and place it in the computer.
Use the umbrella on the desk to shield the workspace. Then place the computer on the table.
Take the key from the floor where the chassis was. Use the key to open the bottom drawer of the desk. Inside, find a disk and take the operating system CD.
Use the CD on the open drive of the computer to install the operating system and trigger the next scene.
On the Train
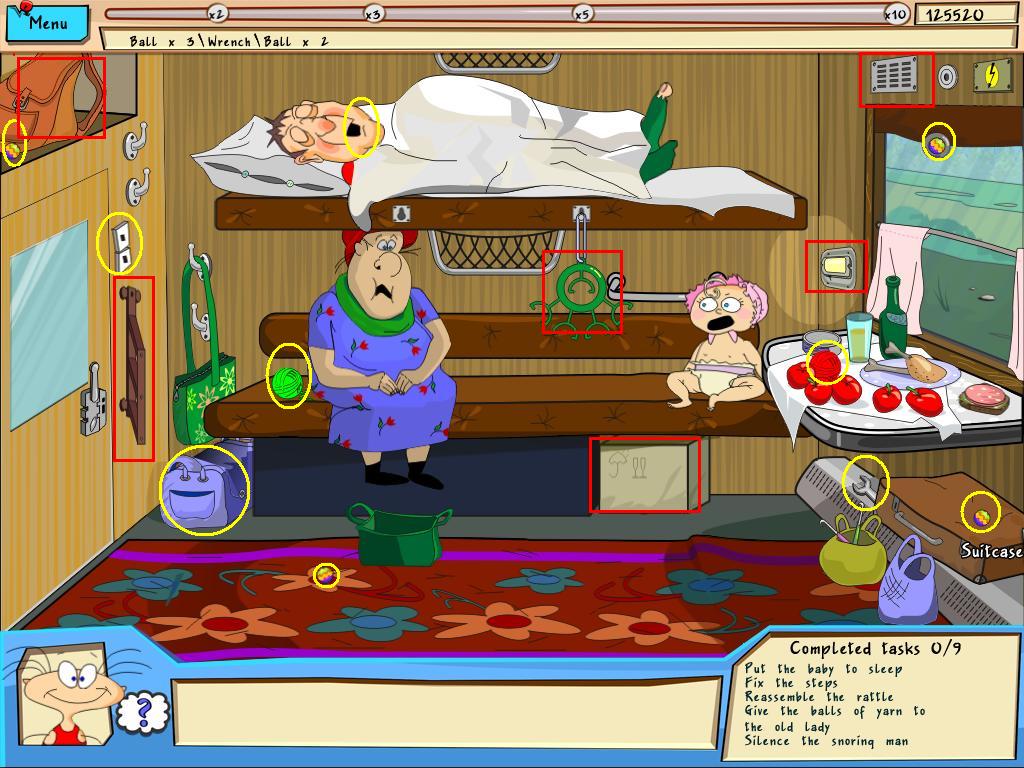
Balls - Examine the blue duffel bag on the floor on the left to find another ball. Three others are around the room, and another is at the top of the broken stairs. Coin locations screenshot.
Pick up the wrench on the floor radiator on the right.
Move the cardboard box under the baby to find a case. Zoom in and take the broken glasses.
Examine the lamp on the wall to the right of the baby. Take the loose bolt on the bottom right. Use the bolt to repair the stairs on the right wall. Use the wrench to tighten the top bolt.
Now you can reach the fifth ball. Use them on the broken rattle to the left of the baby.
When the baby moves, a knob is revealed. Take it and use it on the small circular radio near the top of the right wall.
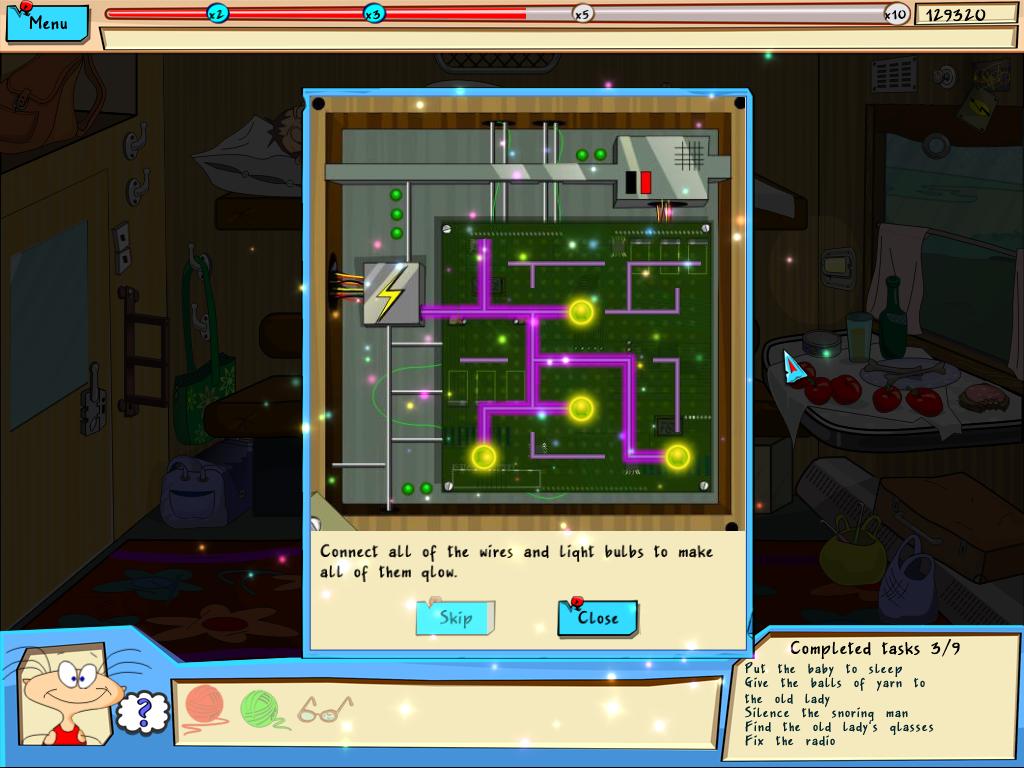
Examine the broken electricity box next to the radio. This triggers a puzzle where you must connect the circuits such that all the bulbs are lit. Solution:
Screenshot
Yarn - Pick up the red ball of yarn in the pile of tomatoes on the right. Pick up the green one to the left of the old lady. The last one is in the bag at the top of the stairs - you can reach it once the stairs are repaired.
Give the yarn to the lady. Now give her the broken glasses. Look in her green bag to her left and take out the spare lens - it will repair the glasses so you can give them to her.
Once she is knitting, pick up the sock that has fallen to the floor. Put it in the snoring man's mouth. Then hit the light switch above the stairs to exit the scene.
At the Farm - Third Assignment
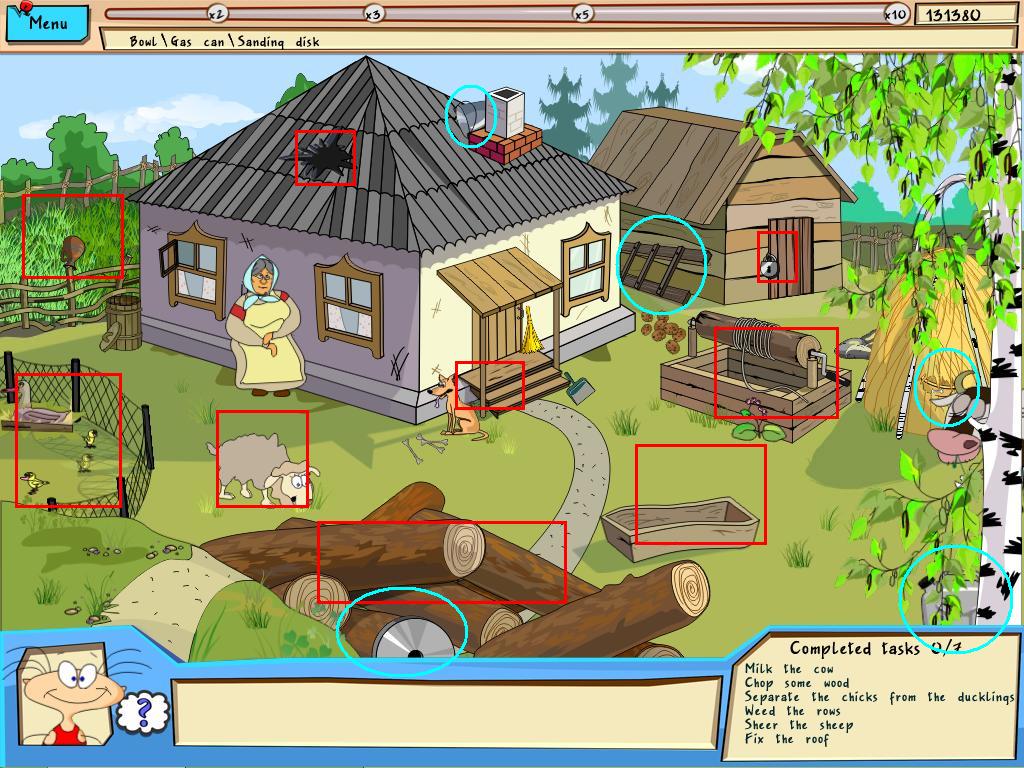
Click the stairs next to the barn to access the roof. Take the bucket near the chimney.
Screenshot
Use the bucket on the well, then pick up the filled bucket. Pour it in the trough to lure out the cow.
Use the bucket on the cow's udders to get a bucket of milk.
Click on the bowl in the haystack on the right. Use the bowl on the dog in front of the porch. The dog will leave giving you access to the porch. Zoom in on the porch and take the key.
Use the key on the barn.
Inside the barn, open the chest in the back of the room and take a handful of grain. Take the hammer on the floor near the grain. Get the dull axe on the floor and take one of the shingles on the left wall. Take the dull scissors near where the shingle was.
Notice the sander on the left - it is missing a part.
Leave the barn and get the sanding disk from the pile of wood in the foreground on the left. Return to the barn and put the sanding disk on the sander. Now turn it on with the power button and use it to sharpen the dull axe.
Fix the roof - put the shingle on the broken part of the roof. Now examine the junk under the porch again and take the nails. Use the nails on the shingle and the hammer on the nails.
With the grain, you can do the duckling/chick minigame on the left. Click the area with the ducks and chickens and use the grain on the trough. Then pull the birds with longer beaks over to the duck and the short beaks to the chicken.
Return to the barn and use the dull scissors on the sander. Then use the scissors to shear the sheep.
Click the garden in the left back. To weed the garden, click the weeds until they are all gone. There are many different solutions to this puzzle.
Pick up the gas can in the right foreground by the tree. Go to the barn and use the gas can on the chainsaw in the center of the room. Now you can take it.
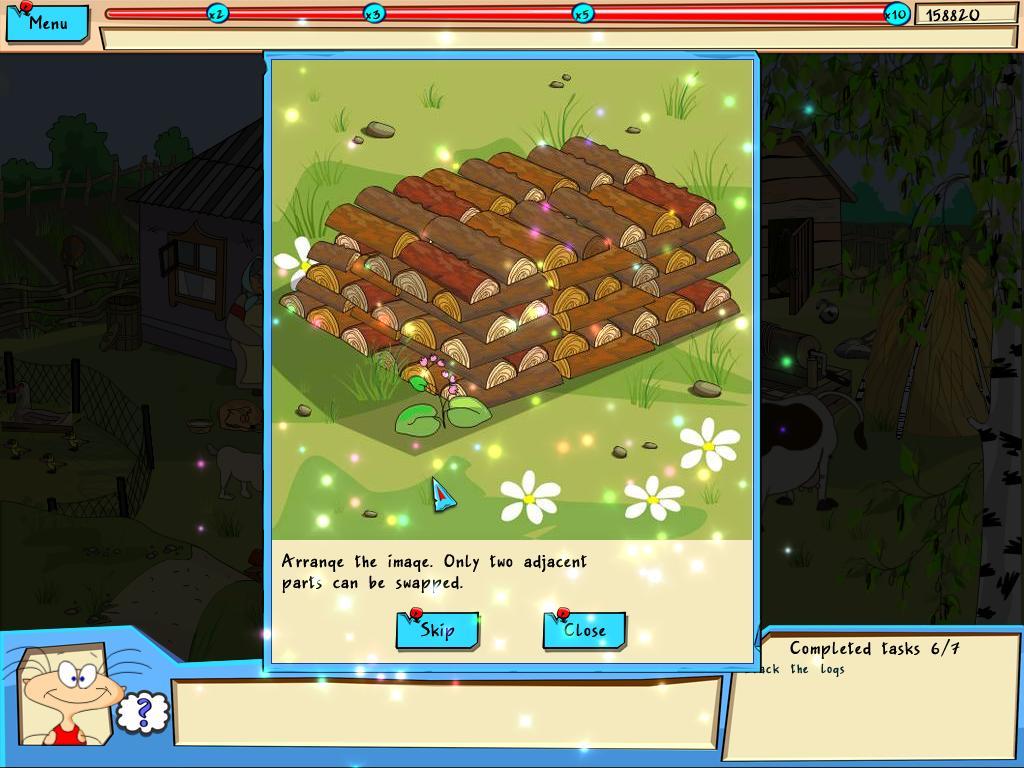
Go to the logs outside and first use the chainsaw on them, then the axe. Then examine the chopped logs to trigger a sliding tile puzzle. Solution:
Screenshot
Once you've completed the tasks, the woman will tell you where to find Martha.
Meet Martha
Open the window on the left and take the spoon and butter. Use the spoon to eat the porridge next to Martha. Take the axe blade at the bottom of the porridge bowl.
Find the axe handle on the left side of the cart, near the horse. Use the completed axe on the pond to clean it.
Use the butter on the hinges of the gate leading to the forest to open it.
In the forest, click the pile of brushwood to obtain the rope.
Use the axe on the small pine tree near the pile to get a stick.
Now go back to the wagon area and use the stick on the broken shaft connecting the horse to the wagon. Then use the rope to connect the stick. The wagon will move giving you access to the cellar.
In the cellar find five nuts and the sickle on the shelf.
Leave the cellar and use the sickle on the reeds in the pond. Give them to Martha to get a basket.
Go into the woods and put the basket on the stump to start collecting. In the scene, find 10 mushrooms, 10 red berries, and 10 purple herbs.
For the last five of each, give the nuts from the cellar to the squirrel in the tree. This triggers a minigame where you collect only the mushrooms, herbs, and berries. When you've completed the game, you'll have all 15 of each item.
Place all the items in the basket and pick up the basket. Return to Martha and give her the basket.
Take the grain from under the bench and the cage from the window. Pick up the peg with rope attached from the ground.
Return to the forest and use the rope with the box on the ground on the right. Then put the grain under the box. When the bird comes, use the birdcage with the box and bird.
Return to Martha and give her the bird to get her story and exit the scene.
The Office, Third Trip
Pull all the notes off the bulletin board on the left. Then turn off the lights - a message will appear.
17:05
Click the clock on the back wall and change the time to match the time you found.
5:05 (17:05 military time)
The first disk will appear on the left side of the cabinet.
Click the laptop and open the CD drive. Place the disk in the drive and wait for the image from your first story to appear.
Examine the floor near the door. A puzzle will be revealed under the carpet. Slide the numbers into the correct order.
Then a code will be required to get into the box. Zoom out and look at the paper in the trash can near the boss. Solution:
X, swirl, sun, heart.
Enter these numbers into the lock on the box.
Get the second disk from the box. Pull the first disk out of the laptop and place the second one in.
Take the scissors from the pencil box by the boss. When the carpet rolled back, a piece of yarn was exposed. Cut it with the scissors and take it.
Take the pliers from the open drawer you used the key in earlier.
Click the coat hanging near the doors. When it falls it reveals a hook. Use the pliers to take the hook off the wall. Now you have a fishing rod.
Use the hook and yarn in the aquarium to get the last disk. Put it in the laptop like the others.
Get paper for the printer - take the mouse out of the mouse hole and use it with Meredith.
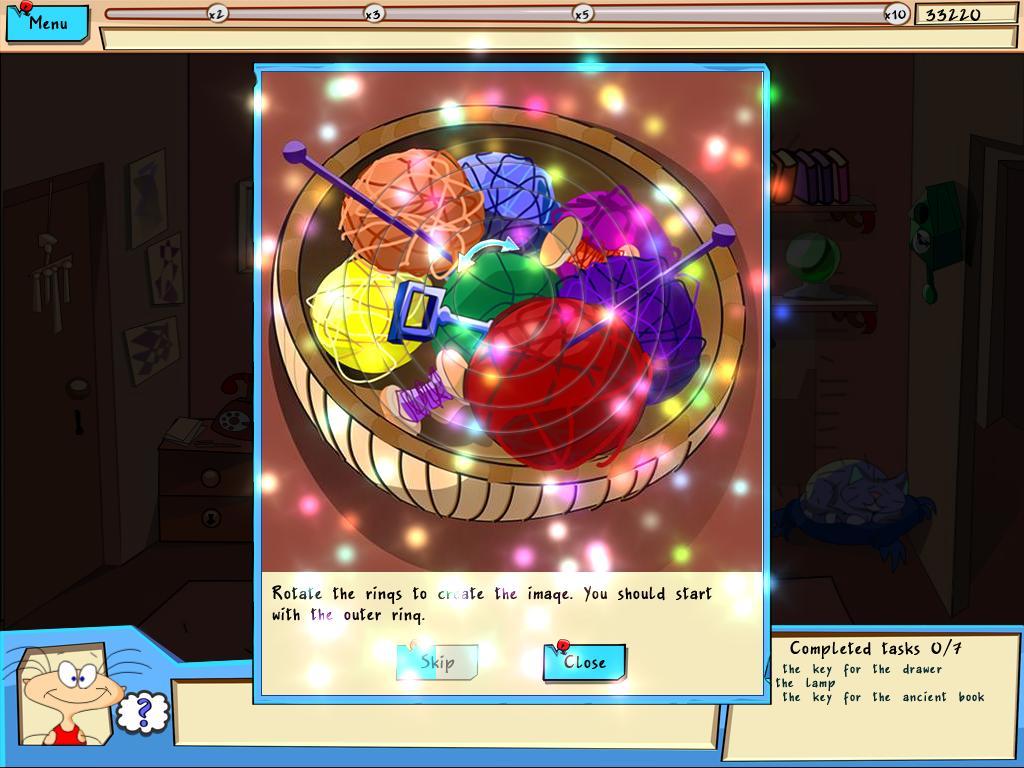
With Meredith gone, examine her purse. Click the pink container for a puzzle. Spin the circles until they make a complete picture, starting with the outer ring.
When the casket is open, take the pin (lock picker). Use the pin on the drawer below the open drawer and take the paper inside.
Put the paper in the printer.
Examine the envelope near the boss for your next assignment.
The Haunted Mansion
Click the top left compartment of the closet and examine the book for a puzzle. Solution:
Screenshot
Pick up the bowl in the foreground to get a glass cutter. Then use the glass cutter on the case around the skeleton to get a skeleton hand.
Pick up the knife on the red couch.
Close the red curtain on the left to get the lace.
Move the teddy bear near the couch to get a paint brush.
Open the bottom drawer of the closet to find a bed sheet and a film reel.
Notice the loose tile on the ground on the right. Use the knife on the tile to get the key for the closet.
Now use the key in the closet to gain access to the vials. Also take the magnet behind the box which will combine with the lace.
Look at the chemical agents on the top shelf inside the closet. Two of these match the ones you put together in the painting. Take these two.
The red one with the image of a drop, and the green one with a lightning bolt.
Turn off the light using the switch near the door, and notice which paint inside the closet glows in the dark. Take that vial of paint.
Use the magnet and lace with the glass vase on the left to get the second film reel.
Place the bed sheet over the fan in the left back corner. Then use your brush covered in paint on the sheet to paint your ghost.
Hang the hand from the hook with the bells near the door.
Combine the two chemical agents in the bowl on the table in the foreground to create fumes.
Zoom in on the projector and place the two film reels inside. Then click the cord on the ground to set your trick in motion.
The End
Notice the piece of torn wallpaper to the right of the peacock feather. Click it to see a series of symbols. Enter these symbols onto the lock box.
Inside, examine the treasure map. Then answer the phone when it starts ringing.
Thanks eileen for putting together such an awesome walkthrough :D
Posted by: Kero |
October 16, 2009 1:06 AM
|
October 16, 2009 1:06 AM