
Tiger Eye: The Sacrifice
Platform: Mac, Windows
![]() Tiger Eye: The Sacrifice is a new casual adventure game from PassionFruit Games, creator of Tiger Eye: Curse of the Riddle Box. The story is based on the book by Marjorie M. Liu, who also had a hand in writing the games, and picks up right where the first one left off. The gameplay departs from the usual hidden object adventure formula, though it still provides ample challenge and plenty of puzzles to solve as you try to keep Dela and friends out of trouble!
Tiger Eye: The Sacrifice is a new casual adventure game from PassionFruit Games, creator of Tiger Eye: Curse of the Riddle Box. The story is based on the book by Marjorie M. Liu, who also had a hand in writing the games, and picks up right where the first one left off. The gameplay departs from the usual hidden object adventure formula, though it still provides ample challenge and plenty of puzzles to solve as you try to keep Dela and friends out of trouble!
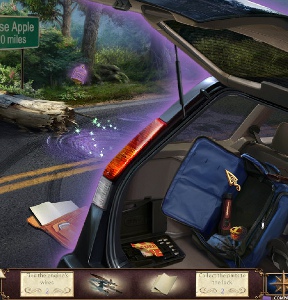
 In the first Tiger Eye game, protagonist Dela Reese unleashed the ancient warrior Hari who was trapped in a riddle box. Thousands of years old and bound to serve the owner of the box, she quickly sees the humanity behind his weathered eyes and sets out to free him from the curse. Her actions gained the attention of an evil wizard, though, and as The Sacrifice begins, Dela finds her car enveloped in a strange purple light as it crashes into a tree. Soon, she learns her friend Kit has been kidnapped, and it appears the same shady group could be behind it all: the Magi.
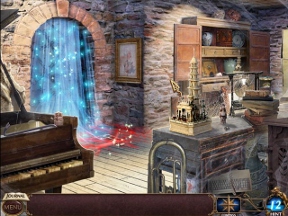
Tiger Eye: The Sacrifice plays out in a series of chapters that are seamlessly woven into a single continuing narrative. The game is strongly centered around puzzle solving, item finding, and clever mini-games, leaving you free from standard hidden object scenes with lists of items to find. Instead, Tiger Eye encourages you to organically explore each area, clicking on items you see and trying to solve whatever puzzles you encounter. The bottom of the screen holds a handy tasks bar that tells you what you should be looking for, whether that be levers to complete a mechanism, statues with wings, or pieces of newspaper.
The mini-games really make The Sacrifice shine. Not only are there dozens of them, but each one makes it a point to be more than just a rehash of a familiar mechanic, incorporating new concepts and creative visual designs into each theme. Best of all, the instructions aren't spoon fed to you, allowing you to figure out what's going on through experimentation. Sure, hints are available at the top of each puzzle, but where's the fun in that?
 Analysis: Tiger Eye: The Sacrifice will surprise you with its high quality visuals, attention to design, and refusal to fall victim to most pitfalls casual adventure games succumb to. There are no text lists of items to find in crowded scenes, just exploratory-based object finding, which feels so much more natural than staring at a single screen for ten minutes trying to find a hot dog in ancient Egypt. And the puzzles play directly into the plot, all of which is wrapped in gorgeous hand-drawn artwork.
The story, while perfectly entertaining and even a bit intriguing, does fall on the side of the paranormal romance genre, so you can expect a fair number of cheesy moments, hunky protagonists, B-movie villains, and last minute saves from Dela's psychic powers. Not quite the epic tale some players might be hoping for, but then again, have you seen what most of these other casual adventure games pass off as plot?
Tiger Eye: The Sacrifice is an extremely well-made game, a fact that shows in the gameplay, the visuals, the writing, and the puzzle design. It provides a sturdy three hours of play time, more if you choose the higher difficulty level or decide to save up to unlock expert mode.
![]() Windows:
Windows:
Download the demo
Get the full version
![]() Mac OS X:
Mac OS X:
Download the demo
Get the full version


Walkthrough Guide
(Please allow page to fully load for spoiler tags to be functional.)
Tiger Eye: The Sacrifice Walkthrough
General Information
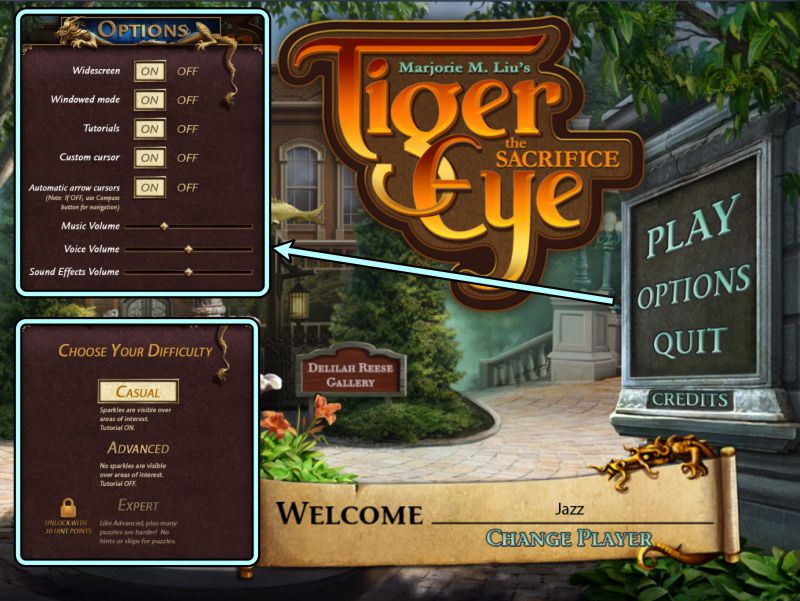
Main Menu
From the Main Menu, you can Play or Quit the game, choose your Options and your Profile.
Options include Music, Voice and Sound FX volume, Full or Windowed screen, use of a custom or system cursor, and an adjustment for a wide screen in full- screen mode.
There is an additional choice for Automatic arrow cursors. If it is "Off", there will be no arrows to show you other locations, but you can still use the Compass for navigation.
You are given your choice of two Difficulties in the beginning: Casual or Advanced.
In Casual Mode, the Tutorial is turned on, and areas of interest have visible sparkles.
Advanced has no sparkles, and the Tutorial is off.
Once you have 20 hint points, you will unlock Expert Mode. It has the same attributes as Advanced with no hints or skips for puzzles, plus many puzzles are more difficult.
Dela has psychic powers to read and manipulate metal, so you will encounter her PSI Visions as Match 3 puzzles throughout the game.
You will notice that the container will say you are "Done", but you will still need to complete the puzzle in order to see her vision.
Screenshot
Scene Navigation
Your Journal is located in the lower left corner of your screen along with a link to the Menu.
There are three sections to the Journal: Journal Entries, a To-Do List, and the Help screen.
From Menu, you can access the Options, resume the game or save and exit to the Main Menu, as well as access the Help screen.
As you complete a task on your To-Do List, it will be checked off.
At the lower right are your Hints that increase with time if you don't use them.
Hints will decrease when you use them to located items, find out where to go next, or Skip a Mini Game.
Just to the left of Hints, you will find a Compass. Pressing it will immediately show you all the directional arrows in that scene.
When you need to find objects in a scene, a box will pop up in your task bar at the bottom center of the screen, telling you what to find and how many items.
If you go to a scene that doesn't have any of the needed items, the task box will be grayed out.
Question marks in a circle want you to check out the area or object for more information.
Puzzles and Mini Games have tabs with instructions, two special hints, and the skip option.
Chapter 1: Trip to Rose Apple
Roadside Right
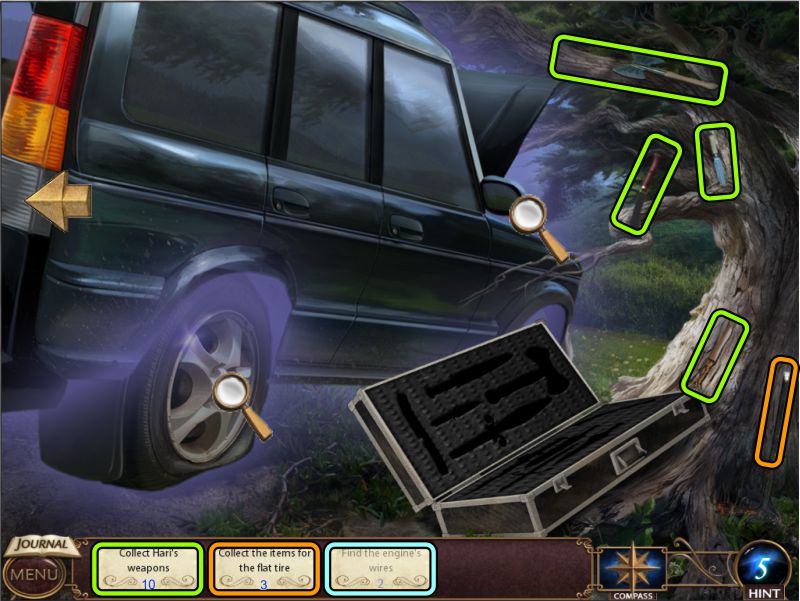
A purple haze appears on the road and causes Dela's car to crash, so you need to help her get the car running again by finding items to repair the flat tire, the engine wires, and Hari's weapons that scattered out of his carrying case.
Once you've located the items on the right side of the car, go to the left.
Screenshot
Roadside Left
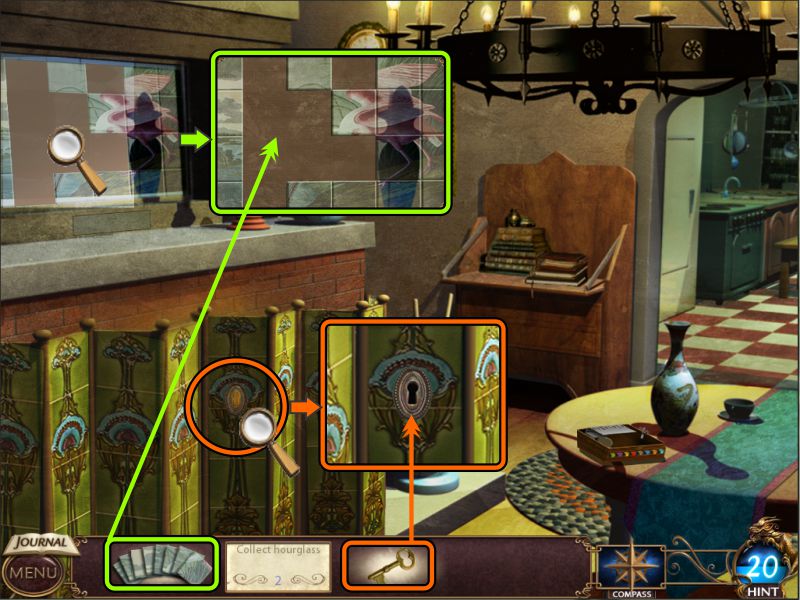
Collect all the color coded items shown in the screenshot and check out the Riddle Box.
Zoom in on the Journal.
Play the Puzzle.
Examine the birdcage.
Screenshot
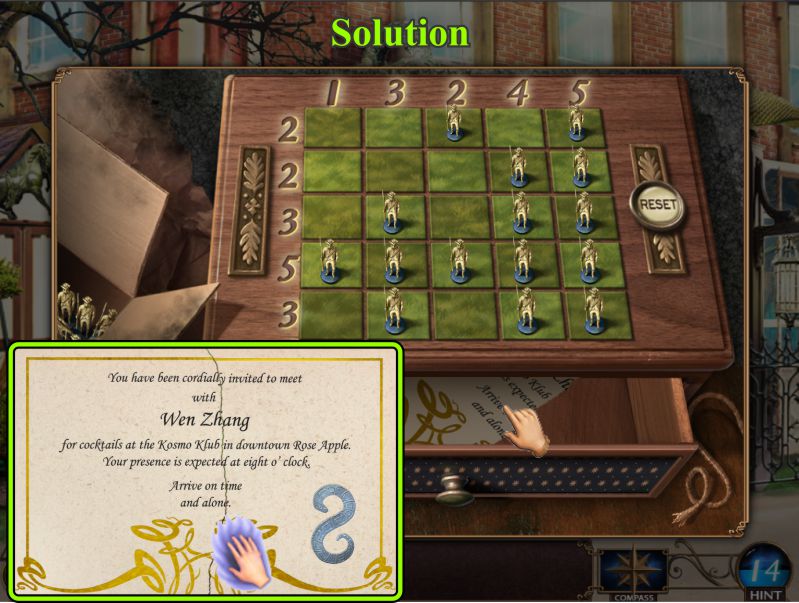
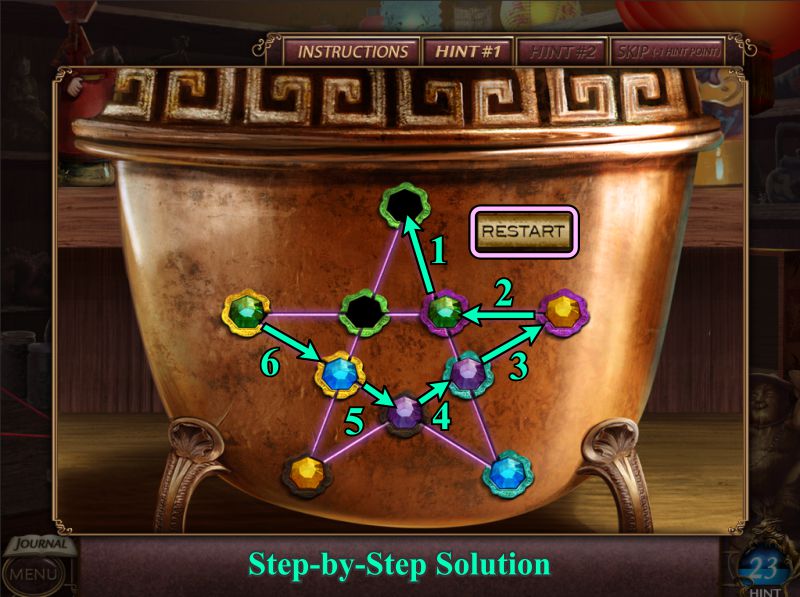
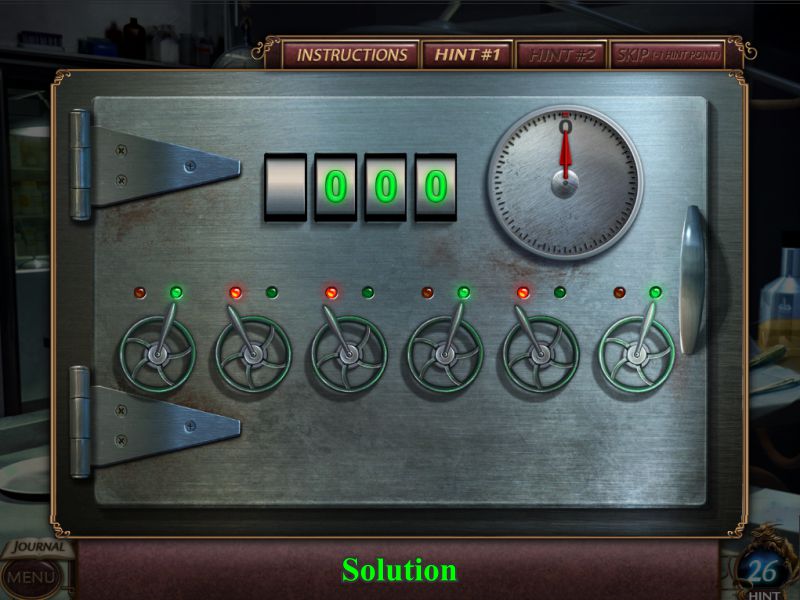
Curse in the Road Puzzle
Your goal is to line up the snake-like portions of the image at the right by moving the rings at the left.
The two portions in the squares are already fixed, so move the rings as shown in the screenshot.
Screenshot
Roadside Left
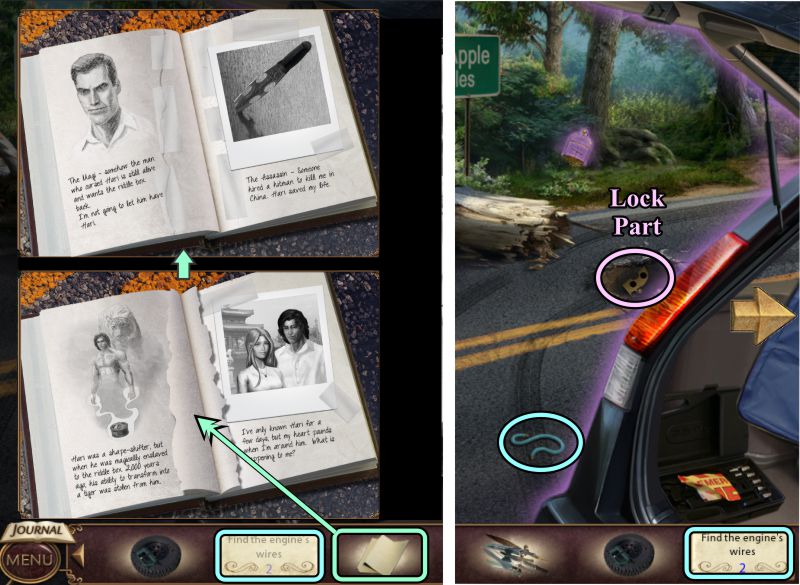
Replace the missing Journal Pages.
Pick up the Lock Part and Engine Wire.
Return to the other side of the car.
Screenshot
Roadside Right
Use the tire parts to fix the flat tire, then replace Hari's weapons in the case.
Screenshot
Pick up the Engine Wire that appears when Hari's case closes, then zoom in on the engine of the car.
Place the Engine Wires to trigger a Mini Game.
Screenshot
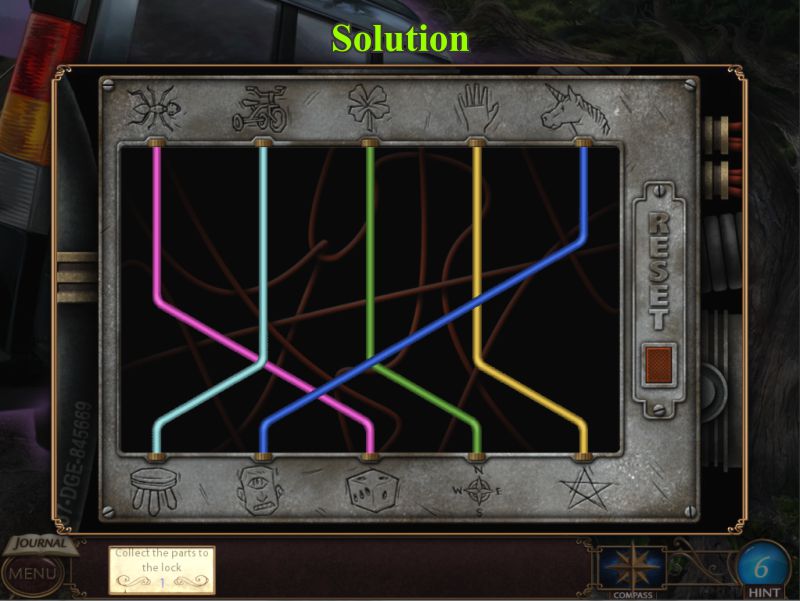
Engine Wire Mini Game
Your goal is to connect the Engine Wires to the bottom images based on the numbers they have in common for each object.
See the screenshot for the solution.
Screenshot
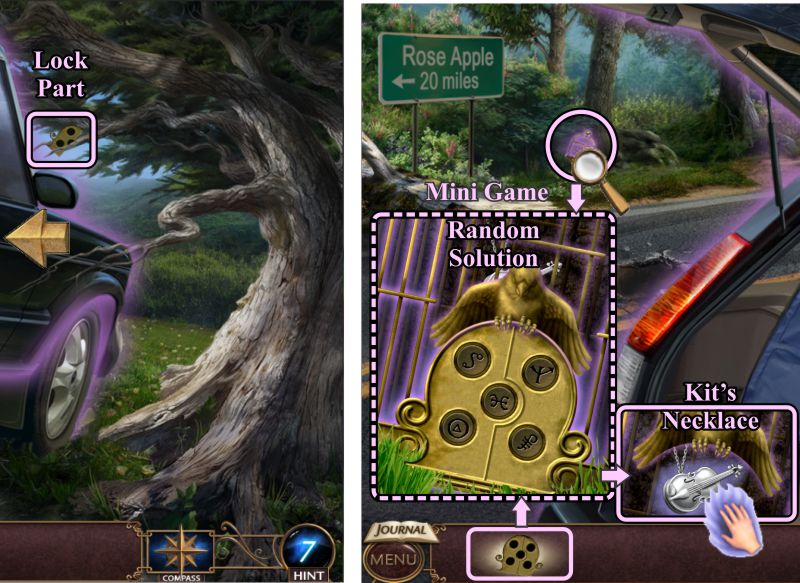
Birdcage Mini Game
Collect the Lock Part, go left, and zoom in on the birdcage.
Place the completed lock and press the buttons to open the birdcage. The solution is random.
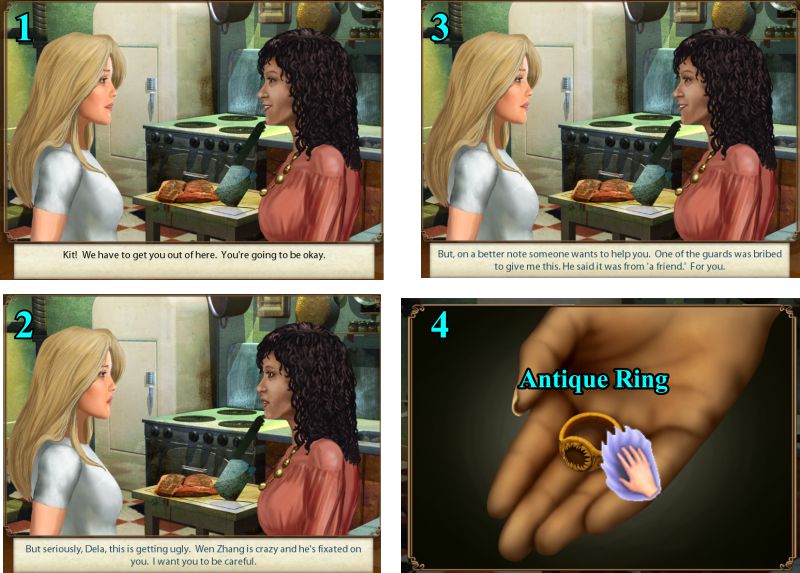
Your reward is Kit's Necklace. Dela feels the metal of the necklace and is getting a vision.
Screenshot
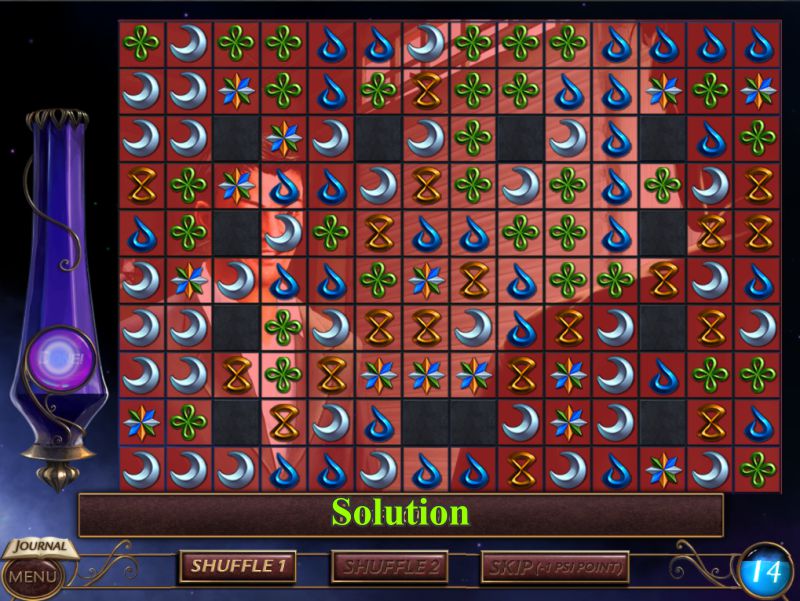
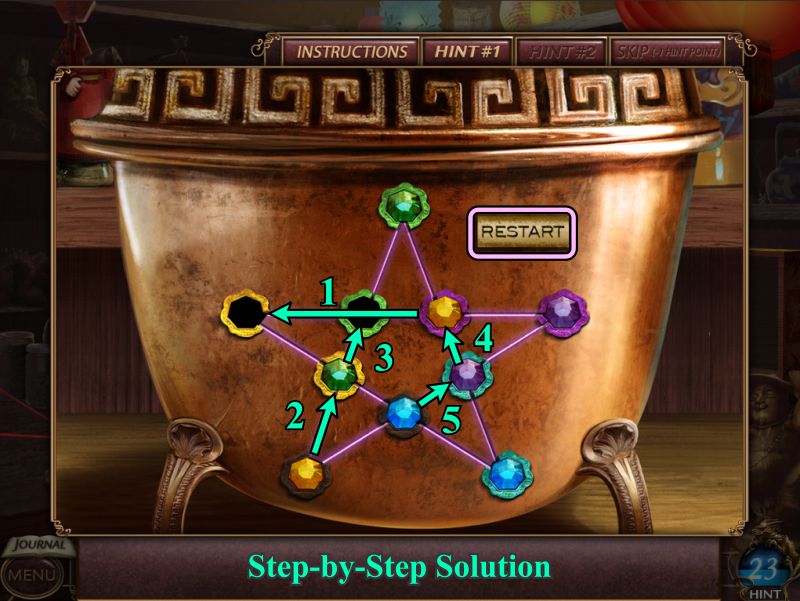
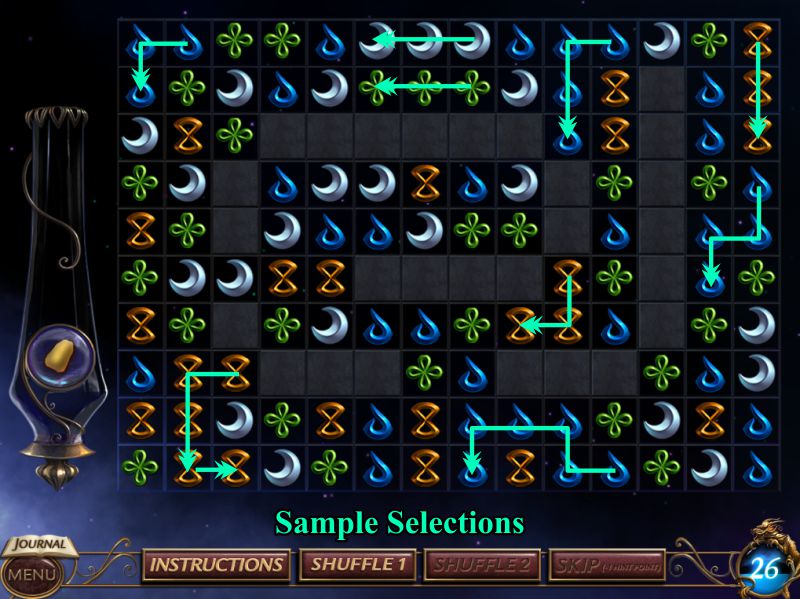
PSI Vision Mini Game
Match the symbols until the puzzle is complete.
See the screenshot for sample selections.
Screenshot
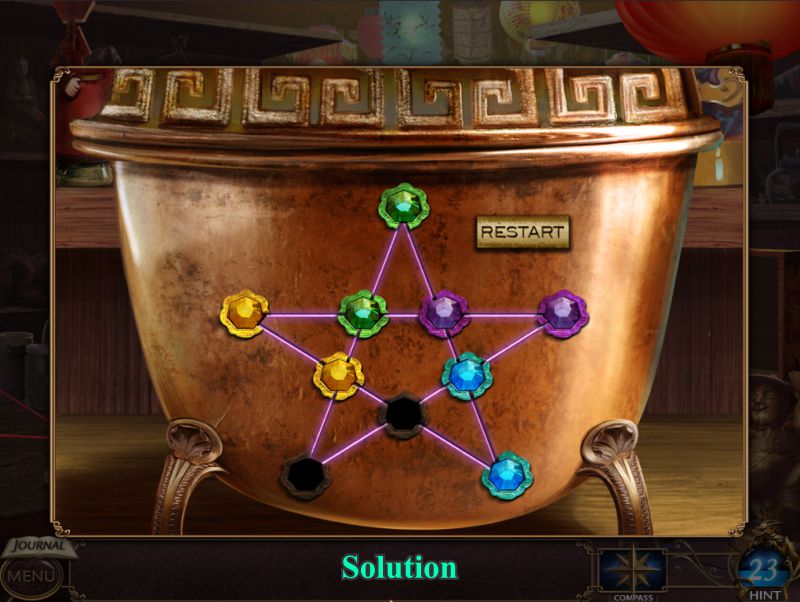
Kit's Been Kidnapped
See the screenshot for a sample solution.
The solution will morph into Dela's vision of what she has seen, which, in this case, is the fact that her best friend, Kit, has been kidnapped.
Screenshot
Chapter 2: Where is Kit
Town Square
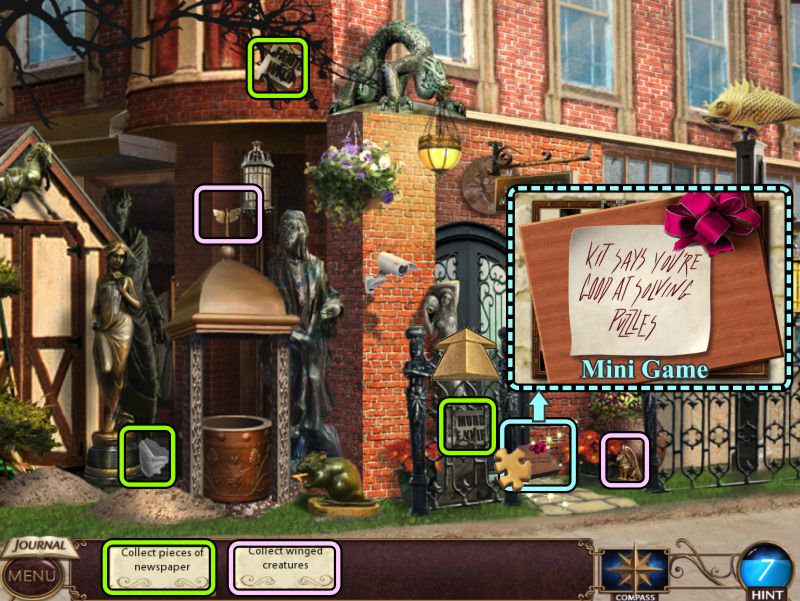
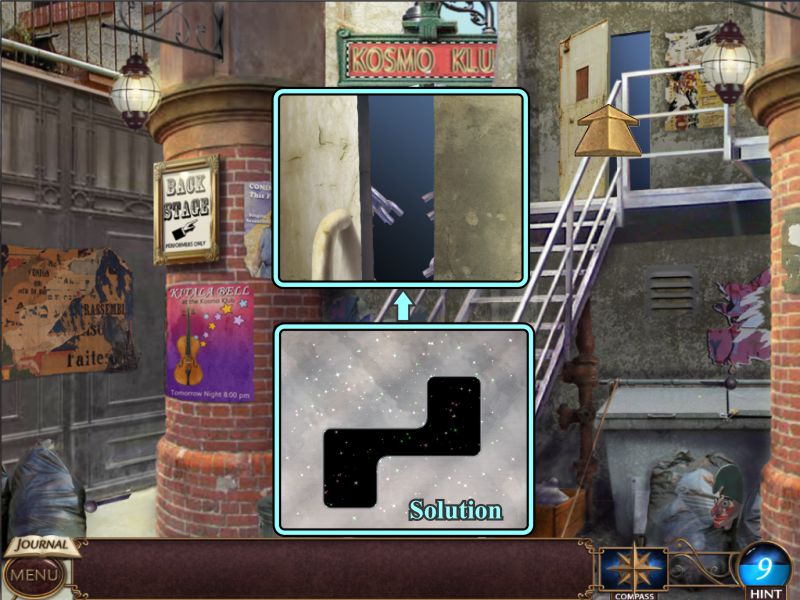
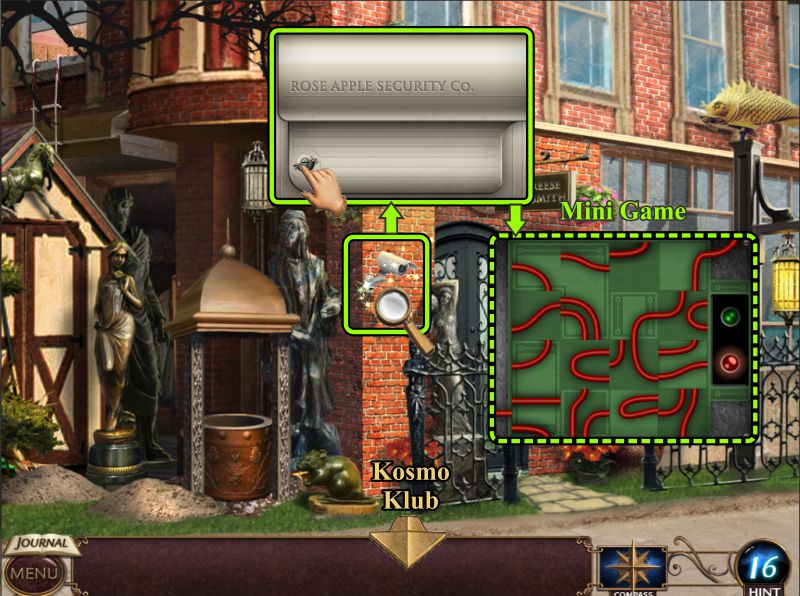
You have arrived in Rose Apple and find yourself in the Town Square, so check out where you can go and look for more information.
Collect 4 of the 10 pieces of newspaper, then head toward the Kosmo Klub.
Screenshot
Outside Kosmo Klub
Collect 3 more pieces of newspaper, then go to Dela's Gallery.
Screenshot
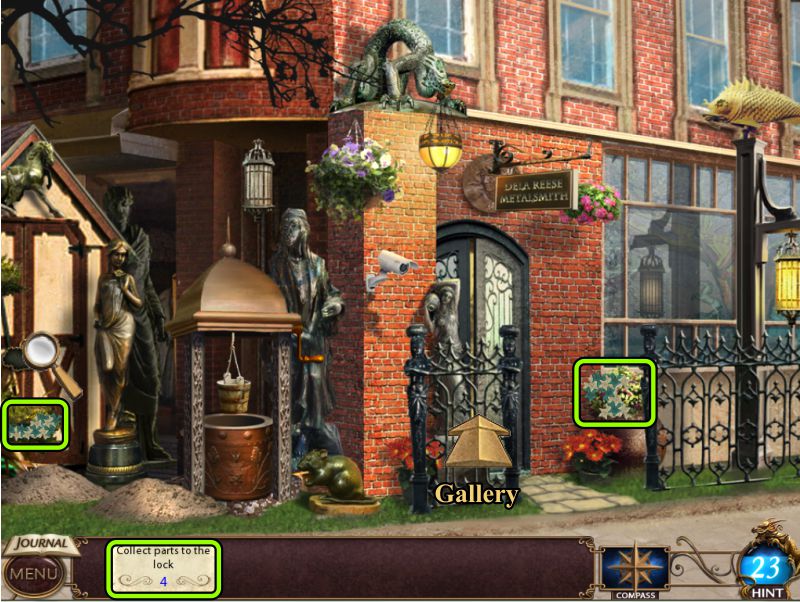
Outside Dela's Gallery
Pick up the last 3 piece of newspaper and grab two of the winged creature pieces.
Examine the package at the door for a Mini Game.
Screenshot
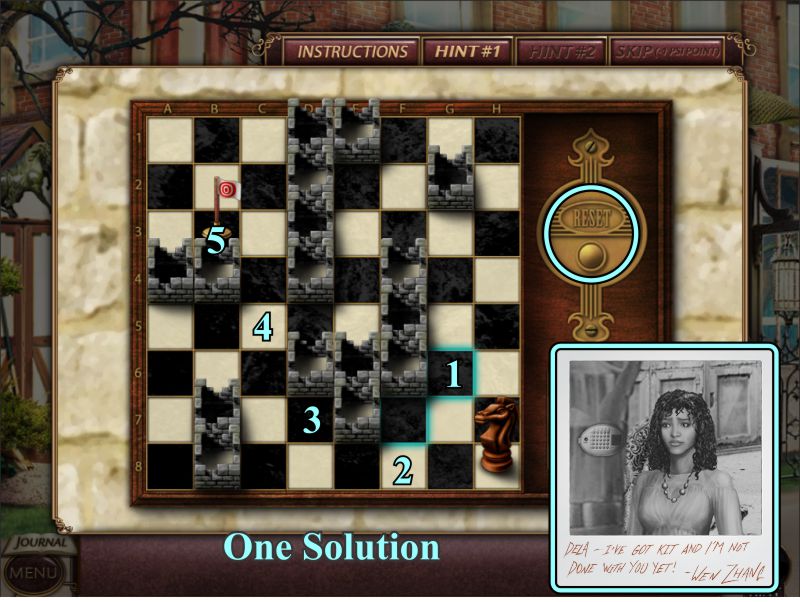
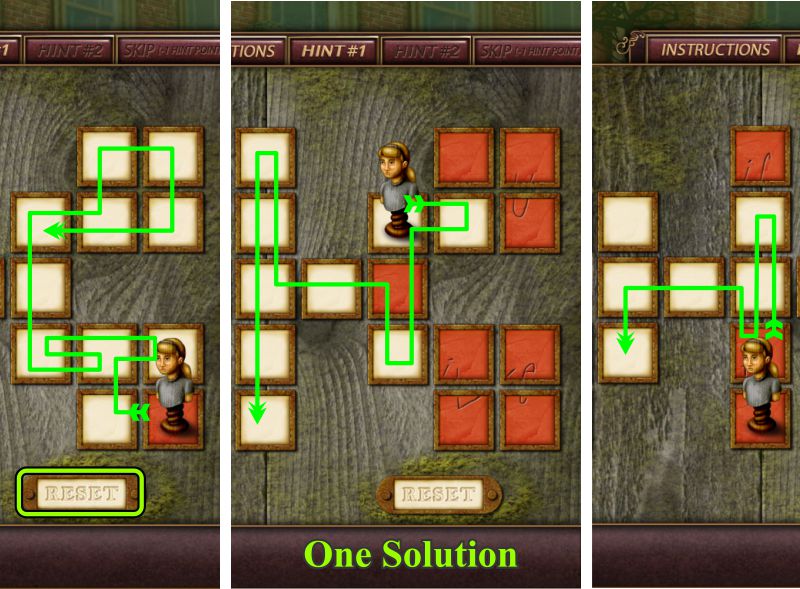
Chess Puzzle
Your goal is to move the knight chess piece to the flag.
There is a Restart button if you need it; otherwise, you can check the screenshot for the solution.
Kit's picture appears after the solution.
Screenshot
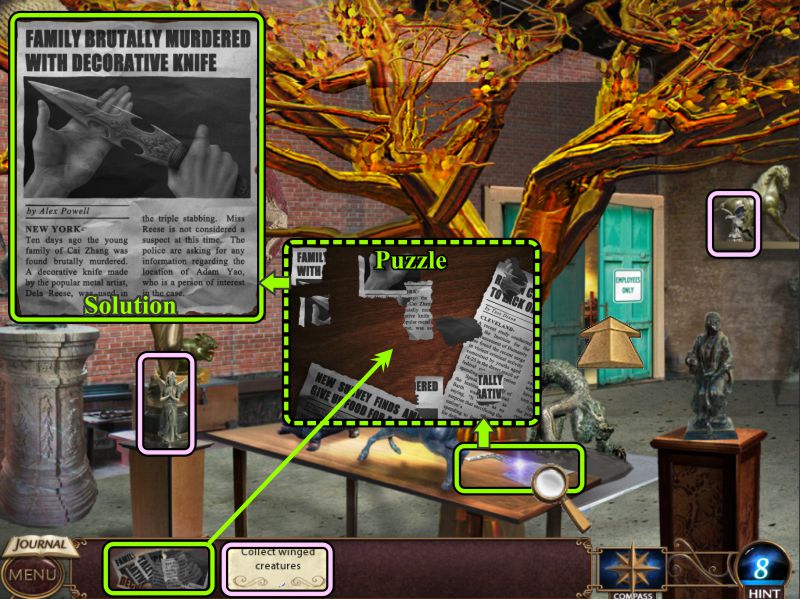
Newspaper Puzzle
Go inside the Gallery, grab the two winged creatures, and zoom in on the table to assemble your newspaper pieces in a puzzle.
See the screenshot for the solution.
Enter Dela's Workshop.
Screenshot
Workshop
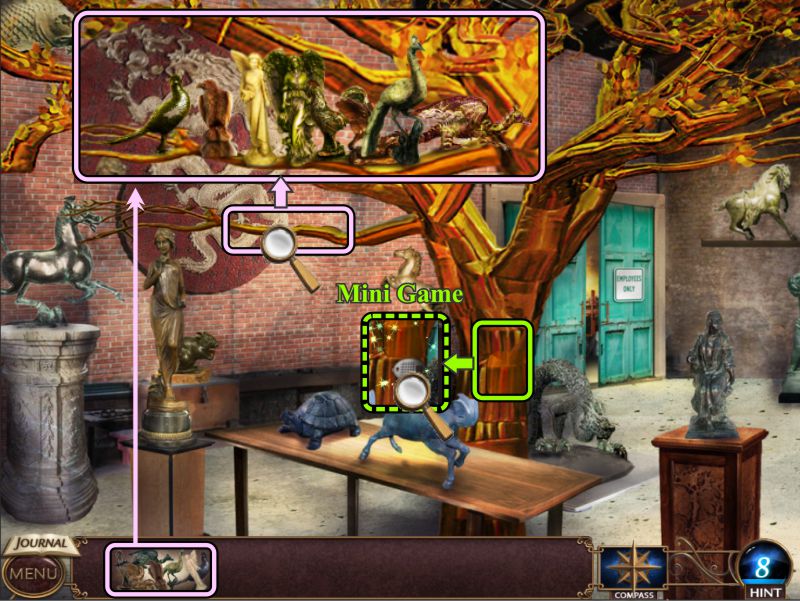
Take the last 2 winged creatures, then return to the Gallery.
Screenshot
Gallery
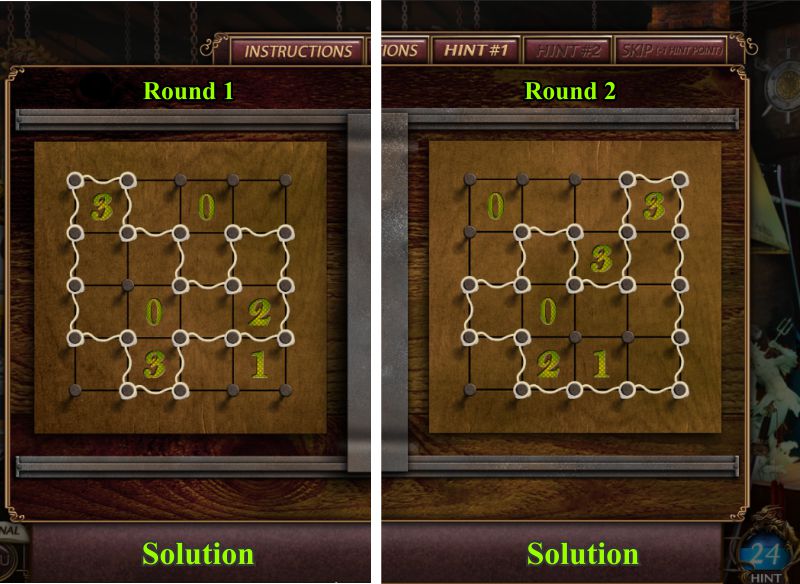
Zoom in and place all the winged creatures on the limb to open the tree compartment for a Mini Game.
Screenshot
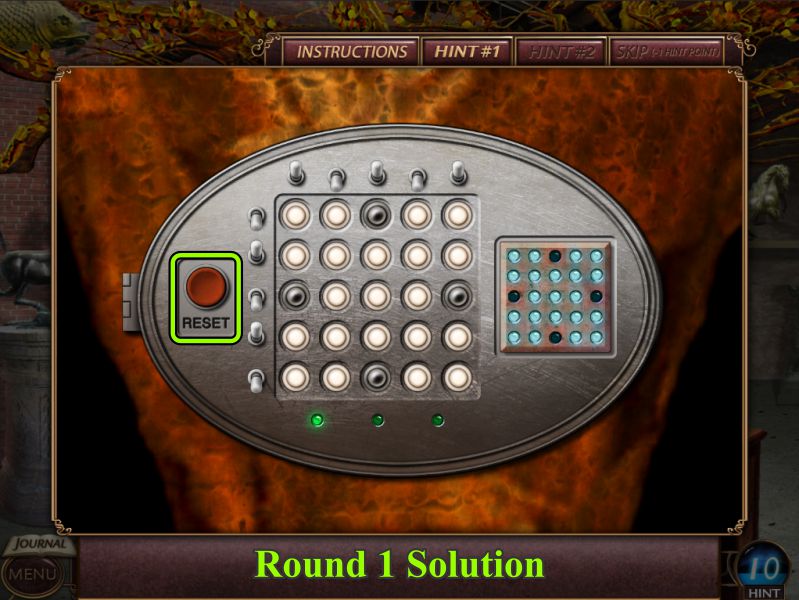
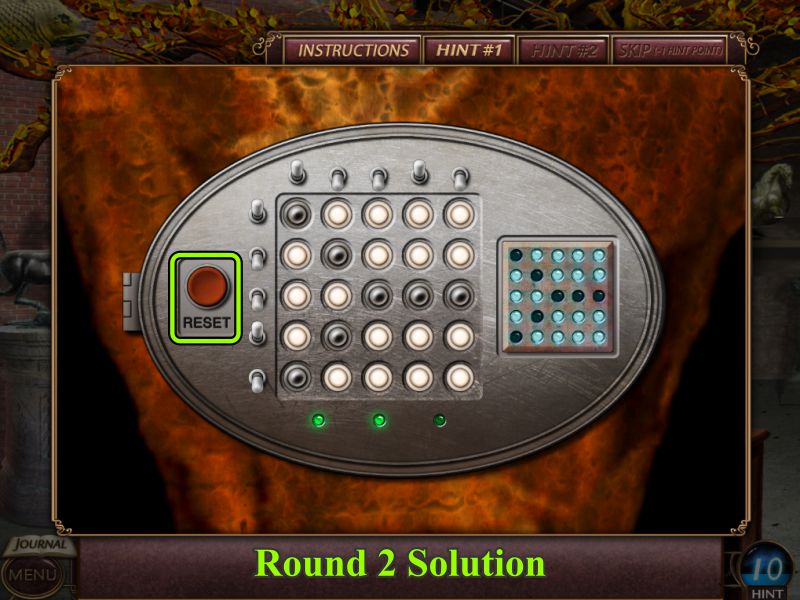
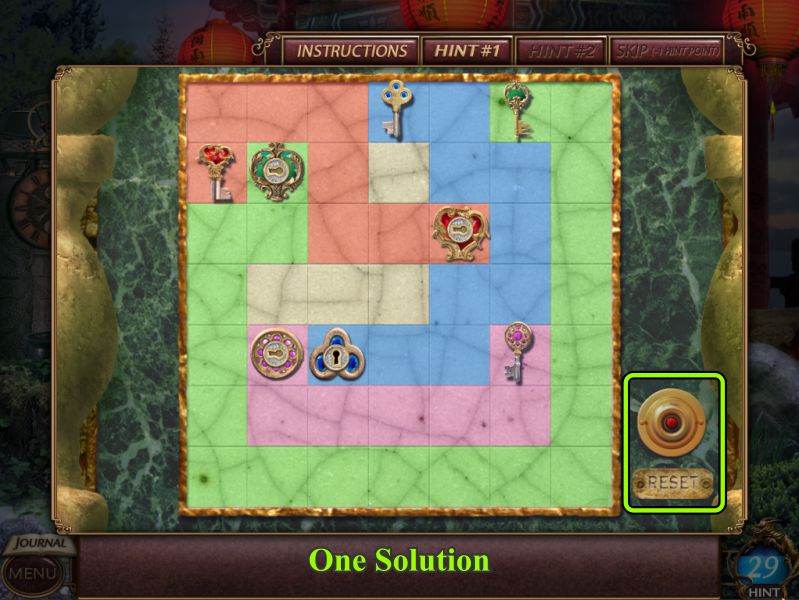
Tree Safe Mini Game
Your goal is to flip the switches so the configuration at the left matches the diagram at the right.
There is a Reset button if you need it, but the solution to Round 1 is in this screenshot.
Screenshot
See the screenshot for the Round 2 solution.
Screenshot
This is the third and last round to open the safe, so see the screenshot for the solution.
Dela's papers are all missing, and there is now a flyer for Kit's performance at the Kosmo Klub.
Screenshot
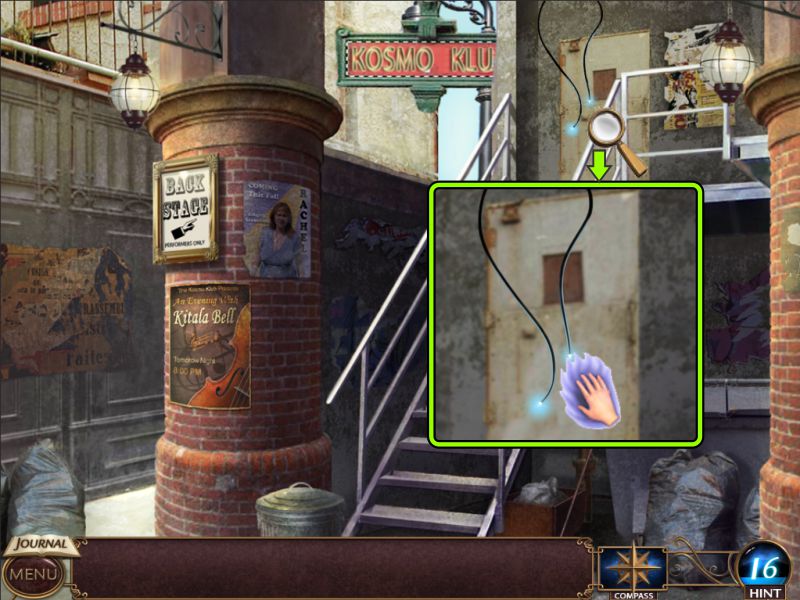
Outside Kosmo Klub
After your encounter with Wen Zhang, he leaves a photo of Kit outside the Kosmo Klub, so go there.
The door is chained, so Dela uses her powers of Metal Manipulation to try to remove them.
Screenshot
Metal Manipulation Puzzle 1
Your goal is to turn all the pieces to metal gray in 6 clicks.
See the screenshot for the solution.
Screenshot
When you've solved the puzzle, the screenshot will show you what happens.
Enter the Kosmo Klub.
Screenshot
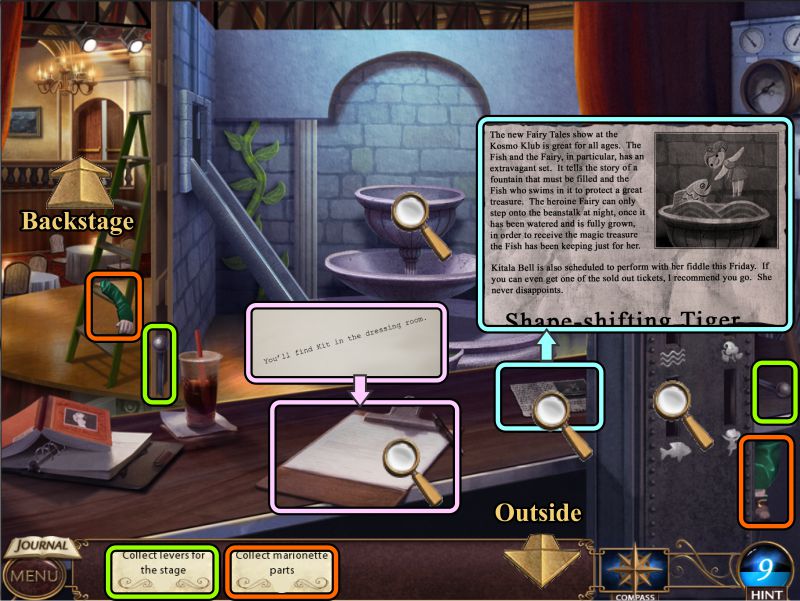
Chapter 3: Kosmo Klub
Stage
Check out all the magnifying glasses to see what's happening.
Collect the levers and marionette parts that are available, and go back Outside in search of more items before going Backstage.
Screenshot
Outside Kosmo Klub
Collect the available levers and marionette parts, then go Backstage.
Screenshot
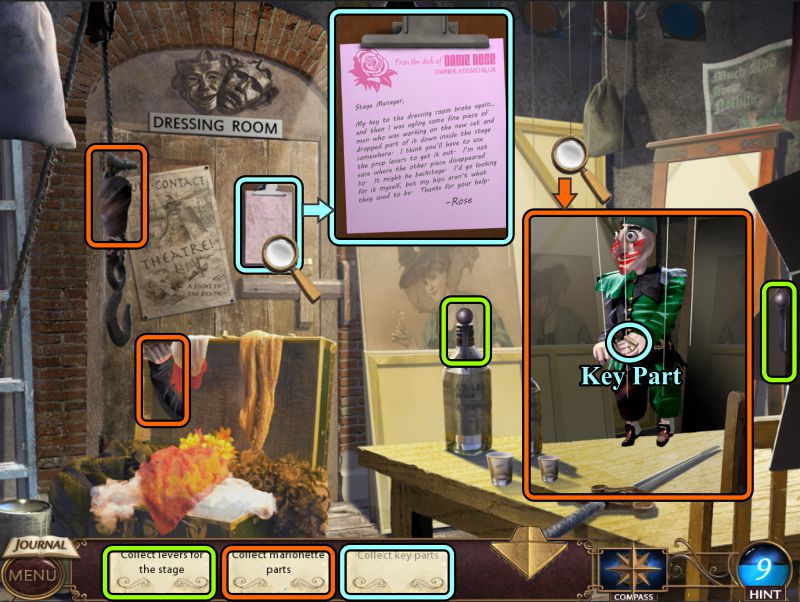
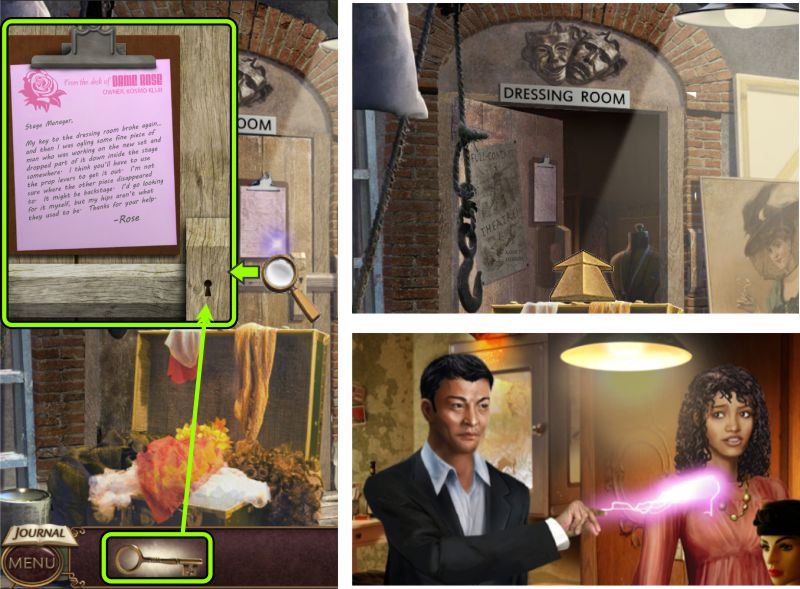
Backstage
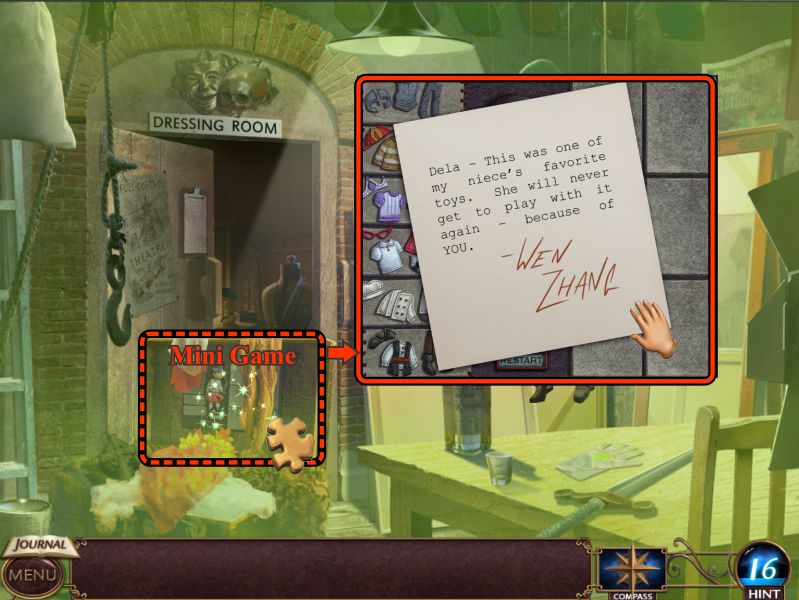
Zoom in on the Dressing Room door and read the note.
Collect the rest of the parts you need, then zoom in on the strings.
Place the completed marionette and take the Key Part he offers you.
Return to the Stage.
Screenshot
Stage
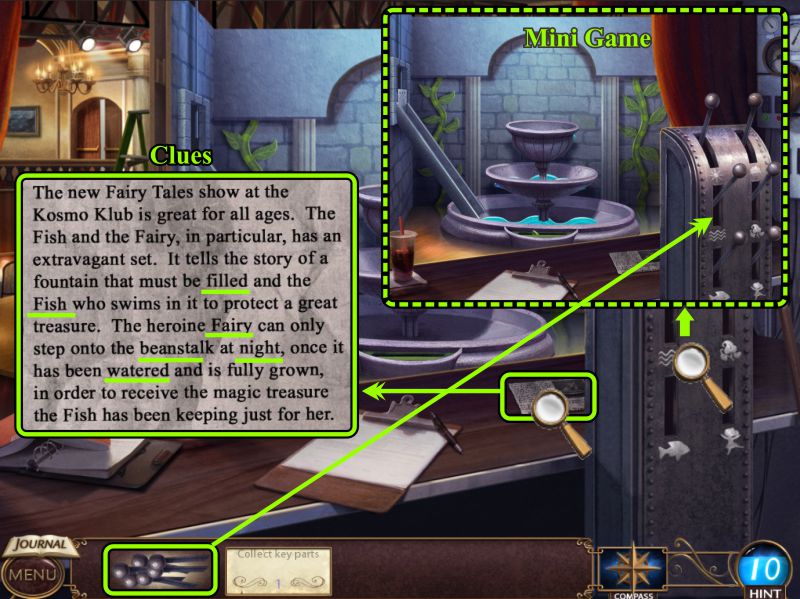
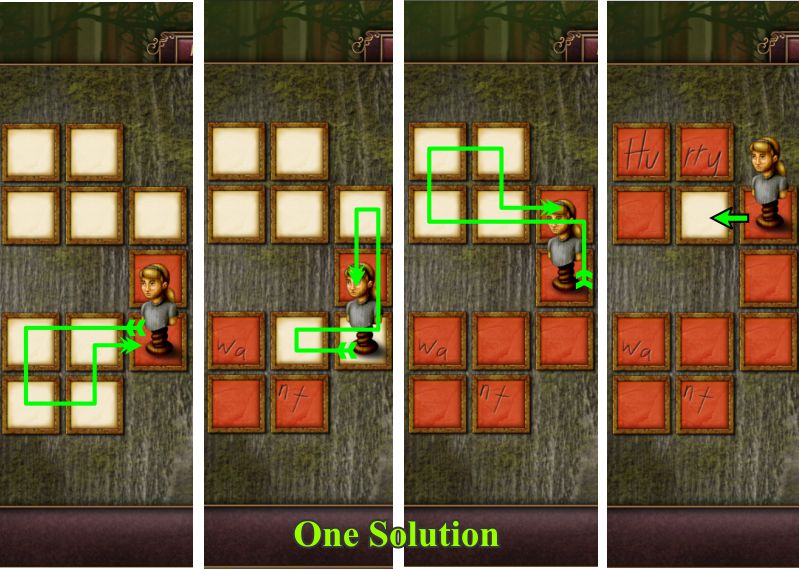
Examine the note for clues. See the underlined portions in the screenshot for help.
Place the levers to trigger a Mini Game.
Screenshot
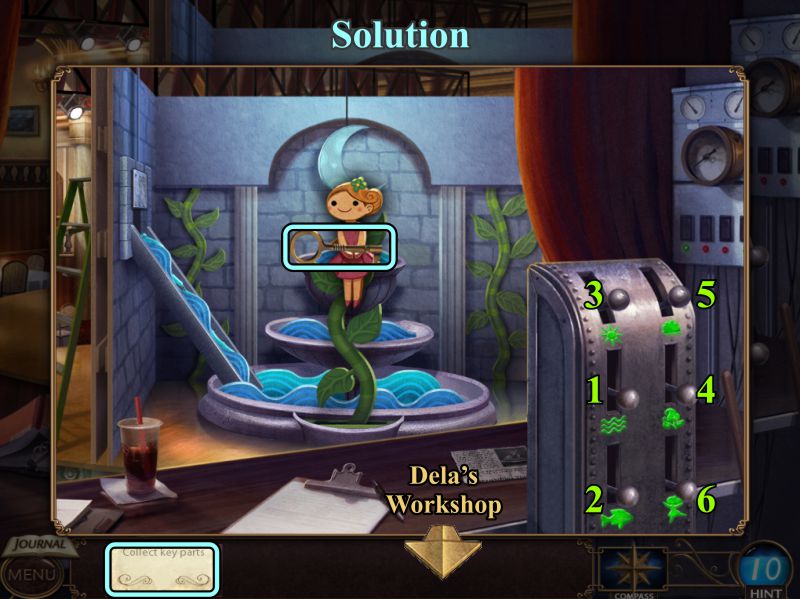
Prop Lever Mini Game
Click on the levers as shown in the screenshot to move the stage props in order to produce the play.
Take the key portion and go to Dela's Workshop to assemble the key parts.
Screenshot
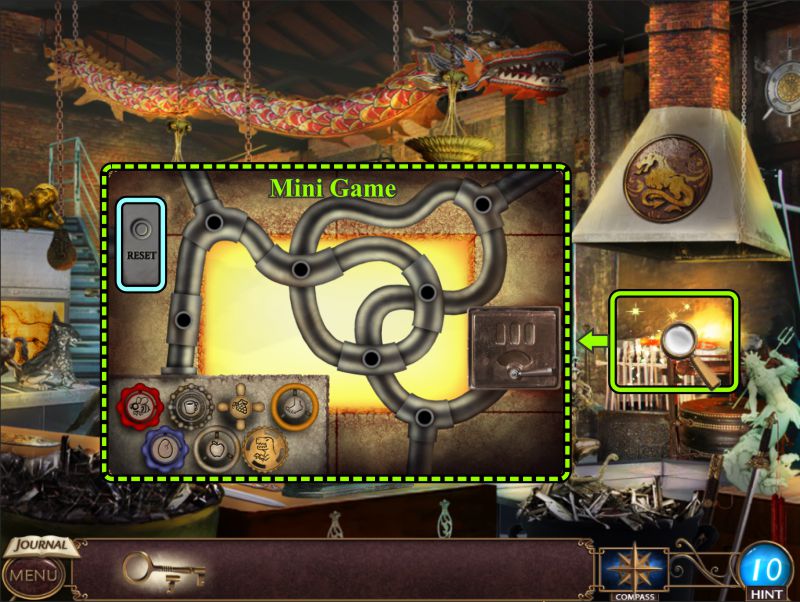
Dela's Workshop
Zoom in on the Forge for a Mini Game.
Screenshot
Forge Mini Game
Your goal is to make the forge work. Place all the buttons in alphabetical order, as shown in the screenshot.
Place the key parts to make a complete key, then go to the Dressing Room at the Kosmo Klub.
Screenshot
Dressing Room
Zoom in on the Dressing Room door and place the completed key to open the door and enter.
Wen Zhang is there with Kit and zaps her, then they both disappear.
Screenshot
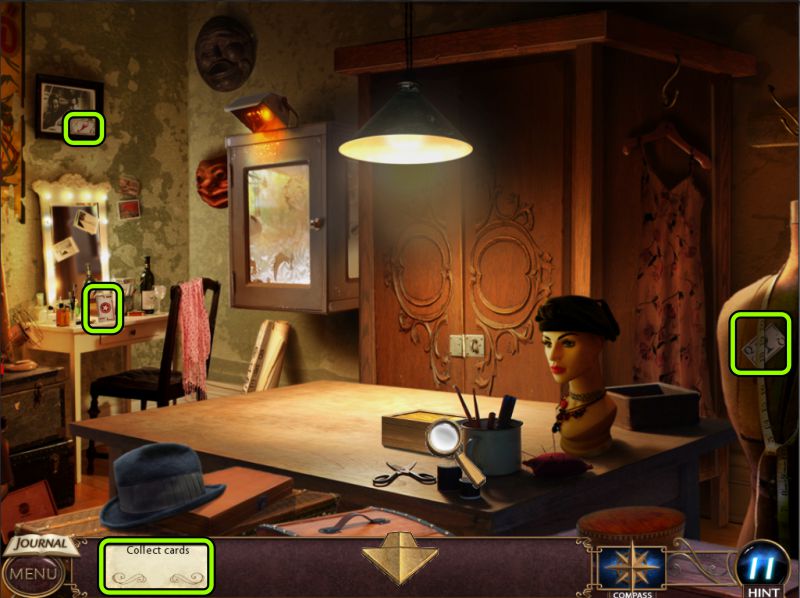
Examine Wen Zhang's box to learn you need to find a bunch of playing cards.
Collect the ones available here, and then go Backstage.
Screenshot
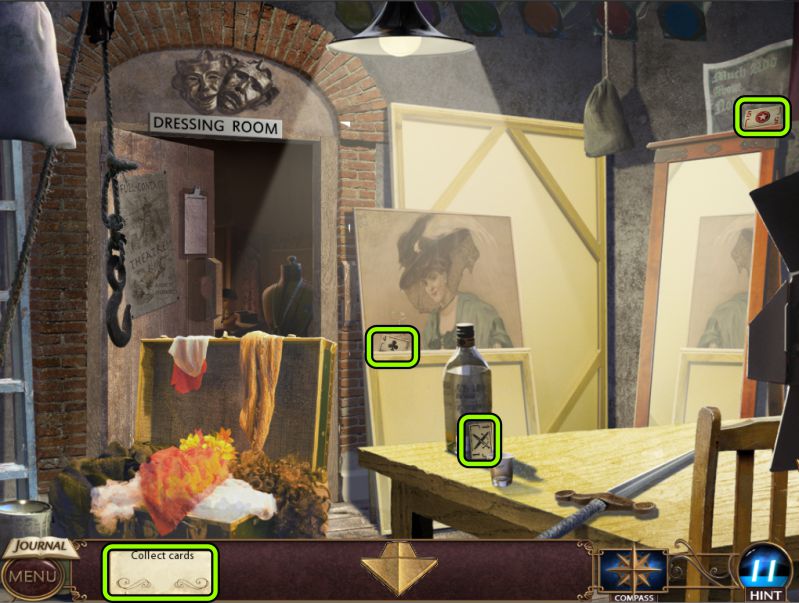
Backstage
Collect the playing cards here, and go to the Stage.
Screenshot
Stage
After you collect the two cards here, return to the Dressing Room.
Screenshot
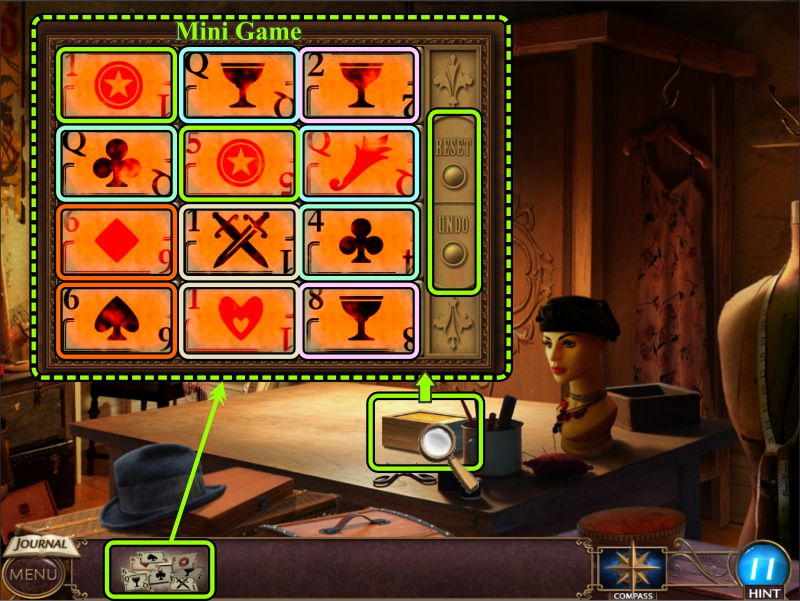
Card Mini Game
Zoom in on the box to place the cards and trigger a Mini Game.
Your goal is to match up the cards by symbol or number.
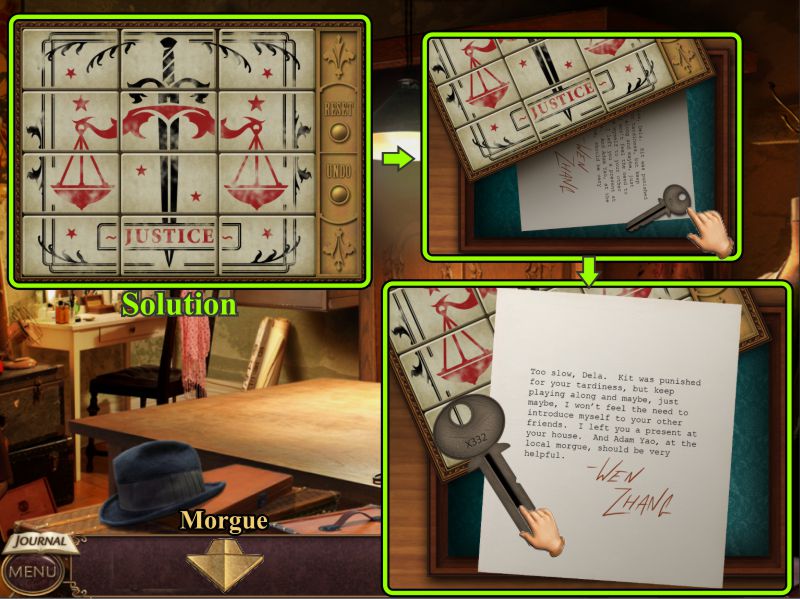
See the screenshot for the solution.
Screenshot
Wen Zhang's Box
See what happens after the solution. The box then opens.
Read the note and take the key.
Go to the Morgue via Town Square.
Screenshot
Chapter 4: The Morgue
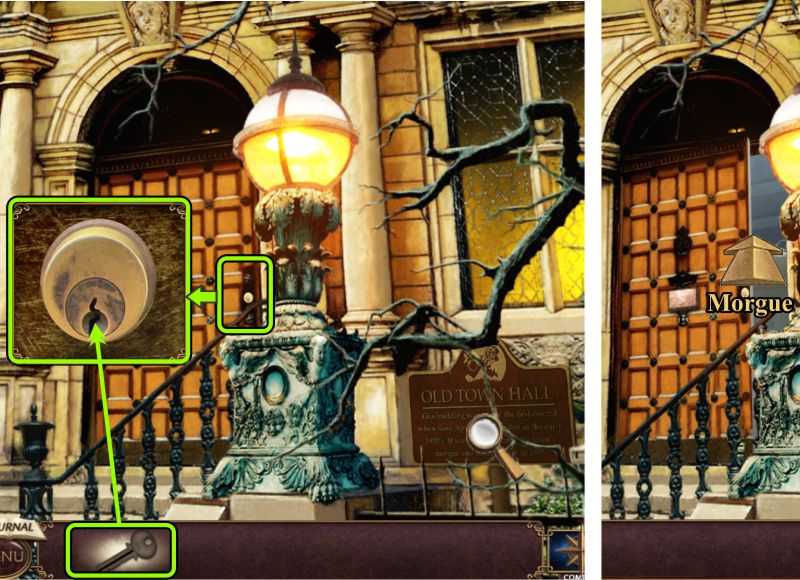
Outside Morgue
When you arrive at Town Square, the truck pulls away, giving you access to get to the Morgue.
Zoom in on the door, place your key, and enter.
Screenshot
Morgue Drawers
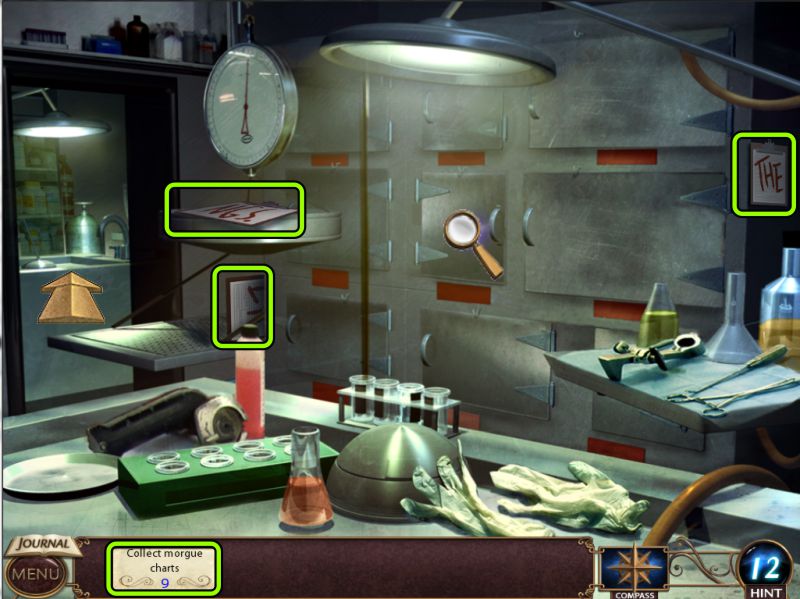
Collect all the clipboards with charts in the room with the body drawers.
Go to the Lab to check it out.
Screenshot
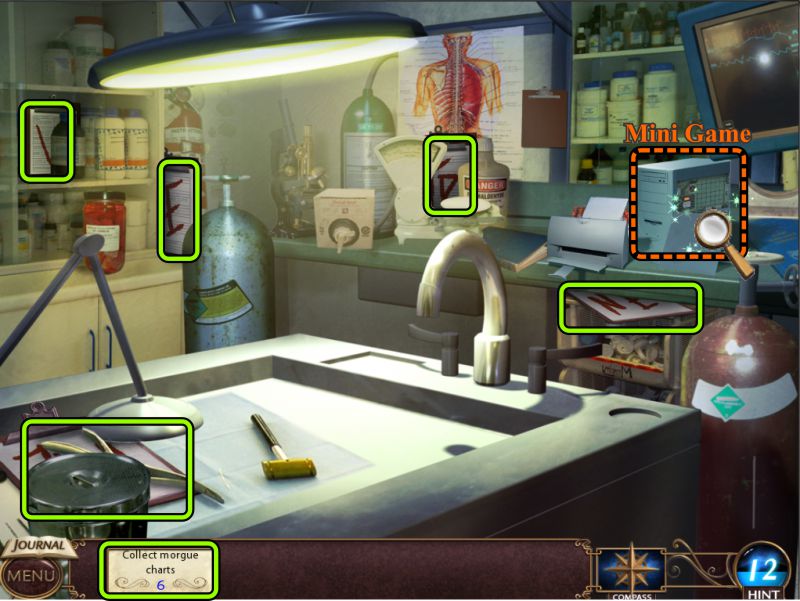
Morgue Lab
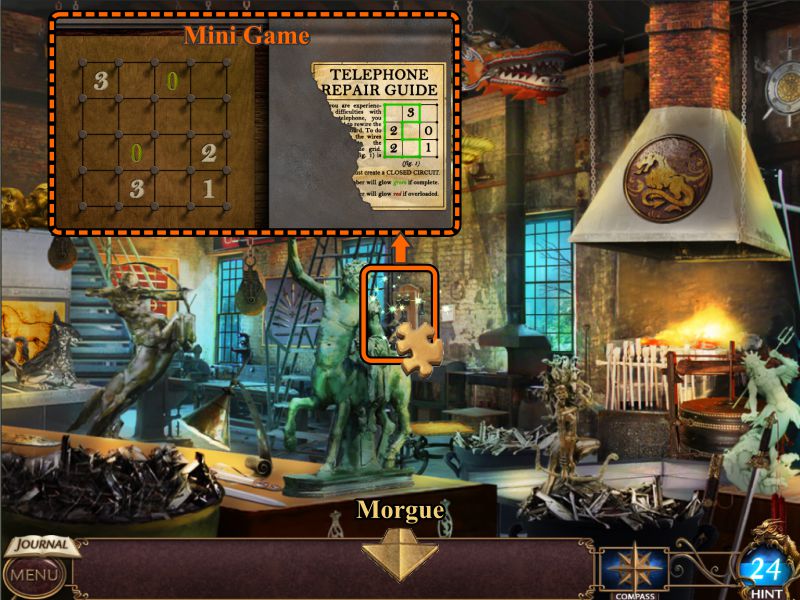
Collect all the other visible charts, then zoom in on the computer for a Mini Game.
Screenshot
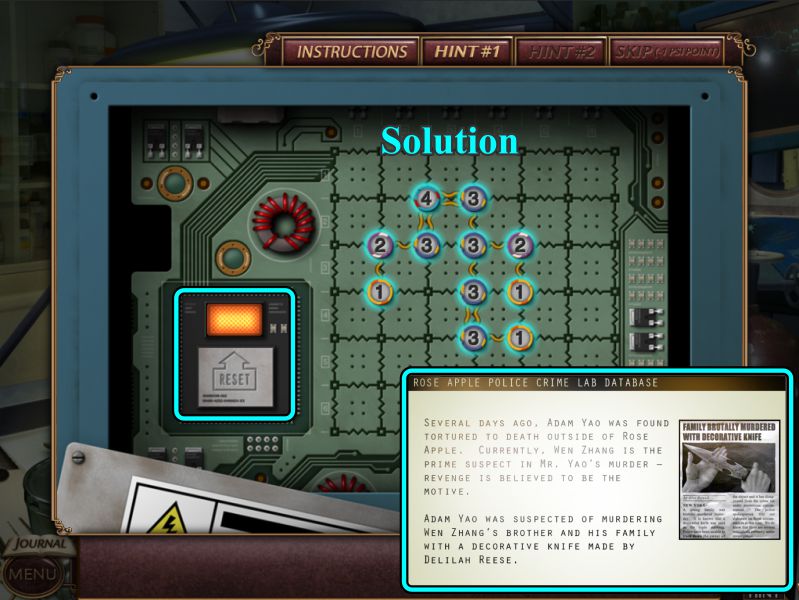
Computer Circuit Board Mini Game
You need to connect all the circuits to repair the circuit board. See the screenshot for the solution.
There is a Reset button.
Some circuits need to be used twice in order to make all the connections work.
You now have another message about the knife Dela made.
Screenshot
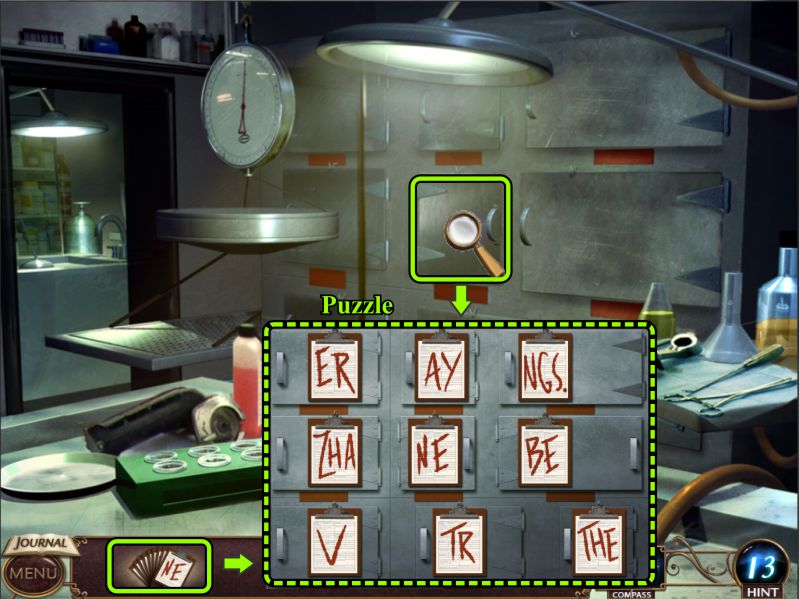
Morgue Lab
Take the page from the printer and place it on the clipboard.
Collect the clipboard and return to the drawers.
Screenshot
Morgue Drawers
Zoom in on the drawers and place the clipboards to trigger a Mini Game.
Screenshot
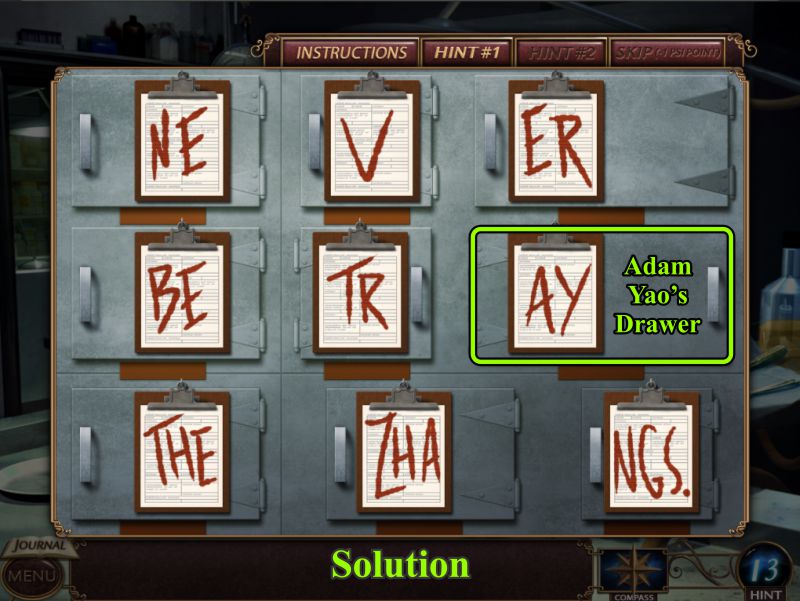
Chart Puzzle
Rearrange the clipboards as shown in the screenshot so you can locate Adam Yao's drawer.
Screenshot
Adam Yao
Select Adam's drawer and click on the urn for a Puzzle.
Screenshot
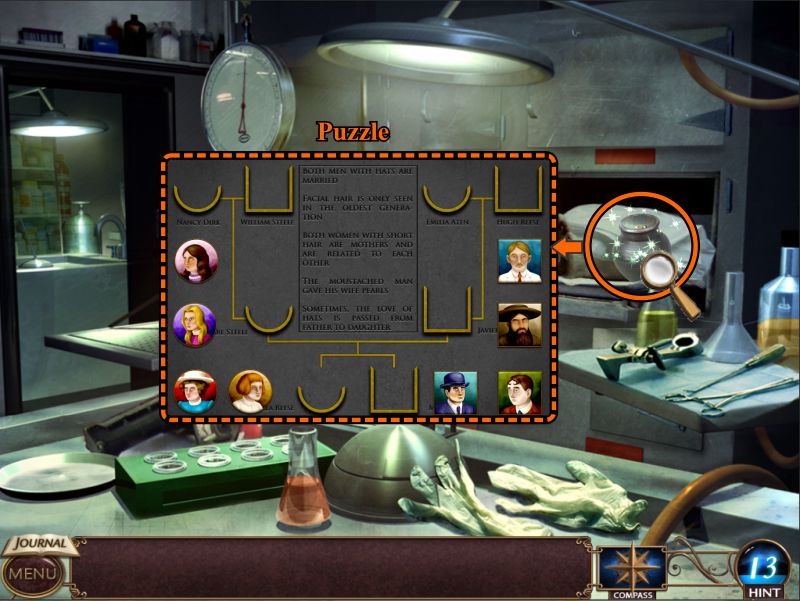
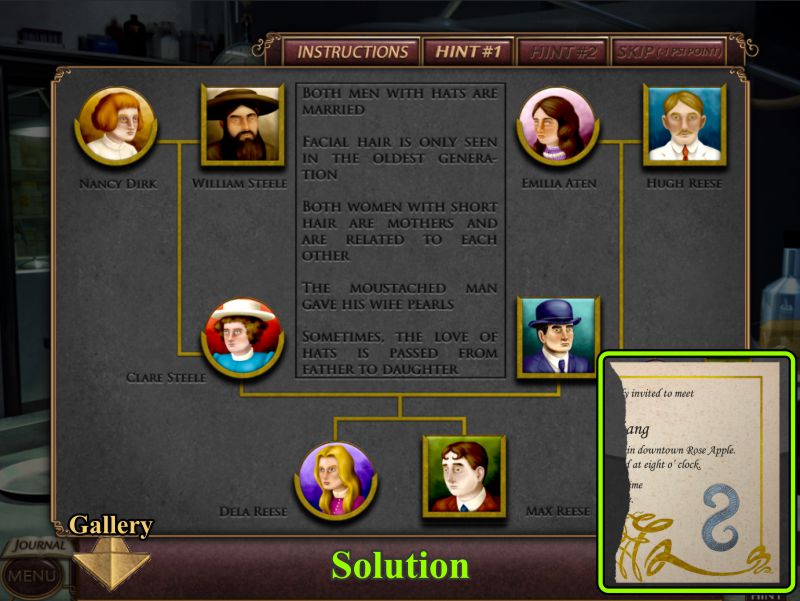
Family Tree Puzzle
The Family Tree turns out to be Dela's. Arrange it as shown in the screenshot.
Wen has left you part of a message, so let's go look for the other half by starting at Dela's Gallery.
Screenshot
Chapter 5: Dela's Gallery
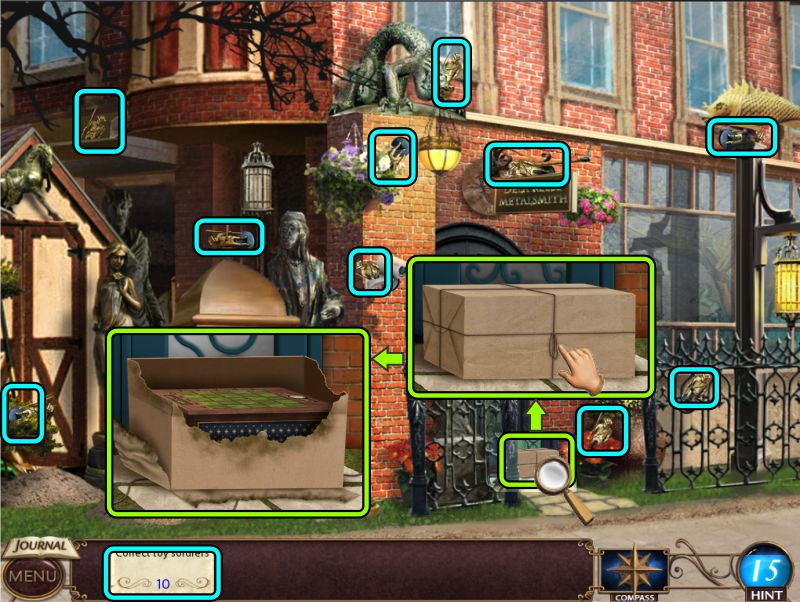
Toy Soldiers
Zoom in on the package at Dela's door.
It blows up, and we need to find 10 toy soldiers to solve the situation. See the screenshot for their locations.
Screenshot
Zoom in again on the package and place the toy soldiers to trigger a Mini Game. If you need it, there is a Reset button to help you with your solution.
Screenshot
Toy Soldier Mini Game
In case you need help, the solution to the game is shown in the screenshot.
Your reward is the other half of Wen's message, so Dela needs to check it out with her special powers.
Screenshot
PSI Vision
Complete the Match 3 game, and check the screenshots for sample selections if you need help.
Screenshot
Wen Zhang's Colleague
The solution morphs into a conversation between Wen and his colleague, who looks very much like the Magi.
Screenshot
Chapter 6: Dela's Plan
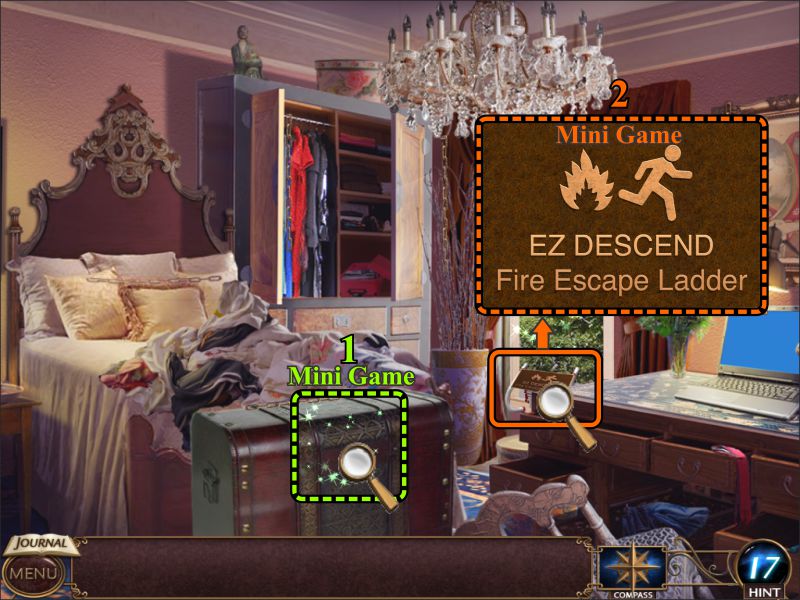
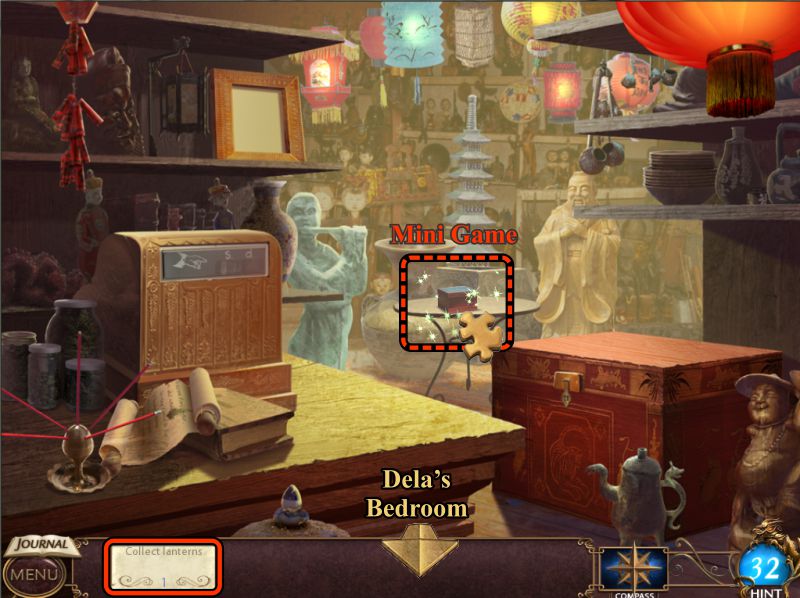
Dela's Bedroom
Dela goes to her bedroom to form a plan as to how to meet Wen alone without Hari knowing.
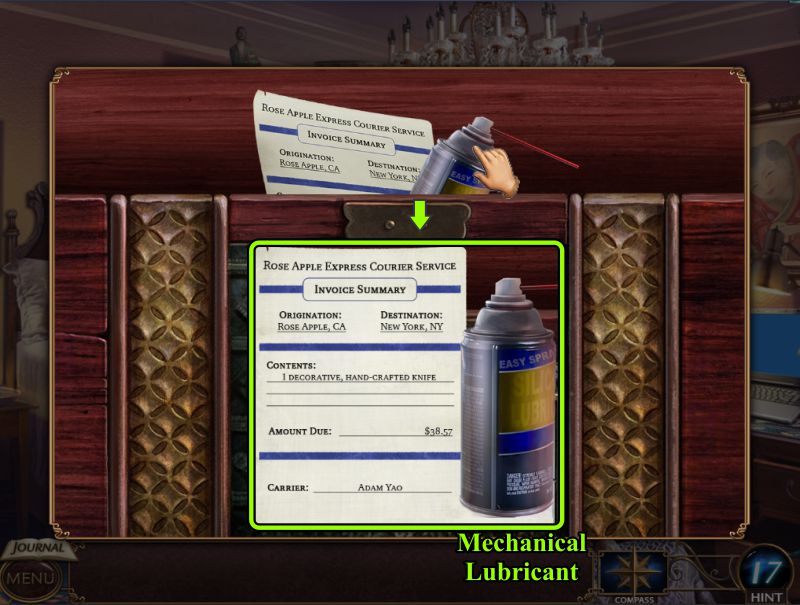
Zoom in on the chest for a Mini Game to open it and get some mechanical lubricant.
Then, zoom in on the window to see about escaping with a Fire Escape Ladder, and play that Mini Game.
Screenshot
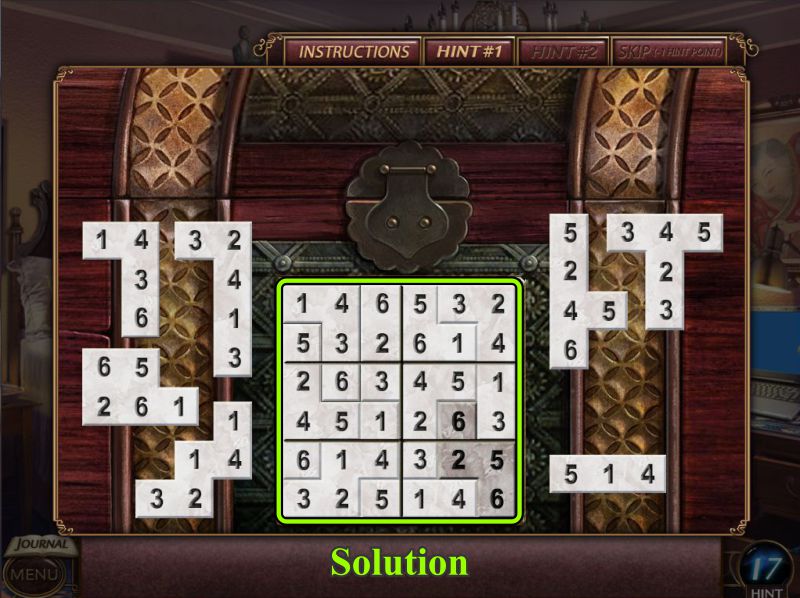
Chest Mini Game
This is a Sudoku type game where your goal is to place all the pieces so that each column and row has the numbers 1 though 6, and they are not repeated.
See the screenshot for the solution.
Screenshot
When the chest opens, take the contents.
You find out that Adam Yao was the courier for Dela's knife, so take the Mechanical Lubricant.
Screenshot
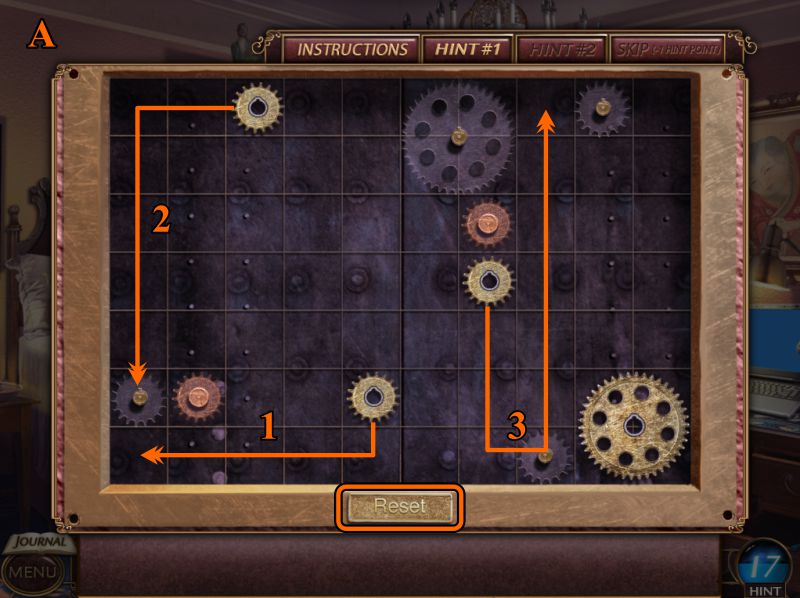
Fire Escape Ladder Mini Game
You need to place the gears so that the Escape Ladder will fall and you can escape.
See the screenshot for the first moves to make this happen.
Screenshot
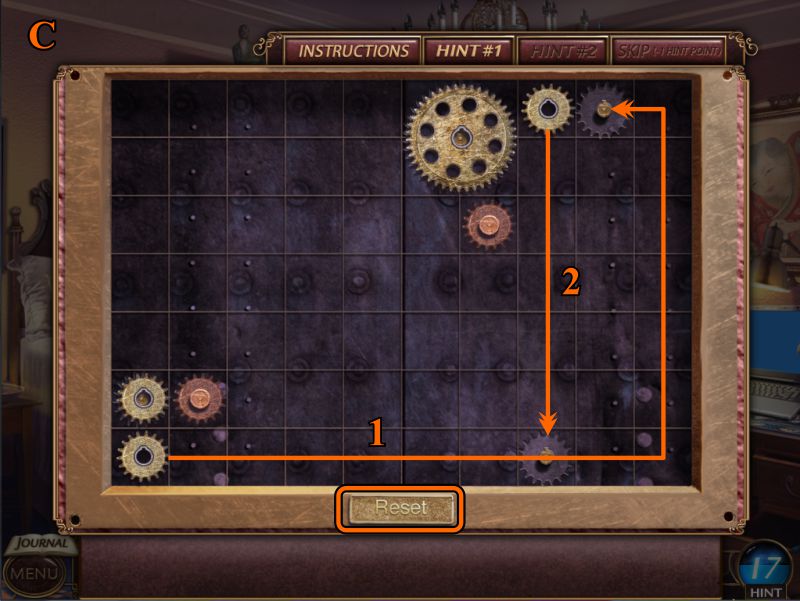
Move the next gear according to this screenshot.
Screenshot
Finally, move these gears as shown in this screenshot.
Screenshot
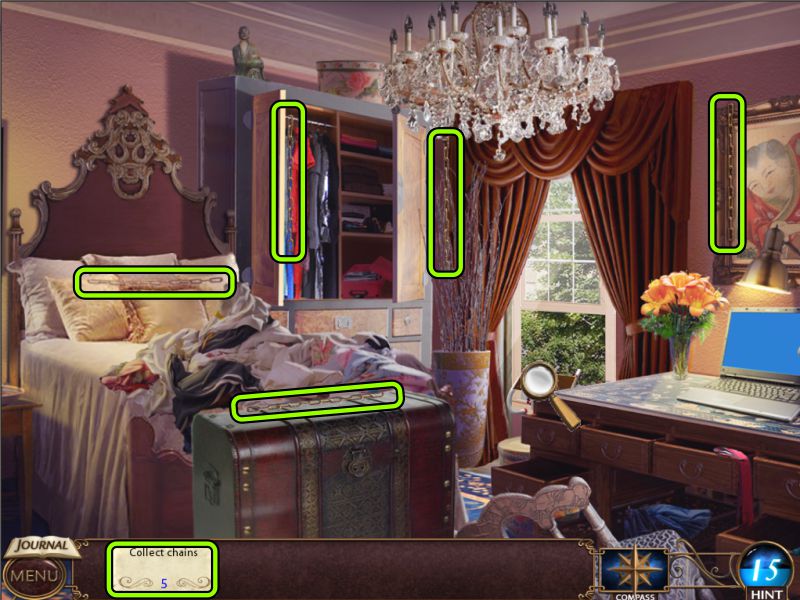
Chains
You cannot lower the ladder without chains to help you, so collect the chains.
Screenshot
Escape
You now have everything you need: Lubricate the rusty gears and place the chains.
Go out the window.
Screenshot
Outside Gallery
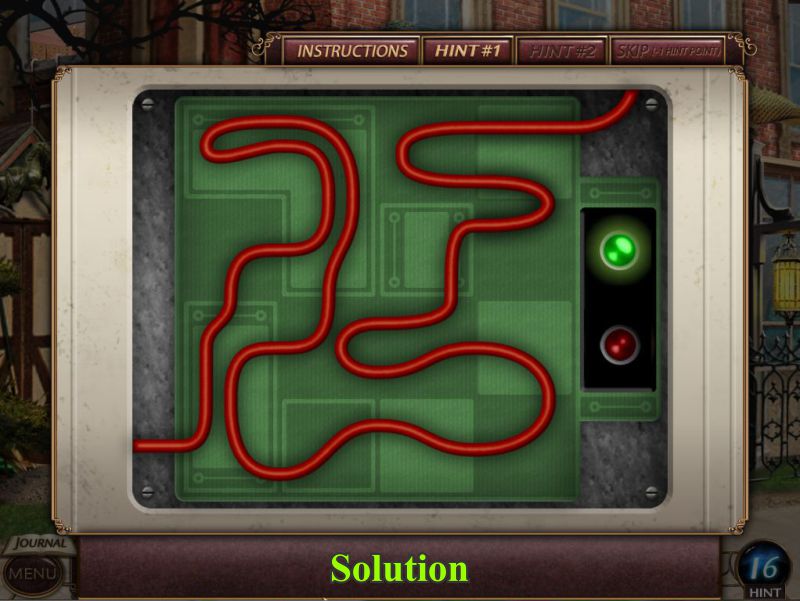
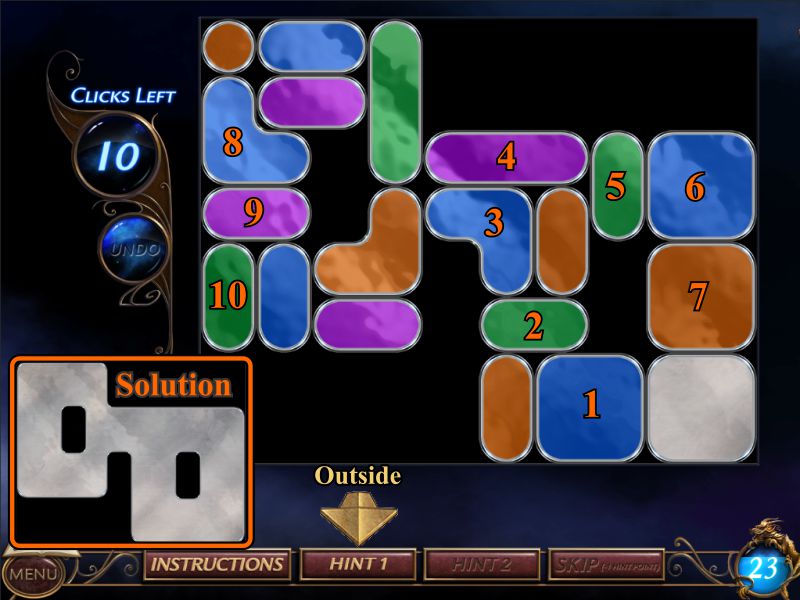
You need to disable the surveillance camera so Hari can't see you leave, so zoom in and turn the knob to trigger a Mini Game.
Screenshot
Security Camera Mini Game
Your goal is to swap the tiles to make the board look like the screenshot.
Screenshot
Chapter 7: Poisoned
Outside Kosmo Klub
The electrical wires are live in front of the door, so Dela must use her psychic powers to manipulate them.
Screenshot
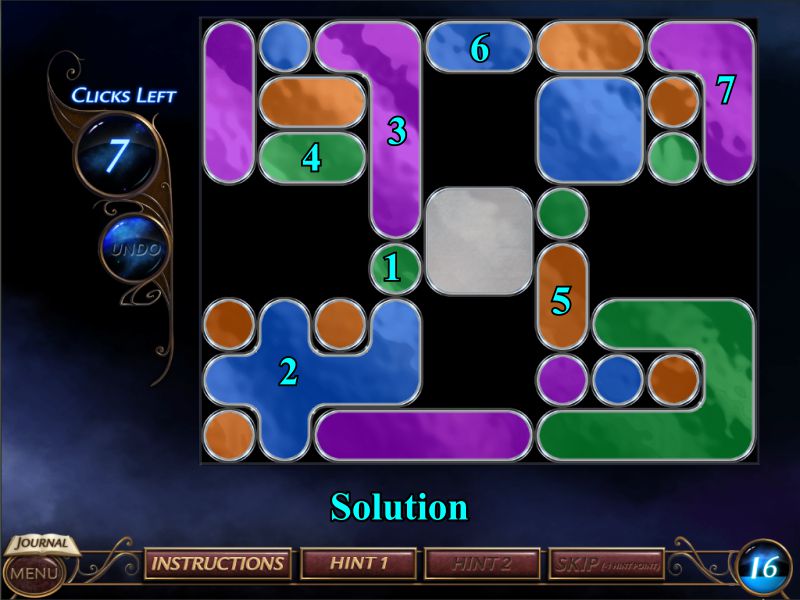
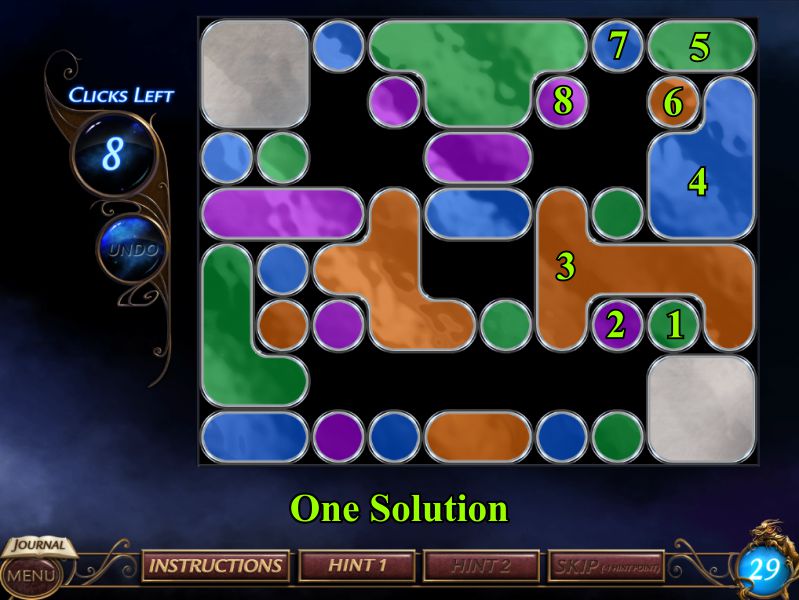
Metal Manipulation
Your goal is to click on the colored pieces until they are all absorbed into the silver piece.
You have 7 clicks to turn everything silver, and there is an "Undo" button in case you want to change your choices.
See the screenshot for the numbered solution
Screenshot
Wen Khang
Go backstage to meet with Wen Khang, who poisons Dela.
Screenshot
Backstage
A green haze has appeared to represent Dela's vision until you find the antidote for the poison.
Zoom in on the Mini Game and read Wen Zhang's note.
Screenshot
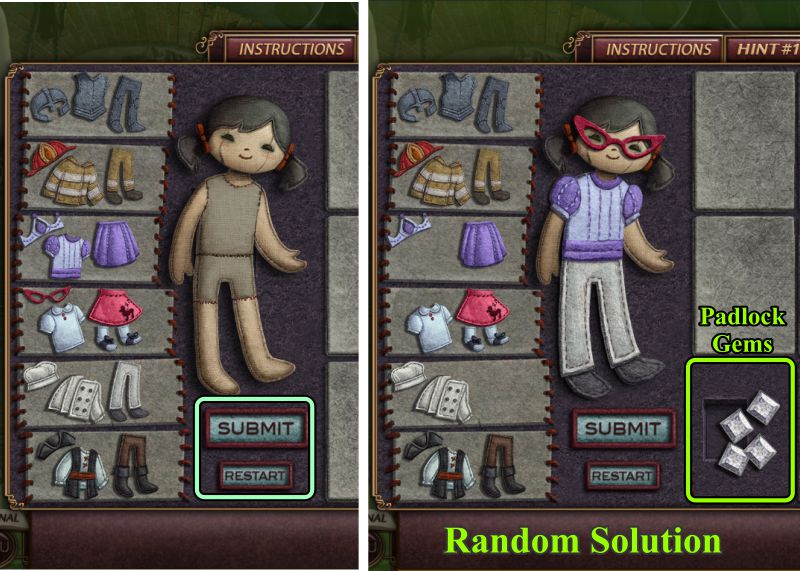
Doll Mini Game
The solution to the game is random, so if you restart, you will get different pieces of the outfits for your correct solution.
Once you choose a part of her outfit, press "Submit" to see if your choice is correct.
If your answer is "Correct Character", it means that the item is from the correct outfit but not the right piece of clothing.
"Correct Piece" means an item is from the correct outfit and is also the right item.
To narrow down your selections, start by dressing the doll in complete outfits rather than mismatched ones.
A sample solution is shown in the screenshot.
Screenshot
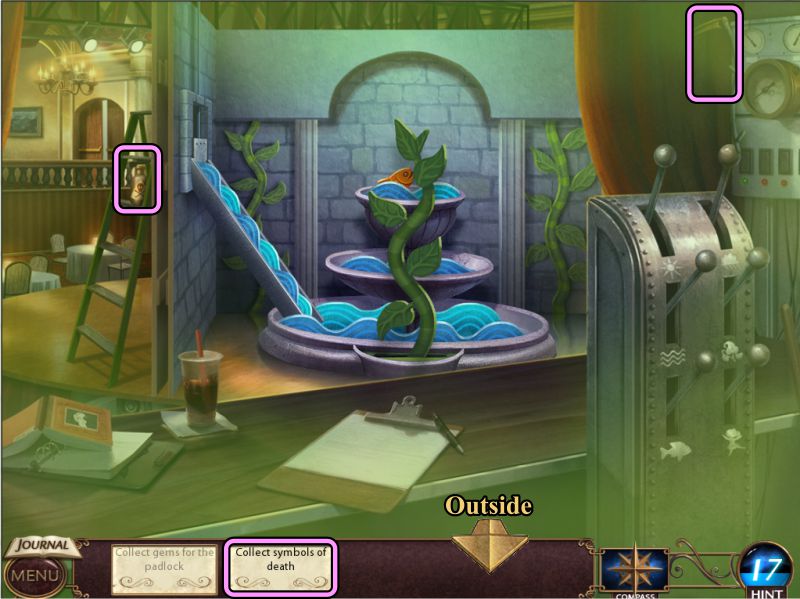
Backstage
Collect the 3 Symbols of Death, then go out front to the Stage in search of more.
Screenshot
Stage
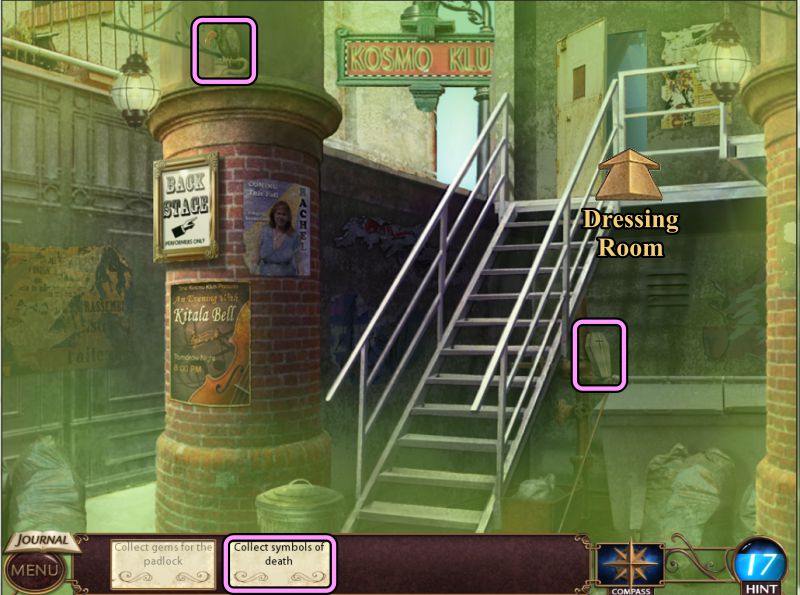
Collect the 2 Symbols of Death, then go Outside.
Screenshot
Back Door
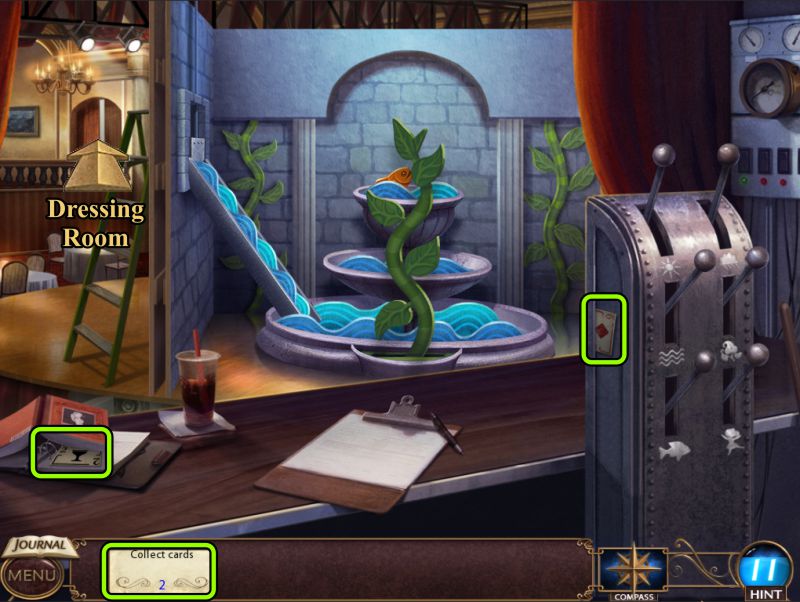
Collect the 2 Symbols of Death, then go to the Dressing Room.
Screenshot
Dressing Room
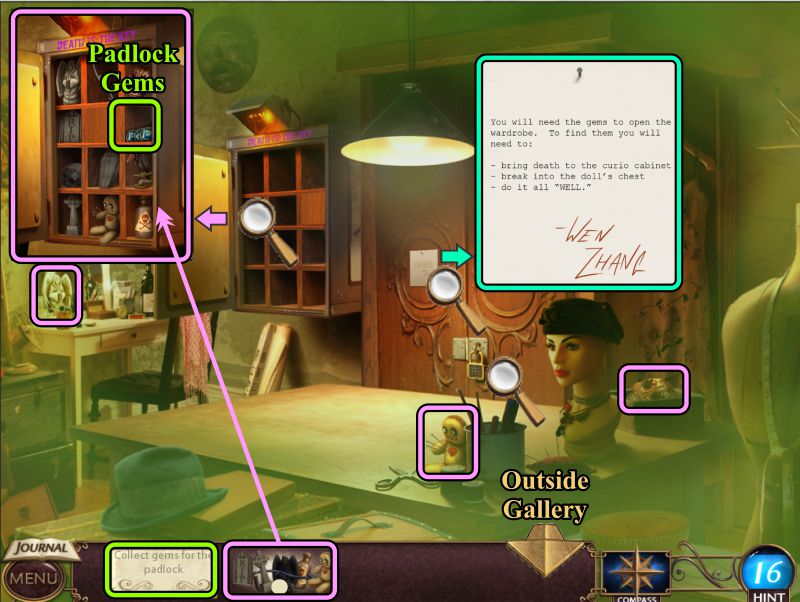
Collect the 3 Symbols of Death and place all of them in the open cabinet.
Take the Padlock Gems and read Wen's note on the locked cabinet.
Go to the door of Dela's Gallery.
Screenshot
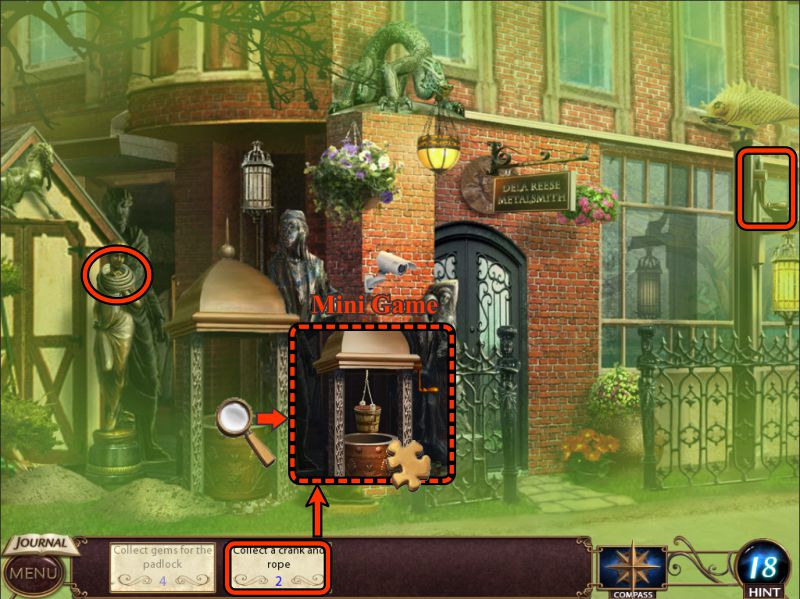
Gallery Door
Zoom in on the well to find out the Crank and Rope are missing.
Collect them and place them on the well to trigger a Mini Game.
Screenshot
Well Mini Game
Your goal is to remove the lid from the well, so move the figure of Dela over all the white squares in order to turn all of them red. You will need to backtrack.
See the screenshot for one solution of a path.
Screenshot
See the screenshot for Dela's continued journey on the well lid.
Screenshot
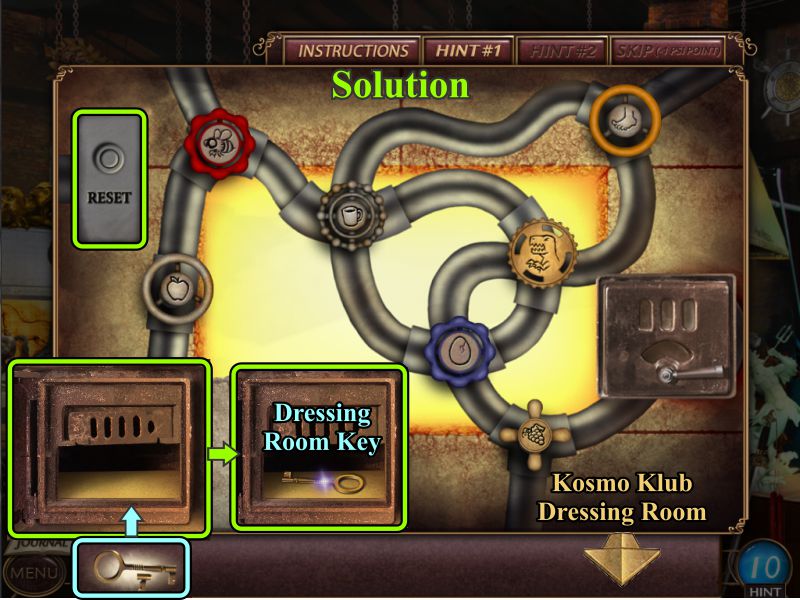
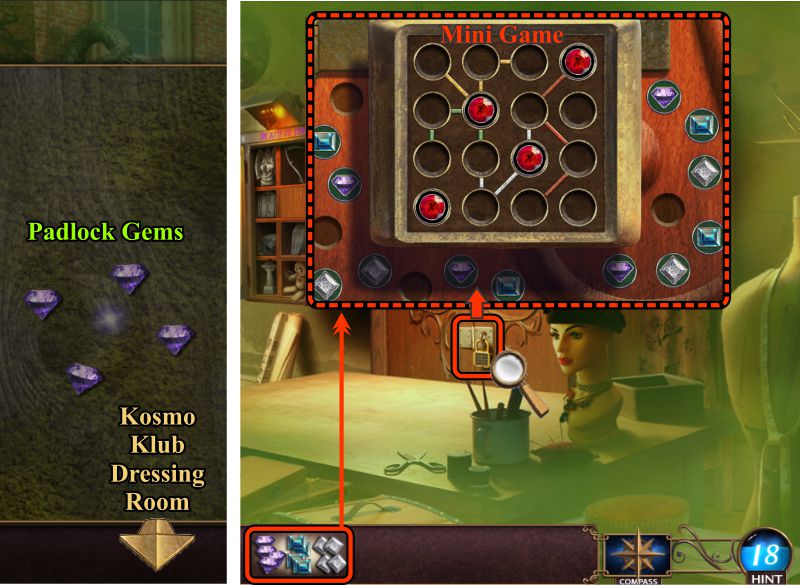
Kosmo Klub Dressing Room
Take the Padlock Gems and go to the Dressing Room at the Kosmo Klub.
Zoom in on the cabinet lock and place your Padlock Gems to trigger a Mini Game.
Screenshot
Padlock Gem Mini Game
This is a gem Sudoku type game, where each row and column can only contain one color of gems.
The added difficulty is that there is also a connected path which can also contain one gem of each color.
The 4 red gems are already placed, so try a gem of another color and place them in each column until you have completed the game.
See the screenshot for one solution.
Take the Poison Antidote, and the green haze will disappear.
Screenshot
Chapter 8: Le Soleil
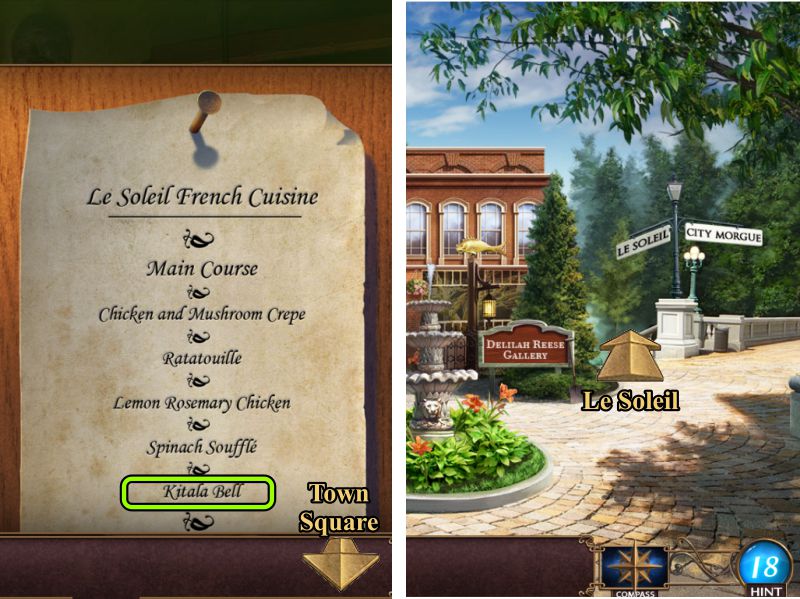
Menu and Town Square
Check out the menu for Le Soleil to find that Kit is listed as the last main course.
Go to Town Square and head to Le Soleil restaurant.
Screenshot
Le Soleil Door and Dining Room
Someone broke into the restaurant, so enter the Dining Room and check the magnifying glasses to find out your tasks.
Go to the Kitchen.
Screenshot
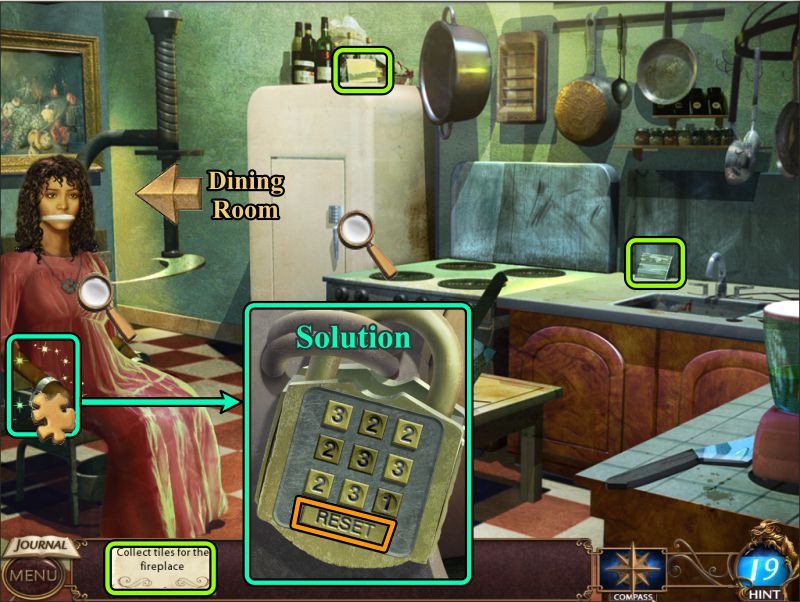
Kitchen
Kit is there handcuffed to a chair with a guillotine like device attached.
Zoom in on the padlock for a Mini Game and press the necessary buttons to remove the padlock.
Each button has a certain number of surrounding buttons that must be pressed, including diagonally.
See the screenshot for the solution.
Collect the two Fireplace Tiles, then examine Kit's amulet, which appears to be keeping her in a trance.
The amulet is a clue as to where you can find the missing parts because it has burn marks and is dirty.
Return to the Dining Room.
Screenshot
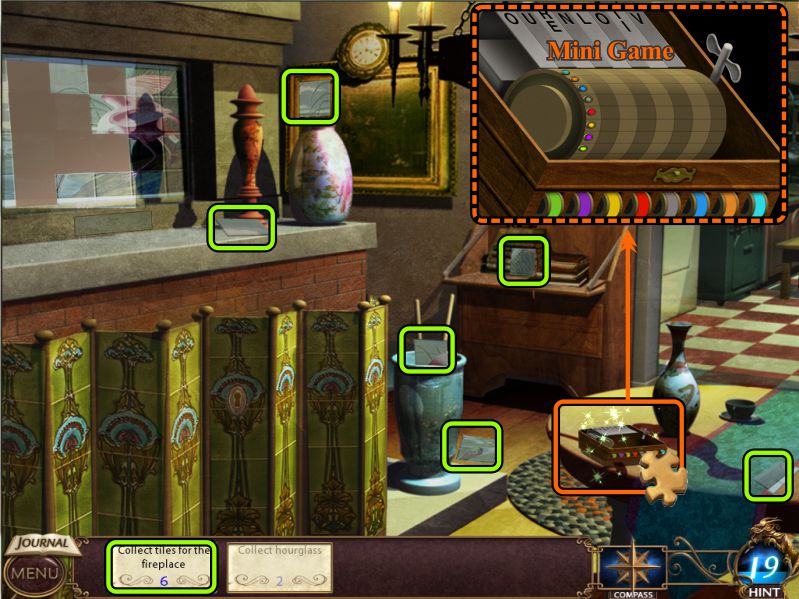
Dining Room
Collect more Fireplace Tiles, then zoom in on the music box on the table for a Mini Game.
Screenshot
Music Box Mini Game
Move the colored pins around the barrel as shown in the screenshot.
Click on the crank, and letters will appear at the bottom.
Grab the Fireplace Key.
Screenshot
Dining Room
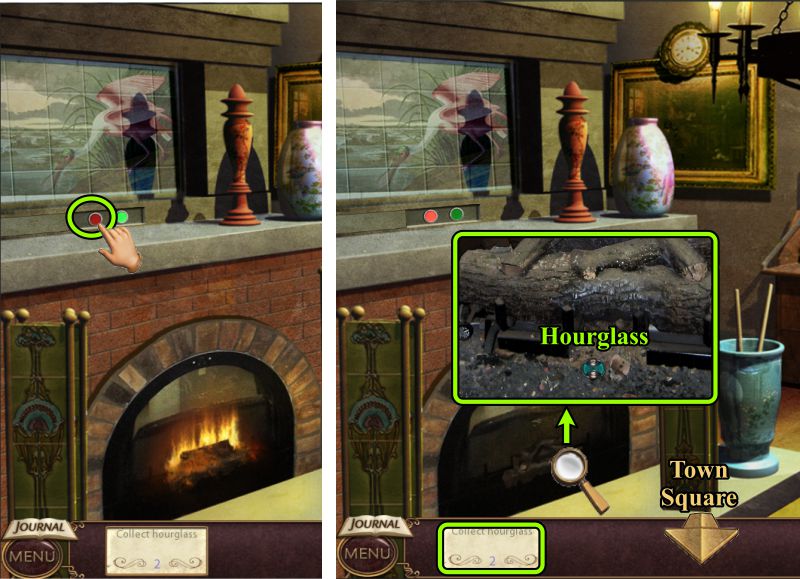
Zoom in and place your Fireplace Tiles above the mantel.
Use the Key to open the fireplace screen.
Screenshot
Backstage
Push the red button above the mantel to stop the fire.
Pick up the Hourglass from the fireplace, then go to the Town Square.
Screenshot
Town Square and Outside Gallery
Pick up the Shovel and head to the Gallery.
Use the Shovel on the dirt pile to uncover another Hourglass.
Return to Le Soleil Kitchen.
Screenshot
Le Soleil Kitchen
Zoom in and place the Hourglass parts in the amulet to trigger a Mini Game.
Screenshot
Amulet Mini Game
Your goal is to destroy the amulet by turning all the skeletons upside-down. Turning one hourglass will also turn two others.
There is a Reset button in case you need it. See the screenshot for a numbered solution.
The amulet cracks and Kit is free.
Screenshot
Antique Ring
After your conversation with Kit, she gives you an Antique Ring that was given to her by one of the bribed guards.
Kit feels it to get a PSI Vision.
Screenshot
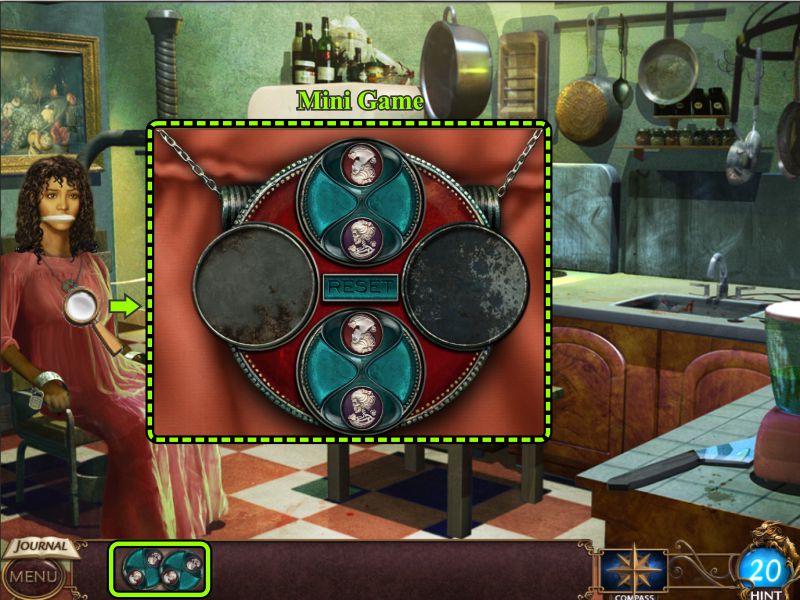
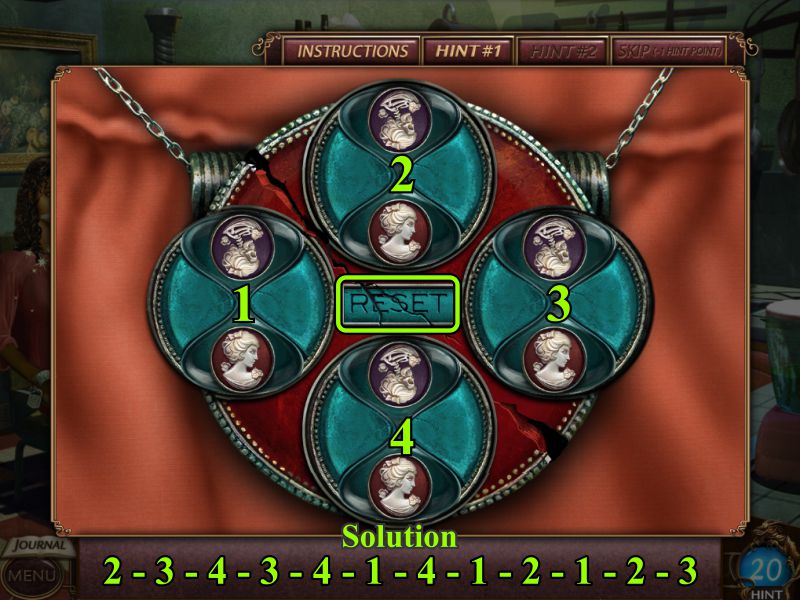
PSI Vision Mini Game
See the screenshot for samples of this Match 3 game in which your goal is to turn the background to purple.
Screenshot
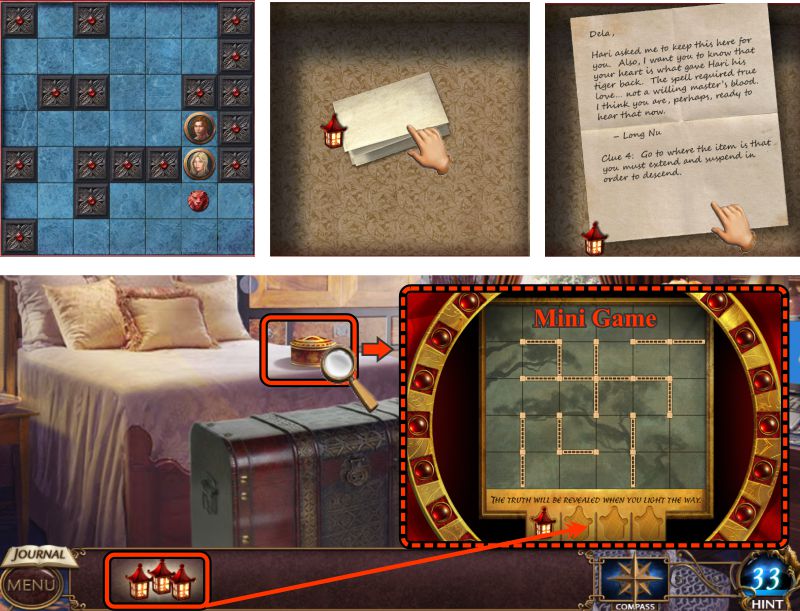
Chapter 9: Long Nu
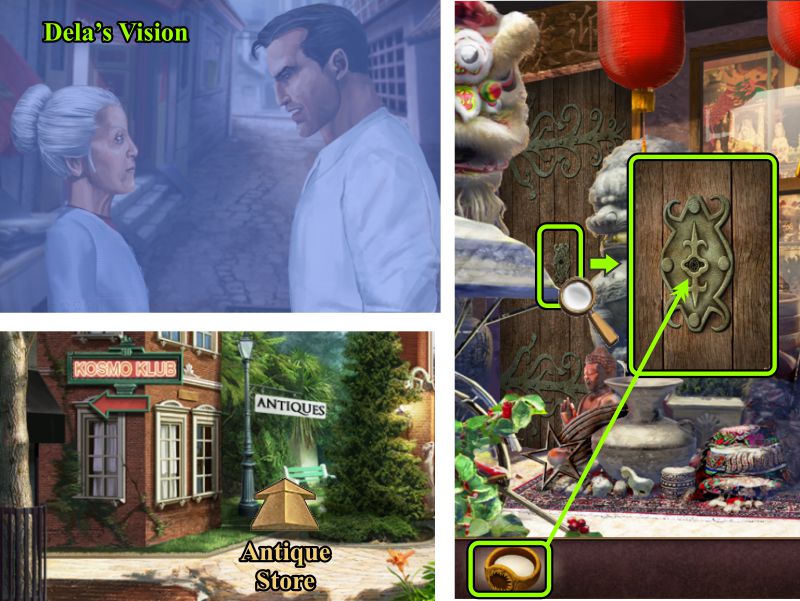
Dela's Vision and Antique Store Exterior
Dela's Vision shows the Magi threatening Long Nu, the woman in China who sold her the riddle box.
Dela wants more information about the ring, so go to Town Square and head to the Antique Store.
Zoom in on the lock and use the ring to open the door.
Screenshot
Antique Store
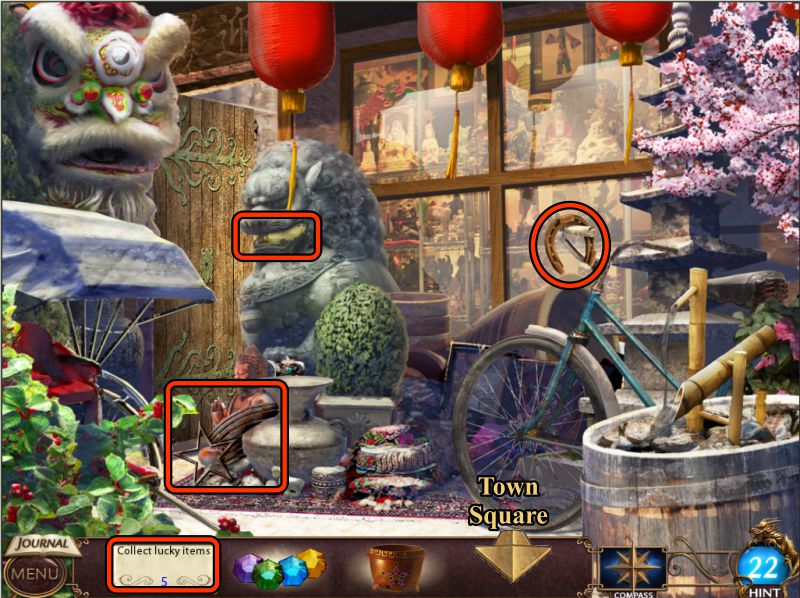
Inside the store is Long Nu, who is in Rose Apple to help Dela break the curse and restore Hari's shape-shifting ability. She gives Dela an ingredient list for a potion: 8 lucky items, a magic vessel, and gems to activate the vessel.
Screenshot
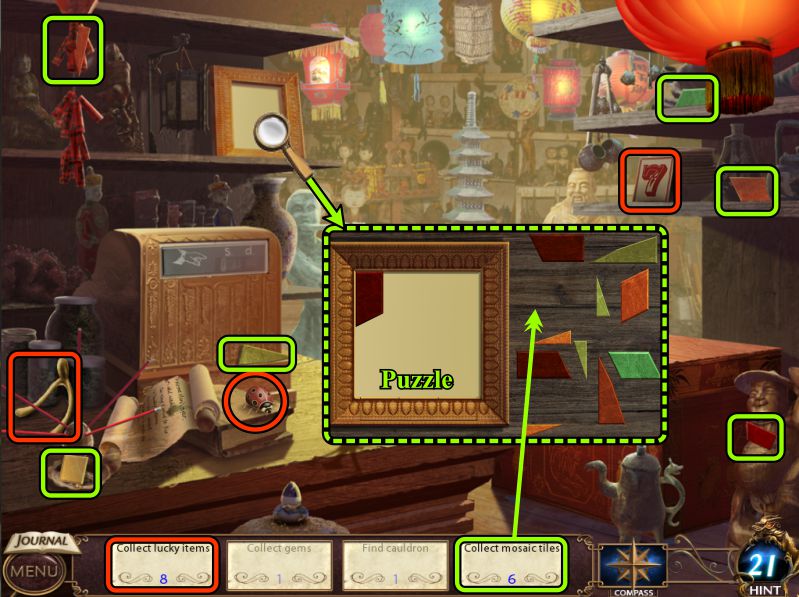
Collect the available Lucky Items and the 6 Mosaic Pieces.
Zoom in on the frame and place the Mosaic Pieces to trigger a puzzle.
Screenshot
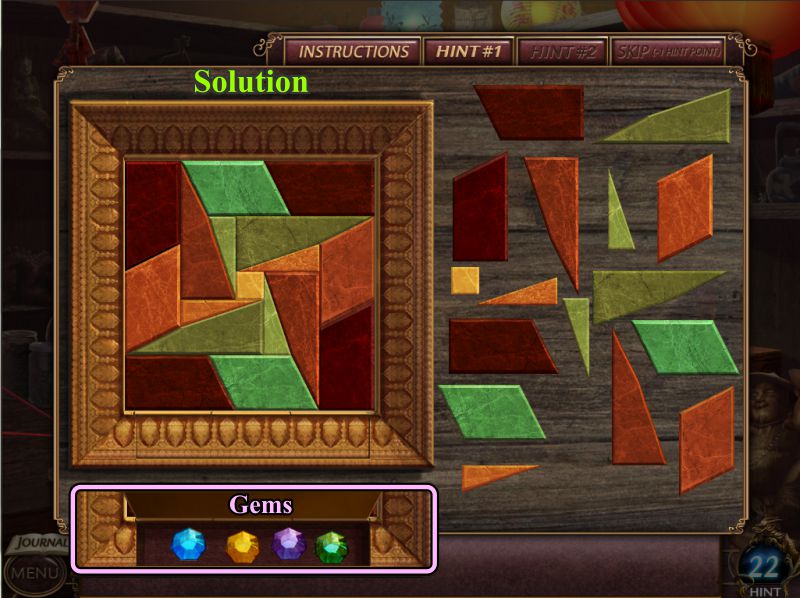
Mosaic Puzzle
Piece together the Mosaic as shown in the screenshot.
Collect the Gems.
Screenshot
Chest
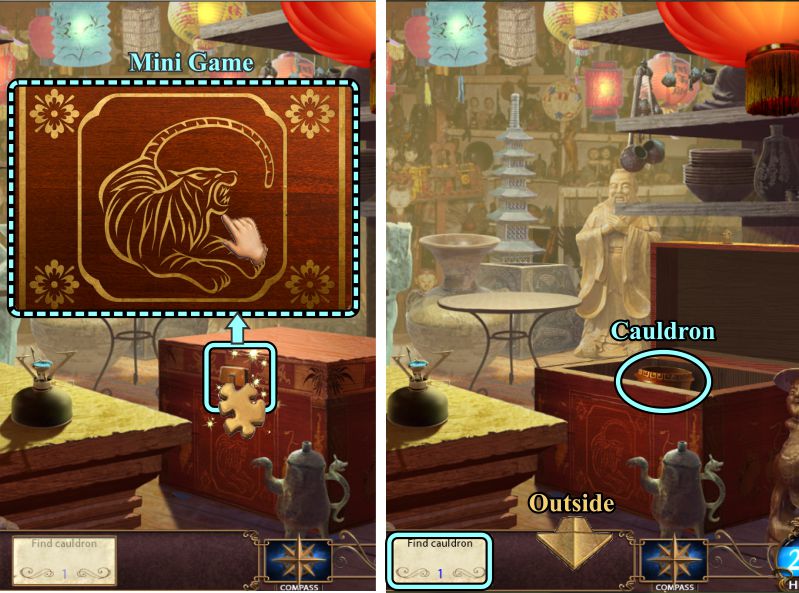
Zoom in on the chest and touch the lock to trigger a Mini Game.
When you have opened the chest, take the Cauldron and go Outside.
Screenshot
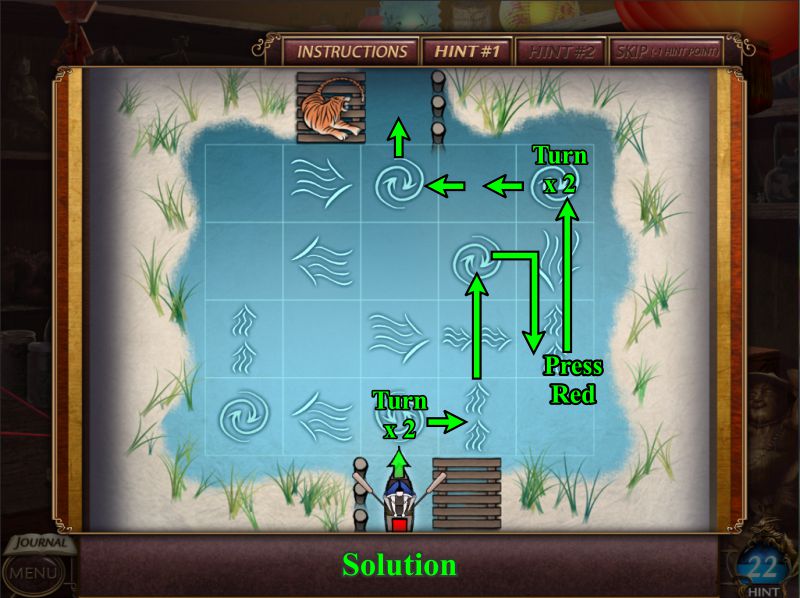
Chest Mini Game
Your goal is to get the boat across the lake to the tiger using the currents in your path.
Spirals turn the boat around counter-clockwise, and arrows move the boat either one or two spaces in the direction of the arrow.
There are 2 buttons on the boat: a green arrow to move it forward, and a red "Wait" button that can be used to turn the boat around in a current.
See the screenshot for the path to take to get you to the tiger.
Screenshot
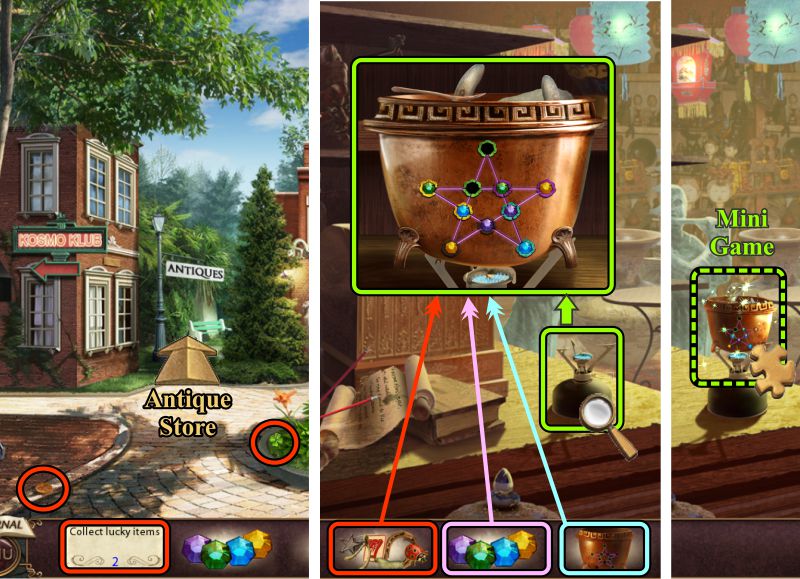
Antique Store Exterior
Collect the Lucky Items and go to the Town Square.
Screenshot
Town Square and Antique Store
Collect the Lucky Items and return to the Antique Store.
Zoom in on the burner and place the Caldron, the Lucky Items, and the Gems to trigger a Mini Game.
Screenshot
Cauldron Mini Game
Your goal is to activate the Caldron by moving the gems around so that they match the colors on the star of the Caldron.
There is a Restart button if needed.
See the screenshot for the first set of step-by-step moves.
Screenshot
See the screenshot for the final steps.
Screenshot
See the screenshot for the solution.
Watch the cut scene.
Screenshot
Metal Manipulation
You have 10 clicks in which to turn everything to the silver solution.
See the screenshot for the numbered solution.
Screenshot
Chapter 10: Wen Khang's Death
Outside Gallery
Kit saw somebody outside the Gallery near the shed so go there.
Look at the lock and collect the two Lock Parts.
Go inside the Gallery.
Screenshot
Gallery
Collect the two lock parts and return Outside.
Screenshot
Outside Gallery
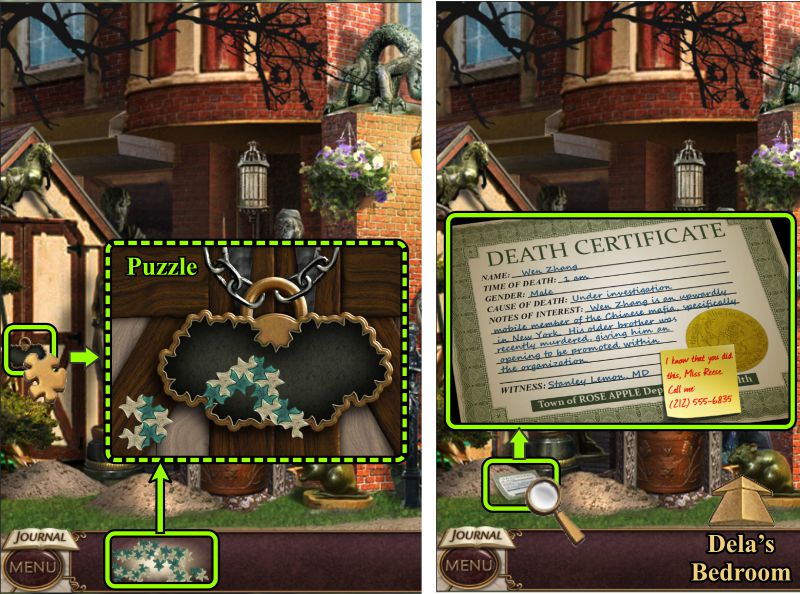
Zoom in and place the Lock Parts to trigger a puzzle to open the lock. When you open the shed, a grim reaper ghost flies out and drops Wen Zhang's Death Certificate.
Go to Dela's Bedroom.
Screenshot
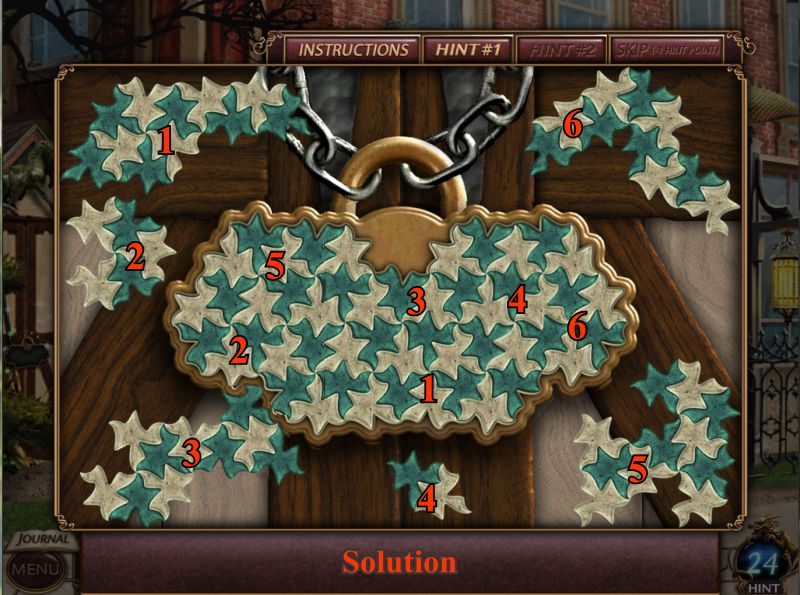
Shed Lock Puzzle
Rotate the puzzle parts as necessary and place them on the lock.
See the screenshot for a numbered solution.
Screenshot
Dela's Bedroom
Zoom in on Dela's computer to find evidence she didn't kill Wen Zhang.
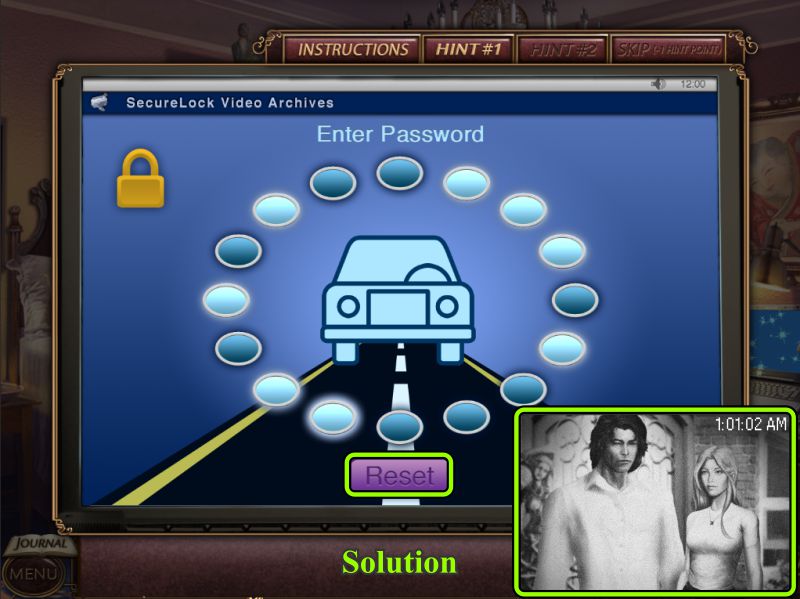
Press the Securelock Video Archives to trigger a Mini Game to enter the password.
Screenshot
Computer Password Mini Game
Your goal is to press the correct combination of buttons to create the image password.
Your clue to the image is the background.
One way to solve the game is by turning on all the buttons and taking away the pieces you don't need.
There is a Reset button if you need it. See the screenshot with the lit buttons and the image solution.
Dela finds a security photo showing Hari with her at the exact time of the murder.
Screenshot
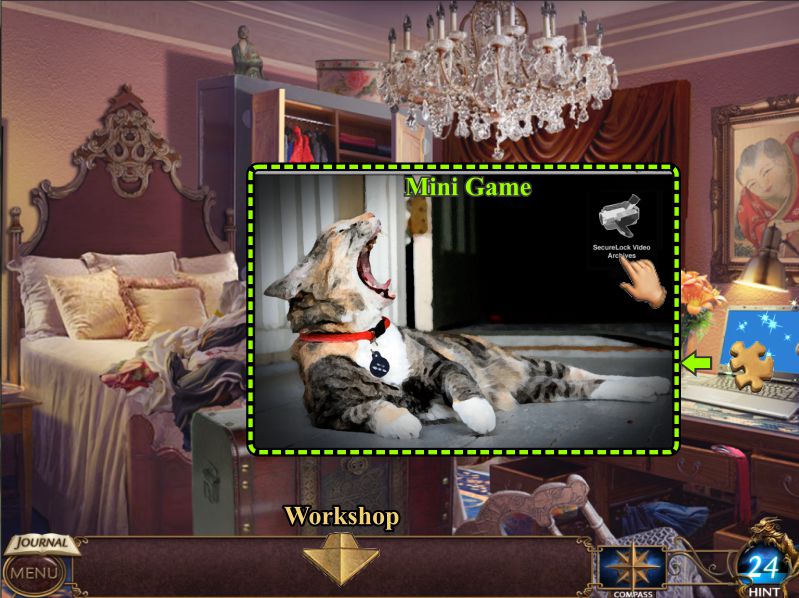
Workshop
Go downstairs to the Workshop and zoom in on the antique telephone for a Mini Game to repair it.
Screenshot
Antique Telephone Mini Game
Your goal is to rewire the phone so you can use it to call Wen Zhang's henchmen and prove you are innocent of his death.
Once you complete the circuit on the left, the instructions will move over for you to complete another circuit on the right.
Click between the posts to add a wire, and click twice to remove it.
The numbered squared indicate how many pieces of wire need to be surrounding that square.
See the screenshot for the solution.
Screenshot
Chapter 11: Return to the Morgue
Outside Morgue
A key will no longer open the Morgue, so you will have to deal with the thumbprint machine and find a keycard.
Click on the envelope on the doorstep to find a note left by one of the Morgue employees.
Complete the puzzle to get information about a keycard.
Screenshot
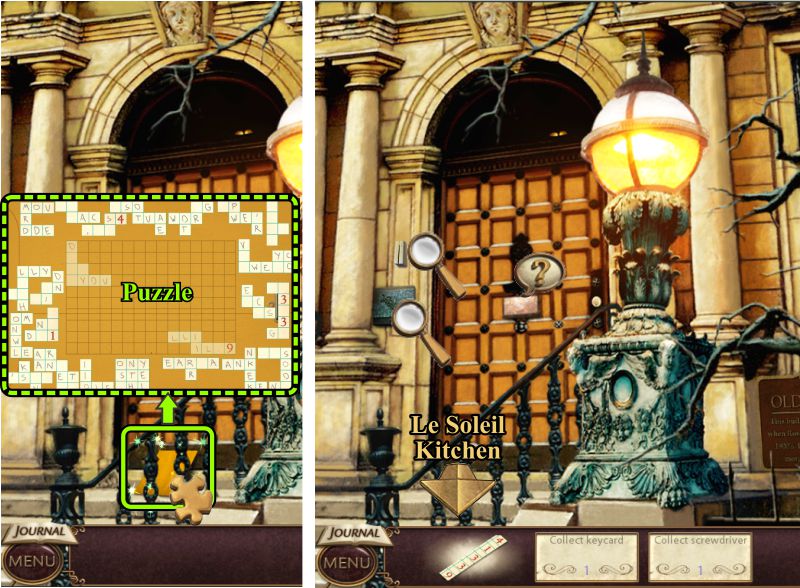
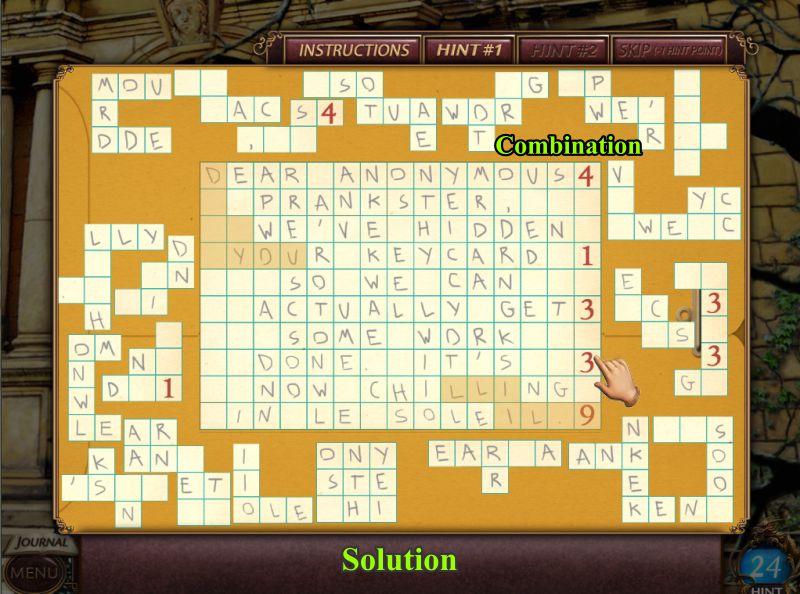
Anonymous Note Puzzle
Using the pieces of the puzzle, fit them back together as shown in the screenshot.
Take the numbered column which appears to be a combination, then head to Le Soleil.
Screenshot
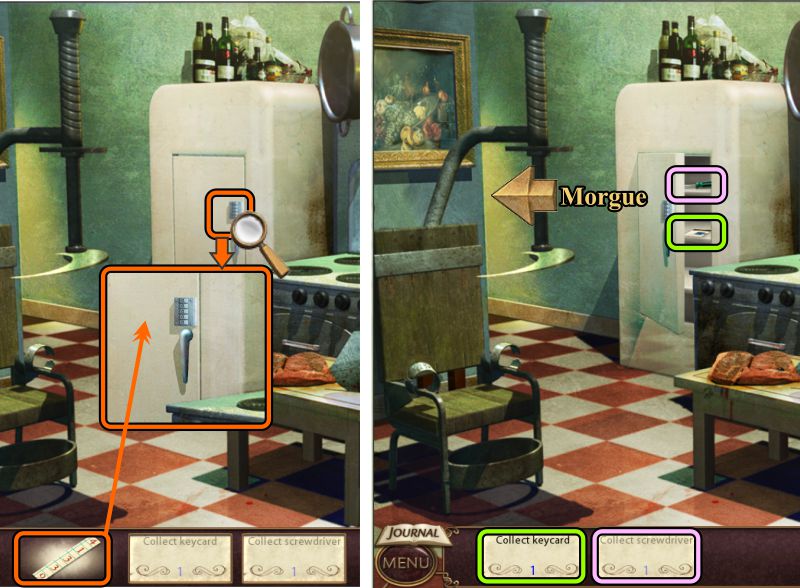
Le Soleil Kitchen
Since the note mentioned chilling, go to the kitchen, zoom in on the freezer, and place the combination.
Take the Screwdriver and Keycard, then return to the Morgue.
Screenshot
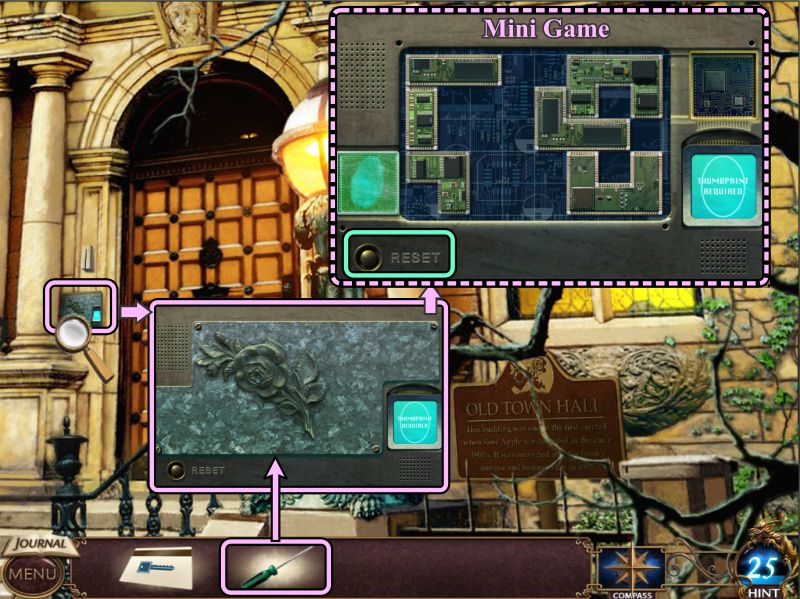
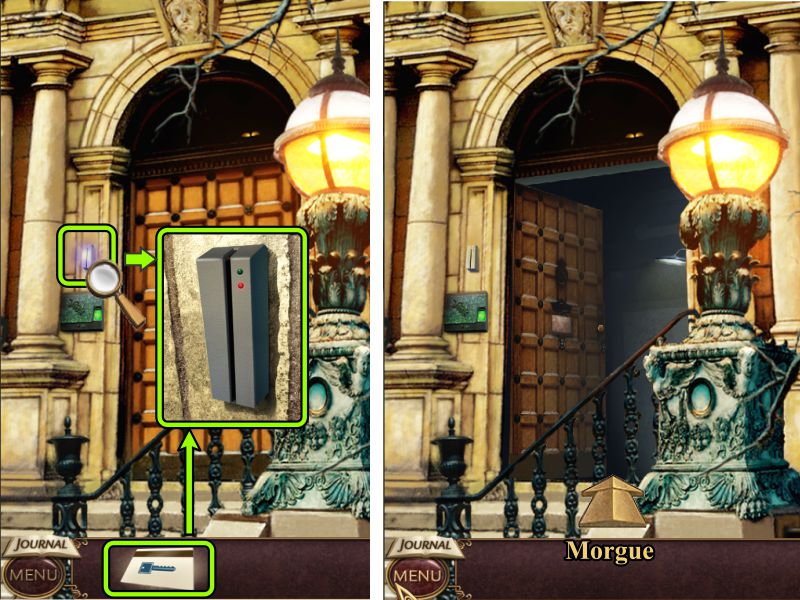
Outside Morgue
Zoom in on the thumbprint machine and unscrew the panel to trigger a Mini Game.
Note the Reset button in case of need.
Screenshot
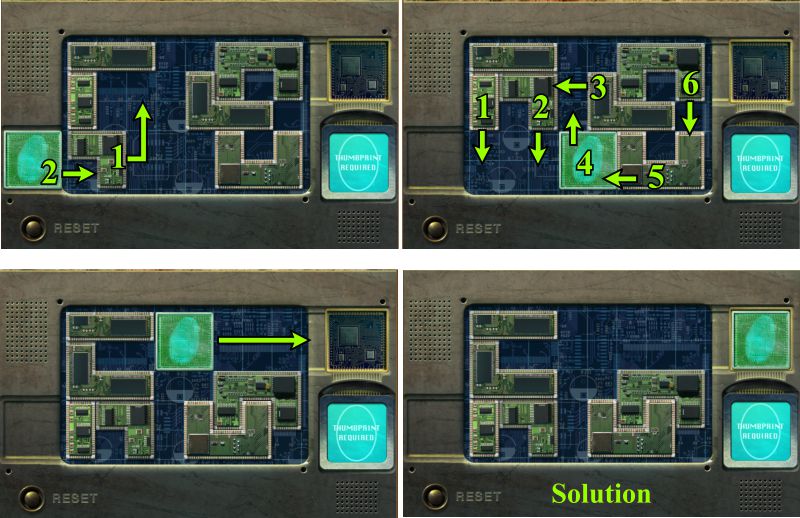
Thumbprint Machine Mini Game
Your goal is to slide the circuits around to get the print to the upper right corner.
See the screenshot for a step-by-step solution.
Screenshot
Outside Morgue
Zoom in on the keycard machine and swipe your Keycard.
Enter the Morgue.
Screenshot
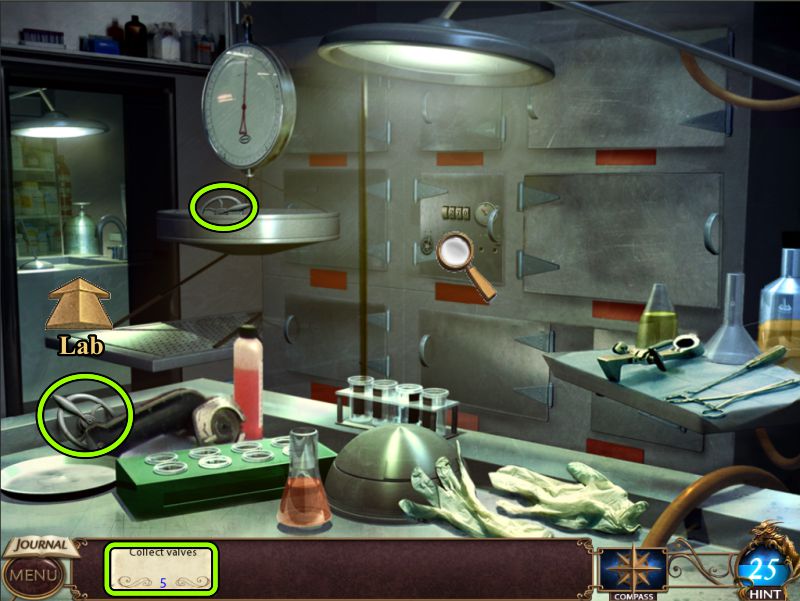
Morgue
Zoom in on the drawers to find out you need to find the valves.
Pick up the two Valves there, then go to the Lab.
Screenshot
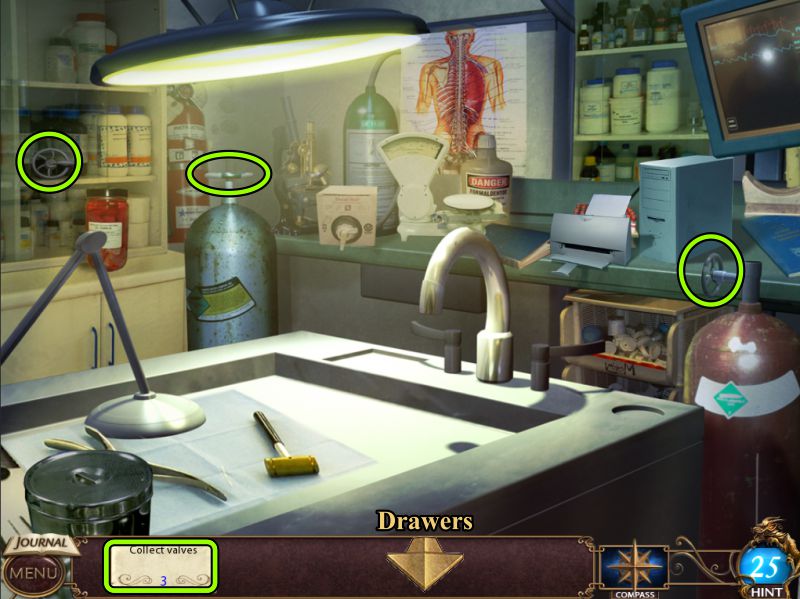
Lab
Collect the remaining Valves, then return to the drawers.
Screenshot
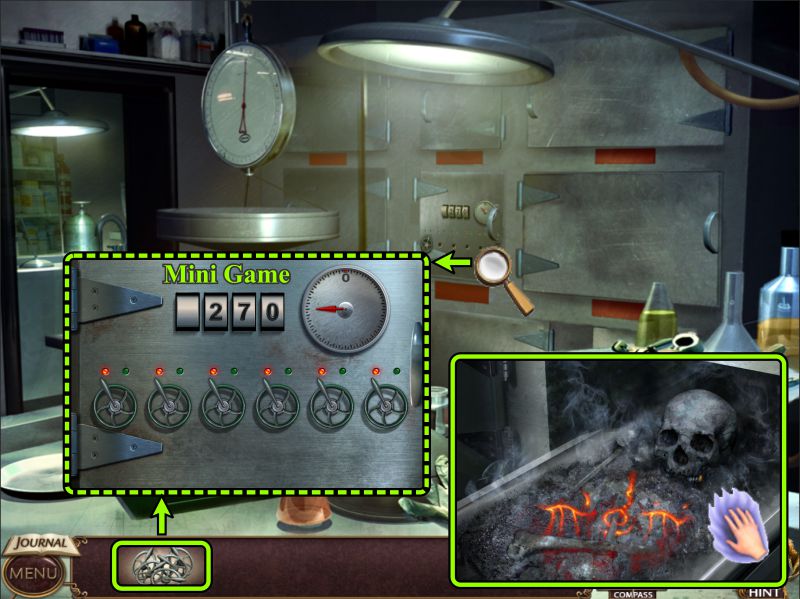
Morgue
Zoom in and place the Valves for a Mini Game.
When the drawer opens, Wen Zhang's remains appear, and Dela needs to get a psychic vision from them.
Screenshot
Valve Mini Game
Your goal is to turn the valves so the gauge shows zero degrees and the door can be opened.
See the screenshot for the solution.
Screenshot
PSI Mini Game
See the screenshot for sample selections.
Your goal is to turn the background green.
Screenshot
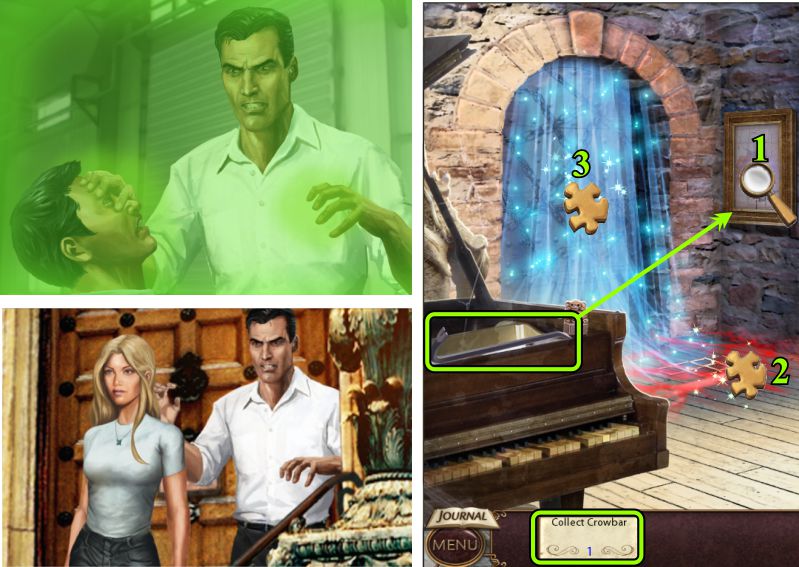
Chapter 12: Escape the Magi
Morgue and Magi's Basement
Dela's vision shows that the Magi killed Wen Zhang. As she hurries out of the Morgue to warn Hari, the Magi captures her and takes her to his liar.
Click on the framed picture to find out you need something to remove it to find the safe Dela can sense is under it.
Collect the Crowbar on the piano and rip the frame from the wall.
You need to disable the magical alarm on the floor, so click on it for a Mini Game.
Also examine the magical Veil over the door for another Mini Game.
Screenshot
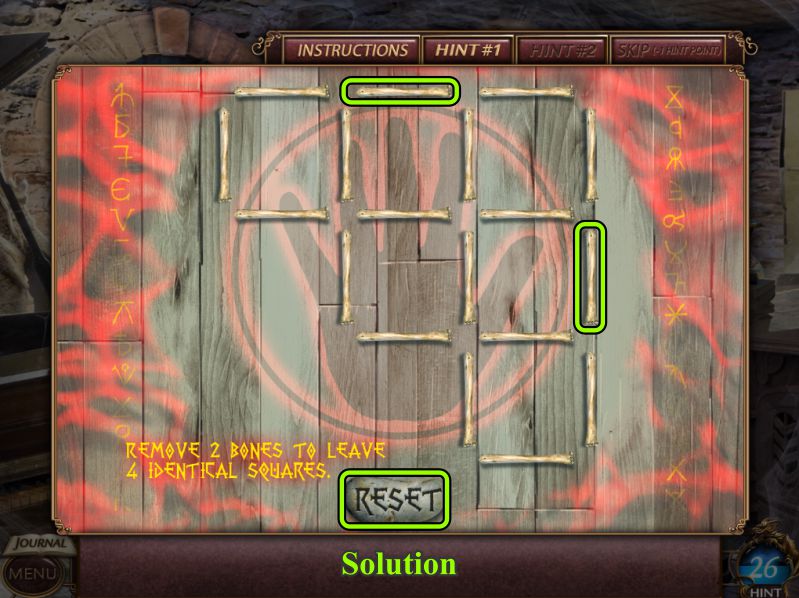
Magical Alarm Mini Game
Remove the 2 bones shown in the screenshot so you are left with 4 identical squares.
Screenshot
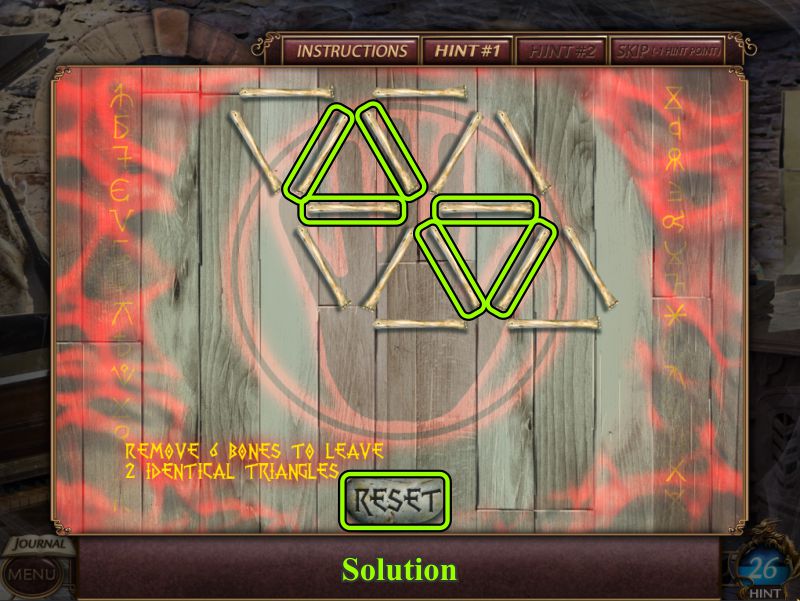
For part 2 of the game, you need to remove 6 bones to leave 2 identical triangles.
See the screenshot for the solution.
Screenshot
Magical Veil Mini Game
Your goal is to move all the symbols to their correct spaces on the veil so that their colors match.
Use the swap and rotate buttons to achieve your goal.
See the screenshot for a step-by-step solution.
Screenshot
When you remove the veil, you find out the door is still locked with chains.
Examine the safe for another Mini Game.
Screenshot
Safe Mini Game
Your goal is to turn the board to get the key to the lock.
See the screenshot for the step-by-step solution.
Screenshot
Basement Door
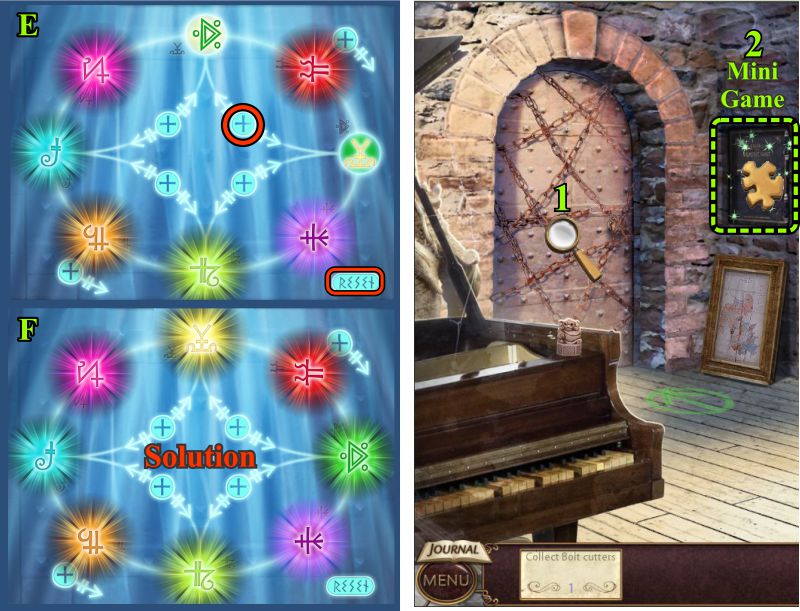
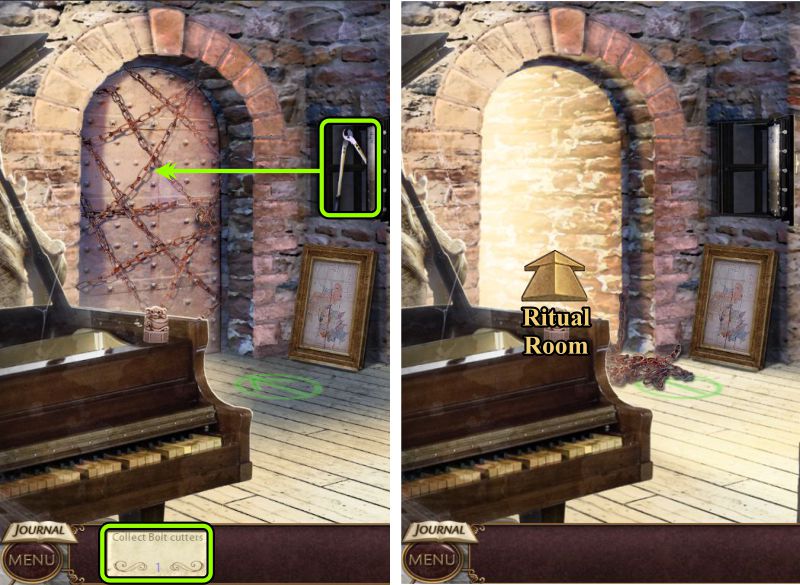
Take the Bolt Cutters and remove the chains so you can leave the room.
Screenshot
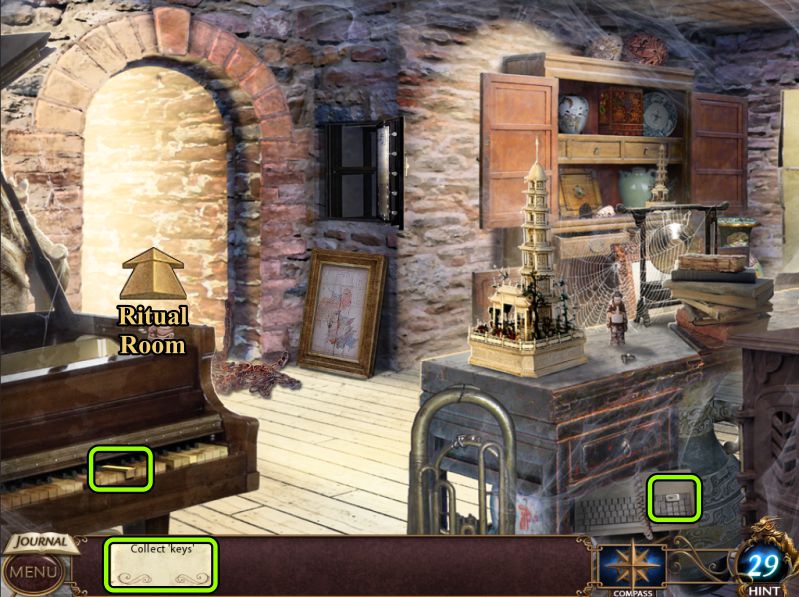
Ritual Room
Examine the door and clock for your tasks.
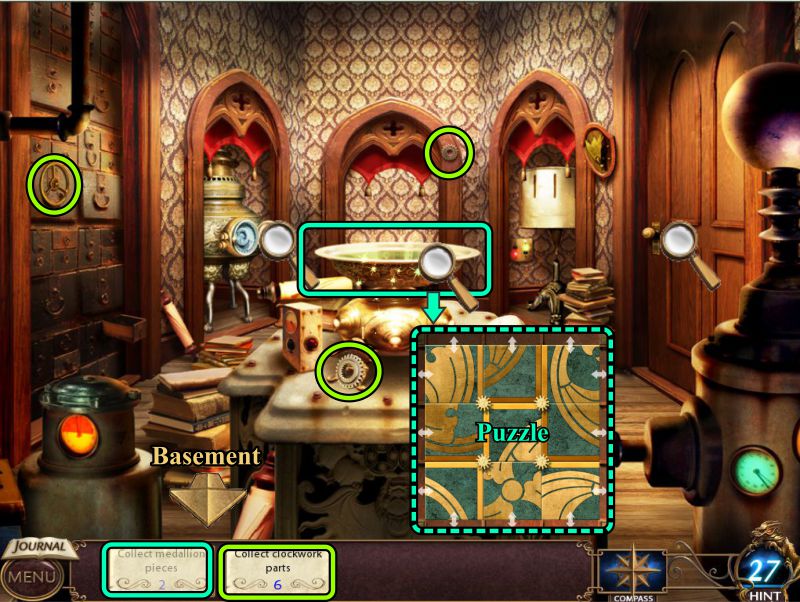
Collect the available Clock Parts and zoom in on the fountain for a Puzzle.
Return to the Basement in search of more items.
Screenshot
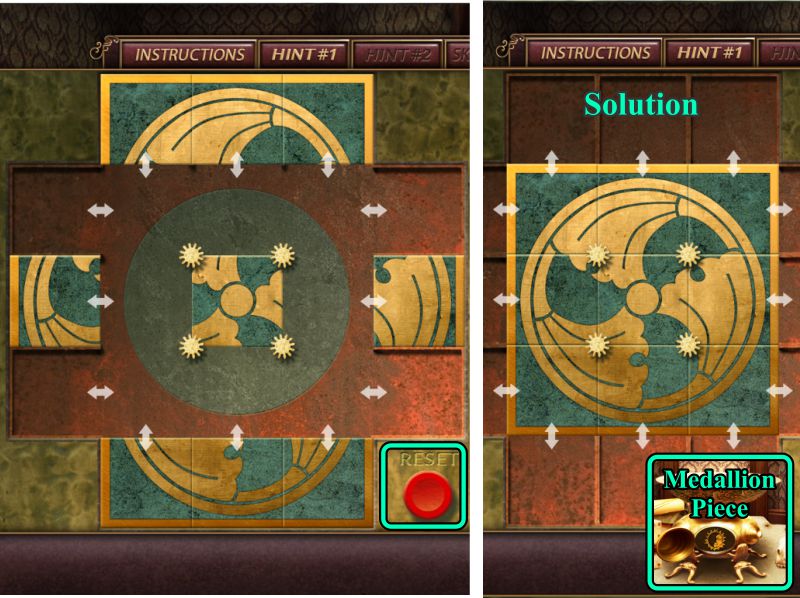
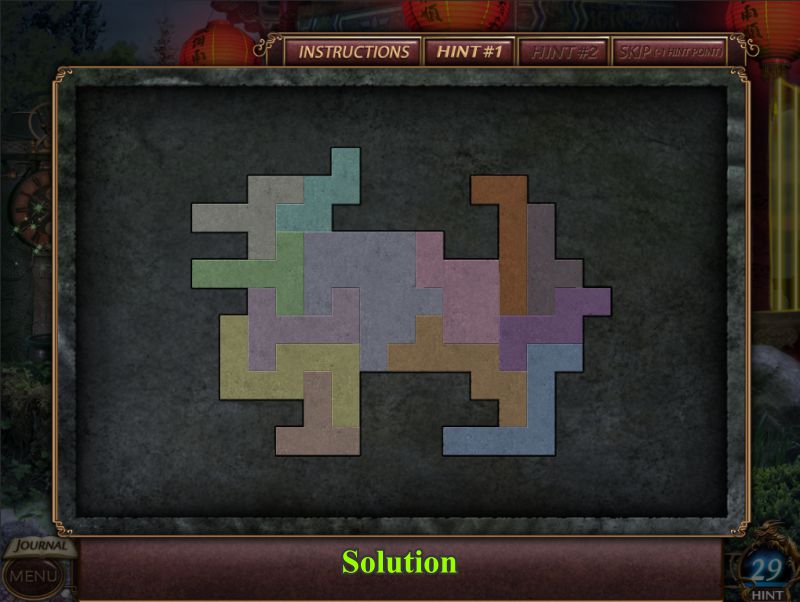
Fountain Puzzle
Your goal is to unscramble the image and place it in the center.
Click on the gears to rotate the surrounding tiles. Use the arrows to move tiles into spaces along the sides.
Rotate the tiles so you can move all the edge pieces to the outside.
Once you have the edge pieces there, all you need to do is move them to the middle.
See the screenshot for the solution.
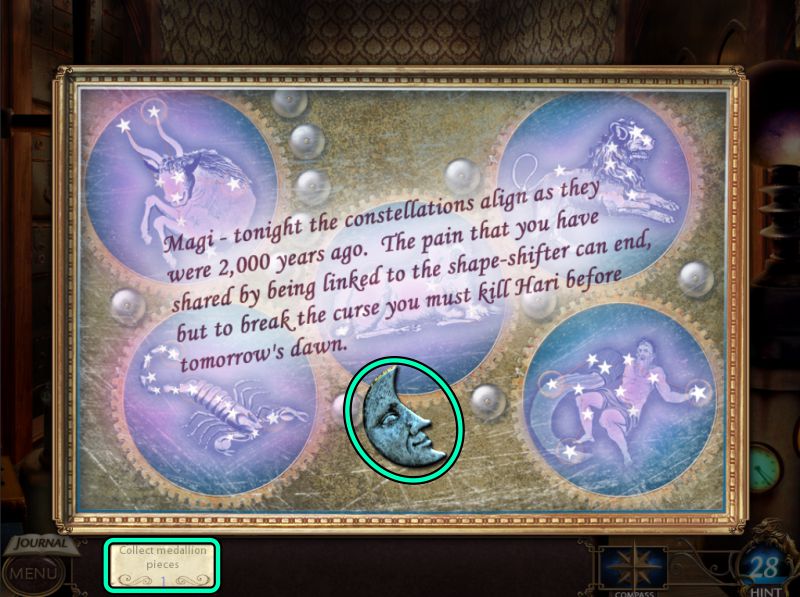
Take the Medallion Piece from the compartment in the fountain.
Screenshot
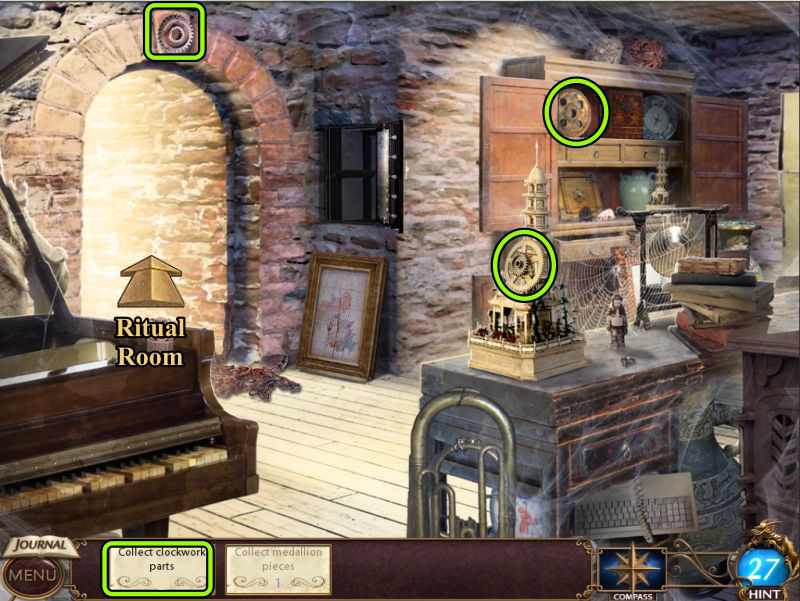
Basement
Collect the Clock Parts and return to the Ritual Room.
Screenshot
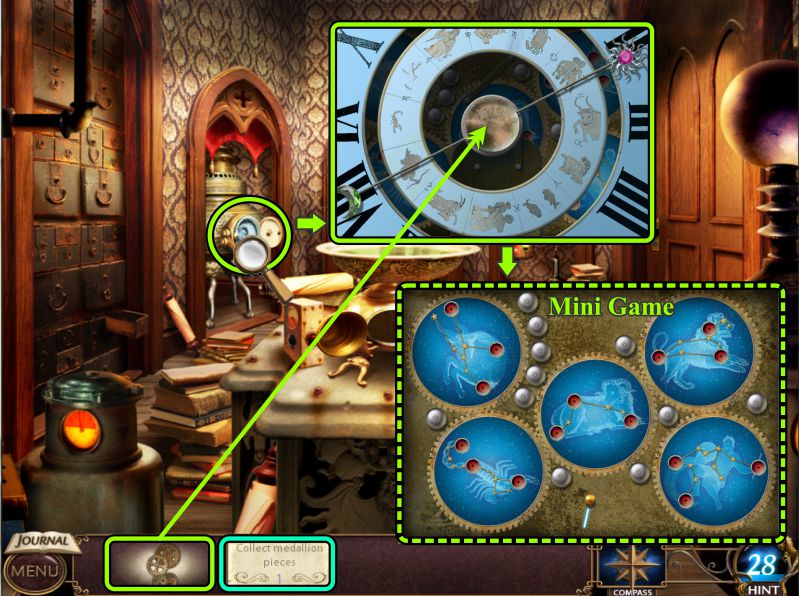
Clockworks
Zoom in and place your Clock Parts to trigger a Mini Game.
Screenshot
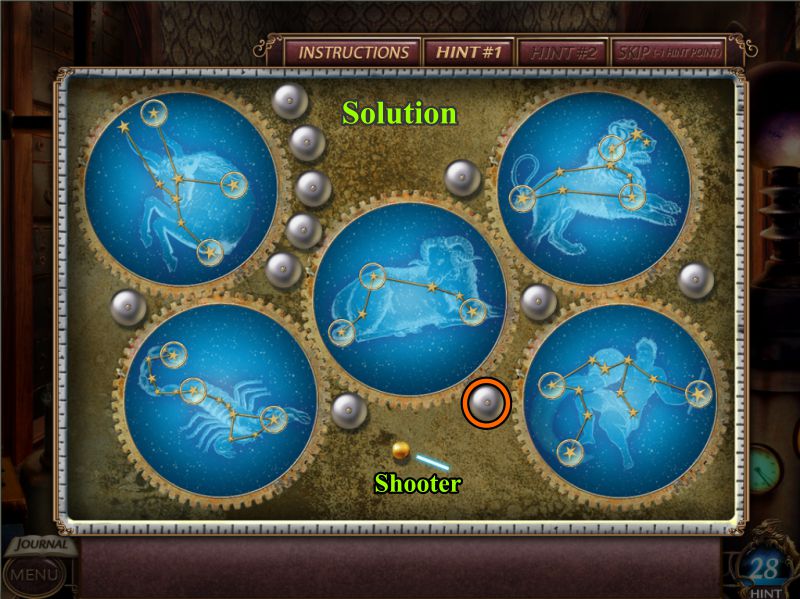
Constellation Mini Game
Your goal is to complete the constellations by shooting stars into them.
Move the shooter to the angle you want and then click to shoot the star.
The game is sort of like playing bumper pool because you need to use the walls and bumpers to help get the stars where you want them.
The most difficult area is the upper left, so try shooting off the bumper marked in red in the screenshot solution.
Screenshot
Read the message and take the Moon Medallion.
Screenshot
Outside Door
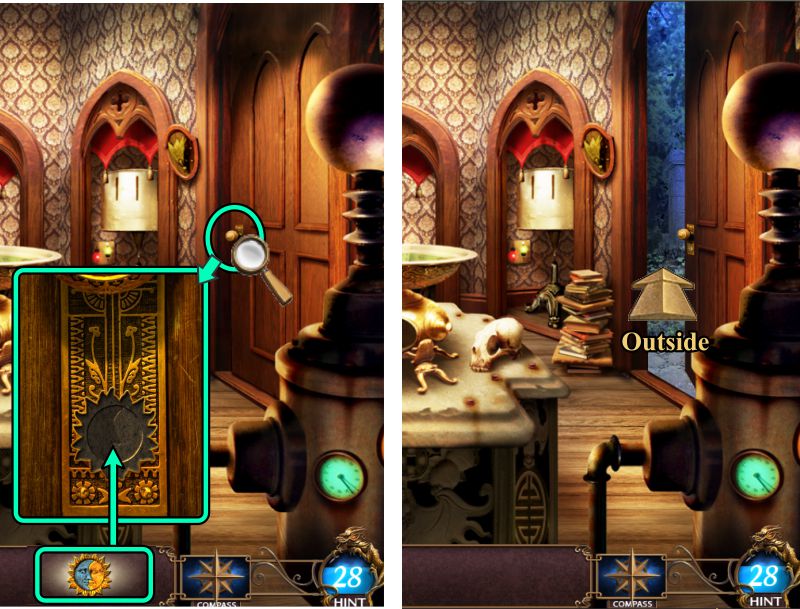
Zoom in on the door, place the completed Medallion, and go Outside.
Screenshot
Chapter 13: The Showdown
Garden
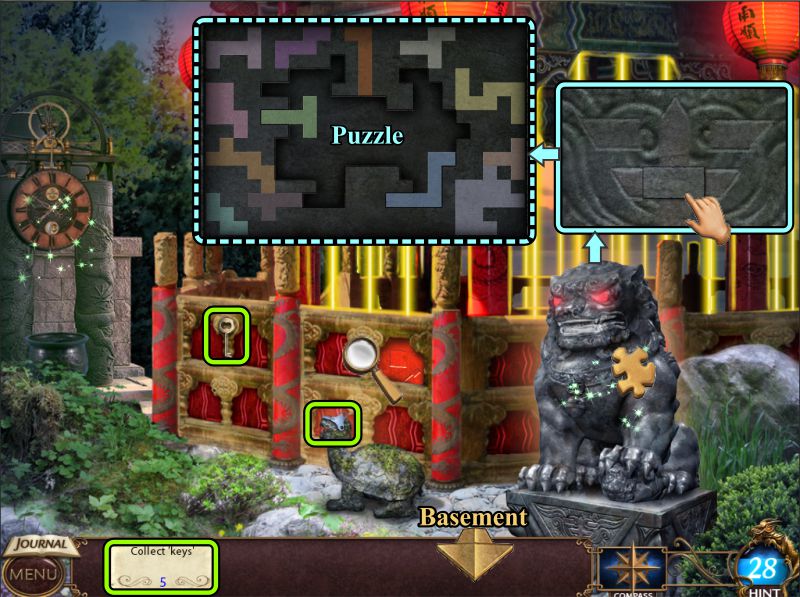
The Magi has set up a trap for Hari in the gazebo, and it appears there are several elements that need to be deal with in order to deactivate it.
Click on the gazebo to learn you need to find some keys.
Collect the two there and go to the basement after you've dealt with the Fu Dog.
Zoom in on him and remove the plate to reveal a Puzzle.
Screenshot
Fu Dog Puzzle
Rotate the pieces and arrange them in the puzzle to form the shape of a dog as shown in the screenshot solution.
You have deactivated a portion of the gazebo.
Screenshot
Basement
Collect a couple more Keys, then go to the Ritual Room.
Screenshot
Ritual Room
Collect the note Key under the fountain and go Outside.
Screenshot
Outside
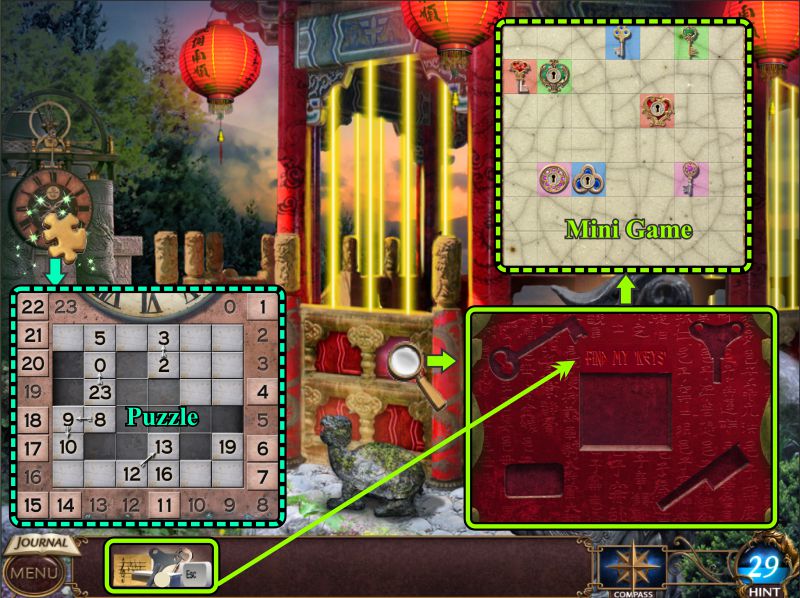
Zoom in on the Water Clock for a Puzzle.
Zoom in on the gazebo and place the Keys to trigger a Mini Game.
Once you have played both games, you will have deactivated the gazebo.
Screenshot
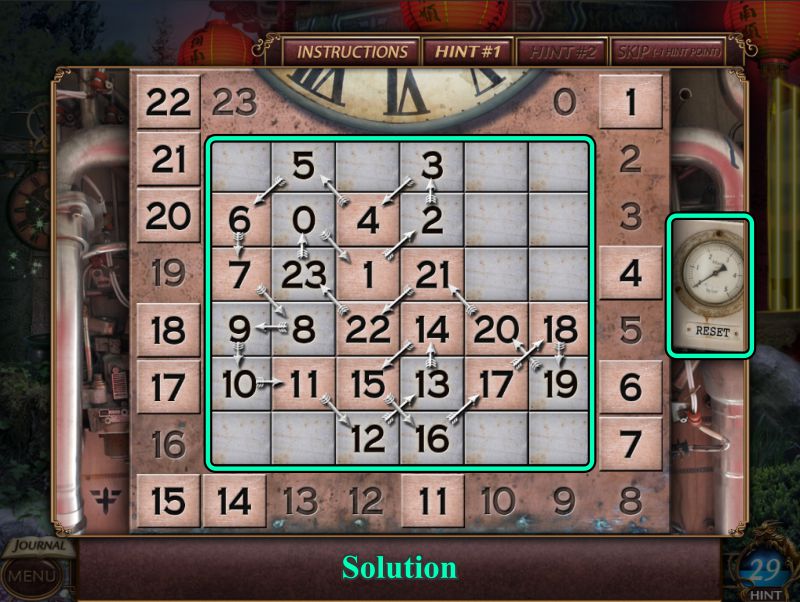
Water Clock Puzzle
Move the numbers on the outer edge into the puzzle to create a circuit of adjacent numbers in numerical order.
The connectors for the circuit can be in any direction.
See the screenshot for the solution.
Screenshot
Gazebo Key Mini Game
Your goal is to connect each color key to its lock.
Click on a key and paint a path of that color to the lock of the same color.
The paths cannot cross each other.
Se the screenshot for a solution.
Screenshot
Metal Manipulation
The Magi arrives to see his trap has been disabled. Watch the cut scene, then complete this metal manipulation to destroy him forever.
This time there are two silver squares, and you have 8 clicks to turn everything else silver.
See the screenshot for a numbered solution.
Screenshot
Chapter 14: Scavenger Hunt
Dela's Bedroom
A month later, Hari and Dela are back in Rose Apple and Hari has left Dela a note on her bed.
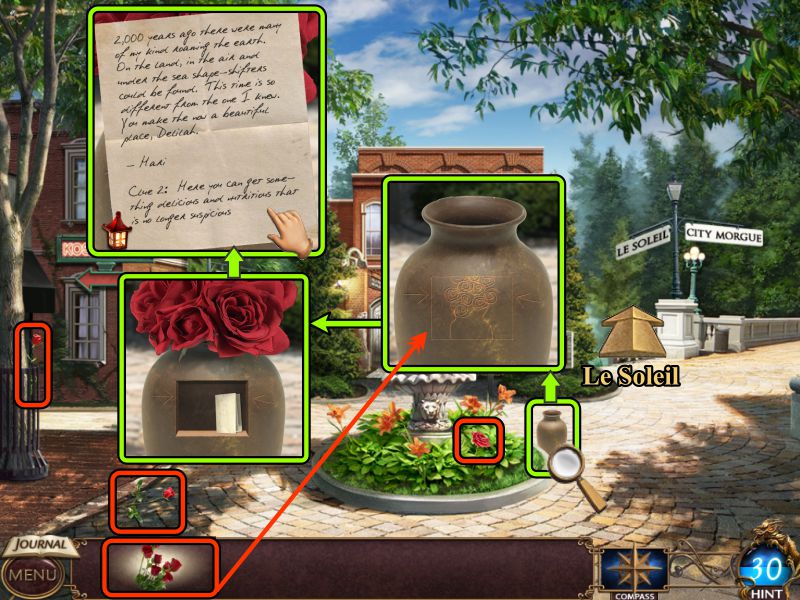
Read the note and take the Rose.
Go outside the Gallery.
Screenshot
Outside Gallery
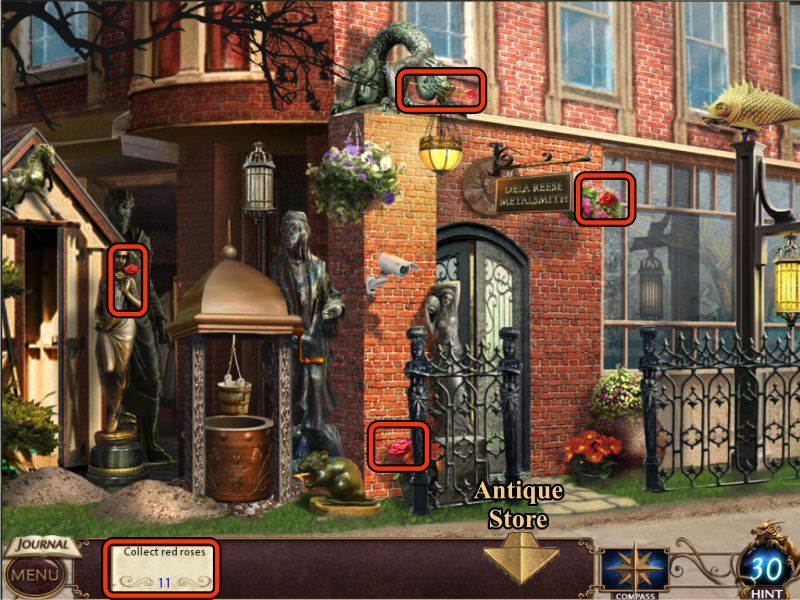
Collect more Roses, then head to the Antique Store.
Screenshot
Outside Antique Store
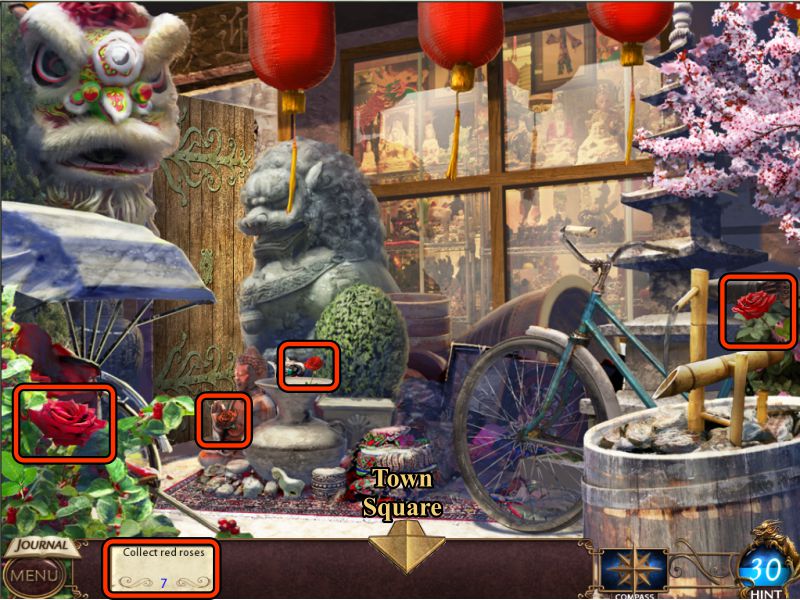
Collect more Roses and go to Town Square.
Screenshot
Town Square
Collect the rest of the Roses and zoom in on the vase.
Place the Roses in the vase, and it opens with another note.
Read the note, collect it to get the Lantern, and go to Le Soleil.
Screenshot
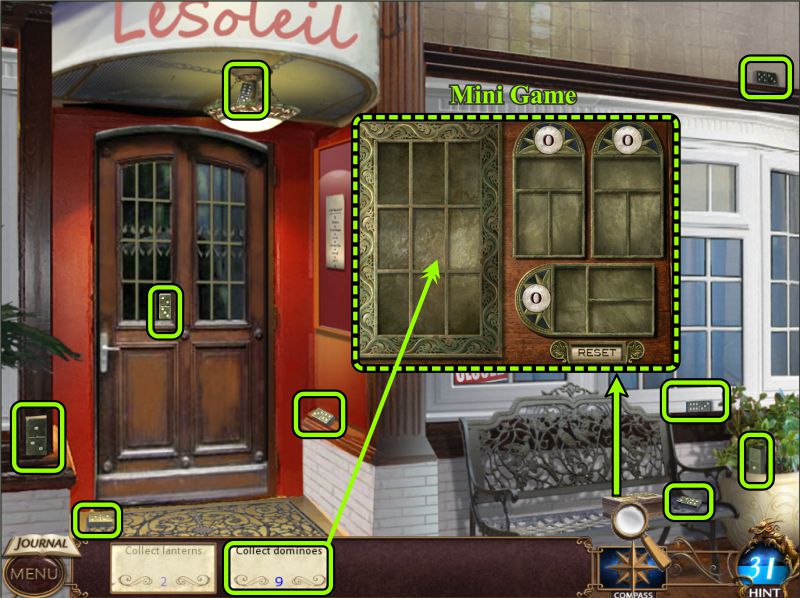
Outside Le Soleil
There is a box on the bench, so click on it to find out it's missing its dominos.
Collect the 9 dominos, zoom in on the box, and place them for a Mini Game.
Screenshot
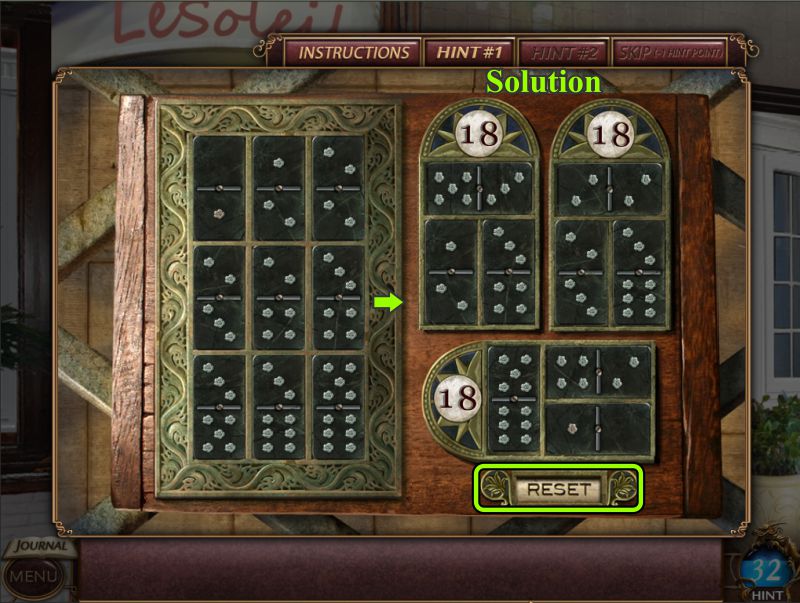
Domino Mini Game
Place the dominos on the left in the squares to the right so that each box adds up to the same number.
See the screenshot for the solution.
Screenshot
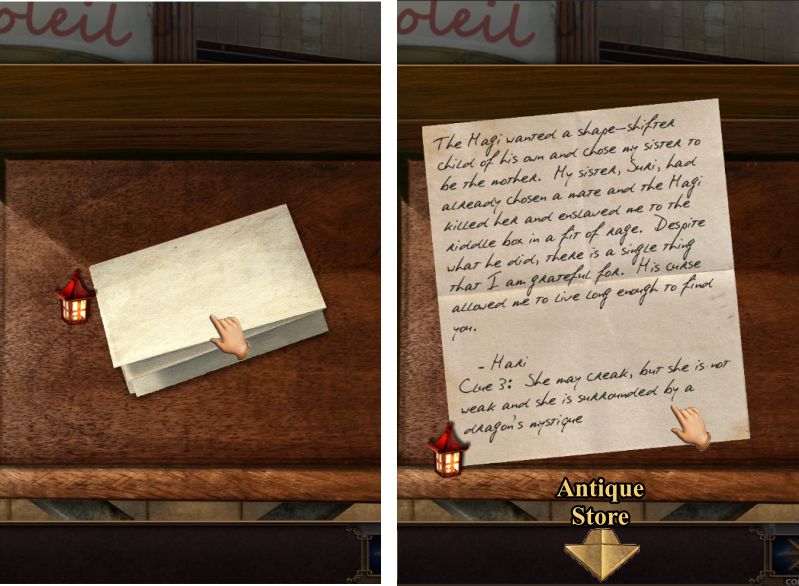
There is a note inside the box, so read it, collect the Lantern, and head off to the Antique Store.
Screenshot
Antique Store
Click on the box on the table for a Mini Game, and then go to Dela's Bedroom.
Screenshot
Hari and Dela Mini Game
Your goal is to use the arrows on the tiger to push Hari and Dela around the board until they meet in adjacent squares.
See the screenshot for the first steps to the meeting.
Screenshot
See the screenshot for the step-by-step conclusion.
Screenshot
Antique Store and Dela's Bedroom
After the solution, the box opens with yet another note. Read the note, take the Lantern, and go to Dela's Bedroom.
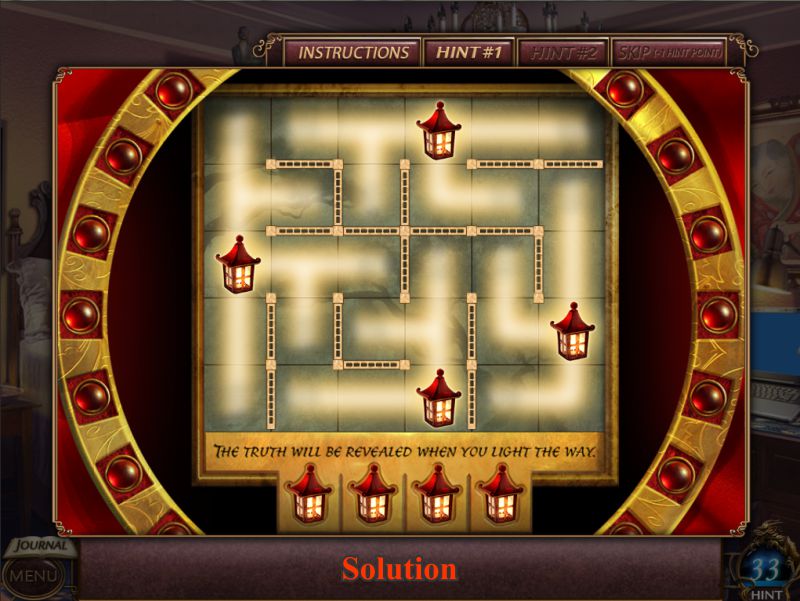
The Riddle Box is on her bed, so zoom in on it and place the Lanterns to trigger a Mini Game.
Screenshot
Lantern Mini Game
Your goal is to place the Lanterns to light the whole board.
See the screenshot for the solution.
Screenshot
Happily Ever After
Read the note, take it for your Journal, and watch the cut scene.
Screenshot
Congratulations, you have completed Tiger Eye: The Sacrifice, so Hari and Dela can have their happily ever after.
Posted by: Jazz |
May 11, 2012 4:52 PM
|
May 11, 2012 4:52 PM