
Wayward
Platform: Mac, Windows, Linux, Javascript/HTML5
![]() Carry on, my wayward sooo-o-on! Whether it's from belting out prog-rock standards way too loud at 2 a.m., a mugging after having a night of one drink too many, or just plain getting shipwrecked, the protagonist of Unlok's new crafting survival adventure Wayward (currently in BETA) definitely isn't in Kansas anymore... but that's only good news for you! You wake up on a desert island with no recollection of what happened, nothing but a few shoddy tools to your name, and you're thinking what we'd probably all be thinking in a situation like that: TREASURE! It's going to take a whole lot of fortitude to make it, but with a bit of ingenuity and plenty of raw natural resources just laying around you'll be throwing together everything but coconut radios before you know it.
Carry on, my wayward sooo-o-on! Whether it's from belting out prog-rock standards way too loud at 2 a.m., a mugging after having a night of one drink too many, or just plain getting shipwrecked, the protagonist of Unlok's new crafting survival adventure Wayward (currently in BETA) definitely isn't in Kansas anymore... but that's only good news for you! You wake up on a desert island with no recollection of what happened, nothing but a few shoddy tools to your name, and you're thinking what we'd probably all be thinking in a situation like that: TREASURE! It's going to take a whole lot of fortitude to make it, but with a bit of ingenuity and plenty of raw natural resources just laying around you'll be throwing together everything but coconut radios before you know it.
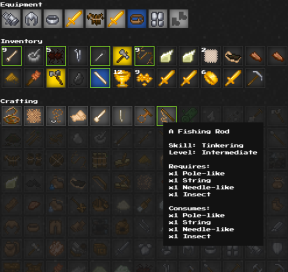 Movement is via the [arrows], though the mouse option is there as well if that's your preference. For inventory and crafting management, it's mouse all the way as you use and slot your vast array of items and equipment. Everything including the combat is turn-based. Crafting aficionados are going to be thrilled with this system. Recipes for which you've got all the items will display at the top of your list, with the rest greyed out. Each recipe tells you what you'd need to craft it, and hovering the mouse over it will also highlight what you've got in your inventory to make it happen. There are no levels, classes or experience points here. Using skills gradually improves them, and you'll occasionally learn relevant new crafting recipes in the process.
 Death is permanent, so don't expect to be taking your settlement or items with you, though you'll keep any recipes you learned. Unlok's site features a Save / Load add-on for the previous beta version of the game, but as of this writing it appears to be outmoded by the latest beta release so for now it's probably better to leave a browser tab open for it. And do take notice, Wayward is still in beta. It's been exceptionally stable when we played through it though, and the only problems we encountered beyond the Save / Load modding were mild latency and a tendency for equipment being slotted not to register with the mouse the first time. Which is pretty darn good for a game this complex still being in beta, and we definitely wanted to bring you its phenomenally detailed crafting system. Wayward is available for all the major operating systems, and probably several brands of toasters as well, so you have no reason for not playing it! All crafting and survival buffs, just cross out the rest of your weekend now.
![]() Windows:
Windows:
Download
![]() Mac OS X:
Mac OS X:
Download
![]() Linux:
Linux:
Download for 32-bit systems
Download for 64-bit systems


Walkthrough Guide
(Please allow page to fully load for spoiler tags to be functional.)
Wayward Beta 1.3 General Guide and Hints
on Firefox
Disclaimer: I am maxed out in crafting, so am not sure how it unfolds with skill. Each self-contained section is for a progressively higher difficulty, so you can stop when you've had enough hints.
Don't be surprised if you land in a game without any Sandstone. It happens.
Welcome to the Menu! We've got fun and games.
Keep the hints/tutorial on, and refer to it.
Good morning! Those messages at the top are your turn-by-turn status updates. The game's TURN-BASED—time moves as you move. Spacebar or clicking on yourself will skip a turn (or pick up an item under you, or enter/exit a CAVE). Messages are archived on the bottom left.
Also on the bottom left is the INVENTORY button. Click it open! (Or tap I!) Resize it! Love it.
Equipment
The two slots with sword-and-shield equip tools/weapons which stand between the world and your delicate hands. Previously the right-handed slot took damage first, but now it seems both slots will now take damage, besides a second-hand TORCH. (The third slot is for your neck armor, and is usually filled by something called a gorget.)
Hand-held attacking and armor defense must be equipped; projectiles live in the inventory, like they're in your pocket or sheathe. Remember what is equipped! One or both can take damage while Inventory's closed.
Inventory
Here's your stuff! You can use anything out in the open here. That means you can double-click your shovel and it will dig. Important: crafting recipes only activate when all necessary items (in quantity) are showing in your inventory, out of their containers.
Crafting
This is your stuff from the future. If you know the recipe, and you have all the components in view, you can craft these lovely items! (Maybe.) Crafting is a SINGLE CLICK push-button operation, not double-clicking. Mousing over will tell you everything else, including highlighting the components in inventory.
Quickslot
That 9-square keypad on the bottom right is an extension of inventory, like a tool-belt. You can drag items there that have double-click uses. Double-click or tap the corresponding bottom-right numbers. Great for the frequently used. You cannot craft with these. If you're watching your weight: the top left number is quantity of these items. Right-click to return it to the inventory and drop the extras.
Is your game too slow? Try clicking OPTIONS and turn off Animations. Other useful options include toggling Auto Gather.
Status bars across the bottom speak for themselves. Low stamina and hunger will drag down your health. Hunger, like your distended stomach, has a fixed limit. STATUS is the most urgent—might not want to ignore bleeding. Moving while over weight limits will drain stamina (see the weight section).
This one's important: nearly all items have hit points just like your own stats. That means they'll wear out. Unless you REPAIR them... read on for more.
Item Use Basics
The key to this 2-D interface is that you are surviving a 3-D environment. Does it attach to the ground? Is it lying on top of something? How tall is this object? Can I walk or float on it? Is it see-through? All this is intuitive, and will affect how you interact with anything. The only omniscient device is the mini-map on the bottom right.
Items and environment can react to: single clicking, double clicking, and right clicking. Mouse-drag your items otherwise. Need information? Items in their squares: mouse-over. Environment: right-click.
You can click to move, or use several different keyboard directionals (no lefty discrimination here). First click/tap can change direction you're facing, next one starts you moving.
Typically, right-clicks DROP or PLANT. You can now toggle this at the bottom of the Inventory window (the button says "Double Click:"). Note: dropping an item is not the same as installing/building it, typically a double-click. (More in the container section.) Any kind of harvest, including the bloody harvest of battle, is done by running into said objects—with whatever equipped hand-held leading.
Mousing over some items? Some of them belong to GROUPS, which denote special uses or crafting types.
Groups are not the same as the actions you can perform with the item—described with double-click or right-click. For instance you can eat Seaweed and also craft with it as a Rope-like item.
Recipes especially are very specific! "A Rope" is not the same as the Rope-like group.
Again: crafting is SINGLE-CLICK of highlighted recipes. Accidental crafting happens; resize the inventory window as needed.
Mousing over a crafting recipe will show the necessary ingredients, and also highlight them if they're in Inventory.
You can't choose which components are used. Especially watch Sharpened weapons sitting in Inventory, as their "hit points" are used up with each crafting. (If you're discovering recipes, you may want to drop any item you don't want to craft with—like a lone item in its group, or a tool/weapon on its last legs.)
Environment: You must be facing elements to use them. Hence, facing a Wooden Chest or a fire source and right-clicking an item will drop that item into that element.
There are some terrain restrictions, mostly intuitive. Notable ones include—you can lay down plantable items on any stone/rock surface, or a floor. Also note where fires can be started. Your feet will treat shallow water as solid ground, but buoyant objects only see more water.
Can you walk into the flames? Yes you can. And you will get burned. (Though I have harvested things that are on fire.)
Everything's on a grid, so all use/attacks/aiming are perpendicular. Useful if you're agile enough to evade hungry monsters. The exceptions are the tranquil spread of plants, and light effects spilling diagonally through the gap in the trees... illuminating that hungry monster. Oh, and some things don't care about walls, just so you know.
Screenshot example: Screenshot
Beginner's Luck
Keep your KINDLING. You'll need that.
Learn how to make a fire. And how fire behaves. See first landing objectives for a bit more.
Equip the SHOVEL. All handheld tools can be used universally, except specialized uses like CARVING and DIGGING.
Best tool is that SHARP ROCK, of course. There are others in the Sharpened group that can be crafted, but the SHARP ROCK is usually in abundance.
Make lots of STRING. When you're bored, make string. Unless you're under attack, you're making string.
Save TREE BARK. Yes, it can make kindling, just don't run out of it.
Stockpile the non-spoiling food. It's the ones without the DECAY countdown.
Hit things and see what happens.
Gather SAPLINGS. You may not use them, and they're heavy, but if you decide you want them later, they'll likely have matured. Store them anywhere they can't be planted. P.S. They don't need any fertilizing. Just plant, even re-plant, and wait.
Craft one of each BONES. Fewer uses, more commonly used.
Value the versatile BRANCH. Many branches in the crafting tree.
The rocks quickly reveal their uses. (Pick your mine carefully, though! See below.)
Advanced... botany. Plant lots of COTTON. Their white puffs are quite random, but if you see some, harvest them, figure them out, and plant them near your favorite haunts. Planting edible foodstuffs is a good idea too.
Only dig out the plant, at first. See note on digging below!
Don't confuse CHARCOAL and COAL. (In this version they seem to be identical in use. This may change.)
When in doubt, craft or use or hit it. Excess resources can be made lighter, and crafting increases skill points.
Develop the skill of THROWING. These common projectiles don't need to be crafted.
Check Before You Dig
If you see any cave entrance, duck inside and make note of the map. Above- and below-ground maps superimpose nicely. Line up the dot of the cave entrance.
I'd hold off on extensive above-ground digging for two reasons: the materials/tailings are very heavy (see the weight section), and there is probably an underground CAVE system to fall into.
How? Where?
Digging (with a shovel) and mining (hitting rock walls) will likely open up a cave entrance—only when the bottom layer is DIRT, though. (So shorelines are usually clear.)
Usually taking something from the surface, like a plant or visibly embedded rocks, is not enough to make that Orphean leap. I have gotten that sinkhole feeling from stripping ASH or finally breaking down a ROCK wall.
Important: loose objects on the "landing spot" of a new cave entrance may be locked up there, and you'll have to mine it back out.
If you don't care where your cave entrances are, then ignore this. Otherwise...
Advanced tip!
Cave creatures are not easy to defeat, but there are fewer of them than above. Monsters can't follow you into or out of caves. If you can evade (Torches are handy for seeing them) or can survive the monsters, you can use them to circumvent obstacles.
Making your own cave entrance is easy.
Again, above-ground the terrain must open up into DIRT, including any demolished ROCK type (like that cliff you were hitting). Underground shafts can drop down into walkable areas that aren't over WATER. A shaft is a 3x2 block—each one just needs room to exit, plus the "archway" of stone on the top and the sides (though some tight spaces will generate an entrance without a side-wall). The 3 square wide entrances can be as close as adjacent to one another. Once you've picked a spot, start digging.
Not making a cave entrance is slightly trickier.
Mining or digging over a cavern beneath can open up shafts every two squares. To prevent this, you can build WALLS underground to support that cave ceiling. You'll have to plot exactly where the entrance will be generated with each 3x2 block.
All effort this requires high STAMINA, so it may be better to wait until you're strong enough to take more WEIGHT and do all that hauling.
Now that you know where cave entrances can't be, you can dig and mine in the sunshine with confidence! Like most of the environment, you won't discover what's beyond the surface if you don't keep digging.
Landing day objectives
Find shelter and a fire-source. (Water? You don't need no stinkin' water.)
Shelter:
You have to start scouting as soon as you land, because nightfall draws bigger, badder monsters. (Some monsters ignore walls.)
What do you need? You have to craft a DOOR. These are more like gates. You can stand in their thresholds, and move through them, but monsters cannot get past. (There's nothing wrong with randomly putting doors in all the narrow passages. Nope.)
Clever door positioning can seal off more than two spaces, as they can be installed on the diagonally from the wall/barrier.
Besides enclosed spaces, figure in size and shape. Too small, and there's no room for caches or fires. If it's massive, monsters may respawn inside your camp (I tried to enclose an entire desert. It was crowded.)
Sometimes you luck out and there's a crack in a stone wall that's just perfect. Other narrow fissures circle entire mountains, and while the real estate is desireable, two doors may be needed for that first day.
My quickest shelters? Check the map for copses of trees that meet up in an enclosed shape. Cut into the circle, or nearby, and you'll make the opening and the DOOR at the same time. They do have the disadvantage of being combustible, though, so I try to make them temporary and/or waystations.
The easiest wall in the world: Plant a SAPLING. It will take some time, but it takes less effort and item-damage than any other kind of wall. I bring sap's on scouting trips and wall up future shelters.
Indoor-outdoor living:
As mentioned elsewhere, some crafted items also work as barriers. So if they're part of your wall, you can use them from the inside and the outside, saving a lot of raw materials. (Advanced crafting ahoy.)
Wooden Chests let light out, but work nicely. You can also shoot arrows or throw projectiles across them.
Furnaces are closer to real walls, and block out the view.
I have yet to try a Hammer and Anvil or a Kiln; they'd probably work too.
Screenshot
Tips: scouting and movement
The other reason to scout is to map as much terrain as possible. Plan ahead for landmarks and navigation in the dark. Give places awesome names.
Avoid mini-map blindness. Many items can be hidden in the environment, ready for you to dislodge them. Line-of-sight rules will apply just like real-life (something under or behind a barrier will not be visible to you.)
See more tips in the eat or be eaten section—you aren't slowed by lowering HUNGER, just zero hunger. Only eat when hungry and/or rations are about to spoil. You can cover more ground that way.
Don't stop to hit things repeatedly or unnecessarily—your STAMINA will drain quickly. (See the weight section.)
Instead, prioritize noting or constructing landmarks (like a pile of junk or a special planting), and come back later.
TREES: Sometimes you want to chop. Sometimes you want to burn.
It will be quite a while before you're strong enough to take a night-time stroll. And even then, speed is of the essence. So a secondary objective: DON'T GET CORNERED. See eat or be eaten section for evasion.
See containers and weight sections for more on caches.
Almost all my shelters have multiple exits. For those days when something sits outside your camp waiting for a midnight snack. Another exit can always be built in later.
I like to make as many shelters as possible. Even if you minimize shelter-building, pick a spot that's close to the resources you want to harvest.
Fire (See item use basics.):
If you have KINDLING and you start hitting, I mean chopping trees, eventually a recipe for a proper firestarter will pop up. There are a few to choose from, so no need to settle.
Fire, fire. Eh hehe. In a hurry? Pick the closest grassy spot, and get it burning. You may now throw down Combustible items and get them burning on dry squares. Warning: it will spread to any nearby greenery.
Intermediate crafting: Can you make a CAMPFIRE? Start collecting materials for that right away. Pick a spot where you can't walk right into it, and right-click to place.
Sick of hauling LOGS? PEAT can be picked up anywhere swampy. Don't run out of it, though! (The obsolete tip: COAL is more light-weight and usually hanging out in nearby rock walls. Do not waste your CHARCOAL! These are two different things. They seem the same in this version, subject to future revision.) (See weights section.)
Advanced crafting: If you can make a FURNACE, then build that instead. Currently there's only one function that a CAMPFIRE does exclusively; the FURNACE does everything it's meant to do and serves as a fire-source besides. I've also used it as a wall, to allow indoor-outdoor use. It'll save you from that extra load of Rock-likes.
How Do I... ?
Repair items? See section below.
Harvest or dig things up?
Use any kind of SHOVEL. Anything visible that you can walk on can be dug up. Specifically, it's anything attached to the ground. See the weights section for more tricks.
Light things on fire?
Face something that can be set on fire and right-click a HAND DRILL or FIRE PLOUGH or BOW DRILL or any LIT TORCH or a LENS in sunlight.
Wait for a FIRE ELEMENTAL to set some terrain on fire. A TORCH can be lit by facing any fire source and double-clicking.
Sleep / regain stamina?
Double-click A LEAF BEDROLL. Preferably somewhere secure from attack.
Tip: How long you sleep is dependent on a number of factors, so eat up as many nearly-expired foodstuffs as possible before you bed down.
Pick up meat from dead monsters?
Face your kill, and double-click something from the Sharpened group to CARVE the corpse. Auto-Gather should be toggled on in OPTIONS. Some item drops remain even after carving, so walk on top and keep clicking / tapping spacebar in place to mop up everything. You will also scoop up anything that was growing on that spot.
Extra note: what remains is that bloody mess—which takes up space. It eventually fades away [something poetic] but while it's there, you can't place anything down on it. CARVING or SHOVELING this last bit incurs no item-damage.
Stop this bleeding?
Apply a SUTURE or TOURNIQUET. Other healing items may also tide you over until the hemorrhage ends.
Get rid of this junk?
Drop it in WATER (not SHALLOW WATER). Beware: if you toss something edible, you may get company. Right-click, and down to the depths with ye!
Tip: ground your valuables in case of accidental drops. It's always best to keep a supply of each item to learn more recipes, too.
COMBUSTIBLE items can also be burned. You could always eat the EDIBLE items (and take the consequences).
Any PROJECTILE that lands in the deep is no more!
Shoot arrows?
Step one: Equip a (poor) BOW in a tool/weapon slot.
Step two: have any ARROW in inventory.
Step three: walk towards any monster in range, including the ones you can't see. You can also walk into low object, with a sight-line, such as a Wooden Chest.
Step four: get attacked by the monster.
Step five: if you survive, retrieve your arrows. Anything in the WATER will be washed away.
Important! Hand-to-hand combat will damage a BOW just like any other weapon.
See more in eat or be eaten section.
Fish?
What if there are no fish? Try dropping FOOD into open water. None of it will float back to you, naturally. Thus far you cannot fish for SHARKS. Hope you still have your hand.
Like any other attack, you must face the fishy head-on, which can make for some fun watery hunting.
Activate your fishing tool, and it should cast any distance towards the fish. Et cetera, the rest is intuitive.
Cross this ocean?
Swim. Watch that Stamina...
Higher skill: Generally speaking, following spots of medium-deep water will lead you to dry land, even when out of sight (see next how-to spoiler tag). It's risky, though, and there are no, ah, landmarks anywhere. If you get lost or run out of supplies, you could go from survival show to horror movie fairly quickly.
Advanced crafting: Build a RAFT.
Set it down in SHALLOW WATER so you can come back with heavy provisions, and not be over-weight.
Align it with your destination, then activate it to drift across all types of WATER. *All* types, including where you can walk.
How do you see distant land?
Make or obtain a SPYGLASS. Many of the item-lugging monsters will drop this. This will only show you one map screen over, though.
Find treasure?
Fight some higher level monsters carrying such shine. Usually it's IMPS or PIRATE GHOSTS.
Find a mysterious WOODEN CHEST.
CAVES usually have a few of these, though not more than one per screen. A very good reason to bring a TORCH to a dark place.
You'll need to unlock it, of course.
Obtain a TREASURE MAP.
Try to read it. Match your location to the map—messages will eventually change from "nowhere near" to "far away" and so on as you close in. Face the spot where it's hidden.
You probably need both a stone and a metal SHOVEL in Inventory, though this is unclear. In water, you may need a FISHING NET, though this is also unclear.
Here's the important part: do not dig! Double-click on the matching TREASURE MAP. This will activate your inner metal detector, and reveal a WOODEN CHEST.
This will also reveal several monsters trying to kill you.
Don't die.
Concurrently, you can waste a turn unlocking the chest.
Advanced tips! As a weakling, when I used to locate a treasure in open ground... I'd face the location of the Wooden Chest, build a barrier behind me and to one side, and a door on the other side. The Wooden Chest is its own barrier ... for most monsters.
A really consuming version is building a FIRE source inside this cocoon, so as to have a constant food source between kills.
If you keep walking into the Wooden Chest, you can keep firing ARROWS in that direction. Throwing other projectiles works just fine, too.
Win the game?
First find enough treasure to show your face at home. Placing treasure (hint: they're GOLD) into your inventory will eventually give a message of completion. But you can always find more treasure than the minimum. See above for how to do this. Learn to craft a BOAT PADDLE... and then... Learn to craft a BULL BOAT.
This functions like a RAFT, so just pick it up while in the WATER and activate it. You will leave that world behind, perhaps forever.
You may want to take essentials other than your booty. And have a high talent number to get a better score, and for boasting in taverns.
Decay and Repairs
Okay, all items deteriorate... but they don't all do it the same way. Some items get damage from every try, while others only get damage if they hit. Also watch out for which tool/weapon slot is used (this has been revised in the new version, but there could still be a dominant hand taking more damage.) TORCHES are safe unless they're the only item equipped.
Tools / Weapons
First put the item on the ground in front of you.
Repair it with... Any HAMMER or a GRINDSTONE. This will return it to 100% maximum "hit-points", but this max is halved from before until there's nothing left. Best not to repair too early.
(Advanced) Reinforcement POOR GLUE and MELTED AMBER will do the trick. Reinforcing an item will slightly increase both current *and* maximum "hit points".
Both of these actions will increase skill points for the respective item. Thus if the item repaired was made with Blacksmithing, your points will increase in that. And yes, you can repeat the action as long as the repairing tool/item itself will last. So a tip: try to keep at least 2 repairing items on your person.
Disposable (high skill)
As you start crafting awesome new weapons, even their great durability is nothing compared to the vast infrastructure in your plans. No problem. Have a giant cache of raw materials? Any tool, including BONE POLES, will do a lot of the repetitive actions like mining or chopping. Just let them break, and move on to the next one. (You're grinding; they should, too!)
Fire
You can check the decay of a hand-held LIT TORCH.
For other fire sources, dropping (right-click) Combustible items will strengthen the fire. Charcoal and Coal still seem to work for this, despite no longer being classed as Fuel-like for crafting purposes. It may take several tries to bump it to the next level (in messages), and will depend on which fuel is used.
You can also now extinguish fires! For some reason. This does not seem to work on fire sources like FURNACES, but that may change. More testing needed.
Corpses
So far, I've never left a corpse and come back to find it turned to mush. Once you CARVE it, you start the clock.
Again, the bloody mess leftover from carving can be cleaned up (with Carving or Digging) without item penalty. It takes up space on the ground but will eventually decompose.
Food
There's food that'll spoil, and smaller foodstuffs that keep for much longer. Apparently some or all containers will allow the food to keep for longer (I've not kept track). Important: food doesn't all decay at the same rate. Check it often.
Tips: There's no need to cook meats right away, especially if you know there's another fire waiting at the end of a journey. Like well-aged prime beef, they'll keep longer this way. The reverse is valid if you want to minimize stored food.
Naturally, read more on eat or be eaten.
Eat or Be Eaten
Also see decay section above.
Some things labeled 'edible' are not good for eating. Be wary as you try new foods.
Meat
The more creatures, of any strength, that are killed, the more powerful creatures spawn in their place.
Certain creatures only come out at night. One is only found in caves.
Remember to cook the meat! You'll need a fire source. Smaller kills may not produce that yucky OFFAL or large BONES. The really small ones, including foraged creatures, are not perishable.
Hint: fish like bait. This GROUP really should be labeled 'Bugs' but oh well.
Beware the arrow
See How do I? section.
Arrows will auto-fire at any monster in range. Including in the dark. This is great if you want to kill a lot of things!
This is not so great because all those things want to kill you. Bow and arrow thwarts evasion.
Arrows will be lost in the WATER. (There is also a bug when you kill TROUT with arrows. They become undead.)
Range increases with skill.
So consider vegetables.
This is a major incentive to avoid killing too many creatures. If you want to live meatless, you could do that when agility is high enough to evade nearly everything. (See evasion below.)
Right-click either a seed or whole plant, depending on species.
Any DIRT-based terrain (this includes the short green grass) seems to be arable land. I have not yet fully tested CAVES where MUSHROOMS rule.
Good practice is to establish edible plants in remote areas.
You can also plant inside your shelter if it has a dirt-based floor, though you will not be able to place anything on top of a grown plant.
Plants seem to grow on top of existing heaps, last I checked. You'll have to harvest it off the top before taking from a heap.
How to cultivate plants?
Plant fertility dictates how much a plant will spread. Only SAPLINGS do not spread.
Increase fertility by, ah, fertilizing. Two items can be dropped onto plants, COMPOST and/or FERTILE SOIL.
I like to carry PILE OF ASH around for the latter. These can be made from "waste" materials, so hey, circle of life. This is like feeding a fire, as the status in messages may not improve on the first try.
Then dig up the harvest with any SHOVEL. I think you can carve some above-ground plants too.
Evasion 101
As mentioned in landing day objectives, don't get cornered. For example, clear a bolt-hole between trees and seashore. While it's bright out, clear straight paths between distant points.
Keep some twisty paths for better evasion. Hint: monsters stalk in straight lines.
Again: you attack facing forward, and monsters attack facing forward. If there's a baddie keeping pace with you, they shouldn't be able to hit you unless you cross their path (I'm supposing, because my own agility is high.) There's definitely no attacks on the diagonal, which should affect strategy.
Also: crafting items will waste a turn and leave you open to attack. Same with dropping items. Switching equipment will not.
Best evasion tip: open WATER is your friend.
Open ground is only your friend if you have good AGILITY; by then you're likely strong enough to fend off most monsters.
Pay attention to CAVE maps for possible bottlenecks where evasion is impossible. (You may not want to venture underground too early, other than to glimpse the map.)
Build many shelters, with more than one exit each. This way your mad dash heads towards a safe spot, instead of into more trouble.
The higher your stats are, the easier it'll be to spam DOORS everywhere. If you're a chicken like me.
Small tip on crafting
Early on, you'll likely learn to craft simple weapons (I like the SPEAR). The most payback given your lack of strength and hit points, though, is in defense. Upgrade that equipment as soon as possible. It will be a long, long time before you can slay monsters with a single blow.
Weight Lifting
The one limiting factor in your crafting reactions: how much you can carry. Again, when over the weight limit, non-crafting actions will cause a drain in STAMINA. The weight limit goes up when your STRENGTH improves. The best way to do this seems to be
by doing anything which taxes STAMINA. After skipping unnecessary tasks in the beginning, by contrast you may want to, well, grind a few out to power up later on. Personally I like digging tunnels for short-cuts. And there's always trees to chop.
Read more about containers below.
Quick tips:
Plan for longer expeditions. Overextending may force you to leave valuables behind.
Just drop it if it's not perishable. Come back for it later. In fact, drop a whole container and come back for it. See more in containers section.
You could always consume edible items. (And take the consequences.) Earmark heavier, closer-to-expiring food.
Over the limit, you can always "walk" large items by picking them up and dropping them. There's no penalty unless you take a step.
Don't forget multiple items, including the ones in your Quickslot below. Even lighter items add up quick. Note projectiles, especially.
Craft away! Some crafting recipes come out with equal weight, but most pare down into lighter items. SHARP ROCK to ARROWHEAD. LARGE ROCK to STONES. Any BONE to BONE POLE. Minerals to their powders. Et cetera.
Once you start breaking rock walls, tunneling still seems impossible because of the heaping item limit. Not so! This is why FLOORING exists. Breaking down a LARGE ROCK into STONES lightens everything considerably... hint, hint. Significantly reduces tailings. Combined with tip on disposables in the decay section, you could break down a mountain.
Sail the ocean blue! Ocean-going vessels are rather heavy, so leave them in SHALLOW WATER, walk onto them to pick them up, and the activate them without moving. You may have to pick your landing point carefully so there's no overland transport.
In-depth:
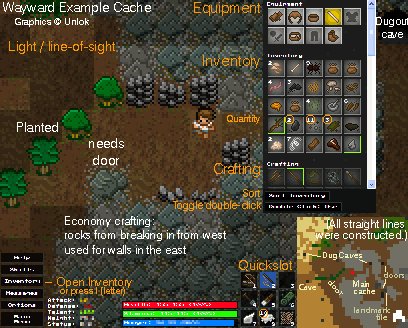
Caches: Much discussed in landing day objectives. Here is a screenshot example of my main shelter: Screenshot
A permanent base of operations needs room for caches. Do you put them in a box, or pile them in heaps?
Boxes: weight limits. Heaps on the ground: quantity limits. I like to heap mined resources, because a set number of them weighs more; also I can see quantities more easily. Bones also start piling up fast—processing them all into BONE POLES is attractive, though it'll wear out your Sharpened tools. Many smaller items can cram into containers.
Bonus: it's uncertain, but possibly large heaps of heavy material act like barriers. I've seen one monster get blocked by a pile of GRAVEL.
Big hint: don't bother crafting more than one WOODEN CHEST. Especially if you're willing to do a little travel and heavy-lifting. You can save a lot of LOGS this way. See the container sections for more.
All items must not be "in use" when you try to wrench them from the earth. The fires must be out, wooden chests must be empty.
Advanced tips: Lighten up:
Fire starter: LENS
Sharpened: SHARP GLASS
Digging: WROUGHT IRON SHOVEL
A POOR SHOVEL is easier to make. Both are high-level item drops.
Repair: GRINDSTONE, if there's abundant Sandstone. A Hammer is more durable and is more versatile.
Rope-lik:e SPIDER'S SILK
Fuel-like: PEAT. Also versatile.
Needle: POOR NEEDLE. Same weight. Less crafting.
Torch: ANIMAL FAT TORCH is easier to make, and .5 heavier than BARK TORCH. Both are frequent drops.
Container: SMALL BAG.
BACKPACK is good for several larger items.
How do I lift...?
DOOR: With SHOVEL.
WALL: Hit it repeatedly until it dislodges.
FLOORING: With SHOVEL. Underlying terrain will be exposed, usually DIRT.
WOODEN CHEST: Dig or carve.
Plants: If they're above-ground like TALL GRASS then that can be carved or dug up. Underground / root plants have to be dug up.
Graduated to Containers? (Sorry, pun!)
All these transfers start from the Inventory. Pick-ups will go directly to the Inventory, or Quickslot if equipped there, not any container.
Drag items into containers, right-click to remove them from the container.
If it's a WOODEN CHEST on the ground, you can face the container and right-click, and that drops it in like you're dropping something on the ground.
If you're carrying the container, you must drag-and-drop *into* the container. You can right-click to drop an item from carried container to Inventory.
And as always, each container tells you exactly what it will do to your total weight.
You cannot put a container inside a container; no inception, sorry.
Traveling tip: Since weight reduction is the same for the SMALL BAG and the BACKPACK, several bags may be lighter than one backpack. It makes it easier to drop a single bag for a temporary lightening.
Need to reduce weight? Stuff it all into a container.
Or dump everything from all your containers and get rid of the extras. There's one button at the bottom of each container window to do that.
Locked? Use a LOCKPICK. (Or attempt it.)
As mentioned, a WOODEN CHEST has a lower profile and yet can serve as a barrier. Same properties as a TREE STUMP except without being chopped down. So, also as mentioned, it can be positioned as a wall, accessed from the inside and outside of a shelter, and be used as cover from which to shoot projectiles.
The more TREASURE you find, the more WOODEN CHESTS you can collect. As soon as your weight limit allows, you can recycle these containers for your shelters and caches. See weight section above for more.
Advanced Crafting
No crafting trees here. Just a list of crucial tools for crafting mojo. Can't do without them! High skill note: As your skill in any one category rises, some newly crafted tools will have more stats than usual. Remarkable (blue) is a small buff, Exceptional (yellow) is a larger buff, and Legendary (purple) adds stats to a random skill. Still not certain how Legendary buffs work, as some tools don't match up with the skill; probably just need to be equipped.
Plants
COTTON. COMMON MUSHROOMS, THISTLE SEEDS. Optional: SAPLINGS.
Basic
LARGE ROCK, SOIL (from DIRT terrain) - abundant, no need to carry.
Any in the Sharpened group. Remember that a Sharpened weapon sitting in Inventory can be worn down if crafting calls for Sharpened.
Any HAMMER.
Any NEEDLE.
BONE POLE
Intermediate
MORTAR AND PESTLE.
Advanced
PURIFIED FILLED WATERSKIN.
Leave at home: A SAND CAST FLASK. TONGS.
Staples
SHARP ROCK. LOG. FIRE PLOUGH (to start). STRING. WOODEN POLE. A (COOKED) SPIDER. TREE BARK. PEAT. PILE OF ASH.
A POOR BOW.
Any Healer. Any Repair/Reinforce. Some Fabric.
Cache: LARGE ROCK. TANNED LEATHER.
All minerals. WROUGHT IRON.
Posted by: Shudog |
June 13, 2013 5:04 PM
|
June 13, 2013 5:04 PM