
 Make time for a trip to the past, Retro Weekday Escape is here!
Do you feel flat or tired? Cheer up, this Weekday Escape is full of magic! Enchanted forest, magic gemstones and a dryad in Esklavos' game! Astrology and zodiac signs in HintSan's game, with cameo of Sherlock Holmes! Magically changing maze in Denofthekamo's game! Well, the changes depend on your actions - but they are magical!
Have a good time and enjoy!
You get lost in Esklavos' magical wood and while wandering around, you meet a dryad! (elves are not here - they stay in Magic Forest (WE-RE N°6); in Ancient Forest (WE N°44) are neither elves nor dryads, only huge spider - otherwise is the forest very nice too). The dryad has lost a fire stone and hopes that you help her - do it, for she would help you...and you certainly need it, as the enchanted portal is closed and doesn't seem to open by itself!
The cursor is changing, no save button, one ending.
Finally, after countless movies, books and video games, Sherlock Holmes penetrated into escape games genre! (In fact, he did it few years ago as this game by HintSan is part of Retro WE). The intro is skippable (you don't need knowledge of Japanese language to get through) and after a short dialogue, you end up in a room crammed with various occult stuff. Astrology, tarot, ouija board, everything is here - the game doesn't expect you know anything about it, though it gives you a lesson in using of ouija board. Don't let yourself blind by all that mystique, puzzles' solutions are usually quite simple!
The cursor is not changing, no save button, one ending.
This game by Denofthekamo (earlier Kamotokamotokamo) is only two years old, so not exactly retro...but too old for regular WE... anyway, it's here now and it's wonderful! Similar to Nunu Kid Escape- soft, tender and clever. After short intro, you find yourself in a room, which is the beginning of a small maze. Ringing sweet melody sounds around and apart from small table the room is almost empty - there are six more to explore, but first you have to find how to get into them...but you discover how to move around soon. For better orientation there is a map in lower right corner.
The cursor is not changing, save button, two endings.
Note: Disable any adblocker in order to run the game on Kamonosoukutsu website
We love escape games, and our readers love talking about them and sharing hints! How about you? Let us know what you think, ask for clues, or help out other players in the comments below.


The Mr. Hint: Fortune Escape game was quite straightforward, I only got stuck near the end and needed to consult a hint-through.
I got stuck when I had all 12 zodiac symbols and needed to figure out what numbers to plug in
Try cycling through all of the numbers under each symbol. Do you notice a pattern?
Each of the numbers cycles through the number of letters in each symbol
That means each number stands for a letter
You need to spell out the answer to the riddle above
The answer can be found in the book of words. The book that has the words "the sun"
and "moon"
For Magnuk and 6 Strange Rooms, I was able to get the normal end, but have no idea to get the other ending.
Here is where I am stuck:
After I saw room #5 with the saw, I push down the wall with the hooked cane. Then I go back to the table and pick up the end of room #5,
and remove the wooden part in order to get the blue bracket. But I can't seem to use the blue bracket with anything
@Bliznik: For the other ending, you need to follow a hint.
What's the first hint you got when you started the game?
Technically, it's one you haven't used yet.
The clue
1~6can be interpreted a different way.Place the tiles down so you can walk from 1 to 6. There, you should find what you need.
Enchanted Trees Escape
Yes, the trees are magical too.
Exploration
(Remember that some actions in this game require an empty hand.)
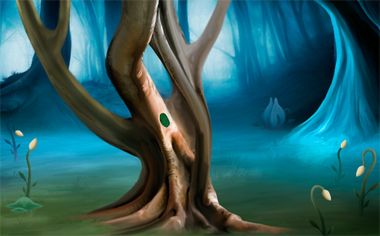
You start off facing a tree with a green-colored hole in it. It's surrounded by five white flower buds. There's also a giant bud in the background.
Go forward to a screen where a table has some skulls arranged around a candle. Pick up the mortar (and pestle) and flask from the table. The tree in front has a note about some lost crystals, and a stick in the lower left has a hint with colored stones and numbers. There's also an ornate tombstone in the background with a hole, and a pot in front of it.
Go forward to a screen with a dryad who's lost her fire crystal. There's a sword-shaped stone beside her with a hole in it, and a large greenish bud in the lower left.
Go right to a screen with a sealed magic portal marked with two skulls on sticks. On the left of the screen there's a puzzle with colored stones, with a pink note next to it explaining what magic plants need. On the right of the screen, there's a tree with a note on it telling a story of five guardians' demise. The tree has a loose branch that you can click thrice to get seeds from, and there are five colored flowers in the lower right beneath a puddle of water.
Stones
Use the clue from the stick to solve the stone puzzle on the portal screen.
Colorblind help:
The stones on the stick (top to bottom) and in the puzzle (clockwise) are colored in the same way: red, blue, green, yellow, gray, black, white, red.
As you've seen before in other Esklavos games, the stones connect when they're close enough, and display the number of connections they have.
So the stick indicates that each stone should connect to two others, except for blue and green (3 each) and black (4).
Here's one way to do it: arrange white, yellow, gray in a triangle in a corner. Also arrange black, blue, green in another triangle, and connect a red to both black and blue only, and the other red to both black and green only.
Once done, the stones stop moving, and you'll find that a red crystal has dropped next to the puddle.
Water and seeds
Fill the flask with the water from the puddle.
Combine the seeds with the mortar to produce seed dust.
Now you just need to find the plants that need them.
Use the seed dust on the giant bud near the dryad. It opens up so you can take a green crystal.
Use the water on the giant bud on the first screen. It opens up so you can take a blue crystal.
Death
Use the clue from the guardians' story to solve the puzzle with five skulls.
The dotted lines should connect each skull (guardian) to their cause/circumstance of death.
So connect the first one to midnight (moon), the second and fourth to drowning (water) and the third and fifth to storm (lightning).
The candle lights up and a yellow crystal falls from it.
Restoration
You now have four crystals, one for each of ice, nature, fire and blood. Find somewhere to place them.
The red (blood) crystal fits in the tombstone, and placing it makes red flames erupt from the pot and an eye falls from the sky.
The yellow (fire) crystal belongs to the dryad, and she rewards you with a white crystal flower.
The blue (ice) crystal fits in the stone beside the dryad, and placing it makes another eye fall.
The green (nature) crystal fits in the tree on the first screen, and placing it makes yet another eye fall.
Flower magic
The crystal flower can be used on each of the crystals to change its color.
So look around for a hint about where and how to use it.
The colored flowers on the last screen are green, blue, yellow, red, green, suggesting that you should make the buds on the first screen the same colors.
So use your crystal flower on the blue crystal and then on the second flower bud on the first screen.
Then use your crystal flower on the red crystal and then on the fourth flower bud.
Then use your crystal flower on the green crystal and then on the first and last flower buds.
So far so good, but you don't have a yellow crystal anymore because you traded it for the flower. What now?
You got the yellow crystal from a fire. A lit candle, to be exact.
So use the crystal flower on the lit candle to turn it yellow. Now you can color the middle flower bud yellow!
The last eye falls next to the tree.
Escape
Place all four eyes in the eye sockets of the skulls beside the magic portal, then click it to leave!
Mr. Hint: Fortune Escape
Even though his name in the game is Mr. Hint, we all know that he's actually an alternate universe Sherlock Holmes.
Intro
In Hint's voice:
One day, I was troubled.
"This is an unlucky year. Since meeting that weirdo, I've frequently been trapped. I might have to get an exorcism done."
At that moment, one news article caught the attention of my troubled eyes.
"Bakery Times 001" "Fortune-telling house "Hexagram" opened in early January!"
"Talk of the town! Fortune-telling house is a big hit! (Infallible accuracy?)"
"Long queues daily! Impressive queues form daily. Though this reporter was a bit unsure even with its reputation for accuracy, he decided to give the fortune-teller a try. He queued first thing in the morning and only got in past noon. As a reward for filling out the survey, he got a souvenir made from power stones!"
(click right arrow)
That's right! I headed straight for the fortune teller's. Even though the place looked familiar, this was definitely correct. I opened the door of fate.
(Advance dialogue by clicking the arrow next to About Item.)
Hooded figure: "Welcome to the fortune-teller's house. What troubles you?"
Mr. Hint: "I recently met a weird guy, and been trapped several times after. It's a real nuisance, what should I do?"
Hooded figure: "I see. You must put 12 panels in order, and then you'll still be trapped. Right here!"
Mr. Hint: "What?"
The hooded figure reveals himself. "Hahahaha! We meet again, my rival. Well, do your best to escape from here. Farewell!"
That Lupin! This is getting interesting.
(Note: In the Sherlock Holmes stories, Lupin appears as a nemesis.)
Exploration
As Mr. Hint would tell you (click the icon for his hints), you should start by searching the whole room for those well-hidden panels.
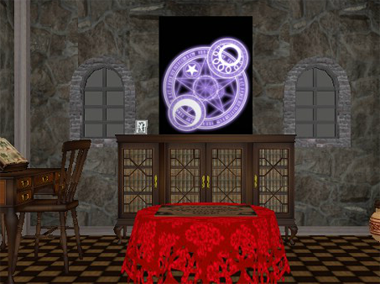
You start off facing an ouija board which seems to be incomplete. In the back are three beautiful pots, the insides of which are too dark to see. On the pot lids, you find a silver key, an infuriating taunt, and a Capricorn tile. The locked dresser has an Empress tarot card on it. On the right are three weird safes: a three-digit one with colored rectangle marks, another three-digit one with card suit marks, and an unusual shape with eight buttons.
Turn left. Two windows have clues written on them, and in between a magic seal drawn on a curtain that hides a Cancer tile. Looking closer on the bookshelves, you find a Hermit tarot card and Aquarius tile on top, as well as a poker leaning against the left side. The books themselves contain information about using an ouija board, the zodiac signs and tarot cards in order, and various astronomical terms.
Turn left. There's a stopped clock you don't have the winding key for, a fireplace with charcoal too risky to touch, and a window with writing and a Pisces tile over a table with a botanical book, a Magician tarot card and several drawers. Two of the drawers are locked and require a key, and the lower-left drawer is locked and requires a three-digit code, but the others are unlocked and they contain a spade-shaped planchette and a Sagittarius tile.
Turn left to face the door, with sun, moon and "close" signs attached to it. There are two bookstands with dubious books on them. One of them has a Leo tile hidden beneath, and the other has nothing but disappointment.
Now that you have six tiles, the hint switches to tell you to pick up the poker. Oh, you've already done that. Next step…
Burnt
Hint: Pokers are usually used in fireplaces.
Moving the coal aside, you find a Taurus tile.
Frame
Hint: There's some significance to the three tarot cards, for sure.
Use the clue from the tarot cards to unlock the three-digit safe with colored rectangles.
The green, blue, white frames surround the Empress, Magician, Hermit tarot cards.
By looking at the cards or in the book, you find that they're numbered 3, 1, 9.
So enter that in the safe to get an Aries tile.
Pane
Hint: What do the digits on the windows mean? There's a device with the same shape.
So use the clue from the windows to unlock the device with the same shape.
Superimposing the window clues gives the grid
62

58

71

34
So push the buttons in that order to get a Gemini tile.
Unlock 1
Hint: Is there nowhere to use this key?
The silver key fits in the middle desk drawer, which contains a heart-shaped planchette.
Seance
Hint: That's an unusual ouija board. Is there no instruction book for it?
There is, but you already know how to operate an ouija board, don't you?
Just put the planchette(s) down on the open board, place your index finger on it, and let your wish guide your finger.
Hmm… all you get are two codes with letters and digits.
Message
Hint: Connect the letters shown by the ouija board.
If you noticed that PL from the heart code matches US on the spade code, you'll know what to do with the digits.
The shapes of the planchettes are also a clue for where to input the code.
Just work out
831 plus 96, which is 927, and enter that into the safe with both shapes to get a bronze key.Unlock 2
(Same hint as Unlock 1.)
The bronze key fits into the upper-right table drawer, which contains a Virgo tile and a winding key.
Revive
Hint: I'm interested in the stopped clock.
Use the winding key to wind up the clock.
The clock now shows a different time, but it's still stopped!
Tick
Hint: What are H, M, S initials of?
The letters on the drawer stand for units of time, which are indicated by hands on the clock, which point to the roman numerals for 3, 7, 2.
Enter that in the drawer to open it and find a blue flashlight which shines with a bright light.
Search
Hint: Somewhere to use a flashlight… would be somewhere you can't see in the dark?
Use the flashlight to look in each of the pots. There's another taunting face (I'll beat that guy up!), a golden key and a lizard. Let's just leave that alone.
Unlock 3
Hint: Is there's another locked spot you've forgotten?
Unlock the dresser to find a Libra tile resting on an orange button and a Scorpio tile in a drawer.
Push the orange button, and you hear something unlock.
Of course, it's the drawer beneath, which holds the final puzzle telling you to "hide the sun with the moon".
Final puzzle
Place the zodiac tiles in the puzzle's holes (they automatically go where they fit), and digit buttons appear under each.
Hint: Moon hiding the sun… Is that a nisshoku? What's that in English? There's a hint in this room.
Since you already know English, you don't have to read the book to know that this condition is a solar eclipse.
What does that have to do with the tile puzzle?
"Solar Eclipse" has 5+7 letters, and the tiles in the puzzle are arranged in rows of 5 and 7.
So each letter in the clue should correspond to one digit in the puzzle. But how?
Each button counts from 0 up to the number of letters in its tile, suggesting that the digits should indicate the position of each letter in its zodiac sign name.
Indeed, the letters in "Solar Eclipse" occur in the 6th, 7th, 1st, 1st, 8th, 2nd, 4th, 1st, 2nd, 5th, 8th, 5th positions.
So enter that code in the puzzle to solve it.
Close is covered by the sun, and then the moon! Open comes out! The door is now open, and you can leave.
Outro
This was a long and tiring escape, so let's go home right away.
After returning, I casually glanced at the news that started this.
"Trapper Lupin"? I've been conned!
Bonus message:
"The hidden? theme this time is solar eclipse, which is visible all over Japan on the 9th of March.
It's definitely a sight to see in person.
What riddles will Lupin pose next? Stay tuned!"
And here's the last walkthrough.
Magnuk and 6 Strange Rooms
After a one-screen intro with a powerful teleportation spell, you find yourself in the strange rooms. Wait, weren't there supposed to be 6 of them?
Exploration: Starting Room (5)
(Make sure you check the map in the lower-right beside the music toggle.)
There's nothing in this room but a pedestal with spaces for square tiles. One of them is already present and marked 5, and there are several other numbers on the pedestal.
Click the right side of the pedestal to find a 1 tile, which you can flip over to find a colored square on the back.
Another room
Try placing the 1 at various places on the grid. You find that nothing changes unless you put it somewhere specific.
If you put 1 below 5, a door appears behind you, but it opens into a gray featureless room.
Instead, put 1 on the right of 5. The door that appears on your right opens into a room with four statues.
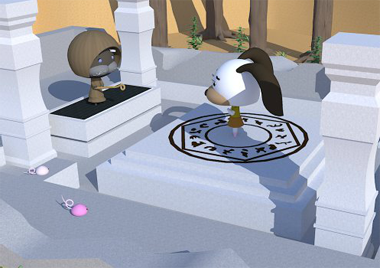
Exploration: Statue Room (1)
The four statues seem identical, with a mage and two mice on each. However, they each appear to be facing a slightly different direction. Pick up the grabber on the north side and notice the red arrow on the west side that points at something out of reach.
Grab
Use the grabber to retrieve the gem above the door.
Discrepancy
One of the statues is different. But which one?
The mice face the same way as the mage in each statue, except for the one in the northwest, where the mage faces directly away and the mice face you.
So click the mouse to the left of that mage to turn it around. A compartment opens, containing a 3 tile. The lid of the compartment also has a clue with five colored rectangles.
Exploration: Shelf Room (3)
You can find this room by putting the 3 tile below the 5 tile, and then going south. If you don't see a pattern yet, it will become clear soon.
Directly across at the south of this room is a small table with slots for 3 gems. Since you don't have 3 gems, you can't use it.
Turn right (west) to face another small table with four empty chairs. On both sides of it, shelves stand against wallpaper with ducks. But there's something unusual about this wallpaper…
Discreet
You might notice a duck on the top of the second shelf from the left, which you can get with the grabber. Are there any others?
Another duck is on the same (second) shelf, third from the bottom.
Another duck is leaned over on the third shelf, fourth from the bottom.
Another duck is on the bottom of the rightmost shelf.
Now that you have all four ducks, place them on the chairs, and the drawer opens so you can get a 4 tile.
Math time
Before we move on, let's figure the number pattern out.
The left column adds to 8, and it's possible to make the top row add to 10 by placing 4 there. In fact, you can follow the same rule to deduce the correct position of each tile:
5 1 4

3 2 6
Just as the clue says, the tiles will be numbered 1 to 6. (And this is the only way to solve the puzzle with the numbers 1 to 6.)
Anyway, you can now place the 4 tile to the right of the 1 tile, and go east twice to enter the new room.
Exploration: Simple Room (4)
There's nothing in this room except for a table with a locked drawer. A fancy holder on top has concentric squares with a number 1 in the middle.
Displaced
You need to bring the 1 tile to room 4, but you can't just pick it up and walk there.
Room 4 only appears if the 4 tile is placed correctly, and you need another tile in between 5 and 4 to provide access.
The only option is to pick up the 3 tile and place it in between 5 and 4:
5 3 4

x x x
Pick up the 1 tile and bring it to room 4 to open the drawer and get a 2 tile . Pick up the 1 tile again, and the drawer snaps shut.
Exploration: Symbol Room (2)
Place the 2 tile in the middle of the bottom row of the tile grid, and walk to that room on the map.
This room has two grids of symbols on its south wall, where each symbol has a large (hollow) shape and maybe a smaller (filled) one contained within.
On two of the other walls (east and west), there are clues… with shoes? The clues have a cross formed by intersecting lines, as well as large or small shapes in some of the corners of the cross.
Discern
Hint: Use all four clues together.
Superimposing the clues, you get
Cc Dc

H_ Cd
where h, c, d mean hexagon, circle, diamond and capital letters mean large shapes.
This exact pattern occurs only once on the wall of symbols.
The pattern occurs near the lower left of the left grid, in the 2nd-3rd column from left and 3rd-4th row from bottom.
Click any of the squares in the pattern to open a secret compartment containing a 6 tile.
Exploration: Scramble Room (6)
(Place the 6 tile in the lower right.)
The east wall of this room is covered with 2×1×1 cuboids with lines on their faces and notches on the edges perpendicular to the wall.
The south side of this room has a clue showing a specific section of wall which seems to have a secret compartment.
Distinguish
Use the picture clue to find the hidden compartment on the east wall.
(You have to be quite exact about where you click.)
Close examination of the blocks above and below the gap indicate that they can only belong to the upper-left cluster on the left wall and the one below it.
So click the wall just to the lower-right of the upper-left cluster. The hidden compartment opens up so you can take a gem.
Distortion
You're still missing a gem, and there's a rather major clue you still haven't used.
The colored rectangles in the statue room (1) match the colors on the featureless rooms you get when you place the tiles wrong.
So you have to visit all five of the "wrong" rooms in the right order (without visiting your starting room in the middle).
The "wrong" rooms' colors are on the back of the 3, 2, 1, 4, 6 tiles, and you have to place them in the five spaces such that
3 is adjacent to 2, which is adjacent to 1, which is adjacent to 4, which is adjacent to 6.
3 is not in the lower left, 2 is not in the lower middle, 1 is not in the upper middle, 4 is not in the upper right, 6 is not in the lower right.
As it turns out, there's only one way to do this.
The southwest room can only start or end the sequence. Since 3 cannot be there, 6 must be, so 4 must be the south room. The remaining space forces 4 to be adjacent to both 3 and 1. Since 1 cannot be in the north room, 3 must be there, and 2 in the northeast, and 1 in the southeast. In short, the only solution is
532

641
Place the tiles accordingly, then go east twice, south once and then west twice. As you enter the red room, you notice a table directly opposite on its west side, which holds the last gem in its drawer.
Display
Return the 3 tile to its position in the lower left, and go south to the shelf room.
You can now place all 3 gems in the table, which opens up to give you a comb? No, it's a handsaw!
Dismantle
Go back to the starting room, and use the handsaw on one specific spot.
The number grid has a small notch to the left of 5, so use the handsaw on 5 to split it. A crack appears in the wall of the room.
Of course, the crack runs across the floor and up the west wall. Examine the floor crack and use the grabber on it to topple the entire wall section over.
Save your game.
Normal End
Leave through the tunnel that opened up. You get an end screen with everyone just floating in the magical void.
Happy End
Load your game, and look back at the tile grid. The sawed-off portion of the 5 tile now sits outside the grid. So pick up the tile shard.
You can now remove the wood (and attached screw) from the shard's metal frame. Now to find a place to use this. But you've explored every room, unless there's some other secret you missed?
Maybe you should arrange the tiles in a different order, something so simple it's literally right under your nose.
The tiles were numbered 1~6, so why not place them so you can walk from room 1 to room 6 in order? There are several ways to do so.
Arrange the tiles in the order
561

432
then just walk around the rooms clockwise until you come back to 6 (red)
On the north side of the room (west if you placed 6 in the southwest), a table appears with a locked box on it.
The metal piece unlocks the box, and you find a small wand inside.
Now you can leave through the tunnel again, Everyone's still floating in the void, but all it takes is one magic spell to return back home.
confused on 6 strange rooms
I put the 4 next to the 1 as suggested but I still have 2 rooms and not 3.
please help
Thanks @kktkkr!!!
@Paul
If you have 3 tiles, the 4, 1, and 3 tiles, then when you put them down, you will have 3 rooms
If you set the tiles down as follows, they will be in the correct locations:
5 1 4
3 _ _
But doing this doesn't allow you to put the 1 tile down in the 4 room
So reshuffle them, allowing you to go into the 4 room while keeping the 1 tile
Use the following configuration:
5 3 4
Then walk from the 5 room to the 4 room, and place the 1 tile down to get the #2 tile.
Mr. Hint looked interesting until
the 3 digit code to open the safe does not work. Three different colored frames, a number assigned to The Magician (1) The Hermit (9) The Empress (3). No combination of the three numbers works. The walk through said 319. Perhaps, you have to "see" the clue before code will work. I thought I had looked at everything. Maybe not.
Update