
 After a pause, it's right time for Retro Weekday Escape!
You start in almost empty Yomino Kagura's room, but may happen that you stay here a bit longer than expected - puzzles are clever and thinking outside usual patterns isn't easy sometimes. Then you may test your lock picking skills in Barking Games game, and enjoy clean and neat graphics reminding of early Submachines. Bad Viking takes you for exciting adventure from the world of top secrets and sunglasses worn all day (and all night if equipped for night vision). Very good Esc-Forest's game is pure classic.
Have a good time and enjoy!
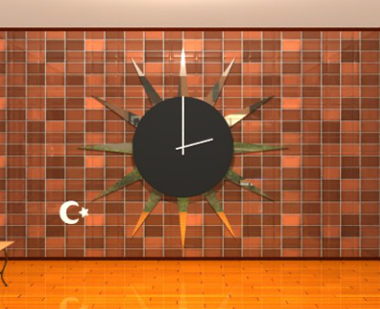
Yomino Kagura locked you in a nice polished room with only few pieces of furniture and really huge clock. The key which you need for escape is inside that white and blue checked box, but let's not jump ahead - there are some codes to be solved and items to be found, and although puzzles are intuitive, they do require some brain activity. Can you escape?
The cursor is changing, no save button, one ending.
The name of Barking Games's game says it all - crack all the safes you see, and in the rooms without any, look for it or for something what may serve the same purpose. For escape, you need to gather ten red gems, and place them into sockets around the exit door - the game starts right in front of it, and there are five rooms on each side of the 'exit room'. With arrows you can move between rooms (small lever in white bar in the upper part of the game screen indicates your position). Good luck!
The cursor is changing, autosave, one ending.
Cute adventure by Bad Viking (Rob Donkin and John Donkin) gives you a chance to travel in time! Secret Agent Panda got into trouble with an example of alien technology (blue telephone box) stored in Secret Goverment Bunker, and now he's stuck in the time machine outside of time, without a chance for return. Unless he finds the four missing parts of the machine lost during his wild flight through a time vortex. However, the situation isn't hopeless - through the monitor, he may enter four scenes in different time periods, and with your help he will solve all the puzzles and get home for sure!
P.S. Bigger and longer sequel is here: Panda's Bigger Adventure, or Panda: Tactical Sniper 2 (sniper game).
For more pandas (the evil ones), try Detarou.
This Esc-Forest's creation is great - good looking graphics, challenging puzzles and much to explore, with perfect retro feeling. At the beginning is a skippable intro in Japanese, but you don't need to understand. So, you are trapped in a nice apartment, want to go away, and the door is closed. What a surprise. Look around carefully - you know the routine already, just notice, that the game is linear and codes can't be entered before you find the proper hint.
The cursor is not changing, save button, one ending.
Note: If you have problems to start the game, try another browser! I experienced problems in Chrome, Firefox and Edge are fine (on my PC).
We love escape games, and our readers love talking about them and sharing hints! How about you? Let us know what you think, ask for clues, or help out other players in the comments below.


Big Clock Room Escape
It's about time!
Exploration
You start off facing a locked door. The light switch beside it has two buttons marked with red and green cup symbols. Taking a closer look at the narrow windows, you see that one of them has a blue object on a high shelf. Under that, the table has a Time box with three digit buttons, and also a book with a crescent and star on one page, and the number 3 on the other.
Turn right to find a large wall clock with a crescent and star marked at its bottom left. It doesn't seem to be running though.
Turn right to find a tall cupboard. The top two doors have their handles tied together with wire, while the bottom two doors are locked with a keyhole. There's also a small glass table with a checkered box on top, having three different-shaped holes.
Turn right. There's a painting on the wall fastened by screws, and beneath it, there's a table with a three-digit lock on its drawer.
Read
Use the clue from the book to unlock the three-digit box under the windows.
As the book tells you, the crescent and star are supposed to represent the three o'clock position of the clock. The minute hand, being four points clockwise from it, indicates 7, or 35 minutes. Using that same reference, the hour hand would be between 9 and 10.
Thus, mentally rotating the clock correctly would give the time shown as 9:35. Enter 935 into the box and open it to find some pliers.
Cut
Use the pliers to remove the wire from the top cupboard doors. Inside, you find a row of colored cups with numbers printed on their bottoms. There's also a box that has some metallic numbers protruding out the top as well as a lock with three colored buttons.
Two colors
Use the clue from the red and green cups to activate the light switch.
The number on the red cup is 134 and the number on the green cup is 265.
If you combine those clues you find that the digits 1 to 6 appear on the red, green, red, red, green, green cups.
So push the UDUUDD buttons on the switch to turn the lights off.
There's nothing special about the darkened room, except for the wall clock which now has some of its points lit up in red, blue and yellow.
(Turn the lights back on when you're done.)
Three colors
Use the new clock clue to unlock the box in the cupboard.
Paying attention to each phase of the lights, you find that 4 of the points light up in red, 1 in blue and 7 in yellow.
Since the buttons on the box are yellow, blue, red, this means that the digits 7144174 correspond to the LCRRCLR buttons.
Push them in that order, and the compartment opens up so you can take a red round piece.
One color
Examining the round piece and turning it over, you find a cup symbol marked in cyan.
So use that clue to unlock the three-button drawer under the painting.
Enter the code from the cyan cup (514) into the drawer, and open it to find a screwdriver.
Unscrew
Use the screwdriver to remove the painting. The compartment behind it has a well-hidden metal rod with something on its end.
Reach
Use the rod to reach the blue item on the shelf, which turns out to be a square piece.
Examine this piece and flip it over, opening the compartment on the back to find a golden key.
Unlock
Use this key to unlock the bottom cupboard doors, which are empty except for a yellow triangular piece. (No hidden clue this time.)
Fit
Place all three pieces into the checkered box, and open it to find an identical-looking key.
Use that key to unlock the door and leave!
I'm skipping Crack The Safe because their text walkthrough is already pretty good, but I'd just like to reemphasize that you can switch rooms with the keyboard or using the slider instead of struggling with those corner buttons.
Panda's Big Adventure also has a good walkthrough (as well as comments from the original Link Dump Friday), but it's not strictly in text format, so…
Panda's Big Adventure
Title Screen
Panda (that's you) is confused by the lack of a Play button, but all you need to do is click the battery to pick it up and then click the terminal to put it in to make it appear.
You might not be surprised at blue telephone boxes that are bigger on the inside, but this time Panda's carelessness sends the sophisticated alien tech down the drain and back in time.
Exploration 1
Hovering over and clicking on various objects, you find that the broken console is missing four parts, and the control panel isn't powered.
No problem! Just reach over and pull the power lever right next to you. You can mess around with the buttons to change areas, but for now let's leave it on the first area and click the pulsating screen to go!
Exploration 2
Prehistoric
Mmm, spicy volcanoes and a time machine piece already in sight, but the pesky dinosaur is in the way. With the help of the changing cursor, you also find the dinosaur eggs, an empty patch of soil, and a seed hanging from a tree with an eye.
(You can place the seed in your inventory, which makes it easier to read its description, which tells you that the seed will take a while to grow.)
If you wait a minute or two you might see
2 critters show up for an extremely short while: one in the forest on the left, and one poking out from the tree where you got the seed,
which you need an empty hand to get. Don't get too stressed finding them, since they're optional.
Medieval
Return to the portaloo and choose the next area. Yes, the one with the big castle, but the closest you're going to get to it is this row of merchants lined up outside. Herbert of the herb stall would like an interesting plant to trade for his spinach, and Godfrey of the gem stall would like anything interesting to trade for his artifacts, but it should be quite obvious which artifact he's willing to trade away. There's also a shovel leaning against a hut, a sword embedded in a rock, a bucket you can take from the well, and a pile of horse dung.
The 2 critters on this screen are partially hidden behind the herb stall (left edge) and the time machine (right edge).
Apparently Dodgy Pete has a tiny chance of showing up here, if you're interested in some panda accessories? I got him to spawn by just re-entering the area dozens of times, but this also seems to be strictly optional.
Egyptian
The next area is an Egyptian tomb. You see some torches under some symbols, a coffin in the middle, a broken stone on the left, and a slab that's slightly propped up off the ground but still too heavy to lift.
There's only 1 critter this time, and it peeks out to the left side of the leftmost coffin.
Dark Ages
Next up, we have a relatively clean room with stone brick walls, a body on a table with its head cut open, and a strange machine hooked up to a less-strange machine by a wire that's broken in one part. After taking the matches, potion, metal rod, brain and piece of meat, you can open the cupboard to find a heart, and click on the stone slab on the right to find that it's too heavy.
Of the 2 critters here, one is relatively easy (brain stand, right edge) and the other is extremely hard (cadaver table, right edge of base).
Zap
Once you've picked up everything from the zombie zone, you can start placing the heart in the body and the brain in the head.
Fix the machine by placing the metal rod to connect the two loose wire ends, then pull the lever to get the monster moving.
Once that's done, you can take the ring-shaped time machine piece from the floor and retrieve the metal rod.
Scoop
Make a quick stop by the castle, use the shovel to pick up the dung pile, and use the bucket to collect water from the well.
Park
Let's pay the dino a visit. While you're there, you can plant the seed, cover it with the dung, and water it with the bucket.
You can't really give anything to the dinosaur unless you're prepared to have it eaten up. But that's a weakness you can exploit!
Add the potion to the meat, and feed it to the dinosaur. With that threat out of the way, you can finally reach the disc-shaped time machine piece and the pile of dinosaur eggs, which hide a single dinosaur tooth for some reason.
Barter
Back to the castle, you can give the tooth to Godfrey, starting off a conversation where you have to convince him of its worth.
Which will it be, truth or fantasy?
You need to exaggerate just enough to make it seem valuable, while not including any details too obscure for his shallow brain to believe.
Tell him it's a dragon tooth that Dave found. Godfrey then lets you take anything you want "as long as it's the gem".
After taking the gem, he mentions that it may have originated from an Egyptian tomb.
Meanwhile, the seed has now grown into an exotic plant that you can collect with the shovel.
Trade that with Herbert for the spinach, who advises you to eat all your greens so you can get strong.
Power
Spinach makes you strong, so eat it by using it on yourself. Now you can pull the sword out of the stone.
Merlin appears and tries to talk you out of becoming king, and offers you a clock-shaped time machine piece to sweeten the deal.
Sandy
Travel to the tomb, and use the metal rod to pry up the heavy stone slab, revealing another broken stone piece.
Combine the two pieces (use one on the other) to form a full stone, and click it to read the clue.
Following the order shown in the clue, use the match to light the 3rd, 1st, 5th, 6th, 2nd, 4th torches from the left.
The coffin opens up and there's a mummy guarding the last piece.
Give the gem (back) to the mummy, who hands you the helmet-shaped time machine piece.
Warp
(Make sure you've done all you want to in the four areas.)
Place all four pieces in the broken console, and the screen changes to a view of a tropical island. So click it to travel there… oh no, it's not just a deserted island, it's a pirate's treasure island!
You're now faced with the prospect of walking the plank, and all you have left is matches and the sword.
Good thing Captain Blackbeard doesn't care if you use the sword to cut yourself free, then scare him with it, and then prance around his deck.
Exploration 3
It's easy to find and take the hammer, 10 gram weight, weighing scales, cannonball and ramrod, which leaves the mast and the cannon with a sticker attached to it.
But more difficult to get are the 2 critters peeking out from behind the barrels and steering wheel.
Launch
Clearly you need to fire the cannon, but the game is very particular about which steps you do first.
Start by breaking the barrels (in the back) with the hammer to gain access to a pile of gunpowder.
Trying to load the cannon with the gunpowder reveals that there are some instructions hidden on the side of the cannon to use exactly 15 grams. However, you only have a 10-gram weight!
No problem! Just attach the sticker to the weight to make it read 15 grams, and then use it on the scales followed by the gunpowder to weigh it out. Place the smaller gunpowder stack into the cannon.
Use the cannonball, ramrod and then matches on the cannon to fire it!
After watching the ending cutscene, you're presented with an end screen that lists how many critters you found.
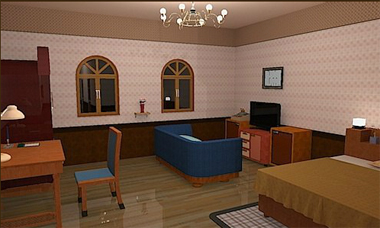
Esc-03 Guest Room
After seeing a sign for an (evening) escape room, you decide to visit. The owner has decided to bring his online creations into the real world by remodeling one of his rooms.
Note: the game has a lot of descriptions even for irrelevant items, but sometimes it helps to watch the Japanese text that shows up. If it starts with 先に (first), you haven't found the necessary clue yet. However, if it starts with 既に (already), then you've used that puzzle/clue and don't need to worry about it any more.
Exploration
Bear in mind that screen navigation appears when you hover the edges. The starting screen roughly divides into four sections, so let's cover them from left to right.
Click the desk on the left to look at that wall. There's a calendar beside the desk, which has a lamp, writing materials, a locked drawer and an empty drawer. To the right, a wardrobe has its upper doors locked with a three-digit lock. Its bottom compartment is unlocked and contains an unusual box with different-colored buttons in the shape of card suits.
Back out and check out the windows, which look out onto a moonlit city of tall buildings beyond a wide forest. Just in front of the windows, the couch has two cushions but there's nothing hidden there.
In the corner of the room, you can look at a framed picture with seven dots, as well as the television area beneath. There's a box with two dog figures over letter buttons that spell DOG, and it's on top of an unlocked cabinet that you can take 4 wine bottles from. (The whiskey and wineglasses left over are definitely not clues.) The TV is turned off, and beneath it you see some drawers, the top one locked and the others empty, and a cupboard full of books or maybe videos. Clicking around, you find that the thin book that's leaning on the others in the middle shelf is a hint book. (Don't read it if you want a challenge! Seriously, it's completely optional and will just vanish if you solve all the puzzles without picking it up.) The cabinet on the right only contains a green four-digit safe.
Finally, there's the bed. The pillow is normal but the blanket hides a note. Checking the headboard, you find a plant, unlit candle and alarm clock that's stopped. Under the bed, one drawer is locked and the other is empty.
Back out to the starting view, then turn around. Now you're in a corridor leading to a locked door. You can take a closer look at the keyhole, but all you see through it is some sort of monitor screen. Next to the door, there's a panel with three tiny colored holes. The right wall has a framed picture that looks very convincingly like the city view through the windows. And the left wall has two doors, leading to the Restroom and Bathroom.
Let's check out the restroom first. It looks pretty normal, except that the sink doesn't work, you can't use the toilet, and the control panel next to the toilet bowl has its buttons labeled with some weird symbols. Also, the cabinet under the sink has a four-letter lock, the clue above the toilet seems rather unusual, and you can click the right wall to find an air freshener, potted plant and a set of cross-shaped grooves with a rounded hole in the middle.
Next up, the bathroom. The sink here doesn't work either, which makes all the cleaning products arranged around it rather pointless (other than being parodies of normal products). The cupboard under this sink has various cleaners for different purposes, but you can pick up the Mattack! detergent in the middle. The washing machine looks rather normal except for the three colored buttons on its top. The glass door next to it has a complicated lock with a card slot and six pink buttons. Finally, look in the laundry basket to find a small dirty towel.
Three digits
Use the clue from the note to unlock the wardrobe.
The colored curves/lines on the note come in pairs, and each pair can combine to form only one digit.
In fact, you can find those digits by mentally sliding the bottom row to the left until it touches the top row.
That gives you the code 835, so enter that into the lock (using the brown buttons) and push the big Enter button.
The OK that shows up tells you that you can open the wardrobe.
Inside, you find another hint hanging from a rod, as well as an unusual device with four colored columns labeled with letters.
Open!
Use the wine from your inventory on the device in the wardrobe, which empties out each bottle into the matching column. Each column gets filled with wine to a different level.
As the hint plate suggests, the next move is to use that clue to unlock the sink cupboard in the restroom.
Clearly, pouring the wine is important to the puzzles, as the game won't even let you attempt to solve it beforehand.
So how do wine levels matter for the four-letter lock?
The wine fills up 3, 7, 9, 2 segments above the letters OPEN, which means that you need to enter that word and then click the buttons above it that many times.
With the power of math, you can precompute that O+3 is R, P+7 is W, and so on, which gives you the rather uninspiring code RWNP.
Enter that into the lock and open the cupboard to find even more cleaning products! However, when you take a closer look you find a metal key hidden in the back.
Unlock 1
Use that key to unlock the drawer beneath the TV, which contains a remote control for the TV.
Then use the remote to turn on the TV, which shows a hint with colored circles over a grid with a spiraling arrow.
Wash
Return to the bathroom, place the towel in the washing machine and the detergent in its drawer (top left of the door), then use the clue from the TV to start the machine.
Each square on the grid corresponds to the circle directly above it. Since the colors appear in the same order on the buttons as the TV, we can just focus on their positions.
The arrow passes through all nine squares of the grid, which appear in the CRRCLLLCR columns. Push the buttons accordingly to make the machine work!
When it's finished, pick up the clean towel. The unusual hint printed on it somehow makes it look even messier.
Digital
Use clues from the clean towel and book to unlock the safe in the cabinet to the right of the TV.
The bathroom shows a grid of squares colored blue, green and yellow, and as the first page of the book tells you, green contains blue and yellow.
This means that the blue brackets count both blue and green squares, and the yellow brackets indicate both yellow and green squares. The matching-colored squares in the columns covered by each bracket spell out the code 3659.
Enter that in the safe and open it to find a card key and a very green turtle figurine.
Swipe
You can use the card key to activate the pink-button keypad on the glass door in the bathroom. But where's the clue for it?
Read the back of the card key to find a photo and a sequence of numbers. Now you need to translate that to a sequence of buttons.
The photo is of the bathroom shelves, and the numbers in the clue represent the number of items on each shelf:
5 3

1 6

2 4
You need to click the buttons in the 451362 order, i.e. the bottom-right, top-left, middle-left, top-right, middle-right, and then bottom-left.
Yay, you can enter the bath! (Click the door handle, not the lock.) Unfortunately, you still can't use the water taps yet.
Looking around, you find that the blue plastic tub under the mirror hides a pixelated key. There's also a small empty shelf on the wall just above the bathtub, which contains several orange and pink things on a green stand. Maybe you can already guess what those things are a clue for, but that doesn't count.
(Back out and click the left side of the screen to leave.)
Unlock 2
Use the new key you found to unlock the drawer under the bed.
It contains a transparent sheet with symbols, mounted in a green frame.
Squared
As the next page of the book tells you, attach the transparent sheet to the clue above the toilet. (You can click that square even when the item is unavailable, but that's just a bug.)
Now that the clue is complete, you can obviously see that the page after that is relevant too.
First, click the + button on the washlet control panel twice to make the third lamp light up.
Start by considering the right side of the hint in the book. The As and Bs should alternate before the Cs and Ds, but there's a specific order in which they should go.
Once you've figured that out, the instructions on the left side should be quite clear.
The sequence should start at the marked arrow (third symbol of first row), pass through the jagged line connecting the two halves of the grid, and end at the letter E. If you look at the grid except for those four symbols, you should find that the symbols in the first two columns match each other but out of order, and likewise for the last two columns.
Since the jagged line connects identical symbols, you should think of those matching pairs as connected portals, with the arrows telling you to move rightwards from the exit of one portal into the entrance of the next.
Maybe that sounds a little confusing anyway, so in simpler terms…
Each arrow from A to B connects two symbols that are beside each other in the grid, while each arrow from B to A connects two identical symbols. Similarly, the arrows from C to D and D to C connect symbols which are consecutive/identical. So the sequence would start: pink, orange, orange, blue, blue, and so on.
However, the hint book tells you to only push the buttons for the columns A and C, and the last button in the corner. This effectively removes all the repetitions. In short, all you have to do is combine/overlap the rows in the left half of the grid into a five-symbol code, overlap the rows in the right half of the grid into a five-symbol code, and then overlap those two halves into one single nine-symbol code.
(Make sure the green lamp has been set correctly, and) enter that code by pushing the 423524351 buttons (numbered from the left). Once you're done, the entire panel opens up so you can take a brick-shaped remote control with only one red button.
View
Use the new remote control on the fake landscape painting in the corridor, which slides aside to reveal a hidden compartment with a pair of binoculars.
Then use those binoculars on the real landscape visible through the windows. On one of the buildings, you see a large neon sign, but some of its letters are flickering.
Blink
Use the clue you saw through the binoculars to unlock the box at the bottom of the wardrobe.
As the next page of the hint book indicates, the flickering letters are initials of card suits.
So SDCCSHDH refers to the 21442313 buttons on the box (numbered from the left).
Once you've pushed those buttons, the arrow pieces on the box slide apart to reveal a small lever you can pick up.
Controller
Once again, the hint book helpfully tells you to place the lever into the cross-shaped groove in the restroom. You can now shift it to each of the points of the cross and back.
Unfortunately, the book doesn't also give you a good hint for it, so you'll just have to deduce which of the clues in the room match.
The clue is the picture above the TV. At first glance it just shows seven dots at different heights with an arrow beneath.
However, the thin lines between the dots divide the area into seven rectangles, and the dots at middle height are aligned to the left or right edges of their rectangles.
In fact, the seven dots are on the DULRULD sides of their rectangles. Move the lever to those positions (returning it to the center after each move), and eventually the potted plant rises up to reveal a secret shelf with a blank-labeled key and a blue turtle figurine.
Unlock 3
Use this key to unlock the desk drawer. Inside, you find a small device with four orange buttons and one red steamy button.
After picking that up, you find a note with some letters in a row of red circles.
Steam
In the bath, place the device on the shelf above the bathtub. Unlike your average heater control, this one takes a four-digit code.
So use the clue from the note (and the hint book) to unlock this device.
The string of circles on the note represents four digits spelled out, where the last letter of each digit is the first of the next.
The clue is extra helpful because the letters shown on the note are the last letters of each digit, but even if you don't make that assumption the only four-digit number that fits in the available space is 1821.
Enter that in the device and push the button to fill the tub. There isn't enough water to fully cover the orange and pink things.
Colored
Use the clue from the full bathtub to unlock the dog safe to the left of the TV.
The unsubmerged regions of the orange/pink things spell out a phrase, in which only the letters D, O, G are orange.
Using the phrase as a guide, you easily see that those letters spell out GODOODOG.
Push the corresponding buttons on the box, which opens up to reveal a pink turtle figurine.
Shell
Place all three colored turtles on the panel next to the door (they will only fit on the matching-colored holes), which activates a three-letter lock that you can adjust by clicking the turtles.
The hint book tells you the next move…
Connected
Look through the keyhole to find that the screen has turned on, displaying two images side by side.
So use the remaining clues from the room and book to solve the puzzle!
The arrow appears to be pointing at the woman's ear, but what really matters is that she's holding a baby.
Just as both Cat and Gold can be combined with Fish to make longer words, both Mother and Sun can be combined with a certain word.
You've seen Sun on the calendar, where it's an abbreviation for Sunday.
This means the missing word is Day, and Mother's Day in Japan (or the US) does fall on a Sunday in May.
Enter DAY in the panel and open the door to end the game.
After a really long chat over some sweet treats, the owner gives you a cool Escape badge to bring home!
Esc-03 Guest Room keeps trying to download a file (escape_003.swfhtml)to my computer. Pass.
Yeah - this file looks like it was meant to open the game inside a window. but bad name
uh - I meant frame
Happened to me too, Chrome did the same thing. In Edge and Firefox the game normaly started.
I was using Firefox, though. Maybe a PC v. Mac version issue?
Update