
 Hi, it's the middle day of week and we are going retro!
The first game, Puxupo's classical escape is followed by another pure classic from Maruho with a bit of pixelhunt, but also with a feeling of satisfaction in the end. Lovely Funkyland's creation is retro too (technically) though doesn't seem so, and brings a pice of joy to its player as always. And then the time for adventure comes! With Gatamari, you need to prove all your abilities and skills to escape from Red Creature's tricky trap!
Have a good time and enjoy!
Puxupoleft you in a hallway alone. The exit door is locked, you can't go back to the house, so an attempt for an escape is the only reasonable thing to do. Look around and maybe you find some hint how to open the colorful padlock preventing you from leaving!
The cursor is changing, no save button, one ending.
Many years ago, Maruho locked you in a charming garden (Escape from the Garden) and it took a good while to escape it. Now you find yourself in a room with huge pot plant and a pet owl, and also locked drawers and a cabinet. It's important to click everywhere (luckily, the room is quite small) as some spots doesn't seem active and on some you may need to click more times to find the right pixel. Can you awaken the owl?
The cursor isn't changing, no save button, one ending.
P.S. Talking about owls - here is the first game by Amajeto: Night Forrest. And here's something completely different, Owl's Nest by Pastel Games.
Funkyland at its best, colorful, vivid and joyful. Mr. Frog has the key from the door and will exchange it for folded nice fresh crepe - but even if you had it, there's a problem - he's right below a ceiling and you're standing on the floor. Seems that you need to get yourself up or him down, somehow. However, you don't have the crepe yet so maybe you should concentrate on available puzzles and postpone this important exchange business for later. Will you escape?
The cursor isn't changing, save button, one ending.

Gatamari knows how to make excellent long games very well and here is another proof. Don't skip the intro in Japanese, it's quite short and explains a lot visually...several really strange things happen in it and you end up locked in a house with a Red Creature, who is chilling in his redroom with TV. Your goal is to escape the house and the Red Creature (with all your possessions of course) and that means very many puzzles and loads of items - look how many empty slots does your inventory have - and a lot of fun. Notice that the game is long indeed and has two endings which both worth playing. Save button comes handy. Also notice that you can put on costumes you find.
The cursor is changing, save button, two endings.
We love escape games, and our readers love talking about them and sharing hints! How about you? Let us know what you think, ask for clues, or help out other players in the comments below.


can't wait for the walkthroughs on these.
Escape 11
Going outside is both the goal and the theme.
Exploration
(The labeled button in your inventory helps you "view details of a held object".)
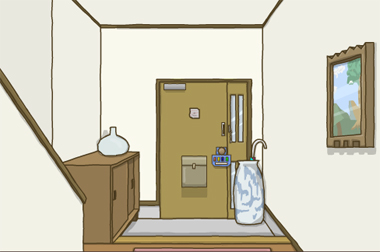
There's only one screen in the game, which occurs in the genkan (entrance hallway) of your house. The door has a colorful four-digit padlock on it, a newspaper in the mail slot, and a transparent sticker on the peephole that leaves a lot of residue when removed.
Next to the door, a tall vase holds an umbrella. Further to the right, the painting on the wall shifts when you click the arrows on its sides.
The shoe cabinet on the left side is locked. On top, a key sits in a fishbowl with a rather lively goldfish.
Click the left gray area of the floor to look under the cabinet.
Let's look at the items. Open the umbrella to get a good look at its design made out of colored triangular panels.
Unfold the newspaper to find a small round object labeled "shoe cabinet". (I won't name the object yet since the game doesn't.)
Sweep
Use the umbrella to retrieve the small box under the cabinet, which has a circle of white and pink buttons, the pink ones changing color when clicked.
(If you've opened the umbrella, you'll need to close it for this to work.)
Those colored buttons form a shape like an umbrella, so use the clue from the umbrella to unlock the box.
While open, you can see that the umbrella has three white triangles, just like on the box. The game helpfully puts them in the same orientation, so you can just copy the colors over:
Top half: white Pink (0) Brown(4) Purple(3)
Bottom half: white Blue(1) Green(2) white
Click the buttons that many times, then the bottom button ("Decide", or confirm) to open it and find a key tip.
Unlock
Use the key tip on the key handle (the round object) to form the shoe cabinet key, then use it to unlock the cabinet.
The left side has two pairs of shoes, but when you look at the top pair you end up removing a shoelace from it. The bottom pair has a numbered red square printed on the inside. The right side of the cabinet only has a locked green box with a keyhole.
Line
Use the clue from the plastic sticker to unlock the shifty painting.
The sawtooth/square/sine/constant(flat) waves appear on the top, bottom, right, left sides of the painting.
Following the sequence on the clue, click the top, bottom, bottom, right, left, top sides. The painting comes off to reveal a screw and a key holder.
(The item's description mentions that this keychain has a waterproof flashlight attached. Click it to turn the light on and off.)
Bright
The only dark spot in the game is the bottom of the vase. So turn the flashlight on and look there to find a numbered yellow square.
Dip / Unlock 2
Tie the string to the key holder, and dip it into the fishbowl to pick up a box key.
Use the key to unlock the green box, which contains a bottle of sticker remover.
Transparent
Uncap the bottle, and use it to clean up all the sticker residue.
Now you can look through the peephole and read the two numbered colored squares outside your door.
Numbers
Use the number clues throughout the game to unlock the padlock on the door.
The red, blue, yellow, green numbers form the code 2357.
Enter that in the padlock to remove it, then open the door and leave!
(Even the dog gives you a woofing congratulations on the end screen.)
Escape from the Owl
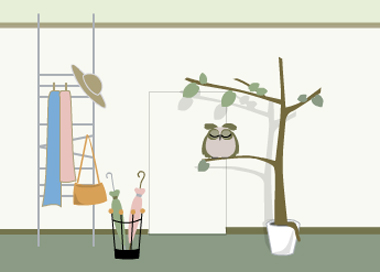
In an unusual reversal of the scenario, you just returned home and the door instantly vanished, and there's an owl in your house.
Exploration
The door has been reduced to a white rectangular outline, not even a handle remaining, and in front of it an owl sleeps/sits motionless on a weird tree that seems to outgrow its plant pot. On the left, you can lift a pink umbrella from the rack and look at its pattern. The clothes rack to the left of that has various items that you can lift aside.
When you turn the hat over, the tiny bump that appears at the brim is your only hint that an egg with a circle marking is hidden there.
(There's one other thing hidden on this screen, but I'll leave that for later.)
Turn right. Besides the potted plant that's completely uninteresting, there's two windows with their curtains down, but you can lift them to find a blue note pasted on the right one. Two chairs surround a table with a locked drawer, and you can lift the cushions on the chairs to find another note.
But you can also lift the cushions of the chairs to find a battery under the right one.
Also, there's a thin green box on top of the table that contains four small colored trays and a key trapped under glass.
Turn right. There's another potted plant here, and this time you can look at its pot to find a pair of scissors behind. A blank picture on the wall hides a box with buttons arranged in a flower pattern. As for the long cupboard, you find that the glass doors on the left don't open, one drawer is locked and the other contains a battery, and the capsule machine on top seems to take ordinary coins.
Click the left side of the cupboard to find a five-digit lock panel.
The picture is attached to a hook that you can pull out from the wall.
Turn right. A counter runs the entire length of the wall, ending with a coffee machine on the right with helpful instructions but no ingredients. On the left, you can take a look at the flower pot (it's too high to reach), the fridge which has three roman numeral buttons on its lock, and the orange alarm clock that seems to have stopped.
Click the bottom of the alarm clock to turn it over. It has no batteries.
Roman
The clothes rack on the first screen is clearly a clue for the fridge, but it seems a bit hard to read, as if the clue is missing a space somewhere.
Clicking on the bars of the rack, you find that the third rod from the bottom comes off.
Now you can easily read the clue as Ⅲ Ⅳ Ⅱ, so click the buttons on the fridge 2, 3, 1 times to enter that code.
Then open the fridge. You can only take the water bottle and the egg marked with a cross, second from the left.
Reach
The rod lets you reach the plant pot hanging from the ceiling, but you can't do anything with it that way.
Attach the hook to the rod, and use it on the plant pot. This time, you remove the whole pot and find a key on it.
Unlock 1
Use the key to unlock the bottom drawer (make sure you click the keyhole) and open it to find an egg with a square mark next to a purse with a (lucky?) 5-yen coin tied to it. You can also open the purse to find a folded note.
Snip
Use the scissors to remove the coin.
Gacha
Use the coin on the machine to make it dispense an egg with a triangle mark.
Five digits
Use the clue from the umbrella to unlock the panel on the left of the cupboard.
There are many ways to interpret the pattern of lines as a repeated sequence of five digits, but the only rule that can be consistently applied to each digit is that they should contain as many lines as possible. For instance, while the last digit looks like it could be 5 or 6, 6 wins because it includes all the lines from 5.
Enter 52986 into the lock (by clicking the smaller buttons) and push the round button.
Now the glass cupboard doors can be opened, and you find a tightly wrapped box on the left and some coffeeware on the right, from which you can take a coffee cup.
Unwrap
Use the scissors to cut the rope off the blue box you just found, which contains a rubber stamp. While you can flip the stamp over to look at the bottom, you can't figure out what it shows without any paper.
Power
Place the batteries into the clock, which changes its time.
Flower
Use clues from the notes and the fixed clock to unlock the flower box (in the wall compartment).
Having so many colors may be confusing, but the ones you need to look at are the colors of the notes:
H (left chair) is written on a pink note.
M (purse) is written on a green note.
S (window) is written on a blue note.
Since these represent the hour (9), minute (2) and second (5) hands, you need to click the petals in those positions 1, 2, 3 times.
Push the middle button to open the box and find a bag of coffee powder.
Brew
The game is rather particular about following the order on the note, so let's do that.
Place the coffee cup on the coffee maker.
Pour the water in.
Add the coffee powder.
Finally, turn the machine on.
Instead of coffee, when you retrieve the cup you find another key inside.
Unlock 2
Use this key to unlock the drawer between the two chairs. Inside, you find a watering can full of water.
Tree
Water the weird tree beside the door, which makes a tomato-colored apple grow on the top branch.
Feed the apple to the owl, and after a short wait (or you can skip the whole thing by backing out) it wakes up, vanishes, and the door comes back, but still locked.
You also find a piece of colorful paper on the floor.
Mark
Use the stamp on the paper to make some shapes appear.
Then use that clue to place the eggs correctly on the green tray.
The orange, blue, pink, white regions of the paper are marked with a triangle, cross, square, circle.
So place the eggs accordingly (from left to right) and click the glass to make it open up. Take the golden key from inside.
Use this final key to unlock the door and leave!
I'm pretty sure they know, Paul. You've been posting the same thing for 6 years:
https://jayisgames.com/review/dokotonaku.php#comment-508936
lourd, these walkthroughs help me just as much as they help you. and at times it takes a while and I'm just posting to let whoever wants to make one know I'm ready to play them. anyway, I'm sorry if you feel I'm bugging you. Anyway, Thanks again KK for the ones you have done so far. looking forward to the last 2.
That presumption is incorrect. I don't use the walkthroughs.
You are also not bugging me, but I do marvel at the sense of entitlement.
well I didn't meant "you' as in you specifically. I just meant anyone in here that has trible with the game as that is what the page is about. I am confused on what you mean by entitlement but it's cool.
@Paul: First of all, I intend no offense, so please read through.
Entitlement:
The "sense of entitlement" issue is in the wording of the comment, which at face value expresses the expectations that
somebody must write a walkthrough for every game
walkthroughs must be written soon
and that your further comments are a selfish attempt to force people into doing so.
(To be clear, this comment does not affect how I currently handle walkthroughs. If it takes a while, that's usually intentional!)
Even if this is not the intended meaning, the implications would certainly bug some readers, regardless of whether the walkthroughs help everyone.
Repetition:
The comment is almost exactly the same all the time, with no particular information about the game, which makes it essentially a type of spam.
And regardless of the comment, posting the same thing several weeks in a row as a first comment certainly feels redundant and annoying for some peple.
Helpfulness:
Under your reasoning, posting that comment every week either signals that you want to play every game or that you want players to have a walkthrough for every game.
Perhaps this is something we can take for granted right now, and will happen even without a repetitive comment. (In other words, yes we know.)
Have patience for the walkthroughs, and if they do seem to be taking too long then you should ask about them in specific terms.
Keep the comments fresh, informative and positive, and they will be better received.
That comment took me too long to write, but anyway here's
Escape a Crepe House
Peaceful music welcomes you into the crepe shop. Let's find a way to open it.
Exploration
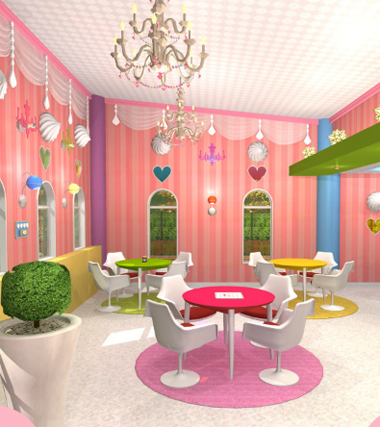
Three colorful tables are spread out across the dining area, and you find a grid with some colored dots on the pink one as well as a jar of blueberry jam on the green one. On the left wall, you can access a panel with four wheels, one quadrant of each colored dark gray.
Turn right. The blue table here has a (tissue?) dispenser with an unusual clue and a row of lights in between two buttons. A row of plants separates those tables from the right wall, where you see a glass door with its handle near the ground, a small grid of shelves with a jar of jam you can't take, and an open button that's trapped behind glass.
Click the top of the open button to find a narrow slot in its glass case.
Turn right. A wall box with eight buttons is placed beside the serving counter, which has a scratch card on it. One of the pink benches on the right has a squarish object with rope tied around it.
Turn right to face the locked door. Beside it, some crepes are on display, along with an unusual picture of cows along a path. Above the corner table, a frog sits comfortably in a basket lifted by balloons. Under the left window, a heart-shaped stand/locket holds a coin.
Quarter
Use the clues from the crepes on display to unlock the four-dial panel on the first screen.
The curved edges of the crepes are on the left, top, right, bottom sides.
Click the buttons 3, 0, 1, 2 times and push the OK button, which opens up to reveal a screwdriver.
Meander
Use the clue under the crepe display to unlock the device on the blue table.
From the fountain(bottom) to the swing (top), the cows face the LRLLRR directions.
After pushing those buttons, a card pops out of the top.
Access / Exploration 2
Since the glass case with the OPEN button has a slot on the top, use the card there.
Now you can push the button to open the shutter door beside.
You're in the kitchen! Clicking around the left side, you find that the only thing you can take is a pair of red scissors from the shelf over the sink. On the right side (from far to near) there's a fridge with a four-digit lock, a register you can't access, and a pair of hotplates.
Unwrap
Use the scissors to cut the ribbons off the box on the pink bench.
Inside, you find eight decorative wedges arranged around a small red box sealed with screws and containing a key. After you take the box, all that remains in the center space is a pink line and arrow.
Eight
Use the clue from the big box you just opened to unlock the wall box beside the counter.
The wedges are joined with pink lines (and arrow), in the order top-right, right, bottom-right, top-left, left, bottom-left, bottom, top.
So click the buttons in the
4 8 1
5 - 2
6 7 3
order, and open the box to find some cooking tools.
Unscrew / Unlock
Use the screwdriver to unscrew the red box you picked up, and get the heart key from inside.
Use the heart key to unlock the locket near the frog basket, and get the coin.
Click the locket again to find a hidden compartment with a throwing dart inside.
Silver
Use the coin to scratch the card on the counter, revealing a sequence of digits.
Four digits
Enter the code (6172) from the scratched card into the fridge, then open it. Take a tray of ingredients and a jar of marmalade jam.
Sizzle
Use the items you picked up to make a crepe!
Use the ingredients and the tools on the hotplates to place them nearby.
Then click, in order, the batter, spreader, knife/turner, cream and chocolate syrup.
Click the crepe thrice to finish it and pick it up.
Flavor
Use the clue from the pink table to unlock the shelf beside the kitchen door.
As indicated by the dots, the purple (blueberry) jar goes under the red jar and the orange (marmalade) jar goes directly to the right of it.
After placing the jars correctly, push the OK button, which opens up to reveal a throwing dart.
Pop
You should have two darts, so use them on the balloons to lower the frog basket.
Serve
Give the crepe to the frog, who holds up the door key.
Use it to unlock the door and escape!
Gatamari will certainly take a while (seriously, open it and look at the inventory). Wait for it!
Paul explained (multiple times in comments) that he really enjoys games but can't play without walkthroughs because he has Asperger syndrome (autism spectrum disorder).
Asperger's does not make it impossible to learn social etiquette. In that regard, perhaps kktkkr's patient and informative walkthrough may be helpful.
I have Asperger's Syndrome myself, and you are correct in saying that it does not make it impossible to learn social etiquette. However, it does make it difficult to utilize it appropriately. Perhaps you should try to keep in mind that we on the Autism Spectrum have a more difficult time with these things. Please also try to remember that nobody is perfect.
I wanted to apologize to anyone i upset. As mentioned earlier i do have aspergers and as cyberjar said it is difficult to utilize my etquette at times and i mean no harm. I will no longer ask for walkthroughs if you no longer want me to. I think i was blocked from my account as i no longer could login but if you'll let me keep this account, i won;t bug anyone anymore. Again i am sorry and did not mean to start anything. Thanks.
I must admit that I was also puzzled about Paul's posts when I started reading the comment section years ago. But as soon as I learnt that he was on the Autism spectrum I felt actually bad for thinking like that – quite annoyed with myself for being so narrow minded. So when I read Paul's comments now, I just read them as someone who is really, really looking forward to the walkthroughs. Why would that bug me? (But maybe I have a different understanding of social etiquette because I'm German: what is considered social etiquette here would be considered highly offensive in other cultures – we're famously considered rude…)
That's why your last comment made me really sad. You might want to take into consideration that some people might find it inconsiderate and some even offensive. Personally, I do marvel at the sense of entitlement to expect that someone with an impairment should be able to adapt to the "normal" world even though someone with Asperger's might have difficulties to fully conform to the social etiquette of us neurotypicals (I think Cyberjar's post puts it in a nutshell). After all, no one would expect someone in a wheelchair to master road curbs with ease. Instead, complaints to make places wheelchair accessible are considered valid in most societies (at least I assume).
@social etiquette: I think we should honour that Paul has (social etiquette wise) adapted his posts over the years - at least that's my impression. Yesterday, he was so kind to apologise for upsetting anyone even though I don't think there has been any need for it – he definitely didn't upset/bother/bug me! I'd find it quite dispiriting if he had been discouraged now to post something at all! Finally, I'd like to point out that Paul is the only one who says "thank you" for the walkthroughs once in a while even though I'm sure there are quite a lot of other people who use these walkthroughs, too – without acknowledging the work behind it…
Thanks for that Milkyjoe and cyberjar for your comments. Milkyjoe is correct though. maybe not always but a lot of the time i thank the people who do the walkthroughs, especially way back when grinnyp write them, and now that kktkkr does them because if it wasn't for those people who were kind enough to do that, not just for me, but to the rest of you as well, this site wouldn't be the way it is today. you guys are the best and i appreciate anyone else n here who were patient with me and enjoyed helping when they can. I think of you as friends and i'm happy to be your friends. Thanks again.
Thanks for the kind words. Here's the walkthrough.
Escape from the Red Creature
Is your nemesis just some red guy, or is there more than meets the eye?
Intro
(Game text is too long and unusual to directly translate, so I'll simplify parts of it.)
You're relaxing in a super-secret hot spring that's only rumored among enthusiasts, which is simultaneously surreal and solitary in a spooky way.
That you happened to find a vacancy here, and the owner is a young beauty… everything's going well thanks to this "luck-calling bracelet" you got through mail order.
It seems to have impressive power for its cheap appearance, as shown in the testimonies from happy customers who had luck with love, exams, and even house-hunting.
The bath is so good, it's making you sleepy.
But then lightning strikes out of the blue, and something swoops down to grab your bracelet.
So you quickly get dressed and chase it to a house with the door ajar. Entering the doorway, you find the lucky bracelet on the floor, thank goodness!
And then the door locks on you.
Once you calm down enough to recognize that nobody's coming to help, you notice some sort of manual hanging from the door lock.
Which leaves you with a simple task: enter the room in the back and enter a password into the control panel.
Charge!!
Red Room may sound like a weird name, but it's where you need to go.
The control panel is on the left, but what's this weird thing with wings? If he's chilling in front of the TV, maybe he hasn't noticed you.
…Oh no, now he's noticed, and he's running towards you. Where's his wings? What's happening?
Exploration
You managed to escape the creature in one piece, or should I say wearing one piece, because white underpants are all you have left. (I'm not even sure you still have the bracelet, as your 42-space inventory is completely empty.)
Now that you're back in the living room facing the entrance, let's start by exploring it. In between the kitchen door (which has a card reader) and the entrance door, a bookshelf has a golden pot with a lock on it. Under that, there's a row of red books with unusual titles and humorous cover art to match. Under that, there's a row of green and red books ending in a black book with lots of information, and a blue book that doesn't seem to actually be a book. The bottom cupboard is locked.
Click the arrow at the bottom of the screen to look at the table and couch. Pick up a portable game console, an interesting but fake potted plant, and a matchbox with a single match inside.
Click the arrow above the couch to return, then turn right to face the bathroom and bedroom doors. Zoom in on the green picture frame to find that it's a dragon drawing, but the dragon is made up of eight weird-shaped holes.
Turn right to face the red room and storeroom doors. The red room now has a key in front of it. The wardrobe here has an unusual three-number lock on its top doors, a keyhole on the top drawer and a six-letter lock on the bottom drawer.
Turn right to find a fireplace which only has a rack in it. You can take the red container on the left, which appears to be full of lamp oil (kerosene). The pig on top of the fireplace holds some spring onions in its gaping mouth. And the armor in the glass case would be really nice right now if only you could figure out the four-digit code to open it. The bottom of the case has four skulls drawn on it.
Next, let's move on to the side rooms…
ENTRANCE
The main door is still locked, the lamp beside is still red, and the manual/map still hangs from it in case you get lost. A single piece of firewood lies on the floor to the left. And along the right edge of the screen you see part of a shoe cabinet that has both of its doors locked, and the rounded lid on top can't be moved because there's no handle or gap there.
BATHROOM
Entering the "bathroom" door you see two more doors, with a switch panel in between that doesn't seem to control anything. The left door leads to the bathroom (i.e. the room with the bath tub) where the taps don't dispense any water but the head mounted beside does, and there's a mirror that you can't do anything with. And the right door leads to the toilet, where the only interesting area is the calendar with lots of circled dates. Removing the tape on the calendar sends you back to January.
REDROOM
Not a chance! You simply can't afford to lose any more clothing. But you can take a quick peek to verify that the control panel is inside, and to wonder about that shiny line running from the floor to the ceiling.
STOREROOM
It's too dark in here to do anything.
Next, we need to explore the items you picked up.
The blue book has some sort of cover/lid on the front, and you can
click the left edge/spine of the book to flip it over and find a grid of buttons.
The game console tells you to press start, and when you do some sprites (randomly) fly across the screen. This isn't much of a game, as the other buttons have no effect on it.
Clicking the bottom of the potted plant reveals two narrow holes, as if something plugs into it.
Unlock 1 / Exploration 2
Trying out the key on various things, you find that it fits into the bedroom door.
The bedroom looks rather normal except for something on the bedside table that I'll call a monster box, because it has four horned monsters on top. Also, who sleeps on a drawing of a skull and crossbones above four zombies?
Click the arrow at the left of the screen to find a poster with a grid of noughts and crosses. (Has somebody been playing tic-tac-toe?) There's also a lance against the corner that seems to be made out of cardboard.
Cyclops
Let's start with the monster box (from the bedroom) because it's easy to mess up. It shouldn't be too hard to stumble on the solution after you do, but you might want to save the game anyway.
As shown near the end of the black book, the goal is to get every monster's horn up and all their eyes in the center.
You'll probably want to skip over the mathematical details:
(Note down your starting position.)
If you click any single horn repeatedly until it comes back to the starting configuration, you'll find that it takes 6 clicks: The horn you click alternates between up and down, and that monster and the adjacent ones roll their eyes between three different positions.
Naïvely, this would mean you only need to try 1296 combinations, but we can do better: clicking any horn thrice toggles its position without affecting the eyes' final positions, so you only need to try 81 combinations for the eyes and then adjust the horns accordingly.
But why search for a solution when you can work it out?
The eyes need to be shifted 1, 0, 2, 2 times (plus multiples of 3 each), and we can easily work out how to do this through the magic of linear algebra:
>>> import numpy as np

>>> np.linalg.solve(np.triu(np.tri(4,k=1),-1),(1,0,2,2))%3
No, not like that! Let's produce a solution manually, starting with labeling the buttons A, B, C, D.
Pushing D causes the rightmost two eyes to shift.
So pushing C, D, D leads to the second eye from the left shifting once.
Therefore, pushing A and then (C and then D twice) twice causes only the leftmost eye to shift once.
In order to get the result of (1, 0, 2, 2), the required button presses are A+2(C+2D)+2D = A+2C+6D, but 6 button pushes on D does nothing, so it's just A+2C.
Now for the horns…
Only horn C should be moved/pushed an odd number of times, and comparing that to the result of A+2C reveals that A and C need to be pushed 3 more times each.
All you need to do is push the leftmost horn 4 times and the third horn 5 times!
Once done, the box opens up and you find a can of healing spray. That's great, but you're not injured at all.
You still have the box, so look in it and click it again to get a better look at the star-shaped (but I'll call it sun-shaped) bump in the bottom. You'll need something sharp to cut it out.
Deadly
Use the clue from the skull drawing to unlock the glass case.
There are only four skulls on the case and no zombies to be found, but perhaps you can make this work.
A four-digit code seems like quite a large number, so you should look for a large number on the drawing.
Since the skulls on the case do not have the crossed bones, it makes sense to interpret the bones as a multiplication sign.
While there are only three zombies, their outstretched arms make them form the digit 7.
So work out 4 × 777 = 3108, and enter that into the lock, then open the glass case and pick up the armor, which is also made out of cardboard.
When you examine the armor, the button in the top left invites you to "try it on". It's not very good armor, but it is better than nothing.
(Putting armor on updates the icon near the save button. Be sure to check there if things aren't working as expected.)
Don't miss the numbered sun piece that remains at the bottom of the case.
Revenge!!
Armed with cardboard armor and a lance, you head into the red room for another raid.
(The game tells you to not try this at home.)
All your jabs and thrusts are easily dodged. Crack!
(The game helpfully omits the unappealing details.)
Another humiliating defeat! You get to keep the broken lance though…
and by clicking its top left you find that the shorter piece has a key in it.
Unlock 2
Use this key to unlock the bottom cupboard of the bookshelf. Inside, you find a purple box with a four-letter lock, as well as a roll of bandage. (But you're still not injured.)
Flame / Exploration 3
Following the instructions at the end of the black book, you can wrap the bandage around the wood, soak it with the oil, and light it with the match.
(This is dangerous too, don't try it.)
Enter the storeroom and use the torch to light it up. A giant axe in the middle of the room is much too heavy to carry. Behind it, a froggy raincoat hangs on a rack. And on the right, the bucket beside the cleaning liquids contains a packet of "bath green", which turns out to be bath salt.
Just like the armor, you can wear the raincoat/costume, which is completely useless indoors but still better than nothing.
Blade
The axe is the sharpest object in the game so far, so use the onions on its blade to cut them.
(Don't try this at home either.)
After venting your emotions for a while, you collect the sliced onion which as a rolled note hidden in it.
Also use the monster box on the axe and then remove the sun piece from its base.
Commands
Use the clue from the sliced onion to do something to the game console.
As the rolled note shows, you'll need to press a total of 16 buttons before you even push Start. (If you're unfamiliar with video games: the arrow buttons are the unlabeled ones to the left of Start; the top one is Up and so on.)
Enter that code (right, B thrice, up, B thrice, left, B thrice, down, B thrice), making sure you hear the clicking sound for each button press, and then push Start.
Once done, the game starts up with a different sound and alternates between rows of squares and groups of moving things.
Formation
Use the clue from the console to unlock the bottom drawer of the wardrobe.
(If you need to review the clue, you can just push the Start button.)
Each group of moving things (people?) traces out a different letter, and the squares tell you to arrange those letters from left to right.
That gives you the code KNIVES, so enter it into the drawer. Opening the drawer, you find lots of them. 36 knives, that is. (Because they're made of plastic, they can't replace the axe for cutting purposes.)
More Revenge!!
Wearing a frog suit and wielding 36 knives, you reenter the red room. Surely you'll be able to hit the red creature this time!
(But still, don't try this in real life.)
He can dodge five groups of three knives, but that puts him exactly where we want: right in front of you for a sweeping attack that leaves him nowhere to hide- he's got a shield?!
There goes another set of clothes. But you still have some knives left, as well as the shield he dropped on your head, which on closer look is actually just a metallic plate.
As you might have noticed, there's something on the underside of the plate: a card with instructions for making yakitori, starting with the required ingredient ratios for the sauce.
Clicking the arrow at the top right flips the card over so you can read the actual steps required. (Boil the mixed seasoning until thick, coat the skewered chicken or food, and grill on a wire mesh to complete!)
Scan / Exploration 4
Use the card to unlock the kitchen door (and then remember to take it back).
There's a lot of stuff here. The stove doesn't work and its cabinet has two colored buttons. The sink doesn't work either, but in its cabinet you find the mirin. Among the utensils and dish towels in the drawers, you find a cross in the top drawer and a dart with a suction cup in the bottom drawer. And in the fridge that's not very well-stocked, you find an ice tray with only three ice cubes as well as a large tray of yakitori, but it's not fully prepared.
(If I'm reading the description of the cross correctly, it won't be an effective weapon because the red creature has a zipper on his back. You'll have to rely on more human methods.)
On top, the left cabinet has a four-digit lock, while the right one is unlocked and contains a bottle of soy sauce. The ventilation fan (range hood) doesn't respond when you push its red button.
But you can click the bottom edge of the fan to look under it and find a banknote stuck in the fan. Okay, it probably isn't a real banknote.
Two colors
Use the clue from the card to unlock the cupboard at the bottom left.
The three skewers shown on the card point from left to right, and only have two kinds of ingredients: the chicken balls are brown (which matches the left button) and the vegetables are green (right button).
So the sequence of 16 buttons you need to press is RLLRL LRLRRL RLRLL (which you can memorize as RLL twice, RLR twice, LRLL).
Once done, the Clear! text will appear and you can open the cabinet to find lots of boxes.
Salty
The boxes in the bottom-left cabinet seem to contain salt that you don't need, but there are two that are different…
The middle box is a box of sugar, and you can open the lid to find a circular mark.
The top-left box is still salt, but it has a sun-shaped mark with a number 6, which hints that you can open the lid and take a sun piece from it.
Vacuum
Since the dart has a suction cup on it, you can use it to lift the lid on the cupboard in the entrance hall.
Click the switch to flip it, and the cupboard is now unlocked! The left side contains firewood and newspaper, which comes mixed in a pile when you pick it up. The right side holds a bottle of sake with a number printed on the bottom.
Don't forget to retrieve the dart!
Checking the lid again, you find a sun piece hidden on the bottom.
Products
You've now picked up or seen all the clues you need to unlock the top-left kitchen cupboard.
(Maybe get a calculator or at least some paper? Doing this arithmetic mentally is possible but tough.)
The sun shape (from the salt boxes) is numbered 6, and the sake (which has a diamond) is numbered 135. Using the ratio from the card:
Square (mirin) is also 135.
Circle (sugar) is 3×135 = 405.
Star (soy sauce) is 5×135 = 675.
The numerator works out to (135×675)−(135×405) = 36450,
and dividing that by 6 gives the answer 6075.
Enter that into the cupboard lock and open it to find a saucepan.
Since you have all the ingredients, you can click the "add seasoning" button that appears when you examine the saucepan to do so.
Burn
Place the pile of firewood (and old newspaper) into the fireplace, then light it with the torch.
It's a warm fire, but of course it's actually hot, so just put the full saucepan on the grill to boil it down. It smells great!
Add the sauce to the yakitori tray, then cook it in the fireplace too.
First batch, looking great. Second batch, piping hot and tasty. Third, wait why are we doing this? You're getting hungry.
Fourth batch and it's all done! You take just one skewer, for "tasting", and then arrange the rest onto the plate.
Data
The fake banknote has an unusual clue on the back, which seems to include three numbers? That probably has something to do with the wardrobe lock.
Looking at the lock, you realize it looks like a person, with the OK button being the head and the triangles at the bottom being the legs.
Which makes sense, because the letters on the note indicate that the numbers are bust/waist/hip measurements.
Anyway, all you need to do is set the numbers on the lock (from top to bottom) to those shown on the back of the note: 88, 58 and 90, and then push OK to open the cupboard. As the game says, that wasn't a very educational password.
Inside the wardrobe, you find a wig, dress, heels and gloves, which adds up to a full female costume. There's also a hint pasted on the door.
Attack??
According to the game's remarks, you don't feel very happy about having to wear these clothes, but since the whole set is there you might as well go all out.
Walk into the red room with your plate of yakitori. Is such a roughly cooked thing even fit for serving? Also, why is he running over here when you were going to bring it to him anyway?
You stand in fear as the red creature nods repeatedly at the plate, and then holds up a single finger.
He counted them and there was one missing!
There goes another set of clothes. Oh, and the REDROOM sign has come loose onto the floor.
Clicking around, you manage to turn the sign over by clicking the right edge, revealing another clue on the back.
As you look around the room, you also find that the fireplace is burning out, the pig on top has become skinnier from the heat, and there's a sun piece on its side.
Locate
The hint in the wardrobe tells you that it's for the purple box you're holding. What's going on "here"?
The color gradient of the "here" square appears on the floor of this room. Looking around at all the floors, you find that the red floor appears in the red room.
What are the other rooms, and how do you translate the numbers to letters?
Checking the sign/nameplate you picked up, you find that D is the 3rd letter of REDROOM.
The rooms indicated by the hint are the kitchen, bedroom, entrance, bathroom.
Taking the 5th, 2nd, 4th, 1st letters of those words gives you the code HERB, so enter that into the box and open it to find a money bag only containing some seeds.
Text
Going through your inventory, the first thing you haven't used yet is the blue "book" with buttons on the back.
If MEET is a clue for that book, then perhaps the buttons are supposed to represent letters?
A grid of letters with some squares colored black… it's a crossword! So each word is only 2 to 4 letters long, just like the book titles!
Let's mentally fill in the crossword:
All eight book titles must go into the grid. We can immediately place SON in the third column as it's the only three-letter word.
The only way for the four-letter words CENT, ZONE, NOSE to fit with SON is to have NOSE in the second row, ZONE in the second column, and CENT along the bottom. (Another way to figure out the placement of CENT is to note that two of its letters don't appear in any other words.)
Only two letters remain, O in the top left and M in the top right:
OZ.M

NOSE

.NO.

CENT
As expected, this grid has exactly one M, two Es and one T.
Push all the buttons in the rightmost column, as well as the second button in the bottom row, then flip the book back over and open the cover to find a sun piece.
Missile
Use the remaining clue from the black book to operate the light switches in the bathroom.
(If you're wondering about the weird shape on the light switches, it's supposed to represent the pair of pants that the man in the book only wears.)
The man switches between three positions to dodge the incoming magic sparks: jumping (up), standing (center) and crouching (down).
With 1 highest and 3 lowest, push the 232121321 buttons, and you hear something drop at the end.
In the toilet, you find a sun piece on the bowl.
Bath
Let's fill up the bath. Push the button on the head to dispense water.
Give it a while to fill by backing out to the living room and then reentering.
The bathroom is now filled with enough steam for you to see a clue on the mirror.
Add the (unwrapped) "bath green" to the tub, which turns the bath unsettlingly green (and somehow less steamy). A sun piece floats to the surface.
Collection
You should now have all 8 of the missing pieces.
(The pieces are numbered roughly in order of when they become available to pick up.)
In blue book
In toilet (from bathroom switches)
In glass case
In/from monster box
In bath salts
In salt box
In cupboard lid (at entrance)
In piggy
They fit in the dragon picture between the bathroom and bedroom, but which piece goes where?
The back of the room sign shows that 1 should be on top and 8 at the bottom, and the V shape is a subtle hint that you should be looking at the heights of the stalactites above the dragon.
By careful observation or perhaps using a ruler, you find that the correct order of numbers is 41762853. Once you place the pieces correctly, the picture rises to reveal a hidden room with a ladder.
Exploration 5
This narrow room has a hole in its right wall, where an empty spot is surrounded by towers that look like bamboo shoots with faces. The yellow button doesn't seem to do anything yet.
Go up, and your exploration is interrupted by a squeaky flying squirrel that dangles a key in front of your face. Hey, that's the one who took your bracelet!
Fake tree perches are placed at the corners of this room, but there's nothing else on this wall. However, you can click the ceiling lamp to find a clue there.
Turn right (nothing here either) and turn right again to find a small green plate on a shelf.
Turn right to find a safe with four lights controlled by two buttons. The squirrel is here- nope, it flies off as soon as you try anything on it.
You can chase it around the room until it gets tired, but it's still out of reach whenever it stops. And once you're done examining it, it flies off again!
Nuts
Place the seeds onto the small plate, then climb down the ladder and back up.
Now that the squirrel is well-fed and distracted, you can take the key from it.
Unlock 3
Use the key to unlock the top drawer of the wardrobe, which contains a colorful toy crossbow among lots of strawberry underwear. It's good to be prepared!
Is it just your imagination, or does the groove on the crossbow seem a bit curved?
Planted
Place the potted plant in the hole beside the ladder, and push the yellow button to start a performance, a dance with lights and music!
Then use the clue from it to unlock the safe in the flying squirrel's room.
(This puzzle was randomized for me even though it had a nice code on my first playthrough.)
In the dance, each pattern of lights is simultaneous with the plant turning to face the left or right twice, and each pattern of lights (whether shown on the safe or not) appears exactly once.
Writing 1 for on/red and 0 for off/white, and lights in reading order (top left, top right, bottom left, bottom right), the plant directions are
0000 C, 1110 R, 0001 L, 0101 L,

1001 R, 0111 R, 1011 R, 1000 L,

0010 R, 1010 R, 0110 L, 1100 R,

0100 L, 1101 R, 0011 L, 1111 L.
However, the < button (matching the mouth of the plant facing right) is on the left side and the > button on the right, which means you need to push the buttons on the opposite side from those I wrote.
To summarize, look at each pattern of lamps on the safe and follow the procedure:
If no lamps are lit, you messed up the puzzle, so push reset.
If only the bottom-left lamp is lit, push the left button.
If exactly two lamps are lit and one of them is in the top left, push the left button.
If exactly three lamps are lit, push the left button.
If none of the above conditions hold, push the right button.
Once you're done, the safe unlocks and you find a barrel full of colored holes with a weird monster in it. (Black-something Danger-something, as the game hints at the real name.)
Grids
Use the grid clues around the house to place the knives into the barrel correctly.
(Backing out to check the clues will reset the puzzle. Copy or memorize them all before starting!)
While there may be ambiguities in how some clues are presented, in all cases there's only enough knives to cover the minority of slots.
The red grid is in the toilet, on the January calendar:
|||

||O

|O|
Click the right arrow for blue. It's the ice tray in the fridge, but the arrow there indicates that the clue is inverted:
|O|

O|O

|||
Next is yellow, from the ceiling lamp in the attic:
||O

|O|

O||
And finally we have green, from the poster in the bedroom:
O||

|OO

|O|
Select the knives and insert them into the 12 slots marked with Os, and the barrel launches a key into the air for you to catch.
Unlock 4
The key is spiky and hard to hold, so get rid of it by using it to unlock the golden padlocked pot. Inside, you find a pink ball labeled GAS that comes with a paper note showing you how it's used.
(Every slot in your inventory should either be filled or grayed out.)
Weaponize
To give your gas ball more range, attach the dart to it and then load it into the crossbow.
Attack!!
You weren't able to find another costume this time, but you won't need one if your sneak attack succeeds. Once more into the red room!
(By the way, you'll notice in the cutscene that the red creature has finished all the yakitori you made.)
There's no room for failure, you've got to land this shot. Take steady aim (but don't try this at home) and fire!
The dart veers way off course even before the red creature can notice, and smashes perfectly into the control panel light, which sets off an alarm, which slams the shutter between it and the rest of the room before the red creature can even reach the dart.
Whoops! At least you're not naked, and you can access the control panel, which has a keypad and a familiar cross-shaped hole.
Door
Place the cross into the hole on the control panel, and use the remaining clues from the game to unlock the keypad.
The keypad fits seven digits and according to the bathroom mirror the last digit should be 0.
Also, both parts of the cross taper at their ends, so how do you use that clue?
Since the cross is made of two separate parts, this suggests that you should find a grid, read across it (just above the middle) to get some digits, and then read down (through the middle) to get the other digits, ending with 0.
And you're already looking at a grid with 0 at the bottom middle! Following the above instructions on the keypad leads to the sequence 4562580.
Enter that into the keypad and push E, which unlocks something.
Save your game.
Bad End
The light beside the main doors has turned green, so you can just open them and leave.
You made it out to the road, but which road? You decide to wait for a car, but the first car doesn't stop even to give you directions.
The second one does respond to your torch waving, but this car is…
"So you're that man? In your underpants and waving the torch around?"
"Not… really? Well yes but there are reasons."
"Well, we'll be happy to listen. Would you please get into the car?"
And then the escape just got a lot more serious.
Revisit
Load your game (you can use the Restart button but you must click Continue).
Since only one of the control panel lights turned green, there must be another code to enter somewhere. You can't see any clue for it right now, but your instinct tells you to look for something that's changed.
Reentering the attic, you find that the flying squirrel has finished all the seed, leaving a short trail of crumbs. Look around for it.
More crumbs are dropped in front of the kitchen drawers, so you open them to find the flying squirrel sleeping soundly on the towels.
Clicking it to turn it over, you find a clue on the towel it's holding.
Reverse
Use the clue from the towel to figure out a new code for the control panel.
(And before you ask, you can't enter that code without doing all of the above.)
As shown on the towel, a 180° rotation turns the cross upside-down, which isn't hard to visualize:
The horizontal bar would run slightly below the middle from right to left, covering the digits from 9 to 7.
The vertical bar (still on top of the horizontal) would run from bottom to top, covering the digits from 0 to 2.
Enter 9870852 into the keypad and push E to unlock something.
Door 2
There are no more locked doors to open, so what exactly did the second code unlock?
As the faint glow from the right side of the screen tells you, there's now a hole in the shutter.
Looking through it, you find that the red creature is still jumping around from having his foot slammed on.
Once you've had your fill of schadenfreude, use the healing spray on the hole.
(Game: Let's grant him the compassion of a knight. Or is it a warrior?)
Back out and turn around a bit (until you reach the glass case), and you hear a sound.
Then go back into the red room to find your clothes on the floor. It's great to finally have them back!
Good End
Don't forget to put the clothes on before you leave through the main door!
You finally made your way to the road, which you don't recognize at all. You could just follow it, but here comes a car!
"Ah, our guest!"
It's the inn's proprietress, who came looking for you herself.
While it's nice to have a place to sleep, you're a bit bothered by that conversation on the way back.
"Sir, are you sure you weren't having a dream? I've never heard of anybody living nearby, much less a weird red man, ha."
That's what she said with a smile before the car arrived.
"And this bracelet, it doesn't seem to be a good object. Maybe you should just not put it on."
That sounds reasonable. Perhaps the whole thing was a nightmare caused by it.
However… could this really have been a dream? Someday, you'll go and find out what really happened.
END
Searching for the truth the week after!
…Too troublesome. The truth, right now!
(Click the option that isn't crossed out to continue.)
Scene: back in the house, red creature is enjoying TV with his flying squirrel, his foot is fine, everything else is exactly as it was before your silly crossbow attack.
"Hey you! You've been pranking our guests with that suit again, haven't you? That's not even a good disguise, it's just a lie! Cut it out!"
Red: "Argh! Run away!"
…
TRUE END
(You get a completion timer and a score, whatever it means.)
i noticed a couple of things on Red Creature.
1.on the sword in the barrel puzzle,you have to view all 4 puzzles before you can put the swords in correctly. i guess i missed one of them because the solutions did not work, but when i viewed all 4, they did. on the blue side solution, even though the solution is correct of middle,bottom left and bottom right, the picture that i saw showed top left, top right and middle. But it doesn't matter because KK's is correct.
2. Same thing with the bread crumb trail in the attic. for me i had to click the bread crumb trail in the attic because the code would not work until i clicked it.
overall a great game and i appreciate it again KK.
, I just read them as someone who is really, really looking forward to the walkthroughs. Why would that bug me? (But maybe I have a different understanding of social etiquette because I'm German: what is considered social etiquette here would be considered highly offensive in other cultures – we're famously considered rude…)
That's why your last comment made me really sad. You might want to take into consideration that some people might find it inconsiderate and some even offensive. Personally, I do marvel at the sense of entitlement to expect that someone with an impairment should be able to adapt to the "normal" world even though someone with Asperger's might have difficulties to fully conform to the social etiquette of us neurotypicals (I think Cyberjar's post puts it in a nutshell). After all, no one would expect someone in a wheelchair to master road curbs with ease. Instead, complaints to make places wheelchair accessible are considered valid in most societies (at least I assume).
Jig is a community and everyone can be part of this community so there is no reasons to panic Paul.
I know i finished this game before but since itls been a few weeks ago, i thought i'd try Red Monster. I need help again on
the cyclops puzzle. i seemed to have forgotten how to do it. can someone show me the correct moves to solve it? everything i try fails.
Thanks.
anyone? as i said
where the tiles are supposed to be moved at the beginning, i cannot move then and i used the screwdriver on them if anyone can help, i'd appreciate it.
I think Escape from the Owl is gone :( :( oh well I guess it is Retro games or something. Tragic when we lose sites with games. (I'm playing my way back through all these weekly games posts and having a great time)
There is still chance that it's temporary as this weekend are several hosting companies having problems. MonkeyHappy was down (now it's ok), Maroya is also down. But yes, we are losing sites. The fact that Hottategoya is gone is almost painful for me. I was very fond of their games.
If I understand correctly, both Maruho and Maroya are hosted on Ninja Tools. Since I'm having difficulty loading their homepage, here's their twitter page.
Escape from the Owl is accessible again.
Update