
 Hello, we are returning to the past this week, it's Retro Weekday Escape!
Primera escape makes a good start - it's not a long game and not difficult so your brain has chance to warm up. Following Esklavos is a sequel to the game you played few weeks ago (Magic Christmas Escape 3) and features the pesky plush toys which mysteriously came alive on Christmas Day and you thought you pacified them. Silly you. You can have a rest then in Suzunari's charming room with their intuitive puzzles. Selfdefiant's escape isn't an asylum infested with evil forces which we usualy get; it's a prison. There are similarities though - you need to find many colorful keys, orbs are flowing in the air too and...actually if the game was labeled asylum you wouldn't tell the difference.
Have a good time and enjoy!
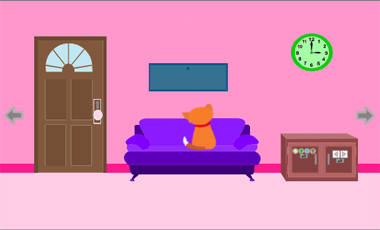
Joyful and colorful Primera's game is small, but fun. The goal is pretty straightforward (find and combine hints, and open all the locked drawers and cabinets) with the only exception. The cat. She doesn't communicate in any way and you need to do something to change it. But what? Can you bribe her somehow maybe?
The cursor isn't changing, no save button, one ending.
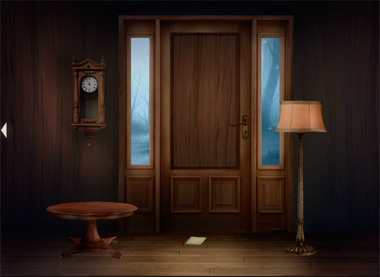
The entrance hall in Esklavos' house, where you find yourself at the beginning, looks quite familiar...perhaps déjà vu? Well, unfortunately not. By the door you find a note with instructions impossible to fulfil (that is, if you want to play), you disobey - and they are back. Four creepy plush toys first singing a carrol (definitely not peacefully) and then trying to destroy the house. Not again! Can you stop them?
The cursor is changing, no save button, one ending.
After short skippable intro in Japanese, Suzunari leaves you alone in a kitchen, and for the players who didn't understand the intro the setting may seem like 'get a recipe, ingrediences and make a cake' kind of game. It isn't. The packet you find doesn't contain a flour but a plaster, foodstuffs in the fridge are not for cooking purposes but a hint and no recipe is available. You are supposed to find a mold and make your own key which opens the exit door - of course, there are puzzles you need to solve before.
The cursor isn't changing, save button, one ending.
P.S. Here is New Year Mini Escape. To find the game, scroll down the page.
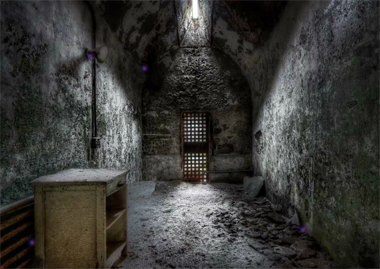
According to lack of new fresh asylums, this week you return with Selfdefiant to the year 2013 (The Year of the Snake) and let yourself imprison. The cell where you wake up with amnesia asking usual questions like "Where am I?" and "How did I get there?" or "Why me? I didn't do anything wrong!" etc. is very unpleasant; dark, damp and dirty. Probably inhabited, but you don't want to get into closer contact with lower life forms righ now and therefore your motivation to escape is excellent! Examine everything, remember that the changing cursor is really helpful here, look everywhere and start to collect colorful gems. You need to find seven of those. Where to put them is - later in the game - obvious. Will you set yourself free?
The cursor is changing, save button, one ending.
We love escape games, and our readers love talking about them and sharing hints! How about you? Let us know what you think, ask for clues, or help out other players in the comments below.


Magic New Year Escape...
That is the creepiest Happy New Year greeting I have ever heard.
I thought something terrible had happened to my speakers.
For The Cat, do NOT
place the key in the mouse before using it to open the wall cabinet
or you will be stuck and have to start over. Other than that small glitch, very easy game.
1134: This will get you started, then I leave it to chrpa or kktkkr, both of whom are MUCH better at Walkthroughs than I am.
First, explore the room. There's a locked gate with a keyboard on the wall to the right. Also, a cabinet on the left with a drawer that's stuck. Find something to open that drawer.
look in the stones and rubbish on the floor to the right to find a screwdriver, and use that to open the drawer. Inside is a paper advertising hats of various sorts with a price range.
Open the gate
by using the hat ad.
the prices are the clue.
enter 3,7,5,4,2,5 pressing the lever at the top after each number.
looking forward to these. no hurry.
I - was - going to play SD's 1143 but cannot get past the spinny puzzle that opens the door. The clue makes no sense.
Finally resorted to a video walk through and it still doesn't make sense. Have to walk away from this one.
Well the power of posting - use the clue with 6 numbers and press the lever for each number. When all numbers have been selected, the lever will open the door.
so everyone ok on the games? as always no hurry on the walkthrough.
I'm a little busy this weekend and somehow got stuck on Suzunari on a tiny detail (why is it always her games and why does nobody else ever have the same problem?) but all of the games/walkthroughs should be short except for Selfdefiant.
Here's the first one.
The CAT!
Primera's homepage lists a creator for each game they release. Technically, this game doesn't have the same creator as Primera's other games, but it still feels similar.
Exploration
You start off facing an orange cat on a purple sofa, but the cat doesn't want to face you. Above it, there's a blue compartment on the wall that seems to be missing its handle. The door on the left is locked, and the green wall clock on the right is stopped. Under the clock, the cupboard has rotating colored arrow buttons on its left door and a pair of gray triangle buttons on its right door.
Turn around (left or right). There's a shelf with some unusual colorful geometric decorations, from which you can take a star-shaped thing. Next to it, the laptop on the table has a three-letter lock. The cupboard next to that has an unlocked drawer with a can of cat food inside, and its left door has a three-digit lock with a colored lightbulb clue, and its right door has a five-slider lock.
Heights
Use the other clue from the wall shelf to unlock the slider lock.
(The colors on the clue and lock are in the same order.)
The tallest bar is red, followed by black and yellow equally, then pink and then green.
Click the sliders (from left to right) 4, 2, 3, 1, 3 times, and open the cupboard to find a pair of pliers.
Triangular
Use a clue from the wall shelf to unlock the two-button lock.
The colored blocks are square shapes missing triangles that point (from top to bottom) in the LRRRLR directions.
Push those buttons and open the cupboard to find a shallow bowl.
Feed
Examine the cat food and click it to remove the lid, then examine the bowl and pour the cat food into it.
Zoom in on the cat and place the food bowl beside it.
Then zoom out, turn around twice and the cat is done!
Use the pliers to remove the key from its collar.
Spell
Use the remaining clue from the cat to unlock the laptop.
Enter the cat's name (MEL) into the laptop and unlock it to view a clue with a green wheel of colored lightbulbs.
Glow
Use the clue from the laptop (and clues elsewhere in the room) to unlock the three-digit lock nearby.
As the wheel shows, each color of lightbulb represents a number according to its position on the clock.
Substituting those numbers into the clue above the lock, you get 123 + 69 which works out to 192 so enter that in the lock and open the door to find a toy mouse.
Key
(There's a particular thing you're warned not to do here but I wasn't able to trigger the bug.)
Use the winding key to unlock the compartment above the couch, which contains four chicks and a star.
Pick the key back up from the compartment.
Insert the key into the toy mouse.
Then place the mouse on the ground, where it moves a short distance. The cat doesn't seem to react.
Back out and turn around twice to find the cat playing with the mouse. Take the star it leaves behind.
Directions
Use the clue from the chicks to unlock the arrow lock nearby.
(Once again, the colors on the clue and lock are in the same order.)
The chicks face (from left to right) LRRL.
So click the arrows 3, 1, 1, 3 times and open the door to find a small box with three star-shaped holes.
Fit
Place the stars into the box and open it to find a golden key.
Use the key to unlock the door and let the cat out.
…Oh right. You escaped, congratulations!
odd! the game wouldn't let me do it until it wouldn't cause a glitch. i'm on firefox
Magic New Year Escape
If you haven't yet, go back and play Magic Christmas Escape 3 (recently covered in WE N°241), which this game is a sequel of.
As promised(?) the four fluffy toys are back to celebrate the new year. But they're just as dangerous and unsettling, so put them back in the Christmas season where they came from.
Intro
You can already start exploring a bit, but you can't get far without doing what the game wants.
So pick up the paper from the floor with the winding key attached to it.
You can't wind the clock because it's broken, so go left, examine the snowglobe (which contains a tree with four wrapped presents), and use the winding key on it.
Snow falls in the globe and the presents open up, and near the end of the music you hear the doorbell ring.
Back out and open the door to hear a familiar greeting. Once it's over, you're trapped in the house once more, and that clock just refuses to strike midnight and let you out!
Exploration
As you've probably already seen, the remaining hotspots on this screen are the broken clock and the lamp that won't light up.
Go left, where you find an axe-wielding rabbit sitting on the piano. You can click on the piano to play it, but only seven white keys are available. The wall behind has a blue valve handle next to an unlit fireplace, above which a piece of paper is actually a grid of squares that you can turn black. And finally, the snowglobe is still sitting on the table, with its four presents now empty, and you no longer have a key to wind it with.
Back out and go right, where a monkey holds a flaming torch in the kitchen. The hood above it has a panel that seems to be screwed shut, and beside the power socket is a clue that includes a grid of gears with dots. In case it's not obvious, the changing cursor also helps you find that the bottom-right cupboard has a keyhole.
Go right. The bathroom is flooded and even the sink and tub are overflowing, which is probably why this cat's so grumpy. You see a blue thing under the sink and a cross-shaped pattern on the wall beside the window, and you can pick up the pliers on the toilet bowl and the screwdriver on the right edge of the tub.
Cross
Use the clue in the bathroom to unlock the grid puzzle in the piano room.
Just click all the squares on both diagonals, and a roll of tape falls out of the puzzle.
Tune
Use a clue from the kitchen to unlock the piano.
The digits on the kitchen clue indicate which piano keys to push, with 1 being the leftmost (highlighted) key.
Push the 14454322 white keys (you can tell if it's correct by listening to the tune). The rabbit plush is now calm enough for you to pick it up.
Dismantle
Use the screwdriver to open up the panel on the hood in the kitchen, revealing the ends of two wires.
Use the tape to connect those two wires, then push the button to disarm the monkey plush, who is now safe enough to pick up.
Drain
Use the valve on the blue knob in the bathroom and turn it to drain the water. You can now pick up the cat plush.
Repair
Use the screwdriver on the clock to reveal a grid of gears with dots.
Then use the clue from the kitchen to solve that puzzle.
It's easier to remember the clue if you notice the patterns between rows, or if you write it down.
But since you're reading this anyway, each gear starts with the dot on the right, and you need to click them
3 1 3 1
1 3 1 3
2 2 2 2
1 0 1 3
times, and then a black key falls out of the clock.
Unlock
Use that key to unlock the kitchen cupboard, which contains the dog plush.
Complete
Look at the snowglobe again, and place all four plushes in the present boxes.
A pendulum falls in the background!
Reattach the pendulum to the clock. Now it's midnight and you can leave through the door.
Escape game 18
Title translation: Wrapped in Cherry Blossom Color
Intro summary
(As usual, not a full translation because it's too complicated.)
Having lost your father and not spent much time with your mother throughout your childhood, you didn't even accept the food she made in the morning because it was cold by dinnertime. But this rebellious stage ended when you started working.
Over a long holiday, you went out drinking with friends overnight and a close friend messaged you to come home. Nobody should be home at this time, and yet you somehow get locked in when you enter!
Exploration
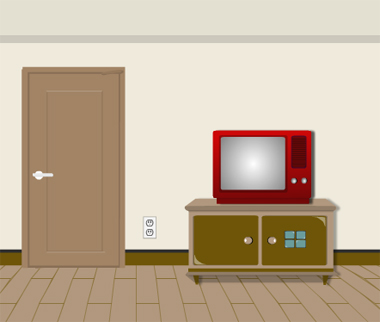
You start off facing a locked door and a red television set on a cupboard that has a left door you can't open and a right door with a grid of four buttons.
Click near the power socket to zoom in on it, where you can plug the TV in. The TV is now lit but blank.
Turn right to face a couch. The wall shelf above has a rabbit stuffed toy with ears you can play with, as well as a tissue box with colored spots on its corners.
Click the area under the couch, and the game tells you it's too dark to see anything.
Turn right to face a locked door and an unlocked window. You can shut the curtain to view a clue.
Turn right to face the kitchen area. The left side has an empty oven over a fridge. Looking in the fridge, you find that you can click the apples and bottles to shift them, then take a screwdriver in the bottom right, then click on an apple and the leftmost egg in the bowl to view number clues.
Next to the fridge is an empty rice cooker next to a working tap over a cabinet with a three-color lock. On the right side, there's a can of green tea with a number on its lid and searching it reveals a battery inside. Under that can, there's a drawer you can't open and a pair of cupboard doors that hide a packet of special flour ("Hardening powder, not for eating. Powder that becomes steel-hard when baked.") You also see a pot on the high shelf which has a number on the inside of its lid.
Click in the open cupboard to find a screw in its top surface.
Corners
Use the clue from the curtain to unlock the right cupboard under the TV.
Each symbol on the curtain is a square with one corner missing, and you need to consider those symbols from left to right (following the arrow) and push those buttons. To avoid confusion, I'm just going to spell it out this time:
Upper right
Upper left
Lower right
Lower left
Upper left
Lower right
Upper right
Open the door and take a flashlight from inside.
Beam
Examine the flashlight, pull the cap off the back end and place the battery in it.
Now that the flashlight's working, look under the couch and use it there to find a remote control.
Use the remote control to change the channel on the TV, which shows the stuffed rabbit doing something with its ears.
Ears
Use the clue from the TV to do something to the rabbit on the shelf.
Since clicking on a ear either raises or lowers it, to reproduce the moves on the TV you need to click the (our) RRLLLRRL ears.
Once you perform the correct sequence, a fluffy key appears next to the rabbit on the shelf.
Unlock 1 / Exploration 2
Use that key to unlock the door beside the window.
Inside this bathroom, you see a mirror that tilts when you click its corners, above a sink with three colored bottles next to it, on a cupboard with a four-digit lock. There's also a washing machine and the game tells you to add the detergent.
Pick up the rightmost handkerchief in the laundry basket.
Click the shadow along the bottom-right edge of the washing machine to find a pair of scissors.
Turn left to face the window, where you can draw the curtain to reveal six colored blotches.
Corners 2
Use clues from the bathroom curtain and tissue box to unlock the bathroom mirror.
Since the curtain has a triangle-shaped handle, you need to read its clue from bottom up.
The red, green, purple, red, green, blue colors appear on the
⌜⌝⌟ ⌜⌝ ⌞
corners of the box, so click those corners of the mirror, which rises up to reveal the bottle of detergent.
Wash
Put the detergent into the washing machine (via the gray drawer at its top left), then open its door, throw the handkerchief in and push the red button, which turns green.
The display on the machine tells you that it's washing.
Back out of the bathroom and check back in on the machine. Its button turns blue and it's now drying.
Back out of the bathroom and check back in on the machine. The button is red again, which means it's finished.
Open the door of the machine and pick up the handkerchief, which has a mathematical formula involving colored dots.
Math
Use the clue from the handkerchief to unlock the four-digit cupboard in the bathroom.
Each colored dot represents a different number according to the corresponding objects in the kitchen:
Yellow (egg yolk) = 37
Gray (pot lid) = 86
Green (tea) = 23
Red (apple) = 65
37 × 86 - 23 + 65 = 3224, so enter that into the lock and open it to find your old backpack, which contains a key mold.
Three colors
Use the clue from the colored bottles in the bathroom to unlock the cupboard under the kitchen sink.
The bottles are pink, black, green, so click the buttons 4, 2, 7 times and open the cupboard to find a bowl.
Unscrew
Use the screwdriver on the hidden screw in the right kitchen cupboard.
Now you can open the drawer above to find a spatula.
Bake
(You should have filled your entire inventory except the last slot. If you're reading the Japanese item descriptions, they include hints for what to do.)
Use the scissors to cut the flour packet.
Pour the flour into the bowl and then add water from the kitchen tap.
Use the spatula to mix up the bowl and then remove the dough from it.
Fill the mold with the dough, then put it in the oven and turn the switch.
Now we just have to let it finish baking.
Turn left and turn right, then open the oven and remove the mold and then the key from it.
Use it to unlock the door and end the game!
Ending summary
Your friend shows up in a furisode in your favorite color of pink. Since yesterday was the coming-of-age ceremony, she and your mother bought it together and waited to give it to you.
This reminds you of your mother's care over the years, and you decide to cook for her instead, picking up her recipes to repay her love.
as alays thanks for your hard work, kk. i know the last one will take time so take your time. looking forward to it.
1134
Even if you've never played this game before, it is undeniably a retro version of the Asylum series, with a tutorial, scoreboard and techno music.
Quick tips
Inventory management is still useful. Shift your items to empty slots to keep the useful ones within reach.
Scoring is 100 per second minus 5 per orb, lower is better. The clock doesn't display properly if you take more than one hour, but you still get penalized accordingly.
Orbs are completely optional to collect so you can ignore them during highscore attempts. If you're missing a few orbs, check on grayish walls, small objects and the corners of the screen.
First room
The game starts in a room with a weird lock next to the door and a stuck drawer. And what are all those orbs floating around?
Look around for something that might help.
Slightly down and left from the bottom-right purple orb, the cursor changes and you can move the almost unnoticeable rock to find an almost invisible screwdriver.
Use it to pry the drawer open and view an old-looking cutout selling hats. How does this help you escape?
In reading order, the digits on the old ad are 375425.
Turn the knob to 3 (by clicking it repeatedly), then pull the lever, then turn it to 7 and so on. If you mess up, back out and retry.
After you pull the lever on the last digit, the doorway opens into a rainbow mist, but you need to click the arrow at the top of the screen to proceed.
Initial exploration
Two stairways lie ahead, one marked down and one up, and there's a map on the up (right) stairs. Also, the down sign hides a white gem.
The path ahead is blocked by a door with a red keyhole.
(Open the map to find that you're at C. You can see every room but that isn't very helpful.)
Go east to D. The glass dome here seems to have only one entrance. Best not to think about this dead-end, and just pick up the crowbar from the floor.
Go north to J, facing a locked gate. There's a panel on the right with a silver keyhole.
Go south and then east to E, where a sign gives you some bad news about the area you just came from. The east door here is locked with a blue keyhole.
Go north to K. In this very bright room, a box on a table has a five-digit lock.
Go east to L. The chair here isn't just for show, as there's a stitch on the front of it.
Go east to M. The whiteboard here has some interesting homework on it.
Math
Use the clue from the whiteboard to unlock the box on the table.
(You might find the middle part weird. That's probably an error.)
The left part is a fraction with six triangles on top and one below, representing 6.
The middle part is a long division problem written wrong, but you can guess that it's supposed to represent 5.
The right part is just a roman numeral of hundred, two fifties, two tens and two ones, representing 172.
Enter 65172 into the box and open it to find a red key.
Red
(You don't even have to put the key down!)
Go south, west, west, north, and use the key to unlock the north door.
You find yourself in a room (I) with its walls half worn back to stone.
After a while of looking/staring/glancing at the room you find a gray rock to the right of the chair.
Use the crowbar to move the rock and reveal a blue key.
Blue
Go south, east, east, and unlock the east door with the key.
F is full of sunlight and purple orbs, but there's nothing interesting here.
Go south to B. This room seems clean and empty, which makes it easy to find the plunger in the bottom left.
Go north and east to G. Nothing here either.
Go east to H. This toilet is so dirty that even the walls drip black, and it gets even worse if you look in the clogged toilet. Thankfully, the sink is much cleaner, with only a drain cover to remove.
Unscrew
Use the screwdriver to remove the drain cover of the sink, revealing a blue gem.
Clean
Use the plunger to clear the toilet, leaving a silver key.
Silver
Go west four times, then north, then use the key to unlock the panel on the right wall. The gate is now open.
Go north to O. If you look closely enough, you'll find
a green gem on the left door.
Go north to R. Try as you might, you can't find anything here.
Go north to T, where you find a sacred jar just lying on the ground. Now you can finally click orbs to collect them, but since they're just for scoring I'll leave the orb counts in the last spoiler.
While you're here at T, notice that the left door has a green keyhole and the right has a purple keyhole.
Go north to W, which has five lettered chairs with a flashlight on one of them. (This is another item (besides the map) that you can't move after you place it in your inventory.)
Go south twice and then west to Q.
The floor here has dust piles you can click: two in the far left, one in the far right, and one in the near right (i.e. bottom right) that hides a yellow gem.
Go east, south, west to N, where a red X on the wall catches your attention.
Go east twice to P, which is yet another messy room.
Pick up the hammer from the bottom left.
Hidden
Use the hammer (from P) to smash the marked wall at N, revealing a purple key.
Purple
Go to T and use the key on the east door.
U is full of rusted pipes, but you notice a duct running along the floor and up the wall into a metal box with four arrow buttons. With the help of the changing cursor, you find that
you can remove the round cover in the distance to look in the pipe, which contains a red gem.
Directional
Use the clue from the chairs (at W) to unlock the metal box (at U).
Hint: you shouldn't think of the clue as a random sequence of letters. What's the hidden message and how do you use it?
First, you need to rearrange the letters on the chairs to form a word. The only common word that works for this is DWELL.
Second, you need to translate letters to directions, and there are two sets of direction words you can use: left/right/up/down or north/south/east/west.
In this case, you need to use both, translating the letters from the first step into the directions
▼ ◀ ▶ ◀ ◀
which appear on the 2nd, 3rd, 1st, 3rd, 3rd buttons.
Open the box and take the green key.
Green
Go west to T and unlock the west door using the key.
S is perhaps the easiest screen for finding orbs, but don't let that distract you from the
knife on the windowsill.
Go north to V, where you find a book near the right edge of the screen. The door on the north side is locked and has a gold keyhole.
The changing cursor reveals that the dark bottom left corner is somehow interesting.
Light
Use the flashlight (from W) to light the dark corner at V, revealing a purple gem.
Slice
Use the knife (from S) to cut the chair at L, clicking on its stitches.
This reveals a pink gem.
Collection
You should now have the white, blue, green, yellow, red, purple, pink gems from C, H, O, Q, U, V, L.
Examine the book and insert the gems into the cover (in any order), and then open the book.
Lorem
The text in this book looks Greek to me!
Flipping through the book, you find that all the pages are identical but a gold key is visible almost at the end.
Gold
Make your way to V, and use the key to unlock the north door.
This puts you in a tunnel leading to daylight! Make sure you collect all the orbs you want, and then continue north to end the game.
Orb counts
There are 23 rooms + 1 exit screen. Each of them contains 4 orbs except for D, E, F which have 5 each, K which has 3 and the exit tunnel which has 3, for a total of 98 orbs.
Among these, the hardest orbs to find were:
B: between left two windows
C: above left stairs and under right stairs
G: on handle
J: on wall at upper left
M: in corner of screen
O: on second door
V: in upper right on wall
(I'm also pretty sure there's a 99th one behind the exit arrow, but that's completely unreachable.)
Somehow I messed up the math on my orb counts.
H also has 5 orbs.
Update