
 Hi! This week we are going retro in Weekday Escape. Three excellent games from three excellent developers are waiting for you!
What do you know about bears private lives? Did you know they like fish? Probably yes, but did you know they also like motor boats? Not many people do, but Robamimi certainly does and she kindly shares her knowledge in Bear´s life with us, less informed mortals.
Talking about private lives, what about flowers, specifically tulips? Do you know, which tulips get along well together, and which are unhappy if coupled? Sanpoman knows it and tells you much more in Tulip room.
In Gate Escape 1 from Gatamari you don´t need a key to escape, but a cutter and some magical ability to get one.
In all three games is some Japanese text(s), but you don´t need to understand to get through.
Have a good time and enjoy!
One of the earliest Robamimi´s games, a very beautiful one, takes you to a seaside house. Owner of the house, a big brown bear, is there too and is a bit stubborn (and hungry) at the beginning but later helps you to leave. With puzzles you are on your own, of course.
The game is fluent and relaxing, and the sound of murmuring sea waves brings solid holiday atmosphere. The cursor is changing, save button, two endings.
P.S. And if you don´t get enough of "sea-wooden pier-blue sky" feeling, there are more seaside houses escapes on JIG, if you liked this one and wish to stay in summer mode longer, try lovely Cottage from 58works, or so cute and sweet Ponpon House (there are two more!) from Orange Biscuit.
In this game you visit one of Sanpoman´s lovely children´s room, and a big cheerful tulip in the corner gives you the key from the exit door only after you solve some puzzles. Don´t forget to check items in your inventory! Also, some hotspots are active later in the game, so it´s useful to revisit places if you get stucked. When the game asks you something in Japanese, pushing left button confirms the action.
The cursor is changing, save button.
 Gatamari Escape 6 - Gate Escape 1
Gatamari´s game starts with long, but skippable intro in Japanese, after which you find yourself in a simple room equipped with few strange devices. The only purpose of the room is obviously escaping, but the exit door is not locked, it´s tied up. And in the corner you find a pentagram, inactive yet, for conjuring cutters (useful thing it is, I can´t find mine cutter for two weeks now). So the main question is, can you find out how to use the devices and activate pentagram and conjure a cutter?
The cursor is not changing, save button.
We love escape games, and our readers love talking about them and sharing hints! How about you? Let us know what you think, ask for clues, or help out other players in the comments below.


Some hints for Bear's Life
The green box
Look at the painting.
It has four coloured squares of different sizes. (The blue and dark-yellow squares look the same size to me, but the blue one is a tiny bit bigger)
Fishing
When the HIT IT and GET IT words went by, I just randomly clicked until something happened. I'm not sure if there was some special place to click, or whether it required some number of clicks.
What to do with the fish in the bucket
Nothing.
Leave the balcony and go around the room. The big bear will go onto the balcony and eat the fish and then lie there, sated.
Get the key around its neck.
Navigation after going through the bear-head door
You can go left immediately or go forward and then left. These are two different places. (It took me a while to see the first left-turn, which leads to a briefcase.)
Finding the honey
There are two areas to click on the seat. In front, where the controls are, and in back, where the honey is.
Briefcase, part 2
The briefcase wants a different set of numbers the second time.
The clue is behind the briefcase.
Number of bottles, number of fish, number of plants.
Another key
After the bear puts the battery in the boat, there's a key where the battery was.
Do a Save after getting the bear-head key
There are at least two endings.
Sad bear ending
If you say "Yes" to the question, and you (you're a bear too!) leave right away after putting the key in the boat, you leave the other bear behind. Aww.
Other ending after loading the game again
Say "No" to the question and go back to the balcony.
You can get a note in the place where you found the fishing rod. This time, the bear is waving as you leave, and when you get home, you have a conversation that seems to be about the other bear. I'm not sure whether this is a happy ending or not, but it's a longer ending for sure.
If anyone's curious as to what's actually going on in A Bear's Life, I found some other discussion groups that explain (but didn't give a direct translation of) the Japanese at the end.
In the sad ending, Baby Bear goes home to his mother, apologises for being late but says Papa Bear didn't want him to leave. I think that Mama Bear then says you can't visit Papa again.
In the happy ending, the letter is apparently Papa Bear apologising for cheating (no, really). Mama Bear tells Baby Bear he's learned his lesson and they'll pick him up tomorrow.
So, yeah. This is a game about ursine infidelity and how it affects the cubs.
Thanks Daibhid. I didn't realize I was a *baby* bear!
any walkthroughs in the works?
anyone?
I'm back! Here's the first walkthrough.
Bear's Life
I remember playing this so long back without a walkthrough and without knowing that there were two endings. It's just as tricky and fun all these years later.
Interface help
The volume control in the lower right only controls the music volume. Click the line of text above the scrolling text (just under SAVE) to turn off the wave sounds.
Items you collect will have both View and Use options, and an item selected for use will have a colored highlight.
You can also ask for hints in Japanese. I'm marking the corresponding lines in this walkthrough with an asterisk (*).
Exploration
You start off facing locked glass doors. Turn right. There's a painting on the wall under a light, with overlapping squares of different sizes and colors. It's next to a wooden door with a bear logo, which is also locked.
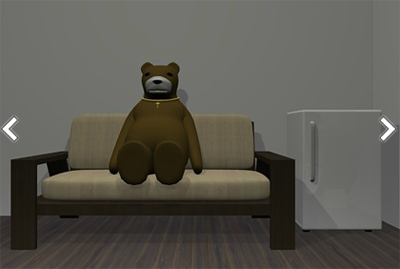
Turn right again. A bear is relaxing on the couch, with a key around his neck. You can click on him, but he just shakes his head. Next to the couch, there's a refrigerator with some beer bottles and a box of fishing equipment.
Turn right. There's a shelf with various items here: three potted plants that you can lift and tilt to view the digits on the pot bottoms, a purple box containing a fishing reel, and a locked green box which needs a sequence of four colors for its differently-sized square buttons.
Four colors
*Use the colors from the painting to unlock the green box.
The colors available on the buttons are blue, brown (tan), yellow, black.
The color with largest area on the picture is blue, followed by yellow, brown, black.
So click the buttons 1, 3, 2, 0 times, and click the ENTER button. A drawer opens up and you can take a silver key.
Use the key to unlock the glass doors.
Exploration: Pier
The doors open onto a wooden pier. No wait, the water surface is below us, so it's technically not a pier. (The game's hint calls this a terrace.) There's an opening in the railing straight ahead, and a bucket of water next to it.
There's nothing on the left side, so turn right instead. You can zoom in on the door area to find a closed wooden door beyond and below the railing, with an envelope attached to it. *There's also a fishing rod next to the door.
Fishing
*Attach both the reel and equipment (fishing line?) to the rod, and use it to fish. (There is no need to click at all during the fishing cutscene.)
When you're done, you have a bucket of fish.
Bears love fish
*Go back inside, then turn around to face the pier again, and the bear is looking hungrily at the fish.
Turn around again, and the next time you face the pier, he's lying down. Go check on him.
Yep, he's eaten all four fish down to the bones and is now sleeping. *Great time to take that gold key around his neck.
Oh, he woke up.
Go back in and- wait, did he just follow you back in from the pier? Apparently he did.
Anyway, you can now use the gold key to unlock the door.
Exploration: Boatroom
Turn left and you can see a bright yellow speedboat at the bottom of the stairs. There's also a poster on the wall advertising honey for bears, and a briefcase on the floor with a three-digit lock. Zooming in on the lock reveals a glimpse of symbols hidden behind, and you can click on the front of the briefcase to flip it down and view the symbols: bottle, fish, plant.
Turn around and go back up the stairs and turn left, where there's a battery at the end of the room. It's 20kg, which is too heavy for you.
Turn left and go down the stairs on this side to find a control panel for some kind of Gate Security System (which needs a key to activate). Turn left here to access the speedboat. It's missing a bunch of things in the front, and a battery in its battery compartment at the back. But look in the compartment behind the back seat, and there's a jar of honey there.
Heavy Lifting
*Give the honey to the bear, and he walks over and puts the battery in the speedboat for you.
Uncovered
*Look at the floor where the battery was, and pick up another silver key there.
Use the key on the GSS control panel, displaying some weird colored shapes in squares on the screen with an input box below that.
PassNumber
*Combine the digits on the plant pots with the symbols on the control panel to get the pass number.
Yellow: 3
Green: 9
Red: 8
Type 398 in the input box. (Oddly enough, the box will let you type other characters, with varying results.)
After clicking OK, the gate opens.
Also, a compartment opens on the lower-right of the control panel, and there's a key with a bear handle inside.
A brief briefcase case
Recall that the briefcase had clues behind it in the form of outlined pictographs.
*So count the number of those objects, and use that to unlock the briefcase.
There are/were 5 bottles, 4 fish and 3 plants.
Enter 543 into the briefcase and take a steering wheel.
Escape
Use the key and wheel on the front of the boat, and the game asks you if you want to leave. To be safe, you should save your game, but the game lets you return to this point from either ending. So go ahead and say YES.
Sad End
(I'm guessing at the ending text with the help of Google Translate and the previous comments.)
You (Baby Bear) ride the boat into the distance as your dad (bear) looks on. You return home, and in conversation with Mama Bear, it's revealed that she's still upset with Papa, so he can't come back.
Happy End
Hit the first choice from the ending screen, which puts you back in the house with the boat key in your inventory.
*Go out to the pier, turn right, and take the envelope which is now within reach. The front of it reads "To my beloved wife".
Use the key on the boat again, and you ride away as Papa Bear waves from the pier. When you reach home, you pass the letter to Mama Bear, who reads it. Since Papa Bear is forgiven, you'll both go pick him up tomorrow.
thanks kk/ glad you are back. when you get a chance I hope you get the other 2 as well.
Tulip Room
Yes, it's a room with tulips, in Sanpoman's distinctive style.
Interface help
The three buttons in Japanese on the title screen are Start, Load and Commentary.
The ? button examines the selected item.
The game will ask you to confirm some actions. In this game, the left option is Yes.
Exploration
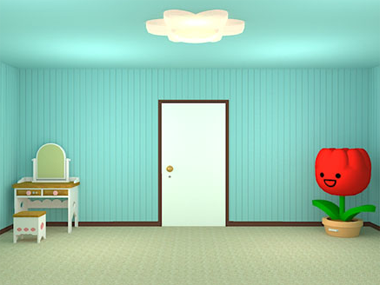
You start off facing a white door with a giant red tulip on its right. This giant tulip has a card slot in the plant pot. To the left, there's a dressing table and chair which has a jar of ointment in it. The table has two drawers. The left drawer is locked and needs a sequence of blue/yellow button presses to unlock. The right drawer is unlocked and contains a notebook, but also notice the pink letter M on its handle. There's a mirror on the dresser with an opaque panel screwed over its surface.
Turn left. There's a yellow tulip here which you can pick up, next to a larger white tulip on a platform. Look around its left side to find an "Extend Button".
Turn left again, and there's a shelf on the wall with pink, purple and blue tulips. The pink one seems a bit sad. You can take the purple tulip, leaving the shelf empty.
Turn left again, and there's a chest of drawers with nine drawers having yellow and blue handles. The drawers seem to be empty, but they close automatically after you open them. On top of that, there's a purple box which takes a six-letter code. There's a white silhouette below each letter.
Reading
Click the right edge of the notebook to open it. Flip through the pages...
Pink's likes and dislikes: "Pink likes yellow and dislikes purple."
Flower button guide: "Check above the blue tulip and the 3x3 grid for a clue."
Purple's interests: "Purple likes its own reflection."
Opening 9 drawers: "Check above the blue tulip and the 3x3 grid to open the drawers."
Very educational. Close the book, then click the lower corner to flip it over. There's a drawing of a red flower under a blue roof shape. The petals are numbered from 1 to 8.
Make Pink happy
Place Yellow on the shelf where Purple was. Pink's eyes change to heart shapes with E's in them.
Stretch
Press the button behind White, who grows a lot taller and smashes a hole in the ceiling. One of the ceiling fragments dangles precariously from the left edge of the hole.
Contract
If you try pressing the Extend Button again, the text advises you to look for a Retract Button instead. So look for it.
Zoom in on the chair and click the right edge to look behind it. There's the button. Press it, and White shrinks back down, with a tear out of its eye and a bump on the top.
Healing
Use the ointment on White, returning it to normal. Now you have a blue tear with a white H written on the back.
Grid
Click the top of Blue to find numbers arranged in a grid:
817

963

254
Click the drawers in that order (top, lower-left, right, lower-right, ...). When you finish the sequence with the left drawer, it stays open and there's a screwdriver in it.
Binary
What colors were the drawer handles?
In the order you opened them, the handles were BBBBYYBYY.
So click the LLLLRRLRR buttons on the left dressing table drawer. There's a click sound and some text, and you can now open the drawer to get a stick.
Reach
Examine the stick, click on it to extend it, then use the stick on the ceiling piece to retrieve it. It's diamond-shaped and has a white A on the back.
Ego
Use the screwdriver on the mirror, removing the opaque panel from it. It has a white S written on the back.
Place Purple on the chair in front of it, and its cheeks light up, and a letter R appears on the back. Pick it back up.
Letters
Enter the letters from various items in the room on the purple box.
Tulip (Purple tulip): R
Heart (Pink tulip): E
Flower (Drawer handle): M
Diamond (Ceiling piece): A
Tear (White tulip): H
Mirror (Mirror panel): S
Enter REMAHS into the box (you can click the bottom of the letter to go backward through the alphabet instead of forward). Open the box to get a tulip card.
Red
Use the tulip card on the red tulip, and buttons pop out of the top.
Refer to the back of the notebook for the order to press the buttons in.
Press the button in the 10 o'clock position, then count 3L 1L 2L 3L 2R 2R 3R, ending at the 7 o'clock position.
The buttons all retract, and a lid pops open, allowing you to take a tulip key.
Escape
Use the key on the door, unlocking it. Click on the door to open it and escape.
The hole in the roof of the tulip house has been mended with a little ointment and band-aid! (You don't get a different ending if you ignore the white tulip.)
If I'm reading Gatamari's games page correctly, this game is first in a series of 7+1 games. Looks like I'll be spending my free time playing through them!
Gate Escape 1
(I'm guessing at most of the intro text because machine-translating every screen is a pain.)
Many have tried to find the Holy Grail and failed. You've finally made it to the fabled ruins, exhausting all your resources on the way, and now you have to leave everything by the door (except your clothes). Inside, you have to conquer seven trials and gather seven treasures. But it's said that nobody can leave with the Grail. This is the first of the trials...
Exploration
You start off facing the door to the next room, with its handles bound tightly together with cord.
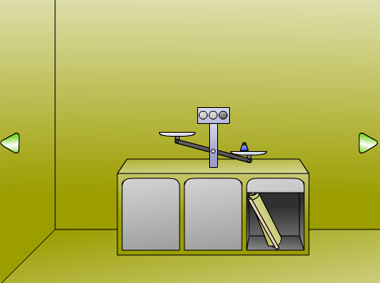
Turn left. There's a crack in the wall, but it's too dark to see inside. There's also a box with a pipe, a slot for a horn, a keyboard and an accordion below it that puffs air after 8 keys are pressed. Check the left edge of the box to find a red weight.
Turn/move left. There's a weighing balance on the cupboard, with a blue weight stuck to its right pan. On the stem, the right circle out of three is colored black. Under the balance, the cupboard has three doors without handles, and the last one is open and contains a tapestry with weird symbols and cutouts.
Turn left. The door out of here is sealed, but there's a stone tablet next to it, covered in various symbols in a grid. A protruding diamond at the top is surrounded by symbols on both sides.
Turn left. There's nothing here but a magical seal on the floor with the word Cutter on it.
Turn/move left. There's a mask on the wall and you can play with its ears, chin and horn. But removing the horn makes the whole room go dark, except for light coming from the mask's eyes. So put it back for now. There's also something embedded in the floor.
Masking
Use the tapestry on the diamond in the inscribed stone, covering all the symbols except some on the left and right sides.
From top to bottom, the uncovered symbols are on the RRLRRLLL sides, which reminds you of something...
Click the RRLRRLLL ears of the mask on the wall.
A tongue extends from the mask to creepily offer you a green weight.
Brighter in the dark
Remove the mask's horn again, and turn left twice, following the beam of light across the room and onto the crack.
A piece of cloth is lodged in there, and it holds a clue with the colors of weights and the numbers 5, 4, 2, 1.
Balance
Use the green weight on the left pan of the weighing balance to tip the scales, causing the left circle to turn black and the left cupboard door to open. Take a yellow weight from inside.
Now if only we could just get the pans to balance!
After some experimentation, you'll find that red + green balances yellow + blue. With red and green on the left pan and yellow on the right, the center circle turns black and the center door opens.
Press the button inside. What did it do?
Spike
Go back to the thing in the floor, which is now protruding out. Click on it to take the spike, revealing a clue in the hole that it was in.
There are several colored bands along the hole, and a number 8 at the very end.
Exchange
Remove the horn from the mask again, and use the spike in its place.
Trumpet
Place the horn on the top of the accordion box.
Now we just need to decipher the clues to figure out the order of keys to press. First, the weights.
We know from the clue on the cloth that the weights weigh 5, 4, 2, 1. Since red is lighter than blue and the other two are heavier, red is 1 and blue is 2. To make the pans balance, yellow must be 4 and green 5.
Now, the stripes.
From the outside in:
G = 5
Y = 4
B+Y = 6
R+B = 3
B+G = 7
B = 2
R = 1
(8 = 8)
So press the keys in the 54637218 order, with the second-right key first and the rightmost key last.
The horn plays a familiar jingle to let you know you got it right.
Cutter
The Cutter seal is glowing green, so click on it to spawn a character.
Let's not jump to conclusions based on the silhouette. This guy's name is Cutter and he'll cut anything you ask him to.
Including the exit door. Use him on the exit door, and he slices the cord with his infallible blade, Durendal!
...which he leaves to you before vanishing into thin air. You got the first treasure!
Escape
Click on the open door to leave and view a teaser for the next room/game.
Confused on the
cutter seal. I pressed those numbers you posted in order,54637218,but no seal turning green happened, so I'm stuck
what am I doing wrong?
sorry about that. you have to be literal with me.
when you typed the order I thought you meant press 5 press 7 etc. you were actally numbering the keys like 1 is here, 2 is here,etc. so I got confused. anyway I got it now.
LOL at the end of Gate Escape
Durendal is a box cutter!
Update