
 Welcome, this week it's retro time again!
Vitamin Hana wants you to escape from an unusual place - from an oceanarium. Then you get locked in Yomino Kagura's prettily decorated room, and then it's time for No1game 's short adventure (the second part you find in P.S.) and practical demonstration of green-men-power. The last Fuwayura's game promises a reward for players who escape - can you get it?
Have a good time and enjoy!
Vitamin Hana locked you in an underwater tunnel. Nice. You may watch sea life deep down under the surface and stay dry! Until you notice that the door is stuck and that there's a suspicious crack in the wall. Also, you'll get bored soon as the local water life is extremely drilled and doesn't move at all. Maybe it wants to indicate something? Maybe you can get from here by yourself before the serviceman arrives?
The cursor isn't changing, no save button, one ending.
Yomino Kagura created many escape games like this one; typical blue-and-white checkered box with three empty slots, tiled or white walls in cosy room with nice wooden floor, and most of clever puzzles based on three colors. Clean graphics and changing cursor make playing comfortable and enjoyable, and solution of well ballanced puzzles give you satisfaction. Can you escape?
The cursor is changing, no save button, one ending.
P.S. You find the sequel in WE N°54. Other games in this WE also worth playing!
In this WE we start a short series by No1game. The beginning of the story is the same as many others - on your way home you suddenly fainted and when you regain consciousness you found yourself in an underground room, no need to say that locked one. Is that a nightmare? Were you kidnapped? If so, why? What are those little green men you keep finding for? May I eat the apple? Those, and many other questions are in your still a bit blurred mind but the only way how to answer them is to play the game.
The cursor isn't changing, no save button, one ending.
P.S. Here is the second part of the series: Find the Escape-Men 83: Secret House 2 - Young Lady

Fuwayura trapped you in a kitchen. Through a French window, you can see inviting terrace with a table and benches, and the blue skies with several white clouds - simply a perfect day to be out enjoying lovely weather and later have a tasty picnic maybe. You can't. You are locked in a kitchen. What do you think, is there a way how to figure out the code from the door lock? Surely is, just don't give up and think about a lunch at the terrace!
The cursor is changing, save button, one ending.
P.S. Here is one retro Bianco-Bianco. Their site seems abandoned but this game unlike others is still playable. If you feel for retro sci-fi short adventure (very atmospheric) you're welcome! Colony Odyssey is here for you.
We love escape games, and our readers love talking about them and sharing hints! How about you? Let us know what you think, ask for clues, or help out other players in the comments below.


looking forward to these.
Can't find the 10th Escape Man. I don't know what to do with the
Whiskey
This always happens to me. I find the solution AFTER I make a comment.
Anyway:
The Whiskey is used on the glass on the second shelf with the green man in the bottom. He floats to the top and then you can get him.
Yep, that's the power of posting (POP).
Found a problem in the Balcony Beer.
The puzzle with the 3 colored buttons whose clue is on the closed curtains does not work. I put the buttons according to pink paper flower clue and now the buttons are inserted in the box and Xd out of my inventory.
I broke down and consulted a video walk through pressing the buttons. I was doing it right but it isn't working for me.
I will come back tomorrow and try again. Cute game and I really want to finish it. :)
Colony Odyssey
Found the small stick and the magic glove. I was assuming the two worked together and it appears I was right. However, nothing was working in that regard so I consulted a video walk through and I am supposed to touch the stick after I double click it in inventory and it is supposed to get bigger and Then the magic glove combines with the stick (wand).
Only for me, this never happens. I think I am calling it a day. These cute and sometimes lovely and almost always fun games are getting fewer by the month. This is why I don't like Unity. The only good Unity games that I have seen for PCs are Nicolet. It appears that the Flash developers are just leaving rather than porting over to a different platform.
I feel so old right now. The phrase "The good old Flash days" is floating around in the back of my mind. Maybe I should take up knitting. KNOT!
:) I'll be back. I'm curious whether anyone else runs into the same problem.
Take care everyone. These games are a godsend in times like these.
Again?
Okay regarding the small stick (wand) becoming a big stick (wand) - this will only happen in the first scene. You have to go back there get it from inventory, then you click on it and it works.
/spoiler
The clue is to put the beer mugs together twice but look at the handle to know which direction to hold it
/spoiler
If you hold the beer with the handle on the left, it's 1 and backward 3 then hold it with the handle on the right is 31 so if you put it together, it's 181
/spoiler
The key is 298+181+298=777
Escape freak, you are typing the spoilers wrong it;s
then (no spaces after the ) Just thought i'd say
to start then to end. dont space anywhere.
sorry. it keeps goofing up for me. try reading this "To post spoilers, please use spoiler tags:
example
If you need help understanding spoiler tags, read the spoiler help.
The correct syntax for a spoiler tag is
<spoiler>Spoiler goes here!</spoiler>
For Paul: if you need a less-than sign, you can type
<instead. Thus,the syntax I used for the above text isThe correct syntax for a spoiler tag is <code>
<spoiler>Spoiler goes here!</spoiler>
</code>
And what I used for that is:
<code>The correct syntax for a spoiler tag is <code>
&lt;spoiler>Spoiler goes here!&lt;/spoiler>
</code>
</code>
If you don't need the monospace font, you can just ignore the <code> tags and follow the same method as the middle lines.
Everyone, don't forget to preview before submitting!
yeah that was what i was trying to do kk but it kept messing up. i apologize for appearing to spam. Thank you for that. looking forward to the walkthroughs.
Find the Escape Men 82
Be sure to change your language to English, if you don't speak Japanese!
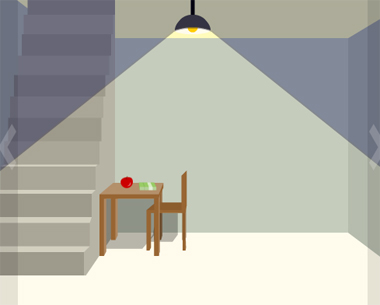
Exploration
Table Screen
1. On the first screen, you should see a table and a set of stairs. Click on the table, and pick up the apple and the pack of cigarettes. Back up.
2. Click on the chair to pick it up. Turn right.
Bookshelf Screen
1. On this screen, you should see a locked box and a bookshelf.
2. Click to the left of the box, and you can see a pink slip behind it. Unfortunately, we can't reach it yet. Back up.
3. Click on the bottom shelf of the bookshelf, and pick up the hammer. Click below the shelf where the hammer was, and you'll find your first Escape Man! Back up.
4. Click on the upper two shelves, and you'll see a cylinder with another Escape Man in it. Unfortunately, we can't pick him up yet. Click on the blue box above the cylinder.
5. Yet another puzzle we can't solve yet! Hopefully, we'll find some clues soon.
6. Back up, and turn right.
Mousehole Screen
1. On this screen, you should see a mousehole, a cuckoo clock, and a set of cracks in the wall.
2. Before clicking anything, wait on the screen for a few seconds. Pretty quickly, you'll see another Escape Man come out of the mousehole! Click on him.
3. Place your chair below the clock. Click on the clock, open it, and you'll find your third Escape Man 4. Pick your chair back up, and click on the cracks in the wall.
5. Use your hammer on the wall several times. Eventually, you'll break through, finding another Escape Man!
6. Back up, and turn right.
Stairs Screen
1. On this screen, you'll see the table from the first screen, a red poster with the words Black and White on it, and a set of stairs.
2. Click on the poster. The bottom half will flip up, offering your fifth Escape Man.
3. Take the stairs. You'll see a door with an escape sign above it.
4. Click on the stick to pick it up.
5. Pull the string hanging from the sign to turn on the light. Place the chair in front of the door, and click on the Escape Man on the sign to pick him up!
6. Turn off the light to save power, then back up.
Escape Men
Now that we've explored around, let's find the rest of these Escape Men so they can get us out! Unfortunately, there's no cutesy way to discuss the puzzles here - they're pretty linear.
1. First, go to the locked box, and go behind it again. Use your newfound stick to pick up the memo. It reads BWWBWBBWWB. Where have we seen something that this could work for?
The blue box!
Use the code from the memo to unlock the box, pressing the black button for B and white button for W.
2. Pick up the key. Where could this go?
The locked box!
3. Pick up the whiskey and knife. Underneath the items, there's another Escape Man! Where could we use these two new items?
Whiskey
The cylinder!
Pour the whiskey in the cylinder, which will send the Escape Man up to the top. Pick him up.
Knife
The apple!
Use the knife to cut open the apple. Inside, you'll find the ninth Escape Man.
5. We've got 9 Escape Men. Where could the last one be?
The pack of cigarettes!
On the back of the pack of cigarettes, you'll find the 10th and final Escape Man.
6. Once you collect the last Escape Man, you'll get a short cutscene, during which the men find a hidden door. Use it, and you're free! Or are you?
Congrats!
Awesome Walkthrough, Thomas.
There is a bit of a bug with Ocean Park.
When you have got the sheet of paper with holes in. Sometimes it does not line up correctly.
It should go over the end wall with the large number, but sometimes the scalling is off and it does not fit correctly.
If so imagine the sheet was a little bigger.
And it fits over the numbers 8 3 2.
I couldn't get that bug to happen regardless of zoom level, Flash or not.
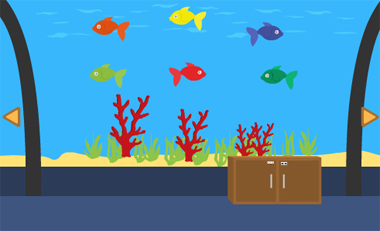
Ocean Park
Welcome to the aquatic attraction! Or actually just part of it.
Exploration
This underwater glass tunnel ends in a stone wall with numbered bricks that glow when clicked. One of those bricks has some tiny buttons on it.
Turn right to look at some colorful fish over some red coral. The cupboard has a left door with buttons that cycle between different numbers of petals, and a right door with two arrow buttons.
Turn right to face a locked door. The brick wall just to the right of it has a cracked area. Pick up the rag from the left.
Turn right to face some unusually floating starfish and more corals. Part of the glass seems smudged. There's a cupboard that you can't use while it's screwed to the wall.
Arms
Use the clue from the starfish to unlock the left door of the cupboard.
Since the stars have 5, 6, 3 stars, click the buttons 4, 5, 2 times and open the door to find a spray bottle of water.
Clean
Spray the water onto the glass smudge and then use the rag to clean it up and reveal an arrow clue.
Arrow
Use the arrow clue you just revealed to unlock the right cupboard door.
The corners (and start and end) of the arrow clue form a grid that matches the arrangement of the fish.
Following the arrow direction, those fish face RLRLLL, so push those buttons and open the door to find a number clue and a screwdriver.
Numbers
Use the number clue you just saw to unlock the brick wall on the first screen.
As indicated, just click the 8635712 bricks, and the last brick pops open so you can take a roll of tape.
Also, you can now click the 4 brick to view its three color buttons.
Unscrew
Use the screwdriver to remove the small cupboard (on the star side), revealing a large red button.
Push that button to release air bubbles and attract three jellyfish.
You can now check the cupboard to find that it has a three-digit lock.
Colors
Use the clue from the jellyfish to unlock the 4 brick on the brick wall.
Make the buttons pink, red, blue by clicking them 5, 4, 2 times, then pull out the brick to find a hammer.
Crack
Use the hammer to smash the cracked wall, revealing a keypad that doesn't work above a screw panel.
Use the screwdriver to remove the panel, revealing a piece of paper with holes.
After taking it, you also see two frayed wire ends.
Holes
Use the paper on the brick wall to view three digits through the holes.
Since the digits are sideways, you need to read them from top down.
Enter that code (832) into the small cupboard and open it to find a short wire.
Gap
Use the wire to connect the ends in the cracked wall, and hold it with tape.
Now you can push the ON button to make some pictures appear next to the keypad.
Marine
Use clues throughout the tunnel to unlock the keypad.
Counting the fish, corals and jellyfish you find that there are a total of 6, 9, 3.
Enter that in the keypad and push OK, and the game should automatically back you out.
That's your cue to open the door and leave!
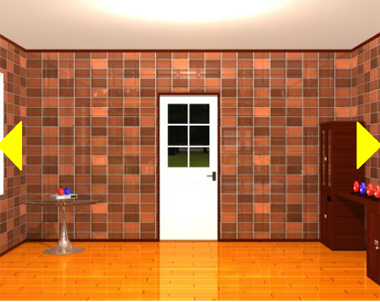
Room with Designed Windows
This has all the nostalgia and familiarity you'd expect from a Room's Room room, but with a bit of mystery from the window patterns.
Exploration
You start off facing the locked door, and the game helpfully tells you you need a key for it. On the left is a slim three-digit box with red and blue squares balanced atop.
Turn right to face a combination cupboard and table. The top part of the tall cupboard contains colorful cups but its handles are tied together with wire. The bottom part has a lock with three colored digit buttons, and while you're zoomed in you can pick up the large paper card behind that has three circular holes outlined in different colors. Along the table, you find six colored rings, and at the end of that is a smaller locked cupboard with a red marking on it.
Turn right to get easier access to the bed, which has a red diamond marked on its headboard. Above the bed, there's a picture frame with numbers but you can't understand its hint. On the right, there's a small table with a drawer that has three colored buttons and a number clue.
Looking under the bed, you find a small object you can't reach.
And finally, turn right to face the windows. Three of them have asterisks painted on.
One to Three
Use the clue from the colored rings to unlock the drawer beside the bed.
Since there's one blue, two yellow and three red rings, the clue 1233121 tells you to push the BYRRBYB buttons.
Do so and then open the drawer to find a pair of pliers.
Snip
Use the pliers to open the top half of the tall cupboard. Under the colored cupboards you see a four-digit box with a large asterisk decoration.
Either by a lucky guess or from the clue on the small cupboard, you find that one of the red cups (you can click either one) contains a silver key.
Unlock
Use the key to unlock the smaller cupboard, which contains a blue diamond clue and a box with three shaped holes.
Diamonds
Use the clues from the blue and red diamond clues to unlock the flat box on the first screen.
Combining the red and blue clues gives you the sum 13+500, which works out to 513.
Enter that into the box, which opens up so you can take a blue square piece.
Stars
Use the clue from the windows to unlock the box in the top half of the tall cupboard.
From left to right, the windows have 5, 0, 1, 2 asterisks.
Enter that into the box which opens up so you can take a red round piece.
Holes
Use the paper on the picture frame to hide all but three of the numbers, then use that clue to unlock the bottom half of the tall cupboard.
The numbers in the red, blue, yellow circles form the code 167, so enter that into the cupboard and open it to find a long rod.
Use the rod to retrieve the yellow triangle piece from under the bed.
Shapes
Place all three shape pieces into the checkered box in the small cupboard and use it to find a golden key.
Use it to unlock the door and leave!
Balcony Beer
(The text under the title says this is the first game in the Escape Space series.)
The book that starts the game invites you to solve the window puzzle and enjoy beer outside. By luck or by skill, it's easier than it sounds.
Exploration
(The game gives you some hints in Japanese during exploration. I'll save the important ones for later.)
You start off facing the window (large double doors) leading out to the balcony, but clicking them only draws the flowery curtains shut. The keypad beside it has room for three digits.
Turn right to face a table with a huge cardboard box, and on top of that is a bowl of edamame. To the right, there's a light switch beside a door that you can't use.
Click the right side of the cardboard box to find some drawings of food.
Turn right to face a bed with two purple drawers which contain folded clothes that have a yellow piece and a folded note with an unusual clue. Above the bed, there's a blank white poster. To the right of the bed, there's some kind of blue cylinder with a keyhole. And to the left of the bed, there's something that looks like a coat rack but is actually a stand for three lamps, with a power socket next to it partially hidden by the bed.
After taking the cylinder, click the right side of the bed again to find a panel above four colored digit buttons.
Turn right to face the kitchen area. The fridge has a pea-shaped three-digit lock, and on top of it is a box with three square holes. There's a mysterious metal panel next to a shelf of stuff you can't use, above the sink which doesn't work and a stove with a four-digit lock. The cupboard beneath is unlocked and you can take a gridiron from the right side.
Tasty
The edamame is so good you just can't stop eating. And eating. And eating.
And then you reach the bottom of the bowl and find a green number clue.
Enter that code (514) into the fridge and push the bright button to open it!
Clicking in the fridge tends to close the door, but after some experimentation you find that you can take the beer can from the top shelf and wine bottle from the door. The crisper drawer has a lock with two triangular buttons.
Drop
Examine the note and use the wine bottle on it to make clues appear.
Triangle
Use a clue from the note to unlock the crisper drawer in the fridge.
Following the triangular parts from left to right, you find that they form the code RRLRLL.
Push those buttons to open the drawer, then take the squid (unwrapping the plate in the process) and look at the food on the plate.
Don't get too distracted by the food! There's a red piece you can pick up at the top right.
Platter
Use the clue from the food in the fridge to turn on the stove.
(Hint: There's a hint in the back of something.)
Counting the food that appears on the side of the cardboard box, you find that there are 6, 2, 5, 3 pieces of them on the plate.
Enter 6253 into the lock, which lights the stove. The panel above now lights up in bright colors.
Digits
(Hint: where can you find a hint with colorful digits?)
Use the clue from the panel above the stove to unlock the panel on the right side of the bed.
Looking at the red, yellow, light blue, dark blue squares you find that they form the code 2607.
Enter that into the panel and open it to find a knife and a heart key.
Slash
The game hints to you that you need a tool to open the cardboard box.
So use the knife to remove the box and reveal a machine with buttons that change the number on it.
(Warning: this screen replaces the previous screen during navigation. If you can't find the door screen, back out of the machine screen first!)
Unlock
Use the heart key to open the cylinder.
It's a trap! Once you're done with the cutscene, pick up the lid from the base of the lamp.
The cylinder now has a heart extending from it, with a three-digit clue on it.
As for the lid, you can examine it, flip it over, and take a purple piece from it.
Triple
You can fit the colored pieces into the box on top of the fridge. But what order do they need to be in?
Examine each of the colored pieces and flip them over to find sakura drawings with numbers in them.
Thus the clue 213 on the note tells you to put the red piece on the left, yellow in the middle and purple on the right.
Push the big button to make all three pieces light up. In case it's not clear what to do next, the game tells you that you need to push the three buttons in some order.
The flowers on the curtain tell you to push the purple, red, yellow, red, purple buttons.
Do so, and the box opens to reveal a power cord.
Glow
Use the cord on the power socket beside the bed to plug the lamp in. The game helpfully tells you what to do next…
Close the curtains and use the light switch to turn the lights off. (If you do it in this order you don't have to rely on reading the game's text to tell you whether the lights are on or off.)
Look at the bed again, where the lamp makes the screen display a four-digit clue.
Increment
Use the clue you just saw to make the machine work.
The bottom row of buttons add 800, 80 and 8 (while the top ones subtract those values). Since 1704 is 8 × 213, all you need to do is click the bottom-left button twice, bottom-middle once and bottom-right thrice.
This opens the lid on the machine. What do you need to put inside?
Use the beer can on the machine to extract the beer into a beer glass.
Grill
Okay, you've left the stove on for far too long already. Place the gridiron on it and then the squid, which cooks instantly.
Pick up the cooked squid and examine it to find a clue.
Sum
Use the remaining clues from the game to unlock the keypad.
The clue on the squid is a sequence of symbols, among which you've already seen that the heart (from the cylinder) represents 298 and the water drop (from the note) represents addition.
The clue has two beer glasses but you only have one that says 31. Also, for the whole sum to make sense these two beer glasses together must represent a number below about 400.
So reflect the number 31 around its left edge to visualize the other beer glass. The pair of glasses now represents 181, so work out
298+181+298 = 777
and enter that into the keypad, which opens the balcony window!
The return button puts you back in the room just before you used the keypad, but you can just leave through the window to end the game!
Thanks again for your hard work, KK. You make coming to Jayisgames awesome.
Surprise bonus.
Colony Odyssey
In this game, you make epic travels to discover distant lands and conquer their inhabitants.
Just kidding! Colony Odyssey is a challenging science-fiction text-input adventure game available in two parts on floppy disk- wait no, that's the game this one was based on.
Anyway, the story is simple: while on a romantic date, a UFO abducted your lover Miyo-chan.
Exploration
(The Japanese instructions hint very strongly that the game is heavy on pixel hunts. If that's what you like, I recommend doing your own exploration first.)
You start off in a quiet area surrounded by weird colorful buildings. The building on the right has a green 4 on it.
And a building on the left has something shiny balanced on its top corner.
Click the bottom of the screen to look down (actually to look ahead, since you started off looking at the sky). On the right side, click the small cylindrical container to zoom in and find a glove. Not just any glove though, the game tells you it's a magic hand!
While looking at that container, click the right side of the screen to turn around and find a machine asking you to enter your data. (The game awkwardly asks whether something should be inserted there.)
Back out and click the floor between the two leftmost buildings. Here you see a grate in the ground with a gap between two pipes under it.
Go right to find an open area with yellow and red stars in the distance. A narrow walkway leads out to a distant building but the game doesn't let you walk it. On the ground, there's a four-digit panel with colored buttons you can't control.
The step near the right edge of the screen has some silvery brackets attached to it. But on closer look, one of them has a curved tip, and you can pick it up to find that it's an ice-ax!
Go right to find a shiny purple spaceship. The game only lets you click on the middle of it, with no effect. On the floor to the left, a bright area in the ground is actually a hole where a pipe ends.
Back out and go left thrice to find a yellow walkway with ring-shaped lighting structures. Quite noticeable is the number in the far right which includes a blue 2, but on closer look you also see a small stick on the walkway and a bucket at the far end.
Go left to find a small hill the size of a large boulder that you can't climb without mountaineering equipment.
There's one pixel hunt spot on this screen, but it's extra difficult because the hill itself is a hotspot.
The changing cursor deactivates when you move it below the hill. But somewhere near the lower left near a rectangular rough patch you'll find that moving the cursor down slowly deactivates and then reactivates it.
Click that hotspot to find a stone wedged into a corner.
Climb
Use the ice-ax to climb to the top of the hill, where you find the inlet of a water pipe nearby. On the right side, a light-colored rectangular thing is actually a space map.
Using the changing cursor, you find two places where you can look at the night sky and identify a warehouse.
Direct
Insert the space map into the machine that asks you for data, and it tells you what to do with the USB thumb drive it spits out.
Reacher
The description of the stick tells you it looks like a NYOIBOU, which means that one of its powers is expanding or shrinking at will.
But the game won't let you activate this power unless you convince it that you know what you're doing.
Specifically, you need to be on the starting screen (with the green 4). Examine the stick and click it to make it expand.
Even carrying a big stick doesn't help with the shiny thing on the building. What's missing?
The Magic Hand is a remote grabbing device that (in this game) you can just attach to the expanded stick.
Use it to pull the shiny thing off the building… whoops!
Checking the drain at the base of the building confirms that the item is now out of reach.
Well
Go back to the hidden spot in the hill, and use the ice ax to remove the rock. Now what?
Back out (and change screens), then look at the hidden spot to find that water is now flowing!
(The water won't flow if you haven't done the previous step with the stick.)
Collect the water in the bucket.
Then climb up the hill (again using the ice ax), and pour the water into the open pipe.
This washes the dropped pass along the pipes so you can pick it up near the spaceship.
Pass
Use the pass on the spaceship to gain access.
From inside, you get a good view of the starfield outside, as well as the nearby panel with one horizontal and one vertical slot, and the binoculars in the corner.
Watch
Use the binoculars on the yellow star to view another number clue.
(Do not try this on your home world.)
Also climb up the hill and use the binoculars on the warehouse hidden on the right side to view another number clue.
While on top of the hill, also use the binoculars to view the sky near the top left of the screen directly above the nearest blue light.
Any idea where that shooting star landed?
Walking around, you find that there's now a golden stick (a space license?) in the middle of the yellow walkway.
Digital
You can't input anything into the four-digit floor panel unless you're holding the golden stick.
But the digits of the code are easy to find:
Blue (tower): 2
Red (warehouse): 9
Yellow (star): 5
Green (building): 4
Enter that into the panel and open it to find a space key.
Normal End
Return to the ship, place the thumb drive and key into the panel in the ship, then step back and turn the key to end the game.
You have escaped into the universe but never saw where the UFO went. For now, you can look forward to a cosmic adventure!
Good End
(No save function, so you have to refresh the page and replay the whole game.)
Once you've placed the thumb drive and key in the ship, step back and use the binoculars on the front window of the ship to locate the UFO.
After the cutscene, turn the key to end the game.
You chase the UFO out into space. It's a journey to get Miyo-chan back!
Update