
 Hi, it's time to have some fun from the past! This Weekday Escape is retro!
Vitamin Hana wants you to escape a room - no surprise - but also to redecorate it. Yomino Kagura isn't so demanding, their escape is just about hints and codes. We started with the No1game's series in the last Retro Weekday Escape (the second part in P.S.) and here are the remaining three parts. With the last Esc-Forest's we return to the best tradition of the genre - long story, many interesting puzzles and a welcome situation when a player thinks it's the end and a new area opens.
Have a good time and enjoy!
Vitamin Hana promised painting of a picture but what they really want is to partly repaint the room where you are locked. Maybe a slight misunderstanding or, maybe, cunning tactics they used to entice you to the room since repainting isn't very entertaining activity...at least you don't have to fiddle with the paint to get the right hue. After all, it's not much work.
The cursor isn't changing, no save button, one ending.
In pleasant retro Yomino Kagura's room is the key from exit door hidden in blue-and-white checkered box, as usual. Before opening, you need to figure out a couple of codes, get into the cabinets and boxes lying around...you know the routine. Can you escape?
The cursor is changing, no save button, one ending.
The No1game's serie continues with a dramatic story in which appear many characters, and describes their complicated relationships. Unfortunately, we can't see much of it. During short intro you do hear loud bangs and screaming but the room where you arrive is, apart from overturned coat-stand, tidy and peaceful. Your goal is well known - find ten green guys and escape. Another piece of backstage drama can be heard in outro, don't miss!
The cursor isn't changing, no save button, one ending.
P.S. Here is the fourth part: Find the Escape-Men 85: Secret House 4 - Old Housekeeper. The last part of the series you find here: Find the Escape-Men 86: Secret House 5 - The Final.
Esc-Forest is absolute classics. The story starts with short skippable intro in Japanese, and after that you find yourself in a room, locked of course. The game is linear and doesn't allow any blind shots which means that puzzles aren't active before finding the correct clue. The description of items and comments are in Japanese only but never mind, you can play without undestanding. The save button comes handy as there is a second ending which definitely worth playing. So, don't forget to save your game before you open the room's exit door!
The cursor isn't changing, save button, two endings, normal and special (much more content).
We love escape games, and our readers love talking about them and sharing hints! How about you? Let us know what you think, ask for clues, or help out other players in the comments below.


Can;t wait for these.
have a question. seeing you have an ESC-Forest game on here i saw a year ago or close to it there was a ESC-Forest game and i read that some had issues playing it because a popup came up asking to get "escape_003.swfhtml". apparently it;s still doing it. i hope someone can fix that and i hope this one doesnt do it either. Just saying.
I'm sorry but the issue with Esc 03 can't be fixed because the problem is on Esc-Forest site. The game uses Adobe Flash and browsers are ending their support for it. Last year it was possible to run ESC 03 in some browsers but not anymore.
ESC 04 can be played in Firefox and Edge (on my pc), you'll need to allow Adobe Flash to run like in many other games. It doesn't run in Chrome (on my pc but I haven't updated Chrome for a long time).
If you have a "local flash player" like Nina mentioned in the comments of Weekday Escape N°251, you can accept Chrome's prompt to download/keep the swf file and then open it using that program. (That's precisely how I managed to write the walkthrough before.)
For Esc 03, the correct url of the file just ends in swf rather than swfhtml. (You can see it if you open the wrong file in Chrome.) After downloading and opening in a local player the swf will take a long while for the sitelock check before it times out and loads the game.
For Esc 04, you can still take the swf that Chrome downloads and open it locally, but here are more advanced steps that will make it load on the page (in Chrome, in April 2020):
Right-click where the game is supposed to be and click "Inspect".
In the Elements pane, look in the source code for a long line nearby starting with
<iframe. Or you could press the up arrow key four times to highlight it.Double-click the
iframetext and edit it to becomeembed.Make Chrome allow Flash, if you haven't already done so.
The game should immediately load, and you can close the pane.
looking forward to these.
Paint Me a Picture
Perhaps not the perfect painting, but plain patches of color punctuated with perplexing pointers are passable.
Exploration
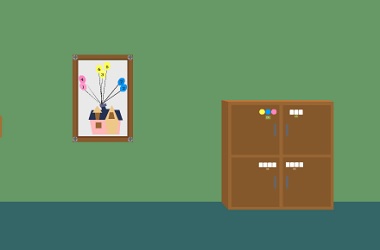
You start off facing a picture of a house with balloons, with screws at the corners of its frame. Looking at the cupboard on the right, you find that the compartments have three colored buttons, three picture buttons, four digit buttons and four shape buttons.
Turn right. There's a sewing machine on the table, but you can't use it yet. The drawers on the right have a grid of buttons that turn black and a pair of arrow buttons, but you can also examine the tomato on top and pull out a sewing needle from it.
Turn right to face the locked door, which has a nine-button keypad beside. The right side of the wall has a huge patch of white, and you can pick up a piece of cloth from the floor.
Turn right to return to the starting screen. Whoa, this room only has three walls!
Balloons
Use the clue from the framed picture to unlock the top-left cupboard door.
The balloons numbered 1 to 7 are:
pink blue yellow pink yellow yellow blue
so push the RCLRLLC buttons and open the door to find a can of black paint (with a paint roller).
Apply the black paint onto the white wall, where it forms the shape of six symbols.
Stitch
Attach the needle to the sewing machine (near its left side), place the cloth in it and click the machine.
After that, pick up the cloth again to view the clue on it.
Squares
Use the clue from the cloth to unlock the top drawer.
As you can tell either from the position of the circle or the arrangement of the squares, the circle represents the OK button on the drawer and thus the grid on the cloth clue is sideways.
Push the
- - B

- B -

- - B

B - -
buttons and then the OK button to open the drawer, which contains a smartphone.
Filter
Turn on the camera app on the phone, and use it on the symbols formed from the black paint.
Then use that clue to unlock the top-right cupboard door.
The pictures labeled 1, 2, 3 are the star, lampshade, leaf.
Click the buttons 2, 1, 4 times and open the door to find a can of red paint.
Apply the red paint to the white wall, where it forms the shape of six birds.
Chirp
Use the clue from the red birds to unlock the bottom drawer.
The birds (from left to right) face RRLLRL, so push those arrow buttons and open the drawer to find a pair of scissors.
Split
Use the scissors to cut the tomato in half, and you find a folded note with a four-digit code.
(And if you were thinking about taking a bite of that tomato, you can see from the cross section why that would have been a bad idea.)
Enter that code (5908) into the bottom-left cupboard door, and open it to find a paint roller.
Examine the roller and pull out the green thing from it, which is actually a screwdriver.
Unscrew
Unscrew the balloon picture, which reveals a smaller drawing on the wall.
Shapes
Use the clues from both house pictures and the note to unlock the bottom-right cupboard door.
The shapes numbered 5, 9, 0, 8 (with 5 being a balloon) are:
Oval, Triangle (up), Square, Trapezium (up).
Click the buttons 3, 2, 6, 4 times, and open the door to find a can of green paint.
Green
Dip the roller into the green paint, and use it to cover up the white wall and all those distracting clues.
A grid of numbers appears on the wall! Use that clue to unlock the last puzzle.
Following the order of numbers on the clue (which you can still see while entering the code), push the
C, L, DR, U, DL, UL, R, D, UR
buttons on the keypad and open the door to end the game!
Room with Designed Windows 3
The puzzles are different, and yet they're somehow the same.
Exploration
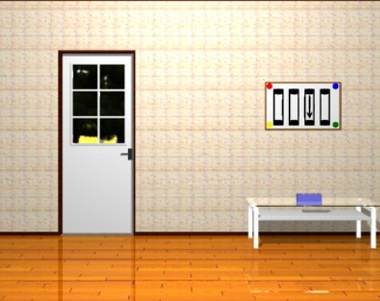
You start off facing the locked exit door. The weird picture clue on the right tilts when you click its corners, and the table beneath has a blue-and-white checkered box with three shaped holes.
Turn right to find a wall clock. There's something behind it you can't reach, and there are three cupboard compartments beneath. The left one is unlocked and contains a star box with three color buttons, the middle one is unlocked and has three colored digit buttons above a word clue, and the right one is unlocked and empty.
Turn right. The only new thing here is a small round table with a three-color box that has a diamond shape on it.
Turn right. Four narrow windows have been completely covered up with colored circles on a white background.
Corners
Use the clue from the windows to unlock the tilty picture.
The third window, from top to bottom, has yellow, red, blue, red, green, yellow circles.
Click the ⌞⌜⌝ ⌜⌟ ⌞ corners of the picture to remove it, revealing a rod and a clue with three green diamonds.
Diamonds
Use the clue you just saw to unlock the diamond box on the round table.
Click each button thrice to make it green, and the box opens up to reveal a blue square piece.
Reach
Use the rod to retrieve the piece of paper behind the clock.
Star
Use the clue from the paper (and windows) to unlock the star box in the left cupboard compartment.
Reading from top down, the 1st circle in the left window is green, the 6th in the second is yellow and the 3rd in the last is blue.
Click the buttons 3, 2, 1 times to set the buttons accordingly and open the box, then take the yellow triangle piece.
Numbers
Use the clue from the windows to unlock the middle cupboard compartment.
Counting the circles of each color, you find that there are 6 red, 4 blue, 6 yellow.
Enter that in the lock and open the cupboard to find a red round piece.
Complete
Place all the pieces into the checkered box beside the door, and open it to find a key.
Use that key to open the door and end the game!
Thanks for the walkthroughs as usual, KK. You do a great job as usual.
hope the last 2 are coming soon.
Find the Escape-Men 84: Secret House 3 - Steward
(Remember that in this game, just like another hundred of games in the series, your aim is to find 10 Escape-Men.)
(Also, check your inventory, if you have the bolded item below, and the item is grayed out and locked in your inventory, then you already have the Escape-Man in that section, and you can skip that section/)
1. First Screen
Check under the hat to find an Escape-Man.
2. Bird
Next to the hat, there is a hatstand. Give it a hand and make it stand up tall again.
Now open the window pane on the left. If you had already opened it, you need to close it and open it again. A bird will fly in.
Go to the hatstand. Click the bird and an Escape-Man will come out from the bird's mouth.
3. Feather
To get this, a bird is required. Check the last section if you don't see a bird around.
Check that the window is open. Then, click the bird repeatedly until the bird leaves.
The bird will leave a feather on the table. On the back of the feather, there is an Escape-Man.
4. The colorful I-II-III
Go to the screen where a face mask is mounted on the wall. Next to it is a colorful picture with a red I, a white II, and a black III. In the top right part of the picture, there is an Escape-Man.
5. Chair
Check the chair. Press on the lever repeatedly to raise the seat up, and an Escape-Man shall reveal itself.
6. Clown Doll
On the lower portion of the rack, there is a clown doll. An Escape-Man is hiding under the doll's hat.
7. Flute
On the left of the rack, there is a locked flute case on the floor.
There is a key in the bottom right drawer under the desk. Take the key and use it to open the flute case. Take the flute inside, and on the right hand side of the flute (its blowhole), an Escape-Man is hiding.
8. Clock
Check the middle left and middle right drawers under the desk. It should be obvious that the clue reads...
12:00. Adjust the clock until it's 12:00, and an Escape-Man shall pop out from the clock.
9. Green Pencil
Below the three cups, there is a cup of pencils. Take the green pencil inside.
The top left drawer has a sheet of music score inside. Take it.
Use the green pencil to fill out the Escape-Man on the music score.
10. Music Score (This item will only gray out if Green Pencil is also greyed out.)
Look at the picture on the left of the face mask, and see the red I, the white II, and the black III on the picture.
Unlock the top right drawer using the clue above. The first is red, the second is white, the last square is black. Take the yellow marble inside the drawer.
Take the music score in the top left drawer if you haven't.
Take the blue marble under the leftmost cup.
There is a blue symbol (quaver rest) on the music score, and there is also a yellow symbol (crotchet rest). You can also see these symbols on the face mask.
Given the clues above, you should put the blue marble on the left (which is the right eye of the mask), and put the yellow marble on the right. Press on the nose of the mask. Something happened, but you can't see it here.
Turn around to the clock and the three cups. An Escape-Man is on the wall!
After the large Escape-Man is formed, the Escape-Man will find a hidden door and escape through it. Just follow the Escape-Man through the hidden door and congratulations.
Same.
Find the ESCAPE-MEN 84: Secret House 3 - Steward
Exploration
After the still-confusing intro, you find yourself in front of a locked door with a coat rack toppled over in front of it. Lift the hat nearby to find an Escape-Man.
Turn right to find a poster featuring an incoherent collage of rectangles and an Escape-Man, as well as a gray mask that stares blankly across the room.
Turn right to face a desk and a window above. Checking the drawers on the left, you find a music score and half a clue. The drawers on the right have a three-color lock, another half a clue, and a key. The office chair can be raised by clicking its lever, until another Escape-Man is fully revealed.
Turn right to face a bookshelf with a flute case leaning against it. You can take the clown doll and a green colored pencil, as well as check the cups to find an blue marble hidden under the left one. This wall also has the faint outline of an Escape-Man, and the wall clock on the right is mysteriously stopped at 3:30.
Checking the clown doll, you find an Escape-Man under its hat.
Flap
Put the coat rack back upright. If you open the left window, a bird flies in carrying something green…
and lands on the rack, where you can click it to make it drop the Escape-Man.
Click the bird about 7 times to make it leave.
As you turn to shut the window, you find a feather left behind on the desk.
(Of course, if you close the window first then the bird will just flap its wings forever.)
Flip the feather over to find an Escape-Man.
Unlock
Use the key to unlock the flute case. It contains a flute, which has a green dot in it that turns out to be an Escape-Man.
Colors
Use the clue from the poster to unlock the top-right drawer.
Reading the poster closely, you find that some of the tall rectangles are joined at their ends, forming roman numerals Ⅰ Ⅱ Ⅲ written in red, white, black.
Click the buttons 1, 0, 4 times, and open the drawer to find a yellow marble.
Green
Apply the green pencil to the outline in the music score, and then pick up the completed Escape-Man.
Not green
Use the clue from the music score to place the blue and yellow marbles into the mask.
The markings on the (our) left and right sides of the face are the eighth and quarter rests, which are blue and yellow on the music score.
Place the marbles accordingly, then push the nose on the mask. Nothing seems to change.
The wall opposite the mask now has a large Escape-Man you can take!
It's time!
Use a clue from the desk drawers to unlock the wall clock.
As indicted by both halves of the clue, you need to set the time to 12:00.
When both hands point up, the clock "chimes" and you can take an Escape-Man.
Complete
The chime informs you that you've found all 10 Escape-Men:
Under hat
On poster
In chair
On doll
From bird
On feather
In flute
On music score
On wall beside bookshelf
In wall clock
Close out of the examine screen to start the cutscene.
Then leave through the poster to end the game.
will the Esc 04 walkthrough be available soon?
Already started on it, but won't really complete until later today or tomorrow. Hopefuly I will have time to catch up on games then!
ok kk. just checking.
Here it is.
Esc-04
The room maker from Esc-03 is back with a new one! (I mean in the storyline.)
Exploration
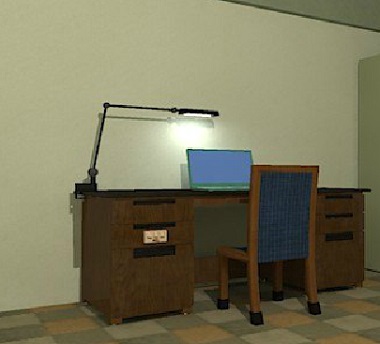
You start facing the table, which has six drawers and a chair you can move aside (but there's nothing under the table). The left middle drawer has a three-digit lock, but all the others are unlocked and empty. The only interesting thing on the table is a laptop with nothing on its screen.
The bookshelf beside has lots of books you can't read, and the top shelf has a hint box with arrow pointing towards a sunflower clock. Something weird seems to happen when you move your mouse onto/off the clock, and the game explains it for you (in Japanese) if you click the green parts. The cupboard doors under the bookshelf can't be opened.
Check the bottom-right corner of the bookshelf to find a keyhole.
Turn right to face a television screen among an amazing array of furniture and equipment. The drawers under the TV can be opened but the door in the middle cannot, and the only other thing you can zoom in on is the set of five books on the right side.
You can also see a blank picture frame on the wall, as well as the back of a couch. Clicking the couch brings you to the front view, where you can lift a cushion to find nothing.
Turn right to face the room door, which has a card reader on it. The corridor leading to the door has a dark square area on the wall with two holes in vertical grooves.
Turn right to face a bed. The wardrobe on the left is locked. Clicking on the bed zooms in on the front. There's nothing under the blanket, the panel on the side is fastened with screws, and the alarm clock is stopped at a different time from what you saw before. Also, that alarm clock has a clue under its face.
After you have enough fun opening and closing the curtains, look at the right cupboard, where the drawer is empty and the doors have a weird round thing with a small circular hole.
Turn right. Here you can examine a picture frame with an unusual shape as well as open the balcony door and leave.
You can't actually leave over the railing, as the game tells you when you click the sky. Instead, you can look at the tall brown box with a locked door and a round bowl in the top.
Pointer / Unscrew
Use the clue from the sunflower clock on the bookshelf to unlock the four-digit box beside it.
When you move your mouse on/off the flower, it turns light green except for the right side.
Knowing that it's supposed to represent four digits, you can read off the code 7701 from it.
Enter that in the box and open it to find a screwdriver.
Use the screwdriver to remove the panel on the bed (under the pillow), then remove the key from it.
Unlock 1
Use this key on the hidden keyhole to unlock the doors on the bookshelf.
Inside, you find a translucent panel.
Layer
Place the panel over the frame beside the balcony door. What is the game asking you to check?
If you haven't realized yet, the picture is a floor plan, oriented as follows:
Door: right side
Bed: bottom
Balcony: bottom left
Desk/Bookshelf: left side
TV: top
Couch: middle of room
which means the circled area is the corner nearest to the standing lamp beside the TV.
Turn until you can see the TV, then click once to face the wall, then click the right edge of the screen to zoom in on the speaker, then click the corner of the room to zoom in on it and find a slightly darker patch of carpet.
Click that patch to lift it up and find a folded note.
(If you can't back out via the bottom of the screen, click the left edge instead.)
Digits
Use the clue from the note to unlock the desk drawer.
Perhaps it's clearer if you look at the item in the inventory: the white spaces between/around the rectangles (and lines) form the digits 563.
Enter that in the drawer and open it to find a disc in its case.
Data
Examine the right side of the laptop to find its disc drive, then click it to open.
Place the disc in it, then click the left side of the screen to return. The screen now has a folder icon on it!
Click the icon to view a clue in purple and pink.
More digits
Use the clue from the computer to unlock the cupboard door under the TV.
The digits, from 1 to 8, appear on the bottom-left, right middle, bottom-right, top-right, left middle, top-left, bottom-right, center boxes.
So open and close each drawer in that order, and then open the cupboard door. (You can safely close a drawer by clicking the floor at the sides.)
Take the remote control and dial from it.
(In case you've wondering, doing the same steps on the table yields nothing new.)
Screen / Dial
Use the remote on the TV to view a clue with colored rectangles in a white circle.
Place the dial in the cupboard beside the bed, and then use the clue from the TV and alarm clock to unlock it.
The colored arrows on circles tell you what directions to turn the dial and how much.
Purple: right 4
Red: left 4
Yellow: right 1
Blue: left 4
Gray: right 2
Green: left 3
After you complete the sequence, the cupboard unlocks and you can open the doors to find a snowman ornament on a blue platform.
Melt / Levels
Place the snowman on the brown box on the balcony, where its glow slowly grows.
Open the box to find a grid of lights above five shape buttons. Clicking each button makes the lit rectangle in each column move up (and then down) by one.
So use the clue from the books to the right of the TV to unlock the panel.
The books labeled with a hexagon, square, star, circle, triangle have lines on their spines that are 5th, 3rd, 2nd, 1st, 4th from the bottom.
Click the buttons 4, 2, 1, 0, 3 times. Even the buttons glow for a while, and then a fancy key falls out!
Unlock 2 / Switch
Use the key to unlock the wardrobe, where you find a set of small empty drawers and a box that contains a lever handle.
Place the lever on the panel near the exit door, and pull it to reveal a hidden compartment behind the small blank picture frame!
Suits
Use the clue from the shifted picture frame to unlock the box it was hiding.
The shapes on the picture are halves of card suits, and they occur on the picture in pairs (even the two half-spades in the middle).
So push the heart, diamond, club, spade, club, diamond, heart buttons accordingly to open the box and find a key card.
Normal End
Save your game, then use the card on the reader on the door to unlock it and leave!
Enjoy the credits roll and animation, and then the game tells you that that was just one ending.
Revisit
Return to the title and choose to continue, putting you where you saved.
Unlock the exit door and open it, but do not leave! After giving up on escape at the very last step, you can now find something different in the room.
Click on the couch to find a secret drawer opened in its front, which has a new note in it.
Tiered
Use the clue from the note to unlock the white drawers in the wardrobe.
As the arrow through the letters indicates, you need to open and close the middle, low, middle, high, high, low, low, high, middle drawers.
Once you're done, the drawers do a little dance and a ladder descends from above, blocking the cardboard box.
Exploration 2
Climb the ladder to find yourself in a boring-looking room. The exit door has a four-letter lock, and the window beside is locked but has a bunch of weird yellow strips on the left pane.
Click the bottom of the screen to turn around and find a three-letter machine with a complicated clue above.
Correspondence
Use the hints above the machine to unlock it.
(They're not really "hints" since you need at least one of them in order to make any deductions.)
Hint 1 tells you to match the first with the last, the second with the second-last, and so on.
Hint 2 gives you some examples of pairs of matching letters. Perhaps this can give you a better idea?
Either by alphabetical intuition or by blindly translating letters to numbers, you figure out that this puzzle is based upon reversing the Latin alphabet.
Let's use the number method. C is the 3rd letter and X is the 24th, and 3+24=27, and the same relation holds for each pair of letters in Hint 2.
Since H, P, B are the 8th, 16th and 2nd letters of the alphabet, they pair with the 19th, 11th and 25th letters, which are S, K, Y.
Enter SKY into the machine and push the Enter button to open it and reveal a stainless steel key.
Unlock 3
Use the key to unlock the window, then open it. Hmm, this window is well-guarded by iron bars.
But when you shift the right pane you find more yellow marks on the bars. Move the left pane over to make both sets of lines overlap and reveal a clue!
(The window panes are now stuck in this position.)
Enter that code (OPEN) into the exit door, and exit through it- not so fast!
Exploration 3
A huge yellow ring is drawn on the roof, but the game won't let you go anywhere near it.
Turn around by clicking the bottom of the screen to find a phone booth. Inside, you find a clue above the phone.
Genre
Use the clue above the phone to dial it.
(Hint: How long is the number?)
The red text on the clue looks normal, but that means the black shadows don't.
But if you just look for digits then you'll find them in the shadows: from left to right, the letters S, A, P, A, S have been "reflected" to form the digits 58685.
Lift the phone and dial that number, and a helicopter lands on the roof.
(You might want to save your game again.)
Special End
Click the helicopter to take an aerial trip though the credits, landing into the end screen.
kk, I'm stuck
i made it to where i reloaded and came back, ysed the card but didn;t leave. it then said "click the couch to see a door opened" and i see no door. i'm confused.
Look at the
front side of the couch, where the cushion is.
In the center, near the bottom, the new note should be very obvious if it's there.
The new item will only appear if
you have unlocked and opened the exit door but not left through it.
Putting this here to complete the series of walkthroughs. You can find parts 1 and 2 in WE N°10 with a repeat of part 1 recently, part 3 above, and part 5 in its own post.
Find the ESCAPE-MEN 85: Secret House 4 - Housekeeper
Exploration
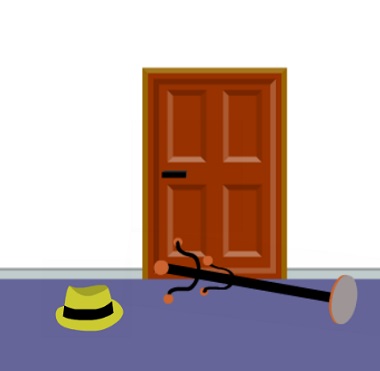
A dish cabinet has fallen over in front of the door. Rummaging through its contents, you find that a sponge falls out of one of the drawers. You can also lift the plate on the left to find an Escape-Man. The wall on the right has a red brick that you can't do anything with.
Turn right to find a picture showing a circle split into colorful parts. A table counter runs across the wall, from a bowl with an orange and peach on the left to an empty Escape-Man-shaped bottle on the right.
Look under the table to find a crowbar.
Turn right to find the kitchen. There's an ugly brown stain on the window, above the simmering pot. The drawers beneath are empty, but you can zoom in on the second column of drawers, where there's a three-digit drawer, an empty drawer underneath, and a drawer with a plate of potatoes. Take a potato from the plate. The tap on the sink is working, and under it is a cupboard with a bottle of dish liquid. Don't forget the colorful hanging pans that make noise when clicked, and the cabinet near the ceiling that you can't reach.
Turn right to find the fridge. In its left side, you find some containers you can rearrange to find an Escape-Man. In the right side, you find a green pepper with a number on it. In the bottom drawer, you find an ice cube tray with one cube of green ice. Take the chair next to the fridge.
Check to the left of the fridge to find three colored squares on it.
Three digits
Use the clue from the ingredients you picked up (and the fridge) to unlock the three-digit drawer.
As indicated on the side of the fridge, you need to look at the pepper, orange, peach. Examining each ingredient carefully, you find that they have the digits 8, 2, 5.
Enter that into the drawer and open it to find a peeler and Escape-Man.
Peel
Use the peeler on the potato to release an Escape-Man from it.
Crunchy
You still have the pepper, so click it to split the pepper and find an Escape-Man inside.
Clean
Apply the dish liquid and tap water to the sponge, then use it to clean off the window and find an Escape-Man.
Climb
Place the stool in front of the sink, then open the high cabinet to find a mug and an Escape-Man.
Liquefy
Find a way to fill the empty bottle on the long counter with green fluid.
Use the mug on the pot to fill it with hot water.
Insert the ice cube into the top of the bottle, then pour the mug of hot water over it.
Back up and click the full bottle to get the Escape-Man.
Spun
Use the clue from the circle picture to do something with the hanging saucepans.
As indicated by the arrow, the circle represents the sequence of colors
RBRYBYRYBYRB
so click the
LCLRCRLRCRLC
pans to make an Escape-Man fall out.
Breakout
Use the crowbar to remove the red brick from the starting screen, revealing an Escape-Man.
Complete
The chime informs you that you've collected all 10 Escape-Men:
Under plate on floor
In left side of fridge
In three-digit drawer
In potato
In pepper
On window
In cabinet above sink
In bottle on counter
From hanging saucepans
Behind red brick
Back out to let the EM Eye do its thing, then leave through the hidden door it discovers.
Update