
 This week on Weekday Escape is Retro Edition time and that means three wonderful games from past!!
At the beginning Esklavos takes you to the North Pole to see Santa and to give some discipline to his little helpers. After you finish your task, it's time for short relax in pleasant Hottategoya's room and solving few puzzles there. And then comes Gatamari's game. It's something special. It's hidden gem. It's Mother of Ecape Games, maybe the longest escape game ever. Loads of puzzles, hours of gameplay, tough, but not discouraging. It's perfect!
Have a good time and enjoy!
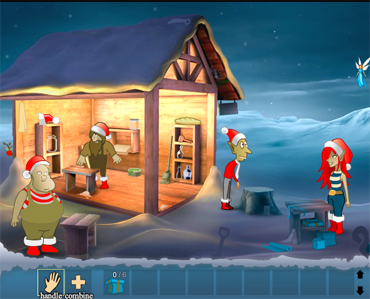
Christmas is coming. Elves are busily making presents in this time of year and you can return with Esklavos to 2012 and see Santa's helpers in full work. Meet Gogor, Gofin, Pumpus and Lumiena!
Elves are supposed to make six toys (Santa hidden in lower right corner gives you a hint about them) and you are their supervisor. But Gofin and Pumpus are hot-tempered, Gogor seems to have problems with his digestion, judging by his green color, pretty Lumiena is a bit foxy, and all together, things may get out of control quite quickly. Angry elves produce something completely different than they should...if your Christmas presents were disappointing back in 2012, now you know why...
The cursor is changing, no save button, one ending.
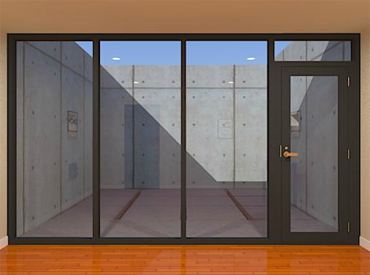
Welcome in Hottategoya's purist room. It's almost empty, seems warm, has private courtyard - would be a really nice study room, just move in a writing desk, a chair, maybe PC, a bookcase...no, that's not why you are here. You are here to escape! Both doors are locked, but if you look closely around you find some puzzles and clues. Will they let you examine the courtyard? Is it dusk or dawn? Or is it just countyard's wall casting a shadow? Go and find by yourself.
The cursor is not changing, no save button, one ending.
Your journey with Gatamari is almost at the end...you passed six trials and obtained six treasures...but there is still much to do! The last step is the hardest and this game is enormous - the lenght can be compared to Elements by Neutral. Notice, that it will take you a few hours to complete it - but of course, this is the quest for the Holy Grail and it's bound to be a challenge!
You find yourself trapped in empty corridor with six locked doors and exit gate locked with padlock. In your inventory are some items already (six treasures) from previous games (WE - Retro Editions N°3, 4, 5, 6, 7, 8), and many empty spaces for new items. Behind each door is a room equiped with various strange devices and locked safes. Devices are not so complicated as they may seem at first sight and the same can be said about puzzles. What you need is good observation and concetration, and also save button and breaks, because puzzles are intuitive and hints are clear, only brain gets tired sometimes. Can you get the seventh treasure, an unlocker, and open the last gate? Wishing you happy playing!
The cursor is not changing, save button.
We love escape games, and our readers love talking about them and sharing hints! How about you? Let us know what you think, ask for clues, or help out other players in the comments below.


nortonsetupnorton, don't be posting this kind of garbage on here. Anyway I can't wait for the walkthroughs. Help us out KK. :)
Paul, that's probably a bot or a someone's got a virus. I'd bet on the former.
Escape from a Room with a Courtyard tripped me up until I realized I'd read a clue wrong. Playing this made me realize I miss classic Hottategoya. I'll have to go back and play some more.
It was more fun creating horrific Christmas gifts than good Christmas gifts. ^_^
Duendes in Christmas 2
Tired of games that give you limited choice over what happens? This time, you get to choose someone else's Christmas. Santa wants you to make the six presents on his gift guide. But if you're not so generous, Santa doesn't have to know!
(Several items can be used in more than one way, and many of the steps are irreversible. Choose wisely.)
Note about the handle and combine modes:
You can only pick up items in handle mode (select the "handle" icon). You cannot use any items in combine mode, but you can leave combine mode by switching to handle mode.
In either mode, you cannot use an item if the cursor is red. Otherwise, an orange cursor indicates a hotspot.
Gather tools
The elves tell you what they need: Pumpus needs a paintbrush and paint can, Gofin needs a hammer, Gogor needs a handsaw and Lumiena needs a pair of scissors.
So gather the stuff they need by picking them up off the floor:
a hammer head and stick from the bases of Pumpus and Gogor's workbenches (1st and 3rd from the left),
a shovel from the snow nearest to you,
a holly(?) berry from the stick on the left of the screen, behind Pumpus,
an empty can on the middle shelf, above the bowl of green paste,
a loaf of bread resting on the right shelf, and the paintbrush beneath it,
and a scissor blade from the roof.
Hmm, those aren't quite the things they asked for. The paintbrush is in poor condition with all its bristles missing, and the bread has turned rock hard!
Combine the hammer head and stick to form Gofin's hammer.
Use the shovel on the snow mound beneath the fairy, and pick up Gogor's handsaw from it.
Use the paintbrush on the bowl of green paste (beside the shelf), which sticks to it instantly. Then hand it to Lumiena, who attaches some hairs to Pumpus' paintbrush.
Give the berry to Gofin, who hammers it into red goo. Combine that with the can to fill it, then hand the filled paint can to Pumpus.
Give the bread to Gofin, who pulverizes all of it, except for the huge scissor blade inside. Combine it with the other one you picked up to form Lumiena's scissors.
That's all of the tools, now we can get to the gifts.
Be nice
Referring to the gift guide (Santa's sleigh in the lower-right corner), you realize that the items you need are:
the empty jar on the left shelf and the cloth hanging on the wall to its left,
the cardboard sheet on the middle shelf,
the broom next to the right shelf,
the wooden block hidden on the right side of the screen just above the sleigh,
and the styrofoam balls hidden on the small cube beneath Lumiena's bench.
Okay, this is closer to what Santa's asking for, but some things are still missing. The last gift is made from the sign hanging off the roof over Gogor, and you can reach it using the broom.
Now that we're in good spirits and have everything we need, it's time to assemble the gifts!
Magic Jar: Click the fairy to sprinkle some dust, and pick it up in the jar before it fades away.
Toy house: Saw the wood block down into a house, then paint it.
Top hat: Cut the cardboard into pieces, then glue them together in the green paste to form a hat, and then paint it.
Bauble doll: Glue the styrofoam balls together, then paint them.
Joy coaster: Saw the sign into a circle and paint it.
Festive Tee: Cut up the cloth into a T-shirt, then paint it.
Give each finished present to Lumiena, who wraps them and puts them in the sleigh. Ho ho ho!
Be naughty!
Pick up the empty jar, cloth, cardboard, broom, wooden block and sign as above. (The balls are optional).
Also pick up two snowballs from the floor of the house (beneath Gofin's bench and beside the front pillar), and use the broom to get the spider off the roof.
But that doesn't seem to have upset anyone. To start the mischief, give both snowballs to Lumiena to start a snowball fight. Now we're in the mood!
Smashed Jar: Just smash the empty jar.
Bloodied Knife: Saw the wood block into a knife, then paint it.
Spider: Don't do anything, it's already a perfect evil present!
Genie:With the jar smashed, you can just pick up the fairy and paint it.
Hate coaster: Saw the sign down and paint it.
Skull Tee: Cut up the cloth into a T-shirt and then paint it.
Give each finished present to Lumiena, who wraps them and puts them in the sleigh. Ho ho horrific!
Choices
Of course, your presents don't have to be all good or all bad. If you're going for all the different endings, one way to control how many of each you give is as follows:
If you need at least 2 bad presents, give the smashed jar and genie. If you need one more bad present, give the spider.
If you can still give the magic jar, do so. If you need more good presents, give the top hat and doll accordingly.
In any case, you should have at most three presents left to give. The coaster, T-shirt and house/knife can each be good or bad: make the good ones first and then start the snowball fight to make the bad ones.
I had no clue what I was doing and ended up with three good and three bad
The snowball fight came first, even before I found any of their tools. I never did find the saw. I think I ended up with the spider, red fairy, and evil T-Shirt for the bad ones.
can't wait for the other 2 walkthroughs :)
Escape from the Room with a Courtyard
The decor may be cosy, but in the end, it's a simple room with simple sights. You can't stay forever, but it's not difficult to escape.
Exploration
You start off facing glass windows and a locked glass door to the courtyard.
Turn left to find a locked safe and a framed clue on the wall above with blue and green squares of different sizes.
Turn left to find a locked door and another framed clue with arrows of different lengths pointing right from crescent moons in different orientations.
Turn left to find another framed clue with tiny arrows pointing in different directions over a wooden table with a locked drawer. The table has a clue with letters and numbers as well as a keypad to the right of it.
Substitution
Use the clue from the alphabetic note to unlock the table.
The numbers with repeating digits appear on lines with repeating groups of letters.
From this, you can deduce that 4, 3, 0, 9 are represented by the strings APK, QV, SY, Z, so that 1, 6, 2, 8 are represented by F, C, HR, NXI, and 7, 5 are represented by O, TDW.
Thus the letters at the bottom form the groups O NXI TDW QV, which is 7853.
So enter that in the keypad and press the E button, which unlocks the table drawer, which contains a star key.
Unlock 1
Use the key to unlock the courtyard door.
Outside, you find only a blank wall, half of it in shade. Turning left, you find a clue hidden at the back of a square hole with different-sized squares and digits. Turning left twice more, you find a wooden box in another hole. The box has four pairs of digits in different directions from a crescent moon in the center.
Arc
Use the moon clue to unlock the box.
If you rotate each clue so that the moon matches the orientation on the box, the arrows end up pointing in the LRDU directions.
Since they are alternately long and short, click the near, far, near, far buttons in those directions.
Opening the box, you find a crescent key.
Unlock 2
Use this key to unlock the safe beneath the square clue. Inside, there's another safe! This one needs four digits to unlock (but something else seems missing).
Layers
Use the remaining clues in the game to unlock the four-digit safe.
The ↓→↙↖ arrows on the arrow clue indicate digits in the blue, green, blue, green squares of the digit grid outside.
Those digits are 4, 1, 6, 4, so enter that in the four-digit safe and press OK.
You hear a grinding noise.
Escape
Look back at the courtyard, where the floor tiles have risen into pillars that form a staircase. So click on the balcony door to leave.
Thanks again KK. Kinda short this time on the Hottegoya game but it was still cool.
can't wait til the last one. I know it might take a while since the description says it'll take a long time to play but I hope it won't take long regardless.
still waiting :)
That last game is EPIC.
I'm too lazy to write a proper hint-through right now.
That game IS epic though. It deserves its own page and upvotes. Quite possibly the best Gatamari game I've ever played. You don't have to know Japanese for most of it except for one section where:
you need to go through an open door but *something* stops you from entering.
When that happens:
make sure you have all of the items that you started out with in your inventory, then walk through the door.
Had no idea what to do in Duendes in Christmas 2, so began with
a snowball fight and ended up with broken glass and a dead spider as gifts.
Multiple endings make this simple game much more fun.
without playing the game, I can tell it jumps around too much on that walkthrough. Perhaps I should find one that does it from beginning to end or else I'll be confused.
Maybe it'll be easier if you start with half a walkthrough :)
Gate Escape 7 (part 1 of 2)
There are warnings throughout the page that the game is very long, and that you should take appropriate rests during the game. Well, that's what the save button is for!
Since Gatamari is great at adding twists to their puzzles, I'll try to avoid spoiling those twists until it's time to experience them.
Previously on Gate Escape...
The search for the Holy Grail is almost over. After effortlessly conquering six trials in the ruins and obtaining six treasures, only this final obstacle stands before you: a giant lock.
Exploration
To face this monstrous task, you have been granted with an inventory expansion! Your six treasures: a box cutter, pointer, pair of screwdrivers, codebook, flashlight and hammer sit comfortably at the bottom of your new 47-space inventory.
Let's test this lock by clicking it... there was a key in the keyhole! (Really.) So turn around the room through brown, white, green, blue, pink doors, each with a keyhole and red light on the wall next to them. And of course, there's a doorway back to the previous game, but who would want to go back there?
Use the green key on the lock beside the green door, which slowly slides up to let you enter. Go on in.
GREEN
Exploration
Oh look, it's an old friend: a stone tablet with an emerald inset on top. It's inscribed with an alternating sequence of + and - signs, and an ellipsis that would make your math teacher gasp in fear. On the wall above and to the left, there's a picture frame with 5 rings and a row of numbers separated by circles, but the numbers are mirrored and the frame is screwed down. On the right, there's a four-digit safe which, as you're used to by now, opens a panel in the wall beneath its lock.
Turn left to find a pipe that seems like it would drain into a hole in the ground, were it not missing some parts on its junction and end. A pair of lights next to the pipe are off and green, respectively. To the left, a hole in the wall has a downward pointing arrow inviting you to look down, which you do to find something rectangular at the very bottom, way beyond what your puny Reacher can handle.
Turn left to find the doorway back, and also a black-and-white grid safe with loads of colored markings along the top and left. The five squares along one diagonal of the grid are missing, and an OK button is in place of one of them in the lower-right.
Turn left to find another grid of buttons on the wall, where the buttons are marked with plus and minus signs and are connected vertically, horizontally and diagonally. An emerald is inset in the panel next to the reset button, and the safe seems to open a trapdoor on the ground. There's also a clock here that seems to have stopped.
Path
Use the clue from the tablet to unlock the grid of plus and minus buttons.
You have to click a plus button, followed by an adjacent minus button, followed by an adjacent plus button and so on until all sixteen buttons have been pressed.
Hint: If you assume the path forms a Hamiltonian cycle, you can immediately deduce a large part of it.
Start the path as follows:
+987
--56
+-14
+-23
and then you have some choices to finish the path as long as you hit the remaining plus buttons from top to bottom.
When you're done, all the buttons spin really fast and the trapdoor opens up and there's a piece of cloth and a clue with digits separated by circles, but one number seems missing. There's also something new: a series of colored lines.
Look back at the button grid to find some colored lines highlighted along a diagonal. That's still not enough information to do the math, so it's time to do something else.
Transparent
Use the screwdriver to unscrew the picture frame, leaving the five rings on the wall, covered with an oil stain.
Math
Placing the picture frame in the trapdoor's space, you find that the circles align, but the resulting clue is unreadable.
So pick it up again, flip it over, and put it down. Now the digits match perfectly to form five two-digit numbers.
The lines between the circles are pink, yellow and cyan, and the similar-colored lines run from the lower-left to upper-right of its diagonal grid.
The buttons on that diagonal have rotated to read + ∕ × +, but the math doesn't work out if you use those symbols.
Instead, you need to rotate your view until the diagonal line is horizontal. The symbols then become ×−+×.
Placing those symbols in the circles, the formula evaluates to 2668-91+2160=4737.
Enter 4737 in the four-digit safe, and open it to get a small turning key. According to the text description, this key fits on a faucet to open up a water valve.
Moist
So use the faucet key on the faucet, and turn it so that water pours into the hole.
Wet the cloth in the water stream, and use it to wipe up the five-ring picture. Something looks very slightly different about it.
Linked
Use the clue from the five rings to unlock the other grid safe.
(There are no other clues for this puzzle, so I'll give you a hint: your final code should be symmetric.)
Whenever two rings are linked, click both buttons where their rows and columns intersect to turn them white.
There are a total of 6 such links: green-blue-yellow-green-black-yellow-red. Thus your grid should look like this:
- R B Y G K

R - b W b b

B b - W W b

Y W W - W W

G b W W - W

K b b W W -
Click those 12 (W) buttons to turn them white, and then the OK button.
The safe opens so you can take a round handle with a square protrusion.
Divert
Use the handle on the pipe junction, and turn it to pump the water out.
A box floats up the hole in the wall, and then a beep informs you that you're out of water.
The box has a screwed-on lid, so unscrew it to find a shiny gray key.
So you leave the room holding a key and the box it came in.
Go back to the main room and insert the key in the matching door lock to open up the next room.
GRAY
Exploration
It's another stone tablet! This one has a gray gem (whatever that is), and a green square around a yellow circle with black in between, and a clue below about 18 yellow circles. To the right of it is a complicated-looking ball machine with a 1/100000 chance of success. On the left, there's a club suit mark in pink, and a lever that tilts the ball machine briefly before springing back.
Turn left to find a bunch of things on a wall: a pink heart mark, a grid of blue lamps with the upper-left one lit green, a safe with four pink buttons and a clockwise arrow, and a bucket trapped behind glass with numerals marked on it. (You'd think the hammer would instantly solve this problem, but it's not that smashy.)
Turn left to find the doorway back, which has a stopped clock and a pink diamond on the right side. On the left is a safe which has a red hole in its upper right and a downward arrow starting at an unlit lamp and passing through two buttons.
Turn left to find a set of three safes in different shapes, with buttons that extend green lines across their surfaces. The middle safe is marked with a gem. There's also a pink spade mark at the wall corner.
Eighteen
Use the clue from the stone tablet to unlock the middle (diamond) panel on the spade wall.
(Experiment with it a bit.)
Yellow circles appear on the panel whenever a small square is formed by the green lines. You need to form exactly 18 of these small squares.
(Hint: all but two of the lines should be fully extended.)
Click every button twice except for the leftmost one on the upper-left side and the rightmost one on the upper-right side. Click the former just once.
Then press the OK button, and its panel opens up to let you have a green ball with a letter and number separated by a line.
The middle panel now shows a cyan square followed by ×13.
Thirteen
So use the clue from the middle panel to solve the left panel, which works pretty much the same way.
Click every button twice except for the middle ones on the top and right side. Click the former just once.
Then press the OK button to open the safe and get an orange ball with no markings.
The left panel now displays a red triangle followed by ×19.
Nineteen
Use the clue from the left panel to solve the right panel, which works pretty much the same way.
Click every button twice except for the top ones on the left and top-left sides. Click the former just once.
Then press the OK button to open the safe and get a gray panel labeled
2.The right panel now displays a bunch of pink card suits.
Pips
Use the suit clues to unlock the four-button panel above the bucket.
In the order indicated by the arrow on the panel, the suits are ♣♠♥♦♥ ♣♠♠♦♥.
But the club, spade, heart, diamond suits are on the lower-left, upper-right, upper-left, lower-right corners of their respective sides.
So push the ⌞⌝ ⌜⌟ ⌜⌞⌝⌝⌟ ⌜buttons on the panel, and the glass raises so you can get the empty bucket.
Pinpoint
You're not tall enough to do anything with the lamp puzzle, unless you use your Reacher.
So use the clue from the bucket to solve the lamp puzzle.
Hint: there's another odd one out.
The green ball suggests that you should convert the numeral Ⅲ to 3.
The numbers 6 and 3 are coordinates, so you need to touch the lamp on the sixth row (from top) and third column (from left).
So poke it with the (extended) pointer, and the panel opens up to reveal orange and green holes over a locked metal cover.
Carrot
Place both balls in the matching holes (they're too large for any other holes), and the machine gives you access to a blue ball.
Rig
You need to weigh down the lever on the wall, but you don't have things heavy enough to fill the bucket with.
So go back to the previous room and fill the bucket with the water there (since the pipe is dry, you'll need to use the bucket on the wall hole).
The full bucket is sufficient to weigh the lever down, and now the ball machine displays a much better 1/1 probability.
So place the blue ball in the machine, and it rolls around a few times before dropping into the front hole.
So check the tray beneath the machine to find a red ball!
Halt
Place the red ball in the matching hole (next to the door), and the lamp and buttons on that panel light up.
That green lamp looks a little familiar.
Look at the grid of blue lamps again. This time, it displays a black arrow and some red dots.
So use that clue to unlock the panel.
Rotating the arrow to point down, you find that the red dots are on the RRLLLLRL sides of the arrow.
Then press the OK button, and the safe opens... or at least it tries for a while, and then gives up with a resigned beep. You can just see a key through the narrow gap.
Well, it had to happen sooner or later, with no maintenance workers this far into the ruins. I guess you're just stuck here now... unless you have a trick up your sleeve?
Use the pointer to drag the brown key towards you, and now you're ready to move on to the next room!
BROWN
Exploration
The tablet in this room has two gems, red and yellow. In between, there's a clue about slanted and horizontal platforms and an arrow pointing to a reddish rectangle. Above the tablet and to the right, there's a lever that you somehow don't have the strength to move. On the left, a four-digit safe has a different color for each digit.
Turn left to find a six-button safe with a brick-like pattern, a weird black-and-white marking, and what appears to be an unlit lamp, but the buttons on the safe don't work. To the left of it, a pulley is hidden behind glass that's resting on an orange panel labeled
?. There's a stopped clock at the upper-right and an X mark just below the safe.Turn left to find the doorway back. On the right, the pulley ends in a raised shutter and a tiny yellow panel labeled
?is sitting there. On the left, a yellow gem marks a clue about scales carrying golden weights.Turn left to find a monstrosity of a machine. A giant empty column on the right passes beside a green button that moves a hook back and forth and a purple button that opens a shutter, and ends in a drain that's probably the same drain under the larger grate on the floor which has a water indicator and a blue button next to an unlit lamp. The hook is attached to a pulley, and the other end of the pulley appears to connect to a weight that's blocking a toy car. (But the green button doesn't move it.) The car sits on a ramp, and three other ramps sit above mathy puzzle panels with trapezoidal holes, leading to a small opening where a blue panel labeled
?rests. Finally, there's a red panel with a red gem and an Open button, but of course it doesn't open.More math
You should now have four colored panels, so use the clue from the colored panels to unlock the four-digit safe.
Colorblind help
The panels always remain in the same inventory slots, in the order Gray, Orange, Blue, Yellow.
The panels that are already in the puzzle are, from left to right, Red, Pink, Green.
Each panel should represent a digit (whether or not it has a question mark).
Use the ramps like weighing scales to deduce the digits for each panel, starting with the digits that are already marked.
You can get the middle scale to balance in three ways:
Pink (5) = Gray (2) + Orange, so Orange = 3.
Pink (5) + Gray (2) = Blue (7), so Blue = 7.
Pink (5)+ Orange (3) = Blue (7) + Yellow, so Yellow = 1.
Now that you know the values of the panels in your inventory, you can use them to find the red (and green) values:
Red = Orange (3) + Yellow (1), so Red = 4.
Blue (7) + Yellow (1) = Green, so Green = 8.
Putting all this together, Orange Yellow Blue Red = 3174.
So enter that in the four-digit safe to open it and get a cyan panel labeled
6.Ruby
Use the clue from the tablet to set the ramps correctly.
Hint: you have just enough weights to do it.
You need to outweigh Red (4), so place the Orange (3) and Gray (2) panels on its right.
Next, you need to outweigh Pink (5), so place the Cyan (6) panel on its right.
Next, you need to balance Green (8), so place the Blue (7) and Yellow (1) panels on its left.
Then press the Open button on the safe marked with a ruby, and it opens up so you can get a weight with a handle. It's marked 20, but it doesn't feel that heavy.
Capacity
Perhaps you could open up the drain cover if you just had a bit more water.
Go back to the previous (gray) room and pick up the bucket there.
Then empty it into the open grate, filling up the water meter.
Now you can press the blue button to fill the column with water (or drain it) while the glass door is closed.
Sinker
You need to attach the 20 weight to the hook in the machine, but how do you get it up there? It certainly doesn't float on water.
Stack it on top of the wooden box you're still holding. (Do this in your inventory.)
Then (open the glass door and) use it on the base of the column, where it fits perfectly.
Then push the blue button to pump the water up, and then the green button to move the hook, and then the blue button to release the water.
The 10 weight rises, the car races off to the left, bounces against the wall back along the ramps to the right, and comes to another bouncy stop. So you pick up the car and open it... all that for a simple note with a heart and a cross.
Weakness
It's a pink heart, so that means you have to go back to the gray room again.
Face the heart wall, and click the spot exactly where the X was in the brown room. (At the center of the wall, to the right of the glass where you got the bucket.)
Now zoomed in on the blank wall, smash it with your hammer...
...you can't, because it's soft! It feels just like a thin layer of fabric.
So use your cutter instead. You cut up the wall, and tear the wallpaper away to find a cute face formed by a button under two unlit lamps.
So push the button, and the face turns green. Don't get too excited, you're not summoning anything yet.
Glow
Go back to the brown room, where something's now glowing green.
It's the lever on the wall behind the stone tablet! So pull it, and the tablet extends out of the ground to reveal a grid of uncomplicated symbols. (Which places the grid right under the yellow gem.)
There were two lamps above that button, so look for another thing that glows green.
The six-button safe under the clock is now activated, and you can push its buttons to change up the black-and-white patterns.
Brick
Use the clues marked with topaz stones to unlock the six-button safe.
Following the gold picture, you need to take the 2nd, 1st, 6th, 5th, 2th, 2nd symbols from each column.
So copy those symbols by clicking the buttons 3, 2, 10, 12, 7, 7 times. (The 4th and 8th presses on each button change the symbol rather than rotating it.)
Then press the OPEN button to slide the panel down. Behind it, there's a single yellow rope.
Sever
So cut the rope, and you hear a loud boom. The other end of the rope has slid over the pulleys and released the shutter to the left.
The closed shutter panel has an amidakuji machine with 6 columns, and some of the bars are colored and controlled by the side buttons. (If you're not familiar with this, press the Start button to see how it works.)
With a total of 256 combinations (which can be reduced to 128 with advanced techniques), you could be here for a really long time.
What you need is a clue. Did you miss one?
Looking back at the brick-patterned safe, you find that its panel didn't slide down very far, and part of the X mark is still visible, right under the triangle symbol. Doesn't that look a bit like something else?
It's an A. Each of the other symbols looks like a letter, and the letters for each symbol form the clue CUTALL.
So "cut all" the bridges on the amidakuji machine by clicking every button.
Then click Start again, and watch the shapes dance to the music and land in their matching holes. When that's over, the picture to the left of the door rises up to reveal a packet containing a key!
So use your trusty Cutter to extract the yellow key, and you're all ready to move to the next room.
YELLOW
Exploration
The stone tablet (with another yellow gem) has a very confusing diagram with red squares, white rectangles and black triangles. To the right of it is a safe with somewhat happy faces, but the buttons are fake and it's just a picture. On the left, a four-digit safe has horrendously misaligned buttons that make loud clanging noises.
Turn left to find a closed green window at the top of the ceiling, a daruma-otoshi machine with an unusual setup, and a bunch of nails in the wall holding up a gray figurine. The nails seem a bit crooked too.
Turn left to the doorway back with a weird protrusion over it. On the right, there's a stopped clock on the wall over a cracked glass panel that covers a familiar-looking key in a stand. On the left, there's a safe with a big arrow pointing at an OK button (which doesn't work).
Turn left to find a green statue with folded arms, and instead of a face there's just three holes arranged vertically. His upper half sits on a platform with an up arrow button. Around him are four rectangular holes with platforms at their bases, and the holes and platforms come in four different sizes.
Break in
Use your trusty hammer to smash the glass case, and an alarm triggers and rusty iron bars lock you in.
You got access to the pink key, but now you don't have access to the door!
On the bright side, the big arrow safe is now activated, and seven new buttons appear.
Break out
Use the clue from the door bars to unlock the arrow panel.
The tapered body of the arrow indicates that you should arrange the bars in order starting with those having the widest (unrusted) middle.
That order is 6342715, so click the 6th, 3rd, ... , 1st, 5th button from the left to raise the bars.
Before you move to the next room, there's another puzzle you can solve here.
Brick bridge
Solve the daruma-otoshi puzzle using the clue on the stone tablet.
Each block of the puzzle can only be hit from the right. The tablet says that the big block can only be hit if it's unblocked on the left and has an exposed surface on the right, and if it rests on the gold platform you win!
The blocks do have a tendency to defy physics, which makes this bost easier and harder.
The blocks, from top to bottom, are Red, Blue, Yellow, Green (lime), Purple/Pink (magenta), and the buttons are in the same order from left to right.
So press the blocks in the following order:
RBYGP RBYG RBYfollowed by
Y G RBGto form a stack: red, blue, green, yellow. With purple left behind, you can continue pushing the stack:
RBGY RBGY RBG RBand finish off by pushing the head to the end:
R R R.The window opens and a tiny button falls to the floor. It looks like an open button for an elevator, but we don't have one here.
With puzzles left unfinished, you have no choice but to head to the room next door. But first, you decide to take a break and save your game before the other half of this walkthrough!
i can't solve the
+ and - Puzzle.
I end up at a dead end every time. can someone help?
sorry I figyred that out but now I canlt solve the
ring puzzle. you posted 6 lines and there were 5 and even the buttons I had to turn white did not line up either. i'm confused.
I hope you can help.
The top row and left column show the colors, so the pattern to form is actually
-W--- WW-
WW WW
-WW W
--WW
(The formatting here looks correct to me, but apologies if I mess this one up.)
Paul,
Regarding the ring puzzle:
Did you clean the rings on the wall? If not, you'll need
to add water to your cloth
If you've seen the rings, look closely at EACH RING A ring that is linked to another ring goes OVER and UNDER the other ring.
If that ring goes over the other ring twice, then it is not linked. If that ring goes under the other ring twice, then it is not linked. Be careful and diligent.
And before it gets lost in the comments, here's the other half!
Gate Escape 7 (part 2 of 2)
PINK
Exploration
The stone tablet here has a pink gem and a clue with arrows pointing in and out of several crystals. At the upper-left, a creepy mask on a shelf has a hexagonal hole on its forehead and three buttons for a nose, and you can turn it over by clicking its right edge to find three more holes on the back. On the right side, there's a safe with footprint buttons on a striped background with an upward-pointing right arrow (as well as the panel that the safe opens).
Turn left to find a dark glass panel with two round buttons that don't work, and a rectangular hole in the ceiling above it. To the left, a machine with a hexagonal keyhole spits out the corner of a blue piece of paper, but the rest of it seems to be stuck inside. On the right, there's a safe with five buttons arranged around a central OK button, as well as a familiar marking at its top right.
Turn left again to find the doorway back with a stopped clock above it. On each side of the doorway are weird paintings with weird people around weird pyramids doing weird things with light. The thing that most interests you, of course, is the key in the hand on the guy in the right painting. Snap out of it, it's not real! What's real is the second pyramid from the left, which turns out to be a triangular wooden block.
Turn left again to find a familiar setup: a closed round window near the ceiling and a rectangular hole near the floor. On the left is a machine with a grid of square enclosures with crystals controlled by buttons on the top and left. The middle crystal rotates in time to a row of lights on the right side that flash one at a time. On the right of the screen, there's a note with a grid of numbered colored circles.
House of Mirrors
Use the clue from the pink gem tablet to unlock the crystal machine.
From the rules shown on the tablet, you can deduce that the crystals have to be placed as follows:
/\/

|||

|\/
So set up the top row by clicking the left and right buttons along the top once each, then the other rows by clicking the middle and bottom buttons once and thrice.
Then wait for the correct timing to release the really slow light beam.
The correct timing is precisely when the lit bulb on the right changes from the 2nd to the 3rd.
When you have it correct, the light beam lands in the hole at the lower left, and the window near the ceiling opens up. No button drops this time.
Expansion
Speaking of button drops, you still have the button from the other room, so place it in the rectangular hole near the floor.
Say, that's an unusual position for an elevator button. Wonder what this opens?
It opens a trapdoor to the basement, this time without a cushion at the bottom.
Exploration 2
Just to rub it in, the first thing you see upon getting up is a ladder right beside the hole. A button panel on the left reminds you of elevator panels again, but this one goes up, down and... left? The left button is lit.
Turn left to find another such panel with neither its left nor right button lit. Below it, a big red X marks a rectangular mousehole through which you can vaguely see some sort of handle. There's also a digital clock which is turned off.
Turn left to find another such panel with up, down and left buttons, all unlit. There's also a track along the floor-wall corner, with some painted footprints climbing up the wall.
Turn left to find a row of light bulbs over a glass porthole which is flooded with light from the other side.
Hidden
Turn on your flashlight and use it on the mousehole to retrieve the handle from inside.
As you back out, the hole returns to its former darkness.
Transport
Press the lit left-arrow button, and the ladder slides to the left... past the hole that you need to climb.
All you can do is press the down button- oh no, that retracts the whole ladder!
All is not lost. You can still turn left and press the left button. The X turns into a red arrow indicating the direction of the rumbling.
Turn left and press the up button, and the ladder reappears from the ground right in front of the footprint tracks.
Some of the footprints are now covered, but others seem to form a clue that you should note down for later.
Send the ladder left, then down, then back across the room, then up to the hole.
Climb
Climb the ladder out of the hole, and then use the footprint clue to unlock the footprint safe in the pink room.
From bottom to top, the (non-covered) footprints appear on the RLRLLRRL sides of the ladder.
So click those footprint buttons, and the safe opens to let you take a figurine that's larger than the previous.
Crank
Use the handle you picked up downstairs on the paper machine, and it "prints" out a paper strip with a sequence of moon phases... but some of the moons shown are physically impossible.
Globe
Use the clue from the paper strip to unlock the glass porthole downstairs.
(The game description mentions a bug in which the last light won't turn off if all the others are off. If you encounter it, the workaround is to turn them off in a different order.)
Click the four buttons beneath the lit lightbulbs to match the patterns.
First, turn them all off and the middle light glows purple.
Then, click the 4th, 3rd, 2nd, 4th, 2nd, 1st, 2nd, 4th buttons from the left.
The porthole slides open and you can crawl through to a room with laser sensors. Somehow this doesn't feel like much of a challenge, so why not go forward?
Having dealt with a laser trap before, you confidently duck beneath and between the beams to a blank stone tablet with a clear gem which comes off easily. Is it valuable, or perhaps completely worthless?
Turn around and make your way back to the porthole and into the basement. There's one more thing to do here.
Not black
The purple buttons match those on the five-button safe, and the marking on that safe matches the open packet you have in your hand (which held the yellow key), and the packet seems sized to fit one light bulb. But which one?
There was that one bulb that turned purple. Light bulbs don't just glow purple, that one seemed to go beyond... beyond violet? Ultraviolet!
Place the packet over the middle bulb, and turn the other bulbs off again. The blacklight reveals a fluorescent clue on the packet, so use that clue to unlock the matching safe.
Labeling the buttons A, B, C, D, E clockwise from top, you need to push the EBDACDEA buttons.
Push those buttons to open the safe and get a figurine that's even larger and more brownish than the others.
Missing
The figurine slots in your inventory suggests that one is missing, which reminds you of some unfinished business in the previous(yellow) room.
So you go back there, and the four-digit safe is still locked.
All those nails and all those loud sounds remind you of the nails in the wall in this room, so hammer them in.
Ah, all straightened out. But you still need to find a digit code, and there are no digits to be found.
The digits are on the grid in the next room, so go over to the pink room and examine it.
The tips of the nails poke sharply out of four circles in the grid.
The numbers in those circles are, from top to bottom, 7, 6, 9 and 4.
Matching that to the heights of the safe buttons gives you the code 9476.
Enter that in the safe (you might want to mute the sound for this), and it opens up so you can get the last figurine.
Green Man
The green statue wants a mask, but the mask isn't ready. First, you need to fill its forehead hole with the hexagonal (bipyramidal) gem.
The mask shoots spikes out the back! Carefully place it on the statue's face.
Next, you need to place all four figurines in their holes. Obviously, the largest figurine should go in the largest hole, right?
You place the figurines in descending order of size, but the button still does nothing.
That's because the order is wrong. Or more accurately, one of the figurines is wrong. Why's the largest figurine not smiling?
Turn him over to find a hole in his back. So fix it by using the triangular block on it.
It doesn't fit? Hammer it in!
The large figurine splits apart so you can get a tiny golden figurine. He's smiling!
Now place the creepily smiling figurines in their matching slots, and push the button in the base of the green statue.
That wasn't a base at all! The statue rises from the floor and the rest of him comes into view. What did that do?
Rays
The pink poster indicates that light reflected off a mask should travel through holes into a dark room. You can see all the holes involved, so it makes sense to assume the dark room is behind the rectangular ceiling hole.
Either way, you need a source of light to shine on the mask.
So point your flashlight at it to do the thing.
As the now-blue light enters the dark room, it (lights up and) turns on the machine under the rectangular hole in the pink room. So walk over to the pink room.
Night and Day
The machine that just turned on has moon and sun buttons, and through its glass you can see hexagonal and circular holes joined by a red arrow, beneath which a miniature smiling green man holds a key.
So use the appropriate clues to unlock the machine.
The laser corridor has a circular hole at the entrance and a hexagonal hole (on the tablet) at the other end.
From the latter to the former, the 1st, 2nd, 4th, 8th laser devices are off.
Would those be moon or sun?
The posters at the door show a standing man in the day and a crouching man in the night.
Since you can only stand when the lasers are off, you should press the sun button for those lasers.
So press the RRLRLLLRL buttons, and the machine opens up, and you can finally take a bluish key from the man inside.
BLUE
Exploration
A familiar sight greets you as you enter the door: a stone tablet with a sapphire and a geometric clue over a sequence of unusual symbols. On the right is a stopped clock and a projector with a slot for a flashlight. On the left is a safe with white and black buttons.
Turn left to find a machine with a TV screen! All it displays is a colored grid. On the right, there's a safe with a simple keypad and some sort of wireless symbol.
Turn left to find the doorway back and a light switch (button) next to it which you don't need to press yet. There's a projector screen but it's both raised and tied shut. Below that, an Othello board has too many squares, one of which is red. (And some of its pieces look different...) It has cardinal directions printed on its edges, though not exactly how you'd expect. There's also a downward-pointing button next to the board that doesn't work.
Turn left to find a black door with a simple device in front. The device is labeled with weird red symbols, and has a metal cover with a button beneath that doesn't work. Next to it is another switch on the wall labeled with weird symbols above a locked purple panel. The switch is missing some sort of handle, and so you don't have the leverage to flip it.
Lookup
Let me just save you the trouble of poring over your codebook: the text on the switch reads
CLOCK ON OFF, that on the door readsLOCK, and that on the tablet readsNW→SE.Bishop
Use the clue from the tablet and game board to unlock the two-button safe.
The board is missing precisely one piece out of 81, the piece that belongs in the red square.
The tablet tells you to place a black piece there, but you don't have it.
But if you did place it there, several white pieces would have to be flipped to become black, and then the pieces along the NW-SE (LL to UR) diagonal would be WWBWBBBWB in color.
So click the LLRLRRRLR buttons and open the safe to get a roll of vinyl tape.
MacGyver
You'll need to both reach the projector screen and untie it... at the same time.
So combine the Cutter and Reacher (in either order), and then tape them together.
It's a little unstable, but good enough to cut the screen loose, and then you quickly separate the two treasures again.
The screen's still up there, so push the downward-pointing button on the wall to lower it.
Shine
Place your lit flashlight in the projector, and push its button to release light from the top, trapping the flashlight inside.
Now all you have to do is dim the lights.
Turn off the lights (and the TV) by pressing the button next to the doorway.
Then look to the screen to find a drawing of a hammer over some coded text.
And that text tells you to KNOCK TWELVE TV.
(You can figure out this clue without lowering the screen, but the game won't let you proceed without doing it correctly.)
When you're done, turn the lights back on, then turn off the projector and retrieve your flashlight.
Fourth wall
Use the hammer on the TV screen that displays the colored grid. It doesn't break, so keep going until you've hit it twelve times. (The counter resets if you back out, or save and load.)
The cover flies off the front and onto the floor, so you pick it up and find that it has buttons. It's a remote control!
You can use the remote on the TV to turn some squares red and remove some blue squares, and then you can see some sort of video going on behind the colored squares.
Maybe your remote's not set correctly? After all, there are 20 buttons there that you can turn blue (in addition to the five that are stuck on blue). You can only activate two of those at a time though.
You can also use the remote control to activate the keypad, which accepts up to six digits of input.
Duality
So you can press up to two buttons on the grid of the remote control. Which two should you press?
There's a different number of squares of each color. The only color that covers exactly two squares is black.
So press the matching buttons (2nd row, 2nd column, and 4th row, 5th column) on the remote control, and then use it on the TV again. Almost all the squares are gone, and you can watch the video quite comfortably.
Flashback
The scenes in the video are:
A bookshelf sliding and suddenly stopping, losing most of its books.
A stone head draining water into an overflowing tank whose front falls out.
An accordion device puffing smoke.
A female statue holding up different numbers of fingers on each hand.
Shurikens flying across a broken machine and onto cracks on the opposite wall.
A dung beetle rolling a ball of dirt, and then giving you a silent look.
So use the clues from each scene to unlock the (activated) keypad.
The books on the shelf form a 7, the balls from the tank form a 2, the accordion smoke forms a 3, the statue holds up 8 fingers, the shurikens fly into cracks that form a 6, and the beetle moves in a path that's shaped like a 4.
So enter 723864 in the keypad. The TV turns off (but you can turn it back on and rewatch the video), and the purple panel opens up so you can get a tiny lever handle.
So insert the handle into the wall switch, and flip it down.
A panel opens beneath, where two doors with semicircular handles are surrounded by - and + markings above shortened levers with familiar-shaped holes, and a clue with an arrow from 4 to 12.
Tick
Use the screwdrivers on the holes, and now you can click the red arrows that showed up to turn the circular centre clockwise and counterclockwise.
Remember that the lever you flipped controls the CLOCKs. So watch each of them carefully, and use their clues to unlock the panel.
All seven clocks are now running, even if they show the wrong time.
But if you wait a bit and pay attention, you'll find that two of them run backwards!
(Since the clocks only run when the game does, you can check most of the clocks by loading an older saved game in a new tab.)
The clocks, in the order that you find them, are:
Green: 4 sides, ticks forwards
Gray: 8 sides, ticks backwards
Brown: 12 sides, ticks forwards
Yellow: 6 sides, ticks forwards
Pink: 10 sides, ticks backwards.
Black (basement): 9 sides, ticks forwards.
Blue: 5 sides, ticks forwards.
But how does that give you a code?
A clock that ticks forwards has hands that move clockwise, and you rotate the disc on the panel clockwise by clicking the right arrow next to the +.
So the clocks with 4, 5, 6, 8, 9, 10, 12 sides tick in the
+++-+-+directions.Click the RRRLRLR arrows to open the panel, which now has six slots shaped like different keys. Next to it, the previously LOCKed panel now shows green symbols and has a row of six keyholes.
Of course, those symbols read UNLOCK.
Retrieve your screwdrivers by clicking on them.
Spectrum
Go back to the main room and pick up 6 keys from the keyholes next to each door.
Other than the color, the only difference between the keys is the shapes of their tips.
The brown, gray, green, blue, pink, yellow keys (that's the order that they appear in your inventory) fit in the LR, UR, UL, R, L, LL key slots in the screwdriver pane to form the letters NKOUCL in the spaces.
But placing them there does nothing, because the keys belong elsewhere.
Overkill
6 keys for one unlock? Sure, but you have to get them in the right order.
To spell UNLOCK, you have to use the blue, brown, yellow, green, pink, gray keys, which are in the 4th, 1st, 6th, 3rd, 5th, 2nd spots in your inventory.
Insert them in the panel, and push the upward-pointing button. Sure enough, the black door rises up to let you into a small room with a single green seal in it! So click on that.
Boss
As the light shimmers, you find a very large throne in the room, and a silhouetted crowned figure sitting in it.
Unlocker appreciates a good challenge after being suddenly awoken from his long slumber. Of course, he's a master at defeating locks, and he invites you to watch.
So use him on the final door, and he invokes the power of his Lemegeton. Wait, doesn't that book have demons in it?
He summons forth four leaders of Hell: Forneus, Bael, Paimon and Eligor, and they cooperate to forge a skeleton key!
It opens the final lock, so you thank him, he praises you for your faith (but his long-windedness gets cut off by the save button), and then he gives you the final treasure, a plain old key.
"It can open things that are shut, and it can shut things that are open."
And with that unhelpful quote, he fades away to take a rest. Not a very active guy, huh?
(Now that you've completed all the puzzles, you might want to save your game before the ending.)
You proceed onward to the Grail. (Oh, did you remember all your treasures? Can't possibly leave a Lighter or Driver behind now!)
But wait, it's just a white room with a poster and pedestals! The huge double doors slam shut and fade into the wall, trapping you inside. There's no turning back now.
ENDING
Exploration
You get an ominous feeling as you look around the room to find seven empty plinths. The only other thing in the room is a clue on the wall showing a tree, or perhaps a root, or perhaps a map, with various circles at the ends of several paths.
(Warning: This is the last chance to save the game. If you intend to rewatch the ending, make sure you save.)
Precious
In clockwise order on the poster, there's a large circle with the Holy Grail, then a circle with a long bendy path, then circles with a crack, a cut line, a keyhole, a plus and minus, the color black, and text-like symbols.
So make full use of your treasures to match the clues.
The poster is a map of the room, showing the three plinths on each of the left and right walls and one on the wall opposite it. Each circle on the clue matches a different treasure.
So place, clockwise from the poster, the Reacher (2), Hammer (6), Cutter (1), Unlocker (7), Driver (3), Lighter (5) and Decoder (4) on the plinths (from those last seven slots in your inventory).
The room goes dark and all the treasures glow. So you turn to face the poster, and a column of light pulsating in front of it.
Treasure
You click on the column of light, and the Holy Grail appears and you pick it up. But does it really work? There's only one way to find out. So you make a wish.
"O Holy Grail, get me out of here!"
In a flash, you find yourself surrounded by sand. A stone eye looks down from above a familiar doorway.
The Grail works! Wait, where did it go?
"It's not here." You look towards the unknown voice, and the eye projects a silhouette of a knight with a swan who introduces himself as the Grail's guardian.
He reminds you about something you knew from the very start: nobody may pass the door unless empty-handed.
Just as written in the old texts, it's impossible to leave with the Grail.
Well, you're empty-handed, so why not go back in for another chance?
"That's not possible. Someone like you who could possess the Grail, even for a moment, would not be empty-handed."
But it's as if it never happened, right?
"Well, you'll see very soon. Something that you have..."
The guardian fades away and the eye shuts. Was it all for naught?
All that hard work! All those puzzles! All the-
Hmm, could that be it? The thing that you still have? That's right, it never remained in there.
Alright, time to go home! Man, this path is long.
Your mind wanders.
Even if I were to fall into the depths of despair
Somewhere there will be a light shining
In order to chase a highly held ideal
Remove heavy shackles, sever this body's bonds
With accumulated knowledge, overcome difficulties
Break through obstacles in the way
The will to pierce through and conviction to never give up...
... the only two things gained
But I may digress. I have to open this door!
Now, let's leave this place!
Erm... why's everybody here? What are they doing?
The silhouettes ask you to wait for them so they can set off with their new master to their new castle.
Wait, they're all moving into your six-tatami room. It hasn't even been dusted yet! It can't be. The things you gained... are these guys?
They're all ready to go, and even have tonight's feast planned out. Alright then, I guess.
The screen pans up and fades out. The end! Thank you for playing!
i'm now stuck on the
light puzzle. I extended the reacher and I sdelected the lights but nothing happens.
what's the deal?
Your walkthrough is fantastic! Thank you so much for doing it! This game really needs it.
This step is described in kktkkr's walkthrough in detail, try it again and concetrate on correct lamp. It's easy to miss the right one, they are very close to each other.
There's only one
lamp and it is high and has blue lights with a green dot on the upper left. I don't see anything else.
please help.
Yes, I described that as
"a grid of blue lamps with the upper-left one lit green".
Of the 143 blue lights on that device, there's a specific one you have to click.
i'm now stuck on the
weight puzzle in the brown room. I followed the walkthrough specifically and now it says to fill and drain the water which I did. then it says attach the weight I have with the box, which again I did. I then added that to the bottom window after opening, then I selected the button at the top with the claw. all it does is go left and right and does not drop. I am confused.
Please help.
i'm stuck on the
Key positions. Based on the walkthrough I put them in correctly but see no up button. Can someone help?
ok finally finished it. some of the things were hard to figure out. One thin for those that are interested
based on my help a couple of posts ago on the machine with the weight. The walkthrough must be done exactly. If you get in a hurry and drain it before positioning the bucket, you can no longer get the bucket back and you'll be stuck permanently unless you reset.
this is why I was having trouble. anyway great walkthrough as usual kk.
Update