

![]() Good morning, JIG team. Your mission, should you choose to accept it, involves the recovery of five stolen candy pieces. But, before you can get to said sugary wealth, there are two other rooms you must break out of. A gauntlet of codes stand in your way. This mission isn't difficult, it's...well, it isn't. Now, you have 30 minutes to make your escape.
Good morning, JIG team. Your mission, should you choose to accept it, involves the recovery of five stolen candy pieces. But, before you can get to said sugary wealth, there are two other rooms you must break out of. A gauntlet of codes stand in your way. This mission isn't difficult, it's...well, it isn't. Now, you have 30 minutes to make your escape.
 Get Out - Here's a simple, stripped to the basics escape-the-room game from No 1 Game. Get Out requires you do just that, given a limited number of resources at hand. While there are three possible endings, it all plays out rather linearly and it's not a new concept, so it ends up being a flash fast venture. Still, despite how little is actually happening here, it's gratifyingly satisfying to play. You're like a super suave no-mission-is-impossible type secret agent, trapped by some dastardly villain, slickly solving your way out before the train runs over your sweetheart.
 Wheel - from Rose Key has a bit more style in its decor than Get Out and should be especially appealing to those who cherish that plastic decoder ring, still smelling slightly of the Chex cereal you begged your mom for a week to buy. On the other hand, a few rather esoteric puzzles—logical in their own right despite vague clues and heavy reliance on lateral conclusions—might make Wheel less charming to the rest of you, who were content merely with eating inexplicably crunchy marshmallows and sneaking handfuls of alphabet-shaped oat bits to the dog. Either way, it's solid enough to warrant a try, an especially good time waster to charge up the brain cells.
 Candy Rooms No.9: Dark Violet Pop - FunkyLand continues construction on the dreamiest pads ever imagined. Just find five pieces of candy and trade them in for a key: rather simple, all told. Even amateur sleuths could solve it in a jiffy. Instead, a bigger mystery comes to mind: "What's the deal with this music?" Okay, sure, it's funky, but in a weird, annoying kind of way. Ironic considering the pop music theme. Just hit the BGM off button and put on your own jams (my pick: "When Doves Cry"). Nevertheless, the eye-pleasing imaginative design is worth a little ear distress.
P.S. If you want the whole house to go, you can also download the iOS version of Candy Rooms on your mobile device.
We love escape games, and our readers love talking about them and sharing hints! How about you? Let us know what you think, ask for clues, or help out other players in the comments below.


Walkthrough Guide
(Please allow page to fully load for spoiler tags to be functional.)
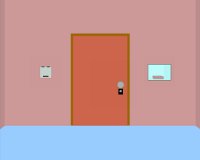
Get Out Walkthrough
Press on "English" to change the game to English. (Menu should show "Japanese")
1. Go right and Click on the fan's dial.
2. Press on the Switch to take it.
3. Back out and turn left. Click on the small rectangular box on the left side of the door.
4. Click to open the hatch and use the Switch on it.
5. Turn it to "WOW". The room will shake.
6. Back out and go left once.
7. Take the Shovel and Hammer.
8. Go Left twice. Use the Hammer on the cracks on the ground around the bottom left of the screen.
9. Click on the newly formed hole and use the Shovel, revealing a black safe.
10. Examine the Shovel. Use the Hammer on the Shovel's handle and receive a Shovel with Key.
11. Use the Shovel with Key on the black safe. Get Sturdy Small Box and Bomb.
12. Back out and turn left. Use the Hammer on the glass panel on the right side of the door. Press the red button. (This turns on the electricity.)
13. Examine the Hammer. Click on the handle 3~4 times and receive a Hammer with Key.
14. Back out and turn left. The fan is now operating. Zoom in to the dial and turn the fan to HI.
15. Click on the back of the fan and get A Part of Note.
16. Back out and turn left twice. Click on A Part of Note on the ground.
17. Combine the Part of Note together and get a Note.
18. Turn left and press on the number lock.
19. Use the numbers from the Note and press on the white button. The hatch will reveal a keyhole.
20. Use the Hammer with Key on the keyhole.
21. Back out to see that the large safe is opened.
END 1 (BAD END):
Insert the Bomb in the large safe and wait for the timer to end.
END 2 (BAD END):
Insert the Bomb and lock the safe using the Hammer with Key.
Wait for the timer to end.
Open the safe again and click on the white rectangular box to replay.
END 3 (GOOD END):
Do the same thing as END 2, but put the Sturdy Small Box in the large safe before closing it.
After the timer ends, open the large safe and take the Key.
Go right twice and use the Key on the door.
Posted by: buding |
May 14, 2014 8:20 AM
|
May 14, 2014 8:20 AM
Wheel Walkthrough
The Three Differences Drawer (CLOCK VIEW)
The draw locked by a spot-the-difference puzzle doesn't seem to require any clues. You should be able to find the differences without too much trouble (You MUST click on the upper picture, the bottom picture doesn't register your clicks).
The three differences are:
-Purple flower in the top-left.
-Purple flower in the middle/upper area.
-Pink flower in the bottom-left.
Once the drawer is opened, collect the Z tile
Clock & 4 Digit Color Drawer (CLOCK VIEW)
Inspecting the clock closely, you should be able to do some interesting things.
Click on each of the colored balls. Four of them should be able to be pushed in.
Using the information from the clock, you should be able to open the 4 digit color drawer underneath.
Use the position of the pushed in color ball on the clock as the digit for the corresponding color on the drawer.
The code is 3 10 8 5.
Once the drawer is open, collect the mug and the scroll.
Scroll & Code Wheel Drawer (DESK VIEW)
Take a closer look at the scroll and unfold it.
The scroll has VII, a green arc, and a dollar sign.
Using the information from the scroll, you should be able to open the code wheel drawer.
Line up VII, the solid green arc, and the dollar sign, then press OK.
Once the drawer is open, collect the green book and the red book.
Red Book, Calendar & Star Sign Arrow Drawer (DESK VIEW)
Take a closer look at the red book and its contents.
The red book has this information:
Capricorn: 16, 10, 4
Pisces: 16, 9, 2
Gemini: 16, 15, 14
Leo: 16, 22, 28
Take a look at the calendar and the numbers on it.
The number 16 is circled.
Using the information from the red book and the calendar, you should be able to open the star sign arrow drawer.
For each set of numbers in the book, imagine drawing a line to connect those numbers. The direction of the line corresponds with the direction of the line underneath the star sign on the drawer.
Going from left to right, the directions of the arrows are top-right, up, left, bottom-left. Press OK.
Once the drawer is open, collect the key
Green Book, Painting & 4 Digit Box (WINDOW VIEW)
Take a closer look at the green book and its contents.
It has a vertical pattern of green, blue, pink, orange.
Take a look at the painting and the numbers.
Using the information from the green book and the painting, you should be able to open the 4 digit box.
There is only one part of the painting that matches with the pattern shown in the green book. The numbers in this vertical line should be used on the box.
The code for the box is 5894.
Once the box is open, collect the C tile.
Mug (INVENTORY)
Take a closer look at the mug, and see if you can find another item concealed on it.
Click on the mug once in the close up view to turn it over.
Collect the Z tile
Key, Shooting Stars & 3 Star Lock
Use the key on the window. Watch the pattern of the shooting stars carefully.
The gold star draws a Z, the pink star draws a N, and the purple star draws a C.
Using the information from the shooting stars, you should be able to place the three letter tiles correctly on the 3 star lock.
The pattern of the colored shooting star corresponds with the letter placed on that color.
The order of the tiles is ZNC. Press OK.
You've escaped! Congratulations!
Posted by: thegreatescaper |
May 14, 2014 9:18 AM
|
May 14, 2014 9:18 AM
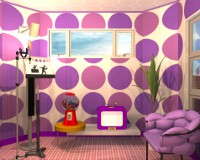
Candy Rooms 9: Dark Violet Pop Walkthrough
Big (flat) lollipop
Look at the music stand in the alcove on the left wall. Note the drawing.
Look at the TV on the low table (next to the gumball machine). Make the picture match the drawing.
Get the microphone and put it into the stand (next to the music stand).
Wrapped gummy candy
Look at the base of the lamp on the coffee table.
Hard candy
Examine the left speaker on the back wall.
Round lollipop
Check out the lamp to the right of the door.
Gumball
Get the glasses from the frog sitting on the couch.
On the back wall, to the left of the mixing equipment, there's an indentation in the wall. Look at it using the glasses. Note the code.
Put the code into the box on the coffee table. Get the record.
Put the record on the left turntable (back wall).
Rotate the record to match the key to the keyhole. Get the coin.
Use the coin on the gumball machine (alcove on the left).
Posted by: Reka |
May 14, 2014 8:03 PM
|
May 14, 2014 8:03 PM