
![]() We probably should stop meeting like this. I know what you're here for. You know what you're here for. But first the glance, the meeting of eyes, a little repartee and, perhaps, a shared chuckle... this is the dance we do to pretend we're all cool, just casually browsing the web for informational and intellectual enrichment. And, oh hey, here's a few escape games that I happened to stumble upon from Tototo Room, Neat Escape and Yomino Kagura. I know you're really busy with your important worky work stuff and other meaningful things us responsible grown-ups do, which you'd totally never shirk for just playing around. But, you know, when you get around to it. Since they are free and already right here, just a few I thought you might like. One little click or two is no big deal, right? It's not like it's going to be a habit or anything...
We probably should stop meeting like this. I know what you're here for. You know what you're here for. But first the glance, the meeting of eyes, a little repartee and, perhaps, a shared chuckle... this is the dance we do to pretend we're all cool, just casually browsing the web for informational and intellectual enrichment. And, oh hey, here's a few escape games that I happened to stumble upon from Tototo Room, Neat Escape and Yomino Kagura. I know you're really busy with your important worky work stuff and other meaningful things us responsible grown-ups do, which you'd totally never shirk for just playing around. But, you know, when you get around to it. Since they are free and already right here, just a few I thought you might like. One little click or two is no big deal, right? It's not like it's going to be a habit or anything...
 Button Escape 20 - by Tototo Room came out a bit earlier than the last find-the-button game we featured in Weekday Escape (but you probably guessed that already, given the subtle signs, like the number "20" and such, we escapers being a brilliant crowd and all). Like before, all the gameplay centers around uncovering and clicking on 11 buttons to open the door. You'll see them under things and on things and, happily enough, secreted away behind locked cupboards giving ample opportunity for all that good decoding we love to do. The puzzles here are twisty enough to involve lateral thinking without holding you up. Yes, it's as much fun as Button Escape 22. We're sorry we took so long to come around to Tototo Room but just think of it like we've DVR'd them, now taking our time playing through.
 Escape from the House with a View of the Sea - from Neat Escape indeed has a pretty keen seaside vista to behold, but the inside of this shack seriously needs a visit from the designing divas. In realtor speak, this place would be called "quaint" and "full of character", read: a tad bit pixel-hunty and a couple less-than-intuitive tasks (a strange device, a hydroactive sheet, and so on). Yet it's remarkably able to deliver a satisfying escape-the-room quickie, engaging the brain long enough to give substance and polished enough for visual appeal—sized right to transition from buttons to diamonds.
 Escape from the Room of the Diamond Apparatus - Yomino Kagura's formula is readily identified the moment you enter, with a smattering of standard puzzle techniques, as straight-forward as doing simple addition, and still it manages to make the puzzle-solving aspect as gratifying as ever. There's a changing cursor and no fussy pixels, although a needed item hidden in plain sight might still be overlooked. Though Escape from the Room of the Diamond Apparatus doesn't have the complexity the title tends to promise, there is a quiet enjoyment in well-implemented puzzles that flow smoothly from one task to the next.
We love escape games, and our readers love talking about them and sharing hints! How about you? Let us know what you think, ask for clues, or help out other players in the comments below.


Walkthrough Guide
(Please allow page to fully load for spoiler tags to be functional.)
Button Escape 20 Walkthrough
Button numbering (see the indicator board above the door)
1 2 3 4 511
6 7 8 9 10
Buttons, in roughly the order I found them
2.
Click the toothy monster's eye.
8.
Open the toothy monster's mouth.
7.
Move the toothy monster's foot.
5.
Lift the gray rock on the shelf.
3.
Click the rolled-up red carpet under the table, then click the end that opens.
11.
Zoom in on the paintbox on the floor.
4.
Lift the life vest (well, what else could it be?) on the small white table, then lift the table.
10.
Click the rolled-up banner on the wall to the right of the door.
6.
Note the "RYGB" on the banner. Click the red door and enter the code. Colorblind: 6 clicks, 3 clicks, 1 click, 2 clicks.
9.
Note the symbols behind the red door.
-x0x0x-
Click the eyes of the "scream" statue and notice what symbols they make.
Left eye (as you're looking at it) = dash, right eye = X
Click the eyes & mouth according to the code.
left, right, mouth, right, mouth, right, left
Notice the number: is it backwards or upside-down?
Click and hold the nose of the statue and notice what happens to the code.
1320
Put the numbers into the blue door. Get the key.
Use the key on the "Museum" sign.
1.
Note the writing on the back of the museum sign. Combine with the front of the sign to get a four-digit number.
If MU = 69, then what does UM equal?
6996
Use the number on the red box on the shelf. Wait for the figure to wake up and move.
Exiting: don't forget to hit the "OPEN" button above the door.
Posted by: Reka |
August 6, 2014 2:25 AM
|
August 6, 2014 2:25 AM
Diamond Apparatus Walkthrough
Exploring
Door view
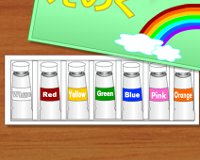
There's a box on the round table with a diamond on top and three buttons in this designer's usual primary colors. (Colorblind: red, blue, yellow)
TV/wardrobe view
Open the top of the wardrobe. Note the diamonds on the top shelf. (Colorblind: blue yellow blue yellow yellow red)
Get the red circle from the bottom shelf, and note that the box will want you to add two circles. (The circle you just collected doesn't seem to be one of them, however.)
The bottom of the wardrobe is locked.
The TV probably needs a remote.
Picture view
It's a wobbly picture with a quarter-note on it.
Couch view
The couch has a big red circle with the number 130 in it.
On the coffee table is the usual checkerboard box with slots for three shapes. You can go ahead and put your circle there, if you want.
Solving
Diamonds
Use the code from the top of the wardrobe to open the box on the round table.
middle, right, middle, right, right, left
Get the key.
Wardrobe
Use the key to open the bottom of the wardrobe. Note the big blue circle with 53 in it. There's also a box with a blue square on it.
Adding circles
Use the two circular numbers you've found to open the box in the top of the wardrobe.
130 + 53 = 183
Get the blue square.
Square
Look at the square you just found. Flip it around and note the writing. 9IL? That doesn't look too useful, but what if it's not the right way up?
Turn it upside-down (in your head) to get 716.
Use the code to open the box in the bottom of the wardrobe. Get the remote.
Wobble wobble
Use the remote to turn on the TV: it's a quarter-note, that looks familiar. Observe the numbers in the corners. Click the corners of the wobbly picture according to those numbers.
TL, TR, TL, BL, TR, BR
Get the yellow triangle.
Last box
Put your three shapes into the checkerboard box on the coffee table. Get the key and use it on the door.
Posted by: Reka |
August 6, 2014 11:56 AM
|
August 6, 2014 11:56 AM
Sea View Escape Guide
It may be helpful to note that all of the Japanese phrases are followed by English translations, including "About Item" descriptions, in case you aren't sure what something is.
Left Right Code locked box
Find the Left-Right Code on the Door.
Use the grey panes for your clue.
L R L R L L R R
Picture
Find the PAPER behind the picture
Click the right side to move the picture right
Shaved Ice
Find the ICE in the freezer.
Zoom in on the outlet beside the low cabinet to use the EXTENSION CORD
Press the power button on the ice machine that you just plugged in. Use the ICE on the machine.
Take the shaved ice and wait for it to melt. Look it again and it should be a bowl of water.
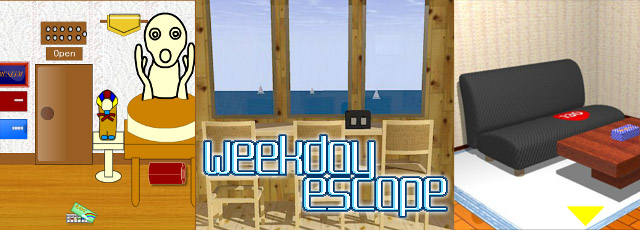
Green Numbers
Combine the water and the paper to get the code for the Green Numbers box.
Red Numbers
Use the telescope to get a closeup view of the yachts reflected in the window. One of them will have the three-digit red code
Exit
I know it's too soon, but this red key is actually the exit key. More time to enjoy the view, I guess.
Posted by: JudyJetson |
August 6, 2014 11:57 PM
|
August 6, 2014 11:57 PM