
 Folks, it's Wednesday, and you know what that means - time to escape! The folks at Ichima have been clearing out their closet and have found lots of old-school goodies to include in one of their latest escapes. A random stranger challenges you to unlock a secret in MouseCity's arcade, and Esklavos send you into a robot-led future and leave you with the task of saving the world. No problem-o, right?
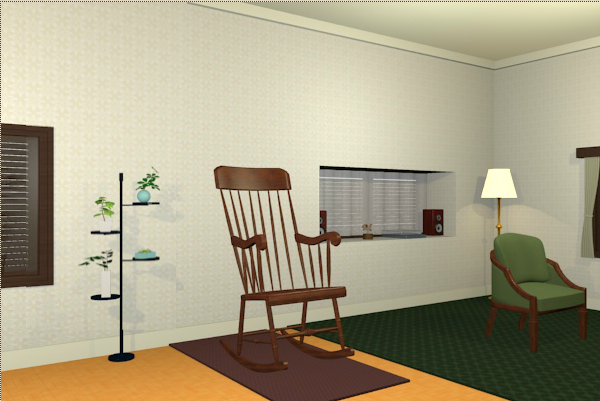 Ichima Room 17
If you've ever accidently locked yourself in your grandmother's apartment, you might get an eerie sense of familiarity from the scenario presented to you in Ichima's Room 17. Navigate your way around this distinctly vintage apartment to escape and enjoy the nostalgic touches you'll find on your way. There's one puzzle that is much easier if you can read Japanese text, but it is still solvable with a little symbol matching and trialling.
Ichima Room 17
If you've ever accidently locked yourself in your grandmother's apartment, you might get an eerie sense of familiarity from the scenario presented to you in Ichima's Room 17. Navigate your way around this distinctly vintage apartment to escape and enjoy the nostalgic touches you'll find on your way. There's one puzzle that is much easier if you can read Japanese text, but it is still solvable with a little symbol matching and trialling.
 The Shadow Realms Arcade
Being stuck in a game arcade after everyone has left may be a dream for some old-school gaming fans, but when it's a creepy-looking arcade with a gypsy machine in the OFF LIMITS back room, it might become less of a dreamy situation. So just make your way out and don't look in the OFF LIMITS back room. Because, you know, there might be a reason that it's OFF LIMITS.
The Shadow Realms Arcade
Being stuck in a game arcade after everyone has left may be a dream for some old-school gaming fans, but when it's a creepy-looking arcade with a gypsy machine in the OFF LIMITS back room, it might become less of a dreamy situation. So just make your way out and don't look in the OFF LIMITS back room. Because, you know, there might be a reason that it's OFF LIMITS.
* sigh * You're going to look, aren't you?
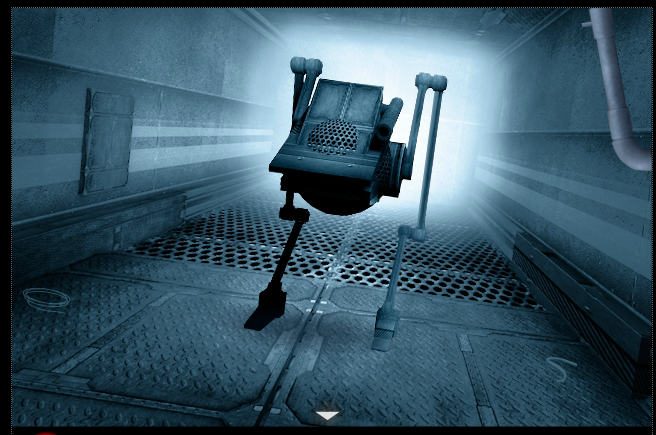 Robot Nest Escape
Ever wondered what you would do if you were captured during a robot uprising? Here's your chance to find out! In this short escape from Esklavos, your task is to escape from the heart of a gloomy facility and destroy the heart of the robot uprising. Engage your inner Will Smith and be prepared to destroy!
Robot Nest Escape
Ever wondered what you would do if you were captured during a robot uprising? Here's your chance to find out! In this short escape from Esklavos, your task is to escape from the heart of a gloomy facility and destroy the heart of the robot uprising. Engage your inner Will Smith and be prepared to destroy!
We love escape games, and our readers love talking about them and sharing hints! How about you? Let us know what you think, ask for clues, or help out other players in the comments below.


the japanese star puzzle in ichima room 17 is actually pretty easy. the code is made up of the
only numbers without grams or any other symbol next to it on the paper under the toaster. i ended up just randomly plugging those in.
the code is 142
hope a walkthrough for all 3 games are in the works
Lots of keys in this game, so keep track of where keys are needed.
Looking around, going clockwise
Rocking chair side
Look at the plant stand. Notice
the shapes and colours of the pots
Click on the rocking chair. It rocks, but nothing happens.
There's a dog-thing and what looks like a record player in the alcove. The record player has a W->B puzzle to open it.
Couch side
There's an album on the table that needs a key.
There's a drawer on the side of the table with a hint inside
Salt 3 5 7 8
Pepper 1 2 4 6 9
The chest has a lock that needs 4 numbers.
On top of the chest there is a locked clock.
There's also a dog picture with numbers on the back: 1 2 3 4 3 2 1
And a puzzle with 2x3 squares that can be clicked.
TV side
There's a locked door in the left-hand corner.
There's a TV.
Click on the red button. A rocking chair appears. There is a vertical line of buttons, but they aren't clickable.
Below the TV is a cupboard that's closed, but there's no lock on it.
There's a picture with what looks like a QR code in the corner.
Click on the QR code. It's a maze.
There's another locked door in the right-hand corner.
Table side
There's an egg with an S on it. The egg can be clicked but not taken. There's a button to the right of the egg but it can't be clicked.
There's a tall cabinet with an arrow puzzle in the middle.
On the bottom of the cabinet, there's a puzzle with four buttons with a letter G that can be moved around.
There's a locked white door to the left of the cabinet.
Solving puzzles
TV and rocking chair
Try rocking the chair a few times.
Look at the TV. A few squares are marked in red.
Go back and rock the chair enough times that all the TV squares are marked red.
Open the cupboard below the TV. Take the HANDLE.
QR maze and arrow puzzle on the cabinet near the table
Click the arrows that match the directions you move when solving the maze.
Up right up right down right up left up right up
Take the PINK KEY after solving the puzzle.
Notice the white and black rabbits bookending the books.
W->B puzzle on the record player
Use the heights of the books between the white and black rabbits after solving arrow puzzle on the cabinet.
It's not the total height of the books.
Draw a horizontal line at the level of the shortest books and use that as the bottom level.
1 0 2 3 1 2 0
Open the record player
The clock puzzle
To unlock the clock
Use the PINK KEY from solving the arrow puzzle
Click on the button inside the clock. A new puzzle appears, shaped like the plant stand near the rocking chair.
Set the pictures with the shapes and colours of the plant pots.
Take the ROUND WHITE KEY after solving the puzzle.
The locked white door in the table side
Use the ROUND WHITE KEY.
Take the P EGG.
Where have we seen another egg?
On the table. Place the P EGG nest to the S egg. They are both clickable now.
S and P ...
Use the Salt/Pepper clue from the table drawer
Click them in the order given by the numbers
P P S P S P S S P
Take the RECORD after solving the S/P puzzle.
The word GAURFE can be clicked. It rotates.
The letter G moves from one position to another
Use the order of the positions to solve the G puzzle at the bottom of the cabinet on the table side
Right Top Left Bottom
Take the YELLOW KEY after solving the G puzzle.
The RECORD and the album
Go back to the record player and place the RECORD. Click on the playing arm and the dog will rotate a bit. Take the SQUARE WHITE KEY.
Use the SQUARE WHITE KEY from the record player to open the album.
There are 4 pages with 6 pictures on each page arranged 2x3
Notice anything about the pictures?
One picture on each page doesn't have a border.
Go to the 2x3 puzzle
1 = top right TR
2 = bottom left BL
3 = top middle TM
4 = top left TL
Try clicking the boxes in the 2x3 puzzle in the order indicated by the album, 1 2 3 4.
TR BL TM TL
Doesn't work.
Did you notice the same picture of the dog in the album that's above the 2x3 puzzle?
The clue was 1 2 3 4 3 2 1, TR BL TM TL TM BL TR
Take the BOWL after solving the 2x3 puzzle.
The locked door to the right of the TV
It's a kitchen
There's a star puzzle on the drawer. It wants 3 numbers.
There's a paper under the toaster. It has a star and what looks like a recipe with the numbers 2 1 and 4 next to three of the ingredients
Use those numbers for the drawer puzzle. I had to brute force it.
1 4 2
Take the DOOR STOPPER
Turn on the water and put the BOWL in the sink.
Take the bowl back. It's filled with little balls. Put the balls in the tray next to the sink.
Click on the tray.
Numbers 6 1 8 2
On the shelves, there's a little tin with a clue on the lid
Start 1
R4 -> L7 -> R2
Click the door to exit
It won't open. We're stuck!
Click the step stool and turn off the light.
Now the door will open but we still can't get out.
Place the DOOR STOPPER
Turn the light back on and leave the room
Opening the cabinet with the numbered lock in the sofa side
Use the numbers from the kitchen
6 1 8 2
Open the cupboard and place the HANDLE and click it.
The couch separates and reveals a box with a combination lock
Use the combination from the kitchen
Start from 1. Go right to 4. Go left to 7. Go right to 2.
Take the YELLOW KEY.
Use the YELLOW key on the door to the left of the TV.
And OUT!
*Gasp*
Barbara, which game is that for?
Hey Paul - that walkthrough is for Room 17. Nice job, Barbara!
I didn't remember the name Robot Nest Escape but the picture brings it back...glad to see it published though, might even play it again sometime.
well I hope the other 2 walkthroughs come soon :)
Robot Nest Escape
Most interactions in this game require an empty hand. If you aren't using or combining objects, remember to click on "handle" or click your current item to deselect it.
Entrance
Take the hook and click the light to move forward. Take the rope and piece of wire from the floor, then go back.
Combine the hook with the rope, and use it on the shining spot on the floor to get a screwdriver. Use the screwdriver to pry open the panel on the right and take the gloves. Move forward again.
Using the screwdriver, pry open the panel on this screen too, revealing the end of a short cable. It's too short to be useful, but we can fix that:
Use the piece of wire on the short cable, and use gloves to attach it to the robot.
Click the light again to move forward.
Take the pliers from the floor, in the right back corner. Go back, use the pliers on the robot to get a digital key, then move forward again.
Click the panel on the left. There are four holes in the panel. Use the digital key on the second hole from the bottom.
Level S, I mean 2
Back up twice to leave the elevator. Pick up the valve and awl from along the right wall. Read the note on the left:
(in upper left corner) CEFGJK
Sun 2 Spark 3 Moon 2 Leaf 1
Eye 3 Wave 2 Fire 2 Down 1
Go back in the elevator and use the key on the bottom hole to return to the lower floor.
On the screen with the robot, attach the valve to the pipe in the upper-right, and click it to turn it. Make your way back upstairs.
Click the burner in the center of the room, lighting it. Use the awl on it before it burns out. Now you have a very hot awl. Make your way back downstairs.
Return to the first screen, and use the hot awl to loosen a microchip from the right panel. Make your way back upstairs.
Unscrew the panel below the screen, and click it to take a closer look. Remove the burned chip with your awl, replace it with the one from your inventory, and solder it back with your awl again. Close out of the view, and zoom in on the screen.
The screen displays EMBRYOS and a bunch of checkboxes labeled with capital letters. Use your key on the hole to the right of the screen, and click the correct checkboxes:
Follow the letters from the note: C, E, F, G, J, K.
Retrieve your key, and take note of the color code on the bottom of the screen. This changes every playthrough, but should only contain the colors black, blue and white.
Return to the elevator and use the key on the third hole from the bottom.
Robot storage
Click on the pair of panels on the back wall. There's a key-hole labeled 4 (or whatever alien symbol represents the fourth floor), and below it there are seven sliders with white lights above them.
Use the sliders to reproduce the color code from the screen downstairs. The colors on each slider are (from top to bottom) black, blue, white, red, green.
Use your key on the keyhole, and close out of the view.
Click the stack of two boxes. A code panel shows up, requiring us to draw on an 8x8 grid of squares. But what to draw?
Go back to the second level and refer to the picture on the back wall, in the left corner.
Three black 2x2 squares in the 4th and 5th column, separated by one white row each, and then a black close (square) bracket to the left and open (square) bracket to the right, each 2 pixels wide and 8 pixels high.
A metal artefact appears on the lower box. Take it and go back to the second level.
Use the artefact on (the indentation in) the left platform. A bomb pops up of the platform! Return to the third level.
Place the bomb in the center of the room. Click on it and solve the puzzle to arm it.
The circles connect when they are close enough, and the number on each circle is the number of neighbors it connects to.
The number on each circle needs to match that on the note, so Spark and Eye need 3 neighbors each, Leaf and Down (triangle) need 1 neighbor each, and the others need 2 neighbors each.
There are several solutions, here are just some of them:
<|> [: Move Eye so it connects to each of Sun, Spark and Moon. Move Wave to connect to Flame only, then Leaf to connect to Wave.
-<=>-: Arrange all the symbols except Leaf and Down in a large loop, each of them getting a number of 2. Connect Leaf to Spark only and Down to Eye only.
_[]_: Place Leaf-Sun-Spark-Eye-Wave-Down in a line, then connect Spark-Flame-Moon-Eye, making a cowboy hat.
-<| |>-: Arrange Spark, Sun, Moon in a triangle (each connecting to the other two) and place Leaf to connect to Spark only. Then arrange Flame, Eye, Wave in a triangle and place Down to connect to Eye only.
|[|]: Set Leaf and Down aside, connecting only to each other. Arrange the others in a 2x3 grid so that its connections form a 日 or Ө shape. One possibility for arranging the symbols is as follows:
Sun - Spark - Flame
Moon - Eye - Wave
[]-|: Form a 모 shape by placing Leaf-Eye-Down, then connecting Spark to Eye, and completing a loop with the other four symbols. It looks kind of like a bomb too.
It's time to leave. Enter the elevator and use the key on the topmost button.
Pew pew!
Upon leaving the elevator, you face one last problem: the exit is on a lower floor, too far down to jump, and the other items are guarded by lasers.
Use your pliers to retrieve the hand laser from the right side. Point it at each of the three panels in the top middle of the screen. When all three panels are lit (simultaneously), pull the lever on the left, deactivating the lasers.
Take the rope at top left and tie it to the handle on the right. Click on the exit door. You have escaped, and blown up a robot nest!
i don't know how to
activate the bomb in Robot Nest. I tried every suggestion but nothing works.
Technically, this game is beatable in less than 15 seconds!
The Shadow Realms Arcade
Let's start with some exploration, with the help of our nifty changing cursor!
We have a bunch of old machines and no tokens to play them with. Let's start by poking around near the counter for spare tokens...
There's a blue arcade cabinet on the left, or at least the back of one. The back panel is screwed down.
There's a cash register on the counter, but it needs a three-letter code. Weird.
There's a mystery box on the counter too, and it takes a three-digit code. Now what's a green/yellow/orange digit?
Hmm... no luck here. Check through the arcade machines.
There's a Love Tester here. It needs a gold token, which we don't have.
(Click the right edge to go to the next screen.)
There's a Whack-A-Zombie on the left. It needs a silver token, which we don't have.
There's also a switch box above it which is locked by some color code.
Then there's a vending machine. It looks like it takes coins which we don't have, but the changing cursor tells us that it doesn't. The drink options are numbered, but not in the usual order.
And on the far right, there's Polybius, which doesn't use coins or tokens. What does it run on?
(Click the blank area in the middle to go to the next screen.)
So many machines. According to the changing cursor, none of the others are really worth playing.
(The arcade machines named Vortex Point and Zombie Mall are named after other games from this developer. Other than Polybius, I don't recognize the rest of the names.)
No tokens here, but there's a screwdriver poking out from the bin. At least that's useful.
Oh look, a locked door. "No Entry"? Access only by combination code? Green glow under the door? There's got to be some amazing stuff happening in this OFF LIMITS back room!
Okay, enough exploring. Let's go back to the counter and start solving puzzles.
We could use up this item we have.
Unscrew the panel from the arcade cabinet from the first screen. There's a note inside.
***879.Is that the whole code? (No, it isn't.)
Did we find any green digits?
The drink options and numbers from the vending machine were:
Grape 3, Banana 5, Pear 7, Cherry 8, Orange 4
Enter the digits on the [?] box:
Green Yellow Orange = 7 5 4
Sproing! A gold token! Nice! Now what can we play with this?
We're spending our hard-earned token on Love Tester? But it's not even a game! And I wouldn't trust an arcade machine to-
Clink! Ding ding ding ding ding ding ding ding!
I guess your love is Burning, Wild and Mild.
Enter B, W, M into the cash register.
Ka-ching! A silver token! Maybe this game will be more fun.
Whack-A-Zombie! Or don't, because there's no mallet to whack them with.
It seems like only half the zombie heads are popping up.
Green, blue, purple. Green, blue, purple. Green, blue...
It looks like we're out of tokens already. Try something other than the arcade machines.
That switch box had some unusual colors on it.
Black, White, Orange, Dark Blue, Light Blue.
I don't think we've seen those colors anywhere, which means it's probably staring me right in the face. I don't think black is going to be in the code though. Just a hunch.
A band of horizontal colored stripes runs across the wall on the first and third screens.
You might have to turn up the brightness to see the colors, and even then they might not match what you'd expect. The code is
Dark Blue
Light Blue
White
Orange
Dark Blue
(which is 3,4,1,2,3 clicks from black.)
Inside, there's another puzzle.
Each of the six buttons is a different color when lit:
Red Green Blue White Yellow Purple
Which ones need to be lit?
Those six colors appear on the Whack-A-Zombie machine, but only some of those zombies were whackable.
...blue, purple. Green, blue, purple. Green,
Oh right. Turn those three lights on and the others off.
We're back on the second screen. What did that do?
Polybius has turned on, and it looks more ominous than ever. It's got a blue screen (of death?) and four colored buttons below it:
Orange Green Yellow Blue
Looks like it needs a sequence of three colored buttons as its "password".
Check the pixel art above the counter: Banana, Orange, Pear.
Press the yellow, orange and green buttons in order.
A code appears.
Half of it, actually. But we have the other half.
Password from Polybius:
575 XXXNote from inventory:
*** 879Enter 575879 into the keypad near the door.
And we're out! I mean, in!
That was a very entertaining walkthough.
KK i'm stuck on Robot's Nest
as I mentioned, I can't find a way to make the bomb. every suggestion listed I can't get. Maybe you could make screenshots to the formation of the icons so it'll be easer to make
@Paul, I've got some screenshots (it took a while) for that puzzle:
http://imgur.com/a/lDBjJ
I suspect my symbol descriptions might not be clear enough, so tell me if that is the case.
Update