
 Assemble, escapers! Stand in line. You are all here because you are the cream of the crop. The escap-iest of escapers. You are the best. So don't let me down!
This week, Vitamin Hana has locked us up with some little piggies, whose only crime was cuteness. Primera has a tasty 'deconstructed' burger on the menu. And Amajeto thinks that you need some alone time - so much so that they are going to force it upon you by locking you away at Hotel Solitude.
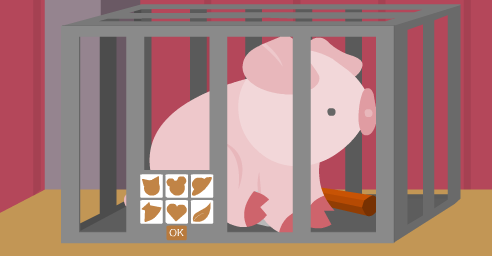
Three poor little pigs have found themselves locked in three very tight cages! Look at their poor snuggly little faces... we just have to take pork off tonight's menu and set them free. Once you've set them free, you also need to set yourself free!
 Burger
Hungry? Good! Primera has a tasty burger for us... but this ain't no restaurant, folks. We have to hunt down the ingredients and assemble the burger before we can chow down and escape. In standard Primera fashion, you'll be unlocking a stack of code-locked boxes to locate your ingredients. Mmm, this IS a tasty burger!
 Amajeto Hotel - Solitude
Sometimes life is just too busy. Too many people, too many things to do, too many places to be. Amajeto has the perfect solution - a huge hotel room with a gorgeous city view all to yourself! Unfortunately they think you should be alone forever, as they've locked you in the room. If you ever want to talk with a human being again, better get escaping!
Uh oh... you're hungry for an instant burrito but someone forgot to clean the microwave! Now where did you leave those cleaning supplies? Probably in one of those locked cupboards. And I bet it's the last one. Sigh. Better get unlocking!
We love escape games, and our readers love talking about them and sharing hints! How about you? Let us know what you think, ask for clues, or help out other players in the comments below.


The third image links you to a MayMay game.
can't wait for the walkthroughs to these
Free the Pigs!
And break more than three things along the way!
Exploration
You start off facing the door of the barn, locked of course. There's a lock next to it with four dice faces in a grid. (I guessed this code on my first playthrough and finished the game instantly, so I had to replay to free the pigs.) To the left of it, a pig is locked in a cage, together with the end of a stick and probably whatever's on the other end. The lock has six symbol buttons in a grid. Above the cage and next to the door, there's a rather insignificant window which (spoilers) is actually rather significant.
Turn around, and your field of view is now closer. The three windows on this screen have their top and bottom sides colored red, green and blue. They also differ from the other sides in that you can see the grain on the wood. The blue window has some blue markings covered up with dirt. There are also a cabinet that looks like stacked boxes walled in, or rather planked in, inside a pen. And of course, there's a pig locked up in another pen with a lumber saw. The lock for this pen has three buttons that cycle through different green arrows when clicked, four counter-clockwise arrows from lower-right and then four clockwise arrows from upper-left.
Head out the side door and take a look at the yard, which has some annoying weeds growing in the center among the neater grass, as well as three less annoying groups of yellow metal bars in the fence among the silver ones. There's a water trough on the right, and on the left there's also a pig locked in a cage with a broom. The lock requires a sequence of three colors.
It should be clear which of the three pigs to save first...
Colors
Use the colors of the window planks to unlock the cage in the yard.
Make the buttons red, green and blue (1, 2, 5 clicks), then click OK.
Click on the pig to free it (and get a cutscene!) and then pick up the broom.
Sweep
Use the broom on the weeds, leaving three curved hoof tracks which you can click on to zoom in.
Arced
Use the clue from the hoof tracks to unlock the pig pen.
It's too confusing for me to type out, but just click the buttons 4, 3 and 2 times.
Open the pen, click the pig (cutscene!) and then pick up the saw.
Chopped
Hmm, there are no trees here. Instead, cut down the colored planks from each window, as well as the long planks below those.
Those were conveniently covering up two locks on the cabinet, which now you have to solve. The top drawer lock needs a three-digit code (in bright yellow digits!), and the bottom drawer lock needs a sequence of red, green and blue buttons.
Unchopped?
Use each of the pairs of colored planks on the long planks to put together a ladder. But there' no way to attach the ladder planks together yet, and the planks are all jumbled up.
Twice the colors
...twice the code. Use the colors from the ladder to unlock the bottom cabinet drawer.
From top to bottom, the planks are Red Blue Red Green Green Blue.
So click the CLCRRL buttons, and open the drawer to get some nails.
Yellow
The groups of yellow metal posts form the clue to unlock the top cabinet drawer.
There are 5, 4, 1 posts in each group.
So enter that in the drawer, open it and take the cloth.
Rag wipe
Use the cloth on the water trough, and then use the wet cloth on the dirt on the right window (which was blue).
This reveals a code with the silhouette of a pig head and a path that takes four angular corners and ends in an arrow.
Bent path
Follow the path from the window to press the buttons on the other pig cage in the right order.
Press the buttons in the following order:
146
235
and then open the cage, pick up the last pig, and take the hammer behind it.
DIY
Use the nails on the unfinished ladder and then the hammer. Now you have a working ladder!
(Don't try this at home, especially if you only have six nails.)
Transparent
Place the ladder under the window on the first screen, climb up. Oddly enough, you can't see anything through this.
Use the hammer to smash the window. Now you can see loads of houses on the hilltops.
Four numbers
Count the houses visible through the window and use that clue to unlock the barn door.
The houses visible through each pane number
2 2
3 4
Enter that (1, 1, 2, 3 clicks), open the door, and walk out with the pigs!
there seems to be a glitch in the game.
I cut down using the saw all 3 colored planks but all I got was Red and Blue. no Green. not sure what happened.
forget my comment but...
the path code must be incorrect because I punched it in like:
1 4 6
2 3 5
as suggested but it won't unlock. I don't get it.
actually the code is
1 4 6
3 2 5
Clearly I'm not checking my walkthroughs enough. Thanks and sorry!
it's ok, kk. you are da man.
canlt wait for the next 2 walkthroughs :)
Link is fixed - hopefully image will be fixed soon.
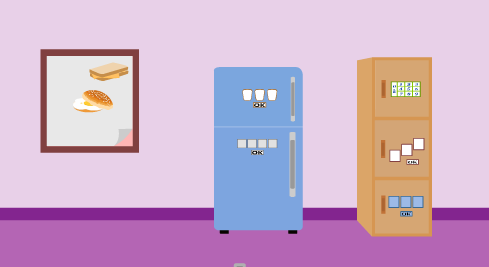
Burger walkthrough
The solution to each puzzle leads to the next puzzle. They have to be done in order.
Diagonal puzzle in the middle of the yellow cabinet
Note the two sandwiches showing in the picture to the left.
Click on the lower right corner to see another sandwich below them.
Solve the diagonal puzzle
Click on the squares until they match the picture. The hidden one is on the bottom.
Get a dish of tomatoes
--------------------------------------------------------
Puzzle with four green squares in the second scene
Look at the tomatoes.
Especially look at the stems of the tomatoes.
Make the lines the circles point in the same direction as the tomato stems.
Get some ketchup and mustard.
--------------------------------------------------------
Puzzle with four squares at the bottom of the blue cabinet in the first scene
Look at the ketchup and mustard containers
There are two shapes on each one.
Do the two red shapes then the two yellow shapes in order.
Get a piece of lettuce with a diagram with three coloured eggs.
--------------------------------------------------------
Puzzle with three squares at the bottom of the yellow cabinet in the first scene
Look at the diagram of the three eggs.
Especially look at the colours and numbers.
The first egg is red and has the number 3.
Make the first picture be 3 red eggs. Etc.
Get a cucumber with a tag with the word "CUCUMBER" on it, in two colours.
--------------------------------------------------------
The cucumber
The light green letters are UCUMIEI.
There doesn't seem to be anywhere to use those letters.
What about the black parts?
They're numbers!
6 3 2
--------------------------------------------------------
The puzzle on the door in the second scene
Enter the numbers from the cucumber.
Open the door to the second room and look around.
--------------------------------------------------------
The puzzle at the top of the blue cabinet
Enter the colours of the peppers from the picture in the second room.
Get a 100% beef patty.
--------------------------------------------------------
The letter puzzle on the top left of the yellow cabinet in the second scene
Click on the letters on the hamburger patty in order.
Get a jar of mayo
--------------------------------------------------------
The puzzle with the numbers at the top of the yellow cabinet in the first scene
Look at the mayo jar.
It has a picture of a tomato, a cucumber, and some lettuce. We know some numbers related to each of these.
The first number is on the tomatoes. The next three numbers are the ones from the CUCUMBER tag. The next three are from the picture of the eggs.
Get some onions.
--------------------------------------------------------
The puzzle on the right of the wall in the second room
Set the pictures to match the picture of the onions.
Get three burgers.
--------------------------------------------------------
The puzzle on the bottom left of the yellow cabinet in the second scene
Match the location of the cheese in the puzzle with the cheese in the pictures.
Bottom, middle, top.
Get a bread knife.
--------------------------------------------------------
Puzzle on the door in the second room
Look closely at the bread knife.
There are three sets of coloured lines under the letters.
Set the top blue row of letters to the letters over the top blue row of dashed lines. Etc.
And open the door to enjoy the burger!
Barbara, thanks for the walkthrough. I got confused a little on a few things but I managed to get through it. looking forward to the Amajeto one.
I wasn't expecting the Amajeto one to be extra difficult (pixel hunts, red herrings and a well-hidden clue), so I had to read a few hints and spoilers to beat it.
Amajeto Hotel: Solitude
If you feel a sense of deja vu, that's perfectly understandable. Welcome back to Amajeto Hotel!
Exploration
So once again, Amajeto Hotel has left you to clean up the room for them. Pick up three golden squares on the couch, next to the telephone and next to the lamp. In the process, you'd probably noticed that the phone's display only has room for five digits, and that the each of the orbs on the lamp lights up a different color and hangs by a different number of threads. Of the three pictures hanging over the sofa, the center one looks messed up and the ones on the sides can be flipped over. But only the one on the left has a clue on it when turned over: a single blue diamond. There's a compartment under the right picture that you can't open yet.
Turn right. The balcony door is locked, so turn right again. The wall here is decorated in a familiar way: four safes under four rectangular sections, and a TV in the middle over some books and a box. Take two golden squares from on top of the box and next to the vase on the right. You don't have a remote for the TV and don't know what the numbers on the top and bottom of the books are for (yet), so look at the four safes. The first safe on the left needs a four-letter code. The second needs a sequence of small and large heart buttons. The third needs a code of four card suits. The fourth needs a four-digit code.
Turn right. The wardrobe on the right side is locked and needs a 4x4 grid of colors, either white, yellow, green or orange. Go down the entry corridor and check out the picture with tilty corners on the left wall and the completely boring room door and the grid panel on the other corridor wall with a white box on the right side and a slot on the left. Pixel hunting, yay!
Broken picture above sofa
Click each piece to rotate until the picture reforms. (It's randomized each time, but try to match the middle pieces along the horizon line, and then the corner pieces to the left and right pictures.
The compartment under the right picture opens up. Take the golden square.
Literary
Use the numbers on the books to unlock the tilty corner picture.
The numbers are:
12____3
45____6
So click the corners in that order (⌜⌜⌝ ⌞⌞⌟), and the picture slides down. There's another compartment which you can open up to take another golden square. Also turn the picture over to see a four-digit code and a diagram of a keypad.
Four digits
Enter the code from the tilty picture to the phone.
Enter 7105, and then press the green E key, turning the digits green. Wait, that didn't unlock anything!
Four letters
Hint: which other safe has its code in green?
Turn the green 7105 digits into four green letters for the first safe left of the TV.
Turn your screen, or turn your head, and the digits read SOIL.
Enter that, open the safe, and take a remote control and golden square.
Watch
Turn on the TV. It's even more boring than before, displaying just the word HearT over a yellow heart shape.
Majuscule
Unlock the second safe with the TV clue.
The first and last letters of HearT are capital (large), so that the letters are large, small, small, small, large.
So click the RLLLR buttons, open the safe and take the key and golden square.
Use the key to unlock the balcony door and go outside.
[Exploration] Take a break
A breath of fresh air, enjoyed against a pixelated night sky.
Take the golden square from the table, which also has a yellow-green-yellow stripe of squares running across the upper-right. The lift the bowl to see a green club suit painted underneath.
At this moment, a strong breeze blows by and you can't help but squint, and you spot something interesting about that building in front...
The lit windows on the building form the digits 5213, underlined by the bottom row.
This gives you the inspiration to go back in and unlock another safe.
Four digits for reals
Unlock the rightmost safe with the digits from the office building outside.
Enter 5213, and open the safe. Take a golden square and a rectangular device with a big red button on it. Notice the red spade suit on the back of the cupboard.
Suits
Use the four card suit clues from around the room and the clue from the lamp to unlock the safe just right of the TV.
Lamp colors, from top to bottom:
1 string , blue

4 strings, green

3 strings, yellow

2 strings, red
Which suits were blue, red, yellow, green?
Suit colors:
Blue diamond (back of picture above sofa)

Yellow heart (TV)

Green club (table outside, under bowl)

Red spade (4th safe)
So 1234 = BRYG = DSHC. Enter Diamond, Spade, Heart, Club into the safe, and take a golden square from inside.
Button
Use the button device on the slot on the left edge of the corridor grid panel, then press the button.
The squares glow yellow and green, and orange if you zoom out and look at it. But three of them are still white.
Color
Combine the corridor grid and table color codes to get the code for the wardrobe lock.
(None of the sixteen squares should be white.)
The colors are (Yellow/Green/Orange)
OYYG

YOGY

YGOY

GYYO
So click each square on the (yellow) edges once, the (green) LL-UR diagonal twice, and the (orange) UL-LR diagonal thrice.
If you have it correct, the door swings open and you can take the last golden square. (Examine it in your inventory to make sure.)
Piece together
Now that you have all 13 golden squares, use them on the square grid.
You have to swap pieces on the grid to form a picture of butterflies. This puzzle is also randomized, but here's a hint: the lightest part of the picture is near the upper left.
Once you have it correct, the box on the side should open up for you to take the door key. Use it on the main door to escape!
thanks KK. good job as always :)
In case anyone is looking for the walkthrough for Safe Microwave Oven, it in Weekday Escape 146.
Weekday Escape 144 (this one) has the link to Safe Microwave Oven and the walkthrough for Amajeto Hotel, and Weekday Escape 146 has the link to Amajeto Hotel and the walkthrough for Safe Microwave Oven.
Hm, I must have missed this somehow back in May because I couldn't remember this Weekday Escape... o_O
But nevertheless, it was fun as always :D
By the way, I had to chuckle about the irony of the first game being "Free the pigs!" and the second one being "Burger". As a vegetarian I feel slightly upset now... XD
Update