
 Wednesday, Wednesday, gotta get down on Wednesday! Down to escaping, that is. No time to waste!
This week, Funkyland have flown us to the Big Apple and put us up in a very fancy hotel - from which, of course, there is NO ESCAPE. The friendly folks at Riddle Escape have locked us in a room that takes rustic cabin décor to a whole new level, and Vitamin Hana needs a little bit of help with their takeaway order.
Start spreadin' the news... I'm leavin' today... well, actually, I'm not leaving today. I'm locked in my swanky hotel room on Fifth Avenue and I ain't leavin' until I can figure out how to unlock the door. Thank goodness there's some really expensive water in the bar fridge to keep me going!
While I appreciate the rustic aesthetic that's going on here, there is a concerning amount of open flame in this room constructed almost entirely of wood. I suppose that means we won't freeze to death, but I think we should escape before a stray spark floats to the ground and sets this whole place alight!
 I'm sooo hungry...
This has been a tough week. You've worked hard and you have an insatiable craving for a greasy takeaway burger and chips. But when you arrive at the burger joint, the creepy faceless server needs cash in exchange for your calories... and you've lost the key to your wallet! Perhaps these other diners might be able to help?
We love escape games, and our readers love talking about them and sharing hints! How about you? Let us know what you think, ask for clues, or help out other players in the comments below.


(clock escape) hmm..... stuck with the
poker and box with seven switches
the candles differ in height but i don't think they have to do with the switch box
Check out the lines on the front side of the chair.
Can't wait for the walkthroughs :)
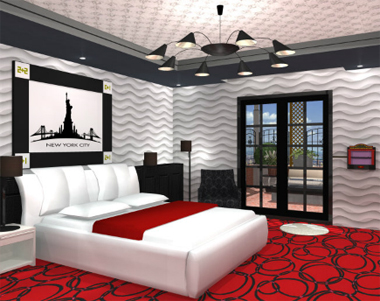
Escape a New York Hotel
In your continuing quest to get trapped in expensive hotels, you've finally made it to the Big Apple. Shopping! Snacks! And something artsy, you just haven't decided yet. Think about it while you make your escape.
Exploration
You start off facing a comfy bed. Above it, a picture frame has some mathematical sums on the corners. Next to the bed, the side table has its drawer screwed down. There's a door leading outside next to a box labeled Broadway, with seven little figurines. Looks like one of them is missing.
Turn left to find a white sofa facing a table with four cupcakes on it. Lifting the cupcakes reveals different colors and letters on the bottom of the plates. (I want to know what that placemat reads, but perhaps we'll never find out.)
Turn left again. The main door is locked and there's a box next to it requiring you to scan a QR code. Turn right and open up the wardrobe, which has bags of various shapes and sizes under the labels Museum and Musical. There's also a box with three dials, the pointers shaped in a triangle, square and circle. Next to that box, there's a tray with a red screwdriver in it. Back out twice and look in the fridge on the left of the screen. There's two bottles of water and an ice cube with the tip of a key frozen in it.
Turn left and look at the other end of the table, which has a locked glass cupboard as well as a drawer missing a handle. Above the table, four pictures hang on the wall, each with an abstract border decoration and nothing else. To the left of all that, there's a door locked with HELLO buttons that cycle through colors when clicked.
Colorful
Use the clue from the cupcake plates to unlock the HELLO door.
Match the letters to their plate colors: H=Pink, E=Blue, L=Green, O=Orange.
So click the buttons 3, 4, 2, 2, 1 times, and open it.
Exploration: Bathroom
There's a mirror in front with an oddly decorated tile in the upper-right corner. There's also four pink soap bottles on the sink counter, and four blue bottles under the left sink. Their labels are slightly different in the directions that the male (blue) and female (pink) dancers face.
Back out and click the left side of the screen to go further in. There's a bathtub and you can turn the hot water on, but it just runs down the drain. Next to the shower, a plant pot sits on a pedestal, and under it there's a red cap of some sort, a cylinder with glass covering one of its ends.
Above the toilet bowl, there's a picture with buttons on its corners, and a row of six lights on top. The picture looks just like the one above the bed, but instead of New York City the caption just reads 112134.
Math
The corners of the New York City picture have sums that add to 4, 1, 2, 3.
So click the corresponding corners of the picture above the toilet bowl.
112134 = UR UR LL UR LR UL (⌝⌝ ⌞⌝⌟ ⌜).
The picture slides down and you can take a female dancer figurine.
Broadway
Use the figurine on the empty space in the Broadway box, then enter the code from the soap bottles.
I'm calling the positions Left and Right based on the position of the extended arm.
Male (Blue bottles): LRRL
Female (Pink bottles): LRLL
So click the 2nd and 3rd figures on the top row and the 1st, 3rd and 4th figures on the bottom row, and then the OK? button, which turns into an OPEN sign with a left arrow. The door next to the box is now open!
Exploration: Terrace
On the left of the screen, a plant pot covers a clue on its table, with square, triangle ancd circle symbols on three different squares of a 3x3 grid with the center square blacked out. There's a large glass box in the middle of this balcony, connected to some sort of mechanism with a part missing. And there's also some nice plants in the far end, with a metal cover hidden in the soil.
Pointers
Use the clue from the plant pot outside to unlock the box with three dials.
Triangle is on the Right square
Circle is on the Top Left square
Square is on the Bottom square
So click the dials 2, 7, 4 times.
... That's a lot of fancy padding for a valve!
Twist
Place the valve on the device in the balcony, and give it a twist (or two). The box opens.
... That's a lot of glass box for a metal piece with a US flag!
The key
Use the metal cap to plug the bathtub, then fill it with hot water and melt the ice cube in it.
Then combine the key tip with the flag piece to form a key.
This key opens the glass cupboard under the table. Take a drawer handle, which is beside the ticket printer.
Handle
Use the drawer handle on the drawer, and open it to get two blank tickets.
Unscrew
Use the screwdriver on the side table, and open it up to take a flashlight.
It's missing the front cover, but you have it in your inventory, so attach it.
Illumination
Use the assembled flashlight on the four pictures. The digits 4, 6, 3, 8 show up.
Choice
Use the tickets on the printer, and zoom in on the screen to find a four-digit lock.
Save your game, then use the clues from the pictures and shopping bags to print some tickets.
The pictures and bags are rectangular, and their shape/size corresponds to one of the four digits 4, 6, 3, 8.
Museum: Large Flat Tall Small = 4386
Musical: Flat Tall Large Small = 3846
Enter that into the printer, and print out two tickets, one of which has a QR code on it.
Unscramble
Scan the QR code ticket in the box next to the door, and a key box appears under the door. The key box has a 4x4 grid of squares, each with its top-left corner colored black. Clicking on the squares rotates them.
Rotate the squares on the key box to match the tile on the mirror.
Click the tiles
3231

0102

3231

0102
times, then click OK to open the box and get the room key.
Escape
Use the key on the door to escape, and enjoy your visit to the Met with a cappucino and cake set, or a Broadway musical followed by a lobster roll dinner.
Now, to work on that Clock walkthrough...
THANKS! i was playing on low brightness last night and completely missed that :)
Clock Escape
This game is of comparable length to Orbit from the same creator. It's also Flashless, which is nice.
Interface help
The note icon in the upper-left only turns off the background "music" (the clock ticking). You will still get item chimes and sound effects from the game.
The game autosaves on every puzzle solved, so you can take a break and load your game afterwards.
Exploration
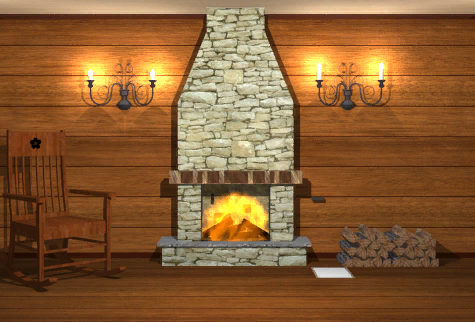
You start off facing a fireplace. It looks quite normal, but those dark rectangles have got to mean something. There's a chair to the left of the fireplace with a flower marking and seven notches on the back. To the right of the fireplace, the trapdoor in the floor is missing a handle. You can take a poker next to the firewood. There are also candles on the walls with different lengths (which are on every screen, so I'm not going to keep pointing those out).
Turn right to find a shelf with a 3x3 grid of card suits. Above the shelf, there's a photo of a clock with no hands. You can zoom in on the picture to see three symbols on the clock face. Let's call them U, L and V.
Turn right. There's a cupboard with some cups in it. The top door is locked and needs a three-letter code. There's an O and an X on the left and right sides of the code buttons. The bottom door is also locked and needs a key. There's something wooden on the top of the cupboard. Next to the cupboard, there's a smaller cupboard in the wall with a dice net on it. The six buttons cycle through different colors when clicked.
Turn right. There's a table next to the chair we saw on the first screen. Above the table, there's a locked cupboard. On the table, there's a box with nine buttons in a grid, and a picture that illustrates additive color mixing. The table has a single drawer without a handle, and there's a safe under the table which is tied shut with rope.
Reach
Use the poker to get the slider panel from the top of the cupboard. Each of the seven sliders is a switch that can be either up or down.
Slide
Use the clue from the chair to unlock the slider panel.
The notches are high, low, low, high, low, high, high.
So flip the 2nd, 3rd and 5th switches, opening the box. Take the key from inside.
Unlock 1
Use the key to unlock the cupboard above the table.
Next to a bunch of books titled after musical instruments, there's a note you can pick up with a blank square grid and four card suits in the corner.
Esraj?
Use the initials of the book titles to unlock the top doors of the cupboard with cups.
The initials are O, S, E, A, X.
So enter SEA, and open the cupboard. Now you can see more cups, as well as a leaf drawn on the upper-right corner and a drawer handle on the middle shelf.
Handle 1
Use the handle on the table drawer, and open it.
Inside, there's an unlit candle and a box with eight buttons. One of them is labeled N, but all of the buttons cycle through images of candelabras, the only difference being the length of the candles.
Playing with fire
Light the candle in the fireplace, then use it on the note to char round spots in four of the squares.
Also use the lit candle on the rope around the safe, and open it to take a vase.
And then take the rope from the floor.
Suits
Use the clues from the note and glass card suits to unlock the box on the table.
The charred squares are the top-left, top, right and bottom-left squares of the grid, and the corresponding suits on the shelf are Diamond, Spade, Heart, Club.
You need to click the corresponding buttons in the order on the note (Heart Club Spade Diamond), which means the correct order is
43-

--1

2--
The box opens and you get a magnet.
Lights
Use the clues from the candelabra and the magnet to unlock the box in the table drawer.
Hint: one of them is not like the others.
Every candelabra attracts the north pole of the magnet, except for the one to the left of the cup cupboard, which repels the north pole instead.
So that one is North and its candles are Long Long, and the other candles clockwise from it are SS SL LS SS LL SL LS.
So click the N button once and the other buttons (in clockwise order) 1, 2, 3, 1, 0, 2, 3 times. The box opens and you can take a cube with the weird ULV symbols in red, blue and green on different faces.
Cubic
Use the cube you just found to put the correct colors on the dice net.
Specifically, refer to the clock face photo and the picture on the table for hints.
The U, L, V symbols are in the 1, 2, 4 positions on the clock face. So each number corresponds to a color: 1=Red, 2=Blue, 4=Green. From this we can conclude that
3=1+2=Magenta
5=1+4=Yellow
6=2+4=Cyan.
So make the faces of the net RBMGYC colors, i.e. click them 1, 5, 2, 6, 7, 3 times.
The doors open, and inside there's a fountain of crystal-clear water.
Full and empty
Use the vase on the water to fill it, then use it on the fire to put it out. Then use the poker to move the burnt logs aside.
This reveals a sunflower image drawn on the base of the fireplace.
Also, the three darker-colored bricks on the back wall of the fireplace can now be pushed.
Short and long
Use the hint from the fireplace mantel to "unlock" the fireplace.
The darkened rectangles on the mantel are short, medium and long, in the order MSMLMSM.
So push the corresponding dark bricks, and the entire brick wall slides apart, opening up a tunnel that you can crawl through.
Exploration 2
You're in another room, facing a clock. Unlike the clock in the photo, this one has three hands and three buttons above the clock face. Beside the clock, some symbols are written on the wall.
Turn right. There's a box on the table with five buttons that toggle between white and red when pressed. Above this box, a floor plan of both rooms hangs on the wall, with five locations marked with an X.
Turn right. Other than the tunnel back, the only other interesting thing here is a butterfly drawn on the ceiling. Turn right again, and all there is is a locked exit door.
X marks
We've seen a drawing in each of the five locations, except for one.
The leftmost X doesn't point to a location we've examined before. Turn left from the floor plan and click the left corner of the floor to find a trapdoor among the (pixelated) planks.
Opening it up, you find a grate of iron bars, a key trapped beneath and a snowflake drawing.
Pickup
Use the magnet to get the key, which replaces the poker in your inventory.
Unlock 2
Use the new key to unlock the bottom doors of the cupboard of cups.
Surprise! There's more cups inside.
Cups
Use the clue from all the shelves of cups to unlock the box in the second room.
Arranging the shelves from least red cups to most:
wwwww

wwRww

RwRww

RwRRw

RRRRw

RRRRR
So click the 3rd, 1st, 4th, 2nd, 5th buttons to turn them red.
The box opens. Take a metal handle (replacing the slider box in your inventory).
Handle 2
Use the metal handle on the white trapdoor next to the fireplace, and open it to find a switch which raises the clock photo and reveals a safe behind.
But the switch won't stay open if you walk away.
Tie the rope to the handle, then back up and click the poker holder to tie the other end of the rope to it.
Now the photo stays up, and you can examine the safe behind it, which has five buttons arranged vertically, and clicking each button cycles through some nature-inspired drawings.
Quintet
Unlock the safe behind the painting with the drawings you found throughout the game.
(But in what order?)
Enter the drawings in order of the height that they appear at:
Ceiling of 2nd room: Butterfly
Top corner of cupboard: Maple
Top of rocking chair: Sakura
Bottom of fireplace: Sunflower
Trapdoor in 2nd room: Snowflake
So click the buttons 1, 2, 6, 3, 7 times. The safe opens up and inside, there's a panel with buttons (labeled with symbols) and a screen (with a different symbol). Pressing the buttons toggles their lights and changes the symbol on the screen.
Symbolic
Use this device to solve the clock puzzle.
(I'm going to approximate each symbol with letters I can type, apologies if the choices I make are unintuitive.)
Call the symbols on the four buttons U, L, N, D. From the previous puzzle, we know that symbols correspond to numbers, with U, L, V corresponding to 1, 2, 4.
Pressing any one of the buttons makes them show up on the screen, but the combinations U+L=N and U+N=V suggest that the symbol shown on the screen is actually the sum of the (numbers for the) symbols pressed.
So we know that U=1, L=2, N=U+L=3 and D=U+L+N=6, and the initial symbol where all four buttons are off is E=0.
The string of symbols next to the clock reads C:HE:NQE. With some experimentation, we get C=D+L=8, H=D+N=9 and Q=L+N=5.
So the whole thing translates to 8:90:350... which isn't a time.
But if it was, it would be 8 hours, 90 minutes and 350 seconds after 12, which is equal to 9 hours, 35 minutes and 50 seconds.
In other words, the time is 9:35:50, and the hands should point at 9, 7 and 10. (I know, real clocks work differently.)
Click the buttons that many times, and the last door opens. Click on it to escape!
I'm sooo hungry...
There's a solution for that: fast food! There's also a problem: no money.
Exploration
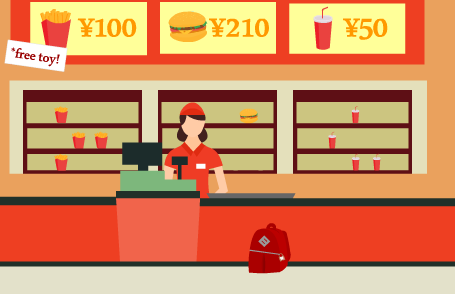
While the cashier waits patiently for you to get your order together, look behind her at the shelves of food. Fries, soda and a single burger. The prices are listed above, with a note that the fries come with a free toy. There's a bag in front of the counter (I hope it's yours), with a padlock hanging off the side. Each of the nine buttons of the padlock (arranged in a grid) cycles through different menu items when clicked.
Turn left, where a man sits alone with a cup of soda. There's a safe with a bunch of double-digit buttons. (Not exactly, but close.) An arrow on the floor points below the safe, but you can't crouch down to look there.
Turn left, where a kid sits at a table. She doesn't want to eat, she just wants a kendama toy. That will have to wait. There's a cupboard with two locked doors. The left door needs a three-digit code, and the right door needs four dice faces (in a grid). On the cupboard, there's a fan thingy that blows upwards with strips of paper extending out of it. (At least, that's what I think it is.)
Count 'em
Use the clue from the fan to unlock the right cupboard door.
There's 2, 1, 3, 5 paper strips in each compartment. So click the buttons 1, 0, 2, 4 times to open the door and get a broom.
Sweep
Use the broom under the safe to get a 50 yen coin.
Soda?
Give the 50 yen coin to the cashier, who tells you to wait. So let's do something else.
Turn left, and the man is gone. He left behind some paper scraps on the table, which you can piece together to form a clue with digits and an arrow.
Digits
Follow the clue on the scraps of paper to unlock the left cupboard door.
The digits read 722, but the arrow points up, so enter 227 in the door to open it and find a roll of sticky tape.
Attached
Use the tape on the paper scraps to fasten them together, then click on it to flip it over. It's a coupon for free fries!
Fries
Use the coupon on the cashier, who tells you to wait again. So turn left to another screen and then turn back again, and the fries are ready. Also, you still get the free toy.
Toy
Give the toy to the kid, who gives you her pocket money. It's just 10 yen, but that's nice.
Grid
Use the clue from the shelves to unlock the padlock on the bag.
The food occurs in the following positions (Fries/Burger/Soda):
F-- --B -S-

-FF --- S--

F-- --- -SS
which combines into a single grid:
FSB

SFF

FSS
So click the buttons 1, 2, 0, 2, 1, 1, 1, 2, 2 times, and unlock the lock.
Open the bag to find a purse (locked) and a red box inside (also locked) with buttons labeled 5 and 2.
Kid?
Turn left twice to where the kid was sitting. She's gone, and she left behind a paper strip with some double-digit symbols written on.
Digital
Use the hint from the paper strip to unlock the safe.
Click the buttons 5, 4, 1, 3 times, then open the door and take a spray bottle filled with water.
Digital 2
Spray the paper strip with water, then use the resulting clue to unlock the red box.
In two different colors, the digits 52 22 55 25 show up. So click the corresponding buttons and open the box to get a key.
Unlock!
Use the key to unlock your purse and get 200 yen, bringing your total to 210.
Burger
Use all 210 yen on the cashier, then turn left, turn right, and your meal is ready!
Update