
 It's Wednesday, it's time for a short break - luckily, Weekday Escape is here!
Summer is over in the Northern Hemisphere and it's more time for indoor activities. The first and the shortest game by Vitamin Hana takes us to the theater, or more precisely, in front of the theater. Riddle Escape's game to another traditional Japanese room and Bianco-Bianco's game to a three starred Italien Restaurant. What a treat!
Have a good time and enjoy!
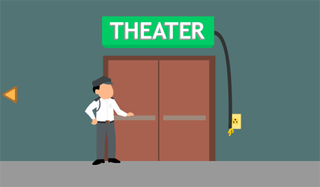
So Vitamin Hana left you in front of the theater, looking forward to the performance, well dressed, opera glasses, pralines and clean handerchief in your purse...and apparently without ticket. What now? Return home and watch TV? No way, there must be a way to get in! Look around and maybe you find some hint for opening this purporseless cabinet by the theater entrance. One solved puzzle leads to another, and after some more effort you finally e̶s̶c̶a̶p̶e̶ get in!
The cursor is not changing, no save button, one ending.
The game can be switched to mobile version (yellow button on the top of the screen)
 Escape from Traditional Japanese Room
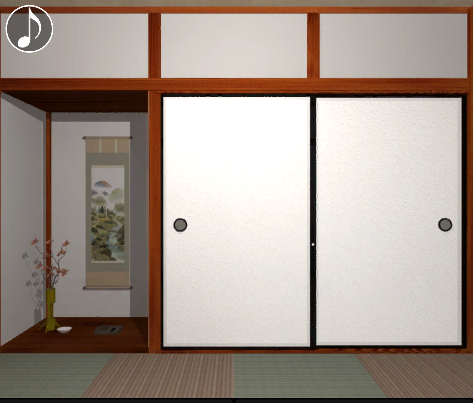
With Riddle Escape you "visit" traditional Japanese room (they've locked you there, in fact). Or tatami room, if you wish. Not the first one, right? Well I think that even before the game starts most of escapists know what's in the room! Sliding door - check, tatami flooring - check, futons - check, windows and doors with transluscent paper over a wooden frame. And wooden kokeshi dolls (taking about them - I am really really missing Detarou's games...). Also music is in Japanese style. Can you escape?
The cursor is not changing, autosave (not 100% reliable), one ending.
This game is available for Android too.
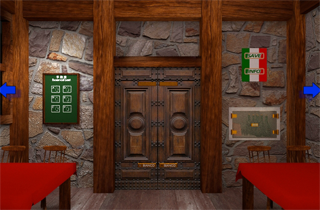
Bianco-Bianco's game is not new, it was released few months ago, but it would be pity to miss such a good game. It's early evening and you are locked in cosy restaurant, alone. Music is off and all you can hear is the thud of your own footsteps. The restaurant should open soon, but six tables with clean red tablecloths are not ready yet. Can you do it? Set the tables? Someone has to, the restaurant is fully booked! Look around the place and follow your cursor carefully, some views are not obvious and some items not visible at the first sight. Puzzles are clever and the simpliest solution may not be the right one.
The cursor is changing, save button (inside the game on the board with Italian flag), one ending.
We love escape games, and our readers love talking about them and sharing hints! How about you? Let us know what you think, ask for clues, or help out other players in the comments below.


Theater Day
The search may just be more exciting than the show.
Exploration
It's a plain theater entrance, but the sign above it seems to be off. Actually, the power supply running to it just ends in bare wires. Of course, the theater guard won't let you in ticketless.
So turn left to another screen with a huge pile of leaves and a chest of drawers. The top drawer needs a three-arrow code with arrows colored yellow, blue and red. The bottom drawer needs a three-letter code with a limited selection of letters.
Turn left to screen with three parked cars. The middle (blue) car has a
HEATlicense plate and a lock on the boot/trunk which needs a code with four colors. You can zoom in on the door lock of the right (red) car, which is how you know it's important.Directions
Use the clue from the colored cars to put the correct arrow code in the top drawer.
The yellow and blue cars are parked facing forward (away from you) and the red one is parked facing the right.
So enter the ↑↑→ code (2, 2, 3 clicks) and open the drawer to get an electrical plug.
Attach the plug to the wires of the sign, and then click the plug again to plug it in, powering the sign up.
The
THEATERletters light up in different colors.Warm
Use the clue from the theater sign to unlock the blue car.
The H, E, A, T letters are lit in green, red, yellow and pink on the sign.
So enter that color code by clicking the buttons 3, 1, 4, 2, then open the trunk up to find a leaf blower.
Use the leaf blower on the leaf pile, clearing most of it up. There was a car key and a black-and-white grid clue under the leaves!
Unlock
Use the car key on the door of the red car.
Inside, there's a phone on the dashboard, but its battery is drained. The glove compartment is locked and needs a combination of Tetris pieces to unlock. In the lower-left, there's a four-digit locked drawer under the radio.
Pieced
Use the grid clue from the leaf pile to unlock the glove compartment.
The squares in the grid form a dark T piece pointing right, a light S piece and a dark T piece pointing up.
So enter that into the lock (3, 4, 1 clicks), then open it up to find a phone charger.
Powerless
Unplug the theater sign and plug in the phone charger, then plug that into the phone.
Now all we need to do is "wait"...
...wait! Some of the
THEATERletters are still lit!Dark
The letters on the bottom drawer lock are dark gray, so read the dark letters off the sign to get its code and unlock it.
The dark letters read
TEA, so enter that in the bottom drawer to find a pin (SIM eject tool).Cell
Now that your phone is charged, pick it back up. It displays a sunflower clue on the front, and a green call button that warns you that there's no SIM card.
Yellow
Use the sunflower clue to unlock the remaining safe in the car.
Follow the clockwise arrow on the sunflower, which passes beside groups of 4, 2, 4, 3 petals.
So enter 4243, then click on the drawer to open it. Inside, there's a SIM card, still in its uh, sprue?
Click the right side of the phone to find the SIM tray, and use the pin on it to open it up.
Then snap the SIM card free, put it in the tray, and close it.
Call
Click the phone icon on the phone, and then the large Call button. Help is on the way!
Go back to the theater screen and turn left. Mama's arrived in a yellow cab, with not one but two tickets!
Use the tickets on the guard to end the game.
thanks, KK as always. Can't wait for the other 2.
This is horribly long and I hope I didn't mess anything up here. Also, that link needs to be fixed.
Riddle Japanese Room
The game has a very similar title to those in the Riddle Room series, which is why I'm writing it this way.
Exploration
You start off facing double doors with comma-shaped holes in the bottom.
You see a blue floral floor mat on the left, so turn left to find that there's more mats, three more in fact for a total of four, with a sakura mark next to the green one. To the left of that, a small display shelf holds three kokeshi dolls with different numbers of red stripes on their bodies. A dark patch on the floor next to the shelf hides one of the missing comma-shaped magatama pieces.
Turn left. On a small table on the right, there's a box with four colored buttons. There's not much else on this screen, except for the wooden column on the left which has a closed compartment and a lit candle at the top.
Turn left. There's a pair of large sliding doors on the right, locked by a single lock which requires a key. To the left of that, a small enclave houses a tilty scroll with a landscape painting, as well as a bowl of dice next to a flower pot and a box which looks like it has three buttons and an empty circular hole at the top-right.
Directional
Use the clue from the colored floor mats to unlock the box with four buttons.
The mats are Blue Red Green Yellow in clockwise order, starting from the furthest one from the sakura mark.
So enter the same code in the box (clockwise starting from the top, 1 0 2 3 clicks), then open it to find a metal key.
Unlock 1
Use the key to unlock the double doors, and open them to find a display with five plates of mochi(?) behind the right door, and another shelf of kokeshi dolls behind the left door, as well as a stack of red floor mats which hides a kokeshi doll on the left. This particular doll has no red stripes though.
Planted
Use the kokeshi doll on the circular indentation on the box beside the potted plant. Its buttons now flash white when pressed.
But where's the code for it?
Each of the other kokeshi dolls has a different number of stripes: 6, 1, 5 on the first shelf and 2, 4, 3 on the second shelf.
The dolls with 1, 2, 3, 4, 5, 6 stripes are on the middle, top, bottom, middle, bottom, top shelves of their respective displays.
So click the corresponding buttons, and the box opens up. Take the other magatama piece.
Twin
Use the magatama pieces to unlock the double doors on the first screen.
Behind, there's another display with five daruma dolls, some having only their left eye painted and the others only their right. There's also a table with a clear glass top which has a box on it taking a code with dice faces, and a blank piece of paper in front of a small photo frame that shows a picture of the column with the lit candle... except it's not lit in the picture.
Quartet
Use the clue from the dice in the bowl to unlock the box on the glass table.
The dice faces show 5, 6, 1, 2 dots, so click the buttons 4, 5, 0, 1 times.
The box opens up and you can take a folding fan from it.
Windy
Fan the candle to put it out.
The compartment under it opens, so take the matchbox within.
Combust
Use the matchbox on the blank paper to char it, revealing a sequence of tilted rectangles.
Oblique
Use the clue from the charred paper to unlock(?) the painted scroll.
The bottom edges of the tilted rectangles point towards the left, right, right, right, left, left.
So click the LRRRLL sides of the scroll.
It rolls up, revealing a pair of googly-eyed buttons on the wall.
Binocular
Use the clue from the mochi plates and daruma dolls to press the eye buttons in the correct order.
The plates with 1, 2, 3, 4, 5 mochi are on the left, upper-right, lower-left, lower-right, upper-left shelves of the display.
The corresponding daruma dolls have their left, left, left, right, right eyes painted.
So click the LLLRR buttons, and the wall panel opens up... into another room!
Exploration 2
Right away, you see another set of shelves, this time with some clues about white circles in red rectangles. Next to it, a triangular pot holds a red flower.
Turn right. A console cupboard on the floor has two locked doors. On its top surface, a squre pot holds a yellow flower, a locked box needs a color code for its shape clue, and a kettle of water ignores your attempts to examine it. Also on this screen, a frame on the wall has a fan-shaped bright area on its wood background.
Turn right. There's a small screen on the floor, divided into a square grid, with flowers printed onto two of its squares. Next to it, a tray holds two empty (Japanese) teacups. To the right of that is the passageway back, but there's also a scroll on this side with cranes (birds, not machines) facing in two different directions. Below that, a lantern is missing a candle, a locked box has three dials, and a round pot holds a yellow flower.
Turn right. The shelves on this wall also form a grid, with picture frames in the lower-left and upper-right compartments showing four and six flowers. A box in the lower-right of the grid has three buttons that light up (with a white circle) when clicked.
Dotted
Use the clue from the shelves next to the red flower to unlock the box on the wall shelf.
Read the shelf clues from top to bottom. The rectangles which change state are the Top Left Top Right Top rectangles.
So click those buttons. The box opens up so you can get another key.
Unlock 2
Use the key on the locked doors under the kettle, then open them to find a teapot and a locked box with vertical buttons that fill up in gradual steps when clicked.
Geometric
Use the clues from the flowers to unlock the box with colored shapes.
The Triangle Circle Square pots hold Red Yellow Yellow flowers.
So enter that code (1, 3, 3 clicks), and the box opens up so you can get a teacup.
Fit
Place the fan onto the frame, and the crane on the front faces diagonally upward.
Use the clue from the crane scroll to tilt the fan in the correct directions.
The cranes face RUURR, so click the RLLRR arrow buttons.
The frame slides upwards and reveals a light switch.
Dark
Turn off the lights. The room is dark except for some light filtering through the wall, in the shape of four columns.
Use this code to unlock the four-column box (after turning the light back on).
The columns cover 2, 4, 3, 1 rectangles, so click the buttons that many times to open the box. Inside, there's a can of tea.
Brew
Place the teapot down next to the kettle and add some tea leaves to it, then click the kettle to fill the teapot. Pick the full teapot back up.
Place the teacup from your inventory between the other two on the tray, then use the teapot on the cups to fill them.
A single tea leaf floats near the rim of each cup.
Divination
Use the clues from the tea leaves to unlock the box near the scroll.
The tea-leaves float near the bottom-right, right and bottom of the cups, from your point of view.
So click the buttons/dials 3, 2, 4 times. The box opens up and you can take a note with a secret spot hinted on it.
Hunt
Following the clue in the note, click the panel to the right of the wall shelf.
The perspective changes, so click it again to shift it, revealing an exit... into yet another room.
Exploration 3
This time, there's no turning left or right. All there is in this room is a wooden chair to the left of the dark-colored door, and a panel with a grid of flower buttons to the right of the door.
Ascend
Place the chair under the candle column in the first room, then climb up and take the candle.
Back
Use the candle on the lantern (entrance of 2nd room), then light it with the matches.
Flowers appear on the outside of the lantern.
Flowers
Use the flower clues (frames on wall shelf, screen beside teacups, outside of lantern) to unlock the panel next to the dark door.
The squares with 1, 2, 3, 4, 5, 6, 7 flowers appear on the LR UR LR LL UL UR LL of their respective grids.
So click the ⌟⌝⌟ ⌞⌜⌝ ⌞ buttons. The dark door is now unlocked, so click on it to escape (and get a well-deserved congratulation).
could someone post the true link to Riddle Japanese Room?
Riddle link:
http://riddleescape.seesaa.net/article/452623136.html
Thanks Konrad. Can't wait for the bianco escape.
Bianco Restaurant
The music from the menu screen stops once you start the game, so I opened the game in another tab just to keep it playing.
Exploration
You start off facing locked double doors. In the upper-right, an Italian flag poster has buttons that will magically save your game or give you instructions on how to play. Below it, a safe in the wall has four buttons that don't work. On the opposite (left side) of the door, a chalkboard on the wall lists the number of people reserved for each seat, and it asks you to write in the correct numbers... but you have nothing to write with.
Turn right. There are two tables here with nothing interesting about them, but between them on the wall, a power outlet is fastened by screws. Above the tables, there's a large flowery poster reading F³. To the left of the poster, there's a golden hinged panel on the wall with shapes on it. Further above that, there are flags labeling the tables with letters and pictures. Even further up in the top left, a pair of white sunglasses hangs from the top beam, out of reach.
Flip up the hinged panel by clicking its lower edge. Behind, there's a clue reading C3.
Look under the B table to find a clue reading D4.
Check out that poster again. There's a metal hook hidden to the upper left of the 3.
Turn right. Tables A and F are here, so look around them to find a locked box and a box containing a pointer, respectively. On the wall, a metal cage holds six letters, and the sign above it has twelve buttons that light up purple when clicked.
That picture above F looks a bit unfamiliar... so zoom in on the flag to find the bent end of a nail sticking out of the window frame.
Turn right, and look behind table E (the left one) to find some graffiti reading B2, as well as a chisel (or is it a scraper?). Also examine table D to find an empty lighter on the left chair.
Tall
Extend the pointer and use it to retrieve the sunglasses above table C.
Thin
Use the chisel on the box behind table A (examine it and click the gap under its lid, facing you) to open it up and find a tube of lighter fluid and a clue reading E4, with the E in a purplish shade of red.
Also turn over the lid to find a clue reading A1, with the 1 in the same red.
Dismantle
If you examine the straight end of the metal hook, you'll find a screwdriver head.
So use the hook to unscrew the power socket next to table C. Behind, there's a piece of chalk and a clue with a cross between two squares.
Reserved
Use the clues around the room to "write" the correct numbers on the chalkboard (using the chalk you have on it).
The clues are A1 B2 C3 D4 E4 F3, but that doesn't work!
Clearly, there's something more to some of the clues.
The E4 and A1 clues had mixed colors. Match the colors to get A4 in white and E1 in red.
The numbers for A to F are then 4 2 3 4 1 3.
After writing those numbers in, a chime sounds and the whole board glows blue.
Violet
Use the sunglasses on the chalkboard, and lots of other symbols appear: some plus signs, some equal signs, and some geometric shapes.
Math
The safe to the right of the door is now active, so use the shape clues to get a four-digit code for it.
Circle Triangle Square (from the hinged plaque) would be 938, but that's only three digits. What else was there?
The clue behind the socket reads ◻×◻ (vertically), which works out to 64.
Use that in place of ◻=8, and you get 9364 as the code.
Enter it, and the safe opens up.
There's lots of goodies inside, to click on them to set them on the tables.
Then look in the safe again. The code 112112121 is written on the back of the safe in alternating magenta and red digits.
Twelve
Use the clue from the back of the safe to get the code for the sign above the candles.
The buttons are magenta when turned on and red when off, so there should be 1 button pressed, then 1 button not pressed, then 2 pressed and so on, in the pattern
P-PP-P--P--P.So press the 1st, 3rd, 4th, 6th, 9th, 12th buttons from the left, and the cage bars slide up.
Hot
Uncap the lighter fluid. If you examine the tip,
you'll find that it's sealed shut.
So use the tube of fluid on the sharp point under the F flag.
Then use the lighter fluid on the lighter (clicking on the Oil EMPTY button).
Bright
Use the filled lighter on the candles. Now they're lit and set on the tables!
Where the candles used to be, there's only a golden key left. So use it on the door to unlock it and escape!
(Sit through the end screen for a little comment about lack of planning delaying game development.)
I like when the game pays attention to details like
keeping the chalkboard updated when you zoom out, and setting each table for the correct number of people.
And of course, using obscure alphabet trivia as a hint!
Update