
 The new Weekday Escape is here to brighten year 2018 from its start!
Vitamin Hana usually brings colors and joy to your gaming life. This time takes you to a basketball gym under maintenance and succeeds again. Reliable Riddle Escape stand up to their quality standards and delivers another great game. The last one is from a newcomer - I'm happy to introduce Daikokuya Soft! Very cute, clever and amusing game they've created and I hope we meet again soon!
Have a good time and enjoy!
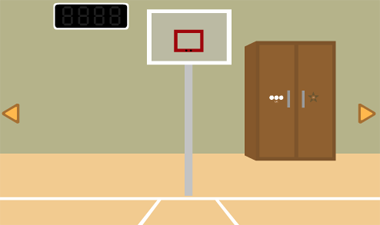
Are you missing pure relaxation, some simple and sweet game with clear hints and without pixelhunting? Vitamin Hana is perfect for you then! The gym you are locked in is out of service and to escape, you have to make some small repairs and step by step, from puzzle to puzzle, find the last code for exit door. The game's name doesn't lie, you'll get a chance to play a basketball a bit. And what's even better, virtually only, you score on the first try!
The cursor is not changing, no save button, one ending.
Hourglasses filled with colorful sand are everywhere around Riddle Escape's room. They can measure moments only, about one second, but nevermind, you are here to escape and not to boil eggs - the hourglasses are helpful hint. What else? Some shelves, closed cabinets, pictures hanging on room's walls and two locked doors - good. There is another room or closet behind one of them, obviously. Puzzles are many and imaginative, you won't get bored!
The cursor is not changing, autosave, one ending.
The game is avalable for Android too.
With Daikokuya Soft you stay locked in a lobby of traditional Japanese-style hotel. Again. They are dangerous, these ryokans, I'm telling you! You just peacefully check in, have some dinner, go to lobby and bang! The door is locked and nobody's around. Time to escape! The lobby is cramped by traditional Japanese objects plus non-traditional vending machine, and also by hints and surprizing number of puzzles for such a small lobby. Can you solve them and escape?
The cursor is not changing, autosave, one ending.
The game is available for Android too.
We love escape games, and our readers love talking about them and sharing hints! How about you? Let us know what you think, ask for clues, or help out other players in the comments below.


Basketball Game
Exploration
You start off in the middle of the basketball court, facing a backboard without a basket. A scoreboard on the left isn't working, and you can see a locker in the background with a three-color lock on the left door and a five-button lock (arranged in a star shape) on the right.
Turn left to face the bleachers, where your red backpack is sealed with a three-digit lock, and some of the seating next to it is discolored. The windows above are screwed shut.
Turn right twice to face the exit, which is locked and needs a four-digit code. The exit sign above it has some unusual lettering. To the left of the exit, there's a full paint can and a cupboard with a five-color lock on the left door and a two-button lock on the right.
Red digits
Use the clue from the exit door to unlock your bag.
The clue in red on the sign reads 71×3, which works out to 213.
So enter that in the bag, then open it and take the screwdriver from inside.
Unscrew
Use the screwdriver to unscrew the windows. You keep the screws, and get a view of six different-colored birds outside.
Five colors
Use the clue from the birds out the window to unlock the left cupboard door beside the exit.
From left to right, the birds are yellow, blue, black, white, red, yellow.
So click the 5th, 2nd, 3rd, 4th, 1st, 5th buttons from the left and open the door to find a basket (hoop and net) and a paint roller.
Paint
Dip the roller in the paint can, coating it in a nice layer of brown paint.
Where have you seen that exact shade of brown?
Use the roller to paint over the gray patch next to the bag, revealing a clue with five pointy triangles.
Isosceles
Use the clue from the painted seat to unlock the right locker door behind the backboard.
The triangles on the clue match the top, lower-left, left, lower-right, right buttons.
So push those buttons and open the door to find a ladder.
Fixup
Place the ladder against the post supporting the backboard, and use the screws on the basket, then the basket on the backboard, then the screwdriver on the basket.
Now that the basket's fixed, you can pick the ladder back up.
Two buttons
Use the clue from the ladder to unlock the right cupboard door beside the exit.
The dirty footprints on the ladder are on the (from top to bottom) LRRLRL sides.
So push those buttons, then open the door to find a crowbar and a deflated basketball.
Leverage
Use the crowbar on the other discolored area beside your bag, lifting the seat to find a translucent plastic sheet behind.
Three colors
Use the clue from the plastic sheet to unlock the left locker door behind the hoop.
The sheet tells you how to combine some pairs of colors, and you've seen the same pairs of colors somewhere.
Those colors match the birds in the windows, whose colors combine to form green, gray, orange.
So push the buttons 4, 1, 5 times, then open the door to find a pump.
Air
Use the pump to inflate the ball.
Then shoot the inflated ball through the hoop, and it vanishes.
Turn away from the hoop and then back, and the scoreboard displays four digits in bright green.
So enter that number (0517) in the exit door lock to unlock it and escape.
awesome as usual kk :)
Anyone else having issues with Escape from the Hourglass Room? I get the arrows to click and sound and everything, but nothing else appears. The title screen's just a blank blue screen that glows white when I click it, and all the screens I go to are just one of 2 shades of blue.
And now I have Eiffel 65 stuck in my head. :[
Escape New Year's Room - Walkthrough
Exploration and initial collection
Room 1
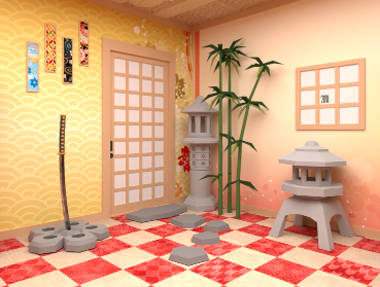
You’re in a cute room with pretty wallpaper (albeit an oddly large number of outdoor garden features indoors). Notice the following:
Four banners on the wall, each in a different print, arranged at different heights
Katana sword stuck into a stone flower. There are slots in each of 5 petals. Click to toggle through different letters (A, B, H, I, P, Q, Y, Z). One petal has an arrow pointing right.
Door, currently locked.
Tall Japanese stone toro lantern in the corner. Under the top part are three rings that can rotate, with marks (square, x-shaped star, triangle, diamond-shaped star, circle, snowflake-shaped star). Could some of these be shuriken throwing stars?
Rice paper shoji wall panel, above another stone lantern (not clickable). 2018 appears in the middle pane, surrounded by 8 clickable panes (pawprint, sakura blossom, koma spinning top, coin).
Stepping stones. Why are there garden-style stepping stones (tobi-ishi) indoors on a tiled floor?
Click one of the stone paving tiles: it moves. Underneath is a clue: A->B, B->C, C->D...
Room 2
More stepping stones lead to a dais against one wall. Notice:
Stepping stones. Underneath 4th tile is a clue. "HAPPY" with arrow above H, pointing right.
Red paper bag with a white, Japanese-calligraphy circle on it. It is locked with 3 white buttons, each showing 5 different kinds of brush stroke.
Box with a festive half-red, half-gold bow. Six flowers are arranged around the bow, and are clickable to be different colors (red, white, black, gold).
Fan-shaped wall decoration, showing 4 silhouettes of what looks like balls with tassels.
Fan-shaped wall decoration, showing 4 silhouettes of rectangles, at different heights and clickable to show different patterns.
Against the other wall, notice:
Bamboo. On one side, a single stalk of bamboo. On the other side, a cluster of 4 bamboo stalks—notice anything unusual?
Three throwing stars are stuck into the side of the bamboo.
Red wooden pail. On it, around what looks like a central slot or paddle shape, are six koma spinning tops which change colors (red, yellow, green).
Wooden bucket or table. On it are three different beverages (bottle, tall blue can, short red can) and a button by each, with digits 0-9.
Hanging from a rack, 9 cards with pictures of cute dogs. But when you go to take a closer look, why does the zoomed view not let you see the entirety of all 9 cards?
The zoomed view does show the red stamp in the lower left corner of each card: row 1 - sakura flower, pawprint, sakura flower; row 2 - top, 2018, coin; row 3 - top, pawprint, coin.
Room 3
The whole corner is dominated by a large red Japanese torii gate. Notice:
On the gate itself, circular symbols pointing different directions.
Stone lions. What are they guarding?
Each lion rotates, and the studs in the base change colors (red, white, black, in addition to stone grey).
Wall decoration. A ring of 12 sakura flowers around a red and gold bow.
On the altar under the torii gate, what looks like a tray on a wooden pedestal (with a keyhole), with a red-and-white paper streamer or garland. What could this be?
Large chest in front of the gate (actually an incense burner). On it are 3 circles between two lions and gem studs, as well as a shallow drawer with a ring pull that can’t be opened.
Clicking the circles reveals shapes similar to those on the tori gate.
Room 4
In this cozy, food-themed corner, observe:
Blue banner on wall, showing a calligraphy circle underneath a brushstroke.
Wall decoration, showing a little Shinto pedestal offering tray (samboh) with some rice on top, a bow, and a satsuma orange, as well as red-and-white garlands.
Lanterns, each with a different square-shaped pattern.
Vending machine, with a selection of different drinks. Above the slot where drinks come out, there is also a panel showing the following: “cola bottle x 5 = green tea bottle.”
Table in center of room: different-colored tops (koma) are arranged around what looks like a paddle (kagoita).
On a table against the wall, notice:
Black lacquer box with flowers, and some mysteriously-shaped cutouts on top.
Tray, with teapot and teacup.
The Katana in the Stone (Room 1)
Go to Room 1 and look at the stone flower in which the katana is stuck. Where have we seen a five-letter clue before, including the arrow?
Under the stepping stone in Room 2 is the clue “HAPPY” with an arrow on the H.
But just entering it into the flower doesn’t work! We need another clue.
Under the stepping stone in Room 1 is the A->B, B->C etc. clue.
These are instructions for a letter shift (replace each letter with the next one in the alphabet). Combine this clue with "HAPPY" to get: "IBQQZ".
Enter the flower code and press OK. Nothing seems to happen but if you have sound turned on, you’ll hear a ding. Click to get the katana sword.
Grey Lantern (Room 1)
Some of these shapes look like stars or shuriken. Where have we seen these star-like shapes before?
Look at the three shuriken throwing stars from the cluster of bamboo in Room 2.
Match the patterns (top to bottom: diamond shuriken, snowflake shuriken, diamond shuriken) and press OK to light up the lantern. Click to get a tasseled ball (temari) that goes into your Items.
Gridlocked (Room 1 - shoji screen panel)
Look at the square shoji screen panel on the wall in Room 1. Where have we seen a similar 3x3 grid arrangement of clues?
Use the cute dog cards in Room 2.
Look at the red stamp in the lower left corner of each card. (There is even a “2018” stamp on the middle card that matches the “2018” in the center of the panel.)
Enter the code:
Row 1 - sakura flower, pawprint, sakura flower
Row 2 - spinning top, 2018, coin
Row 3 - spinning top, pawprint, coin.
Press OK. Another tasselled ball appears in the short stone lantern beneath the shoji screen panel.
The Adventure of the Red Circle Bag (Room 2)
Look at the red bag with a white Japanese calligraphy circle painted on it. Where else have we seen something like this?
Blue banner in Room 4 has a black Japanese calligraphy circle. Above it is a paint stroke.
On the bag lock, pressing each button once reveals one complete brushstroke; pressing each twice reveals another brushstroke, etc. The last brushstroke is the one that matches the brushstroke on the banner. Press each button five times.
Press OK and get another locked box, with 4 buttons on top.
Each button shows several different patterns of squares. Where have we seen this before?
The same patterns appear on the lanterns in Room 4. Match the patterns (L to R: pattern #3, #1, #4, #2). Click OK. Box opens to reveal another tasseled ball.
Many a Screen and Fan? (Room 2 - fan with rectangles)
The pink fan on the wall in Room 2 shows 4 silhouetted rectangles at different heights, each toggling through several familiar-looking prints when clicked.
Look at the banners on the wall in Room 1 for the clue.
Match each color/print to the heights of the banners on the wall in the First Room.
Left to right in correct order: black with grey/teal flowers, cream/orangish pattern, black with pink/red flowers, pale blue print.
Click OK to reveal another tasseled ball.
Fanball (Room 2 - fan with ball-shaped cutouts)
Look at the fan on the wall in Room 2 with ball-shaped gold silhouettes, or cutouts. What might fit there?
Place each of the temari or tasseled balls that you have collected into the corresponding slot.
Once all four balls are added, a slot in the wall below the fan reveals a small gold key.
Gold Leaf (Room 2)
Use the katana on the single stalk of bamboo in Room 2. Inside is a gold piece shaped like a paintbrush stroke.
Flower Power (Room 2)
On the wall of Room 3, look at the multicolored sakura flowers arranged in a circle around a red-and-gold bow. Where have we seen this arrangement before?
Go to the box in Room 2, which has three sakura flowers both above and below the red-and-gold bow. But there are more flowers on the wall than on the box?
Use only the top three flowers and bottom three flowers:
Top - white, red, black.
Bottom - white, gold, black.
Click OK to get a gold piece shaped like a paintbrush stroke.
Proper A-lion-ment (Room 3)
Match the appearance of the room to the marks on the front of the large chest/incense burner:
Rotate the lions to face inward toward the Japanese gate, as appearing on the front of the large chest/incense burner.
The gems on the stone lion pedestals must also be black, as shown on the chest/incense burner.
On the chest/incense burner, make sure the three circular symbols appearing between the lions match the circular symbols on the Japanese gate.
Click OK and get a gold piece shaped like a swirl.
A Tea Ceremony (Room 4)
Look at the tray with teapot and teacup in Room 4. Could it perhaps use some tea?
According to the panel on the vending machine, “cola bottle x 5 = green tea bottle.”
There are five cola bottles in the vending machine. Click to turn on all the yellow lights below the cola bottles. A bottle comes out of the vending machine: get green tea bottle.
Pour the green tea bottle into the teacup. The teapot then opens, revealing a a gold piece shaped like a spiral.
Black Box (Room 4)
The black lacquer box with pink flowers in Room 4 has odd-shaped slots or cutouts on top.
Place each of the gold pieces into the matching slot.
Box opens to reveal another box below, locked with 4 digit code. Where have we seen a 4 digit number before?
Examine again the cute dog cards in Room 2 (or the shoji wall panel in Room 1).
Only lower-left corner stamp available for a closer look is "2018".
Enter 2018 into the second black lacquer box; get a yummy satsuma orange.
Drinks Bucket (Room 2)
Where else have we seen the drinks that are on the wooden bucket-table in Room 2 (cola bottle, tall blue can, short red can)?
Look at the vending machine in Room 4.
Count the number of bottles of each type. 5 cola bottles, 7 short red cans, 2 tall blue cans.
Enter 527, click OK, and get a large white lump of rice cake.
Toys Bucket (Room 2)
Look at the red wooden pail in Room 2. Looks familiar!
Match the colors of the spinning tops to how they appear on the table in Room 4.
Don’t forget to adjust for the direction of the paddle in the middle!
Solution (clockwise starting at 12:00 Noon position on the red pail): red, green, yellow, red, green, red.
Get a second rice cake with a red bow.
The Offering (Room 3)
Go to the Shinto pedestal offering tray under the Japanese gate in Room 3.
Use the wall decoration from Room 4 as a guide to assemble your offering:
Put the large rice cake (no bow) on the bottom.
Put the medium rice cake with red bow on next.
Add on the satsuma orange.
Once everything’s assembled, use the small gold key on the keyhole in the base of the Shinto offering tray to get the room key.
Congratulations!
Vyrastra, thanks for the walkthrough to the new years game. I can't wait for the hourglass room walkthrough. Keep up the good work on them. :)
This game is well worth your time. (More time puns coming up.)
Escape from the Hourglass Room
Time isn't running out, so take your time and you will escape in due time.
Exploration
You immediately spot two hourglasses. On the left shelf, there's an hourglass with white sand next to some books, one of which has a green spine that stands out but only a single flower symbol printed on its pages. On the right shelf, an hourglass with blue sand (and a black-colored base) rests on shelves that also contain four glasses with varying amounts of wine, and a locked compartment with a keyhole. The wall between them has a conspicuous rectangular outline, but no noticeable opening.
Turn left to find the double doors letting daylight in, as well as a photo of grapes that's fixed to the wall by screws.
Turn left to find a smaller door locked by a rectangular device on the wall that's screwed shut. On the right, there are slightly different shelves with a green-sand hourglass and a three-button safe which has its card suit buttons simply labeled KQJ.
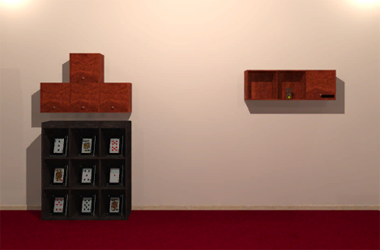
Turn left to find two more sets of wall shelves. On the right, there's one with a yellow-sand hourglass and a four-button safe where the buttons display purple stripes. On the left, there's another with four shut compartments, where each one except the middle is unlocked and contains a photo of scenery. Beneath it, there's another shelving display with eight large playing cards in photo frames.
Grape
Use the clue from the wineglasses to unlock the safe with striped buttons.
Click the buttons 2, 1, 0, 3 times to match the levels in the wineglasses, and the door opens to reveal a weird device with colored squares and buttons. So you play around with it to get another clue.
Face
Use the clue from the framed playing cards to unlock the card suit box.
The picture cards on display are King of Clubs, Queen of Hearts, Jack of Spades.
So enter ♣♥♠ in the safe by clicking the buttons 3, 2, 1 times, and it opens up so you can take the key inside.
Unlock
Use the key to unlock the safe on the wineglass shelf. Inside, there's another safe with six colored buttons.
Memory
Use the clue from the colored square device to unlock this colored-buttons safe.
The squares, when lit up, are
Red(0) Blue(1) Blue(1)

Yellow(2) Red(0) Yellow(2)
so click the buttons that many times to open the box and get a weather note.
Forecast
Use the clue from the weather note to solve the puzzle with the photos.
The photos are in the shelves above the playing card display, and display snowy, sunny and rainy weather.
The weather icons on the note occur in groups: 1 rain, 2 sun, 3 rain, 4 sun, 5 snow.
So open the RURUL compartments on the shelf to reveal matching photos, and the middle compartment opens up. Inside, there's an hourglass with red sand next to a clue involving rectangles, two of them marked with a flowery symbol and a red cross.
Browse
Follow the clue on the rectangle diagram to find a hidden treasure.
The diagram suggests that you should look in the book four to the right of the flowery one.
So click the third book from the right, pushing it in and opening up the hidden wall compartment. Inside, there's an ink splodge on the back and a nine-button safe with a clue written on its top.
Bright
Use the clue from the playing cards to unlock the nine-button safe.
Each card is either red or black, and removing the black ones leaves only the cards in the
--R

R-R

R--
So push those four buttons to open the safe. Take the screwdriver from inside.
Unscrew 1
Unscrew the grape photo to find a lever behind which doesn't seem to do anything.
Unscrew 2
Unscrew the rectangular door lock to find four colored buttons behind, in the shape of polyomino pieces.
Tile
Use the clues around the room to unlock the door.
The shapes on the lock match those on the shelves which have hourglasses, and those hourglasses have yellow, green, blue, red sand in them.
So click the buttons 3, 0, 2, 1 times, and the door to the next room swings open!
Exploration 2
Entering the door, you face a shelf on the wall with three unlit candles and a three-button safe with different-shaped buttons. There's also a box on a small table, with a valve and hole on its top, and there's a clue with fruits in squares on the wall above.
Turn left to find a photo of apples, which isn't screwed down so you can just remove it to find a lever. Under it, three round tables have different-shaped bases, and the middle one has a safe on it that seems inactive, and has a hole in its upper-right. There's also a large desk on the left where a book has flame and pencil markings on its pages, and a three-button safe has buttons that display flowers when clicked.
Turn left to find the door back. There's nothing on this wall.
Turn left to find a photo of oranges which hides another lever. Beneath it, a cupboard has a three-button lock where the buttons display flames of different colors.
Fruity
Use the fruit clue on the wall to flip the fruit levers correctly.
The grapes, apple and orange in the clue appear in the right, left, right squares of their pairs.
So flip the levers behind the grape and orange photos to the right. Nothing seems to change.
But when you look at the clue again, you find that it's disappeared and a pencil is in its place.
Shade
Use the pencil on the book where the pencil marking appears to get a flower clue.
Shape
Use the clue from the three round tables to unlock the safe beside the candles.
The bases of the tables are shaped like a hexagon, circle, octagon.
So click the buttons 3, 0, 4 times to open the safe and get a towel.
Clean
Use the towel to clean up the ink from the wall compartment in the first room, leaving only a flower clue.
Floral
Use the flower clues to unlock the safe on the desk in the second room.
The groups of 1, 2, 3, 4, 5, 6 flowers occur on the LCLRCR sections of the clues.
So push those buttons to open the box and get a matchbox.
Combust 1
Use the matches on the book where the flame marking appears to get a clue with jointed pipes.
Combust 2
Use the matches to light the candles, and they glow different colors.
So use that clue to unlock the cupboard beneath the orange picture.
From tallest to shortest, the candles light up in blue, red, yellow flames.
So click the buttons 2, 1, 3 times to open the cupboard.
Inside, there's four small hourglasses with white sand and a photo of another hourglass in a familiar location.
White
The photo clearly indicates the white hourglass from the first screen (beside the books), but it's been moved from its original position, marked by a hole in the photo.
So zoom in on that shelf, and click the bottom of the screen to look under it.
There's a screw there, which you easily remove with your screwdriver. Now you can pick up the hourglass.
Conical
Place the hourglass on the safe beneath the apple photo, activating the buttons on it.
Now use another hourglass clue to unlock it.
The sand in the hourglasses in the cupboard are in the
--SS

S-S-
halves of the hourglasses, so click those buttons to open the safe and get a valve handle.
Arms
Place the valve on the safe that already has one, and use the clue from the book on the desk to unlock it.
The bars on the left handle should point up and right, and those on the right should point left and down.
So click the left handle 6 times and the right handle twice to open the box. Inside, there's another note with four hourglasses and a cross.
Location
Use the clue from the hourglass note to find more treasure.
The note points to the location between the red and yellow hourglasses, so click the floor just to the right of the playing card display. Sure, there's something there, but you can't seem to get the compartment open.
Maybe you should check the note again.
The hourglasses on the note have lines drawn above and below them. In particular, the yellow and green hourglasses have lines above.
So flip those two hourglasses to place the black bases on top. Then look in the compartment again to find that it's now open and has a golden key inside.
So use that key to unlock the double doors and escape!
Thanks again for your hard work KK :)
My pleasure! Used to write occasional walkthroughs for fun in law school but it's been a while :) kudos to the JIG community for amazingly speedy solves then and now.
BTW: Daikokuyasoft hasn't been on JIG before, but they do have a number of other cute escape games (English enabled) on their website. The browser versions are linked on the sidebar to the right of their Escape New Year's Room page.
It was nice to try out Daikokuya Soft's game. Hopefully we'll see more from them!
I have read your article. it is very informative and helpful for me.I admire the valuable information you offer in your articles. Thanks for posting it, again!
- impossible game
Vitamin Hana usually brings colors and joy to your gaming life. This time takes you to a basketball gym under maintenance and succeeds again. Reliable Riddle Escape stand up to their quality standards and delivers another great game. The last one is from a newcomer - I'm happy to introduce Daikokuya Soft! Very cute, clever and amusing game they've created and I hope we meet again soon! microsoft office 2017 product key
Update