
 Another week is over and another Weekday Escape is here. Three cute games are waiting for you!
You start with "not so simple as it seems" game by Flatsan followed by "longer, and more complicated than it seems" game by Yonashi. Finally comes time for some rest in kids room, but Neat Escape doesn't let you play there; locks you inside and puzzles you have to solve are definitely not childish, even though you use toys!
Have a good time and enjoy!
Flatsan seems like modest Vitamin Hana's sibling - their games are short, design simple and has two or three game screens only. Apart from different color palette (pastel) there is another significant difference - more complicated puzzles which require out of the box thinking and combination skills. Just don't give up too early - the aha moment would come later, accompanied with a satisfaction.
The cursor is changing, no save button, one ending.
You are locked in an underground room with few bright pink objects, few stuffed toys and absolutely clueless. Yonashi's games are a bit weird and this game is not an exception - but they are lovely too and so is this one! There isn't much to do at the beginning - so start furiously clicking everywhere and you will get some results sooner or later...but don't expect any explanation why is the rabbit cautiously watching you through magnifying glass...and prepare for more strange meetings later.
The cursor is not changing, save button, two endings.
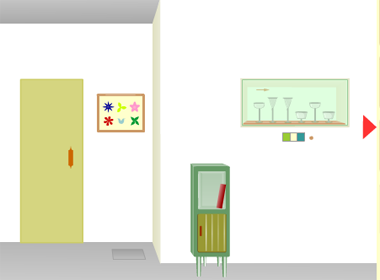
So, you came to a villa to see another Neat Escape's friend and you were told to play in children's room (being a child, apparently). It's a nice pinkish room, but Chloe, its owner, has gone and the door doesn't open. What now? Well, they told you to play ...but there are not many toys around and these you can see are missing some parts or lay out of reach...seems that the escape time is here, and the toys are part of it! Before you start, just one note - one key can open two locks, and the ending depends on your choice.
The cursor is not changing, autosave plus save button, two endings.
The game is avalable for Android too.
P.S. Don't want to be adult? You can play longer in Kid's Room by Robamimi! Or in Kids Room by Mygames888 (this one is really good!)! Or Escape from the Kids Room by Tesshi-e? Or Playroom or Playroom 2 by Kayzerfish? Choose your own favourite!
We love escape games, and our readers love talking about them and sharing hints! How about you? Let us know what you think, ask for clues, or help out other players in the comments below.


While Vitamin Hana's games have a tendency to become linear (find clue, copy it to the safe), Flat designs many puzzles around combining clues, many of which are deliberately ambiguous. There are other differences (Flat has fully-alphabetic locks, hint buttons, and some older games had Japanese-only puzzles) but this is the main reason I wouldn't put them in the same category.
Flowers
If you like flowers a room with a variety of flowers (none of them real) this is the room for you.
Exploration
You start off facing a capsule machine which you don't have tokens for, next to a small table whose drawer is locked and needs a three-digit code. Above the table, three flower-themed T-shirts hang on hooks. To the left, chains of lettered four-pointed star panels in two different colors hang on a rope. Where the left wall juts out, you can click on the edge to zoom in. The compartment at the top has a card slot on the right and a green slot on its bottom, and the three-button safe below that compartment has a clue between unlit lights and buttons that don't work.
(Back out all the way, and) Turn left to a screen with a fascinating wineglass display at its upper-right. The wineglasses have different heights and an arrow above them indicates their order, and the device with green, white, and teal buttons beneath seems to unlock the glass panel that covers the wineglasses. On that same wall, there's also a low cabinet with a book with several clues, and the lower compartment of the cabinet has a four-digit lock. Further left towards the exit door, there's a picture with differently-colored flowers that opens up to reveal a transparent flower sheet over a three-letter safe. On the ground directly beneath, a trapdoor hides a panel with a lotus flower picture and the digits 1 to 9.
Another Name
Use clues from the book to unlock the four-digit safe.
The flowers on the first page match those on the ROSE T-shirt, and those four letters appear in blue, blue, blue, red on the wall.
The down arrows tell you to read the letters beneath R, O, S, E closely.
Those letters spell out LEAF, so enter that in the cupboard door (where you found the book) to open it.
Inside, you find a long metal stick with a rounded handle.
Envelope
Use the clue from the T-shirts to unlock the wineglass display.
Each glass is shaped like one of the three flowers on the shirts: the tall one is shaped like a rose, medium one like a sunflower, short one like a lily.
The flowers which look like the MTTSMS glasses are on the white, teal, teal, green, white, green shirts.
So push the CRRLCL buttons and then the round red one to open the display up. Now you can reach each of the glasses to turn them over. Doing so, you find a coin in the fourth one!
Reward
Place the coin in the capsule machine, which dispenses the only small capsule it has.
Opening the capsule up, you find a round disk with a protrusion on its back.
(As written in the book, you will need to come back with 2 more coins for a large capsule.)
Bloom
Use the disk on the stick to attach it to the other end.
Then "Click here" as the game tells you to, making shorter sticks branch out from the main one.
Line
Place the branchy stick on the panel with non-working buttons. Its buttons light up, allowing you to enter a three-color code. But which colors?
The lines on the panel and branches on the stick combine to form the digits 584.
The flowers with 5, 8, 4 petals on the picture beside the door are pink, blue, green in color.
So click the buttons 4, 2, 5 times to turn them the correct colors, then open the safe to find a coin and a blue handle.
Operate
Go to the wall device with slots, place the flower sheet on the green slot and the blue handle on the vertical slot.
Then pull the handle to raise a filter over the flower sheet, highlighting some petals in blue.
(If you mess up this step, you can back out to reset the device.)
Pointer
Use the clue from the flower sheet to unlock the desk drawer.
The highlighted petals are in the 2 o'clock, 7 o'clock, 9 o'clock positions.
So enter 279 in the desk drawer, then open it to find another coin.
Prize
You now have two coins, which means you can afford to use the capsule machine again!
After placing both coins in the machine, it dispenses a large capsule with a lotus flower magnet inside.
Single
Place the magnet on the lotus picture under the trapdoor, which lights up the 1 in blue and 2, 4 in red, and displays their English names above.
As the hint button tells you, the English number names can be spelt on the lettered panels. But what do you do with the colors?
If you spell out ONE, you'll find that the only blue letter in it is O.
Similarly, the only red letter in TWO is T, and the only red letter in FOUR is U.
So enter OTU in the three-digit safe behind the flower picture. (You probably want to use the smaller blue buttons for this.)
The safe unlocks and letters appear to complete the word LOTUS. Opening it, you find a golden key and another lotus picture with the Japanese name for lotus.
Use the key on the exit door, and you're out!
Thanks for the walkthrough for Flowers KK. That was a cool game. Can't wait for the other 2.
Strange House
A strange house is a fun house.
Exploration
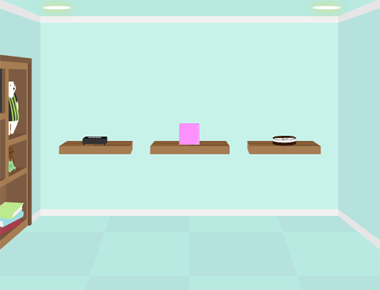
The strangeness of this house starts with three shelves on a wall. The left shelf has a box with hand gestures on its buttons that you recognize from rock-paper-scissors. The middle shelf has a pink cube with no distinguishable features. The right shelf has a round brown-and-white box with two long rectangular buttons in different orientations.
Turn right to a wall with a pink rectangle on it. A two-colored rabbit sits on tall stool, holding a pink-lensed magnifying glass to its right eye.
You notice a screwed-down panel on the floor near the stool.
Turn right to find a framed picture that's completely blank and has upward-pointing arrows on its frame. As you click the picture, it bursts into dark spots which briefly reveal a clue before fading away. Next to it, a completely pink bottle is fastened to a wall shelf. On the right, there's a locked door.
Turn right to find an eye chart which sneakily hides a four-button safe. There's also a set of display shelves with several weird items: a caged chameleon, a white bear (toy) in a striped shirt in front of a similarly-dressed gray bear, a pair of bowling pins, a miniature vaulting box, a teddy bear hiding a paint stroke on the wall, five neatly arranged books and three not-so-neatly stacked books.
Fist
Use the clue from the seemingly blank picture to unlock the rock-paper-scissors box.
From bottom to top, the gestures on the picture are scissors, paper, rock, scissors, paper, scissors.
So click those six buttons on the box (CRLCRC) to open it and get a gold key.
Unlock 1
Use the key to unlock the door and leave the room. That was easy- oh never mind, you're not out yet.
The door opens onto the bottom landing of a staircase, so climb up past a locked safe on the wall to the top landing, where a clue is drawn on the wall next to a door with a keypad lock.
Axis
Use the clues from the knick-knack shelf to unlock the two-button box.
Each shelf contains a different number of something vertical or horizontal: one paint stroke, two bowling pins, three books laid down, four tiers in the vaulting box, five books stood up, six stripes on the bears' shirts, seven cage bars.
(That one paint stroke can also be read as 一, the Japanese kanji for 1.)
Of these, only the paint stroke, stacked books and box tiers are horizontal.
So click the
-|--|||(RLRRLLL) buttons to open the box and get a triangle key inside.Unlock 2
Use the triangle key to open the safe on the stairs.
Inside, there's a blue battery and an hourglass device that's half pink, half white with a cyan indicator at the top.
Not pink
Click the hourglass display to flip it, putting the white part on top. What did that change?
Going back to the room, you find that the cube is now clear and holds a drawing of a bear in purple sportswear above a three-digit code.
The pink panel on the wall has also turned clear and you can look through this window at a bear on a couch just eating pawfuls of honey out of a pot with a number on it.
The rabbit's magnifying glass has turned clear, except when you zoom in on it you find a bent arrow between two decimal numbers.
The bottle on the shelf is also clear, and you can see a cardboard piece in it shaped like a 3.
Diminish
Use the clue from the magnifying glass to unlock the safe behind the eye chart.
The arrow points right from 0.2, then down, then left to 0.6.
The gaps on the C shapes that the arrow would pass through are on the RDULURD sides.
So push those buttons to open the safe and get the purple hairband from inside.
Math
Use the clues from the formerly pink objects to unlock the door at the top of the stairs.
Substituting the numbers in the formula gives 83×3+101, which works out to 350.
So enter that in the door, and open it. Success! But there's more.
Exploration 2
In this green-wallpapered room, a black bear sits on a wooden crate. He's all dressed for action except for one small thing. Leave him alone for now and open up the windows on the left, and lean over the railings to see the honey-eating bear from before rolling around all over a weird carpet.
Turn left to another set of shelves on the wall with various items in them. There's a book with one word on each of its three left pages, and there's a panda in front of a penguin labeled TV. The door to the left of the shelves has a five-letter lock.
Turn left to find two very tall dogs in different-colored overalls. In the middle of the wall, the digits 303 sit next to a hole/pivot, but each digit can be rotated. Zoom in on the left dog and pick up the penguin labeled MO behind his feet, then click on his clasped hand to lower it. As you do so, the right dog releases his grip on a screwdriver, but both dogs return to their original poses soon after.
Turn left to find a locked cupboard with a penguin display on top that looks like it could fit four more penguins for a total of seven. Each penguin on the display has two letters across its chest. On a table to the left, a snowglobe has "4th" written on a tree inside, and it releases a letter C when you invert it. The circle of letters on the wall above spell out the alphabet in clockwise order.
Turn left (again!) to find the doorway back, and something red on the floor in front of it which turns out to be a screw head when you zoom in on it. There's also a black device on the wall with five buttons, five small squares with white stripes, and a hole for a battery.
Barred
Place the blue battery in the device.
The white vertical stripes have vanished, and the now-activated buttons make the squares display white horizontal stripes instead.
So use one of the clues in this room to unlock the device.
The only clue with five letters is FIFTH, and the vertical stripes were in the positions corresponding to the vertical strokes in FIFTH.
So push the buttons to match the horizontal strokes (5, 0, 5, 4, 6 times), then click OK.
The vertical strokes light back up to complete the word, and the device opens up so you can pick up a penguin labeled HJ. Pick the blue battery back up.
Gear
Place the headband on the black bear, and he stands up.
Now you can open the wooden box to get the hammer inside.
Exchange
Place the hammer in the left dog's hand, which sinks down and stays down. Now you can take the screwdriver from the right dog.
Since you will need the hammer later, pick it back up.
Unscrew
Use the screwdriver to remove the red screw (in the green room by the door).
Use the screwdriver to unscrew the floor panel in the blue (first) room. Beneath, you find an empty cup.
Mallet
Use the hammer to smash the bottle in the first room and pick up the cardboard 3 piece inside.
(You're now done with the hammer, and it vanishes from your inventory.)
Three
Use the cardboard piece on the hole beside the digits on the wall upstairs.
Then use a clue from the room to solve the puzzle.
Spin the digits around until they spell MEOW.
Pick up the penguin labeled FH from the compartment that opens up, which has "1st" written on the back.
Feet
Use all four penguins on the penguin display, in the order given by another clue.
The alphabet circle hints that you should pay attention to the letters' positions in the alphabet.
Each pair of letters is exactly two letters apart on the circle, and the letters in between them spell PEN____.
In order to spell PENGUIN, the last four pairs of letters must be FH, TV, HJ, MO.
So place those four penguins in the display in that order, opening up the cupboard beneath to reveal a much larger penguin holding up a "3rd" flag.
Focus past the small weirdness to find what's truly weird: the bright yellow right foot (our left) of the penguin.
Spell
Use the clues you've seen in this room to unlock the five-letter door.
The clues are:
1st: MEOW between the dogs
2nd: U on the carpet out the window
3rd: Penguin in the cupboard
4th: C in the snowglobe
Fifth: black device
Each of these clues gives a letter on the door. Which letters are they?
The 1st letter of MEOW is M, and the 3rd of Penguin is N, and the 5th of FIFTH is H.
So the letters from all five clues combine to form MUNCH. Enter that in the door to open it.
Exploration 3
The door opens to the bottom of a spiral staircase. So climb up, and it ends at a white door at the top.
Opening that door, you find yourself in a room with a yellow slime bouncing around. There's a hole in the ceiling at the top left.
Chomper
The slime will eat whatever you give it, but then spit it out immediately unless it's the right color.
So feed it the penguin's foot, and it turns red. Not to worry, all we need to do is feed it the red screw. Now it's blue!
Since you picked up the battery from the black device earlier, you should have it ready to feed the slime.
Do so, and it turns pink. Look around for something pink.
You shouldn't be able to find any pink objects, because the hourglass switch turned all of them clear.
Go back to the hourglass and flip it again, and the glass in your inventory turns pink.
Feed it to the slime, who turns green.
This one's easy. Feed it the screwdriver. It turns gray, extends upward, and pop! It's now a ladder.
Pick the ladder up and place it on the left side of the room, allowing you to climb up through a trapdoor and escape!
Thanks again,KK, can't wait for the last one :)
Strange house walk thru
Room 1: no freebies
How many fingers?
Clue is on the shadow box dry erase board of mystery
with arrows
2 5 0 2 5 2
Enter code into the black box with hands on it to get gold key
What is that behind the teddy bear?
A single horizontal slash
The heck’s that supposed to mean?
it’s the beginning of a pattern
2 vertical bowling pins
3 books laying on their side,etc
H V H H V V V (H = horizontal, V = vertical)
Enter code into brown and white circular box and get a white key
Use the gold key on the door
halfway up the steps, use the white key on the panel
Flip the pink switch to white, grab the blue battery, and go - downstairs!
Back to room 1, for clues. And a solve.
All that was once pink is now glass. That you can see thru.
One of the clues is not like the others
the rabbit is taking a eye exam
the magnifying glass works both ways
.2 to .6, got it!
the arrow meanders
overlay the arrow onto the grid of the eye chart
right down up left up right down
Enter the code into the box behind the eye chart and get a purple band.
go upstairs and get your math on
C'mon, you can do it!
350
Room 2: If Richard Simmons was a cat
He would need a sweat band to match his leg warmers
Hammer!
Open the shutters, get a clue
Back out, click left, click shelf, collect a penguin, read a book for more clues.
Back out, click left.
Only one kind of dog wears overalls
tool users!
hammer users!
Collect ALL the tools. And there is another penguin
303?
Plus room for one more “3”
or is it a “m”?
next time you go downstairs, bring the hammer with you
Back out click left and make note of some more clues
Looks like you are two penguins short. DANG!
Eh, click left
There is a puzzle you could solve, but I’m more interested in that – is that a ladybug on the floor?
You know what to do.
Let’s go downstairs
Back to room 1
unscrew panel in the middle of the floor and get the glass, smash the bottle and get the 3
Back upstairs to room 2
3303?
Between the dogs, add the 4th 3, and spin!
use your words
from the book
MEOW
Penguin! And a clue.
Back out, click left twice, and revisit the black puzzle box.
spoiler: It needs a battery!
You can remove the battery.
Without the battery, you see a fixed pattern of vertical lines, With the battery in, you can enter a variable sequence of horizontal lines, but the vertical lines dissappear.
Or do they?
pretend the vertical lines are still there
use your words...
FIFTH
Now you have the all the penguins you need. Go back to the penguin stand, and just plug 'em in!
Nothing happened? There must be a reason they have letters on their chests.
How come you can only rearrange the four penguins that you put on the stand?
all the letter groups on the penguins are spaced the same, alphabetically
you only have one word left to use
PENGUIN!
You are rewarded with another clue, and a ridiculous yellow object. Go ahead, find it.
Last puzzle in room 2
By the wooden door, you got a 5 letter puzzle.
by now, you should have found clues for the 1st, second, third, fourth and fifth something or other.
"first" is found under the word "meow"
first letter of "Meow" is "M"
2nd letter of "rug" is "U". Also, there is a big "U" on the rug.
4th letter of the word "snowman" is "C"? Just go with it. The other letter clues make sense.
assemble the 1st 2nd, 3rd, 4th, and 5th letters in that order onto the puzzle lock, to get "MUNCH"
And you are so...not quite outta here.
Go up, and thru the door to find a yellow pac-man type thing.
throw some stuff at it
turns out a yellow pac man wants a yellow ridiculous sock, wonder what a orange pac man thing wants?
don't have anything blue? Oh yes, the battery!
I don't have anything pink, just this dumb ol' clear glass
and a switch in the basement that makes clear things pink!
Once you are finished with the pac man, you get a ladder, and a place to use it. But there are 2 endings, so save your progress!
Eh, the ending on the roof was pretty cool, but how do you get to the other ending?
This particular ladder can also be used to climb down
like off a balcony
maybe roll round with with a bear on a crazy sugar rush
Hurray ramen!
Thanks for posting a walkthrough with the other ending, which I missed on my playthrough.
You betcha.
This kid's room is a strange room.
Escape from the Kids Room
Your friend has invited you to "play" in his kid's room. Don't let the flamboyantly pink decor distract you, you need to escape!
Exploration
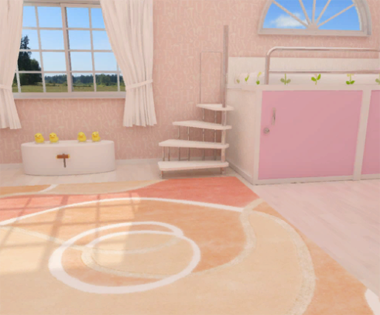
Your tour of this childish room starts with a box on the left with four chicks on it. There's room for a fifth, and a lever that doesn't do anything yet. Stairs lead you up to a small bed with a sepia photo of a cardboard cutout house hidden beneath the pillow, and the window next to the bed has a semicircle of digits where the wedge-shaped panes meet. As you descend the stairs and take a closer look at the pink cupboard doors beneath the bed, you find that both doors are locked.
Turn left to face another window which has more pink cabinets beneath: a small square one with a four-digit lock in two colors and two larger compartments holding a box with green grass cutouts and a safe with a jumbled image on it.
Turn left to find a very lovey wall with hearts above and beneath a wooden train set which runs into the wall and is missing both a track piece and a battery for its control knob. The shelves above are too high to reach, but you can see something perched on the right one. You can also zoom in on the radiator on the left, but there's nothing you can do there.
Turn left to face a desk with an assignment book and a stopped alarm clock that you can turn around. Above the desk, a sepia flower picture is attached to the corkboard. The desk also has two locked drawers, the top with six wedge buttons that form a semicircle, and the bottom with five buttons that display chevrons pointing in different directions. Next to the desk (and wastebasket), there's a locked door with a Chloe's Room nameplate, which you can lift up to find a wooden piece behind.
Sector
Use the clue from the window to unlock the top (six-button) desk drawer.
Since the wedges on the drawer is upside-down compared to the window, you need to push them in the 426135 order (i.e. the last button pressed should be the third from the left).
The drawer opens so you can take a duck toy.
Quack
Place the duck in the middle among the others, then pull the lever, and each duck turns to the right or left.
So use that clue to unlock the bottom desk drawer.
The ducks face in the LRRLL directions, so click the buttons on the desk drawer to show the
<>><<symbols.Then open it to find a knob inside.
Scramble
The jumbled image of a flower is not randomized. To solve it, click the pieces
123

220

113
times until it matches the sepia flower photo.
Open the safe to find a screwdriver inside.
Unscrew
Use the screwdriver to unscrew the battery panel on the back of the alarm clock, then remove the battery from it.
Drive
Place the wooden piece (track section) to complete the track, then the battery in its control panel, and then turn the knob.
The train comes back pushing another car, so look in it to find a pink key.
Then remove the battery from the control panel again.
Unlock 1
Use the pink key to unlock the left cupboard door beneath the bed. Inside, you find a stepladder.
Reach
Use the stepladder to the right of the train tracks so you can reach the shelf above, where there's a plane on a platform connected by wire to another control panel missing its knob and a battery.
Launch
So use the knob and battery you have on the panel, and the plane zooms over to the other shelf and smashes into a wall.
It's a red miniature wall panel that you can pick up behind the radiator. Flipping it over, you find a two-digit clue on the other side.
Digits
Use the clues from the room to unlock the four-digit safe.
The white digits on the wall panel read 95, and the blue digits on Chloe's book read 23.
So enter 9523, and open the safe to find a blue triangular piece.
Buildup
Place the wall piece in the lower-left cabinet device (below the four-digit safe), and then top it with the blue roof piece.
The device opens so you can get a blue key.
Normal End
Save your game, then use the blue key on the door to leave.
You enjoy a tasty strawberry tart which your friend prepared.
Unlock 2
Load your save, and use the blue key on the other locked cupboard door beneath the bed.
Inside, you find a tiny passage into the wall, so crawl through it to another room!
Four letters
This room has letters attached to its walls, with one of the letters on each wall glowing a bright golden color.
So use that to unlock the (box next to the) door.
The gold letters on the walls spell, of course, GOLD.
So enter that in the box to open it to enter yet another room with more 2D cutouts of a house and grass but much larger.
The model house has a four-digit lock next to its door.
Happy? End
Go back to the first room, and open the cabinet with the cutouts inside. Click the house cutout in the cabinet to push it down, and the drawer reopens with a grid of letters.
So use that clue to unlock the final door.
The columns in the grid read TWO SIX TEN.
So enter 2610 in the lock, then click on the door to leave.
You escape into the courtyard with a merry-go-round, and you return home after having loads of fun.
thanks again for the walkthroughs as usual kk.
Update