
 Welcome! Three fresh and new games are here for your relax and fun!
Tototo Room let us go and play outside hide-and-seek with eleven grey blobs, and enjoy sunny weather. Maymay let you out only after you open several boxes and cases, and find the code for exit door. With Riddle Escape, you start inside in a cosy room, but if you solve all the puzzles here, find the key from the main door and open it, you will see arrival of spring live!
Have a good time and enjoy!
Sun is shining, weather is nice, and Tototo Room prepared for us game outside in the courtyard. High fence is all around, the exit door locked and all you can see from outside is the sky and a strip of bright green grass under the fence (the grass is apparently greener on the other side). A bit nervous vulture is quite peacefully siting in the middle of a sandbox...you wouldn't expect a vulture, right? And that's not all, later in the game are more surprises! Just go and play!
The cursor is not changing, no save button, one ending.
Maymay wants you to find five balloons. Not for fun - they hide the code from the last door and as they are deflated, they can be anywhere, in any of these boxes and cabinets - and you know, all are locked and all locks are puzzles. The game is straightforward and uncomplicated as we are used too; still, there is a chance you may get stuck for a while.
The cursor is not changing, no save button, one ending.
Huzzah, after more than two months a new Riddle Escape's game! Beautiful, atmospheric and long! The room where you start is traditional japanese room with tatami on floor, small fireplace surrounded by few colorful cushions and round paper window. And origami birds and shoji lamps. And puzzles, of course, which are well ballaned, not difficult, not too easy, the game just flows nicely from its beginning to the end with few awesome moments. Happy playing!
The cursor is not changing, autosave, one ending.
The game is available for Android too.
P.S. Here are some more spring games: Spring Celebration by Tomatea and 10 Gnomes episode 3: Early Spring Garden by Mateusz Skutnik.
We love escape games, and our readers love talking about them and sharing hints! How about you? Let us know what you think, ask for clues, or help out other players in the comments below.


Stuck on Spring Cherry Escape.
I've managed to get into the courtyard and the upstairs room. I'm pretty sure the next step is either the 4 arrows on the cabinet on the right side of the courtyard, or the 5 petal-shaped buttons on the wall upstairs, but I can't find a clue for either. There's a round cabinet upstairs that still needs a handle, a page of kanji on a table, and 3 pedestals outside that have different patterns of lights on them that don't seem to relate to anything else. I've extinguished the fire in the main room, but can't do anything else in the fire pit. The only active item I still have is a screwdriver.
Oh, and according to Google Translate the page of kanji says "children's education," "children's torment," "children's injuries," "children's traffic injuries," or "children's tickets," depending on how I put spaces between the characters. I'm not sure how much I trust those translations
@Vinca: I'm only just starting to write the first walkthrough, but here's two hints for where you're stuck at (I had to look this up myself):
All you need is the other handle. Have you seen one?
It's attached to something else that you had to open earlier.
As for the kanji, their exact meanings are completely irrelevant to the puzzle, so I'm not going to put spoiler tags around this explanatory link.
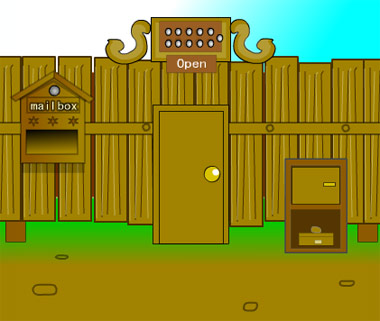
Button Escape 47
As usual, you need to find the eleven buttons in the room to esc- wait, this isn't a room!
Exploration
A familiar sight greets you when you start the game: eleven unlit lamps that are required to make the Open button work on the door beneath. To the left of that is an empty mailbox with a button on it. On the right, a cabinet has a locked door with four cat buttons, and the compartment beneath has an unusual box with four chicks that can be pushed down, with a single-word hint: Six.
Turn left. Despite the superficial similarities, the locked door on this screen is for a locker. Click the button beside it. The picture frame on the right has an intriguing collection of arrows, and the clue above it indicates which arrows to start from. You can see another button between the frame and the Start clue. Over the fence, you see a sign with distances to the stadium and airport. On the left of the screen is a plain and simple four-digit safe.
Turn left. Finally, a glimpse of the sun! On the fence, a fish hangs from a wooden beam with a button on it. The dirt patch in the lower right is guarded by a fierce-looking raven.
Turn left to face a flagpole (with no flag) and a well (with no bucket). In between them is a hole in the fence. So look closer at the hole (and click the button at the top-left corner of that screen), then look through the hole at two rows of four birds, each of which raises a coloured wing when hovered.
Chicks
Use the clue next to the chick box to unlock it.
The word Six refers to the digit 6 which appears in the middle of the arrow clue.
So follow the arrows in that digit, starting from the yellow one, which tell you which chicks to click: the ones facing in the ←↓↓→↑← directions. (Note that those chicks are actually on the RUULDR sides.)
A drawer opens from the box, revealing a key and a tiny button.
Unlock
Use the key to unlock the locker (click the doorknob with the key selected).
Now you can access the button on the back of the door, as well as the bucket inside and the safe with two rows of four buttons.
Carry
Attach the bucket to the well, then click it again to fill it with water. As it comes back up, some water spills onto the edge of the well.
So look closer at the spill, where the water has revealed three letters, and then click the button hidden on the right side of that screen.
Four digits
Use the three-letter clue from the well to unlock the four-digit safe.
The clue can be read as
km m, which are the units on the signpost.The corresponding numbers on those distances are 14 and 97, so enter 1497 in the safe to open it. Take the wooden hammer from inside.
Whack
Use the hammer on the fish…
"You called?"
…which summons a tiger on the other side of the fence! It's so scary that the raven immediately leaves.
"Piece of cake!"
"Thanks!"
As you read the color clue on the piece of paper beside where the raven was, click the button that was on the ground beneath the paper.
Colors
Use the color clues to unlock the box in the locker.
The birds with black, red, orange, green, blue, pink, yellow, brown wings are in the
8765

1234
positions, so just click the buttons on the box in counter-clockwise order from the lower left.
This unlocks the box, so take the flag from inside.
Fly
Attach the flag to the flagpole to raise it, and a voice over the fence informs you that your delivery has been made.
So check the mailbox, which now has a bag of seed in it.
Plant
Plant the seed in the dirt patch where the raven was.
Then check the seed bag, which you can peel apart to find a clue.
Face
Use the clue from the seed bag to unlock the cupboard door on the first screen.
You need to place the lips indicated by the clue on the cat faces, from left to right (I'm guessing that's what the darkened ear in the corner means).
So click the face buttons 6, 5, 4, 1 times, then open the door to find a dipper and a button.
Scoop
Use the dipper in the filled bucket, and then use that to water the seed, which grows into a giant flower, which blossoms to reveal the last button!
Complete
The Complete message confirms that you've found all the buttons:
In the order of this walkthrough, the
09 11 05 03 01 06

07 02 08 04 10
lights on the door are controlled by the following buttons:
On mailbox
Beside locker
Behind/above arrow frame
On beam holding fish
Top-left corner while looking at hole in fence
Inside drawer of chick box
On back of locker door
Right side of screen while looking at spill
Beneath paper in dirt patch
In cupboard on first screen
In giant flower
Click the Open button to open the door and escape.
Thanks! That was a tricksy one, I wouldn't have thought to look there =)
I was wondering if the kanji had something to do with the zodiac, but wasn't sure how "child" fit in. Thanks for the link, that was really interesting. Also, Google's translation fail was rather amusing to me, the progression of "education" to "torment" to "traffic injuries" in particular
On "Spring Cherry Escape":
Was that white vase thing supposed to be a bottle of sake? Was so sure the red thing in the courtyard was another spot for candles. Clicked and poured it before I knew what was happening!
That Wikipedia article about the "Earthly Branches" was interesting, kktkkr. Laughing at myself, because I was over here matching things up by saying,
"French seven, F/X, and crossed K."
Who needs kanji when you have mnemonics, LOL…
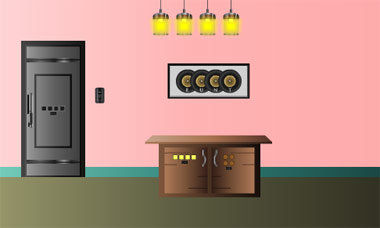
Find 5 Balloons
And have a ball of a time!
Exploration 1
A picture on the wall shows four (gramophone) records with letters on them, and the cupboard beneath has two locked doors, one with a row of four animal buttons and the other with a grid of four shape buttons. The door to this room requires a four-letter code, and the switch beside it turns off the four lights, revealing four animal silhouettes on the wall.
Animals
Use the clue from the wall to unlock the left cupboard door.
The animal clue reads Swan, Monkey, Snail, Penguin.
So click the buttons 4, 1, 5, 2 times, then open the cupboard door to find a record player.
Looking closer at the record player, you find that you can zoom in on its buttons (which you can't push), and open it up to find a yellow balloon on the record, which is only labeled with a number.
Shuffle
Use the clue from the labels on the records to unlock the door.
The label on the record in your inventory tells you to look at the 4th, 2nd, 3rd 1st records on the wall.
The letter on those spell out TUNE, so enter that in the door and unlock it.
Exploration 2
Who left all these ducks on the floor? And a mysterious package that you can't do anything with. The cabinet on the left has two doors, but the lower one is empty. That just leaves you to figure out the three-digit code for the top door. The exit door for this room has three buttons on it which remind you of player controls.
Red and Yellow
Use the clues from the ducks to unlock the cabinet door in the same room.
The wing-shaped red markings on the ducks end in 1, 2 or 3 points, with 5, 3, 2 of each type.
So enter 532 in the lock, then open the door to find a note with circles and numbers.
Controller
Use the clues from the note and record player to unlock the door to the second room.
The circles numbered 1 to 4 match the⏵⏪︎⏸⏴buttons on the record player.
So form the matching symbols by pushing the RLLCCL buttons on the door, which unlocks it.
Exploration 3
More things to unlock! This table has two locked drawers, the left having four colored digit buttons and the right having four lettered color buttons, and two locked doors, the left having three letters arranged vertically next to a clue, and the right having just a simple lock which needs a key. The potted bamboo on the left catches your eye with its colored stem sections, and the exit door of this room has five colored lettered buttons.
Four digits
Use the clue from the bamboo to unlock the left drawer of the table.
The orange, yellow, blue, pink sections of the bamboo are on the 5th, 2nd, 6th, 1st sections of their respective stems, counting from the top.
So enter 5261 into the drawer, and open it to find a box cutter.
Unbox
Use the cutter to open up the box in the second room.
It contains a toy bear with shapes on its paws.
The bear also wears a jacket, which hides an orange balloon!
Four shapes
Use the clue from the bear to unlock the right cupboard door in the first room.
The symbols on the bear's paws are
Circle(1) Triangle(5)

Pentagon(3) Heart(6)
So click the buttons that many times, then open the door to find a green balloon and a mysterious arrangement of screwdrivers that you can't pick up.
Pointed
Use the clue form the screwdrivers to unlock the three-letter door of the table.
The screwdriver beside the letter buttons points downward.
Rotating the screwdriver clue to match, you find the letters N M V.
So enter that in the safe to unlock it, and open it to find a cake and a red balloon.
Four colored letters
Use the clue from the cake to unlock the right table drawer.
The letters P, I, E, S on the cake are pink, red, yellow, orange.
So click the buttons 4, 5, 1, 3 times, then open the drawer to find a blue balloon and a key.
Unlock
Use the key to unlock the right door of the table, which contains an air pump.
Balloons
Use the pump to inflate all five balloons. Now you can read the letters on them.
So use that clue to unlock the last door.
The letters on the yellow, orange, green, red, blue balloons spell out SMILE.
So enter that in the door to unlock it and escape. Time to party!
Because this game is Unity/WebGL-based, it's currently affected by a Chrome muting bug where no sound plays at all. One temporary workaround is to click on the game area before the game loads.
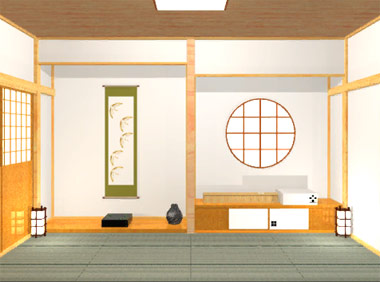
Spring Cherry Escape
As you may have come to expect from Riddle Escape, actually finding cherry blossoms (sakura) is not an easy task.
Exploration
It's another traditional Japanese room! On the left side, a scroll with birds(?) hangs over a flowery box with three buttons arranged vertically, and the pot on the right has a key hidden inside that you can't reach. On the right side, a long box has two comma-shaped slot, a white safe has four colored buttons, and the locked compartment below has four buttons arranged in a grid.
Turn left to face locked sliding doors. On the left side of the room, there's a fire pit with its fire lit, surrounded by four different-colored cushions. A shelf in the corner has four candle holders, but a blue circle marks where one of the candles is missing.
Turn left. Now you can take a closer look at the short panel with three digits beside the cushions. To the left of that, there's a set of shelves with yellow paper cranes on them, but the top shelf is empty.
Turn left to find a fancier round display shelf with a bluish box that requires a key and a round wooden box with six color buttons. The small sliding door to the left of it is marked by blue flowers, but if you try to open it you'll find that the door is blocked by a screw. You also see a very high shelf near the ceiling, but the paper crane on top of it is way out of reach.
Four colors
Use the clue from the cushions to unlock the safe with four colored buttons.
The two lines on the bottom of the safe match those on the firepit beside the red cushion. So leave the bottom button alone.
The button at the top should be yellow (3 clicks), the button on the left should be blue (1 click) and the button on the right should be green (2 clicks).
When you have the colors correct, the safe opens so you can take a comma-shaped magatama crystal.
Violets
Use the clue from the flowers on the smaller sliding door to unlock the box beneath the scroll.
The flowers fit into three rows, more specifically on the (from left to right) bottom, middle, bottom, top, bottom, middle rows.
So push the BMBTBM buttons on the box, which opens up to reveal some delicious skewers of dango! But you can't eat it because it's a clue.
Triangular
Use the clues from the dango to unlock the round box on the round display.
Just reproduce the pattern exactly by leaving the corner buttons red (0 clicks), turning the middle left button blue (1 click) and the other two buttons green (2 clicks).
The box opens up so you can take the other magatama.
Dual
Place both magatama in the long box.
This time, you have to open it yourself. Take the long pole from inside. Examining the pole, you find that the metallic end has a hole in it.
Highest
Use the pole to retrieve the paper crane from the high shelf.
Then place the paper crane on the shelf along with the other ones.
Nothing appears to happen, but if you click the cranes again you find that you can now move them to the left or right sides of their shelves.
Left and Right
Use the clue from the scroll to place the cranes correctly.
The birds on the right side of the scroll are 2nd and 3rd from the top.
So click the cranes on the 2nd and 3rd shelves from the top to move them to the right.
You hear something unlock, and it turns out that the scroll has rolled up. So turn around and take the screwdriver from the newly-revealed hidden compartment.
Unscrew
Unscrew the screw that blocks the sliding door, which opens into a small alcove.
Inside, there's three kokeshi dolls with different facial expressions and colored stripes at their bases, and that shelf continues on to hold a box whose five buttons display red and white diamonds. Beneath that, there's another panel with three digits similar to the one you saw before. There's also two pegs on the wall, and clicking above it makes you look up at the trapdoor in the ceiling.
Corners
Use the clues from the panels with digits to unlock the compartment with four buttons.
The digits 1 to 6 appear on the LL UR UL LR UR LR corners of their panels.
So click the ⌞⌝ ⌜⌟⌝⌟ buttons to unlock the compartment. Ooh, that's a nice katana! If you try to pick it up, you end up zooming in on the colored symbol lock at its lower right, which also has a paper clue with a colored Venn diagram.
Mixed
Use the clues from the kokeshi dolls and the Venn diagram to unlock the lock on the sword.
Taking red, green, blue as primary colors, the cyan and yellow colors on the lock are obtained as green+blue and green+red.
So the symbols needed for the lock are Square, Square+Triangle and Square+Circle.
So click the buttons 2, 5, 4 times, and you hear something unlock again. Now you can pick up the katana!
Diamonds
Checking the grip of the katana, you find a pattern of red and white diamonds on it.
So use that clue to unlock the box with diamond buttons next to the kokeshi dolls.
Click the buttons 2, 1, 2, 1, 1 times to display white, red, white, red, red diamonds that match those on the grip.
The box opens up so you can take a hook from it.
Pull
Attach the hook to the end of the pole, and use it to open the trapdoor. A candle falls from the ceiling.
Flame
Light the candle on the fire or on another candle, and place it on the empty holder on the shelf.
The large sliding doors unlock, and you can click them to leave… into another area.
Exploration 2
Wait, where's spring? You look across the rectangular pond at a row of bare trees, and there are piles of snow around.
Click the right side to zoom in on that wall. The entire right half of the wall is snowed in, but you can still access the stone lanterns, the locked cupboard with four petal buttons and an umbrella with three images on it.
Back out and click the left side. A single tall bamboo shoot grows taller than the walls, and four empty bowls on a low table.
Slash
Use the katana to cut the bamboo in half, then pick up the bamboo section.
Float
Fill the bamboo in the pond, and then use it to fill the pot under the scroll.
The key floats to the top and you can take it!
Unlock
Use the key to unlock the blue box on the round shelf.
Inside, there's a beautiful vase, but its Japanese description reveals that it's filled with sake!
Quench
Pour out the wine into the red bowls.
A long compartment opens in front of them, containing a ladder.
Climb
Use the ladder on the wall beneath the trapdoor so you can climb up through it.
Exploration 3?
Surprise! The attic is pitch black other than the moonlight from the open window. Turn around to find the light switch, which is locked in a box which requires three familiar images need to be adjusted to the correct sizes.
Fish Cat Moon
So you head back down the trapdoor and out to the pond, examine the umbrella closely, and return to the light switch casing to unlock it.
The picture of the cat is larger than that of the moon (and branch), which is larger than that of the fish.
So click the buttons on the light switch 2, 0, 1 times. Now you can turn the lights on.
Exploration 3
Your eyes quickly adjust to the light in the attic. On the left, there's a stack of colored cushions. On the right, there's a three-color safe on a small table, where the potted bonsai beneath has only three leaves. Pick up a pink petal from behind the pot.
Turn around to face the window. The table beneath it has a locked box with six misaligned buttons that turn green and a piece of paper with twelve kanji on it, following the order of Earthly Branches (地支). Under the table, there's a clue with three columns of five rectangles, one of the rectangles shaded black in each column. On the left, there's a wooden cupboard missing its handles. On the right, there's a box with a sakura made out of petal buttons, two of which are missing.
Leaves
Use the clue from the plant pot to unlock the box on the table beneath the window.
The positions of the buttons match those of the ends of the branches.
Exactly three of those branches have leaves left on them: the lower one on the left side and the 2nd and 3rd from top on the right side.
So click those buttons to turn them green, and the box opens so you can get another petal button.
Three colors
Use the rectangle clue beneath the large table to unlock the box on the small table.
The shaded rectangles (from left to right) are 3rd, 2nd, 5th from the top.
The corresponding cushions are yellow, purple, red.
So click the buttons 2, 4, 0 times to unlock the box and get a handle.
Search
The handle from the three-color box fits on the cupboard, but you still need to find one more.
Perhaps you've seen the missing handle already?
It's a handle for something else.
Climb back down the trapdoor. While on the ladder, click the trapdoor to close it.
Then zoom in on the trapdoor handle and unscrew it. After a while, you pick up the handle.
Place both handles on the cupboard, and open it to find five bowls with dice in them.
(Hold down the mouse to take a closer look at the dice, but I managed to get the game stuck while doing so. If you have the same issue, just refresh and load the autosave.)
Sakura
Place both petal buttons on the sakura box, then use the clues from the dice to unlock that box.
The dice read
-3-

4-2

1-5
so click the lower-left, right, top, lower-right, left petals on the box.
You hear a click, and a single petal floats in through the window. Where did it land?
As you head towards the trapdoor to leave, you find the petal on the ground beside.
It landed perfectly on the cover of a hidden compartment, which you can open to find a yellow bun.
Spring
As you exit into the courtyard again, you find that the snow is gone, the trees are blooming and it's raining petals.
On the left wall, a table is now visible, and it has a box with square patterns on its buttons. You can also take a second look at the bowls of wine, where (you can zoom in to find) a single petal has landed in the middle of each.
On the right wall, the door is now accessible, and so is the shrine on the right which has four plates, which are empty except for a green bun on the top-right one.
One more change: if you check back on your candles, you find that all the ones that were originally there are now missing, and you can reclaim the candle you put down. Now each holder has a colored circle on its base.
Square lights
Use the clue from the lanterns (hold down the mouse button) to unlock the box on the left wall of the courtyard.
From tallest to shortest (center, right, left), the patterns on the lanterns have lit squares on the bottom, on the lower-left to upper-right diagonal, and on the right.
So click the buttons 1, 5, 3 times to open the box, which contains a blue bun.
Four petals
Use the clue from the bowls to unlock the petal cupboard beside the double doors.
The petals in the bowls point to the UR DR DL L directions.
So click the buttons 5, 7, 1, 2 times to open the cupboard. Take the shovel from inside, and look at another locked box with kanji buttons marked with dots.
Dig
Use the water from your bamboo to extinguish the fire, then push the logs to the side, then use the shovel to dig in the fire pit to find a piece of paper with a square grid and a flame symbol.
Burn
So use the paper on the only remaining fire source: the candle that you picked back up.
The only change to the paper are dots of soot that appear in three of the grid squares.
Paper
So use the clues from the charred paper and the paper in the attic to unlock the kanji box.
The squares with 1, 2, 3 dots correspond to the 子戌未 kanji in the grid.
So click the buttons 0, 10, 7 times to match. The box opens and you can pick up the pink bun from it.
Offering
Place all four buns according to the clue from the candle holder.
The blue, yellow, green, pink buns appear in your inventory in that order, and you need to place them in the
G P

Y B
positions.
Once that is done, the shrine opens up and you can take a golden key.
Use the key to unlock the courtyard doors and escape! Enjoy your sakura-themed congratulation screen.
Hit a glitch in Spring Cherry Blossom escape, zoomed in on a clue and it won't zoom out again. I can select inventory items but not navigate away from zoomed in view.
Number 5 dice in cupboard
Cannot complete game.
why don't you can not complete this game? @@
Update