
 It's Escape Wednesday, the peak of the week! Welcome!
Amajeto is still in summer mood and locks you in a shack somewhere nearby water and doesn't let you go fishing or boating until you solve all the codes and puzzles here. The game by tomoLaSiDo evokes spring and introduces very special device never seen or heard before - you may leave without getting it working though, it's side quest only, the so-called Dandelion Quest. Short adventure by IcyOak leads you to small sandy island in the middle of vast sea and your reward is heap of gold! Minoto doesn't give you any reward, just inner smile.
Have a good time and enjoy!

Amajeto has changed their usual living room for untidy beach shack with paddles, deckchairs and other beach stuff lying around - however escape stuff is there too, puzzle tiles, wobbly picture and coded drawers. The shack is missing TV set, but at least you don't have to look for batteries for controller (for once). The exit door is absolutely indentical to those in living room and the key as well, can you find it?
The cursor is changing (its color), no save button, one ending.
Familiar tune in tomoLaSiDo's room isn't throwback; you return to spring for a while, when dandelions were in blossom and someone hid ten flowers around the apartment. There are more than one room to explore and also more keys you need to find - the one in lower right corner is from the exit door, others can be found in one piece, luckily. Some clues are a bit vague, but the overall game is fun to play.
The cursor is changing, no save button, three endings.

Everybody knows that there are always treasures on small islands, also lack of drinkable water and cannibal tribes, but lets stick with the first from obvious reasons - IcyOak's adventure is cute short game and not survival horror. You find yourself on tiny island with obligatory palm trees and without any equipment - can you escape and get a treasure? Or recover your treasure, as the description says...
The cursor is not changing, no save button, one ending.
P.S. Small islands, cannibals, pirates - The Curse of the Mushroom King by Bad Viking (jdonkin earlier) is excellent adventure!
Yes, there is a cat and a samurai in Minoto 's game. Also a tree in flower pot, some cushions, a fridge, empty bowl. I don't know what to say more, but I liked it and hope you'll too.
The cursor is not changing, no save button, one ending.
We love escape games, and our readers love talking about them and sharing hints! How about you? Let us know what you think, ask for clues, or help out other players in the comments below.


Beach Shack Escape
It's alright to hang out in this homely beach shack, but this wouldn't be an escape game if that's all you did.
Exploration
A scrambled image hangs next to a shield with a fish design, and wooden oars on both sides lean against the wall. You can see the outside sky through the windows near the ceiling, and you also notice a square tile on the middle window, too high to reach.
Turn right. There are more oars on the walls, different-colored fishing lures, a beach ball on a boat and footprints leading to the right.
Turn right. These oars aren't wooden, and they rest on the floor next to a fishing rod, a beach-themed grid device, and a giant painted wave with colorful starfish. The door on the right is locked and the window on the left has several of its panes covered in blue paint splatters.
Turn right. The deckchairs, slippers, sunglasses and pail aren't interactable, but the ladder can be picked up and the painting on the right can be tilted. There's also a chest of drawers in the middle, each having a different lock: 4-digit, 4x4 grid, 4-color, 2-button, 4-bar and 4-digit. Yes, the only difference between those two 4-digit locks is that the one in the top left has buttons and digits in brown.
Unscramble
Fix the (randomized) scrambled picture on the first screen by rotating its tiles. (Hint: start with the numbers.)
Once you're done, you hear a click, the fish shield drops, and you can take a square tile from the compartment behind.
Calculate
Use the clue from the unscrambled picture to unlock a drawer.
Putting the numbers on the houses and the operators in the sand in left-to-right order, you get 72×43−12+19.
Work that out, preferably using a calculator, and you get 3103.
Then enter that into the bottom-right drawer (because the shacks in the picture have white roofs?) and open it to find another square tile.
Above
Place the ladder to the left of the picture you just solved to reach the middle window.
As you take the square tile, you find the window pane taped shut in many places.
Corners
Use the clue from the taped window pane to solve the tilty painting.
The quarters of the pane have
3 1

2 4
pieces of tape, so click the four corners of the painting in that order.
On the back, you find a square tile and a list of small numbers in roman numerals.
Translate
Find some roman numerals and use their clues to unlock a drawer.
The four sets of wooden oars, appearing on consecutive screens, are arranged to spell out the roman numerals V, III, II, IX, or 5 3 2 9.
Enter that in the top left drawer (because the oars are brown) and open it to find a square tile.
Colors
Use the clue from the fishing lures to unlock the middle left drawer.
The lures have different numbers of hooks, from 1 to 4 (including those at the back).
Arranged in that order, they are yellow, red, green, blue.
So click the buttons 2, 0, 3, 1 times, then open the drawer to find another square tile.
Footsteps
Use the clue from the footprints to unlock the middle right drawer.
In the direction of the footprints, the right, left, left, right, right footprints are shown.
So click the RLLRR buttons, and then open the drawer to find another square tile.
Grid
Use the clue from the splattered window to unlock the top-right drawer.
Click the same four squares to turn them blue, then open the drawer to find yet another square tile.
Heights
Use the clue from the splattered window again to unlock the bottom-left drawer.
Click the bars 0, 2, 3, 1 times to match the heights of the splatters, then open the drawer to find the last square tile.
Complete
Use all nine tiles on the grid device under the splattered window, then click it to zoom in.
Solve this (randomized) image puzzle by swapping pairs of tiles.
Once you have it correct, the device opens so you can take the key.
Use the key to open the door and escape!
Escape Challenge 60: Room with Dandelions
Exploration
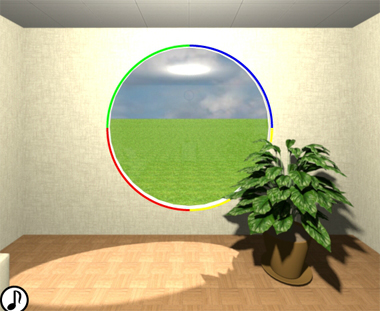
You start off facing a familiar round window outlined in four colors. Check the potted plant to find a dandelion.
Turn left to face a comfy-looking couch with a dandelion on it.
Click both sides of the couch to find numbers printed on them.
Turn left to face a locked door. A picture of a cat, or rather the back of its head, shifts a bit when you click its corners, and the wall box beside it has two buttons on its lock.
Turn left to face a small chest of drawers with a camera on top. The top drawer has a lock with three colored squares in different sizes, and the bottom drawer has a three-digit lock. The clock on the wall above only has three numbers marked on its face.
Three digits
Use a clue from the clock to unlock the bottom drawer.
In clockwise order, the digits on the clock are 2 3 4.
So enter that in the drawer and open it to find a key piece.
Three colors
Use another clue from the clock to unlock the top drawer.
The square buttons on the lock have borders that go from thick to thin, matching the hour, minute and second hands on the clock.
Those hands fall in the lower-right, upper-left, upper-right quadrants of the clock face, and the corresponding quarters of the window outline are yellow, green, blue.
So click the buttons 1, 4, 2 times and then open the drawer to get a key piece.
Two sided
Use the clue from the couch to unlock the wall box.
The digits from 1 to 6 appear on the LLLRRR sides of the couch.
So click those buttons and open the box to find a bowl for pets (presumably a cat), and a clue with yellow digits.
Corners
Use the clue from the wall box to unlock the shifty picture beside it.
Following the order of the digits in the clue, click the ⌝⌝ ⌞⌞⌜⌟ ⌜⌟ corners of the picture.
The picture slides aside to reveal a golden key.
Unlock / Exploration 2
Use the golden key on the door, and go through to the next room.
For some reason, you face another locked door rather than what you saw through the doorway. Light streaming in through the tall windows beside it falls on another potted plant, which has a key piece in its leaves. Zooming in on the plant also lets you see the dandelion on the window behind it.
Turn left to face the doorway you entered from. A weird machine appears to have a display, triangular buttons and a chute for a dandelion, but none of that works right now. There's also a picture of a cat's paw on the wall, with some unusual markings in its top left.
Look under the machine to find another key piece and dandelion.
Turn left to find a larger chest of drawers with a hanger on top. The drawers have a three-digit lock, another three-digit lock (with something extra) and a four-button lock. There's also a picture of a cat's tail with some extra lines on it, and an empty blue bin.
Turn left. There's another locked door and a much larger machine with a knob, a column of lit buttons, a GO button, a green ball behind the glass, and an orange box that reads (upside down) "good cat food".
Dispenser
Place the bowl in the cat food dispenser, and experiment to figure out how it works.
You don't actually have to adjust anything. Just tap the cat food box until the cat food drops out.
Four buttons
Use the clue from the main door to unlock the bottom drawer.
Hint: you'll need to look closely.
The windows around the door have one light tinted pane per row, as well as an upward-pointing triangle at the bottom (while you're zoomed in on the door). So read the rows from bottom to top and note that the lighter panes are at the 4th, 2nd, 4th, 2nd, 1st, 3rd positions from the left.
So push the buttons in that order, then open the drawer to get a fish.
Three digits (top)
Use the clues from the pictures in this room to unlock the top drawer.
Combining the symbols vertically (paw picture over tail picture) gives you the digits 419.
Enter that in the drawer and open it to find a dandelion.
Three digits (middle)
Unlock the middle drawer using a clue nearby.
While looking at the lock, the digits 222 appear above the close button.
So enter that to unlock the drawer and find another golden key.
Unlock 2 / Exploration 3
Use the second golden key to open the door to the next room.
Once again, you get turned to face the view through the window. Zooming in on the counter, you find a dandelion next to a colorful plate that stands out among the other plain cutlery.
Turn left to face the doorway back. There's a sink here that doesn't seem to work, but it has a darkened blue spot above the tap.
Turn left to face another locked door. The picture on this wall shows a cat's paw, and there's a dandelion on top.
Turn left to face an arched doorway (with no door). On the left, a cabinet has three locked doors, one with three sliders, one with two digit buttons, and one with three color-changing buttons.
Enter the arched doorway. It's the toilet! You can't sit on it, but you can look at the device on the right with three digit buttons beneath a blank square, and the toilet paper roll which has digits above the holder and on some of its pieces.
Three digits (wall)
Use the clues from the toilet paper to unlock the wall panel there.
734 from the holder doesn't work, and the numbers on the toilet paper don't seem very helpful. But what if you combined them?
If you keep pulling at the toilet paper, you'll find that the numbers always appear in the same sequence: 12321312.
Taking the 7th, 3rd, 4th digits from that sequence gives you 132, which actually works!
The square center of the panel opens so you can take another dandelion.
Three sliders
Use a clue from the third room to unlock the top cabinet door there.
Hint: you're looking for three items that aren't vertically aligned.
Those three items are the spoons to the far right of the plates.
In order to match their positions (middle-low-high), you need to click the sliders 0, 3, 1 times.
Open the door to find a dandelion.
Two digits
Use a clue from the third room to unlock the middle cabinet door there.
Looking at the spoons again, you find that there's two beside the left plate and three beside the right plate.
So enter 23 in the lock, and open the door to find a key piece.
Three colors (again)
Use the clue from the colored plate to unlock the bottom cabinet door.
The colored areas of the plate are (from outside in, bounded by large to small circles) cyan, yellow, magenta.
So click the buttons 1, 2, 3 times and open the door to find yet another golden key.
Unlock 3 / Exploration 4
Use this golden key to unlock the door in the third room.
There's a small dirt mound with a dandelion next to a rectangular object, and a slightly darkened patch of grass beside.
Blue light
Find a way to turn the blue light on, if you haven't done so yet.
The sink with the light is on the opposite side of the same wall as the food dispenser.
If you look at the dispenser again, you'll find that you can now operate the controls without the bowl.
You still don't have to adjust anything. Keep tapping the food box until it drops down to reveal a button.
Press that button to light it up, and now the sink works!
Wash
Wash the fish in the sink, and you automatically dice up the meat and add it to the food, keeping the fish bones.
Feed
Place the full bowl on the dark patch in the backyard.
Back out and reenter the backyard. The bowl is empty and there's a cat!
Clicking the mound, you get a close-up view of the note ("Thanks for the fish") and the pile of fish bones buried beneath.
Disposal
Add your fish bone to the pile, and a key piece flies out.
Ending 1
(Since there's no save function, once you end the game you'll have to replay the whole thing for other endings.)
You have all six key pieces, so leave through the main door with your dandelions.
Ten
You should now have all ten dandelions (if not, check the item list at the end of this walkthrough).
Click the top-right arrow on the small machine in the second room to deposit all your dandelions.
Now that the buttons are active, use the last clue from the game to get the code.
The cat's note gives you the code ▲ ▶ ◀ ▶ ▲.
So click the CRLRC buttons, and the machine dispenses a flower wreath!
Ending 2
Leave with your beautiful wreath.
Ending 3
Click the cat to give it the wreath, and leave… emptyhanded? You get an animation of the cat playing with the wreath.
Item List:
6 key pieces:
Top left: First room, in top drawer
Top middle: First room, in bottom drawer
Top right: Second room, under small machine
Bottom left: Second room, in plant pot
Bottom middle: Third room, in middle cabinet door
Bottom right: Backyard, from dirt mound
10 dandelions:
2 from first room:
In plant pot
On couch
3 from second room:
Beside door
Under small machine
In top drawer
4 from third room:
Beside plate
On picture
In top cabinet door
From toilet wall puzzle
1 from backyard:
On dirt mound
3 keys:
First room: behind picture
Second room: in middle drawer.
Third room: in bottom cabinet door.
2+ other items:
Food bowl: First room, in wall box
Fish: Second room, in bottom drawer
All other items are obtained from this two by transformation of some sort.
As before, I'm skipping IcyOak's game because they already have a text walkthrough, and moving straight on to
Samurai & Cat Escape
You'll never guess who's been trapped in this… oh, it's in the title.
Exploration
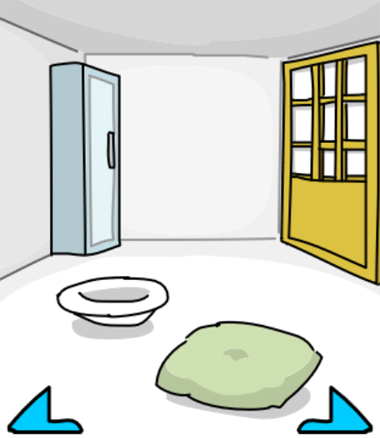
The shoji (paper on wooden frame) door on the right side already lends this room a Japanese flavor. You also see an empty closet, an empty bowl, and a cushion with nothing beneath.
Go left. There's another cushion, a wall panel fastened with screws, and a small crack in the wall.
Go right twice to find a potted shrub and a yellowy rock that hides a hammer.
Go right. Finally, we meet the samurai and cat, who look a little upset about being trapped and won't let you near the fridge at the back.
Smash
Use the hammer on the wall crack to break it, and a mouse falls out.
Enemy
Use the mouse on the cat, who hops into your inventory.
Examine the cat in your inventory by clicking it twice.
Then use the rat on it, causing the cat to become enraged? Or perhaps just excited.
Since the cat moved, you can look in the fridge to find a slice of watermelon.
Strike
Use the cat on the door on the first screen, and it tears holes in the paper.
Juicy
Place the watermelon in the empty bowl (on the first screen), which attracts a rhinoceros beetle.
Free
Place the beetle in the plant pot. It climbs up into the tree and dislodges a screwdriver
Rotate
Use the screwdriver on the panel in the left room, revealing three sliders.
Trio
Use the clue from the torn door to unlock the slider panel.
Match the pattern of broken panels by setting the sliders to the bottom, top, middle positions.
Nothing appears to happen.
But the metallic rattling of the sliders reminds you of the locker next door, which now contains a sword!
Flurry
Give the sword to the samurai, who slices his way out of the house!
Update