
 This week on Weekday Escape! Four new games and more!
Minoto, master of lovely short games explains some not generally known details from skunks' lives. In short TomoLaSiDo's game you meet another cute animal, similar to a skunk, and No1game shows you interesting backstage of telecommunications company. Truly relaxing game by Flash512 wants you to escape a room with a lot of locked drawers and cabinets.
Have a good time and enjoy!
In Minoto's story are skunk and frog (which joins later) trying to leave a house - with your help they do, and in a big style with BANG! My only complain is that items aren't described anymore and sometimes I have no idea what I've found...
The cursor is not changing, no save button, one ending.

New nice brown can from TomoLaSiDo contains coffee, but before you can open it, all three blue spots (on left and right sides, and on the bottom) must shine. Can you lit them up by solving all three puzzles? Well technically you must click them, but they turn clicable only after solving the puzzle.
The cursor is not changing, no save button, one ending.
This is an adventure of CEO preparing for introduction of new pPhone and as it's No1game's game, ten green men are involved. The guys are more and more cunning, seems they've developed quite high resistance to catching! Puzzles are not difficult, but require out of the box thinking and poor CEO needs your help to get out of the room! Maybe he should've taken some helpful advice about the presentation too...
The cursor is not changing, no save button, one ending.
P.S. We haven't heard anything from Tesshi-e in a while...so meanwhile here is one great game by No1game, Find the Escape Men 25: In Mr. EM's Room, which seems like collaboration between the devs or simply, it's Tesshi-e without Mr. Hippo and with ten green guys instead.
At the beginnning, the game by Flash512 seems inactive and you can't zoom on anything - really anything? Don't panic, it's not a bug, there's a reason for it - few spots are active - just keep clicking. Background music is somehow melancholic and slow, and the studio is a pleasant place to stay for a while, you can play at an unhurried pace (just ignore the timer in upper left corner). Perfect relax!
The cursor is not changing, no save button, one ending.
We love escape games, and our readers love talking about them and sharing hints! How about you? Let us know what you think, ask for clues, or help out other players in the comments below.


In Old Studio Escape, items the game says I have picked up are not appearing in the inventory. They don't disappear from the game screen, either, until you move away. Pretty frustrating.
Some players using Firefox complain about this issue too, try another browser, the game should work in Chrome fine. (I played in FF without any problem though)
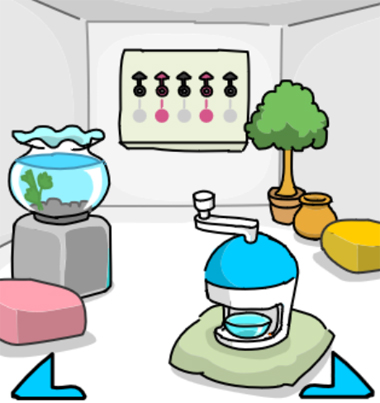
SKUNK & FROG Escape
Okay now who are these guys?
Exploration
You begin in a familiar room with much more clutter. The locker from last time is still here, but it contains a jug of pink syrup and has a ceramic pot at the top. There's also a purple trampoline next to it, a table with a plate you can lift, a light green cushion, an empty glass cylinder, and a lumpier pink cushion that you can lift to find a coin.
Go left. A distressed-looking skunk is surrounded by more cushions that you can lift; the six of them hide a total of 3 coins. There's a tiny tree stuck in a yellow block on the left that bounces a little when you nudge it, and you can click the pot on the right to shatter it. There's also a picture clue on the back wall, but all you can see in it is a mess of pink and gray squares.
Go right twice to find more cushions (with nothing another them), another pot with a coin inside, and a slightly larger tree in a plant pot. There's also an empty fishbowl, a locked wall panel with five pink and gray dials, and an unusual machine in the foreground that you recognize as an ice shaver.
Go right to find a pair of glasses held near the ceiling by some kind of web. The cushions here are different sizes, and the one on the couch hides a coin. Smash the pot to find another coin. The fridge doesn't have a handle, but it has a rather large round hole in its door instead.
Vending
Place all seven coins in the glass tube (remember to select the coins each time), then pick that up.
Now you can attach the full tube to the fridge door, and use it as a handle to open it. Take the ice block from inside.
Chilled
Place the ice in the ice shaver, forming a bowl of shaved ice that you can pick up.
Examine the shaved ice, then pour the syrup onto it.
Saccharine
Feed the flavored shaved ice to the skunk, who sings a happy note with a face on it.
That's because the note is actually a tadpole you can pull from the thought bubble.
Develop
Place the tadpole in the fishbowl, and it instantly grows into a frog.
Leap
Use the frog on the trampoline to reach the pot on the locker.
It tips over and a lit match drops onto the ground.
Removal
Use the match to burn up the web. The glasses drop onto the ground.
Acuity
Use the glasses to read the picture clue in the leftmost room, clicking the gray blobs to turn them into numbers.
This leaves two pinkish spots to decode.
Examine the glasses and pour the syrup on them.
Now the lenses are pink, and you can use the glasses on the remaining blobs to turn them into pink numbers.
Dial
Use the clue from the decoded picture to unlock the wall panel in the fishbowl room.
The gray and pink dials are (un)helpfully labelled with their colors, but all you need to do is follow the number clue by setting the leftmost dial to the 9 o'clock position, the second left one to the 6 o'clock position and so on.
So turn the dials to the ←↓↑→← positions, and back out to find the panel open. Take the pieces of sweet potato.
Fuel
Feed the sweet potato to the skunk, who rapidly fills the room with a thick gas cloud.
Use the match to ignite the gas cloud, and the skunk and frog are out of the house! Actually, there's no more house.
(Click the skunk and frog to return them to their natural nonsmoking state.)
Motto Akeru 59
Kopi Luwak is an Indonesian coffee that has been "processed" through the digestive tracts of civet cats, leading to its status as possibly the world's most expensive coffee. Enjoy all 120ml of it when you open this can!
Exploration
Your interaction with this can begins with its front panel, which has Japanese in the middle and left (both "Kopi Luwak Juice"), right ("Kitty cat flavor!") and in the star ("Indonesian product", on top of an Indonesian flag).
As usual, the pull tab at the top of the can refuses to budge.
Checking the right panel, you find three spinning slot machine reels (which pause when you click their buttons) above the product label, which informs you that the only ingredient is coffee. The product label also has a blue spot which hasn't been activated.
The left panel shows a bunch of coffee berries (both ripe red berries and unripe green ones) hanging over a small plate. There are three different-colored digit buttons next to another blue spot.
You can flip one of the leaves over to find a digit on the back.
The bottom of the can has (under the date) a blank rectangle with three triangular buttons beneath, a dimmed square button on the left and another blue spot on the right.
Three digits
Use the clues on the left panel to solve its puzzle.
The colors of the two left digits match those of the red and green berries, of which there are 4 and 5.
The color of the right digit matches that of the leaves, which reminds you of the digit 7 hidden beneath one of them.
So click the buttons until they read 457, then click the blue spot to light it up. The red berries fall onto the plate and disappear.
Scroll
Other than the orange dots, the signs on the slot machine can also be matched in threes to form "POO", "うんち" (also poo), "高級品" (luxury goods), and of course, a row of three stars.
Which of those is the winning combination?
Line up the three stars on the reels (keep clicking the first one until the stars on the first two align, then keep clicking the third one until the stars on all three align).
Once all three stars are aligned in the middle of the window, the wheels reverse direction to show some steaming coffee, and the blue spot lights up.
Simulator
Looking at the bottom of the can, you find that the square button is lit up and a civet stands in the middle of your screen.
Use the clue from the coffee cups to solve that puzzle.
(Solution 1)
After pushing the berry button to feed the civet, you can control it with the triangular buttons.
The coffee cups produce steam in the LCRCR order, so click the ◀▲▶▲▶ buttons and then the blue spot to light it up. The cat finally reaches its destination and leaves its precious beans behind.
(Solution 2)
Instead of clicking the triangular buttons directly, click the LCRCR buttons under the coffee cups, and the steam changes to triangular arrows which flash in the pattern ◀▲▶.
So (on the bottom of the can) push the berry button, then the three triangular buttons from left to right, and then the blue spot to light it up. The cat does its business and then presents you with a can of coffee.
Finish
Now that all three spots are activated, you can open the can from its top to end the game.
Start up your hype machines because it's new phone season!
Find the Escape-Men 192: New pPhone
The new pPhone is ready to be announced, and you, as the CEO of Pineapple, have come to the event hall to prepare for tomorrow's presentation. Unfortunately, you've managed to lock yourself in and forget your phone. Looks like you'll have to find your own way out!
Exploration
As expected, you begin by looking at the empty stage and the chairs in front of it. Checking the seats, you find that (one of) those on the left hide a four-color safe underneath, and (one of) those on the right have a paper clip hidden in the top right. The curtains on the left side of the stage hide a stepladder and the corner of a poster advertising the new and intuitive Pineapple computer mouse. Behind the right curtains, you find only the corner of a box with a large brown button inside.
Check the floor in front of the stage to find a rolled-up power cable. Closer examination of the cable reveals several different-colored wires bundled into it.
Turn right to face a black display table with two models of pPhone on it for you to play around with; neither of them turn on.
Click the top of the screen to look up at the ceiling and find an Escape-Man there, way out of reach.
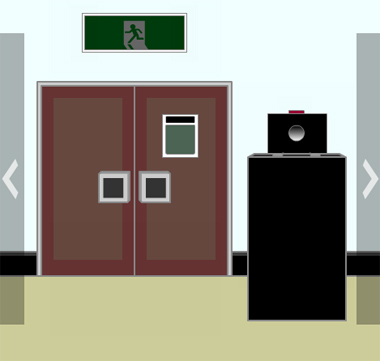
Turn right to face double doors which are locked, as the green patch on the right door tells you. Above them, an exit sign flashes but it's too high to reach. On the right, a black box on a black pedestal has a red button on top that shines a bright light in your eyes.
Turn right to find a trolley carrying identical folding chairs. A poster on the left advertises the pPhone18, and you can fold off its corners but find nothing behind.
If you follow the tagline and don't touch anything for about 5 seconds, an Escape-Man appears on the phone in the poster.
Push
The black box near the exit door is a projector, and pushing the red button makes an Escape-Man appear on the back of the stage. After picking it up, turn it off again.
Similarly, the brown button in the wall panel on the right of the stage makes a spotlight shine onto the middle of the stage, revealing another (really faint) Escape-Man there.
(When both lights are on, it's too bright to see the Escape-Men.)
Turn the projector light back on, and a list of past pPhone models appears on stage.
Tall
Open the stepladder and place it under the exit sign. Now if only you could get it to stop flashing, the Escape-Man on it would be within reach.
But banging on the sign only makes it temporarily turn off.
Use a clue from the phone list to make the sign work.
From oldest to newest, the letters at the end of the phone models are RR R L R L L R.
So hit the RRRLRLLR sides of the sign to make its light consistent. Now you can take the Escape-Man from it.
Extend
Find some way to reach the Escape-Man above the displayed phones.
(You can't reuse the stepladder because there's no place for it, and the game helpfully moves it beside the door to tell you it's not needed.)
While looking at the Escape-Man, throw the end of the cable at it to whip it off the wall, then pick it up off the ground.
Riffle
Use a clue from the phone list to find a secret in the folded chairs.
Using the same clue as before gives you the sequence RRRLRLLR.
This time, the clue indicates the directions in which you need to move the chairs. Since clicking a chair on the left side moves it towards the right, you need to click chairs on the LLLRLRRL sides.
Do so, and an Escape-Man appears on the last chair moved.
Gesture
Use the clue from the computer poster to solve the puzzle on the phone tables.
Paying attention to the capitalized letters, you figure out that the C in 5C is Click and the D in 3D is Drag.
So drag the left phone three times (making sure to put it down on the opposite side of the screen so it makes a sound each time), and click the right phone five times.
(You can also perform the five clicks on the right phone before the three drags on the left.)
Once done, you get an audio and visual signal that the pineapple logo on the front of the counter is now open, so you can take an Escape-Man from inside.
Colors
Use the clue from the power cable to unlock the box under the left seat(s).
If you include all the splits into smaller wires, there are a total of 10 colored ends in the cable: one red, two yellow, three green and four blue.
This means that the first color in the code is red, the second yellow and so on, so click the buttons 1, 3, 4, 2 times, then open the box to find an Escape-Man and a green pPhone.
It's not over yet! Examining the phone, you find that it doesn't have enough charge to power on.
Screen
But you can try to turn the phone on anyway, by using the power button hidden on the right side of the phone.
Hold down the power button, and the screen shows a low battery icon, as well as a charger icon with an Escape-Man drawn on it.
Tray
Straighten out the paper clip and use it to eject the SIM tray, revealing an Escape-Man on the card.
Complete
The chime informs you that you have all 10 Escape-Men:
On pPhone 18 poster
On stage, lit by projector
On stage, lit by spotlight
On exit sign
Above display phones
On folding chair
In phone table
In box under seats
On charger icon on pPhone
In card tray of pPhone
They combine into a large Escape-Man with a line around his wrist.
The Escape-Man's hand comes off to reveal a charger plug!
Bootup
Click it until the wire extends, then use the Escape-Man on the phone to charge it.
Click through the splash screen to get to the menu, which has only two apps.
Escape
The "phone" part of pPhone is useless to you right now, as you can't remember the number to call.
Perhaps you can make use of the QR code app?
Instead of scanning a QR code with the phone, select the option to create an Escape QR Code!
Then show your phone to the green sensor on the door, which unlocks it so you can leave.
Having experienced firsthand the lifesaving benefits of this instant charger, you decide to give it a shoutout in your speech.
Unfortunately, this amazing secret feature doesn't actually exist!
I can confirm that the game works fine in Chrome.
Old Studio Escape
The most traditional and cozy room this week is set in an old art studio, almost as beautiful as the art in it.
Exploration 1
(If you ever want to turn the music off, you can do so from the game menu.)
You start off facing a large window and several cupboards. There are several other things here but none you can interact with.
Turn right to find a landscape painting on an easel. Take both the canvas and the wood block/board it rests on, then zoom in on the lamp on the right which you can pull the working light bulb from.
Turn right to face the door. There's nothing you can do here.
Turn right to face more cupboards. In the middle of the wall, a painting hangs over four wooden posts in the ground.
Light
Place the wooden board on the posts to form a table, then click it to stand on top.
Now you're looking at the ceiling lamp, and you can just insert the bulb to light the room up.
Exploration 2
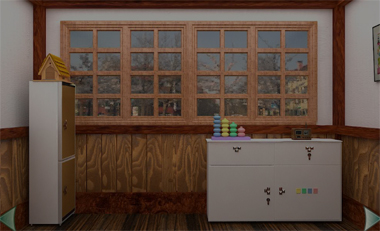
Let's continue where we left off. Clicking on either the table or the ceiling above it lets you look at the light again. The shelves on the left have several objects that you can move around, including a plate that suddenly has a key on the back when you check it again, as well as a vase with another key hidden inside. It also has two small compartments, the right one unlocked empty, and the left one secured with a four-digit lock. On the right side of the same room, a small wooden house with a round keyhole sits on top of a tall locker whose top door is empty and bottom door is locked.
While looking at the closed top door of the locker, you notice an arrow on the window frame beside. So look between the locker and window to find a third key.
Turn right to face the window where you started. The cupboard on the right has two drawers and two doors. The left drawer is empty, the right drawer and left door require a key to unlock, and the right door has four colored letter buttons on its lock. On top of the cupboard, there's a colorful display with plastic columns over letters, and the left column has a shiny coin balanced on top. There's also a device that looks like a radio, but it has a hole in the front and four dials which tell you that something's missing, as well as an antenna you can remove.
Check the top of the radio to find a narrow hole with instructions to look for three circles.
Turn right to face the now-empty easel. Looking through the drawers on the right, you find a hair brush in the top-right one, nothing in the bottom-left and bottom-right ones, no drawer at all in the left middle position (but a hexagonal bolt hidden in the right wall there), and locks on the others which require a key and a three-digit code. Removing the lampshade again, you find a clue painted on the wall behind. On the wall hangs a small painting with mysterious creatures, as well as a blackboard with a doodle and an upward-pointing arrow drawn on it.
Following the arrow on the blackboard, click its top left corner to find a golden coin.
Turn right to face the door again. An even smaller messy painting hides a copper coin embedded in the wall. If you look closer, you find three other well-hidden things:
A line near the top of the door suggests that something should be hung on it.
Beside the door are light switches that you have no need to turn off.
There's a square panel near the floor with its middle part missing.
Four letters
Use the clue from the colorful columns to unlock the four-letter door beneath.
The yellow, green, blue, red columns are labeled CBAK, so enter that in the lock to open it. Inside, you find a round handle and a gray stain covering the back wall.
Hex key
The blue drawer moves a little when pulled, which hints that it's not really locked.
Place the handle on the bolt in the compartment beside, and now you can open the drawer to find a ball of string.
Unlocks
From the exploration, you should have gathered three keys in your inventory. Where do they fit?
The normal-looking key that you got from the plate fits in the left door under the radio, which contains a water bottle (with an antiseptic wash label).
The wide-tipped key from the vase fits in the right drawer under the radio, which contains a broken clip.
The small key you found beside the locker fits in the wooden birdhouse, and turning it makes a bird exit the house holding another key in its mouth.
This unusual key with a split tip opens the bottom locker door. Looking in the first-aid kit, you find a band-aid and a pair of scissors you can take.
Cleanup
Pour the water onto the stain, and scrub it off with the brush to reveal four digits.
Four digits
Following the clue from the stain, enter 9563 in the left door under the display shelves to open it. Take the pliers from inside.
Clip
Use the band-aid on the broken clip to repair it.
Then use the good clip on the canvas, and then hang the canvas up on the line across the door.
Three digits appear on it!
Three digits
Enter the (randomized) three-digit code from the canvas in the upper-left drawer (on the easel screen) to open it, then take the hook from inside.
Pull
Use the pliers to extract the bronze coin from the wall.
Purchase
Place all three coins in the radio, and use the clue from behind the lamp to operate it.
Following the arrows between the circles gives you the order in which to turn the dials: 4th, 2nd, 1st, 3rd from the left.
So touch the dials in that order to light them up, and then pick up the diamond piece which drops in the hole beside.
Fit
Place the diamond in the panel near the floor, which opens up one of the floorboards to reveal a key. Somehow, it's too far to reach.
Fish
Use the scissors to cut a line from the ball of string, then attach the hook to the line, then extend the antenna and attach the line to it.
Use your improvised fishing rod to pick up the door key, then use that key the key to unlock the main door and escape!
Update