
 Hi! Quality time ahead - the new Weekday Escape is here!
All three games in this WE are pleasing the eye - Amajeto's latest creation with changed graphics is attractive and neat, blue and white, and also practical, as players can't overlook any item. MysteriousBox takes you for a trip to the mountains and autumn afternoon atmosphere is amazing here. The last game by Ichima is another island adventure - islands, especially tropical ones, are really suitable for relaxing escapes with their blue sky and sea, yellow sand and green palm trees, and sounds of waves. Seagulls though are silent or flew off.
Have a good time and enjoy!
Amajeto's game is as quality as always, plus has got a new coat which brings simplified and clean graphics, and harmonic colors. Not only visuals has changed though - seems that the new style allows creators to handle items a bit differently than the previous. Don't get me wrong - it's Amajeto as we know them, jigsaw puzzle, four letters/numbers/shapes codes, wobbling picture etc., but items and their use is slightly different. We'll see. I'm curious and looking forward to new games!
The cursor is changing (its color), no save button, one ending.
P.S. This new graphics style reminds a bit of Room Γ by Kotorinoshu, one of the best escapes ever!
You got lost in mountains and discover by accident little valley, well hidden, with Shinto Shrine. What a beautiful and peaceful place, with all the red golden leaves on ground! Setting sun makes them glow like burning lava...oh. It's getting late. You should look for the path before the dark falls, but the exit is protected by some force shield! What now? Well...look around for hints and items, find where to use them and try to overcome or destroy or switch off or whatever needs to be done with the shield, and escape!
The cursor is not changing, autosave, one ending.
The game is available for Android too.
Ichima left you at the beach of pleasant island and right from the game's beginning is clear, that the place is somehow magical - from tree-like objects looking like decorations for gingerbread house via weird bluish tree fruit scattered everywhere around to chubby clouds dancing on the sky. Strange things are happening here.
For navigation use arrows under the gamescreen but you can also try to click on 'likely' places and if your guess is right, the scene zooms in. Can you escape? Any idea how to do it?
The cursor isn't changing, autosave, one ending.
The game is available for Android too.
We love escape games, and our readers love talking about them and sharing hints! How about you? Let us know what you think, ask for clues, or help out other players in the comments below.


Imagine having to stand on the bed to fix a jigsaw puzzle.
Blue Room
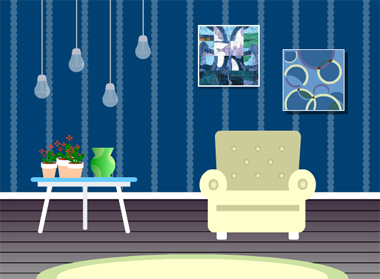
We've seen several monochrome rooms before, but an Amajeto room with 2D art is a fresh experience.
Exploration
Your introduction to this blue world begins with a scrambled painting over a (non-blue) chair. On the left, there are four hanging light bulbs that you can pull down to give colored light to the flowers below. The green vase has no flowers, but you can lift it to find a square tile, and click it again to find a clue on its bottom.
Turn right to face a window looking out onto a sunny day. The side table below that has a two-button locked drawer. On the right, there's a comfy-looking bed with card suits marked at the foot. Check the left pillow to find another square tile. The shelf above has, among other things, a reddish flower vase with a clue on its bottom, and there's a grid device above that which you can't use yet.
Turn right to find the locked exit door. The shelf holds a working digital clock with a button that changes its display, as well as a white vase with another clue on the bottom. Above that, there's another blue (jigsaw?) picture that tilts when you click its corners.
Turn right to find another window looking out onto a sunlit but snow-covered town. Let's ignore this meteorological paradox and consider the furniture below that, which looks like it should have 12 drawers but doesn't actually have anything you can open. At least the circular quadrant pattern looks nice. On the right of the room, you spot a computer with its screen turned off, on a table whose four drawers have four-button, four-symbol, twelve-button and four-letter locks. There's also two flower pots high above the table, and you can lift the right one to find a clue beneath.
Unscramble
Solve the (randomized) scrambled image on the first screen by clicking its tiles to rotate them until they match.
When you're done, that picture frame slides down to reveal a hidden compartment with a square tile.
Corners
Use the quadrant clue beneath the snowy window to unlock the tilty corner puzzle.
Each circular quadrant includes a right angle corner, which appear to the LR LL UR UL LR LL of their respective quadrants.
So click the ⌟ ⌞⌝ ⌜⌟ ⌞ corners of the picture, which comes loose off the wall. So click it again to flip it over and find a clue with four card suits.
Suits
Use the card suit clues to unlock the top desk drawer.
Reading the card suits on the bed from left to right, you find that the ♠♣♥♦♠ symbols appear on the ⌞⌜⌝⌟ ⌞ corners of the other clue.
So push the buttons in those positions, then open the drawer to find a square tile.
Shapes
Use the clues from the vases to unlock the second desk drawer.
Each vase you can lift has a different number on its bottom outlined in a different shape. The vases numbered 1, 2, 3, 4 have them in a pentagon, circle, hexagon, diamond.
So click the buttons 7, 0, 1, 2 times, then open the drawer to find a USB stick.
Plug in
Connect the USB stick to the computer, which repeatedly flashes a sequence of colored squares.
Colored
Use the clue from the computer to make the light bulbs the correct colors.
Counting the squares in the clue, you find that there's 1 green, 2 yellow, 3 orange and 4 red squares.
So pull the bulbs (from the top one to the bottom) 2, 3, 1, 4 times, or (from left to right) 1, 3, 4, 2 times, and four letters appear on the bulbs.
Letters
Use the clue from the light bulbs to unlock the bottom drawer.
Enter the code from left to right: ESCP.
Then open the drawer to find a square tile.
Shades
Use the clue from the fake twelve-drawer cabinet to unlock the third desk drawer.
The buttons glow a shade of light blue that matches the lighter fake drawers, so you need to click the buttons corresponding to those drawers, namely those in the four corners of the grid and the middle two in the middle column.
Then open the desk drawer to find another square tile.
Up and Down
Use the clue from the digital clock to unlock the drawer beside the bed.
Holding the button down makes it display the code 96699. Of these two digits, which represents the upper button, and which the lower?
The buttons are drawn as white outlines, which suggests that you look for white loops. Both the digits 6 and 9 have loops, and the loop in 9 is higher than the one in 6, which means that 9 represents the top button and 6 the bottom.
So push the UDDUU buttons, then open the drawer to find the last square tile.
Complete
Use all 7 square tiles on the grid device above the bed to reveal another jumbled image.
So unscramble this (randomized) image too by swapping its tiles into position. (It will help if you look around for hints.)
Once you've pieced together the picture (which matches the snowscape through the window), the compartment beneath opens up to reveal a key.
So use that key to unlock the door and escape!
The site and game design might look different, but it's still the same MysteriousBox.
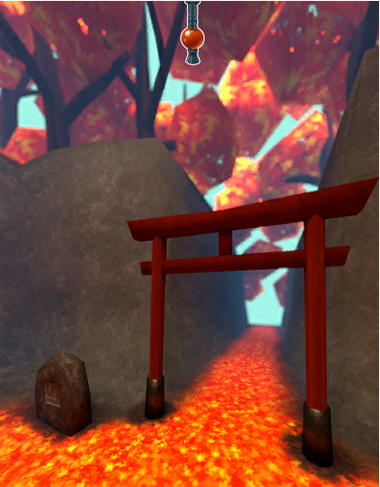
Shinto Shrine in Autumn
The 幻 (illusion/dream) in the title makes you wonder how much of this is real.
Exploration
(I'm naming most of these shrine terms based on Wikipedia, so I hope they're correct.)
You can pull on the string hanging from the top of the screen to open and close your inventory.
This shrine is built in a valley surrounded by maple trees which cover the entire ground in fallen leaves. You can zoom in on each of the stone komainu statues to find buttons that make them rotate, as well as the wooden lanterns on the left and right behind them. The lantern on the left is open and holds an unlit candle, while the lantern on the right has two arrow buttons on its door.
Before we go further in, did we forget something? Click on the arrow at the bottom of the screen to turn around and look at the entrance. The path out looks clear, but a force field stops you from leaving! The stone on the left has a snake drawn on it, and you notice a bright object behind the stone that turns out to be a long wooden stick.
Turn around back to the starting screen, and click the middle to walk forward. On the ground, you see rectangular stone tiles divided into angular pieces.
Turn right and enter the chōzuya (washing area) on the right. While the water basin looks normal, the bamboo hishaku (ladle) is missing and you see part of it at the top left, out of your reach. To the left of the washing area, you see two hokora (small shrines) with locks on their stone bases. One of the locks has nine octagonal knobs with arrows drawn on, and the other has six rectangular buttons which can be pushed in any order.
Back out and turn left to find three more locked hokora shrines, whose locks have nine buttons surrounded by a light-and-dark frame, six buttons surrounded alternately on the left and right by komainu, and nine buttons with no apparent clue for them.
Back out, and move forward towards the main shrine. Being super observant, you notice the bright objects at the right of the stairs, which turn out to be flint and steel. The door of the shrine is padlocked.
Water
Use the stick to retrieve the wooden bowl from the washing area, then attach the stick to the bowl to form the ladle.
Dip the ladle in the water basin to fill it. Since you need that water later, you'll be carrying it with you.
Fire
Use the flint and steel on the unlit candle, which lights up all of a sudden after a short delay.
Maybe you should close the lantern so the flame doesn't go out again.
As you close the door of the lantern, you see that the squares of the door are lit up in different amounts.
Shades
Use the clue from the left lantern to unlock the left hokora on the left side.
The outer frame (and the arrows on it) tell you to start at the brightest square and end at the darkest:
7 8 1

6 9 2

5 4 3
Push the buttons in that order, and the door slides open to reveal a key.
Unlock / Exploration 2
Use the key to unlock the door of the main shrine.
As you enter, you face a wooden wall with a path connecting four octagonal outlines, leading to a grate in the middle. There's also a pedestal with a receptacle in the middle of the room, and the game tells you that you can fill it with water.
Click the left arrow to turn around. You can't leave the door normally through this view, but you can click the byōbu (folding screen) on the right to unfold it and view a pretty painting with birds.
Now that we've seen the whole place, let's finish unlocking those small shrines.
Head
Use the clue from the komainu statues on the first screen to unlock the middle hokora on the left side.
The statue on the left (originally facing right) turns towards the front (away), back (towards you) and left before returning to its original orientation, whereas the one on the right turns towards the right, back, front.
You can enter those codes individually into the lock, but I'll interleave them for your convenience: URDDLU.
Turn the dials to those positions to open the shrine, then take the octagonal fish piece from it.
Tail
Use the clue from the stone beside the entrance gate to unlock the left hokora on the right side.
Dividing the snake into nine sections (from tail to head) tells you how to rotate the dials:
˄˅˂

˄˂˄

˃˃˄
When you're done, the shrine opens and you can take an octagonal dragon piece.
Number
Use the clue from the stone tiles on the ground to unlock the right hokora on the right side.
You may have guessed that you need to follow the six cracked rectangular slabs in order from least cracked to most. Indeed, the least cracked slab is safely in one piece while the most cracked one is in six pieces.
Push the 5th, 1st, 4th, 2nd, 3rd, 6th buttons from the top to unlock the shrine, and then take the octagonal flower piece from it.
Sky
Use the clue from the folding screen to unlock the right lantern.
Hint 1: the exact positions of the birds aren't important; they're only there to tell you to read the other clues clockwise. What are those other clues?
Hint 2: Maybe you should try a change of perspective.
Along the borders of the folding screen, some sections are marked red. Each red section spans two panels, so they appear where the folds end in corners.
So try to ignore the screen and look only at the red corners, and you might see that the red corners pointing towards you are up arrows and those pointing away from you are down arrows. Reading them in clockwise order gives you the code ⌄⌄⌃⌃⌄⌃⌄.
Push the DDUUDUD buttons to open the lantern, and take the folded note with a sequence of blue squarish symbols.
Square
Use the clue from the folded note to unlock the right hokora on the left side.
If you've used a pigpen cipher, you should know how this puzzle works: the squares on the grid are separated by blue lines, and each square on the grid is represented by the shape formed from the lines surrounding it.
The symbols on the note represent the top, bottom-right, center, bottom-left, left, center squares, so push those buttons to open the shrine and find an octagonal bird piece.
Jigsaw
Enter the main shrine and solve the puzzle there. (Note that the top two octagonal frames are not accessible with the inventory open.)
Examining each octagonal piece, you can click on their sides to find holes on some of them. For instance, the fish piece has holes on the right and top. To make the holes match the path, you'd have to put that piece in the lower-left frame.
Similarly, the bird piece goes in the lower right, the dragon in the upper right and the flower in the upper left.
Once the pieces are in place, pour the water in the receptacle to unlock the grate. (If you've already poured it away, you can refill the ladle and retry.) Take the ōnusa (purification wand).
Wave the wand over the torii gate at the entrance to shatter the seal and leave.
As you escape, you hear a voice from nowhere in particular:
"Sorry for the bother, traveler. Thanks to you, killing the time was fun. We'll meet again somewhere. How skilled."
Room23 home work
Don't worry, Ichima isn't locking you up to help complete school assignments.
Exploration
Minimap:
6534

--2-

-817
White clouds pulsate over an incredibly bright landscape, inviting you to explore everything you see: a green box with four wavy sliders, and a row of pastel patterned trees with a left arrow marker, and lots of greenery in the background. For now, you can click the trees on the left to look at the entire row, finding a tree fruit somewhere in the middle.
Let's go straight towards the green trees in the background. Now there's trees all over, but you also see a piece of paper on the ground (with a picture printed on it), a box with ten switches, and another tree fruit.
Keep going forward, and you finally end up in front of some stone wall with more clouds oscillating overhead. You find a mysterious stone on the ground, and it looks like only the middle portion of the dead end is covered in shrubs.
Go right to find a tower with no way to climb up. The round box with the blue top has three buttons with different patterns.
Go left twice to find a small-looking house with a large-looking pair of pruning scissors outside. The door is locked and you can look on the table to find a box with four colored buttons.
Go left to find bigger taller palm trees. The middle one has a ladder stuck in its branches as well as a gold base with an unusual hole.
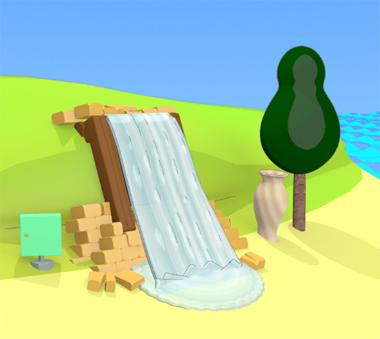
Make your way back to the first screen, then go right to find a waterfall, a tree with a vase next to it, and a locked box.
Then go left twice to find a bridge that seems to be misplaced. On your side of the river, the bridge controls are missing a handle lever.
Removal
Use the pruning scissors to remove the plants blocking the stone wall, revealing a star-shaped hole surrounded by five small bumps.
Easter
Go to the tower (to the right of the stone wall), and use the clue from the long row of trees to unlock the box there.
In the order indicated by the arrow sign, the trees have (triangles/stripes/dots) TSDSTDS patterns.
So click the LCRCLRC buttons, then open the box and take the lever handle.
Connection
Replace the lever handle on the bridge controls, and pull it. The bridge rotates back into place, and you might notice that it has some planks missing.
Cross it anyway, and you find an aqua scope on the small island.
While standing on the small island, you notice a puddle of water that hints that you can dive in there.
So use the aqua scope on the water at the top of the screen to dive in and take a look.
There's several things underwater, but you seem to be looking straight at four pieces of seaweed with different lengths.
Wavy
Use the clue from the seaweed to unlock the box on the first screen.
The second strand of seaweed is the longest, followed by the fourth, third, first.
Accordingly, move the sliders (from left to right) to the bottom, top, second bottom, second top positions, then open the box to find a scoop.
Dig
Now that you have the scoop, the picture clue tells you where to find hidden treasure.
On the waterfall screen, dig between the tree and pot to find a small key.
Unlock 1
Use the key to open the box.
Then turn the valve handle inside, and you find that the waterfall stops flowing!
Exploration 2
Entering the cave behind the waterfall, you find a burning fire, a bucket whose markings indicate it's for firefighting, and a four-digit panel beside a doorway in the back.
Splash
Fill the bucket in the sea (where you used the aqua scope), and then use it to put out the fire.
What do you see?
The cave has turned completely dark except for some bright blue spots highlighting a clue in the ceiling and a matching faint blue light outlining the door and illuminating its lock.
In the darkness, your mysterious stone glows in your inventory to give another clue.
Pair
Use the clues from the dark cave to unlock the doorway in it.
The shapes on the cave ceiling and stone combine to form the diamond shape on the door lock.
So add the numbers on the cave ceiling (2135) and stone (2020) to get the code (4155) for the lock. Once you get it open, you can take the star-shaped stone from inside.
Five points
Go back to the dead end in the stone wall and use the star-shaped stone in the hole. This makes the five buttons around the outside light up.
So use a clue nearby to unlock it.
Observing the clouds above, you notice that the small ones grow and shrink in the order
--15--

3----6

-4--2-
So push the top, bottom-right, left, bottom-left, top, right buttons, and the panel opens to reveal a golden key.
Unlock 2 / Exploration 3
Use this new key to unlock the house. Ah, now we're in familiar territory!
Some fun background music starts playing as you explore the house, which has only one screen.
The window has some colorful shades you can pull down, and the large box below that has five small holes around a larger one that's filled with some kind of giant fruit. On the right side, you find an ear of corn on top of a book (that you can't read), as well as a tree fruit in the drawer.
Colors
Use the clue from the curtain to unlock the box just outside the house.
When you pull the curtain, the colored stripes come into view from the bottom up: pink, green, blue, yellow, pink, yellow.
So push the ⌝ ⌜⌟ ⌞⌝ ⌞ buttons, then open the box to find another tree fruit.
Rows
Use the clue from the corn in the house to unlock the box with ten switches (north from the first screen).
The darker-colored kernels are on the (from left to right) UDDUUUDUDD rows.
So flip the 2nd, 3rd, 7th, 9th, 10th switches to the bottom position, then open the box to find the last tree fruit.
Fruits
Go back to the house and place all five tree fruit in the large box. The palm fruit in the middle pops up.
Leave the house, go west and place the palm fruit in the hole under the tree, which lowers into the ground so you can take the ladder.
Height
Place the ladder on the tower and climb up to the top, where you find some sort of phone. (It has a tiny screen, so it's not that primitive!)
You can also turn around to find some huge text written on the top of the house.
Rescue
Use the remaining clue from the game to escape.
The letters M:E on the phone refer to the Mission:Escape text on the house, so enter the number there (13810) into the phone and then push the green button.
A helicopter promptly arrives to bring you back to real life!
I won't be on for the next week or two, so see you again after Halloween!
Yes, it's the same.
Update