
 Hi! It's time for a break and time to relax with the new Weekday Escape!
Another Kamonosoukutsu's game recently ported to PC arrived - you visit beautiful room of Ms. Dog this time and need to fulfill her request to get out of here. Then come two games by tomoLaSiDo, in the first one you can try your drawing skills, and in the end of WE waits Selfdefiant's asylum. Prepare for a tough battle with Evil! Higher rank forces have apparently developed resistance against sacred objects (no wonder after all the successfully exorcised buildings), so you have to upgrade your methods of fight too!
Have a good time and enjoy!
A string of beads is hidden somewhere in Kamonosoukutsu's neat pinkish room, and Ms. Dog wants you to find it for her - in return, she would give you something too. There are only three scenes and very few pieces of furniture, but it takes a while to get through the game and fully understand to hints. Will you get out?
The cursor is not changing, save button, one ending.
The game is available for Android too.
You aren't supposed to look for crayons here as one would think, judging from the game's title and experience. It's only one box of crayons which you find in the first room - this tomoLaSiDo's escape is quite big and consists of several rooms - but after you get a notebook too, you can use the crayons and draw several pictures! Your main goal is put together the exit key, as usual. Notice, that some hotspots are without any visual clue so the changing cursor is your good friend.
The cursor is changing, no save button, one ending.
Back in the room with round windows, nice. However, there are some changes in tomoLaSiDo's usual pattern - we got new music and the key from exit door has changed its color to red - and that's enough of changes, the capsules containing key parts are still blue and white, graffiti is at the same place as always and the most importantly, the puzzles are amusing. There isn't any language barrier, you don't need to know what says the paper laying on the table. Just find all parts of the exit key and if you wish, look for seven pairs of sewing press studs.
The cursor is changing, no save button, one ending.
You find yourself locked in another Selfdefiant's haunted asylum which seems very much like a primary school. Well, why not, schools can be haunted too I suppose...otherwise it's usual dark asylum-like place with flowing purple orbs, many locked doors and evil spirits. You need to find the green bottle for orbs first, collect all the orbs you can, find the 'shop' and buy a map and sacred objects for fight with minions. However, the darkness is strong here and to get rid of evil spirits you need more than simple cross or a dagger. After you place seven blood red gems in their sockets (they appear on walls in some rooms), golden skull activates and the second part of the game starts! Now you can get more powerful tool to defeat the Evil Creature infesting school entrance hall!
The cursor is changing, autosave, one ending.
We love escape games, and our readers love talking about them and sharing hints! How about you? Let us know what you think, ask for clues, or help out other players in the comments below.


Chotto Escape 003 - Looking for Accessories of Tempu
Or, as the android app page says, Let's search for Nunumi's accessories.
Exploration
(As usual, I'll skip some details until you need to look at them. Feel free to seek them out though!)
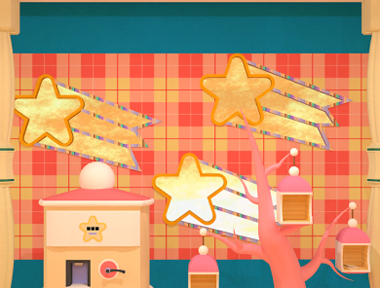
You start facing a locked door, a wall with a shooting star, and a an octagonal table with a hole in its middle.
Go left to meet Nunumi, who asks for her necklace. The drawers here have (from top to bottom) a diamond piece on a stand, a screw in the drawer top, and a three-digit lock.
Go right twice to find an unusual machine with a three-color lock and a handle that activates some kind of stamping press. The tree on the right is actually a stand for three boxes hanging from it, the right one of which contains a folded note with silhouettes on them.
Variety
Use the clue from the folded note to unlock the bottom drawer on the left screen.
The silhouettes drawn on the note tell you which items to look for, and then it's just a matter of counting them: there are a total of 6 shooting stars on the walls and 3 hanging boxes, but there's only 1 Nunumi.
Enter 631 in the drawer and open it to find a white cube with purple stickers, and a clue with a numbered shooting star.
Extract
Place the cube in the stamping machine, then pull the handle to punch out its top.
It looks like a mess inside the open cube, but you find that the contents are actually a screwdriver with teacups on its handle.
Use that screwdriver to unlock the middle drawer on the left screen. Inside, you find a triangle piece.
Countdown
Use the shooting star clue from the bottom drawer to unlock the three-color lock on the stamping machine.
There are walls with 3, 2 and 1 stars on them, but you need three colors from them. In particular, there's something on each screen that appears in a different color…
Whether by careful inspection or wildly clicking around, you'll eventually notice that the pillars on the sides of each screen are different colors that you can take a closer look at when zooming in.
The screens with 3, 2, 1 shooting stars have pillars that are green, blue, red, so click the color buttons 4, 2, 1 times, then open the drawer to find a big red button.
Push that button, and the top of the octagonal table floats up (it's actually supported by metal rods).
So look inside that table to find an octagonal piece.
Shapes
The geometric pieces can be placed in the hanging boxes on the right screen, but which piece goes where?
Examine the square piece and flip it over to find the clue: the boxes should (from left to right) hold the octagon, triangle, square pieces.
Place them accordingly, and a chime sounds to inform you that it's correct. What changed?
The tree now has a green fruit growing from it with a small round protrusion.
Connect
Attach the green fruit to the hole in the octagonal table, and it becomes a handle that lets you further open the top part.
Inside, you find the necklace!
Complete
Give the necklace to Nunumi, who rewards you with a heart-shaped key (and thanks you later).
Use the key to open the door and leave!
Escape Challenge 70: Room with Crayons
This room isn't quite as colorful as you'd expect from the title. Perhaps you can change that.
Exploration
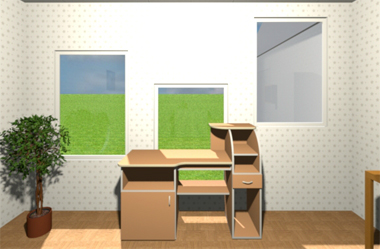
This week's room starts you off facing some rectangular windows, an extra-complicated desk that you can't do anything with, and a potted plant that's perfectly normal.
Turn left to find a smaller round window through which you can only see a flower patch, and a framed picture with several brightly colored regions.
Turn left to find a chest of drawers. The top drawer has a lock with three large sliders, the middle one has three different-sized circular buttons which cycle through different colors, and the bottom one has three digit buttons in outlines of different colors and shapes. The wall clock here is a bit interesting: its minute hand is pointy while its hour hand is rectangular.
Turn left to face the locked exit door. The wall box beside it has three square buttons, and is connected to a machine with musical note buttons that don't seem to work. The text on it tells you to get crayons.
(Hmm… no toilet corridor, so this means this is one of those multi-room games.)
Three drawers
Let's just do this all at once: use clues from the room to unlock each drawer. Solutions are given in the next three spoilers, from top drawer to bottom.
The (tops of the) rectangular windows are in the middle, bottom, top positions, so set the sliders on the top drawer accordingly and open it. It's empty but decorated with circular dots.
In the picture frame, the colored circular regions are (from large to small) green, blue, red, so click the buttons on the middle drawer 3, 2, 4 times and open it to find a key piece and a pattern of triangles.
The black circle appears in the room as the outline of the clock, the yellow square as the picture frame, and the white circle as the window.
The clock hands form the digit 7, the white region in the picture frame is the digit 8, and the flowers visible through the window form the digit 5.
So enter 785 in the lock of the bottom drawer and open it to find a box of crayons and a pattern of squares.
Kureyon
The machine has a ledge right under its text, so place your crayon box there.
Now the buttons work! Clicking them fills the gray bar, so you just have to find the correct sequence of four clicks.
Follow the clue given directly above the buttons by clicking them in the LLLR order.
After the jungle plays, a yellow-and-orange light bar appears at the top of the machine.
The wall box also works now.
Column
Use the clue from the open drawers to unlock the wall box.
The shapes at the bottom of the drawers are circles, triangles and squares, so click the buttons 0, 1, 2 times, then open the box to find a key.
Unlock / Exploration 2
Use the key to unlock the door. Yes, of course it leads to another room.
You're facing another locked door, and the frame on the left seems to show a horizontal beam supporting two small boxes.
Turn left to find yet another locked door.
Turn left to find the doorway back, and the wall box on this side has three rectangular buttons separated by thin lines.
Turn left to face another chest of drawers. The top one has a grid of four color-changing buttons, and the bottom one has two buttons in different colors. On top of the drawers, there appears to be a spiky glass dome but something about it looks familiar. Also, there's another uninteresting potted plant.
The beam in the frame looks like another perfect place to put the crayon box. Do so, and the beam descends while the shutter behind rises to reveal a sketchbook.
Unfortunately, you can't take the sketchbook without disturbing the crayon box and causing the shutter to drop.
Four colors
Use the clue from the crayon box to unlock the top drawer.
The outside of the box is almost entirely covered in four colored rectangles, which are
Yellow(1) Blue(2)

Green(3) Red(4)
Click the buttons that many times, then open the drawer to find a key piece.
Two colors
Use a clue from the previous room to unlock the bottom drawer.
The lights at the top of the machine blink from left to right. Since their colors are YOYYOY, push the LRLLRL buttons and open the drawer to find another key piece.
Separator
Opening both drawers has caused the longer spikes on the glass dome to light up in yellow and blue, as well as activate the buttons on the wall box.
So use the clue from the dome to unlock the box.
Checking inside the crayon box, you find that the yellow and blue crayons are 2nd and 7th from the left, which means that there's 1 crayon to the left of yellow, 4 between yellow and blue, and 2 to the right of blue.
Enter 142 in the lock, and open the box to find another key.
Unlock 2 / Exploration 3
Use this key to unlock the door beside the "picture" frame, then proceed to the next room.
This room has a blue chest of drawers! The top drawer has four colored sliders, and the bottom one has shape buttons in colored square outlines. There's also a framed drawing of eyes and a nose that seem to be mocking you.
Turn left to find a couch with a big teddy bear. The drawing on this wall seems to be of a medal, or is it a flower?
Turn left to face the doorway back. The drawing on this wall is a bear's face, but without the face.
While zoomed out, click to the right of the drawing to find a hidden panel that opens up into a compartment with the sketchbook. Taking it reveals a face that's definitely mocking you.
Turn left to face another locked door connected to a wall panel with lots of buttons and colored rectangles. The drawing of the wall is a single water drop.
While looking at the right potted plant, you might notice an occasional blue flash. Clicking it zooms in on some leaves, and you realize that the sparkle is coming from a dewdrop hanging from one of them.
Artist
Hint: You can draw better than that!
Use the sketchbook and crayons on the face, bear, and dewdrop to make pictures of them.
What was the last one?
Go back to the first room, and use the sketchbook and crayons on the flowers to paint them too.
Examine your crayons again. You've made a mess of the box!
Four colors 2
Use a clue from your crayon box to unlock the top drawer.
The white, yellow, orange, red crayons have been used in a 1:3:3:2 ratio, so click the sliders that many times, then open the drawer to find a key piece.
Three shapes
Use another clue from the crayon box to unlock the bottom drawer.
On the outside of the box, some shapes have been drawn with crayon.
The green, yellow, red shapes are square, triangle, circle, so click the buttons 2, 1, 0 times and then open the drawer to find a key piece.
Twelve spots
The wall panel has twelve buttons to light up, which can be arranged in three groups of four. Have you seen that pattern before?
The three rooms so far each have four corners, and their chests of drawers are white, gray, blue! The corners themselves look identical except for whether they have a potted plant.
If you arrange their floor plans so the drawers are at the top, the plants appear in the positions
WhiteGray

-0 0 0 1-

-0 1 0 0-

- Blue --

-- 0 1 --

-- 0 1 --
so click those four buttons (marked 1) to turn them green, then push the big button. The grid readjusts until the green lights form an arrow pointing to the right.
Exploration 4
Open the door and go outside. There's not much here except a shelf of discarded models. That cardboard box does look interesting though…
(But if you're outdoors, why can't you just leave?)
Dump
Leave your sketchbook and crayons in the box, which makes a key fly out.
(If the game doesn't let you do this, check that you've completed all four drawings and opened both drawers in the room.)
Unlock 3 / Exploration 5
Return to the second room and use the key to unlock the remaining door, which opens into another room.
The locked door in this room is surrounded by fancy wooden frames.
Turn right to find another picture frame. This one is just a simple handwritten thank-you note!
Turn right to find the way back.
Turn right to find three panels on the wall. No matter which one you click, you'll zoom in on the middle one.
However, while zoomed in you can click the left and right edges of the screen to move around and find two levers on the sides.
Puzzler (B)
The white buttons extend/retract the left rod, middle divider and right rod respectively, but the right rod immediately retracts after extension.
No problem! Just click the two left buttons to remove the divider and extend the left rod, then click the right button to complete the connection.
A shutter closes over the puzzle. What now?
Puzzler (A)
Click the left edge of the screen to look at the left lever, and pull it to the bottom.
The middle panel now shows three bars, two on the right and one on the left. As before, only the left one has a red button.
The top button extends the bottom rod and moves the left rod down two steps, while the bottom button extends the top rod and moves the left one up one step.
So you can complete the puzzle by just clicking the bottom button once. Once done, the shutter closes on it.
Puzzler (C)
This time, go to the right lever and pull it to the bottom. (Note that the lever positions reset if you back out; you'll need to make sure the left lever is also at the bottom.)
The middle panel now shows four rods on the bottom and one on the top, along with digit buttons along the bottom. These buttons do something a little different than usual…
We've seen a similar mechanic all the way back in Escape Challenge 59: the first button clicked shows 1, the second shows 2 and so on, but clicking a button with a nonzero number has no effect. Once every rod has a number, the corner button makes the rods rise in the same order you clicked the buttons.
For this puzzle, you need to push the button four times in one go, once with each rod.
Paying attention to how the top rod moves, you find that you need to click the 3rd, 2nd, 4th, 1st button to make the digits read 4213.
Puzzler (D)
Go to the left lever and move it to the top. (The right lever should remain at the bottom.)
This panel has a hammer and a button, as well as a power meter which climbs to the red zone before weakening.
Simply click the button when the power meter is in the red, and the hammer swings up to hit the button. (If you click at any other time, nothing happens and you get to try again.)
Puzzled
Now that all four puzzle panels are solved, you can move the levers to the middle position.
With both levers in the middle, the middle panel gives you a view of the entire capsule containing the last key piece you need.
Since you have all the pieces, you can finally leave through the door.
The crayons and sketches turn into a rainbow and stars!
Item list
6 key pieces:
Top left: 3rd room, in top drawer.
Top middle: 1st room, in middle drawer
Top right: 3rd room, in bottom drawer.
Bottom left: 4th room, from puzzle panels.
Bottom middle: 2nd room, in bottom drawer
Bottom right: 2nd room, in top drawer
3 keys:
1st room, in wall box
2nd room, in wall box
Outside, from cardboard box
2 kinds of art supplies:
Crayons: 1st room, in bottom drawer
Sketchbook: 3rd room, in hidden panel.
The title on the third game is still wrong, but it links correctly.
Escape Challenge 71: Room with Snap Buttons
Snap fasteners. Press studs. Whatever you call these metal pieces, they'll really add a click to your point-and-click.
Exploration
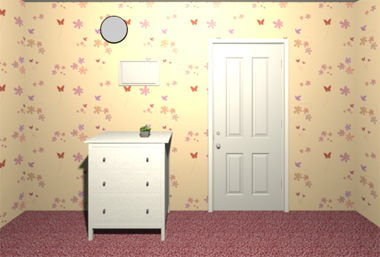
We're back to round windows in this comfy carpeted room. Looking at the table, you find some sort of flier for snap buttons:
"The new snap button has a purity of eleven nines! Moreover, you can sew onto any hole! An astonishing 720 single sides! 20 yen."
Maybe you find the math a little dodgy, but take a snap button (set of top and bottom) from the chair anyway. There's also a potted plant here.
Turn left to face a machine with a button that dispenses a load of snap buttons, and a white ball with a face on a cabinet with some white rectangles. You can click the middle rectangle to unbutton the right side and find a capsule with a key piece, and click it again to open the left side and find another snap button.
Look under the machine to find a snap button.
Turn left to face the exit door. The clock on the left is shaped like (half of) a snap button, and the picture frame is actually four colored strips that you can unbutton to find a key piece. The locks on the drawers below have four horizontal sliders, four color-changing buttons and three digit buttons.
Turn left. In addition to empty blue bin and the wall box whose three-digit lock has colored stripes behind the digits, there's a huge yellow-and-red pouch that you can unbutton to find a large pot that looks like a cup.
Enter the corridor to the toilet. As usual, you can sit down, look right, look up and look left to find a drawing of someone sewing.
Riches
Place the cup in the machine and press the button to make it rain!
Aw, it's a bottomless cup. Guess it goes into the trash then.
At least you get a snap button for your efforts.
Stitches
Use the clue from the advertisement to unlock the wall box.
The clock tells you that the white thread is in the 12 o'clock position, so that the colored threads in the picture translate to numbers on the clock face.
Since the clock face is the top of the button and the picture shows the bottom, the clue needs to be reflected.
This means that while blue is still opposite white (which makes it 6), yellow ends up on the left of white (making it 10) and red to the right (2).
On the clock face, 10 shows up as 0 because the left digit is covered.
So the final three-digit code you need to enter is 602. Open the wall box and take the key piece.
Four sliders
Use the clue from the cabinet (under the white ball) to unlock the top drawer.
After peeling off the right side, the four button (halves) attached to the left cover appear in the left, center, right, center positions.
So click the buttons 0, 1, 2, 1 times, and open the drawer to find a key piece and a snap button.
Four colors
Use the clue from the large pouch to unlock the middle drawer.
After opening the pouch, you'll notice that the button halves on the flap are different colors.
So make the drawer buttons green, yellow, yellow, red by clicking them 2, 1, 1, 4 times, then open the drawer to find another key piece and snap button.
Three digits
Use the clue from the frame on the wall to unlock the bottom drawer.
After peeling off the colored strips, you see that the buttons form the digits 147.
Enter that in the drawer, open it, and take the last key piece and snap button.
Item list
6 key pieces:
Top left: in top drawer
Top middle: in middle drawer
Top right: in bottom drawer
Bottom left: in wall box
Bottom middle: in cabinet under ball
Bottom right: in frame under clock
7 snap buttons:
1 on chair
1 in cabinet
1 under machine
1 from cup/trash
1 in top drawer
1 in middle drawer
1 in bottom drawer
Archaic Asylum
In case the warning text on the title screen sounds… scary, let me just say I didn't find it any worse than the previous Asylum games.
Initial exploration
(Just a reminder: you can scroll your inventory as well as rearrange most items in it by moving them to empty spaces.)
The darkness is overpowering, the exit is blocked by a floating creature with two scythes, and the payphone in the back is stuck on just one number. This sounds like a perfect time to be gathering purple orbs, but you need to find a jar for those.
Go west, north, north, to find the sacred jar on the windowsill. Now you can hover your cursor over the orbs in the room to pick them up.
Let's start exploring for orbs. From here on, the number of purple orbs I found on each screen will be listed in parentheses.
You already took the 6 orbs from this room, so just notice that the locked door to the west has a blue keyhole.
Backtrack out, starting by going south (4), where you see some colored beads on the right ladder.
Go south again (6), where you find a red gem on the window. The west door has a green keyhole.
Go back east (4) to the starting screen.
Go south (3) to find a hooded creature, your trusty Orb Shop. As you might have guessed, the most useful item to buy here is the very first one: a very useful map.
The shop "room" is labeled B, which reminds you that you can go west to A(5). I still don't know what these machines are, but the left one seems to be full of some foul stuff it might be worth looking through.
Go east twice to C(4), where the front of the tub has a panel that's screwed down.
Make your way back to the starting room at F, and go east to G(4). The open cupboards in the middle of the screen hold a three-digit safe.
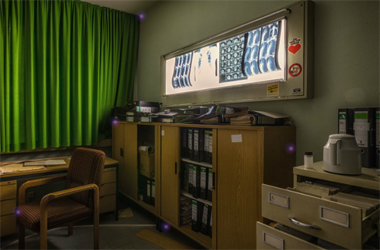
Go east to H(5). In this doctor's office, you can look closer at the X-rays to find a shocking prognosis.
Open the top-left desk drawer to find a screwdriver.
Return to the starting screen, and go north to J(4). This screen is a cheerful contrast to the first one, except for the creepy golden skull mounted onto the wall. The north door has a gold keyhole, and the east one has a silver keyhole.
You should now have enough to return to the orb shop and buy the last item: a crystal ball. Once you have it, you can teleport to any room by clicking it on the map, provided you've been there already.
Number
Enter the clue from the payphone at F in the safe at G.
After entering 976, open the safe to find a red gem.
Unscrew
Use the screwdriver you found at H to unscrew the panel at C. Inside, there's a green key.
Green
Unlock the west door at E with the green key.
This puts you at D(5), where you see an old book on a table.
Word
Enter the word you saw at H into the old book.
That word is DEATH.
Flipping through the book, you find some curious pictures, colored stars and a black triangle, and a narrative guide on how to destroy evil.
With all the locked doors around, you could really use a key right now. Click the black key on the last page of the book, and a silver key appears over it!
Ladder
Before we go off opening new areas, some clues on the book match the colored balls we saw in room I.
The red, yellow, green, purple/pink, gray, blue stars appear on pages 5, 9, 4, 11, 7, 2, so move those balls to the correct ladder rungs by clicking them 4, 8, 3, 10, 6, 1 times. (To double-check: the purple ball should be on the second rung from the bottom.)
Once you're done, a red gem appears.
Silver
Unlock the east door at J with the silver key.
This puts you at K(4), which looks so plain that one item stands out: the bright red horseshoe magnet attached to the stand on the right.
Pull
Go to A, and use the magnet you just found to retrieve a blue key from the brown material.
(Instead of mysteriously vanishing after you use it, the magnet just sticks to the metal rim.)
Blue
Unlock the west door at M with the blue key.
The bathroom at L(4) has an evil spirit, but you don't need to do anything with it yet. What exactly is the spirit trying to stop you from finding?
Click the bottom of the hand dryer to make a gold key fall out.
Gold
Unlock the north door at J with the gold key.
N(4) doesn't seem to be very interesting, except for the bright-colored rope tying two of the cupboard doors together in the back. The door to the north is locked with a purple keyhole.
So go east to O(5). After even more intense pixel hunting, you find
a knife on the right radiator.
Go east again to P(3), where you find a purple key on the left lamp as well as some sort of scrambled picture on the wall to the right.
Unscramble
Solve the scrambled image puzzle at P by rotating the tiles until they align.
Click the tiles
1 3 1 2 2

1 2 2 3 1

3 1 3 1 3

2 3 1 3 1

1 2 2 2 3
times, and then a red gem appears over it.
Cut
Use the knife from O to cut the rope at N.
The drawer is covered in strips of tape. Just peel them off to get to the red gem!
Purple
Unlock the north door at N with the purple key.
Q(3) is the last dead end in this place, and it has another evil spirit floating around.
Exorcise
Go back to the orb shop at B, buy both the sacred dagger and sacred cross, and use them to defeat the spirits at L and Q, who drop the last 2 red gems.
Collection
You have all 7 gems (from E, G, I, L, N, P, Q), which means that some new things have appeared.
You can now find hexagonal sockets at C, D, H, K, M, P, Q. (If you picked up the last gem in P or Q, the socket there will appear when you reenter the room.)
So place the gems there, one for each socket. What now?
Visions
The gold skull at J now has red lights coming from its eye sockets. So reach out and touch it…
Is this another world? Is time even moving?
Oh right, the book mentioned unlocking a mystic portal. According to it, the next step is to find some eyes!
Final exploration
Most things in the game have inverted color (with the notable exception of our orb shop friend and the payphone from the start), but let's go through the rooms in alphabetical order and see.
The vat at A is now empty, and you notice a panel in the right pillar that hides an Eye of Ragnor.
You spot another Eye of Ragnor on the X-ray screen at H.
The bathroom at L now has a box with three symbols on it.
The blank wall at N now has a star shape with five circular holes at the corners.
The rest of the rooms look normal, but if there are five eyes to find here then there are at least two more spots that have changed. Where are they?
Clicking the picture puzzle you solved at P brings up a different puzzle with tangled lines!
At Q, you find a cross marked on one of the tiles near the bottom-right corner, and removing that tile reveals another Eye of Ragnor. (It's the third row from the bottom and third column from the right, but if you can't see it you can always check with your changing cursor.)
Tangled
In the puzzle at P, the triangles on the right can be recolored by clicking on them. What colors should they be?
Following the lines, the triangles on the right are (from top to bottom) connected to the yellow, blue, green, red buttons, so click them 0, 2, 3, 1 times to make an Eye of Ragnor appear.
Symbolic
Use the remaining clue from your book to unlock the box at L.
Only three of the symbols available on the box appear in the book, on pages 3, 5, 7.
Make those symbols show by clicking the dials 3, 1, 4 times, then open the box to find the last Eye of Ragnor.
Power
Place all five eyes in the corners of the star at N, and a chest appears on the ground. Open it to find the destiny sword.
Time to vanquish that evil- wait, it's not here in this world.
Go back to J, click the skull to return to normal, and finally return to F and use the sword on the creature. Now you can click the exit on the right to leave!
Thanks for wlakthroughs kktkkr. Needed to refer to them a few times in Asylum. Needed a lot of patience to get aroud that one!
Update