
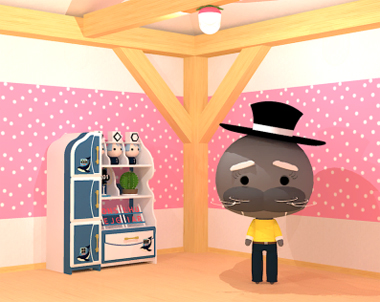
 Hi! Playful and colorful Wednesday is here with four new games!
You find yourself trapped in Kamonosoukutsu's room and again you meet few civilized animals here. With their help you escape to cosy Amajeto's room and no surprise here - nice game as always. No1game's isn't surprising too - find ten little escape-men (more and more cunnig during years of hiding) which can be anywhere in the room. Mummies in Dassyutu's room might seem a bit dangerous, so don't wait until they come back to life and escape!
Have a good time and enjoy!
Kamonosoukutsu locked you in lovely pink room, this time with strict Mr. P. Bear and sad Mr. Seal, who misses seven seashells, but doesn't seem happy when he gets them. I'm wondering what he needs them for. However, you aren't trying to cheer him up, you need to find the shells to exchange them for something important and so get further in this smart and overall enjoyable game. Can you escape (to lavender room)?
The cursor is not changing, save button, one ending.
The game is available for Android too.

You stay for a while in a sweet world - Amajeto's room is painted in shade of lavender, and furniture and decorations match wall paint. Otherwise you get what you're used to - solid game with good puzzles!
The cursor is changing (its color), no save button, one ending.
Last night was New Year's Eve, and you wake up in unfamiliar room - New Year's celebration was very merry obviously. Now you need to get out of here, and you should do quickly something about the demon watching you closely, the sound he makes with his teeth sounds really unpleasant...
This is typical No1game's room with green guys hidden in it, but to discover them you need to pay close attention to all details of the room and to all clues you find. Check carefully items in your inventory and note, that escape-men can be items too.
The cursor is not changing, no save button, one ending.
Dassyutu's room, maybe a museum depository (Egyptian section), stores several mummies in strange and disturbing positions. They seem they may start moving any moment and if so, you don't want to stay locked with them, right? Look around and soon you find many objects to fill empty slots in your inventory, and also ten golden coins lying in various places. Remains to use the items in right places, solve some puzzles and escape an Egyptian curse!
The cursor is not changing, save button, one ending.
We love escape games, and our readers love talking about them and sharing hints! How about you? Let us know what you think, ask for clues, or help out other players in the comments below.


Chotto Escape 011 - Escape from the Room with a Seal and Polar Bear
Luckily for you, none of this room is underwater.
Exploration
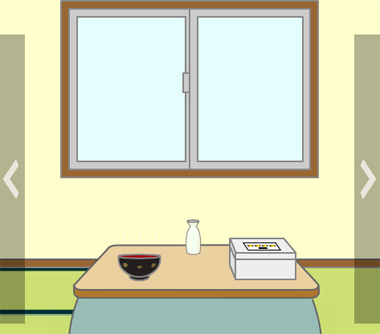
You start off facing the locked exit door and a box next to it that's tied shut. Closer to you, there's a table with two small snowmen and a seashell.
Wait, the box isn't entirely secured! It has a drawer you can pull out to find a note with a grid of symbols.
Turn left to find a polar bear asking for some kind of red bottle. The five empty glasses at his end of the table are placed on different-shaped coasters. In the background, there's a snowman wearing a hat that you can lift to find a seashell.
You don't even need to refer to the snowman from the previous screen to know that the bottom button is out of place on this one. Click it to remove the screwdriver.
Turn left to find a seal asking for seven seashells. The shelves on his left are full of stuff: three gray-haired figures holding up different shapes, a numbered clue in the shape of a club suit hanging from a stand next to a boring cactus, and racks of pinkish letters. There's also a drawer with rectangular buttons that fill up with the color pink, as well as cupboard doors with a three-digit lock, a hexagonal (but still cross-shaped) screw, and four color-changing buttons.
Just to the right of the shelf, you see another seashell.
Turn left to find a window with a horde of cute penguins in front, and a locked cupboard (requiring a key) with a drawer that's also locked. The drawer has a grid of buttons that change between white symbols, except for one that's stuck on a pink star. There's also a conspicuous red arrow on a ceiling beam, and you look up to find… there's nothing above the skylight, but you can faintly see the reflection of a clue.
Three digits
While those three-digit clues are still fresh in your mind (or on your notepad), use them to unlock the top door of the shelves.
The reflection in the skylight tells you that (spade) = 346, and the clue on the shelf tells you that (club) = 201.
So work out ♠+♣ = 547 and enter that in the lock, then open the door to find a seashell and a clue with colored squares.
Four colors
Use the clue you just saw in the top door of the shelves to unlock the bottom door of the shelves.
Paying attention to the location of the line, you figure that the top clue has to be turned upside-down to give the correct colors:
Blue(3) Red(1)

Green(4) Gray(5)
Click the buttons that many times, then open the door to find a pair of bear-shaped scissors.
Untie
Use the scissors to cut away the string on the box beside the door, and then open it to find a red bottle.
Quest
Give the bottle to the polar bear, who gives you a red key in return.
While you were looking at the key, he's poured the bottle out into the glasses!
Unlock 1 / Exploration 2
Use the red key to unlock the cupboard, where you find a seashell on the upper shelf and a ladder leading down.
The basement is decorated almost the same as above, even though it's considerably more cramped. To the left of the ladder, you notice a hexagonal stand with a single note placed inside. The note has a grid of familiar symbols.
Turn around to face a giant snowman standing on a podium, with two penguin silhouettes and a labeled outline of a seal painted on it.
Shapes
Use the clues from the shelf and glasses to unlock the drawer under the shelves.
The pentagon, diamond, hexagon coasters support glasses which are half-full, almost full, and almost empty. But estimation won't help you too much since there's six possible levels for each button.
Calling the lowest non-empty level 1 and the highest 5, the water levels in those glasses are actually 3, 5, 1. Push the buttons that many times, then open the drawer to find another note.
Crossed
Use the clues from the three notes you picked up to unlock the drawer beneath the cupboard.
Notice that the star is missing from the grids, and each other symbol has a fourfold symmetry.
Which means that all three grids can be rotated to match the final code, or in other words, the final code can be obtained by aligning the rotated grids.
Let's call the grids A, B, C according to the order they appear in your inventory. (Just in case this gets messed up, only C has the center filled in, and only B and C have a + sign.)
C shows that two adjacent corners are filled with crosses, and A and B imply that the other two corners are filled with different clovers/quincunxes. This allows you to fill in the grid, from which it's clear that the only unaccounted spot is between the crosses, and it must be reserved for the star.
Therefore A is upside-down, B is right, C should be rotated to put the crosses on the left, and you can enter the final code by clicking the buttons
1 0 2

- 2 0

1 3 3
Open the drawer to get a seashell.
Unscrew
Now for something simpler: use the screwdriver to unscrew the middle door of the shelves. Inside, you find a bright blue bucket.
Accessory
You've seen a much smaller version of the bucket on the left miniature snowman on the table.
So go downstairs and place the bucket on the giant snowman in the basement. Now its broom arms can be moved.
Dance
Use the clue from the penguins and shelf to unlock the snowman in the basement.
Each letter on the shelf corresponds to the penguins under the window, and the letters SEAL on the podium tell you which penguins to look at.
Those four penguins have their RRRL arms raised, so click the brooms on those sides to unlock the panel under the snowman and reveal another seashell.
Collection
Give all the seashells to the seal, who gives you a penguin-shaped blue key (and then thanks you too).
Use that key to unlock the door and escape!
Lavender Room Escape
Exploration
Note that the changing cursor doesn't highlight some areas which can be interacted.
The first screen you're looking at has the classic scrambled picture above a fireplace, as well as a lot of cluttered shelves on the left. Clicking around, you find that the gray compartment at the top of the shelves has a three-button lock.
Turn right. There's more stuff all around the screen, including a purple Christmas tree and a lamp that works, and a safe with four vertical bars. Also, the left picture on the wall can be turned over to reveal a clue with colored squares.
Turn right. This time, the clock on the shelf doesn't work, but you do see some colorful blocks next to the books. The snowman picture tilts when you click its corners, and the chest of drawers under it only has a single drawer with a two-button lock. There's also a locked door on the right.
Turn right. Through the partially open window blinds, you can see a dark landscape outside. Meanwhile inside the room, you see a grid device, a plant in an unusual pot, a computer with a socket on its monitor, and three desk drawers. The top drawer has four buttons which change patterns, the middle one has a four-letter lock, and the bottom one has a grid of buttons that turn gold.
Unscramble
Solve the (randomized) scrambled picture by rotating its pieces until they align.
Once you're done, the picture slides aside and you find a white square tile in the hidden compartment.
Three buttons
Use the colored square clue from the left picture above the teddy bear to unlock the safe on the first screen.
The colors of the squares match those of the presents to the right of the bear, with the purple, white, red, white, red presents being on the CRLRL sides.
Click those buttons to reveal a square tile and a button that shows some letters and numbers on the shelves.
Bars
Use the clue from the windows to unlock the safe on the teddy bear screen.
Looking at the relative heights of the window blinds, you figure that the bars need to be 2nd, 4th, 3rd, 1st from the bottom, so click them 1, 3, 2, 0 times accordingly, then open the safe to find another square tile.
Greens
Use the clue from the potted plant beside the desk to unlock the drawer beside the door.
The pot has a downward arrow on it, so read the leaves of the plant from top down to find the order in which to press the buttons: RLRLLR.
Open the drawer to find a square tile.
Patterns
Use clues from the room to unlock the top desk drawers.
Looking for the red, gray, blue, green items in the room, you find that:
The red bowl on the fireplace screen has horizontal stripes.
The gray bowl on the desk screen has vertical stripes.
The blue bowl beside the Christmas tree has hearts.
The green bowl beside the door has stars.
Click the buttons 1, 4, 3, 2 times and open the drawer to find a square tile and memory stick.
Screen
Plug the memory stick into the monitor, which shows a clue with colored stripes.
Click the monitor again to view a clue with purple rectangles.
Four colors
Use the first clue from the monitor to unlock the tilty picture beside the door.
The colors on the stripes match those on the triangular blocks to the left of the tilty picture.
Since the red, yellow, blue, red, green, yellow blocks are oriented in the ◥◢◤◥◣◢ directions, click those corners to unlock the picture.
Turning it over, you find a clue with letters and numbers, as well as a square tile.
Letters
Use the clues from the back of the tilty picture and the shelves on the first screen to unlock the middle desk drawer.
Consider the top row of the picture clue, which references the 2, 0, Y, E, A shelves.
Since the shelf labeled 2 is longer than the others, all five of those shelves put together form the letter C.
Working through the other rows similarly, you find that the four shelf combinations spell out COLT. Enter that in the drawer and open it to find a square tile.
Staggered
Use the second clue from the monitor to find a hidden spot.
The purple rectangles match the rectangles on the right side of the fireplace, so the white square indicates the rightmost brick on the fifth row from the bottom.
Clicking on that brick makes a fire screen close over it.
Nine
Use the clue you just found in the fireplace to unlock the bottom desk drawer.
The fire screen is divided into a grid of nine squares, and five of them are further subdivided, or covered with crosses:
+--

+++

--+
Click those five buttons, then open the drawer to find another square tile.
Complete
Now that you have all eight square tiles, place them in the grid device and solve the randomized image puzzle that shows up, by swapping the tiles into position. (Watch out for the two almost-blank tiles which may look very similar!)
Once you're done, a compartment opens so you can take a golden key. Use that to open the door and escape!
Find the Escape-Men 196: New Year 2019
It's the very first morning of the new year and already you're trapped in an unfamiliar room!
Exploration
(As usual, I'm going to list out some names from Wikipedia for the things I can find.)
This masked beast with green legs (namahage?) stares right into your soul. You can make it run to the left or open its mouth, and you can jiggle the doors behind to no avail.
Turn right to face a folding screen with a bamboo display (kadomatsu), as well as an unusual clue on an upward pointing arrow. There's nothing obviously out of place, but you can pixel-hunt to find:
an Escape-Man stuck at the bottom of the middle bamboo shoot and a red pen hidden behind the lower left corner of the screen.
Turn right to find a kotatsu with a steaming bowl of soup on it (o-zōni). There's also a bottle of sake and a box with some weird squiggly buttons. You can lift the blanket/futon to find a pair of chopsticks. When you unlock and open the window, the only thing you find outside is an Escape-Man on a tree behind the right window pane.
Turn right to face a table with a blank piece of calligraphy paper, a brush and an inkstone without any ink. You don't have to look very hard to find an Escape-Man under the table. It looks like someone's already done his New Year's calligraphy (kakizome) and hung it up, but he couldn't even spell Year right.
Soup
Don't just do your detective work while looking at the soup bowl!
Take out the chopsticks and use it to pick up the stuff. Around the outside, you have what looks like a mushroom, grilled mochi, sliced carrot, meatballs, and kamaboko. In the middle, there's a green vegetable which I can't identify, but it's supposed to be similar to spinach.
You can't eat any of that, so what do you do with it?
Refer to the arrow clue, reading it from bottom up and matching the markings to the ingredients. (The marking on the meat is revealed when you pick it up.)
It's not a fancy grocery list, but it does tell you to click the kamaboko thrice, carrot four times, mochi once, mushroom once, meatball twice, vegetable twice and mochi once. (So for example you'd pick up the kamaboko, put it down and pick it up again before moving on to the carrot.)
Do so, and an Escape-Man appears on the mochi when you finish the sequence.
Drown
Pour the sake into the middle bamboo. How does this help you get to the Escape-Man inside?
All you have to do is "wait". Turning around once should do the trick.
Check back in the bamboo to find the Escape-Man floating on the surface.
Mistake
Uncap the red pen and use it to highlight the error on the hanging calligraphy. It's horrible!
Wait/turn around again, and you find the enraged Escape-Man stomping on the table.
Whorl
Use the clue from the masked beast to unlock the box on the kotatsu.
There are a total of 10 squiggles on the beast's body, and you notice some subtle differences between them.
Only one squiggle has an additional line disconnected from the spiral.
Two squiggles end with a hook in the very middle, parallel to the outer end.
Three squiggles end in a closed loop.
The other four squiggles have outer and inner ends in perpendicular directions.
Enter the squiggles in the box from least to most common by clicking the buttons 3, 2, 5, 1 times, then open the box to find an Escape-Man and a banana.
Trip
Eat the banana to leave the peel, and place it on the floor to the left of the beast.
Then click the beast to make it slip and fall, leaving the 2 Escape-Men on the floor.
Ink
Having searched the room and found absolutely no inksticks, there's only one thing left you can use.
Rub an Escape-Man on the inkstone, turning the water green.
Then dip the brush in it and use it on the paper. After a few more clicks, you paint a passable Escape-Man and tear it out of the paper.
Examine the brush and click its tip to find an Escape-Man hidden inside.
Complete
The chime informs you that you have all 10 Escape-Men:
Outside window
Under table
In soup
In bamboo
On table
In box
In beast
Also in beast
On paper
In brush
They combine into one large Escape-Man, and all you have to do now is escape.
Use the large Escape-Man on the door. As an escape master himself, he gets it open in no time!
Mummy's Room Escape
Not your mummy's room, just a mummy's room, and that's what makes it so scary.
Exploration
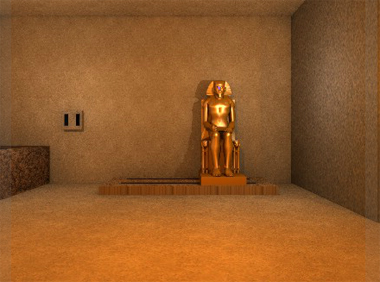
The first thing you see upon starting the game is a mummy facing you with arms outstretched. (Get ready to see that a lot.) As you move closer, you see that it's standing on some kind of box and there's a round protrusion on the wall to the right that seems to show the letter O. On the left, you see a small brick pit holding a crowbar, and on the right you see a stone trough with a stick and a round object that looks like a top.
Clicking around the edges of things, you find a coin beside the brick pit, a red cubical gem beside the mummy's foot and a blue spherical gem to the right of his platform, and another coin to the right of the stone trough.
Turn right to find a pharaoh whose throne seems to be mounted on some tracks, but one of those grooves is blocked by a huge rock/pile of dirt. Oddly enough, the pharaoh has a coin stuck in its eye. On the left, you see what looks like a lever slot in the wall.
In the right corner, you spot a pile of wood chips.
Turn right to see a wall that's partially covered. Looking behind the wall, you see some things in the darkness as well as a trapezoidal bracket attached to the wall. In the uncovered area, you see a pillar with a four-digit lock and a brush next to it.
Turn right to find another mummy sitting on a box, with a four-color wall safe to the right. You can walk up to him and take a key off one hand and the bandage off the other. There's also a shelf high up and to the right. Looking through the shelves on the left, you find a folded piece of cloth, a lever, a hammer-shaped object and a look beneath the shelf.
You find a coin under the bottom shelf, and another coin beside it.
(Check that you have 5 coins.)
Wielded
Maybe you found it weird that both "objects" in your inventory don't have any other descriptions.
Place them on the mummy on the first screen, which activates the box it stands on. It has a lock with four shape buttons.
Pharaoh's secret
Clear out the blockage beside the pharaoh with the crowbar. The pharaoh still needs a few more things before it can move.
Place the gems in the pharaoh's eyes, and they shine brightly.
Now you can place the lever in the slot and pull it to slide the pharaoh over. This reveals a blue spot on the wall where the pharaoh was, showing the letter N.
The gems light up some overlapping circles on the opposite wall, under the high shelf.
So use the crowbar to break the wall there and find some flint (and presumably a rock to use with it).
Click that hollow spot in the wall again to find a coin.
Illumination
Use the flint on the woodchips to light a fire. Great, now you have a really hot fire in your inventory and nowhere to put it.
Wrap the cloth around the stick to form a torch, then use the fire you're holding to light it.
Finally, you can place the lit torch in the wall bracket to light up the dark area, where you see a locked rectangular coffin and a red spot with the letter E.
As usual, this new area comes with its own hidden spot…
Near the top right of the coffin, you find a coin.
Unlock
Use the key to unlock the coffin. There's another mummy holding a note under his left arm.
Also, you find a coin in the far left corner.
Note
Enter the four-digit code from the note (1112) into the pillar. Guess what, it's yet another mummy.
With a few neat clicks, you find a coin at its feet and some sort of bloodstained panel above its head.
Clear up
Use the brush to remove the stain, revealing a clue with arrows.
So click the ← → → ← buttons on the mummy, who holds up a bottle of liquid.
Splash
Pour the liquid onto the bandage, which now shows four colored squares.
Do you still remember where that safe is?
On the safe to the right of the sitting mummy, push the red, blue, green, yellow buttons (3124), which makes the mummy stand up. Take his chair.
Height
Place the chair underneath the high shelf and climb up to find another note.
While you're up there, click the left side of the screen to view the other end of the shelf, which has the last coin and a black spot with the letter P.
Note 2
Enter the code from the second note (circle triangle star square) into the box beneath the mummy on the first screen.
The entire mummy and box rolls aside to reveal a doorway and a clue on the ground. The door requires you to type in a password.
Pass
The colored circles on the ground match the spots with letters which spell OPEN, so type that in the door lock and then open it to escape!
I love this game vidmate
Update