
 Hi! The week is behind us and you can play again! The new Weekday Escape arrived!
Diligent Nicolet ported another cute cube for PC full of apples and codes, and after you escape it, you may connect with your inner pyromaniac in tomoLaSiDo's room and then unleash the passion for fire in KaboKabo's late Christmas game. Beautiful Rinnogogo's creation starts in perfectly equipped tree trunk apartment - who would expect a bathroom and a kitchenette inside a tree - and takes you for a flight at the end!
Have a good time and enjoy!
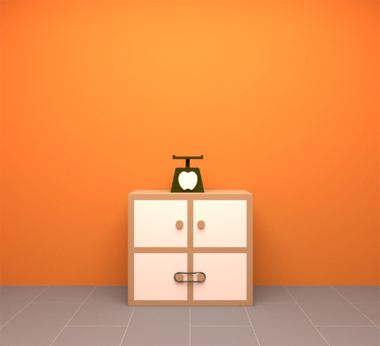
Nicolet locked you in vibrant orange room where big red apple comfortably sits on a couch (without any idea about your intentions). Room design is stylish and puzzles as well - clean and understandable. Will you escape?
The cursor is not changing, autosave, one ending.
The game is available for Android too.
P.S. For more apples check Applicate Vol.1 by Eyezmaze.
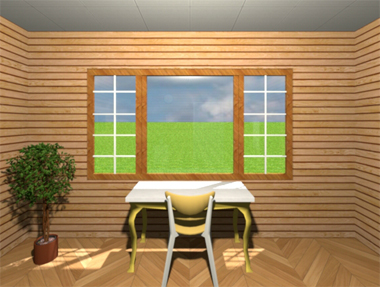
This time tomoLaSiDo leaves you in a wooden room with parquet flooring and you are supposed to collect few matches here (seven). Not to start a fire - where would you escape from next time? Only very small flame is allowed after you find a matchbox. Pay attention to details - puzzles are cunning, but doable.
The cursor is changing, no save button, one ending.
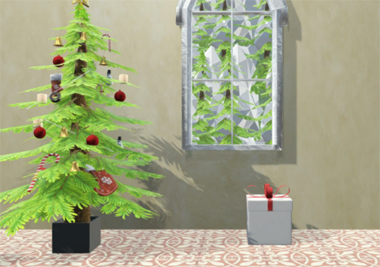
Now you can make a nice fire, KaboKabo gives you a matchbox, some logs and safe fireplace. The room where you're trapped seems abandoned from Christmas, the tree is still decorated and gift boxes are lying around. You don't have to clean up, luckily. Only get out from here and find out how to - there isn't any door...
The cursor is changing, no save button, one ending.
P.S. For more fireplaces, check...hmm...Fireplace by Petithima.
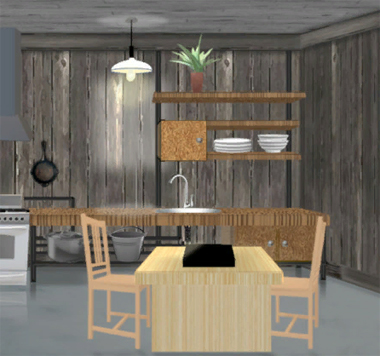
Atmospheric, fragile and very charming game by Rinnogogo takes you to the sky! It's perfect day for flying, with creamy clouds slowly floating on deep blue sky, you only need to get to the balcony of your tree trunk house and also figure out the method of flying. In your way are closed doors, closed cabinets, one old thirsty man (you've met him before) and many puzzles, all logical with good hints. Happy flight! And hopefully soft landing.
The cursor is not changing, autosave, one ending.
P.S. For more clouds (and great adventure) check A Grain of Truth. Higly recommended!
We love escape games, and our readers love talking about them and sharing hints! How about you? Let us know what you think, ask for clues, or help out other players in the comments below.


Here is the recommended wonderful adventure A Grain of Truth: https://jayisgames.com/review/the-trader-of-stories-a-grain-of-truth.php. Don't miss.
Once again and better:
https://jayisgames.com/review/the-trader-of-stories-a-grain-of-truth.php
Apple Cube
Just pay attention to the clues, and your efforts will be fruitful.
Exploration
The first screen you see here has a locked door and a shallow white bin with a kitchen knife inside.
Turn right to face a blue sofa with a huge red apple on it (or maybe the apple is normal-sized since the room is tiny). There's a four-digit safe on the right with an unusual clue.
Turn right to face three wall shelves with clear bowls of different-colored apples, on a wall with some dashed vertical lines. You can zoom in on each bowl to see the apples clearly. In the bottom right, a panel with screws protrudes from the wall.
Turn right to face a cupboard with four doors. The bottom doors are tied shut, while the top-left door hides a three-digit safe and the top-right door hides a nine-button safe with its buttons arranged in staggered rows. On top of the cupboard, you see a weighing scale with the outline of an apple's cross-section on its front.
Slice
Use the knife on the red apple, which reveals a wheel in between the halves.
Also use the knife to cut free the bottom cupboard doors. You find a colorful three-digit safe in the left one and a colorful five-button safe (with a row of five lights) in the right one.
Progression
Use the clues from the apple shelves to unlock both of the right cupboard doors.
The bowls contain different numbers of apples: 1 pink, 2 red, 3 green, 4 orange and 5 yellow.
So click the 3rd, 4th, 1st, 2nd, 5th buttons in the safe behind the bottom-right door. After it opens, take the card from inside.
Each shelf is divided equally into three by the vertical lines, and the square buttons in the safe behind the top-right door are arranged in the same pattern.
So push the five buttons corresponding to the bowl positions:
B-B

_-BB

-B-
The safe opens and you can take a screwdriver.
Card
Turn the card over to find a four-digit code.
Then enter that code into the safe beside the sofa. Nothing appears to happen.
Tap the card on the safe to open it. Inside, you find a golden apple. (No, you can't eat it.)
Dense
Place the golden apple on the weighing scale, which displays its weight in grams.
Enter that weight (253) into the safe behind the top-left cupboard door, and open it to find a short stick.
Drive
Unscrew the panel to the right of the apple shelves, revealing a hole in the wall.
Attach the stick to the wheel and use it on the hole.
It seems that you have some trouble turning the wheel, but when you back out you find that the bottom apple shelf has been lowered to the ground, so pick up 3 green apples from it.
Halves
Use the knife on each of the green apples, and pull out the 3 notes you find inside. Each note has a colored digit on it.
Then use that clue to unlock the safe behind the bottom-left cupboard door.
The yellow, blue, red digits form the code 952, so enter that in the safe and open it to find a golden key.
Use that key to unlock the door and escape!
Escape Challenge 77: Room with Matches
Exploration
The game starts with a table in front of a window. Looking at the table, you find a piece of paper with a matchstick equation, as well as a capsule containing a key piece. There's also a plant pot on the left that you can't do anything with.
While looking at the top of the table, click the chair to look down at the floor, and take the matchbox there.
Turn right to face a machine with an three-digit lock and a face. The picture frame on the wall has a clue with circles and filled triangles. You can look under the machine, but there's nothing there.
Turn right to face the locked door, a clock with a spinning matchstick instead of hands, and a chest of drawers. The top drawer has a lock with three digit buttons in different warm colors, and the bottom drawer has three shape buttons. (There's also a hidden area somewhere that we'll get to later.)
Turn right to face a wall with a locked box that has four round buttons. On the floor, you can zoom in on the blue bin to find a key piece beside.
Enter the corridor on the left, which leads to the toilet. You can sit down, look right, look up and look left to see a drawing of someone striking a match.
Numbers
Use the clue from the matchbox to unlock the top drawer.
Each of the colored stripes has a number on it, and the numbers on the yellow, orange, red stripes form the code 034.
So enter that in the drawer and open it to find a key piece and a match.
(While the text on the matchbox reads "Very good matches", you can interpret the 3 as a ョ to read it as "Very good macho".)
Shapes
Use the clues from the matchbox and top drawer to unlock the bottom drawer.
Following the code from the top drawer, you need to input the shapes with 0, 3, 4 sides.
Make the buttons show a circle, triangle and square, and then open the drawer to find another key piece and match.
Math
It should now be clear that the clue on the paper is for the machine's three-digit lock. However, that clue isn't very helpful in its current form.
Use the matchbox on the paper to add another match to the clue.
That's still not the correct code, so use the matchbox on the paper again to knock 2 matches off.
(Clicking the paper again shows you that all the other matches on it are fake.)
Now you can finally enter the correct code from the paper (111) into the machine to get its key piece.
Deeper
To find the last key piece, you need to use a match for its main function of lighting.
Use the matchbox on the blue bin to light it up and find the key piece.
Now that you have all the key pieces, you can leave, or you can solve the remaining puzzles.
Path
The picture frame clue is clearly for the wall box, but it looks rather ambiguous right now.
So use the matchbox on it to clarify things.
The flame lights up (or rather, darkens) a path except for the bottom-left corner. Thankfully, the arrows provide enough information to reconstruct the path.
The arrows indicate that the bottom-left corner is entered twice and exited twice. Two of those lines have free ends, so they must be the start and end of the path, which means that the rectangular loop is in the middle.
Push the ⌝ ⌞⌟⌝ ⌜⌞⌜⌝ buttons on the wall box accordingly, and open the box to find a single match inside.
Provoke
The face on the machine hasn't changed, and you can still faintly see a hidden compartment over it.
So use the matchbox on the face to make a match pop out of the top.
Spin
You could use the matchbox on the clock, but the game refuses to let you start a fire there.
Instead, click the left edge of the clock to find a switch that stops the rotation, and then just pick up the match from the clock.
Leave through the door to end the game.
Item list
6 key pieces:
Top left: in top drawer
Top middle: in bottom drawer
Top right: on table
Bottom left: from machine
Bottom middle: in blue bin
Bottom right: beside blue bin
7 matches:
1 in top drawer
1 in bottom drawer
2 from paper
1 in wall box
1 from machine
1 on clock
And a matchbox:
under the table.
Snow Ice Escape
The Japanese title directly translates to "Winter House Escape", and there's a lot packed into the one-line introduction of "Escape from the winter house sheltered from the snow and forest!"
(Further down on the game page, there's a link to the Android version which has an ad-based hint system.)
Exploration
You start off facing an empty fireplace with a poker on top. There's an panel on the left with an unusual clue, a keyhole and four buttons that don't work yet, and its connection to the fireplace is secured with screws. There's also a round gift box to the right of the fireplace, and you can open it to see that it's empty, but there's a number printed on the inside of the lid.
Turn right. There's a pretty Christmas tree, a window through which you can see some snowmen, and a square gift box. Opening the box, you find more numbers on the lid as well as a long white object which turns out to be birch firewood.
On the crowded tree you spot one thing that isn't Christmas-related: a roll of black tape tied to a branch on the left.
Turn right. You see a black box with four colored knobs. Clicking on the couch helpfully zooms you in on the floor under it so you can see the item hidden out of reach. The wall has colored sparkles that just look pretty. And the square box here can't be closed but you can still look inside to find more firewood.
Turn right. There's another window, a table and a piece of firewood on the floor. The book on the table has a three-digit lock, and you can click under the table to get a better look at the matchbox hidden there. While you're on that view, move the chair to find a hidden clue.
There's also something on top of the window.
Pickup
Use the poker to get the golden key from the window above the desk.
Also use the poker to retrieve the scissors from under the couch.
Now you can use the scissors to cut the tape from the tree.
Digits
Use the clue on the table to unlock the book.
Both of the digits appearing on the square gift box are 8, and the digit on the round one is 3.
So the clue on the side of the table (square circle square) translates to the code 838. Enter that in the book and open it to find some confusing instructions.
Snowmen
Use the clues from the windows to unlock the box with four dials.
One of the windows shows you two snowmen standing back-to-back. Since they have red and blue clothing, the red dial should point up and the blue dial should point down.
The other window shows you two snowmen in a row. Since the red snowman is facing us, he has a green snowman immediately on his right (our left) and another one further away facing him from his left (our right). So the left green dial should point right, and the right green dial should point up.
Click the top row of dials 3, 2, 2 times and open the box to find a block of ice with a screwdriver inside.
Warm
Place all three firewood logs/branches in the fireplace, and use the matches to light them.
Then place the ice you just found next to the fire, and it melts (and dries) almost instantly leaving just the screwdriver.
Unscrew
Use the screwdriver to remove the cover connecting to the fireplace to the panel beside it. You see two wires, one black and one white, and the white one has been broken in the middle.
The book also shows you one other spot to use the screwdriver…
Use the screwdriver in the middle of the lid of the round gift box, and you'll find a brownish piece of paper inside.
Four buttons
Fix the broken wire beside the fireplace with the tape.
Then insert the key into the keyhole on the panel and turn it to make four digits appear. You can now change the digits using the buttons.
Before you can solve that puzzle, there's one more thing to do.
Use the paper on the fire to reveal a clue with some circles and dots.
Then hold the paper up to the Christmas tree and cut holes in it. (You can cut the holes first.)
Finally, use the clue you see to unlock the panel.
The ornaments in the holes marked with 1, 2, 3, 4 dots are the bell, candy cane, candle and bauble, which are the 2nd, 5th, 6th, 3rd ornaments on the panel.
More precisely, the ornaments on the panel replace the digits from 1 to 8, and those that appear in the holes replace the digits 2563. Enter that in the panel and you hear something unlock.
Escape
Look in the fireplace again to find a ladder leading out. Congratulations!
Take off to the Sky
A bird needs to fly!
Exploration
In this cozy living room, you see a wooden figurine above the couch, a strip of colored squares in the plant pot, and a wall panel secured with screws.
Turn right to find a locked door, a picture of birds and a hat on a stand. Look inside the hat to find another strip of colored squares. The open doorway on the right leads to the bathroom, where all you can do is draw the curtain to view a clue.
Turn right to face a kitchen area, where a black box on a dining table appears to have different kinds of food on it. None of the cupboards in the background seem to work, but you can still use the sink and pick up the bucket under it.
Turn right to find a locked door with a picture of a flower that tilts when you click the corners of its frame. You also see a power socket on the same wall. Further away in the background, there's a desk with a chair you can pull out, a stained tile that doesn't do anything yet and a desk lamp that's unplugged. The top drawer of the desk contains a colorful slider panel, while the bottom drawer seems to be stuck. Above the desk, you see a picture of a familiar old man, who's apparently still struggling to open his "sake cup" jar.
Heights
Use the clue from the bird picture to unlock the slider panel in the top drawer.
The yellow, pink, green, white birds are in the bottom, bottom, top, middle positions vertically, so click the sliders 2, 2, 0, 1 times and push the button.
A message appears on the screen, and you can now open the second drawer to find a screwdriver.
Unstuck
You've managed to open the bottom drawer, but the old man's picture shows you that you can remove it completely.
Simply open and close it repeatedly. On the third time you try to open, the drawer comes off and you find a extension cord there.
Plug
Use the extension cord on the plug of the desk lamp. Looking back at the desk, you see that the lamp now lights up the tile to reveal some roman numerals on its corners.
Corners
Use the clue from the lit desk to unlock the tilty picture.
First, you need to convert Roman numerals to Hindu-Arabic:
13 2

5 4
The digits from 1 to 5 appear in the ⌜⌝ ⌜⌟ ⌞ corners, so click those corners of the picture to remove it. Behind, you see a lock with three colored buttons arranged vertically.
The picture is now on the ground and you can pick up the hook on it.
Unscrew
Use the screwdriver to remove the wall panel.
Now it's just a wooden board divided into three, some colored squares in the center, a vertical rectangle frame crossing all three rows, and a light-colored shape above.
Layers
Place both strips of colored squares onto the wooden panel.
Then use that clue to unlock the three-color lock on the door.
Hint: The middle row can't be moved, which is a hint as to which three colors you need.
The wooden figure is wearing clothes that are (from top to bottom) black, red and green, so you can shift the bottom strip twice to make those colors appear under the white shape.
The colors that appear in the rectangle are then red, white, yellow, so enter that in the door by clicking the buttons 1, 4, 3 times, and then open the door.
Exploration 2
You're now in a narrow bedroom. Surprisingly, there's nothing unusual about the bed, but you can look at the shelves above with various birds displayed on them. On the right, you see a small opening with a chain and a panel beneath it with a grid of nine buttons. There's an empty birdcage on the floor but you can't even zoom in on it.
Turn around and take a closer look at the potted plant to find a printed card hidden behind a leaf. It shows a light and then a bunch of circles connected by a folded arrow.
Grid
Use the clue on the dining table to unlock the grid in the bedroom.
The food items in the tray appear in groups of 1, 2, 3, 4 in the upper right, center, bottom right, bottom left.
So click those buttons on the grid, and the panel comes off so you can see the end of the chain.
Weighed
Fill the bucket in the kitchen sink, then place it under the end of the chain and then attach it with the hook.
Pulling down the chain made a note appear. The note shows several numbers and lines.
The area where you first saw the chain is now a panel labeled Bird with a keypad.
Bird
Use the clue from the bird shelves to unlock the Bird keypad.
Referring to the note, you see that each number corresponds to a spot on the shelves, with 1 being the top right, 2 the bottom middle and so on.
Those spots (from 1 to 9) have different numbers of birds, forming the code
364020131. Enter that into the keypad, and you hear a chime, and the keypad now says "unlock!" when you look at it again.Returning to the main room, you find that the door next to the hat stand is now unlocked. Walking through the door takes you to a dark room with a single spot lit up.
Lit
The light panel has six small switches which can be up or down. Where have you seen that clue?
The bathroom curtain shows you that only the top-left and bottom middle switches need to be up, so flip those two switches and then flip the big switch.
Exploration 3
You can now see a machine on the floor with lightbulbs, colored shape clues and three letter buttons.
Going up the spiral staircase, you arrive at the top landing to find a printed picture clue on the ground and another clue on the top of the pole.
Click the middle of the screen to look at the door, which has just a row of three buttons.
As you head back towards the main room, you find a locked box in the right corner after you turn around from the light switches.
Shapes
Use the clue from the picture you picked up to unlock the lightbulb machine.
Each colored shape appears in a different location on the picture, and the sequences of shapes above the buttons trace out the letters ICT. Enter that in the machine and push the Enter button to make the lightbulbs flash.
(This also uses up the card, which I presume is just there to tell you to read the shapes from left to right in each row.)
Triple
(If you missed the lightbulb clue, you can push the Start button to view it again.)
The lightbulbs flash in the CLCLR order, so push the corresponding buttons on the door at the top of the stairs to open it.
Exploration 4
You made it to the rooftop! But first, a cutscene where you watch a goose fret about flying. It's standing on a suspiciously marked circle.
Turn left to see some colorful balloons tied to a plant pot. After taking the balloons, you can knock the pot over to find a key hidden underneath.
Turn right twice to see a machine with a large dome attached to a pulley. The huge block of stone has a keyhole in its front.
As you head back towards the stairs, you spot the old man again. This time, he wants you to open a wine bottle.
Unlock 1
Use the key to unlock the box you picked up. Inside, there's a corkscrew.
Use that corkscrew to open the bottle, and give it back to the man. He vanishes and you can pick up his chair, which turns out to be a basket.
Fix
Attach the balloons to the basket. Hmm, it's not complete yet.
While looking around, you find that the man's back with another bottle!
He's noticeably drunk, but that doesn't stop you from opening the new bottle and returning it to him.
The man disappears again, and you see a key on the ground.
Unlock 2
Use the key to unlock the big machine. Now you can access and rotate its five dials.
Rotate
Use the clue from the pole on the stairwell to activate the big machine.
The checkered yellow-and-black stripe is on the right of the stair clue and at the top of the machine's panel, so you need to rotate the clue counter-clockwise to make it fit.
Make the dials point up, left, down, left, right by clicking them 0, 3, 2, 3, 1 times, and then push the button to raise the dome, revealing more balloons.
Launch
Attach the new balloons to the basket, and place it on the marked circle on the center screen of the rooftop, then click it to end the game!
(The end screen shows you that the tree house has a front door, which might explain how you and the drunk man got in.)
Interesting and helpful insights into the game. Thank you.
Which one?
So far, every comment from GameTop has read like this. Whoever posted this comment doesn't appear to even know or care that there are four games in this post, let alone to say anything meaningful about any of them.
Am I seriously supposed to believe this is anything other than sponsered comment spam?
Update