
 Wecome! Four fresh escape games are here for your fun!
First you get trapped (twice) in Nicolet's cute tiny cubes - one full of daruma dolls and the second with someone's hats collection. Then in relaxing Amajeto's room decorated in many shades of blue. And finally in a room with ten hidden escape-men, in sequel to No1game's last game. You learn what happened to poor Dennis after the unfortunate Valentine's Day.
Have a good time and enjoy!
Nicolet's minimalist room contains only few coded boxes, few recesses, and four colorful lamps without any switch in sight. Your goal is obvious: figure out right codes and open everything what can be opened, and eventually escape out!
The cursor is not changing, autosave, one ending.
The game is available for Android too.
Hats and caps in this cube are either for very small heads or decorations only, but that's not the point - what's interesting for you are their details and positions. Look at them properly, all of them are important!
Everything in Nicolet's games is stylish, both graphics and design, and puzzles aren't the exception - cunning but still stylish.
The cursor is not changing, autosave, one ending.
The game is available for Android too.
You find yourself locked in Amajeto's peaceful living room, and you need to find eight tiles to be able to complete the final puzzle and get out. Several four figures codes are in your way, one wobbly picture and one left-right code. Look around, there are few white trees painted on the room's walls next to blue houses. The trees, however, don't help you in escaping, but the houses do. Can you escape?
The cursor is changing (its color), no save button, one ending.
Three weeks ago (WE N°210) you helped Maggie to find ten green guys in No1game's store, EM's chocolate. Maggie was successful and as a reward she got the green men chocolates, and gifted it to her collegue Dennis. Well, it didn't go as expected. Dennis turned bright green, and that's not all - his body started shrinking! Now he's on extended vacation from work, the EM's chocolate store is closed and their phone disconnected...
He isn't the only victim though - another man, who also turned green and very small, contacts Dennis and invites him for the first meeting of Little Green Men Chocolate Victims' Group. Will you accompany Dennis and help him?
The cursor is not changing, no save button, one ending.
We love escape games, and our readers love talking about them and sharing hints! How about you? Let us know what you think, ask for clues, or help out other players in the comments below.


Daruma Cube
This game isn't really about the round red dolls on which you paint the eyes, but rather the game where you knock out colored disks to bring that doll to the ground.
Exploration
As usual, you start off facing a locked door in a room that doesn't look very tiny. There are two wall panels on the sides. The right one is boarded up with wooden planks, while the left one hides a safe with three colored digits.
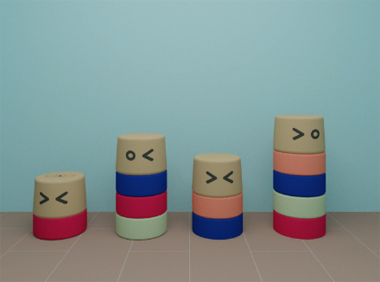
Turn right to face four towers of colored blocks. Instead of the normal daruma, the top block on each stack is just a gently tapered cylinder with an emoticon drawn on. Check the top of the left stack to find a clue with a triangle with a shape in a row of squares.
Turn right to find a shelf divided into nine compartments. Other than the colorful cubes, spheres and cones with faces, you also spot an axe head in the middle right compartment. The purple box in the middle has four color-changing buttons labeled with shapes, the green box below that has five color-changing buttons labeled with letters, and the yellow box to the left of that has four buttons with arrow/chevron markings and two circles on the ends.
The top-right compartment appears to be empty, so look closer to find another clue painted in it.
Turn right to find a wall with two panels similar to those you saw earlier. The left one is locked and the right one hides a safe with a grid of buttons. Four cylindrical lamps hang from the ceiling, and you can zoom in on them twice to find a symbol on the side of each one.
(The view from up there is a bit weird. It's easy to call it a bug, but could it possibly be… that the arrows rotate the room instead of you?)
Pointy
Use a clue from the block towers to unlock the yellow box.
Each pair of symbols on the top blocks must appear on the box, which means that the left and right buttons must both point towards the circles beside, and so the pattern with two arrows pointing towards each other must appear on the middle two buttons. (Yes, this means that pattern only appears once.)
Make the box show < > < > by clicking the buttons 1, 3, 1, 3 times, then open it to find a shiny white key.
Unlock
Use that key to unlock the left panel on the lamp wall. Inside, you find two slightly offset rectangular (more precisely, half-cylindrical) holes, and a smaller round hole beneath.
Skyline
Use another clue from the block towers to unlock the grid panel on the right side of the lamp wall.
The towers have a total of 1, 3, 2, 4 colored blocks, so push that many buttons in each column to turn them black, starting from the bottom.
Open the panel to find a large hammer with a short handle, and another clue on the back wall.
Smashing
Use the hammer on the block towers to knock out one of the blocks. It's blue with a yellow 4 on the top, but you can flip it over to find a red 7 on the bottom.
What you've seen so far suggests that there's another colored number. Can you find it?
Examine the hammer and click it to take it apart. The striking face of the hammer head has a blue 8 on it.
(If you need to, you can reassemble the hammer when you're done.)
Colored digits
Use the number clues you found to unlock the safe to the left of the door.
Since the blue, yellow, red digits spell out the code 847, enter that in the safe and then open it to find a battery.
Take down
Take apart the hammer, then attach the axe head to the same handle.
Now you can use the assembled axe to remove the planks over the panel to the right of the door. Opening it, you find another three-digit lock, this one with each digit surrounded by a red square.
Square row
Use the square clues you've seen around the room to unlock the new three-digit panel to the right of the door.
The clues you need are:
On left stack of blocks: Blue triangle in middle box
In shelf compartment: Orange/pink circle in right box
In right panel under lamp: Yellow square in left box
So the left, middle, right boxes contain shapes that match the cubes, cones, spheres on the shelf. There are a total of 5, 5, 3 of those items, so enter 553 in the safe and open it to find another battery and a clue with a grid of letters.
Spell
Use the clue from the letter grid to unlock the green box in the bottom compartment of the shelf.
The shape formed by the lettered grid squares matches that of the colored blocks (after you used the hammer).
In particular, the squares labeled E, I, A, D, B match blocks that are blue, blue, red, red, gray/green, so click the buttons 4, 4, 1, 1, 3 times and then open the box to find what looks like a red button.
Cell
Place both batteries in the left panel under the lamps, then place the button in the hole beneath and push it.
Back out, and you find that the lamps are now brightly lit in different colors!
Colored shapes
Use the clue from the activated lamps to unlock the yellow box in the middle compartment of the shelf.
The lamps with star, square, triangle, circle (the 4th, 1st, 3rd, 2nd from the left) are white, green, yellow, pink, so click the buttons 0, 1, 2, 3 times. (Even though clicking the button four times produces a slightly different white from not clicking, the game will still accept it.)
Open the box to find a golden key.
Use that key to unlock the door and escape!
Hat Cube
Exploration
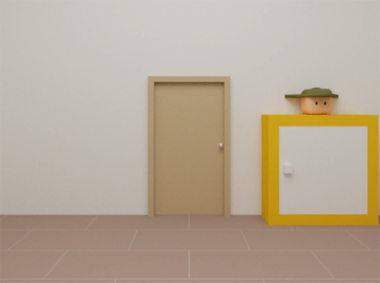
Next to the locked door, you see a large white cube with a yellow border and a figure on top wearing a triangular hat and a square button/squatchee on top. The cube is actually a cupboard divided into two by a shelf, and has two boxes inside. The box on the shelf is tied shut, and the box underneath has white shapes on black shape backgrounds, the white shapes changing when clicked.
Turn right. This green shelf is topped with four top hats, and you can lift them to find a small spanner under the second one. Under that, there's another figure wearing a hat, as well as a brown box that appears featureless. Clicking the box makes you look at its side, where you find a small square hole and a battery stuck behind it. At the bottom, you see yet another box with four nuts protruding out of its top.
Turn right to face a red shelf, which has four different-sized conical devices on top labeled with letters and covered with blue stars. Under that, there's another figure wearing a hat, and an orange cup that holds a utility knife. At the bottom, there are three boxes with red, blue and yellow keyholes.
Turn right to find a blue shelf with four baseball caps on top. The caps face different directions, but you can zoom in to read the letters on them. Underneath, there's yet another figure wearing a hat. At the bottom, there's a box with four colored digit buttons.
Colored digits
Use clues around the room to unlock the box at the bottom of the blue shelf.
The yellow, blue, red, green shelves (yellow being a cupboard) are shaped like the digits 0582, so enter that in the box and open it to find a flashlight that doesn't seem to work.
Bolted
Use the spanner to remove the nuts from the box at the bottom of the green shelf. This removes the cover to reveal four colored letter buttons.
Colored letters
Use a clue from the baseball caps to unlock the box at the bottom of the green shelf.
The purple, yellow, red, blue caps have the letters HATO on them, so enter that into the box to open it and find a white pigeon piece.
(The pun here is that "hato" means pigeon/dove, whereas "hatto" would be the correct transliteration of hat.)
Shapes
Use the clue from the small figures to unlock the box at the bottom of the cupboard on the first screen.
Each figure wears a hat with a different shape which has a button with a different shape.
The square, hexagon, triangle, circle-shaped hats have triangle, circle, square, hexagon-shaped buttons, so click the shapes
3 0

2 1
times, then open the box to find a blue key.
Use the blue key to unlock the middle box on the red shelf. This removes the cover to reveal four buttons with overlapping shaded circles.
Directions
Use the other clue from the baseball caps to unlock the box with the blue keyhole.
When looking at the caps, you find that they face down, left, up, right.
So click the buttons 2, 1, 0, 3 times and open the box to find a ruler.
Reach
Look behind the brown box on the green shelf, and use the ruler to retrieve the battery.
Light
Place the battery into the flashlight.
Then zoom into the hole in the box and use the flashlight to light it up. You find a red key there that you can just pick up.
Use the red key to unlock the left box on the red shelf. Inside, you find a folded note showing some numbered top hats.
Sequence
Use the clue from the note to do something with the top hats.
Simply click the hats in ascending order of their numbers on the note: rightmost, second left, leftmost, second right.
Another (significantly larger) pigeon piece magically appears under the last hat you pick up.
Cut
Use the knife to cut free the top box in the yellow cupboard. The cover comes off and you find two shallow pigeon-shaped holes, one large and one small.
So place both pigeons in the holes, and then remove that cover too to find a yellow key.
Use the yellow key to unlock the right box on the red shelf. The cover comes off and you find a three-digit lock with a letter sum above.
Sum
Use the remaining clues in the room to unlock the box with the yellow keyhole.
Using the ruler to measure the cones, you find that their heights are A=3, D=7, C=2, B=5.
Adding those numbers up gives you a total of 17, so just enter 017 in the box and open it to find a golden key.
Use that key to unlock the door and escape!
Blue House Room
The titles don't get more generic than this.
Exploration
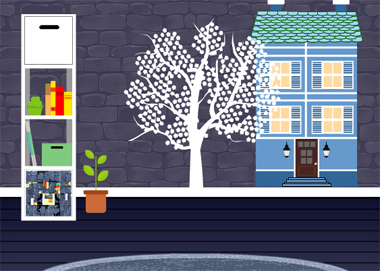
You start off facing a single stack of shelves on a wall with a (tree and) blue house painted on. You see a locked three-button compartment at the top of the shelves and a scrambled picture at the bottom, and with the help of the changing cursor you find that you can zoom in on the door.
Turn right to face a bed with three drawers. The left drawer has four dials and an unusual button, the middle has four shapes and the right has four orange digits. Above the bed, a picture frame showing snow over a city tilts when you click its corners. To the right, there's a simple bedside table on a fancy stand which you can zoom in on, and pushing the button there lights up three distinct crescent shapes.
Turn right to face an uninteresting office chair stacked with books and another painted house. You can zoom in on the top half of that house to take a closer look at its impressive lights and its clock with four hands.
Turn right to find a staircase-shaped shelf divided into large compartments. The usual grid device and computer (monitor) are here, as well as a lamp which you can turn on to reveal shapes on the wall. The bottom three compartments have locks with four colored bars, a grid of sixteen buttons and a pair of identical yellow buttons.
Unscramble
Start with the (randomized) scrambled picture on the first screen, which you can solve by rotating the pieces until they align. (Hint: make sure the corners are correct at the end.)
The completed picture slides up to reveal a square tile in the compartment.
Arrows
Use the clue from the clock face to unlock the left drawer of the bed.
The markings on the button tell you to consider the hands from longest to shortest.
Since those hands point towards the R UL UR D directions, click the buttons 2, 7, 1, 4 times accordingly and then open the drawer to find a square tile.
Shapes
Use the clue from the lamp on the computer screen to unlock the middle bed drawer.
The triangular lampshade, combined with the stack of shapes beneath, gives the code: up-triangle, down-triangle, circle, square.
So click the buttons 6, 2, 1, 3 times and then open the drawer to find a square tile.
Gaps
Use the other clue from the house with the clock face to unlock the right bed drawer.
The lights which are orange form groups of 2, 6, 4, 5, so enter 2645 in the drawer and open it to find a square tile.
Knock
On the first screen, zoom in on the door of the painted house, and then click the door.
This causes the windows of that house to change. Knock again, and the lamps on each side turn on and off.
So use those clues to unlock two of the shelf compartments on the screen with the computer.
The four windows are split into 16 panes, which can be put together into the 4-by-4 grid. The only panes that are unlit are the left two on the top row and the right two on the third row.
So click those four buttons on the middle pink compartment, and open it to find another square tile.
The lamps beside the door flash in the LLRLR order, so click those buttons on the right pink compartment and open it to find a memory stick.
Contents
Plug the memory stick into the computer, which makes a clue show up on screen.
Lune
Use the clue from the screen to unlock the top compartment on the first room.
The crescent shapes on the screen (from left to right) appear on the table in the RCLRCL positions.
So push those buttons, then open the compartment to find a square tile in front of some colored stripes.
Bars
Use the clue from the opened top compartment to unlock the left pink compartment on the screen with the computer.
Since the colors of the bars match those of the stripes in the clue, the height (vertical extent) of each bar should match the height (vertical position) of its corresponding stripe.
The yellow, pink, purple, green stripes are 3rd, 4th, 2nd, 1st from the bottom, so click those bars 2, 3, 1, 0 times and open the compartment to find a square tile.
Corners
It should now be clear that the only puzzle you can solve right now is the tilty picture above the bed.
But where are the clues for it?
Hint: you have to interact with something to view one of the clues, and the other clue cannot be interacted with.
Returning to the first screen, you find that the solved scrambled picture is now back in its original position, and clicking it zooms in.
You get the clue from it by comparing the table in the fixed picture with the one under the window: the potted plant in the picture has colored leaves! (This is also hinted at by the larger potted plant next to the tall shelf.)
So each of the four corners of the picture is indicated by a leaf color, and you're looking for a sequence of colors.
The same colors appear on the books next to the computer.
The yellow, green, white, yellow, red colors (from the books) appear on the UL UR LL UL LR leaves, so click the ⌜⌝ ⌞⌜⌟ corners of the tilty picture, which comes loose so you can turn it over and take the last square tile.
Complete
Place all 8 square tiles in the grid device, which turns into a (randomized) jigsaw puzzle that you can solve by swapping the tiles into place.
(Hint: Start with the piece with the red marking.)
Once you've solved the puzzle, the compartment beneath opens to reveal a key that you can use to unlock the door and escape!
Find the Escape-Men 198: The Chocolate Victims' Group
Thanks to some powerful promotional chocolates, Dennis has had two weeks of pure trouble. Turns out that being an Escape-Man isn't child's play! The Chocolate Victims' Group is here to help, but first they have a game of hide and seek.
Exploration
Even being much shorter than usual, you can still reach the doorknob to verify that the door is locked. Much higher up, you see a red letter N painted on the wall.
Turn around by clicking the bottom of the screen. You see a bunch of tables, as well as the note introducing the game.
Check under the nearest table to find an Escape-Man.
After picking up the note, you can stand on the table by clicking the arrow that appears there. What now?
Click the top of the screen to look up. There's an Escape-Man in the ceiling lamp, which just drops past your fingers when you try to pick it up.
As you back out, you find that Escape-Man snugged tightly in your left shoe.
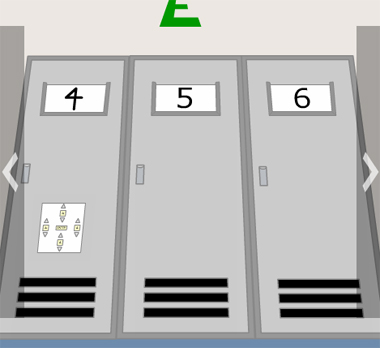
Back out to the first screen and turn right. The wall here is labeled with a green E, and has three numbered lockers. All three are locked, but only the left one has a panel with four letter controls.
Turn right to face a wall marked with a yellow S. You can open and close the window with no obvious effect.
Turn around to get a different view of the tables. You see what appears to be a shoebox with a four-digit lock.
Look under the right table to find an Escape-Man.
Turn back around and turn right to face a wall marked with a blue W. There's also a painting with a green "Smoking Man".
Verso
After reading the note, simply turn it over and pick up the Escape-Man on the back.
Letters
Use the clues from the four walls to unlock the left locker.
The letters match the four cardinal directions, but you have to rearrange them like a normal compass rose, putting North on top. (Another explanation: the arrows look like compass needles which are aligned north-south.)
So enter the code NESW (clockwise from top) and then push the center button to open the locker, which seems to be empty except for a lighter.
Look under the shelf in the locker to find an Escape-Man.
Colors
Look at the left locker again. The buttons on the panel now change colors when you click the arrows.
So use the clues around the room to unlock it.
The buttons now need to be colored the same as the matching Letters on the wall.
So make the buttons (clockwise from top) red, green, yellow, blue by clicking their arrows 4D 2D 3U 1U.
This time, the middle locker unlocks, and you find a letter in an envelope… but it turns out to be blank!
Stare at the screen long enough, and an Escape-Man pops out of the latch of the middle locker.
Hidden
Use the lighter on the letter paper to reveal a clue on it. It sounds like a silly song, but what are all these colors for?
More letters
Look at the locker panel once more. Now the arrow buttons change the letters on the buttons, just like before
So use the clue from the letter you're holding to unlock it.
The red, green, yellow, blue colors on the letter spell out
ICPH.So enter that in the panel (clockwise from top) and push the button to unlock the last locker. Inside, you find an Escape-Man pulling on the bar.
Flame
Use the lighter on the cigarette in the Smoking Man painting.
Do you hear something fizzling?
After the explosion, peel off the title to find the true identity of the painting, and click the painting twice to pick up the Escape-Man from it.
You still have the lighter. Did you forget something?
Examine the lighter and play with it. Every time you turn on the flame, an Escape-Man appears or disappears at the bottom.
Numbers
Seeing the blown-up painting gives you a spark of inspiration that lets you unlock the four-digit box.
Enter the real date of the painting (1987) into the box, then open it to find an Escape-Man.
Complete
The chime confirms that you have all 10 Escape-Men:
Under table on N side
In ceiling lamp/left shoe
Under table on S side
On back of note
At bottom of left locker
From middle locker
In right locker
In painting
From lighter
In box
But they don't transform at all.
Unlock and open the window, then use the Escape-Men on it to reach over the edge. There's a key hanging outside!
Use that key on the door to unlock it and end the game.
Finally, the 10 Escape-Men transform back into their original form. They're no longer chocolate victims!
Looks like there's a cure indeed. However, there's some bad news…
Great job! Cute animation that makes the game stress-free and fun.
Update