
 Hi, Escape Wednesday is here with four new games!
You start in Detarame Factory's bathroom, and there is much to be done indeed. Luckily, virtual cleaning is much easier than the real one, so you can leave the room (very tidy now) quite soon - to find yourself in cute Nicolet's room full of clever and intuitive puzzles. The next stop in this week's serial of escapes is standard tomoLaSiDo's room with nice round window. The last comes No1game with their 200th game - really impressive number!
Have a good time and enjoy!
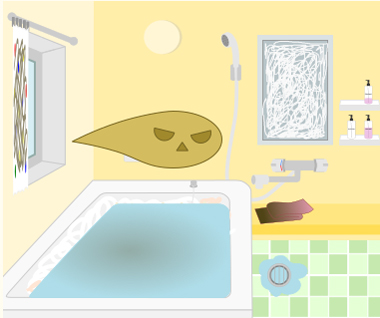
It's this time of a year again - time for Big Spring Cleaning. Detarame Factory locks you in disgustedly dirty bathroom and doesn't let you out until every surface shines - and there's a lot of work in front of you. Owner of the bathroom obviously haven't cleaned it from the last spring and it's such a mess that you hardly know where to start, so look around for items and clues which would push you in the right direction. Brown book in your inventory (next to the question mark) gives you some hints if you need.
The cursor is not changing, no save button, one ending.
P.S. For previous Messy Rooms check WE N°170.
With Nicolet you return to autumn time, when Nature was preparing for its long winter sleep (and this game was released, but only for for Android). Outside the small house where you're trapped are squirrels collecting supplies for winter and trees losing leaves, but you need to figure out how to get out of it first. Concentrate on clues and puzzles - there will be enough time for enjoying golden woods later.
The cursor is not changing, autosave, one ending.
The game is available for Android too.
Escape Challenge 83: Room with Shower Heads
This time tomoLaSiDo locked you in a room where they had hidden, apart from six capsules with key parts, twelve shower heads. Entire room is tiled from the floor to ceiling and therefore completely waterproof - well it's necessary with all the plumbing supplies they store here I guess. Puzzles are tricky, not difficult, but it may take some time to figure out correct solution and not overthink it. Will you escape?
The cursor is changing, no save button, one ending.
Find the Escape-Men 200: Coronation
Leif II, king of EM land has abdicated and Leif III is to be crowned in May 2019 - what a lucky coincidence, such an attractive theme for the 200th No1game's game! Big congratulations! However, things don't go as expected - Ten Sacred Treasures which old king traditionally hands over to the new are gone, and without them is the coronation threatened. Your goal is to find the Treasures and no need to say what are you really looking for - ten pesky green guys doing their best to run away - will you catch them? Remember, kingdom's destiny is in your hands!
The cursor is not changing, no save button, one ending.
P.S. Here are few of their games from early years:
Find the Escape-Men 3: with Wan the Dog & Nyan the Cat (very cute, collaboration with Cogito Ergo Sum)
Find the Escape-Men 5: The Escape Nyans (with special escape "men" - collaboration with Chocochai)
Find the Escape-Men 14: the PICSTAR (nice graphics, seems also like collaboration, can't recognize the partner)
P.P.S. Weekday Escape - Retro Edition N°12 is exclusively devoted to No1game.
We love escape games, and our readers love talking about them and sharing hints! How about you? Let us know what you think, ask for clues, or help out other players in the comments below.


Hmmm. I am stuck on Autumn, close to the end (I think). I have
a golden nut with a square keyhole (?) at the back, a treasure chest I got from my new squirrel friend, and a chisel.
None of those items seem to work on each other, or on anything else I've tried them on.
The seesaw has two ends
Ah! I should have thought of that! Thanks, Brf!
Thanks, Brf!
Messy Room 3
This room has less mess and more fun.
(Take note that the game has a hint system which you can access using the question mark button in the inventory. While the hints are in Japanese, they're introduced with pictures of the relevant puzzles that are helpful for figuring out what to do next.)
Exploration
You start with a book in your inventory that tells you how to clean various things.
A brownish gas cloud floats above a full bathtub, which you can't empty because the floor drain is clogged. The mirror is in a horrible state, but you can still pick up the bath towel and return the face wash and "treatment" bottles back to the rack beside the empty body soap bottle.
The curtains above the tub are dirty too, but you can open them to find a wilted potted plant in front of a window with a three-button lock which has a row of lights on its confirmation/reset button.
Back out and turn around (left or right). Pick up the cleaning cloth and the blue plastic ladle/jug/pail from the floor, and return the shampoo, leaving just a pile of gray monsters on the floor. The locked door has a padlock with colored squares over color buttons in some sort of clue, and you also see another brown cloud emanating from the dirty air vent on the right wall. Under the vent, there's a small panel with two screws, and a single bar for a towel rack. Finally, examine the wall cupboard under the cloud. One drawer has a three-button lock with temperature markings, one has a keyhole, one has a four-button lock with rectangles that fill up with purple, and one has a two-button lock where both buttons have crescent shapes facing different directions.
Hint 1: Opening
Following the first page of the book, clean up the air vent with the cleaning cloth, which gets you some shocked-looking dust monsters/mites.
They seem rather restless when you examine them…
So push the buttons on the window in the same order as their movement: CLLCR.
Open the window, and you see a coin hidden there. (It says 1/2, which is actually the game telling you that there's another coin to find.)
Hint 2: Power
You need to open up the wall panel under the vent, but there's no screwdriver.
Use the coin you just picked up to unscrew it instead. Turn the knob inside from Off to On.
With the air much clearer, you can see a clock on the cupboard next to a bottle of citric acid.
The cloud is also gone from the bathtub screen, which allows you to access a golden keyhole panel next to the tap that you can now use.
Hint 3: Reflect
Page 2 of the book (that's not how page numbering works, but just call it that) tells you exactly what to do: wet the cleaning cloth under the tap, add the citric acid, and clean off the mirror.
The clue that appears in the corner matches the buttons on the bottom-right drawer.
Since the crescents that appear on the mirror clue match those on the LRRRL buttons, click them and open the drawer to find a bottle of mold remover with a four-letter padlock, a pink floor brush and a clue with the letter B in a square.
Hint 4: Green
The plant by the window looks rather dry, so fill the ladle under the tap.
Give it a while to recover (i.e. turn to look at the door and then examine it again), and you find that its leaves now extend in an oddly asymmetrical fashion.
So use the clue from the grown plant to set the clock.
The short, medium, long hands point towards the 9, 4, 1 o'clock positions, which means that you have to push the H, M, S buttons 9, 1, 5 times.
Once you're done, push the unlabeled button on the clock to open up a compartment with a gold key.
Use the gold key to unlock the golden keyhole panel beside the tap.
It's a temperature control! (Each digit is controlled separately, which would make this rather risky to use in real life.)
Hint 5: Degrees
You can now set the water temperature to each of the numbers printed on the top-left drawer lock.
When you fill the ladle with the water from the tap, you see a clue…
(While examining the full ladle, you can click the yellow icon to empty it out.)
Each temperature of water makes a certain number of petals on the ladle light up in red.
Click the buttons 1, 3, 5 times to match, and open the drawer to find a packet of body soap refill and another letter clue, this time with more squares.
Hint 6: Fullness
You've collected all the bottles around the room, but one of them is still empty.
Refill it, and then use the clues to unlock the bottom-left drawer.
The bottle which is now the most full is in the bottom left, and the one which is least full is in the top right, so click the buttons
1 0
2 1
times, then open the drawer to find a box with two circular slots, a packet of baking soda and another letter clue.
Unblock
The hint system has run out for now, but we still have a book to read! Let's work on clearing out that nasty-looking tub, with the instructions from page 5.
Dump the baking soda onto the drain and then pour water of the right temperature on it.
(Are you too lazy to empty out and refill your ladle? Apparently you don't need to do that, as long as the heater panel is set to 60°.)
With the drain cleared, click the bathtub to pull the plug. The water drains away, leaving some horrid stains, and a rubber duck.
Innards
The duck isn't directly helpful, but you can examine and click it again to find a silver key inside.
Use the key to unlock the top-right drawer. Inside, there's a blue spray bottle with a three-digit lock, as well as another letter clue.
Hint 7: Alphabet
You have enough letters to form the code for the mold remover bottle, but what order do you put them in?
Each letter clue in the drawers is contained in a different number of square outlines. The letters contained in 1, 2, 3, 4 outlines spell out the word BATH.
Enter that in the lock, and now you can use the bottle.
Disinfect
Following the clue on page 3, spray the mold remover onto the remaining mold monsters on the floor, and then brush them off to reveal the remaining coin.
Discs
Place the coins into the box, and open it to find a rectangular black sponge.
Hint 8: Dry
Meanwhile, page 4 tells you how to clean the towel up: Just add soap and soak under the tap!
Hang the wet towel on the towel rack, where you find an almost-readable clue.
So turn around and look at the towel again, and it's now dry enough to read the clue. Where does that clue go?
Enter the three-digit code (318) into the lock on the blue spray bottle, and unlock it. Now you can use this bottle too!
Cleaner
There are just two pages left of the book. Following their instructions, spray the blue liquid onto the sponge, then use it to clean the curtain, and repeat for the bathtub.
The spray bottle is now empty, and you see a clue printed on it.
Hint 9: Sum
This is it, the colors on the door lock, the pattern on the curtain, the clue on the empty bottle, it all adds up.
Well actually, the bottle clue is a four-digit number and the curtain clue assigns each color a digit, because there are 2 red, 4 blue, 5 yellow and 1 green dots.
So to make the sum work out, the missing code has to correspond to 6571−2451, or 4120. Now we just have to translate that back… wait, what's 0?
Other than the four colors already on the lock, the buttons have a fifth color available, a dark grayish brown that's very close to black. Since there are no dots of that color, it represents 0.
Therefore, our missing number 4120 can be inputted by clicking the buttons 1, 3, 0, 4 times.
Once you're done, unlock the door and open it to end the game!
After admiring your cleaning work, you enjoy some donuts with a cat.
Autumn
The woody shades of this room effectively transport you to a different season.
Exploration
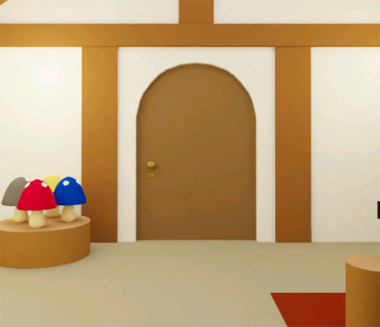
You start off facing padlocked double doors that's slightly above the floor. On the left, a round stump has a box with four numbered color buttons.
Turn right to find three fruity picture frames mounted on the wall, over a see-saw with a red button under its left end. You can't move the see-saw by yourself, so let's leave it for now.
Turn right to face a round door with a keyhole. The stump next to it has colored mushrooms with white dots on them.
Turn right to face a table with a small pumpkin tile on it. Something hangs from the ceiling high above. Looking at the bookshelves on the left, you see that each book has a golden stripe on its spine, some books are marked with symbols, and also
there's a grape tile on the very top shelf, next to a book with five letters printed on one page, and the shelf directly under it has an orange panel fastened with screws.
Count
Use the clue from the mushrooms to unlock the four-color box.
The mushrooms with 1, 2, 3, 4 dots are yellow, gray, red, blue.
So click the buttons 3, 4, 1, 2 times, then open the box to find a screwdriver.
Unscrew
Use the screwdriver to remove the hidden orange panel from the bookshelf.
Empty
The orange panel has nothing you can take, so you need to do the exact opposite, putting the fruit tiles in it.
Placing the grape tile makes the grape picture lower down, and you can take a large golden acorn from it to reveal a four-digit code. Also, examining the golden acorn reveals a square marking on its back.
Placing the pumpkin tile makes the pumpkin picture lower, and you find a four-digit box inside. What a coincidence!
Enter the code behind the grape picture (2484) into the box behind the pumpkin picture, and open it to find an acorn tile.
Finally, place the acorn tile into the orange panel. Behind the acorn picture, you find a box with three shaped sliders.
Shapes
Use the clue from the bookshelves to unlock the slider box behind the acorn picture.
The books marked with the heart, triangle, star have golden stripes at their bottom, top, middle.
Set the sliders accordingly, then open the box to find a small knife.
Slant
Set the golden acorn on the left side of the seesaw to hold the button down.
This makes a box descend onto the table, held by chains. Look inside to find a smaller package tied shut.
Unwrap
Use the knife to cut open the package, revealing three colored square holes.
Fill
Use the clues from the fruit pictures to place the fruit tiles correctly in the square holes of the box on the table.
Each of the wall compartments behind the pictures has a different color which matches the holes in the box.
Since the blue, yellow, red compartments are behind the grape, pumpkin, acorn tiles, all you have to do is place those tiles accordingly. The box opens up to reveal a golden key.
(There are two other ways to arrive at this answer: place the tiles in their closest-colored holes, or place them according to their inventory order.)
Exploration 2
The key fits in the small door beside the mushrooms, leading to another room. But is it really a room, or are you just outdoors surrounded by cardboard trees with lanterns hanging from them?
Anyway, the door in front of you is also locked, and you see some leaves scattered on the ground to the left.
Turn right. The left tree has a door that's high off the ground, and you see something white on the ground: a screwed-down grate with something green hidden inside.
Turn right. You're now facing the way back, which is through the middle door. The left door hides a storage space with a rake and a five-letter safe (which only goes up to E) under a star-shaped arrow clue, while the right door has a lock with four arrow buttons.
Turn right to find a fire pit with what looks like four acorns in it. The tree on the left has four colored creatures hanging from it at different heights, along with a white arrow that just points up.
Unscrew 2
Use the screwdriver to remove the grate from the floor. There's a green apple inside!
Sweep
Use the rake to gather the leaves, then add them to the fire pit.
Five letters
Use the remaining clue from the bookshelf to unlock the five-letter box.
Mentally superimposing the arrow clue above the box with the circle of letters in the book, you see that the arrow passes through them in the order CADBE.
Enter that in the box and open it to find a yellowish key that looks tiny in your inventory.
Unlock (2)
Use the new key to unlock the padlocked double doors in the first room. It seems that this also leads to the outside, but for now all you can do is pick up the acorn on the right, and look at the row of brightly colored apples on cuboidal stands with buttons in front that you can't use yet.
Colorful
Place the green apple you picked up onto the empty stand beside the other apples, which makes the buttons pop up.
Then use the clue from the hanging creatures to push the buttons in the correct order.
As the arrow indicates, the correct order of colors is from lowest to highest: blue, green, pink, yellow.
Push the 2nd, 4th, 1st, 3rd buttons from the left. The drawer under the left apple opens up so you can take a matchbox.
Roast
Examine the matchbox and click it to light a match, then use it to light the fire pit (with leaves) on fire. Everything burns away cleanly except for the acorns, which seem to have been messed up.
So use that clue to unlock the right door with arrow buttons.
The acorns taper towards conical ends that point in the LUDU directions.
So rotate the arrows accordingly, and open the door to find a green ladder and a shovel trapped in a ring.
Use the knife to cut the ring free and retrieve the shovel.
Visit
Examine the ladder and unfold it to its full length, then use it to reach the high door in the tree, where you notice a leaf on the left and a key under it.
Use the key to unlock the door beside. A squirrel is waiting for you, just sitting in front of an empty red plate!
Also, there's a shelf above the squirrel with a tool that looks too much like a chisel or file, but it's actually a flathead screwdriver.
Stash
Give the squirrel the acorn you found. After some really quick eating, it hands you a map with directions to a red X.
So look for that spot (just left of the fire pit) and use the shovel to dig, revealing a red treasure chest.
Reverse
You seem to be all out of ideas, but there's an item you can pick up again.
Take the golden acorn from the see-saw (which makes the box rise back into the ceiling), and place it on the other end instead.
This gives you enough space to take a closer look at the red button, where you see that it's mounted with two screws.
Since you now have the flathead screwdriver, use it to remove the red button entirely. There's a fancy key beneath.
Keys
Use this key to unlock the treasure chest, where you find a winding key inside.
Pick up the golden acorn once again, and use the winding key on its back.
A squirrel pops out of it with yet another key!
Use this silver key to unlock the remaining door and end the game.
Is the seemingly endless rain of spam comments leaving you feeling dirty? Wash it off with a game about showers! (Kind of.)
Escape Challenge 83: Room with Shower Heads
Exploration
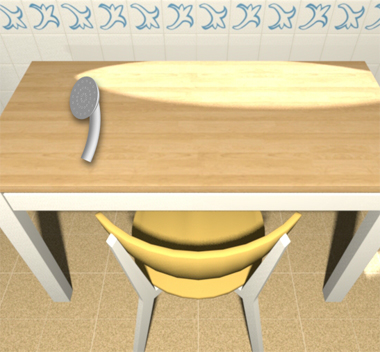
The starting screen is exactly what you've been used to throughout the series: round window, table and chair, blue bin, potted plant. Checking those places, you find a shower head on the table, another shower head in the plant pot, and a capsule with a key piece under the chair.
Turn right. There's another stunning landscape photo that's too small to do anything with. There's a chest of drawers, one drawer having a three-digit lock between two digit clues, and the other having two triangle buttons pointing left and right. And there's a wall box with an unusual-looking handle next to three circular buttons.
Turn right to face the locked door. The wall clock is stopped and all its numbers are out of order. Checking the small table, you find a rather old-fashioned telephone with a grid of buttons that light up in green when pressed.
Look under that table to find another key piece.
Turn right to find a plain-looking table. On its left side, there's a stand carrying two flashing spotlights, with a hole in between them. On its right side, there's a white open-topped box with a face drawn on a ball and a stand next to it, as well as three buttons on the front that don't work.
Look under this table to find another shower head.
Enter the corridor leading to the toilet, where you find a shower hooked up to the wall but missing its shower head. You can enjoy the view outside the narrow window, and as usual you can sit down, look right, look up and look left to find a drawing that's somehow shower-related.
Interval
Use the clue from the wall clock to unlock the top drawer.
On the clock, 1 and 5 are spaced just the right amount apart, and between them you see the digits 426.
Enter that in the drawer and open it to find a shower head (item) and a key piece.
Spray
Try out the shower head in the toilet and on the face ball box. How are they related?
Showering in the toilet makes a clue appear on the window.
While doing so, turn the shower head away. You're no longer drenched, and you can see the clue more clearly.
In order to give the face ball the same refreshing shower experience, you need a three-digit code.
The correct code to use is the second one that appears on the window: 571. Washing the ball down makes the compartment appear so you get a key piece.
Flash
Place the shower head in between the two spotlights on the long table, which completes a sequence of 7 flashes.
There's an obvious place to use that…
Click the buttons on the wall box in the same order as the flashes: CCRCLCL.
This opens up the box to reveal a shower head, a key piece and a clue with seven digits.
Triangles
Use another clue from the spotlight stand to unlock the bottom drawer.
The front of the stand has faint dark-gray triangles that point in the RRRRLLLL directions.
Push those buttons and open the drawer to find a pile of 4 shower heads and a key piece.
This completes the key, but there are still more puzzles to solve!
Project
You can still attach the shower head to the spotlight stand, and that's because another clue becomes visible when you click that shower head again.
The green colors of the squares and the size of their grid means that the clue has to be used on the telephone.
So click the
-O-

O-O

O-O

-O-
buttons on the telephone, which releases the receiver, which turns out to be 2 shower heads joined together.
Repeat
Also, you can still push the buttons on the wall box, and the only clue you haven't used yet is the one inside.
Hint: the seven digits (including the 7 in the shadow) are separated into four groups, so you should be looking for four of something.
On the front of the wall box, the three buttons and the handle form a total of four circular areas you can click, and you need to click them in the order indicated by the digits.
So click the RRCCLL buttons and then the handle, which turns out to be a shower head!
Leave through the door to end the game.
Item list
6 key pieces:
Top left: in top drawer
Top middle: in bottom drawer
Top right: in wall box
Bottom left: under chair
Bottom middle: from face box
Bottom right: under telephone table
12 shower heads:
1 item: in top drawer
1 on desk
1 in plant pot
1 under long table
1 in wall box
4 in bottom drawer
2 from telephone
1 more from wall box
Find the Escape-Men 200: Coronation
It's a big deal when a national treasure goes missing, but all 10 of them going missing, and you're locked alone in the treasure room? This only happens once in about 200 escape games.
Exploration
A quick check at the "10 Sacred Treasures" display confirms that there are no treasures there, only a man-shaped hole.
Look up to find a ceiling grate that you can't reach yet.
You can check both sides of the display, but only the left has an Escape-Man hidden on it.
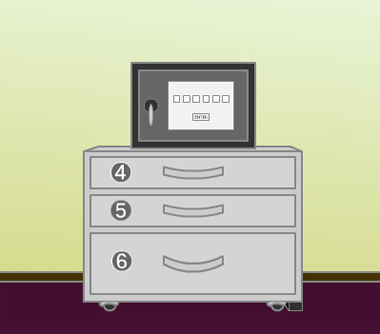
Turn right to find a safe with six color buttons, on a chest of numbered drawers. Each drawer is unlocked and has a different-colored bottom, but drawer 6 is slightly taller and contains a duster. The drawer also has wheels that would allow it to roll away, if not for the small rectangular stopper beside them.
Turn right to face the door, where the note under it tells you that you're locked in until you can find all 10 treasures. The exit sign looks suspicious but you can't do anything with it yet, and the four flags in front of the door can just be raised and lowered.
Click the green spot on the leftmost flag to remove it. Of course, it's an Escape-Man.
Also flip the note over to find some weird lines and another Escape-Man.
Turn right to find another chest of drawers. Each drawer here is also numbered, but drawer 3 is taller and has a four-digit lock. There's also something in the top-left corner of the screen, way out of reach.
Greens
Use the clue from the flags to unlock drawer 3.
After removing the spot, the flags have (from left to right) 0, 8, 3, 4 green areas.
Enter that in the drawer and open it to find a screwdriver.
The drawer also contains a not-so-invisible Escape-Man.
Non-greens
Use the clue from all six drawers to unlock the safe.
In increasing order of number, the bottoms of the drawers are yellow, blue, green, white, red, blue.
Click the buttons 3, 2, 4, 0, 1, 2 times, then open the safe to find a close-up of a full plastic water bottle in front of an Escape-Man.
Roll
It's time to move the chest of drawers (on wheels). Just click the right side eight times until it finally comes loose from the rectangular block and rolls away, revealing a stepladder.
(Don't worry, it'll come back when you change screens.)
Also click the block to roll it over and find an Escape-Man on the side.
Watch
Turn to the screen with drawers 1 to 3, and place the stepladder on the left side. (Make sure you examine and unfold it first!)
The object poking out from the corner turns out to be a surveillance camera with its lens taped shut, and you certainly don't have the tools to remove it.
But on the twelfth/thirteenth blink, the lamp blinks green shortly before returning to red. Clicking the lamp while it's green gives you an Escape-Man.
(Pick up the stepladder, there's more places to use it!)
Exit?
Place the stepladder in front of the door. Now you can access the exit sign, which seems to be a clear empty box.
You can faintly see a hole in the top of the box, but clicking it reveals that the top is completely covered by dust.
So use the duster to remove the dust, revealing the hole. Still, it seems you can only put things in, so how do you get anything out?
Uncap the bottled water and pour all of it into the hole. The Escape-Man on the sign looks like it's almost ready to pop!
Back out, look around the room, and check the exit sign again to find the Escape-Man hanging on to the edge of the hole.
(Once you're done picking him up, you can take the stepladder again.)
Clump
The used duster is now crusted with dust. Clicking it around, you find an Escape-Man hidden inside.
Ceiling
Place the stepladder in front of the treasure display. Now you can look up to access the ventilation grate, the screws holding it in place, and the Escape-Man taunting you from inside.
If you try it, you'll find that the screwdriver doesn't seem to work on the grate.
Examine the screwdriver, and click its tip until the correct side is out.
Now you can use the clue from the note to unscrew the grate.
(If you mess up entering the clue, back out and try again.)
It's easy to get the directions of the screws to match the lines on the note, but that doesn't work.
You'll need to do more. How much more?
Since there are two parallel lines at the top left of the note, you'll need to make that screw horizontal twice. So in addition to the two clicks you need to make it horizontal, you need four more until it's horizontal again.
Similarly, the other screws need 3+4, 1+4+4 and 2+4+4 clicks, for a total of
6 7
9 10.
Once you've clicked each screw the correct number of times, the grate opens up and you can just pick up the pesky Escape-Man.
(You can still pick up the stepladder, but you don't need to.)
Complete
The chime confirms that you have all 10 Escape-Men:
On left side of treasure display
On left flag
On back of note
In drawer 3
In safe
On black stopper block
On camera
From exit sign
On used duster
In ceiling grate
They combine into one giant Escape-Man, so place him into the display where the treasures are missing. Did something happen?
Perhaps the door is now open. Let's try to leave- oh no, your colleague's here.
He's found an empty box, which is a really bad sign. Quickly, fill it with something!
Scoop the Escape-Man back up from where you left him, and click him once more to disassemble him into ten small Escape-Men.
Then use those Escape-Men to fill the box. Ah, those were the real Sacred Treasures all along.
The treasures are returned safely, so you can sit through the king's speech to get to the end screen. Congratulations on reaching number 200!
Update