
 The midweek pause for playing is here, the new WE arrived!
You start in Amajeto's bar; and if you decide to leave instead of chilling here, tomoLaSiDo offers you alternative night activity - hunting (mutant) fireflies. After you leave, doesn't matter whether you've collected them or not, Dassyutu wants you to escape their miscellaneous room, where are hidden ten golden coins. And Nicolet, in their lovely game, takes you to a strange factory where everything is operated by codes - and you need to solve many good intuitive puzzles to discover them!
Have a good time and enjoy!
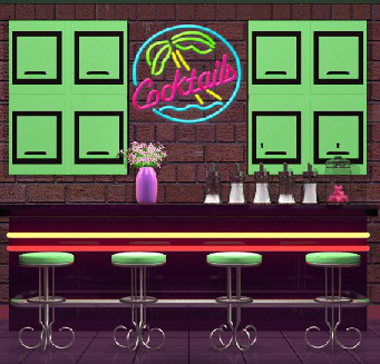
Cocktails bars - or precisely, one particular bar with slightly changed furnishings - are one of favourite Amajeto's themes for summer months. It's warm evening in the city, and you entered an empty but pleasant bar. The door shut close behind you, no waiter or cocktail in sight, and even no bottle with colorful content - maybe try to open the cupboard departments? Would you find the key, or bottles? Will you go or stay?
The cursor is not changing, no save button, one ending.
P.S. Here is two years old Amajeto Cocktail Bar and Amajeto Cocktail Bar 2, and five years old TomaTea's Pool Cocktail Escape and Pool Coctail Escape 2.
It's several fireflies you need to catch this time and so, from obvious reasons, you're locked in tomoLaSiDo's living room at night. However, not noticing the bugs is absolutely impossible as fireflies of that size (authors kindly spared us details) would be hardly overlooked in direct sunlight - the dark is necessary for clues and atmosphere. Assembling the key from exit door isn't difficult; collecting all seven fireflies may take a while - some clues are cunning and twisted. Happy hunting!
The cursor is changing, no save button, one ending.
Dassyutu's room is something between kids room, an office and storage room, and apart from the main task (finding the key from exit door), their usual side quest (finding ten golden coins) is also available. Click everywhere, as few views and hot spots aren't easily recognizable, and remember, that the game is linear and doesn't let you guess or brute force any code before discovering proper hint. Can you escape?
The cursor is not changing, save button, one ending.

You materialised in small factory hall and as it's Nicolet's game, the factory is cute, clean and sweet. Conveyor belt stands and you are wondering what do they produce here - seems that your target is to get the assembly line working by solving puzzles, and than hope that the final product is something what helps you to open exit door...like a key? A doorknob? A door controller? A bazooka? Just play and see!
The cursor is not changing, autosave, one ending.
The game is available for Android and also iOS.
P.S. Talking about factories brings Factory Balls to my mind. Month ago, Bart Bonte released one big game (221 levels) for PC, composed from original game and its sequels and spinoffs. It's paid game, and you can buy it on Steam, itch.io, and Katridge.
We love escape games, and our readers love talking about them and sharing hints! How about you? Let us know what you think, ask for clues, or help out other players in the comments below.


Neon Lights
Looking for a bar that's familiar but dimmer? Cozier? More… condensed? You've come to the right place.
Exploration
You start off at the cocktail bar, facing a familiar neon sign among some green cabinets, three of which on the top row are accessible but locked. One has a two-button lock, one has a four-symbol lock and one has a four-digit lock with colored digits. The rest of the bar looks uninteresting except for a row of bottles filled to different levels with white stuff.
Turn right to find a picture on the wall, missing eight of its pieces. The shelf below that has four colored cocktails, and clicking on them zooms in so you can see the olives in them. The white table near you has several objects and a square tile on a grid, but lifting all of them reveals a total of three green dots painted in the grid.
Turn right to face the locked door and the only view out of the room into the street. The television screen on the left is turned off, and the green cupboard under it has both of its doors locked, the left having a grid of sixteen buttons that turn green and the right having a row of four color-changing buttons.
Turn right to face some short couches along the wall. By intuition or experience, you find that the neon Bar sign above them tilts when you click its corners. There's another white table here with more items and another square tile, and lifting them all reveals a total of two green dots.
Grid
Use clues from both white tables to unlock the left cupboard door beside the exit.
Superimposing both table grids, you find that the five green dots fall within the third square in the first column and every square exactly three steps horizontally/vertically away from it:
- G - -

- - G -

G - - G

- - G -
Click those buttons, then open the door to find a square tile, a flat wooden box of cocktail picks, and a clue with colored dots and stripes.
Four colors
Use the clue from the row of cocktails to unlock the right cupboard door beside the exit.
Each cocktail has a different number of olives in it. From fewest to most, they are blue, red, green, yellow.
So click the buttons 1, 0, 3, 2 times, then open the door to find a remote control, square tile and clue with dots.
Screen
Use the remote to turn on the TV, which shows a pattern of blue and purple diagonal stripes.
Then use it on the TV again to view a very simple clue telling you to add 1 to a circle.
Diagonals
Use clues from the TV and cupboard to unlock the tilty bar sign.
The directions and colors of the stripes on the TV match those on the top-right, bottom-left, bottom-right, top-right, top-left of the cupboard clue.
So click the ⌝ ⌞⌟⌝ ⌜⌝ corners of the poster, which makes it come loose, then flip it over to find a square tile and three yellow dots.
Levels
Use the clue from the containers on the bar to unlock the top-left cabinet behind it.
The containers are filled to two different levels, and from left to right they are low, high, high, low, high.
Push the DUUDU buttons and then open the cabinet to find a square tile and more colored dots.
Contents
Open up the cocktail pick box to find a lot of picks in different shapes. Since you can't pick up any of them, it's not very helpful.
Click the inside of the lid to reveal a hidden clue.
Shapes
Use the clue hidden in the cocktail pick box to unlock the second cabinet behind the bar.
The tip of each pick has an arrow shape. Paying attention to where those arrows point on the hidden clue, you find that the diamond-shaped pick has the leftmost tip, followed by star, circle, heart.
Click the buttons 4, 1, 0, 3 times and open the cabinet to find a square tile and another colored dot.
Points
Use the remaining clues from the room to get the code for the last cabinet behind the bar.
Count up the colored dots by going right around the room:
First table: 3 green
Cupboard left: 1 yellow, 1 red
Cupboard right: 3 blue
Second table: 2 green
Tilty sign: 3 yellow
Cabinet 1: 1 red, 1 green
Cabinet 2: 1 blue
Total: 4 blue, 4 yellow, 2 red, 6 green.
The TV clue tells you to add 1 to each digit, giving the final clue 5537.
Enter that in the cabinet and open it to find the last square tile.
Complete
Place all eight square tiles into the picture to complete it, then solve its randomized puzzle by rotating the tiles until they align.
(A small hint: pay attention to the parts that aren't white or green, especially on the top-left piece.)
Once you're done, the slightly redder brick on the left opens up a hidden compartment with a golden key inside.
Use it to open the door, and you're out!
Escape Challenge 85: Room with Fireflies
Hang on, I got a bright idea! Never mind, it's gone again.
Exploration
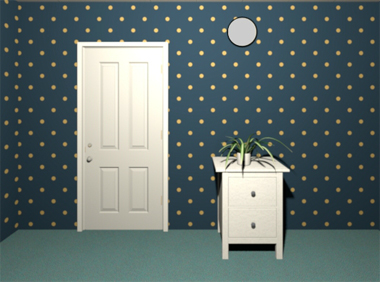
According to the view outside the round window, it's the middle of the night. The small square table has a box with five buttons that send out sparks to light it up very slightly, and you can check under it to find a capsule containing a key piece. The potted plant on the right hides an oversized firefly (cushion?), which absolutely has no space to hide among the leaves.
Turn left. Next to a bright blue bed, there's a gray box which appears to have a firefly stuck in a large hole as well as two buttons that light up in yellow for a while when clicked. There's a small window near the floor on the left, through which you can see some fireflies flashing, and there's a key piece next to that window. The picture frame on the wall has text that (very roughly) says "The Challenge is taking a break. Whoops!"
Check under the bed to find another firefly.
Turn left to find the locked exit door. As usual, the wall clock is completely useless for telling time but still has a large yellow dot and numbers in different sizes. As for the chest of drawers, the top one has a three-digit lock, and the bottom one has a four-slider lock.
Turn left to find a familiar-looking white machine. This time, it has a row of flashing lights above its glass case, through which you can see a giant firefly and a large net. The net is connected to the button on the front… but it's not very effective! To the left of it, there's a wall box with four buttons in a circle, and an empty blue bin.
Look under the machine to find another key piece.
Enter the corridor leading to the toilet. This toilet is longer than before and you can see a panel on the right wall with flashing lights between three digit buttons. There's also a window on the left wall that you can't view directly. While you ponder that puzzle, sit down, look right, look up and look left to find a picture of some magical girls meeting a giant firefly. (This name pun makes more sense in Japanese.)
Instead of following the instructions on the toilet, look right and then look down to find the window there, with fireflies moving in different directions.
Swarm
Return to the first screen, and figure out a way to open the box on the table.
All five fireflies need to be on screen at the same time. You can do this by clicking all the buttons very fast (or even using your keyboard to activate them), but for a less hectic solution you can notice that the middle path is the longest followed by the one beside it.
Quickly push the 3rd, 4th, 5th, 2nd, 1st buttons from the left, and the box opens to give you a key piece.
Trail
Use the clue from the toilet window to unlock the top drawer.
The fireflies visible there spell out the code 235, so enter that in the drawer and open it to find a key piece and firefly.
Formation
Use the clue from the window beside the bed to unlock the bottom drawer.
From left to right, the fireflies visible through the window are 1st, 4th, 3rd, 2nd from the bottom.
So click the sliders 0, 3, 2, 1 times and open it to find the last key piece and another firefly.
You have all the pieces needed to leave the room, but there are still some more fireflies trapped in the room.
Delay
Use the clue from the white machine to unlock the box beside the bed.
On the box, the left button flashes longer than the right.
On the machine, the third and seventh lamp from the left flash longer than the others.
So push the RRLRRRLR buttons on the box, and the firefly vanishes from the box and into your inventory.
Pause
Use the same clue from the white machine to unlock the wall panel in the toilet.
The lamps between the buttons on the panel flash slowly, which suggests that they match the two long flashes in the pattern on the machine.
These separate the short flashes into groups of 2, 3, 1, so enter 231 into the panel and open it. You can look into the machine and take the firefly!
Circular
Use the remaining clues from the room to unlock the wall box.
Hint: as the button layout suggests, you need to look for four of something contained in a circle, and also a sequence to put those four somethings in.
The large window on the first screen is divided vertically and then each half is divided horizontally, which makes four panes of different sizes.
Similarly, the numbers on the wall clock appear in four different sizes, two of each size.
This means that you need to push the buttons corresponding to the panes, in the order smallest to largest and then largest to smallest.
Push the ⌞⌝⌟ ⌜⌜⌟⌝ ⌞ buttons on the wall box, then open it to find a firefly.
Now that you've caught them all, it's time to open the door and leave!
Item list
6 key pieces:
Top left: in top drawer
Top middle: in bottom drawer
Top right: under white machine
Bottom left: from box on table
Bottom middle: under table
Bottom right: under window beside bed
7 fireflies:
Behind potted plant
Under bed
In top drawer
In bottom drawer
In box beside bed
In white machine
In wall box
Room Escape 30
Looks like somebody's serious about balancing work and play.
Exploration
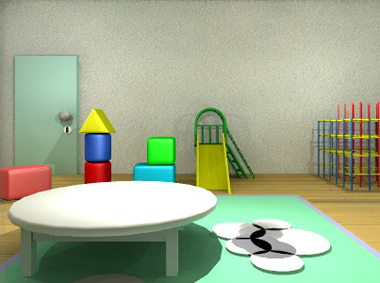
You start out on the playground side of the room, facing the locked door. There's huge colorful blocks on the left, a slide in the middle, an incomplete jungle gym on the right, and a table in front. It's not difficult to find a coin and spray can behind the left and right sides of the jungle gym, as well as the coin under the table.
Keep searching, and you'll find a maze note under the edge of the carpet (visible while looking at the blocks), as well as a coin under the slide.
Turn right. The remaining toys here are an inflatable pool, a robot dog and some tiny colorful beanbags. Under the dog and among the beanbags, you find 2 coins. Searching through the tall chest of drawers, you find a coin in the top drawers (either one) and a bottle of mysterious liquid in the bottom two drawers (either one).
Turn right to find a shelf with four locked chests. While they look identical, the top one has a four-digit lock with a picture of a car, the second one has a password box you can type into, the third has a row of four colored buttons, and the bottom one has another four-digit lock with a picture of some kind of cloth. On the right, there's a desk which only has a memory card. The right desk drawer is locked, but clicking the left one gets you a coin that you're supposed to find by looking under the table. To the right of the table, there's a small cabinet. The blue box on top of it has a lock with two arrow buttons, while the large drawer of the cabinet is unlocked and contains a blank notebook. Finally, you can check in the bin to find a paint roller.
Turn right to a screen with many shelves. The blue shelves on the left only seem to have a red paint can, but closer examination reveals a coin on the top shelf and some jungle gym parts on the middle shelf. On the left side of the gray shelves you'll find a toy car, nothing, piece of cloth, nothing and a coin. On the right, nothing, a trumpet , nothing, nothing again and another coin.
That's all 10 coins, so let's get to solving!
Impatient
Dip the roller into the paint can, and then use it on the slide. (Or if you're really impatient, the next step will still work even if you don't do this.)
Use the toy car on the slide to remove some of the paint, revealing a four-digit code.
Enter that code (2331) into the top locked chest and open it to find a wrench.
Construct
Use either the wrench or jungle gym parts on the jungle gym to complete it (consuming both items).
Then click it again to get a good view of the ceiling, where you find a note with three numbered colored circles.
Three colors
Use the clue from the colored circle note to unlock the trumpet.
The circles numbered 1, 2, 3, 4 are red, green, blue, blue.
Click the left, right, center, center buttons on the trumpet, which makes some really weird sounds.
The trumpet says RCAA, so type that into the second chest and open it to find a red key.
Unlock
Use that key to unlock the right desk drawer. Inside, there's a handheld game console.
Reader
Place the memory card into the game console (as hinted by the matching blue color), which displays a sequence of four colored arrows.
Four colors
Use the clues from the game console and the maze to unlock the third chest.
Following the arrows through the maze gives you a path that passes through ↓→↓← in that order.
As displayed on the console, those arrows are green, red, green, yellow, so click the 2nd, 3rd, 2nd, 4th buttons to open the chest. Inside, you find a huge container of water.
Drop
Fill the inflatable pool with the water.
You can't swim in it, but you can add the bottle of liquid to turn it pink.
Dip the cloth in the colored water, and some numbers appear on it!
(This also works if you place the cloth first before the dye.)
Enter that code (4321) into the bottom chest and open it to find a stuffed animal.
Develop
Use the spray can to reveal the contents of the notebook: a photo of a stuffed toy with numbers printed on it.
Bear
Use the clues from the notebook to operate the teddy bear.
Click on its ear and eyes in the order shown in the photo (the sound and text will tell you when each click is in the right spot).
Once done, the bear does a little dance with its arms. There's only one place left to use that clue…
The blue box beside the desk has its → button (labeled "Right") on the left and its ← button (labeled "Left") on the right.
You may have experienced the same confusion watching the game describe the arm on the left as "Right" and vice versa, because the arm that appears on the left is indeed the bear's right arm.
The correct code is →→→←, entered on the LLLR buttons. Once done, you find a key inside the box.
When you're ready, use the key to open the door and leave.
(The end screen mysteriously shows the room returned to its original state.)
Coin list
Left of jungle gym
Under table
Under slide
Under robot dog
Among beanbags
In top drawer
Under desk
On top blue shelf
On top-left gray shelf
On bottom-right gray shelf
Factory
If you don't see a way out, you'll just have to make one.
Exploration
The factory has bright walls and floor, and on the back wall you see a colorful pie chart with pictures. The stopped conveyor belt has a box with some decorative packing tape around the top, and the pedestal beside it requires a card to activate. On the left of the screen, you can see where the belt starts. Something white is stuck behind a gate which has bolts (or nuts) on top.
Turn right. The conveyor has some different-colored rollers here, and it passes by a box fastened with screws. On the back wall, you see a sign with colored letters (or is that a number?), a yellow machine plugged into the wall, and several colored pipes. You can zoom in on the ends of each pipe to see a colored circle painted there.
Turn right. There's a ladder that ends at a railing, but that section of railing is locked and the lock has three buttons that cycle through different shapes. The panel on the floor is fastened by bolts.
Turn right. There are more colored pipes here that you can zoom in on, as well as two gray kiosks. The left one has a row of two-colored buttons, some of which don't work, while the right one has some circular protrusions that you can't do anything with.
Halved
Use the clue from the box on the conveyor belt to operate the left kiosk.
The red and blue buttons are stuck, and they correspond to the red and blue images on the packing tape. This means that the other three buttons correspond to the 2nd, 4th, 5th images, which have their colored sides pointing right, up, left.
Click those buttons 1, 0, 3 times, and push the button to dispense a box cutter.
Use that cutter to open the box. After disposing of the packaging, all that's left is a gray slab with a card on top.
Roll
Use the card on the pedestal to activate the conveyor belt. The box moves away under the yellow machine and the screwdriver takes its place.
Also, the gate at the start of the conveyor has closed again and you can see a box trapped behind it.
Unscrew
Use the screwdriver to open up the panel in front of the yellow machine. It has a big red button, so push it!
The machine lowers and raises its arm, and the box is now a cute oval shape with eyes, arms and a leg.
Shapes
Use the clue from the processed box to unlock the railing.
The left, right, bottom sides of the thing have protrusions shaped like a hexagon, triangle, circle.
So click the top-left button twice and the top-right button once, then push the middle button. The railing opens up and you can proceed!
Exploration 2
You find yourself in an almost similar area, but is that the exit in the distance over the next wall? The railing has no lock this time, and the panel beside the ladder looks like it can be opened, but you don't know how.
Turn right. There are more pipes but you can't look at them. Instead, you can look at the row of three lockers, the left two padlocked and the right one unlocked. The padlock on the left locker has four circular color buttons within colored outlines, while that on the middle locker has four buttons with silhouettes of factories that grow bigger when clicked. As for the right locker, you find a giant pair of pliers and a hard hat that you can zoom in on.
Turn right to face the ladder back.
Turn right again to face the conveyor belt. Behind it, there's another sign and another yellow machine, but there's a loop of wire securing the machine to the upper railing, and the box on the left has some gray parts you can't take. The panel on the left of the belt can't be opened, and looking to the right of the machine reveals that its power cord is too short to reach the socket.
Pry
Use the screwdriver to pry open the panel beside the ladder, revealing some clockwork with one cog missing.
Core
Use the clue from the pipes you saw earlier to unlock the left locker.
The green, blue, yellow, white pipes have red, white, blue, green circles painted on their ends.
So click the buttons 1, 0, 3, 4 times, then push the button to open the padlock. Inside the locker, you find an extension cord as well as two more helmets with different numbers of stripes on them.
Expand
Use a clue from the pie chart to unlock the middle locker.
The factories shown on the padlock appear on the smallest, largest, second smallest, second largest sectors of the pie chart.
So click the buttons 0, 3, 1, 2 times and open the padlock. Inside the locker, you see a crank handle and two more helmets.
Free
Connect the extension cord to the machine, and use the pliers to cut the loop of green wire.
This opens up the panel to the left of the belt, which has a tiny hexagonal protrusion.
Place the crank handle on it (and you automatically turn it). The belt runs, the machine carries the thing and attaches limbs to it, and now it's a pretty handsome robot!
Also, you can take the cogwheel from the box to the left of the machine.
Use it on the panel beside the ladder, and you can proceed.
Exploration 3
You're now facing double doors with extremely low handles.
Turn right to find a yellow-and-white machine. For now, all you can see is the locked panel in front and something on the right pipe leading out of it.
Turn right. You now have a really good view of the factory, but the only new thing is the four-digit panel to the left of the ladder.
Turn right. There's another sign, more colored rollers, and this time the pedestal has a box with three semicircular buttons (and a row of five lights) next to a green funnel.
Dome
Use the clue from the lockers to unlock the three-button box on the pedestal.
The helmets with 1 to 5 stripes are in the LRCCL lockers, so push those buttons to open the box. Take the spanner from inside.
Wrench
Return to the first area, and use the spanner on the floor panel beside the ladder. Inside, there's a key.
The removed panel is quite colorful, so click it to find a hint with four colored squares under a black dot.
You still have the spanner, so use it to remove the gate from the start of the conveyor belt. The brown box behind has three colored buttons that cycle through both letters and numbers.
Alphabet
Use the clue from the signs to unlock the brown box at the start of the conveyor.
The green, yellow, blue letters/numbers form the code A1C.
Enter that in the box and open it to find a wheel handle.
Four digits
Use the other clues from the pie chart and floor panel to unlock the wall panel in the third area.
Following the color order on the floor panel (blue red yellow green), the squares on the pie chart show 1, 4, 3, 2 objects.
Enter 1432 into the panel and open it to find a grayish box with screws on its top.
Unscrew 2
Use the screwdriver to open the box. Inside, there's a paint can with some white stuff.
So pour that white paint into the funnel.
Storage
Place the wheel on the right pipe of the yellow-and-white machine. This removes the white cover to reveal a box with three colored buttons between black and green squares, as well as a light bulb next to it.
Also use the key to unlock the front of that machine, which reveals two robot hands.
Lit
Back in the first area, place the light bulb on the second kiosk and push the button to make it flash different colors.
Rainbow
Use clues from the bulb and conveyor to unlock the color lock on top of the machine in the third area.
Each set of colored rollers starts with a gray roller. Whenever the 1st, 2nd, 3rd, 4th rollers after that are colored, they are yellow, red, blue, green.
Therefore, the blue, red, yellow, blue colors shown by the light indicate the RCLR buttons. Push them to open the box and find a red heart.
Automaton
Place the hands on the robot in the second area, and the conveyor belt pushes it through to the third area.
Since you've already placed the white paint, the robot gets that coat of paint too.
As the belt comes to a stop, click the robot to open up a compartment on top.
Place the heart in that compartment. The robot makes its way to the door and opens it so you can leave!
Update