
 Hello, it's Wednesday, it's playing time!
In their lovely point'n'click game, Lilou Cormic and Hamsterspit take you to a gloomy and greyish place to help unfortunate zebra. From the other world you return to the completely different one - to a sweet and cute Nicolet's house where merry snowmen live, and then you need to save one wedding in No1game's game. Neat Escape locks you in a trading room and promises tasty dinner. If you escape, of course.
Have a good time and enjoy!
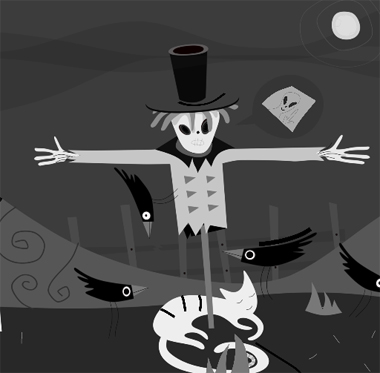
Black and white Halloweenish adventure by Lilou Cormic (programming), Hamsterspit (design and art), Joshua McLean (music) and Kenney (sounds) is spooky but not scary - skeletons and ghosts behave quite friendly, or at least aren't jeopardizing you. The target is to find poor zebra's stripes - it's helplessly lying on the ground, unable to move, probably paralyzed due to some unexplained accident which caused total loss of its camouflage. Some stripes are carelessly thrown out of zebra's reach, some are more or less hidden and you need to solve few puzzles to get them - will you?
The cursor is changing, no save button, one ending.
P.S. For similar experience try Aldo and Gus: The Skeleton Key. Awesome art, great music and nice story.
Despite pretty hot weather (or maybe because of it to cool down) Nicolet's latest game reminds of winter, and Neutral's Christmas games (a key inside an icicle or snowmen in a forest). Doesn't copy them at all, no doubt that Nicolet is absolutely original! It's just a delicate homage. There is much more, of course, well ballanced puzzles not too easy and too hard, cuteness and overall pleasant playability. Can you escape?
The cursor isn't changing, autosave, one ending.
The game is available for Android and iOS too.
No1game is back with an exciting story - the character you play is a groom, it's wedding day and his bride is missing. What happened to her is unknown, she just mysteriously disapperead...social catastrophe seems inevitable...unless someone saves the day and finds her! And as you are in EM's world, ten green guys must be involved for sure - the only question is how. Let's put the answer aside, and start the hunt! Can you find all of them and help the groom? And if you find the bride, is it for better or for worse?
The cursor isn't changing, no save button, one ending.
P.S. Here is Find the Escape-Men Part 157: At the Wedding.
Neat Escape's room is a simple classic - you are trapped in a tidy and polished room, and the door is locked. Notice, that they are two endings, and one key fits two locks - save button comes handy. However, before you get this two purpose key you need to figure out several codes and open few cases, and cope with items found in the room. So, will you get your dinner?
The cursor isn't changing, save button plus autosave, two endings.
The game is available for Android too.
P. S. Another so far inaccessible Tesshi-e's escape is available in Unity now: Escape Game The Boss Room (original title is Escape to Mr. Y's Office Room ). Good puzzles!
We love escape games, and our readers love talking about them and sharing hints! How about you? Let us know what you think, ask for clues, or help out other players in the comments below.


Nicolet's escapes are always a pleasure.
It looks like the markup in your entry for Snowman is messed-up though
indeed, very nice! Puzzles were not too hard
This game might still be missing some clues, so there's a little bit of guessing.
Ze Field
It's where you look for ze stripes!
Exploration
(The game has been recently updated (0.2.0) to include the item names. No more guessing as to what things are supposed to be!)
Just like the zebra stuck on the ground, the entire scene shows up in black and white. Actually, it's not just like the zebra, which has the stripes missing from its entire body except for the nose. As you move your mouse around the screen, some of the objects turn gray under the cursor: a crow which tells you what to do, and a white claw-shaped alien left arm hidden behind some grass.
Click the arrow to go right. This screen is covered in crows (which have nothing more to say) but by checking everything else you find that you can take the spade and zebra stripe (beneath the swirl) on the left side, as well as move two rocks on the ground and the broken egg (actually an insulator) at the top right to find 3 worms. Only the white cube in the middle remains a mystery,
but if you listen closely you'll find that the two buttons make sounds when you push them.
Go right. A scarecrow greets you and his speech bubble shows an alien or a drawing of one. Now that you know what to look for, you can directly see 7 zebra stripes (1 on the left hill, 3 on the cat and 1 beside it, 1 on the crow nearby, 1 on the hat) as well as a worm within the cat's tail.
With the help of audio cues or by right-clicking on them, you find that the buttons on the box and on the scarecrow are interactable.
Go right. There's more than enough crows for a murder (right-clicking reveals that they're hungry), and they seem to be magically stacked on top of a small machine with a clue on it. The grave with unusually soft dirt and the mysterious ghost standing at the crypt entrance add to the spooky atmosphere. However, that ghost greets you and even lets you take his tie, which is another zebra stripe. After shifting a rock, you pick up 2 worms from the ground.
Go right. All the crows here are perched on trees and almost all looking up, even though the moon is extra low and bright. Hovering over things reveals a zebra stripe beside the second tree and a small lid of tree bark that hides a worm on the third. That still leaves a mysterious stump and an alien who doesn't look well.
Go down the rabbit hole (at the top right of the screen), where you find some weirdly-shaped bunnies filling up the space, as well as a zebra stripe and a candle that looks like a drink cup. Moving the bunnies reveals 3 worms beneath them.
Go left and forward (there's an arrow next to the stump). This screen is extra spooky, with crows covering someone hanging from a tree with a screaming poster on it, a black cat right under the moon, and a four-eyed demon with a harp on his head? He sits at a toy piano which has a hat-shaped plate and a claw-shaped alien right arm on it, and the rock nearby hides yet another worm.
The very tip of the cat's tail turns out to be a zebra stripe you can pick up.
You can click the piano, but its keys aren't arranged in the usual way.
(Count the dots in your inventory to check that you have 12 stripes and 11 worms. Also, don't worry if you don't see everything you've picked up: it's just that your inventory extends off-screen.)
Easter egg
Let's start with the secret (not so secret if you've read the comments, game page, or jam page).
The tree stump beside the alien has a number on it. Place the plate and then the candle to complete the celebration.
Friend
Give both arms to the alien, who points up at something.
3 zebra stripes appear as tree branches from the left tree!
Piano
Use the clues painted on the tree trunks (on the screen with the alien) to play the toy piano.
(If you find the piano keys too small, you can try making the game full-screen.)
The symbols on the trunks match the keys on the piano, and from left to right they have 2, 1, 4, 1 dots under them.
So push the leftmost key twice, the next key once, the next key 4 times, and the rightmost key once. (If you got it wrong, the sound effects will tell you.)
Once you're done, the crows vanish and only 3 zebra stripes remain on the hanging body.
Triangles
Use the clue posted on the left tree (the one with holes on it) to solve a puzzle with the scarecrow.
Click the scarecrow's buttons in the order indicated (top left, top right, middle left, middle right, bottom right, bottom left).
A rabbit with a huge bowtie pops out of the hat!
Pick up a zebra stripe from the left side of the bowtie.
Dig
Use the shovel to dig up the grave. There's only a worm inside!
Boxes
You haven't seen any other clues (no obvious ones, at least), so how do you solve the boxes on the second and third screens?
The sound effects tell you when you push a wrong button, so use trial-and-error to figure out the correct codes.
For the cross box beside the scarecrow, it turns out to be just a cross shape: top left, bottom right, bottom left, top right. (Alternatively, it's the sizes of the crows' eyes from smallest to biggest.)
After pushing those buttons, a small bird pops up with a worm!
As for the other box (with a square and two buttons), the code is up four times and down seven times. (Also, four crows above the ground and seven on the ground.)
Another bird pops out of the box holding a worm.
Feed
You now have all 14 worms needed:
Numbers in brackets tell you which screen the item is on, from left to right. The starting screen is [1], the rabbit hole is [6], and the deep forest is [7].
2 under rock [2]
1 in egg [2]
1 in cat's tail [3]
1 under rock [4]
1 on ground [4]
1 in tree [5]
3 under bunnies [6]
1 under rock [7]
1 in grave [4]
2 from boxes [2,3]
Give them to the crows in the graveyard, which disappear one by one until only the machine is left, and now you can access the two buttons on top of it.
Just as the clue says, push the left button 3 times and the right button 6 times, and the machine prints out an alien picture.
Friend too
Give the picture to the scarecrow, who rewards you with a zebra stripe in his hand.
Help
You now have all 20 zebra stripes:
Screens are numbered the same as above.
1 on ground [2]
1 on left hill [3]
3 on cat [3]
1 beside cat [3]
1 above second right crow [3]
1 on hat [3]
1 on creature [4]
1 on ground beside tree [5]
1 at bottom left of hole [6]
1 on cat's tail [7]
3 on left tree [5]
3 on body [7]
1 on bowtie [3]
1 from scarecrow [3]
Drag them onto the zebra, which stands up, gives a quick thanks, and then the game is over!
Snowman
Why would you want to leave this warm house for a snowscape so white it hides the menu buttons?
Exploration
You start off facing a squarish fireplace that's empty. On top, there's a cup with a yellow button and a cute picture of snowmen in a forest. There's also a tree stump on the right, and at the edge of the pink rug some floor has been covered by a nailed-down board.
Turn right to find a window with three yellow stars hanging from it. There are four crates on the ground but only the left one has a three-slider box.
Turn right to find a snowman with a numbered scarf who doesn't seem to realize he's in the way. His body is missing all three buttons.
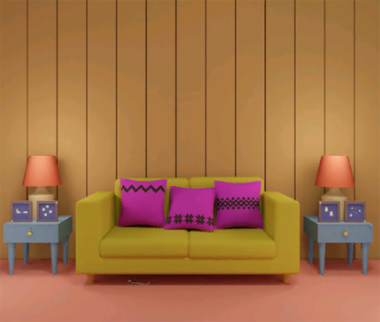
Turn right. Warm lighting on the wooden wall and a large soft couch with purple cushions add to the comfy feeling, but you also notice the four picture frames on the side tables which have winter symbols on them and also on their corners. The left table has a locked drawer, and the drawer of the right table is blocked with screws. Lift the right cushion to find a button with a different pattern, and look under the couch to find a crowbar.
Sizes
Use the clue from the window to unlock the slider box.
The small, medium, large stars hang in the bottom, top, middle positions.
Click the sliders 0, 2, 1 times, then open the box to find a matchbox with a snowman on it.
Examine the matchbox and click it… whoops, guess you'll just have to carry this lit match around.
Pry
Use the crowbar to pry up the board to the left of the fireplace. Inside, you find a cylindrical piece of wood and a four-digit box with some familiar symbols.
Numbers
Use the clue from the picture frames to unlock the box.
The frames show 3 stars (among some dots), 1 reindeer, 4 houses, 2 trees.
So enter 3142 in the box and open it to find another button.
Stripes
Use the clues from the cushions to give the buttons to the snowman correctly.
The patterns appear on the cushions in different positions, telling you that the top pattern is a zigzag, the middle is diamonds and the bottom is stars.
Place those buttons on the snowman accordingly, and his hat drops onto the ground.
You don't have any use for a hat, but examine it closer (by clicking it again) to find a small golden key hidden inside.
Unlock 1
Use the key to unlock the left drawer and then open it. It turns out to be deep enough to fit a whole axe.
Fuel
Place the wooden log on the stump and use the axe to cut it into firewood.
Then place that into the fireplace.
And then light it with the match. The snowman neatly melts down to a tiny size, scarf, buttons and all.
This reveals a locked door, and you can pick up the tiny snowman to access the trapdoor it was standing on. Beneath that trapdoor is a box with four square buttons, each split in two, under a small purple square.
Squares
Use the clue from the crates under the window to unlock the box beneath the trapdoor.
The positions of the crates and purple box match perfectly, so all you have to notice is that the diagonal support on the second box is different from the others.
Click the second button and then open the box to find another key.
Unlock 2 / Exploration 2
Use this key to unlock the door you just revealed. It's another room!
You're now facing an almost identical locked door. On the left, a hat hangs on the wall and it looks like there's room for another hat, but that knob is mounted on a vertical groove.
Turn right. Some colorful stars and white shapes hang from the ceiling above a combination cupboard/shelf. A pair of cupboard doors hide two connected boxes with indentations on their fronts. A pink box has colored buttons and a row of lights. The bottom shelf has a green box with a grid of four symbol buttons as well as a gray/metal box containing a flathead screwdriver.
Turn right to find the doorway back, surrounded by pictures showing pairs of colored reindeer. Take the ladder from the left, which is unfortunately tied shut.
Turn right to find a sliding window too high to reach. You can see some icicles outside with a key trapped in them.
Corners
Use the clues from the picture frames in the first room to unlock the green box in the bottom of the cupboard.
Combining the symbols at the corners of the frames gives you the code:
Snow(2) Cup(1)
Bell(0) Mitt(3)
Click the buttons that many times and open the box to find a shovel piece.
Weight
Hang the hat you got from the snowman onto the peg beside the door. As it slides down, you notice the cupboard opposite changing.
What previously seemed like empty space turns out to be a cover that slides aside to reveal a purple panel with screws at its corners.
Unscrew
While that purple panel is still visible, let's go ahead and unscrew it. It's a lid of a box which contains some pliers.
Also return to the first room and unscrew the board over the right drawer. Inside, you find a box with reindeer buttons and a row of light between two white shapes.
Riding
Use the clues from the hanging shapes and reindeer frames in the second room to unlock the drawer box you just found.
The red, purple, blue, red, yellow reindeer face LRRLL, but that means they appear on the RLLRR sides of the frames.
Click the RLLRR buttons on the box and open it to find a saw.
Snip
Use the pliers to free the saw from the drawer box.
Also use the pliers to cut the wire away from the ladder.
Climb
Place the unbound ladder in front of the window, and climb up. The window is still locked, but you can look out at the icicles on the left.
But if you look through the right window, you'll find a row of trees, with six of them in the middle flashing different colors despite being apparently coated in snow.
Three colors
Use the clue from the trees outside to unlock the pink box on the shelf. (Can't find the pink box? You'll need to reclaim your hat first.)
The trees flash red, green, red, blue, green, so click the left, right, left, center, right buttons and then open the box to find a bucket piece.
Matched
Open the double cupboard doors, and place the bucket and shovel pieces in their corresponding spots.
Two small platforms slide out from the half-boxes. One has a snowman with a blue scarf, but the other is empty.
Place the snowman from your inventory on the empty platform, which makes a tiny key pop out from the blue snowman.
Unlock 3 / Spike
Use this key to unlock the window, which opens just enough for you to reach the icicle.
That's alright, because the only thing you can do here is to use the saw to take the icicle down.
Cold
The saw isn't very good at breaking the ice, so in order to get the key out you'll need something else.
Melt the icicle in the fireplace, leaving just the key.
Unlock 4
Use the key to unlock the door to the second room and esc- what's this?
A snowman asks you to fill in the numbers on the box he's holding.
Group
Use the remaining clues from the room to fill in the numbers.
The last time you saw three snowmen together, it was in the photo above the fireplace, where they wore, blue, green and red scarves.
The snowman on the door has the number 2 on his scarf, while the tiny ones (now) in the cupboard have the numbers 5 and 3.
Enter 325 on the box, and the snowman lets you leave.
Find the Escape-Men 201: At the Wedding 2
It's almost like a TV drama: you find yourself in a rush just before the wedding, because the bride has gone missing. Thankfully, you're good at finding things, so that might help.
Exploration
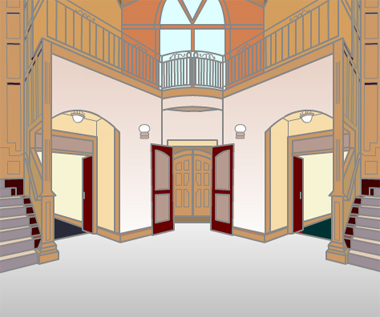
This church is very symmetric, with three doorways visible in front and stairways leading up on both sides. But first, look under your feet to find a trapdoor with a green keyhole.
Clicking the staircases does nothing, but you can click the orange areas to the left and right of the window. The left corner has a Sick Guy who's probably feeling the stress of this whole situation, while the right corner has a mirror you can look at.
Enter the left doorway which leads to a small dining room. All the tables are already nicely set, but it doesn't hurt to look around at the nametags and the chairs closest to you. There's nothing to pick up though.
Back out, and enter the middle doorway which leads to the church hall. A gray box with a grid of buttons and colored squares sits ominously in the middle. Your keen eye for green draws your attention to the colorful stained glass windows, but there's nothing hidden there either.
Back out and enter the right doorway to find a "gift money taker" at a counter, who doesn't mind you borrowing her blue pen. Behind her is a door to the waiting room, but let's look around some more first.
Click the left side of the counter to find a Blue Escape-Man hiding there!
Turn right to find a door to a cold room which seems to have a rather sophisticated face-recognition lock.
Turn left twice to find entrances to the toilets. You can't enter them, and neither will anyone else after you take both bathroom signs.
Finally, enter the waiting room. Ooh, there's a table of free drinks, and it's got your favorite Blue Hawaii.
Check under the table to find another Blue Escape-Man.
You can also click the couches visible on the side of the screen. The left couch is empty and normal, while the right couch is occupied by a couple who are definitely just waiting.
Lift the leftmost corner of the woman's dress to find another Blue Escape-Man.
Care
Carrying this sick guy around must be tough, so drop him onto the empty couch.
Maybe he needs to cool off some more. Remove his suit and his tie and his shirt and trousers… wait a minute, he's just a Blue Escape-Man!
Taste
Drink the Blue Hawaii to distract yourself from that disturbing experience.
Hmm, why are you still carrying the glass around like there's something you need to do?
Check yourself in the mirror upstairs. Specifically, click your (mirror image's) mouth to extend your tongue and find a Blue Escape-Man there.
Men
Seeing blue everywhere and confused about your own identity, you decide to destroy the bathroom signs by ripping off their bodies and heads.
Now that they're both halved, combine the bathroom signs to form a white bathroom sign.
Then uncap the pen and color the sign blue to form a Blue Escape-Man.
Absent
In the dining room, use the (uncapped) blue pen to fill in the empty nametag. Surely someone has a name that generic?
Back out and reenter the room, which looks exactly the same. A closer search reveals the Blue Escape-Man under the left chair.
Small
You still haven't looked in the locked refrigerator room. If only you could somehow pass the Small Face Recognition…
Use the Escape-Men you've picked up on the sensor, which unlocks the door for you.
Oh no, someone's tied to a chair in here! Save her by clicking, and after a short conversation the woman who was tied-up follows you.
Before you leave, flip the corner of the blue blanket to find another Blue Escape-Man there.
Also check the right pillar to find a mop leaning against it.
Colleague
That woman was wearing a familiar uniform. Could there possibly be two Gift Money Takers?
Use the woman you saved on the woman standing there to find out.
The culprit was a Blue Escape-Man!
Puzzle
Finally, use the clues from the stained glass windows to unlock the box between them.
The puzzle is easy, requiring you to just count the number of panels of each color in each window:
4 r 3

3 b 5

3 y 2

2 g 4
But with almost no visual feedback, you'll have to be extra careful to push the buttons exactly that many times. (On the bright side, you can push them in any order you like.)
Once you're done, open the box to find a can of green paint and the last Blue Escape-Man.
Complete
The chime confirms that you've collected all 10 Escape-Men:
Beside counter
Under drinks table
Under dress
As sick guy
In mirror / in your mouth
From bathroom signs
Under left chair (in dining room)
Under blanket
As gift money taker
In safe
They combine into a big Blue Escape-Man in your inventory.
Which you can paint green to form a normal Escape-Man. What special powers does this one have?
None at all, apparently! But you can look in the paint can to find a key. (If it wasn't already a green key, it is now.)
Found
Use the key to unlock the trapdoor. Why's the wedding dress here?
Could it perhaps be… this Escape-Man is the bride? But wedding dresses are for women!
Dismantle the mop and place it on the Escape-Man's head. Now he/she can be the bride!
Click her to end the game.
Unfortunately, it seems your bride still feels a little blue!
Escape from Trading Room
Your friend has decided to step away from his giant octo-monitor setup to make an escape room. But is it a good trade?
Exploration
The door on the right is locked, so take a look at the office area, where a wall of monitors sits beneath a wall of small picture frames and a wall clock, but you can't do anything with any of them at the moment. So check the drawers on the left to find a box with three lights, as well as a numbered button. You can shift the office chair aside to access a single CPU that isn't plugged in.
The chair doesn't move back until you back out all the way, which prompts you to take a closer look, and find a pair of pliers on the chair after turning it around.
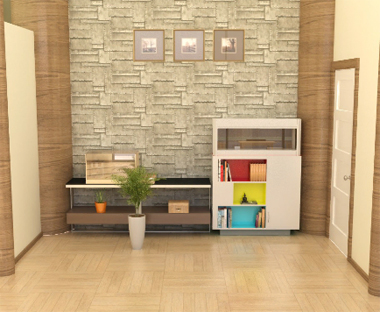
Turn right. There's another locked door on the right! On the left, there's a miniature of a house (this house?) with a switch that doesn't work, and a subtle rectangular area on the front side of its base. Under that model, there's a four-letter safe. On the right, there are some shelves with a glass case on top. It's not obvious by looking, but the dark rectangle is a narrow hole in the glass. While you ponder over what to do there, look beneath at the colorful shelves where only the books are interactable: they move aside to reveal a locked panel. Finally, a metal handle draws your attention to a compartment in the bottom-right, but it appears to be empty.
Turn right. Before we get to the furniture, check out the guitar on the left. For some reason, you can zoom in on its body as well as click its neck to shift it aside. Surely there must be something about the power socket behind? You check it and find that it's just a cover over a numbered button panel.
Click the couch to walk around it. It's got two safes, one with six digit buttons and letter clues, the other with three color-changing rectangular buttons. The small table on the left has a flower vase (with lemons?), a large drink mug (how thoughtful) and a remote control.
Check under the couch to find a metal stick.
Back out to look at the potted plant, which you can slide aside to reveal the last numbered button. Wait, that's it? You don't even get to look out at the balcony? Aw.
Push
Let's begin by pushing all three numbered buttons.
As you might expect, this lights up the box in the top drawer, and you can open it to find a power cord.
Connect
The power cord is still too short to connect the computer to the power socket nearby, and that's because it's been neatly folded and tied with wire.
So use the pliers to cut it free, and now you can use the cord to plug the computer in.
Push the power button, and the computer makes a loud noise as it starts up.
Trend
All the monitors show the same graph, but one of them has some extra info, so use that clue to unlock the left box on the couch.
The top-right monitor tells you that something was bought at 101 yen and sold at 108.
So enter those numbers into the box and open it to find a part. (There's no better name for it right now, but perhaps you can figure out what it does?)
Bars
Use the clue from the colored shelves to unlock the right box on the couch.
The buttons on the box are the same proportions as the colored areas, which means you need to rotate the clue to match.
The correct colors are blue, yellow, red, so click the buttons 1, 5, 3 times and open the box to find a red key.
Unlock (red)
Use the red key to unlock the door on the first screen. Oh no, this room is pitch-black!
Snip
You're out of ideas but you still have the pliers, so it's time to take desperate measures.
Use the pliers to cut the strings on the guitar, then reach in and grab another part.
Extend
Attach both parts to the stick, which makes it into a "toy".
Use that toy grabber to reach into the glass case, pick up the thing on the left, and drop it in the chute on the right.
Then check in the bottom compartment to find the flashlight!
Light
Turn on the flashlight, and use it in the dark room you unlocked.
You can only point it at two spots, and after a little searching you manage to shift the white towels on the left side (under the hangers). It's really hard to see the USB memory stick, but the game forces you to pick it up before the toy tractor it was leaning on.
Data
Plug the memory stick into the computer, which makes some letters appear on the screens.
Driven
Place the tractor at the front of the house model. You hear a click and the game shows you that the tray on the side is unlocked.
Hmm, there's a flat plate on one side and a protrusion on the other…
It needs batteries! You can now examine the flashlight and remote to remove two pairs of batteries from them.
Then place all the batteries in the compartment, return to the front of the model and flip the switch.
The house remains in one piece as the bulldozer pushes it over. But on closer look you find a clue drawn where it was standing.
Spell
Use the clue from the model (and monitors) to unlock the four-letter box under it.
The arrow on the clue passes through four rectangles, and the letters on the corresponding monitors spell out MOVE.
Enter that into the box and open it to find a blue key.
Save your game.
Normal Ending
Use the blue key to unlock the other door and leave. Since your friend's not there, you'll have to walk home alone.
Unlock (blue)
(Load your game, and) Use the blue key to unlock the panel behind the books. There's a large red button, so push it.
A ladder with colorful steps descends from the ceiling, allowing you to climb to the hole at the top of that wall. It seems that your escape route is through an air vent, but the grate is padlocked.
Pop
Since you've read the ladder clue, you know to turn off buttons 1 and 3. (Reach into the bottom drawer and the power socket behind the guitar, and click the buttons to toggle them back out.)
Try opening the box in the top drawer again. This time, you get a key with a wooden handle!
Food Ending
Use the new key to unlock the padlock and leave. After a short crawl, you end up in the kitchen just in time for dinner!
I keep having a problem where neat-escape games load after a very long time, then once I click "new game" I get an error message and firefox freezes. Is anyone else having this?
I remember I had the same problem and found out that Neat Escape games run better in Chrome or Edge than in Firefox.
I keep having a problem where neat-escape games load after a very long time telldunkin survey
Update