
 Welcome! Four pleasant and relaxing games just arrived!
Games in this Weekday Escape game are very cute indeed - doggies, duckies, family of beavers...lovely animals everywhere, but also many quality and intuitive puzzles. Shigeyuki Kagamura is another very interesting newcomer, and after you escape their temple like place, Kamonosoukutsu locks you in a small colorful apartment where does Duckie live. From Duckie's home you get to Nicolet's beavers' house with several floors and several codes to solve, and finally you arrive to Neat Escape's friend's room with beautiful view on blooming sakura tree.
Have a good time and enjoy!
Note: If any game doesn't appear on the page try to disable an adblocker.
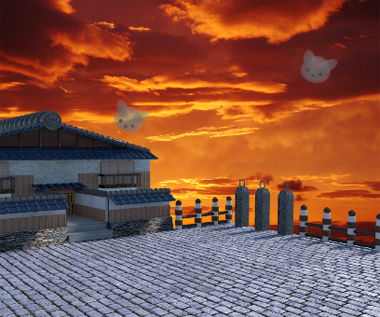
Shigeyuki Kagamura's game is an excellent start. Very good an all aspects - clever puzzles, beautiful looks and fluent playability. At the beginning you find yourself on a terrace under dramatic skies, and to get further you need to figure out codes for few locks. Clues aren't difficult to find but you need to use your combination skills to get the right answer - can you escape?
The cursor isn't changing, autosave, one ending.
The game is available for Android too.
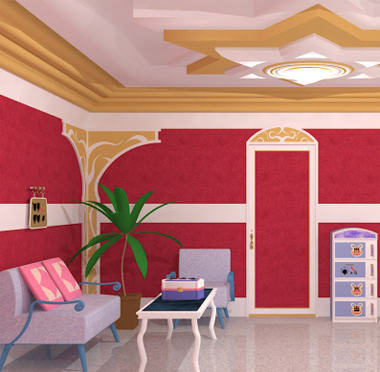
Kamonosoukutsu's trapped you in a nice apartment with Duckie who wants you to read a book. It's apparently not one of those lying on the table in front of her so you need to look for it in drawers and closets which are, not surprisingly, coded and apart from clues for them you have to find six coins. Look everywhere as some coins are just scattered around the room but don't worry, no pixelhunting. A joy to play.
The cursor isn't changing, save button, one ending.
The game is available for Android too.
Nicolet's creations are always a joy to play too, and this one isn't an exception. The near future is bright as they are thirteen games now available for Android only and the devs keep porting them to PC. Slowly, but they do port them.
This time you are locked in a comfortable beavers' tree house, nicely equipped, and the family plays the game with you - its members give you hints on puzzles. If you aren't sure what to do next check on beavers as they may help you. Will you escape?
The cursor isn't changing, autosave, one ending.
The game is available for Android and iOS too.
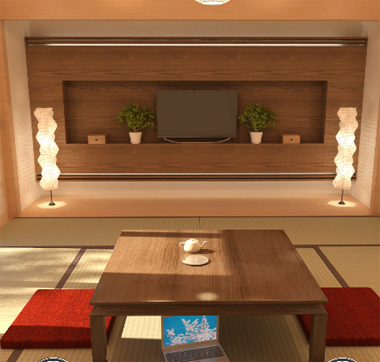
Neat Escape's joker friend had invited you to his apartment, and while you were admiring awesome view from the window he locked you inside the room. Not for the first time. Well, time to escape is here! Explore the room carefully, think about clues you discover and notice, that one key can be used in two locks (as usual) and that means two endings, simple escape or nice dinner. Enjoy your meal!
The cursor isn't changing, save button plus autosave, two endings.
The game is available for Android too.
P.S. Here is Fairyland Treehouse Escape, the latest game by Flash512 which would fit this WE perfectly if the playability was better. Pleasant and relaxing game but quite messy with vague hints.
We love escape games, and our readers love talking about them and sharing hints! How about you? Let us know what you think, ask for clues, or help out other players in the comments below.


Escape from the Secret of Doggy
In case you can't find the game: scroll down! It's below the large picture and the wall of text that explains how to play, the in-game hint system, why this version doesn't work on a phone and so on. (But in addition to the Android app linked above, an iOS app is also available — try the link at the bottom right of the game page.)
Somewhere in the middle of that, there's a backstory of how your curiosity about a torii gate brought you to this secret land of dogs.
Note about color puzzles:
Even though most puzzles have color clues, you can ignore them because the clue and lock have the same sequence of colors.
Exploration
(Once again, a reminder that you can view hints and control the music volume from the top-left menu.)
You start off on a rooftop(?) made of stone bricks, with doggy clouds floating around in front of the sunset. On the left, an arrow lines up three objects. Next to it between the two braziers, the path to a building is blocked with a chain and a huge padlock with number buttons.
Turn right. The new things on this screen are a wheel with twelve pictures around it, mounted on a pedestal with a silver dial that reveals numbers behind each picture in turn, and a rack with some red masks.
Turn right. A path leads up to a house with a paw mark on its roof, but unfortunately the door is locked and needs a key. On the right, there are three small stone pillars with thin outlines of shapes on top.
And if you squint a little, you can see some letters on the pillars.
Turn right. The large torii on the left is presumably where you entered from, but it's now sealed off with wooden doors and a large paw-shaped thing in the middle. On the right side, a giant dog statue wears a clue with a square grid (some of the squares are colored) and sits on a plinth with colored letter buttons.
It's as hard to see on this one, but just above the grid are the same three shapes you saw before.
Columns
Use the clue from the small stone pillars to unlock the large dog statue.
The square grid on the statue can be divided into three columns, with the shapes at the top of the columns matching those on the pillars. Thus, the three empty squares in each column correspond to the letters on each pillar.
The blue, red, green squares are in the top, middle, middle positions on the left, center, right pillars, and the letters in those positions spell out TAB.
Enter that into the buttons, and a compartment opens up so you can take a pair of scissors.
Objects
Use the clues from the objects on the first screen and the pictures on the wheel to unlock the padlocked area.
Clicking the dial that appears in the middle of the wheel, you find that the numbers behind the objects are 8, 3 and 11.
So enter that into the padlock, which vanishes. Now you can walk up to the building (shrine?), where a clipboard on the front has a piece of paper with pairs of eyes.
Wink
Use the clue from the red masks to do something to the clipboard.
Perhaps it's not obvious which eyes are closed and which are open, but there's only two ways to interpret the clue. To save you the trouble: the black eyes are open and the red ones are closed.
So, the open eyes on the masks can be left, right, both or neither:
L B R

N - L

R - -
Click the squares on the clipboard
4 4 4

3 2 2

1 1 4
times, and a mysterious paw swaps out the clipboard for a golden paw key.
Unlock / Exploration 2
Use the key to unlock the door to the house.
Entering it, you find yourself in an entrance hall with dogs on both sides, all dressed up and seated. The door at the end is unlocked.
So you pass through it and end up in a Japanese room. The table in the middle has a kettle and a tea tray without any drinkware, as well as a tiny pink cushion that looks quite familiar. The doors on the other side are open and you can see the sunset through them, but on closer look you find a symbol grid clue just floating in the sky.
Turn left to face the left wall. In the large urn is a small dog with long hair almost covering its eyes. Next to it, a white box (the hint says this is a fridge) has its front divided into a rectangle and six squares which you can click to make arrows appear. Then there's a huge scroll but instead of words it's just weird squarish symbols. At the end, you see a green payphone sitting on a cabinet with two doors. The left door hides a box with weird decorations and an unusual selection of numbers on its buttons (hint says this is a storage box for a tea set), while the right door hides a four-letter safe with pictures of colored clothes.
Turn right twice to face the right wall. The clothes (actually yukata) you just saw are on the right side of this wall, except there are two of each and someone's drawn on them with black marker. There's also a red television set (so old it has an antenna on top) with just three colored buttons on it. At the far left, three golden dogs guard three identical scrolls with different colored borders. The light blue paw button on the dividing wall makes them lower their heads in sequence.
Flanks
Use the clue from the corridor to unlock the white fridge on the left wall of the room.
The positions of the dogs match those of the square buttons. If it gets confusing, notice that the four dogs at the corners face the corridor, while the other dog on the left faces you and the one opposite it on the right faces away.
Make the arrows on the six buttons point
→ ←
↓ , ↑
→ ←
and open the fridge to find a can of tea leaves.
Worn
Use the clue from the closet of yukata to unlock the safe directly under the phone.
The markings on the clothes can combine to form letters. For example, the circle and line on the white ones combine to form a letter Q.
Using that same logic, you find that the only letters that can be formed from the marks on the blue, pink, green, yellow clothes form the code TKXQ.
Enter that into the safe, which opens up so you can take a teapot.
Infuse
Place the tea in the teapot, and then fill it with the kettle.
While we let it steep, let's solve another puzzle.
Primary
Use the clue from the drinking gold dogs to activate the TV.
The dogs move in the order RGBGR, or LRCRL.
Push the buttons on the TV in the same order, and some numbers appear in a grid on the screen.
Grids
Use the clue from the "window" and the TV to unlock the decorated box on the left under the phone.
The items on the box match clouds that (from left to right) appear in squares that, according to the TV, are numbered 84, 90, 70, 0.
Enter that into the box to open it. All the decorations fall off, and you find a teacup inside.
Serve
Use the cup on the teapot to fill it with tea, then place it on the tray.
Hmm, looks like this tea isn't for you…
It's for the dog in your inventory, but we can't get it to drink yet.
Trim
Use the scissors to cut the dog's hair/fur. Now you can seat it on the cushion.
Click the dog again to get a silver paw coin from it. After taking the coin, you get a view of the room from the dog's perspective.
Call
Place the coin into the phone, and then use the clue you just saw to activate it.
The steam from the tea fogs up your vision, reducing the scroll on the wall (as viewed by the dog) to just four letters.
Enter that code (TZHE) into the phone, which summons…
A helicopter and a dog with sunglasses who gives you a large pawprint.
Use the paw on the gate in the first area to end the game.
Chotto Escape 012 - She Wants to Read a Book
Exploration
As usual, there's lots of stuff on screen, so let's look at them in order.
The couch has nice cushions and the right one hides a duck coin, and above it hangs a placard with some silhouettes involved in its instructions. The table has a box with three numbered buttons (currently inactive) and a keyhole above. Beside the locked door, there's a storage cabinet and its compartments have a lock with three digits and color clues, a hole with instructions to insert 6 coins, a lock with two buttons having left and right arrows, and a lock with three buttons and a drawing above and an irregular-shaped hole below!
Turn right. As you already know, the duck wants to read a book. There's already a stack of books on the table, but you can only read the top one to find some pairs of unusual shapes. On the left side, you see a cupboard with several colored striped mugs (whose handles have handles) as well as two drawers which have a duck coin and a three-button lock with circular sectors. Next to it to the right, there's a shelf with bears holding darkened circles, and the front edges of the shelf are colored, and the entire shelf seems wired to the wall but instead of a power socket there's an empty battery socket. Above that is a shelf with colorful parrots surrounding arrow signs, and to the right of the duck is a shelf full of cute animals which are almost entirely made of their oversized heads.
In the bottom-right, you can look under the potted plant to find a duck coin, but what's that in the background? Surrounding the mouse/hamster hole are three empty shelves connected to the ground by ladders. Above the shelves, there's a familiar drawing on the wall.
Digital
Use a clue from the shelf with the wire to unlock the top compartment of the cabinet beside the door.
The green, blue, pink segments are each shaped like a digit, but the blue and pink ones have to be read sideways.
That gives you the code 734, so enter that into the lock and open the compartment to find a battery and duck coin.
Powered
Place the battery in the wall socket, and now the circles held by the bears light up with circular sectors.
So use that clue to unlock the bottom drawer nearby.
Once again, the clue is sideways relative to the lock. The buttons, from left to right, match the narrow sectors, from bottom to top, but you have to rotate each pattern too. You could do the rotation mentally or with some tools, but there's a smarter way:
The (bottom to top) circles have their sectors at the bottom left, top, bottom right, which ordinarily would require 5, 0, 3 clicks. But since we need to rotate each of them through an extra right angle, that would be an extra 2 clicks on each.
Click the buttons 7, 2, 5 times to place their sectors at the top left, right, bottom left, then open the drawer to find a small hexagonal container of sunflower seeds as well as a duck coin.
Feed
Give the seeds to the hamster, who retreats, and then suddenly nine of them exit the hole and position themselves on the nearby tiny shelves.
Pairs
Use the clues from the parrots and the blue book to unlock the third cabinet compartment beside the door.
The shapes in the book are just the wings of the parrots. Only the second one (in the direction of the arrow) is different, and it matches the top shelf (right arrow).
So push the LRLLL buttons, and open the drawer to find a leaf.
Hidden
The placard tells you to use the leaf on some animals. Actually, there's a specific one you need.
The silhouettes match the animals on the shelf, and the only place that they appear in that formation (a small square with a checkerboard pattern, each type of animal arranged along a diagonal) is along the right edges of the middle rows.
Place the leaf on the rightmost animal of the second row, and a hidden compartment opens from the wall with a long button in it.
Threes
Place the button in the bottom compartment of the cabinet beside the door. The buttons now work, and clicking them you find different colors and then different numbers of purple stripes.
So the obvious place to look is the mug cupboard, which has three mugs of each color, and three of each stripe count.
The not-so-obvious place to look is the tiny shelves with the hamsters on, which have the same drawing of cups above them.
It's time to put those clues together…
The patterns on the left, center, right small shelves point out triples of mugs in the cupboard. Each mug in the first triple has two stripes, each mug in the second triple is green, and each mug in the last triple is white.
So click the buttons 4, 2, 0 times, then open the compartment to find a wolf holding a duck coin.
Collection
Place all 6 duck coins into the coin slot of the second compartment beside the door, and open it to find the book!
Give it to the duck in exchange for a key with a round shape (and then a thank you).
Total
Use the key on the box on the table. The three buttons activate and you can change them to show different animals.
So use the remaining clues from the room to unlock it.
Counting the animals in the room, you find no seals, nine hamsters, five wolves (one you recently saw), four parrots, eight tanukis and one duck. (Hope I named those correctly.)
Since the numbers are 1, 5, 9, the buttons need to show a duck, wolf, and hamster.
Click the buttons 5, 2, 1 times and open the box to find a duck key.
Use that key to unlock the door and escape!
Other two walkthroughs coming soon.
Beaver
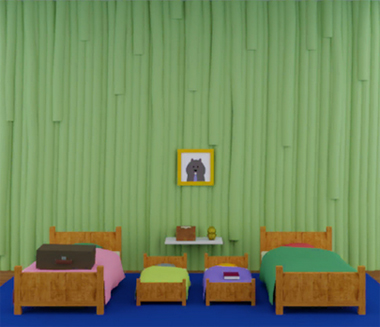
This game will keep you busy as a whole family of beavers.
Exploration
You start off facing an unusually textured wall, on which a framed picture of a beaver wearing a tie hangs over a shelf with a four-button box (each button is split diagonally into triangles) next to a golden coin bank in the shape of a beaver. Under that, there are four beds with different sizes and different colors of their pillows and covers, and it's easy to spot a locked suitcase on the leftmost one and a maroon hint book on the third one. Checking the others, you find that the second bed has a tiny key under its pillow, and the rightmost bed has a stick extending from under it. Interestingly, the end of that stick has a circular hole.
Go left. A loop of rope in the ceiling marks a ladder that doesn't extend down far enough for you to use. Next to it, something is boarded up and nailed shut. On the right, a small chest of drawers has a tall yellow box with a keyhole on its top. The top drawer has a four-color lock with a four-color clue, while the bottom drawer has a set of four beaver buttons under a row of five lights.
Contrast
Use the clue from the beds to unlock the top drawer.
Each bed has two colors, top (pillow) and bottom (blanket). As usual, there's quite some color nuance but I'll simplify the color names.
The top colors are given on the drawer; those colors (gray yellow green red) appear on the 2nd, 3rd, 1st, 4th beds alongside the colors lime, blue, pink, green.
Click the buttons 3, 4, 1, 2 times, then open the drawer to find a hex key.
Unlock
Use the gold key you found earlier to unlock the suitcase. Inside, you find a sealed paper bag with a dashed red line across the top, and you can click the bag again to take closer look at its clue with squares divided into triangles.
Halved
Use the clue from the book and bag to unlock the box on the shelf.
The book points out four particular squares in the grid shown on the bag, and the shaded parts of those squares are in the UR LR LR LL corners.
Click the buttons 2, 1, 1, 0 times and then open the box to find a small crowbar.
Pry
Use the crowbar to remove the boards from the wall beside the ladder.
It's a window where three beavers are holding paint brushes next to colored paint cans, while another one distracts you a lot.
Poke
Use a clue you just saw in the window to unlock the bottom drawer.
The beavers appear along the bottom, top, right, top, left edges, so push those buttons and open the drawer to find a hook.
Upward / Exploration 2
Combine the hook and stick, and use it on the rope to lower the ladder.
Climbing up, you find yourself in a very similar room, and all the furniture is still tiny. The beaver in this picture wears a bowtie, and the plant pot under it only contains dirt. As for the cupboards next to that, the top two doors are blocked by a gray piece that opens up (click the piece itself) to reveal three shield-shaped holes. Under that, a book has only one useful page and the plate next to that has wooden sticks (chopsticks?) with heart-shaped cross-sections. Opening the bottom pair of doors, you find even more plates with sticks, as well a locked drawer with colored leaf buttons and another drawer with two digit buttons.
Go right. The door here is locked and the transparency of the glass gives nothing away. On the left, a kitchen area has a pan with a pancake already placed/poured into it, as well as a fruit bowl which sneakily hides a winding key near its top right. Under the pan is a panel opening into the wood-powered stove, but someone has left their shovel inside, and the other panel on the left is screwed shut.
Buried
Use the shovel to dig some soil out of the plant pot. There's a shield piece charged with a pair of crossed handsaws!
Unlock 2
Bring the winding key downstairs and use it to activate the yellow box on the chest of drawers, which just opens up to reveal three cute beavers holding different items. The middle one has a shield piece (with paintbrushes) next to it.
Leaves
Use the other clue from the window (downstairs) to unlock the drawer at the bottom left of the cupboard (upstairs).
The purple, green, brown paint cans are marked with leaves divided into five lobes, one (i.e. no) lobe, and seven lobes.
So click the buttons 1, 0, 2 times, then open the drawer to find the remaining shield piece (with hammers).
Trades
Use the clue from the yellow box (downstairs) to place the shield pieces into the gray piece on the cupboard (upstairs).
Based on the tools held by the beaves, you need to put the shields in order: (from top down) paintbrush, hammer, saw.
The top cupboard doors automatically open, revealing a wineglass with straw, yet another plate with sticks, a four-digit locked drawer, and a four-slider locked drawer with different-shaped sliders.
Geometry
Use the clues from the green plates with sticks to unlock the drawer at the top right of the cupboard.
There's no clear pattern to the placement of the sticks, so it must be the positions of the plates that matter: the sticks with near-circular, heart-shaped, pentagonal, hexagonal cross-sections are placed on plates in the bottom, middle, top, bottom sections of the cupboard.
So click the heart slider once and the pentagonal slider twice, then open the drawer to find a spatula.
Arithmetic
Do some simple math with clues in the upstairs room to unlock the drawer at the bottom right of the cupboard.
(Or perhaps you'd like to just guess the answer?)
Counting the fruit in the bowl, you find that there are a total of 3+2 apples and pears, but only 1 banana, for a difference of A=4.
Even though there are two digits, that just means the code you have to enter is 04. Open the drawer to find a pair of scissors.
Unwrap
Use the scissors to cut the paper bag. Inside, you find a matchbox, and clicking it removes a match and lights it.
Cook
Use the matchbox to light the stove. The pancake quickly puffs up and browns on its top.
Use the spatula to pick the pancake up (and onto the green plate that was nearby). It now has a four-digit code on its top.
Enter that code (2481) into the drawer at the top left of the cupboard, and open it to find a tin can.
Unlike any other cans you might have seen, this one has four screws around the edge of its lid, each having a hexagonal socket in it.
Unscrew 1
Use the hex key to open up the tin can, and retrieve the door key from inside.
Unlock 3 / Exploration 2
Use the key to unlock the door. Instead of freedom, all you win is a breath of fresh air and a quick climb up a ladder. Wait, if this is the rooftop then where does that door go? It's a mystery for now, as it doesn't have a handle.
The weird tree on the left has a rope wrapped around its left branch, connected on one end to a tray with a request, and extending out of sight on the other end. Next to the tree is a box with four square color buttons in colored outlines.
Dish
Place the pancake plate on the tray hanging from the tree, which descends. The tray on the other end of the rope comes up with a doorknob.
As you take it, that tray goes back down and the original tray comes back up, now with a picture of a drink.
Optional: if you return to the original room and look through the window you'll find the three beavers holding the pancake.
Handle / Exploration 3
Attach the doorknob to the door and open it.
A beaver stands in front of a sign fallen on the floor, and it holds a box with a slot at the top and a picture of a beaver in a stream of falling water. It's also blocking another glass door. The picture on the right has another beaver in a tie, while the wall box on the left has three buttons that change patterns when pressed.
Ties
Use the clue from the picture frames throughout the game to unlock the wall box on the left.
Each level of the house has a different picture, or maybe the same picture with a different tie.
Those ties have patterns that are (from top down) yellow with green stripes, purple with green dots, and blue with red dots.
Click the buttons 2, 0, 1 times and open the box to find a wine bottle.
More leaves
Use the clue from the tree to unlock the box beside it.
The leaves with pink, green, blue, aqua outlines have white, red, orange, black interiors.
So click the buttons 0, 2, 3, 1 times and open the box to find a flathead screwdriver.
Unscrew 2
Use the screwdriver to unscrew the panel to the left of the stove. Inside, you find a bottle opener.
Pour
Now you can use the bottle opener to open the wine bottle and use it to fill the glass.
Place the finished drink on the tray attached to the tree, and up comes a hammer.
After you take the hammer, the left tray comes back up with a request for coins.
(Checking in on the beavers through the window, you find one watching another drink the grape juice.)
Payout
Use the hammer to smash the coin bank (on the first screen). In the debris, you find five coins.
Place the coins on the tray on the roof, which gets exchanged for a card with the same picture.
Pass
Give the card to the beaver in the topmost room (by placing it in the box), who holds up the sign with some buttons showing different accessories.
Looks like you need a new clue for this. Have you seen it?
Looking through the window in the first room, you find five beavers wearing different accessories: (from top left counterclockwise) glasses, hat, glasses, cane, cane.
After entering that into the sign, the beaver lets you onto the slide that ends the game!
Sakura & Washitsu
Exploration
As the title tells you, this is a traditional Japanese room with a view of some sakura (we'll get to it!). The small table has a teapot and an empty saucer. You can't do anything with the laptop under it, but you can lift the cushions on both sides to find a clue with an arrow as well as a blank piece of paper. Along the back wall, you see a television screen (turned off), a box with a grid of buttons that turn on when clicked (on the left) and another box with a grid of rectangular color buttons (on the right). The potted plants separating them can be lifted from their pots to reveal more arrow clues.
Turn left to get a view of the garden with sakura in full bloom. When zoomed in, you can find an arrow clue at the left end of the bridge. Also, you can close the doors to find some sakura flowers on the left panel.
Turn left. The door is locked and the wardrobe is padlocked, so there's nothing much to do here right now.
Turn left. There's a standing paper lantern on the right without any candle in it. The table on the left has a box with three sakura buttons, a miniature torii gate with a book under it, and a bonsai tree that has a magnifying glass hidden behind it.
Three buttons
Use the clue from the left sliding door to unlock the three-button box.
The clue visible through the window tells you to view the sakura on the clue from bottom to top.
In that order, the sakura appear in the CRRLRC columns, so push those buttons to open the box and find a candle.
Print
Use the magnifying glass to look at the right page of the book. The tiny clue there is actually a grid of letters!
So use that clue to unlock the box to the left of the TV.
According to the grid, only the three buttons at the top left, bottom, bottom right should be Black and the rest need to be turned White.
Click those six buttons not mentioned, and then open the box to find a pen.
Heat
The instructions on the left page of the book look simple enough, if you pay attention to the details.
Use the pen to color the paper black.
Then place that paper on the saucer in the middle of the table and then use the magnifying glass to focus sunlight onto it.
While the paper is on fire, light the candle on it.
Place the lit candle in the lantern. When you close it, colors appear on the front!
Colors
Use the clue from the lit lantern to unlock the box on the right of the TV.
The lighting is a bit deceptive, but the colors on the lantern are:
Red(4) Yellow(5)
Green(3) Blue(6).
Click the buttons that many times, then open the box to find a silver key.
Unlock (silver)
Use that key to unlock the padlock on the wardrobe.
The left side of the wardrobe is numbered 1 and has another locked panel, while the right side has a box with four symbol buttons, as well as some cushions stacked on top of a remote control.
Screen
Use the remote to turn on the TV, which shows some letters and numbers and a star.
So use that clue to unlock the box in the wardrobe.
It's easy to compare each pair of numbers, and even though there's a pair of letters, they are clearly identical.
The symbols you need are > = < >, so click the buttons 2, 3, 1, 2 times and open the box to find a blue key.
Save your game.
Sakura Ending
Use the key to unlock the door and leave, and you get to enjoy a view of sakura on the way home.
Unlock (blue)
(Load your game, and) instead use the blue key to unlock the numbered panel in the wardrobe.
It just has a red PUSH button, so push it and you hear a click from the direction of the flower painting.
So remove that painting to find a weird wooden device with an OK button between two colored square holes.
That device also has a handle at the top that opens a switch panel, with switch 1 being on and the others off.
Switch
As you flip each numbered switch on, the others turn off and you hear something move.
That thing turns out to be the numbered panel on the wardrobe.
Panel 2 has a framed picture with the word BLACK in white on white with a black outline.
Panel 3 has a box with four arrow buttons in colored sakura shapes, as well as a smaller screwed panel.
Ink
On panel 2, use the pen to color in the word.
Although nothing else appears to change, you can now lift the frame to find a toy (pink cube).
Pointed
On panel 3, use the arrow clues around the room to unlock the box.
The clues are:
Pink ↑ (outside window)
White ↙ (beside table)
Yellow ← (right potted plant)
Green ↘ (left potted plant)
Click the buttons 0, 5, 6, 3 times, then open the box to find a toy (white cube).
Fit
Place both cubes in the device behind the painting, and push the OK button to receive a screwdriver.
(Panel 3) Use that screwdriver to remove the screw panel, revealing a switch in the OFF position.
Food Ending
Flip that switch, and the entire panel descends out of view to reveal a door.
Leave through that door to meet your friend for dinner!
I'll be unavailable for the next few weeks, but as always, you're welcome to write your own hints/walkthroughs and answer questions.
thanks for the walkthroughs as usual, KK. So I hope there will be some nice people who will submit walkthroughs while KK is gone. It would mean a lot to not just me, but to everyone that needs them. Thanks.
For some reason, I can't get Beaver to run in Firefox/Mac 68. Nicolet's games have never had any issue before.
Nice Article. Thank you for sharing TellSubway
Great artticle. i see your website and you have many interesting game.great job
Bully Anniversary Edition Android
Update