
 Hello escapers, welcome to the new Weekday Escape!
Almost traditionally, you start with pleasant Amajeto's room followed by another one of theirs. Nicolet settled their newest game in a small village where you need to visit all houses and interact with all animals living there before you earn a reward - yummy strawberry cake. The similar can be said about Neat Escape's game; many places need to be visited and codes need to be figured out before you get rewarded (with breakfast).
Have a good time and enjoy!
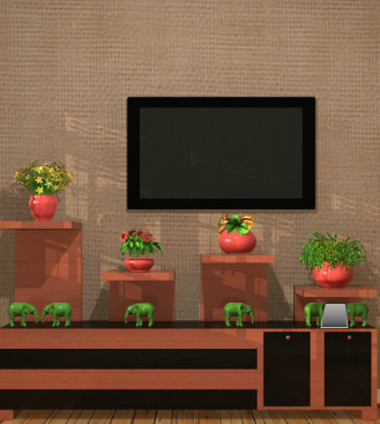
This week Amajeto's persistent creativity focused on elephants and colors. Elephants are many and an abacus would come handy although you can do very well without it, I'm sure. Can you escape?
The cursor isn't changing, no save button, one ending.
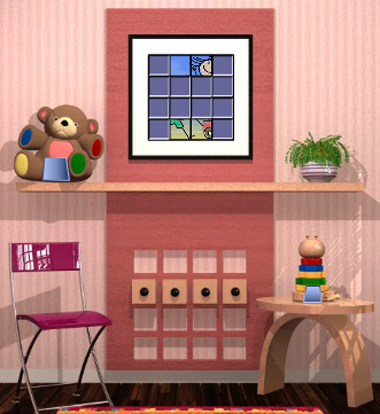
Kids rooms are favourite and this one isn't definitely the first Amajeto's room crammed with plush bears and toy trains...are you going to stay there and play, or leave?
The cursor isn't changing, no save button, one ending.
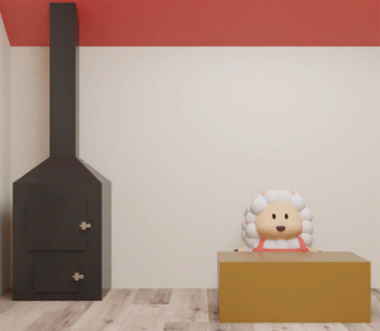
Little sheep wants cake. Granny promises to bake one, but things don't go so easy...there are many ingredients necessary for a proper strawberry cake and it's you who is supposed to get them and overcome many obstacles at that. Nicolet's game is as lovely as always, puzzles are intuitive, not too difficult not too easy, all animals you meet cute and helpful. Pleasure to play!
The cursor is not changing, autosave, one ending.
The game is available for Android, iOS and also on Steam.
P.S. I was sure I played a game by MayMay where the goal was to collect ingredients for a cake. I didn't find it, so here is Find 10 Yellow Cupcakes or Find 10 Cookies instead. Or Find 10 Cookies Part 2.
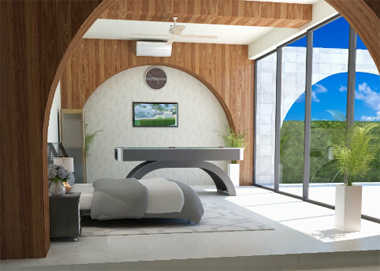
One of many Neat Escape's friends owns a hotel, and not surprisingly, it's the escape hotel. You just peacefully fall asleep in your room and after waking up (still peacefully) you find out that the room is a trap. A comfortable one with awesome bathroom and a billiards table but still a trap...there are many puzzles you need to solve before you get a breakfast! One key fits two locks as usual and the second ending definitely worth playing.
The cursor is not changing, autosave plus save button, two endings.
The game is available for Android too.
P.S. Another 'bathtub' with pink water you find in The Escape Hotel- Hot Spring by Tesshi-e.
We love escape games, and our readers love talking about them and sharing hints! How about you? Let us know what you think, ask for clues, or help out other players in the comments below.


can't wait for the walkthroughs to these.
I logged in because I finally beat a puzzle entirely on my own (YAY)
My first Walkthrough: Amajeto Kids Room
Exploration:
Room 1: Teddy Bear and Ending Picture
Noteworthy items:
four squares that have colors and Up arrows: good idea to remember the colors and use this hint on another puzzle. Also grab the blue Puzzle piece for the ending puzzle.
The Bear and the Stack of colored Blocks contain the same 4 colors, and go together to solve a puzzle later on. They also hold nicely two of your Ending Picture pieces!
To the Right> Room 2: Room with the windows and Piggy
Noteworthy items:
The train has some interesting numbers on the 3 cars it pulls. This should go for a puzzle offering 3 choices...
The piggy bank looks like it's "hungry": aren't piggies always hungry? You'll find something to insert here later on.
The doors have puzzles that can be solved from hints around the other rooms, mostly... with one exception:
door 3 below the Piggy
Also: two puzzle pieces on the zoom ins by the train and Piggy
Turning Right> Room 3: Four Fun Pictures and a Model Toys Set
Noteworthy Items:
One picture is not quite like the others. If you need help, it's the:
bottom left picture, which tilts!
Turning Right> Room 4: TV Room and More cupboards!
Noteworthy Items:
Cupboard on Right has 3 buttons...remember the train?
middle, left, right, middle, left
You then obtain an interesting gold "chip"... and a puzzle piece.
Cupboard on Left has familiar looking shapes in this room...
I had trouble with this clue only.
there's a certain number of the blocks above.
One star, two triangles, three rectangles, four squares...
Puzzles:
Room 1:
Four Blocks go to a puzzle in room 2
Red no click, Blue click once, Green twice, and orange 3 times
Colors of the Bear, using the descending rings of the ring toy, can decipher the tilty puzzle in Room 3
Upper Right, Upper Left, Lower Left, Lower Right, Lower Left
Room 2 with 4 colored blocks contains a TV remote and a puzzle piece. Using the TV remote:
there's Dots that match up with two words somewhere else in the game, each dot per letter. Goes to one of the cupboards, If you follow the arrow on the TV...
L, I, M, E
Piggy Bank: Oh what eyes you have! (after you're "fed the chip" of course)
L, R, R, L, L, R
You should have all 12 puzzle pieces and be able to figure out the ending puzzle by rotating the pieces until they make a very pretty Picture of a couple of very happy children!
(wow I never knew writing a walkthrough was this tough!)
@chrpa and the cake game: Perhaps you played a Primera game? One of my earliest walkthroughs was for Pancake Ingredients.
Yes that's the one. Thanks!
on the first game, I don't see half of what is in the walkthrough. could you redo the interview or maybe if KK has time, he could do one? I appreciate it. Thanks just the same,WhiteSwan.
Elephant Room
Not to be confused with an elegant room, though it is one.
Exploration
This room starts off a bit different, with a television (that's turned off) over some shelves with potted plants, over some porcelain elephants with the right two covered by a square tile, over a cupboard with two small doors at the right end. The left compartment has a four-color lock, while the right one has a two-button lock.
Turn right. The furniture here is uninteresting, so focus on the colored framed pictures of trees, each of which has a corner marked. Under them, a shelf has some books you can't read, bookended by blue elephants where the right one is covered by a square tile.
Checking the picture frames, you find that the third (orange/red) one tilts when you click its corners.
Turn right to face the locked door. On the left is a picture divided into a grid with eleven squares missing, a word formed on the wall from tiny tiles with a screw nestled in the letter H, and you can pick up 2 square tiles from the armchair and the side table that has a red elephant.
Turn right to face a window with a view of the forest. But the only elephants are indoors and lined up in a row in order of size, with a square tile on the left end next to the largest. The locked compartments beneath have locks with four colored digits, four plain black digits, and four vertical bars that grow upward when clicked.
(Check that you've picked up 5 square tiles.)
Two buttons
On the first screen (with the TV), use the clue from the green elephants to unlock the right compartment beneath.
From left to right, the elephants face the RLLRRL sides, so push those buttons and then open the compartment to find a square tile.
Heights
Use the clue from the shelves under the TV to unlock the right compartment under the windows.
The shelves are different heights, with the highest to lowest being the 1st, 3rd, 2nd, 4th from the left.
Click the bars (from the left) 3, 1, 2, 0 times to make them match, then open the compartment to find a screwdriver and a square tile.
Unscrew
Use the screwdriver on the screw in the middle of the wall letters. This doesn't remove anything, but the entire word is now upside-down.
Colored numbers
Use the clue from the colored elephants around the room to unlock the left compartment under the window.
Counting the elephants of each color, you find that there are 2 blue, 7 yellow, 1 red and 6 green.
Enter 2716 in the lock and open the compartment to find a square tile and a remote control.
Screen
Use the remote to turn on the TV, which displays a row of rectangles with numbers on some of them.
Then use it again to find a clue with a large white square over a row of colored squares.
Nine
Use clues from the TV and the wall letters to unlock the middle compartment under the windows.
Since there are nine letters on the wall, the numbered boxes on the TV must refer to the letters in those positions.
However, using the screwdriver to rotate the word has caused different letters to enter those positions, and upside-down too.
Reading the second-last, third-last, last, and first symbols, you find that they form the numeric code 7335, so enter that into the lock and open the compartment to find a square tile.
Corners
Use the other clue from the TV to unlock the tilty tree picture.
The colors shown on the second clue (red yellow red green blue) match those on the framed pictures, and the marked corners on those pictures are the ones you need to click on the tilty one.
So click the ⌞⌝ ⌞⌟ ⌜ corners of that picture, and all four pictures come loose! Click them to flip them over and find clues with dots as well as a square tile.
Colors
Use the clue from the backs of the framed pictures to unlock the left compartment under the TV.
Each framed picture has a different color on the front and different number of dots on its back. (If you flip all the pictures over and then flip them back in order of increasing number of dots,) you'll find that the pictures with 1, 2, 3, 4 dots are red, green, yellow, blue.
Click the buttons 4, 5, 1, 2 times and then open the compartment to find the last square tile.
Complete
Place all eleven square tiles into the device beside the door, then solve its randomized puzzle by rotating the tiles until they align.
Once you finish assembling this gorgeous photo of an elephant, the picture slides up to reveal a gold key, which unlocks the door so you can escape.
Hopefully this redo helps.
Amajeto Kids Room
(Rewrite of WhiteSwan3's walkthrough, with different formatting. I've tried not to change the puzzle order and descriptions too much.)
Exploration
On the first screen, you'll find an incomplete picture that you'll need for the end of the game. The teddy bear in the top left and the tower of rings (stars?) in the bottom right have the same color scheme, and you can take 2 puzzle pieces from them. In the bottom middle, four black handles open up colored compartments with numbered arrows, and after you take the puzzle piece there you'll find that only the red compartment doesn't have a clue.
Turn right to face the windows. Clicking around, you find that you can zoom in on the train (it has three numbered cars, so keep an eye out for a matching puzzle) and a cute piggy which seems hungry for some reason. Take 2 puzzle pieces near them. The three cupboard doors below have different locks, one of which looks simple enough to solve right away. (But we won't do that yet.)
Turn right to find the exit door, some colorful toys, and four fun-looking pictures. One of them is special:
The bottom-left picture tilts when you click it.
Turn right to face the TV. You can zoom in on the building blocks underneath to find a puzzle piece. The two cupboards at the bottom have very familiar-looking stuff on their locks.
Before we jump into the puzzles, you should check your inventory to make sure you have 6 puzzle pieces.
TV Cupboard Right
Ah yes, we've been waiting for this three-button puzzle. Now what was the train clue again...
The numbers 1 to 5 appear on the middle, left, right, middle, left cars.
Push those buttons, open the cupboard, and take the gold coin and puzzle piece.
TV Cupboard Left
A tricky one! The buttons cycle through various shapes, so look for those shapes!
The building blocks directly above the cupboard hold the answer. But which shapes go where?
The tower is made up of 1 star, 2 triangles, 3 rectangles and 4 squares.
Set the buttons accordingly (from left to right), open the cupboard, take a puzzle piece.
Let's follow up on some clues from the first screen.
Window Cupboard Left
These bars go upward, and the same colors (purple not blue) appear in the bottom compartments of the first screen.
Red compartment is empty, so leave that bar at the bottom.
Green shows 2⇑, so raise that bar twice.
Purple shows 1⇑, raise that bar once.
Orange shows 3⇑, raise that bar thrice.
In other words, click the bars (from left to right) 0 2 1 3 times.
Open the cupboard and take the puzzle piece and remote control.
Tilty Picture
A sequence of corners is provided by the bear and ring tower:
From top of the tower to the bottom:
Red = upper right (paw)
Blue = upper left
Yellow = lower left
Green = lower right
Yellow = lower left
In short: ⌝ ⌜⌞⌟ ⌞
Click those corners on the tilty picture, which comes loose, then flip it over and take a puzzle piece.
TV clue / Window Cupboard Middle
Use the remote to turn on the TV, which shows a clue with dots and an arrow.
Based on the number of dots and the remaining puzzles, you can figure out what's going on...
Unlock the middle window cupboard using word clues and the TV clue.
The two rows of dots represent the words Children and Room.
Which means the arrow passes through letters that spell LIME.
Open it and take the puzzle piece.
Hungry / Window Cupboard Right
Feed the gold coin to the piggy (bank), which winks at you. Of course, that's a code for the last puzzle:
From your perspective, the eyes wink in the order LRRLLR.
Push those buttons on the remaining cupboard, then open it and take the last puzzle piece.
Ending
Place all the pieces in the puzzle on the first screen, and rotate them to complete a picture of happy children.
Then take the gold key that appears and unlock the exit door!
Cake
The intro may be confusing, but the game page explains it well: you (a sheep) need to bake a cake for a worm who's never heard of one.
Mama sheep is happy to help you bake, but you'll need to find a bowl and wooden spatula!
Exploration
Back out to get a first look at the room, including the oven on the left that you're presumably not allowed to touch.
Turn right to find a pink fridge with some interesting notes attached. The lock on the fridge has buttons that don't work, as well as a panel fastened by a screw. There's also a red ladder to the right of the fridge, but it's high out of reach.
Turn right to find some yellow cupboards. On top of them, cutlery has been neatly arranged in colored cups (except for a fork that's just left on the side). In the top cupboard, you find a white bowl next to a box with three shape buttons and a picture of a fork. The bottom cupboard is locked and needs a key.
Turn right to face the locked door. A bag hangs on the hooks to the left, and you can take a pair of pliers from it.
Shapes
Use the clue from the top of the cupboards to unlock the box inside.
Judging by the position of the forks on the clues, the leftmost button (furthest from the fork) corresponds to the rightmost cup and vice versa.
Paying attention to the shapes of the cups, you find that the buttons (from left to right) need to show a square, pentagon, circle.
Click them 1, 2, 0 times and open the box to find the spatula.
Hand in the items, and you get the next request: flour, sugar and milk.
Also, you now have access to the ladder. Climbing it, you find four boxes. The lightest and largest one on the left has a small hole on its right face, as well as a battery placed near its left corner. As for the other boxes, the left one has two wires holding a bag of flour down, the middle one has four sliders with pictures of ingredients on them, and the right one is secured with screws on its corners.
Snip
Use the pliers to cut the wires in the left dark box, which lets you get the bag of flour.
Levels
Use the clue from the fridge to unlock the slider box.
The note with the egg on it is pinned higher than the one with the strawberry, which is higher than the one with the other two ingredients.
So click the leftmost slider twice and the middle-right one once, then open the box to find a golden key.
Unlock / Exploration 2
Use the gold key to unlock the door. Now you're facing a greenhouse which, according to the small nameplate by the door, is owned by a mole. A giant crate has a clue with pictures in squares, but when you open it you find a panel with three square holes, one outlined in red. To the right of the greenhouse, you spot a dark-colored mound of dirt.
Turn right to find a yellow-roofed house blocked by a layer of tall grass, too much for even a grass-eater to clear out.
Turn right again to face a red-roofed house, which (as the nameplate confirms) is where you live. The chest on the left has four buttons which gain more and more concentric circles when clicked, and the left button is marked with the drawing of a worm. To the right of your house, there's a table and four chairs all made from tree stumps, and the worm on the table will move around all over them when clicked.
Turn right to face a river with a blue-roofed house opposite. The bridge is incomplete so you can't cross, but you can still look at the colorful fish swimming on the left.
Circles
Use the worm's clue to unlock the chest to the left of your house.
Counting only the white circles on the logs, the ones that the worms climb onto have 3, 2, 1, 4 rings.
Since the buttons start with one circle around the outside and go up to four, you need to click them 2, 1, 0, 3 times. Open the box to find a screwdriver and another clue with pictures in squares.
Unscrew
Return home, climb the ladder, and unscrew the rightmost box upstairs, which contains the jar of sugar.
Also unscrew the battery compartment of the lock on the fridge.
And then insert the battery to activate its buttons, which show different-colored fish that grow bigger when clicked.
Fish
Use the clue from the fish in the river to unlock the fridge.
The yellow fish is large, the purple one is medium-sized, and the other two are small.
So click the leftmost button twice and the rightmost button once, then push the button to unlock the fridge and take the milk inside.
Hand in those three ingredients, and the next request is for a carton of eggs.
In case you missed it during the mixing, you were given a scythe at the end.
Clearing
Use the scythe to cut the tall grass, gaining you access to the yellow-roofed house.
The nameplate shows that this belongs to the chickens. Under it, there's a grid of squares with an arrow connecting some pictures.
The moment you enter the house, three chicks run away while the hen covers her eyes, and she continues to do so while you talk to her. For some reason, it's up to you to complete the game of hide-and-seek.
On the left side of the room, you see a large piece of wood nailed to the floor, and some egg cartons in the back that you can't take, but opening them up reveals that some of them are colored.
Search
It's time to look for those three chicks. Given that they're bright yellow and not very good at hiding, this shouldn't be too hard.
One chick is beside the greenhouse, another chick is standing on a fish, and the last chick is hidden between two of the log chairs.
Use them on the hen to get your reward: a carton of eggs.
Hand in the eggs, and now you get to watch the cake enter the oven. But it's the kind of oven that needs wood and a matchbox.
You got a round handle to help you progress.
Rotate
Use the handle on the light-colored box upstairs, which pops open to reveal some firewood.
After you take the wood, don't miss the silver key at the bottom.
Unlock 2
Still inside your house, use the key to unlock the bottom cupboard. You find a box with six color-changing buttons, or five if you don't count the top-left one which is stuck at black.
Six colors
Use the colors from the egg cartons (in the hen house) to unlock the box in the bottom cupboard.
Each of the five colored eggs appears in a different position in its carton:
None Pink Green
Blue Red Black,
but since we need to have black in the top left, the clue must be rotated accordingly:
Black(0) Red(2) Blue(3)
Green(4) Pink(1) None(0)
Click the buttons that many times, and then open the box to find a matchbox.
Hand in the items, and the cake is instantly baked. Now all you need is some cream.
And you got a shovel to help you out.
Dig
Use the shovel on the dirt mound beside the greenhouse, which reveals another treasure chest with four animal buttons (and a stuck star button).
Boxes
Use the three grid clues you've seen to unlock the chest you just unearthed.
The three grids are (1) on the crate beside the greenhouse, (2) in the chest beside your house, (3)on the wall of the chicken house.
All three include pictures of the chest and star drawn on, which allows you to align the first two grids to complete a grid of pictures:
Chest Cow
Mole Sheep
Chicken Star
The arrow on the third grid passes through the chicken, mole, sheep, cow pictures, so click the buttons on the chest 1, 3, 0, 2 times and then open it to find a crowbar.
Plank
Use the crowbar to remove the wooden plank from the floor of the chicken house.
(I know, I was expecting a trapdoor too.)
Then use the plank to extend the bridge so you can cross.
The house has a (cow) nameplate on the left and an intercom on the right that takes a four-digit code. It also has another treasure chest outside with the animal pictures above four teardrop-shaped dials.
Pass
You've actually seen the password for the intercom before, all you have to do is remember where it was…
Like any good reminder, it was posted on the fridge! The cow note has the number 7384, so enter that in the intercom to unlock the door.
The cow's all too happy to dispense some cream out of the steel machine, but it seems to be missing a red plastic thing. Browsing the shelves behind, you find that the milk bottles have their labels rotated differently, and one shelf only has a star painted on the back.
Pointer
Use the clue from the labeled milk bottles (and somewhere else) to unlock the chest outside the cow house.
The shelf of milk bottles has a star, and the chest mentions animals. Those things appear together in the clue you worked out for the previous chest!
However, the grids seem to have different sizes…
In this case, the correct solution is to fix this by rotating the previous grid:
Cow Sheep Star
Chest Mole Chicken
The sheep, chicken, cow, mole pictures point out the top-middle, bottom-right, top-left, bottom-middle bottles on the shelf, which have labels pointing up, down, right, up.
Click the second button twice and the third button thrice, then open the box to find the tap handle.
Give it to the cow, who finishes dispensing the cream and gives it to you.
Hand in the cream. The cake is looking pretty good, but it wouldn't be complete without strawberries and a candle.
This time, you get a note with a sequence of animals surrounded by colorful squares.
Visit
It seems you're short on clues and items. Who can you ask for help?
Following the sequence on the note, you should start with the hen. Clicking her gets you an yellow strawberry tile.
Next up, the cow gives you an orange strawberry tile.
Finally, revisit the chicks to get a pink strawberry tile.
Squared
Use the clue from the note to unlock the panel in the crate outside the greenhouse.
On the note, the square with the red outline is filled with orange, and the ones to its right are yellow and pink.
So place the tiles in the slots accordingly, and the greenhouse door opens!
Inside, you see a box with four animal buttons, a plot of nicely growing strawberries, and a mole with a blue basket who happily collects some of the strawberries for you.
Line
Use the clues from the nameplates on each house to unlock the box in the greenhouse.
Each nameplate is bordered on the left and right by striped patterns, varying in colors (both thin and thick) and direction.
Considering those factors, you find that:
The horizontal stripes on the left of the chicken only appear once,
The blue/yellow stripes on the right of the chicken also appear to the left of the sheep,
The red/aqua stripes on the right of the sheep also appear to the left of the cow,
The aqua/pink stripes on the right of the cow also appear to the left of the mole,
The horizontal stripes on the right of the mole only appear once.
This means the pictures and stripes can be fit together, in the order: chicken, sheep, cow, mole.
Click the buttons 1, 0, 2, 3 times and open the box to find a candle.
Hand in the last two items for a grand finale:
The worm gets a cake, and a party too!
I noticed
that I didn't need the sequence of colored squares surrounding the pictured animals in the note. If you remember which animal gave you which colored tile, you can place them in the chest in the order the animals show on the note.
Let's not waste the obvious pun: you should use this walkthrough as a last resort.
Resort Room
I can only imagine that every room in your friend's resort plays the same quirky music.
Exploration
The right side of your starting view is all sliding glass doors you can't do anything with, so let's follow the left wall. The huge bed with a metallic bedframe has a can of oil hidden under the right pillow. The top drawer to the left has a lock with three colored digits, while the bottom one has a grid of six buttons. On the other hand, the top drawer to the right is locked and has a keyhole, but the bottom drawer is unlocked and contains a hammer. Further back in the room, you can look at the billiards table, as well as the frosted glass cabinet which has a padlock on it.
(The wall painting seems to be of a familiar deserted island. And the clock seems to have stopped, since it's certainly morning. Right?)
Back out, and click the bottom of the screen to turn around. The laptop on the desk is passcode-protected, and you can move the chair aside to find a candle on the floor. Furthermore, you can then remove the carpet to find a locked trapdoor! The other wall has a picture with a grid of roman numerals, and removing it reveals a hidden compartment with a box that has both a circular hole and a square hole. Under that picture frame, you can click the right end of the low stone counter (where the flowers are, beyond the yellow line) to find a mysterious device marked with the word OIL.
Click the door to take a closer look at the entrance area. To the left of the locked door, two wall shelves are bent around, and the boxes on those shelves have a five-digit lock (but not really) and a four-picture lock.
The curtains on the left open into the bathroom, where you can enjoy the sea view over the low wall from the comfort of your pink bath. The hole in the right wall above the tub seems to be missing something. A bunch of flowers surround the super-shiny toilet bowl, which has a paper note stuck to the bottom of its lid.
Six squares
Use the clue from the picture frame near the laptop to unlock the bottom drawer to the left of the bed.
The roman numerals translate to
3 6
5 1
2 4
so click the buttons in that order (from 1 to 6) to open the drawer and find an object carved from stone. Clicking the object only reveals a bright cross drawn on the bottom.
Weakness
Use the hammer on the bottom of the stone object to find a yellow key.
Unlock (yellow)
Use the key to unlock the trapdoor hidden under the computer desk. You can take the ladder down, but it's completely dark in the basement except for the ladder and a small empty shelf next to it.
Copy
Enter the passcode from the piece of paper (119274) into the laptop, which displays an icon that you can click to bring up your check-in details.
Entry
Use the clue from the laptop to unlock the top box near the door.
To follow the same time format as the laptop, you need to click the leftmost button until it shows PM, then the other buttons to show 1647.
Open the box to find a metal key.
Unlock (silver)
Use the key to unlock the frosted glass cabinet, and take a billiard cue among the several stored inside.
Shot
Then use the cue on the billiards table. The balls are all spread out, and three of them are missing!
Oh wait, they've just rolled into the pockets and ended up on the side near the window.
Points
Use the clue from the sunk balls to unlock the top drawer left of the bed.
The orange, yellow, purple balls are numbered 5, 1, 4. (You may have known that already, but the game really wants you to do things in order.)
Enter that in the drawer and open it to find a toy bicycle which for some reason has a huge exhaust pipe.
Light
Some of the items you picked up fit on the OIL device under the roman numeral picture frame.
Place the toy bicycle on the left side of the device and the oil can on the right, then zoom in on the bicycle and push the big metal button to make it spew flames!
Light the candle on those flames.
Go downstairs through the trapdoor, turn around, and place the candle next to the ladder.
The additional light is just enough to help you find the light switch to the right of the candle.
Exploration 2
The room still seems as dark as before, but when you turn right you find some pictures of furniture on the wall, lit by tiny spotlights.
Turn right again. Instead of silhouetted pictures, the left rectangle has a spiral mollusk shell, while the right rectangle is a locked wall box with a keyhole.
Turn right to see more pictures of furniture.
Fragment
Use the hammer to break the mollusk shell, revealing a red key.
Unlock (red)
Climbing back upstairs, use the red key to unlock the top drawer to the right of the bed. Inside, you find a lever handle.
Shift
Place the lever handle in the hole in the bathroom wall, and pull it to the right.
This drains the tub, leaving only an object that looks like a miniature tree on a square wooden base.
Furnished
Use the clue from the basement to unlock the bottom box beside the door.
These table pictures are tricky, so I'll focus on the unique features of each. Using the ladder to orient yourself, you find that the pictures are of:
Top right: round table with cross-shaped frame and base
Bottom right: rectangular table with tripod base
Bottom left: square table with hoops
Top left: round table with low tripod base
Click the buttons
3 8
5 2
times, and open the box to find another tree-like object on a round base.
Ornament
You now have three items named "object". The two newer ones (with the trees) are identical except for shape, which suggests that you need to place them in the box behind the roman numeral picture.
After doing so, push the button to dispense a blue key.
Save your game.
Checkout Ending
Use the blue key to unlock the door and leave. Enjoy your coffee while listening to the extra-long ending music!
Unlock (blue)
Load your game, and use the blue key to unlock the wall box in the basement instead.
Inside, you find a red PUSH button, so push it. The sliding doors open, you rush outside into the fresh air, and…
Exploration 3
Your path forward is blocked by another set of glass doors. This exit seems to be controlled by the card scanner on the left.
Lifting the cushions from the chairs, you find a card hidden under the right cushions on the left couch, as well as a menu hidden under the cushion on the far right armchair.
Breakfast Ending
Use the breakfast card on the scanner, which asks you for three codes.
So use the remaining clues from the game to key in your order.
You can read the name and ID from the unlocked laptop, and the room number from the menu:
TARO

8864

3587
Enter that in the panel, and a delivery van shows up with your order!
Click on the man to end the game. You get to enjoy your breakfast in the room (also with long and relaxing music).
Update