
 Hi! Another week is over and the new Weekday Escape here!
You find yourself locked in Amajeto's peaceful room. After you escape it, you need to get through Shigeyuki Kagamura's old house which is a bit less inviting and darker...and the situation gets even glooomier then. Selfdefiant traps you in a cemetery and one more time in an asylum. Both are haunted...will you save your soul?
Have a good time and enjoy!
Amajeto's room is Charlie Chaplin themed this time. It's good looking of course, has nicely polished graphics and interesting puzzles. Can you find all the pieces of the last puzzle and get the key?
The cursor isn't changing, no save button, one ending.
Charming Shigeyuki Kagamura's game takes you to the traditional Japanese house and begins with dialogue in Japanese. Just skip it (if you can't read Japanese) and play...after you finish the first stage, there is another dialogue before the second one, and before the third one as well. You can easily get through without understanding a word. It's a good game with good art.
The cursor isn't changing, autosave - saves only finished stages, one ending. The game is at the bottom of the game page.
P.S. Here is interesting game by yasuhiro22: Escape Game: Search for Treasure. Not long, but atmospheric and pleasant. Some players experienced problems in the gameplay; and that's why it's just mentioned and not posted. Runs without any problem on my pc so it's not the game's issue but pc settings, probably.
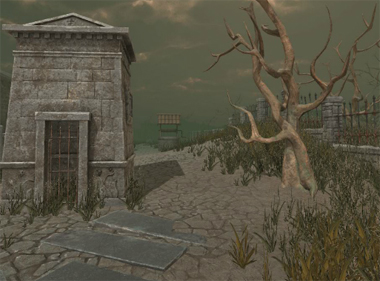
Nights are getting longer and days are getting colder...Halloween is coming, and here is the first thematic game - you are trapped in a Selfdefiant's cemetery, alone and lost, and not knowing how did you get there. It's a strange place, desolate and sad, you can't see properly because of a fog but it's not dark yet...trees are bare but the grass is green...are the trees dead? Is the cemetery real or some kind of nightmare? You need to find four gems to get the key and escape. Can you do it or stay there forever?
The cursor is changing, autosave, one ending.
Selfdefiant delivered new asylum heavily infested with evil, quite large (definitely bigger than it seems at the beginning) and mysterious. On your way through dark abandoned rooms and halls watch the cursor carefully as few important items are tiny and may be easily overlooked (but they are placed logically). Your first target is to get bright green bottle for orbs and then find a 'shop' to buy a map and some sacred objects which can be used against demons. Alas, only the minor ones. The chief demon can't be defeated so easily. You need to find five blood red gems and place them at the corners of the pentagram under hovering black shape. The foolish demon lets you - it obviously doesn't realize the seriousness of the situation! Ha!
The cursor is changing, autosave, one ending.
P.S. Another 'bathtub' with pink water you find in The Escape Hotel- Hot Spring by Tesshi-e.
We love escape games, and our readers love talking about them and sharing hints! How about you? Let us know what you think, ask for clues, or help out other players in the comments below.


these games look cool. Hope the walkthroughs come soon.
chrpa/Jeff: The tags seem to be missing from this post. (Also, tag pages are out of date by over half a year.)
Limelight
For once, you don't have to be the star of the show.
Exploration
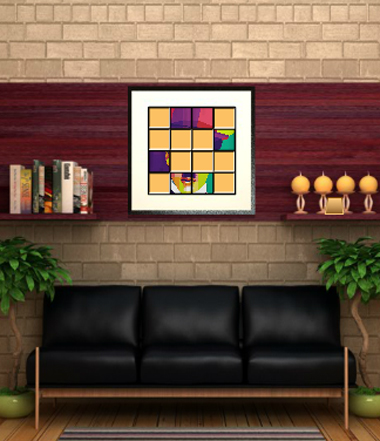
Above the bench with leather cushions, there's a picture divided into a grid with several tiles missing. The wall shelf on the right has a square tile leaning against some bulbous unlit candles.
Turn right to find, from top to bottom, four identical portraits in different colors, a row of colored books with a square tile, and a projector that pops out a disc tray when you click it. All the books are the same, showing a clue with an arrow connecting four dots, and you can flip the right page to view another clue with a square and some lines.
As you might expect, one of the pictures is tilty. That's right, the yellow picture tilts when you click its corners.
(You might also spot a tiny inconsistency, but that's an error you can ignore.)
Turn right. There's a locked exit door and a small window facing out, but you can also zoom in on the couch to take a closer look at the wooden figure beside a square tile as well as a green word on the wall.
Turn right. The right area here is actually a projector screen, but it has four columns of horizontal lines drawn on it. Under it, a cupboard has five locked narrow compartments (with handles at their tops), and their locks have:
four letter buttons,
four pairs of large and small square color buttons,
four colored digit buttons,
two colored buttons,
and four dials.
A white box on top of the cupboard has four sliders and four arrow markings at its corners, and you can pick up a square tile next to it.
Two colors
Use a clue from the books to unlock the fourth compartment.
From left to right, the books are purple, green, green, purple, green, purple.
Since purple is on the right and green on the left, click the RLLRLR buttons and open the compartment to find a square tile.
Directions
Use clues from the books and slider box to unlock the rightmost cupboard compartment.
On the first page of the book (or each book), the arrow runs from the top right to bottom left to top left to bottom right.
The circles in those positions on the slider box contain arrows that point in the ↗↘→↓ directions.
So click the dials 1, 3, 2, 4 times to make them point in those directions, then open the compartment to find another square tile as well as a lighter.
Light
Examine the lighter and click to open it.
Now you can use it to light the candles on the first screen. Each candle displays a number when lit.
Sliders
Use the clues from the candles to unlock the slider box.
The candle numbers tell you how high/low each slider should be. For example, the leftmost candle is numbered 3, so the leftmost slider should be at the third spot from the bottom.
Unsurprisingly, this means the sliders (from left to right) must be 3rd, 2nd, 1st, 4th lowest. Click them 2, 1, 0, 3 times.
Once you have the correct pattern, you hear a click, the sliders can't move anymore, and when you back out you find that the spotlights/limelights above the screen turn on.
(You could reverse the logic and still get the same answer, but I think this makes more sense.)
Four-colored
Use the clue from the lit screen to unlock the middle cupboard compartment.
Counting the horizontal lines, you find that there are 5 yellow, 3 blue, 6 green, 2 red.
Enter 5362 into the lock and open the cupboard to find a square tile and shiny disc.
Load
Place the disc into the projector, and it shines a bright beam across the room.
When you look at the screen you find that the colors and lines from before are gone, replaced by a flashing clue consisting of a familiar silhouette and number.
Seated
Use the clues from the projector and couch (beside the door) to unlock the leftmost cupboard compartment.
The picture part of the clue is a hint to look at the nearby word:
limelight.The 8th, 4th, 5th, 3rd letters of that word spell out the clue HELM. Enter that in the lock, open the cupboard, and take the square tile from inside.
Directions 2
Use clues from the books and slider box to unlock the tilty picture.
On the second page, the five lines in the clue are either vertical, diagonal (up or down) or horizontal.
Those lines are drawn with ↓↓↗↘→ movements, and the circles with those directions appear on the ⌟⌟⌝ ⌞⌜ corners of the slider box.
Click those corners of the yellow picture, and you find that all the pictures tilt slightly. You can now flip them over to find a square piece and small colored squares.
Eight colors
Use the clue from the framed pictures to unlock the second cupboard compartment.
The pictures have colored squares on both sides:
Front/Large: Blue(3) Red(2) Yellow(1) Green(0)
Back/Small: Yellow(0) Green(2) Blue(1) Red(3)
Click the buttons that many times and open the compartment to find the last square tile.
Complete
Place all 10 square tiles into the picture device on the first screen, which activates a randomized puzzle where you have to rotate the pieces to complete the picture.
(Hint: If you seem to be done with the picture, watch out for the bottom corners.)
Once the picture is complete, it slides up to reveal a blue key, which you can use to open the door and leave!
Old House
(Hints, but not codes, are in Japanese under the game.)
Two boys visit a crumbling old house that's rumored to be haunted. Is there truth to the rumor?
Stage 1
Well, at least one of you is excited about going in!
Exploration
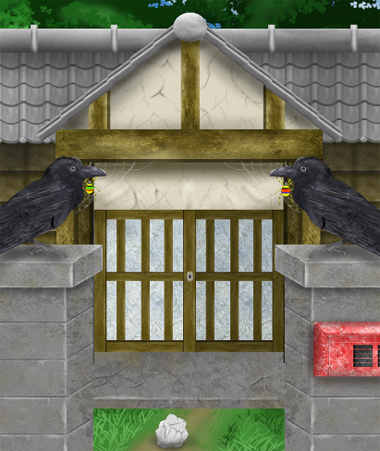
After the intro dialogue, you're left looking at the narrow gateway (with no gate) with crows on both sides. The red mailbox on the right has ten black buttons that change color when clicked.
You also see a crumpled paper ball on the ground, and unfolding it reveals that it only shows two columns of feather markings.
As you approach the locked main door, you notice two brightly colored things: giant spiders, attached to webs at the corner of the porch frame.
Stripes
Use the clue from the spiders to unlock the mailbox.
Each spider's body is split into five colored areas from top to bottom:
(Left / Right)
Yellow(4) Yellow(4)
Black(0) Black(0)
Green(3) Red(1)
Red(1) Blue(2)
Yellow(4) Yellow(4)
Push the buttons that many times, which opens the mail flap. Some paper strips with arrow marks hang out of the opening.
Points
(Select the paper strips at the top left, and) Place the strips on the unfolded crumpled paper, which makes the arrows point to some of the drawn feathers.
Use that clue to unlock the crows on the gate.
From top to bottom (which follows the arrow direction), the arrows (and the feathers they point to) are on the RRLLLR sides.
Zoom in on the crows and click them in that order, which makes them vanish, leaving behind a large metal key.
Despite the Escape Key label, it actually unlocks the main door so you can enter and complete the stage.
(From the clear screen, click once more to access level select, then click the second/middle small picture for stage 2.)
Stage 2
Nobody seems to respond when you call out, so all you can do is explore further.
Exploration
A huge nest of honeybees hangs overhead, and somehow you get brave enough to take a closer look.
You also see a cupboard (actually a shoe cabinet) on the right, and clicking on it changes the view. There's a calendar dated all the way back to 1950, and it has some weird markings on its left side and on the cupboard, which has more of those markings on the four-number lock.
Back out twice to view the main door. Those scary spiders are gone now, but there are no new clues to replace them.
Back out again to the gate, where you find a three-digit box on the ground with buttons of different sizes. The mailbox has now been boarded up. (How did they even drive nails into a metal mailbox?)
Sizes
Use the clue from the bees' nest to unlock the box on the ground outside.
Looking carefully at the bees, you find that they come in three sizes.
Since there are 4 medium, 3 small and 1 large, enter that into the box to open it to find a crowbar.
Pry
Use the crowbar to remove the board from the mailbox.
There are even more paper strips here!
Spots
Place the paper strips on the cupboard clue, which covers up two-thirds of the numbers.
Use the remaining visible clue to unlock the cupboard.
Treating the shapes on the left as a separate column, counting three squares right from ◯ gets you to the number 3 on the calendar, and counting two squares down from that gets you to the number 17.
Following that logic, each row of the cupboard clue indicates a different number on the calendar: 17, 9, 15, 10.
Click the buttons until they show those numbers, and the cupboard opens just enough for you to take a can of bug spray that claims to drive bees away.
Clean
Use the spray can to get rid of the bees. Once they're gone, the sliding door opens and you can progress to the next stage.
Stage 3
Someone is in this room! After you apologize for intruding, she apologizes for the house's poor appearance, and explains that she left recently without saying goodbye, and came back to do so.
But the old lady is still looking for something: a purple flower her father gave her three days before his death. So you offer to help look for it to make up for trespassing.
Exploration
Clicking on either the vase or on the old lady, she reminds you that it's a really pretty purple flower.
Start off your new mission in this traditional room by examining the photo frame on the left. The picture has been torn in half, and there's a red arrow running clockwise around the frame.
Back out. The nest is completely gone, and there are some weird marks on the ground below. You can still turn right to look at the cupboard, which now has a two-button lock, and its calendar has a different set of markings on it.
Back out (twice) until you reach the gate. The mailbox has been shut yet again, and this time it has a four-number lock.
A spot on the ground seems to have dried and cracked up.
Dotted
Use the clues from the calendar and the ground nearby to unlock the mailbox.
You may recognize the symbols as a pigpen cipher: by locating the shapes from the ground clue on the calendar and then looking for the numbers where the dots would go, you find that the indicated numbers are 14, 30, 16, 4.
Enter that into the mailbox to open it, and take the torn photo that sticks out.
Photograph
Place the torn photo you picked up into the photo frame in the house.
Then use the clue from that to unlock the cupboard.
The red arrow passes next to the six crows along the edge of the photo, which face the RRLRLR directions.
Push those buttons to unlock the cupboard, and take the shovel from inside.
Find
Use the shovel on the cracked earth outside, and you uncover the purple flower in perfect condition!
Scared boy recognizes this as a Chinese bellflower/balloon flower, representing eternal love. He read about it at the library.
Ending
Give the flower to the old lady, who tells you that it was the very first present she received from her father.
After she thanks you, she fades out of the cutscene and vanishes from the room. Click once more to end the game.
Haunted Cemetery Escape
The fog makes it hard to find things, so you should pay close attention to the changing cursor in this game too.
Exploration
The only area you can click on the first screen is the angel statue. Since you're (and I'm) not interested in deciphering the faded runes, just open the panel to find a red gem.
Click the arrow at the bottom of the screen to turn around. The gate has a gold padlock. You also find a crowbar near the right edge of the screen.
Turn back around. Going forward to the tall tower, you find that its door is locked.
Back out and go left to the colored coffins beside the tower. The middle light-colored one catches your attention, but it's nailed shut.
Go right twice to a small building with a bronze lock on its gate.
Go forward. The well is missing a handle, the windows on the left have symbols under them, and the nearest coffin to you has a skeleton missing a bone.
Go forward. There seems to be nothing here, but you manage to find a bone at the bottom left.
Go forward. The coffins seem uninteresting, but you can take the ladder resting on the building at the right.
Go forward. For some reason you're interested in this particular coffin, but the lid is too heavy to move.
On the left side of the fence, you find a handle nearly hidden on top of the brick wall.
Lift
Use the handle on the well, and turn it to bring up a bucket with a blue gem inside.
Missing
Place the bone in the skeleton (near the well), and a bronze key appears in its hand.
Unlock (bronze)
Use the key to unlock the small building. Inside, there's only a chest with three dials.
Symbols
You've seen all three symbols required to open the chest, even if you don't remember it.
While looking at the skeleton near the well, you get a good view of the symbols: a heart key, a heart with cross, and a triple spiral.
Click the dials 1, 5, 2 times and open the chest to find a bottle of green potion.
Pry 1
Use the crowbar to lift the lid of the stone coffin, where you find a skeleton with an iron key.
Unlock (iron) / Exploration 2
The game has forgotten to tell you which lock is iron, but you manage to figure out that the iron key unlocks the door to the tower.
The inside is really dark, and the changing cursor fails you by not pointing out the hammer on the left bench.
Walk forward to the altar, which has a red old book on top and some unlit candles to the right.
Back out and turn right, which puts you facing the door. You can't leave from here, but when you click the wall the game tells you that you need to climb up somehow.
White
The book is completely blank, but when you flip to the end you find a lighter inside.
Use the lighter on the candles, which makes a yellow gem appear.
Climb
Place the ladder against the wall and climb up. It seems you can't do anything with the bell, but the chest on the right side has four empty slots on its lock.
Pry 2
Use the hammer to remove the nails and open up the wooden coffin. It's full of webs!
Dissolve
Use the green potion to remove the webs, revealing a skeleton with a green gem.
(I know it would make sense to use fire here, but the game doesn't allow it.)
Complete
Place all four gems (in any order) in the treasure chest at the top of the tower, and open it to find a gold key.
Use the gold key to unlock the gate and escape!
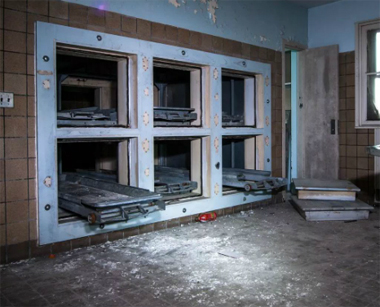
Derelict Asylum
Reminder: your inventory has a top and bottom that you can scroll between, and you can rearrange your inventory by moving items into empty slots.
Initial Exploration
You start off in a room with lots of square holes in the wall, with rails in those holes… those are refrigerators of a morgue, with their doors lying in a pile on the floor! Checking them carefully, you find a silver key in the top middle one. The slightly shattered window lets the winter chills in, and there are purple orbs everywhere.
After (clicking the up arrow and) unlocking the door, you're at the bottom of a staircase with some unusual graffiti. The metal panel on the right is screwed shut.
Go west to a corridor with strange noises. The south exit from here is a locked skull door.
From here, go north twice to a vaulted area with a green sacred jar, with which you can pick up 3 purple orbs by hovering over them.
(I'll write how many orbs I found on each screen in parentheses. Pick up all of them!)
The east door from where you got the jar has a purple keyhole.
So go west(4) to a very greenish corridor that smells bad. The north door here has a gold keyhole.
Go west(3) to find an unusual bed/chair. Your interest quickly turns to fear when you see the electric generator beside, but you stay calm enough to pick up the hammer under it.
Backtrack by going east twice and then south(4). The door to the west has a green keyhole, and you can peek into the east room which is too dark to see anything.
Go south to the vaulted noisy corridor(3), then finish backtracking by going east(3) and south(3).
Go north and west twice(4). A single bedframe stands in the center of this huge room.
Which distracts you from the batteries hidden on the windowsill just above the rightmost leg of the bed.
Go west(3). With the help of your changing cursor, you find some unlit candles and an X under the lifelike painting on the wall.
Smash
Use the hammer to smash the X-marked brick wall, and take the green key that was hidden there.
Green
Go east twice, then north, then unlock the west door using the key.
This room(3) is disturbing enough to make you want to leave immediately.
But then you'd miss out on the flashlight in the bottom-right corner.
Bright
Go east twice to the dark room. Insert the batteries into the flashlight, and use it to light the room up.
This room(3) is full of stuff, including a cryptic clue, some sort of registration card, and a red drawer handle. Opening that drawer, you find a purple key.
Purple
From the dark room, go west and north to where you got the jar, then unlock the east door using the key.
This corridor(4) passes by some spells, and you can hear whispers coming from the second one.
Focus on pixel-hunting, and you'll find a screwdriver on the windowsill.
Go north(3) where a hooded figure appears in a puff of smoke. It's the Orb Shop!
You should have enough orbs to buy the first and last items: a map and a crystal ball. (Strongly recommended for exploration, and I'll assume you have them for the rest of this walkthrough. However, they're technically optional and you can ignore them to save on orbs.)
As long as you own the crystal ball, clicking any room you've visited on the map lets you teleport there.
Unscrew
Leave the Orb shop (and the sad ghost) behind, and go to E.
Use the screwdriver to remove the panel, and take the gold key from inside.
Gold
Go to J, and unlock the north door.
This puts you at N(3) where you can view an impressive painting on the wall. The east door here has a blue keyhole.
Go west to M(3), which has a familiar message among the graffiti on the wall. Pick up the old book in the bottom-left corner. It has a five-letter lock on it.
Go east and north to Q(3). You can't seem to find anything of interest.
You find a lighter to the left of the three metal containers on the windowsill. Unfortunately, this one is empty.
Words
Use the clues you saw at H to unlock the book you picked up.
The registration number on the card has the only thing written in red, and it's made out of five small numbers.
You'll need to convert that to five letters for the book code, which means the red text on the crate is a clue for how to do it.
A is the first letter of the alphabet and not the fourth, but you can fix that by subtracting 3 from 4.
That means, that the number 6 (that the registration number starts with) represents the 3rd letter in the alphabet, which is C.
Repeating this for all the numbers, you get the code
CLOSE. Enter that in the book and open it. Flipping through, you find some (familiar?) text, a few blank pages, and a blue key on the second-last page.Blue
Go to N and use the key to open the east door.
Room O(3) looks like a chemistry lab, and you find some lighter fluid in the nearby cabinet.
Flame
Use the lighter fluid to fill the lighter, and use it to light the candles at B.
The candles go out if you light them in the wrong sequence. I don't see any clue for this, but you can get it by trial-and-error because any candle that doesn't go out must be lit correctly.
Light the 3rd, 1st, 5th, 2nd, 4th candles from the left, and a skull key appears.
South
Go to D and use the key to unlock the skull door to the south.
More Exploration
Instead of the exit, you find yourself in a large hall(2). A black thing floats above a red pentagram drawn on the floor (which your cursor changes over certain parts of).
All the other rooms are missing from the map (which shows you at V), but you can still access them by going south. (I know that calling it "south" is inconsistent, but I'm going to stick with that convention.)
Go west to U(0), the weird camera angle lets you appreciate how reflective the shiny floor is.
Go west to T(0). The right table is cold, but you see a clue on the wall above it, as well as a rubber glove on the left table.
Go east and north to Y(4). The chest here has a grid of buttons and three starry lights (and a switch at the bottom).
Go south twice to S(2). You might not want to look down this stairwell, except to read the clue on the left wall.
Go south to R(3). This mysterious area has a vat of green liquid with a red gem in it. (Let's leave it alone for now.)
Teleport back to V, and go east to W(3).
Go east to X(3), where some keys on the piano are helpfully labeled.
Go west and north to AA(4). Perhaps the knocking sound is getting to you, but this room seems a little tilted.
Go west to Z(3), where you find a nice bath tub that sadly doesn't fill with any kind of liquid. The mirror on the wall is already misted and has a clue written on it in red, while the box on the side table has a six-digit lock.
Go east twice to AB(4), which is occupied by a green spirit.
Go west and north to AC(4). This locked door is different but looks eerily similar to the others.
Protected
Use the rubber gloves to retrieve the red gem from the barrel at R.
Grids
Use the clue at T to unlock the chest at Y.
(Hint: it will help a lot if you teleport to T while looking at the chest.)
I won't copy the grids here, but you need to enter the grids in a particular order. (Push the buttons corresponding to the green squares.)
Enter the top-left grid and click the switch, turning the left lamp on.
Do the same for the top-right grid and then the bottom grid.
Once done, the chest opens and you find a red gem.
Player
Use the clue from S to play the piano at X.
(You can teleport for this one too, but if you mess up you might have to revisit the piano.)
Following the clue in the stairwell, push the keys marked FEGDAB, which makes a red gem appear.
Underworld
Use the clue from the mirror at to unlock the box next to the bath tub (all at Z).
When the words in the mirror are turned upside-down (not mirrored), they form the code 773451.
Enter that into the box and open it to find a black key.
Black
Go to AC, and use the key to unlock the north door.
This puts you at AD(3), where another green sprit is really ruining the mood. Despite what the game says when you click the chairs on the right, you won't just get rid of it through prayer.
Spirits
It's time to revisit the Orb Shop! (Click the purple bar to check that you have all 50 of the remaining purple orbs first.)
Go to V and click the down arrow to return to D, then make your way back to P.
Buy up the sacred dagger and sacred cross from the Orb shop, clearing it out.
Make your way back to AD, and use the dagger to remove the spirit there, who drops a red gem.
Do the same at AB: cross on spirit, get red gem.
Star
At V, place all five gems at (or slightly above) the points of the red pentagram.
Once you finish, a bright beam removes the demon. The way north is now open, and going there ends the game!
The flashlight in Derelict Asylum seems to behave weirdly:
Its glow effect can be used in any room, and
remains when you move the flashlight to an empty inventory spot (or open the map, or read the book)
resets/deactivates if you then select any item and click it again to deselect.
but it also
vanishes when you switch from holding the flashlight to holding another item (or vice versa)
after doing so, doesn't come back when you reselect the flashlight,
unless you reset it by deselecting or moving any item.
Now that's insanity.
confused on towards the end of Derelict.
the second or 3rd spoiler says to make your way back to AD. at this point, i have no idea how to get back to that 2nd half of the map. Anything i'm doing wrong?
The way there is
same as how you got there the first time: go to D and go south, and you should reach the second half.
Thank you for noticing and letting know.
Update