
 Welcome to the new Weekday Escape!
Amajeto's lets you play for a while with chess pieces and accessories, and after you escape from their room, Maymay locks you in another one where is enough puzzles and codes to keep your mind busy for a while. Now you should be ready for tomoLaSiDo who prepared a room full of puzzles too and wants you to be creative about hints. InkaGames in their adventure game shows you how dangerous are witches and remind you that even surely dead ones may return and attack again!
Have a good time and enjoy!
Homely Amajeto's room is ready for autumn activities like playing chess or reading by a fireplace...if there was any fireplace, of course. Seems that only chess is left, so look around, examine all the chess pieces scattered here and there, the chess board too, and start collecting the tiles. Can you get all of them? Will you win?
The cursor isn't changing, no save button, one ending.
P.S. Here is older game by the same devs, Chess Swap Escape.
A new game by Maymay arrived after the whole year and it's very welcomed! Their classic escape consists of three scenes as usual and each of those contains several puzzles. You need to figure out many codes to open all the drawers and cabinets; the hair clips you are looking for could be anywhere. At the end you'll get a chance to be a stylist for a while!
The cursor is not changing, no save button, one ending.
tomoLaSiDo fluently switched to Unity and seems that not much changed. Only obligatory bathroom with graffiti is missing and there are no items to collect this time - that pot plant you find is just a gift to you. On the other hand, there are more puzzles than usual and some of them are a challenge indeed - 'thinking out of the box' is required and also the realisation that some hints can be interpreted in more ways...
The cursor is not changing, no save button, one ending.
Four years ago, InkaGames released an adventure game about Coraline and her big and brave fight with evil witch (based on Neil Gaiman's novella). Earlier this year was released a remake, with slightly changed graphics and the protagonist's name (Coraline changed to Geraldine) and now we get a sequel. You don't need to play the previous game (the link below) but some situations or hints make more sense if you do.
Witches, as is their nature, die hard. Even if defeated, they tend to rise from dead and bother again - and that's exactly what happened to poor Coraline aka Geraldine. The witch who had threatened her and was totally beaten attacked again and targeted weak spot, Coraline's good friend. Can you help her to find him and liberate him?
The cursor is changing, save button, one ending.
P.S. Here are original Coraline and the Secret Door and its remake Geraldine and the Small Door. I played only the remake and it's quite a long adventure game for patient players. Nice story and art.
We love escape games, and our readers love talking about them and sharing hints! How about you? Let us know what you think, ask for clues, or help out other players in the comments below.


this is gonna be cool here. Especially MayMay. little nervous though on Inka because it tends to have ways to die in it but i'll try it.
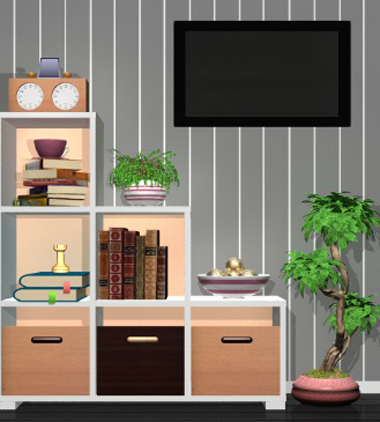
Amajeto Chessmate
Exploration
You start off facing some shelves and a TV that's turned off (and lots of stuff that doesn't help you escape). The cupboards at the bottom have locks with four digit buttons, four color buttons with chess designs, and four buttons arranged in a grid. The chess timer at the top left does something weird when you push its right button, but you can take a square tile near it. And the only other chess thing here is a white rook balanced on some blue books, which you can lift to find a number printed on its bottom.
Turn right to find three chess pictures on the wall over a shelf, couch and side table. The table has a red knight piece, and its drawers have four lettered color buttons and sixteen buttons in a grid. The pink basket on the shelf holds a square tile.
And the lowest framed picture tilts when you click its corners.
Turn right to face the locked door, a picture grid with missing tiles, a word on the wall over the armchair, and a tall shelf. The only interesting thing on the shelf is the green bishop in the top compartment.
Turn right to face some windows and two chairs placed around a chessboard, which has a square tile and a blue king, both much larger than the five pieces on the board.
Four points
Use the clue from the chess clock to unlock the right cupboard under the TV.
The needle on the clock rotates to the upper-left, lower-right, lower-left, upper-right, upper-left positions.
So push the ⌜⌟ ⌞⌝ ⌜ buttons and open the compartment to find a square tile.
Colored pieces
Use the clue from the colored chess pieces to unlock the middle cupboard under the TV.
The rook, knight, king, bishop are yellow, red, blue, green.
Click the buttons 0, 1, 2, 3 times, then take a square tile and remote control.
Screen
Use the remote control to turn on the TV, which shows four letters on its corners.
Use the remote control on the TV again to view a mathematical clue with chess piece variables.
Use it once again to view a clue with two yellow squares.
Corners
Use a clue from the TV (and elsewhere in the room) to unlock the tilty picture.
The letters of CHESS appear in the ⌝⌟ ⌜⌞⌞corners of the TV.
So click those corners to make the picture come loose, then flip it over to find a row of colored rectangles.
Colored letters
Use the clue from the tilty picture to unlock the top drawer under it.
The rectangles on the back of the picture represent the letters of CHESS, which means the E, S, C, H letters are represented by yellow, green, red, blue.
Push the buttons 1, 6, 3, 2 times, then open the drawer to find a square tile.
Math
Use the clues from the TV and the room to unlock the left cupboard under it.
Using the numbers on the bottom of the pieces, the formula works out to
9×7×8×6 = 3024.
Enter that into the cupboard and open it to find a square tile.
Grid
Use the clue from the chessboard (and TV) to unlock the bottom drawer beside the couch.
All of the pieces fit within the inner 4-by-4 square, occupying its
P---

--br

-B--

---p
Click those five buttons and unlock the drawer to find the last square tile.
Complete
Place all nine square tiles into the grid by the door, which activates a randomized puzzle which you can solve by rotating the pieces until they align.
Once you complete this quirky picture, it slides up to reveal a gold key. Use it to unlock the door and escape!
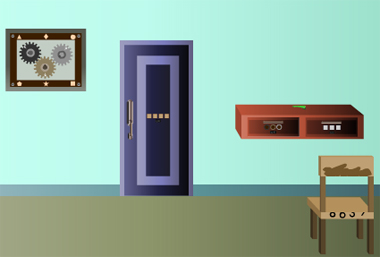
Find 5 Hair Clips
Exploration 1
The first screen here has a locked four-digit door, on the left of which is an unusual picture frame with shapes and screws and gears and arrows.
On the right side, two drawers are mounted on the wall, and they have three colored shape buttons and three fruity buttons on their locks. Take the green hair clip from them.
Under that, there's a chair with some unusual markings and a stained area.
Shapes
Use the clue from the picture frame to unlock the left drawer.
The black, brown, gray gears have arrows pointing to the triangle, star, circle.
Set the buttons accordingly, and open the drawer to find a piece of cleaning cloth.
Clean
Use the cloth to clean up the chair, revealing more markings.
Then use that clue to unlock the door.
Ignoring the empty space, the top and bottom markings on the chair combine to form the code 8639.
Enter that into the door to unlock it.
Exploration 2
A female head with long hair is placed on a stylish column/table in the middle of the screen.
On the right, the locked door has triangles on its buttons.
The top left shelf has three wine bottles with different shapes, flavors and label colors. As the changing cursor points out, there's something special about the bow tied on the middle one.
Underneath, a cupboard has two locked doors. The left requires a key and the right has three colored number buttons separated by colons.
Fruits
Use the clue from the wine bottles to unlock the right drawer on the first screen.
Make the buttons show grapes, a blueberry and apple by clicking them 3, 5, 2 times, then open the drawer to find a gold key.
Use that key to unlock the left cupboard door on the second screen.
Inside, you find a blue hair clip, a glue gun, and a clue with four ducks.
Triangular
Use the clue you just saw to unlock the door.
The ducks beaks point:
Right (1) Up (0)
Down(3) Left(2)
so click the buttons that many times and open the door.
Exploration 3
The door here has a five-color lock. On the right, a clock doesn't seem to be working and you can open it up to view the clockwork with one cog missing, as well as a clue with six colored dots.
Under the clock is a cupboard, which has several locked parts:
Red box on top: four digit buttons
Top drawer: three lettered buttons
Bottom drawer: grid of six buttons
Right door: four letter buttons
Assortment
Use the clues from the clock (third screen) and bottles (second screen) to unlock the top drawer (third screen).
The red, blue, blue, purple, blue, purple bottles are labeled with the letters ABBGBG.
Push those buttons and open the drawer to find a paper note held closed with a yellow hair clip. After removing it and unfolding the note, you see shaded shapes and an instruction to add a percentage.
More shapes
Use the clues from the note and picture frame (first screen) to unlock the bottom drawer (third screen).
The circle, pentagon, square, diamond appear at the top right, bottom left, bottom right, top middle of the frame.
Push the buttons in those positions, then open the drawer to find a screwdriver.
Unscrew
Use the screwdriver on the picture frame to remove its cover, leaving a pink hair clip and some gears.
Clicking on the gears, you find that the middle brown gear comes off.
Clockwork
Place the gear into the clock, then close it and back out.
Back out once more and reenter the third screen, which now shows a different time.
Use that clue to unlock the right cupboard door on the second screen.
As indicated by both the clock and the lock, the blue, green, red hands/numbers represent hours, minutes and seconds. Based on the numbers available on the blue button, the time shown must be in a 24-hour format and at night.
Enter 23:35:15 into the cupboard door and open it to find a pair of scissors.
Snip
Return to the second screen, and use the scissors on the head to cut its hair.
Also use the scissors to remove the blue bow from the middle bottle.
Text
Turn the bow over and apply the glue to it, then place it on the head (or rather, the bust).
That's not just a word, it's a code!
Enter GIRL into the right cupboard door on the third screen, and open it to find a barcode scanner attached to a large screen.
Price
Scan the note (by using the note on the scanner) to view the price of something.
Then use that clue to unlock the red box (on the third screen).
As the note says, you need to add 10% to the value shown, which means the final price is 3150×(110÷100) = 3465 yen.
Enter 3465 in the box and open it to find a light blue/aqua hair clip.
Clips
Back on the second screen, place all five hair clips on the head.
You should then see a clue that helps you unlock the final door.
The order of the clips on the head is aqua, yellow, green, pink, blue.
So click the buttons 5, 3, 4, 1, 2 times, then open the door and leave!
I too am getting real nervous about Geraldine, but it's because I had to use the video walkthrough a total of 10 times (plus too many to count for the first game). Some of these I consider to be pixel hunts or logical failures, so let's see if I can write helpful hints for it.
I played the Geraldine remake and it was good. I did have to resort to a video walkthrough to finish. But it was still a good game and a very long one. I did not like the timer bit. I died a lot. It helped a lot to have either read the book or seen the movie.
Return of the Witch - is not as good. Again the timer bit. Got tired of dying and resorted to a video walkthrough. Even that did not help. I couldn't see the logic of some of the puzzles. The one with the three dwarfs completely eluded me.
I was dying more than I was playing. That can be attributed to me being old maybe confused and my mouse clicky finger isn't what it used to be.
All of that said, I thought it was cute, sometimes funny, and the graphics were really nice. They followed the theme of the movie. Especially in the remake of the first game, it followed the movie graphically and with the dialog.
Overall a nice game.
PS: In the remake of the first game - the two old ladies acrobat scene was spot on with the movie. :)
I couldn't decide whether post Geraldine or not (for the reasons you mentioned) and was postponing the decision until last possible moment.
But I didn't find better game and thought that other players may find this one easier than I did (and they maybe don't hate timer in games as I do). I'm sorry for the trouble with walkthrough.
as mentioned in my original post, i was nervous about playing Geraldine because inka games causes a lot of places where you can die. i know a few months ago i had it a lot. but last week or the week before, it wasn't as bad and i think it only happened like 5 times. Sounds like i might not like this one but i will try.
Escape Challenge 95: Room with Echeveria
グリムワン ("Grim One"?) appears, on a quick internet search, to be the name for
× Graptoveria 'Opalina', a hybrid between Echeveria colarata and Graptopetalum amethystinum.
…which means this game's topic is cacti. However, you'll have to play quite a bit before you even get to see one.
Some notes about the Unity version
(It actually runs on WebGL, so don't try to install any plugins for it!)
You may notice higher CPU usage for Unity, which is a general trend for such games. If you're not actively playing, you might want to leave the game in a background tab or minimize the browser window to reduce power consumption.
Note that the changing cursor is gone. Similarly, those of you who've been abusing the Tab key to find all the hotspots in Flash will have no such luck here.
The blue rectangle markers for changing screens now fade in with a quick animation. But they should still be impossible to miss, and they're in the same positions you're used to.
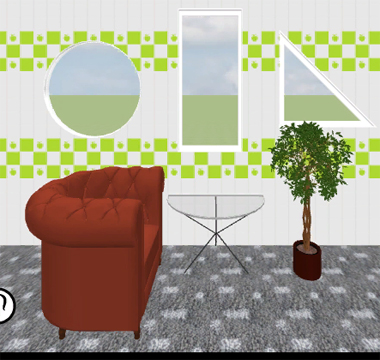
Exploration
You start off facing three windows with different shapes over an armchair, a semicircular table and a potted plant. You can zoom in on the armchair to find a clue, and the paper on the table is a familiar looking challenge note.
Turn left to find a wall clock, a picture frame with lots of numbers, a blue bin that's toppled over, and a chest of drawers, the top having three digit buttons and the bottom having nine buttons with stars arranged around a stick figure.
Turn left. The locked door has an exit sign above it, although it only shows a single vertical line. There's another framed picture here with a line passing through triangles and ending in an arrowhead. Next to it is a three-digit wall box, and underneath is a shelf with nine compartments. Each compartment contains an item, but the cover on the middle one has an arrow and slides when you click its sides.
Turn left to find another wall clock, picture frame with numbers, toppled blue bin, and chest of drawers, all of which seem to be mirror images of the ones you saw before. However, this clock has three buttons to adjust it, and on this chest of drawers the top one has three numbered color buttons and the bottom has a toggle switch and a circle button.
Arrow
Use the clue from the picture above the shelves to unlock the arrow cover on the middle shelf.
Hint: you need to move the cover exactly six times.
As the arrow suggests, the order of the triangles must follow the path shown on the picture, from bottom right to top left.
However, the path doesn't always proceed in the leftward direction.
So to find the code you need to first mentally unwrap the path (carrying the triangles with it) until it's straight. For example, the second triangle points right on an upward segment, so when that segment rotates to point left the triangle would then be pointing up.
Following that pattern, the sequence of directions you need to enter is UURDRL. Click those sides of the cover to make it come off.
Miniature
Use the clue from (all nine of) the shelf compartments to unlock the bottom drawer on the non-reversed side.
Hint: if you think you have the answer but it doesn't work, try swapping the big and small stars.
The items shown all seem to be different sizes, none of which seem to fit the figurine.
Specifically, the figurine is too big for the forklift (top left), truck (right) and bed (bottom left), so click the buttons in those positions.
Open the drawer to find a key piece and a circled clue.
Numbers 1
Use a clue from the numbered picture(s) to unlock the top drawer on the non-reversed side of the room.
The outlines around the buttons tell you to only look at the numbers with dotted outlines.
From left to right, they form the code 342, so enter that into the drawer and open it to find a capsule containing a key piece.
Numbers 2
Use a clue from the numbered picture(s) to unlock the top drawer on the reversed side of the room.
Each pair of numbers from the buttons appear close to each other on the pictures, so close that they actually overlap.
Those overlapping areas (between 7 and 8, between 5 and 9, and between 5 and 6) are yellow, red, blue.
So click the buttons 1, 5, 3 times and open the drawer to find another key piece.
Correct
Use the clue from the armchair to unlock the bottom drawer on the reversed side.
The arrow on the clue passes between five pairs of circles. In those pairs, the circles appear on the UDDUD sides, so those are the sides that you need the slider to be on each time you push the circle button.
Using L to represent flipping the switch and R to represent pushing the button, the sequence of actions required is RLRRLRLR.
Open the drawer to find a key piece and a clue in a triangle.
Time
Use the clue from the normal wall clock to unlock the mirrored wall clock.
To set the correct time (as shown on the normal clock), the hour hand must point to 4, and the minute hand must point to 2.
So push the left button 4 times and the right button 8 times, then push the middle button. The clock gives you a key piece.
Numbers 3
Use the shape clues to unlock the wall box.
Each window represents a shape clue you've seen, starting with the circle (110).
The rectangle has different dimensions from the sign above the door, which suggests that you need to mentally rotate the sign. Regardless of how you do it, the line on the sign would now be horizontal.
The triangle in the drawer reads 5, but it needs to be flipped to match the window's shape, making 2.
All three clues together read 110 − 2, which is 108. Enter that into the box and open it to find the last key piece and a potted cactus.
Exit
Now that you've completed the key (and got your gift), click the door to unlock it and leave.
Item list
6 key pieces:
Top left: in top drawer (normal)
Top middle: in bottom drawer (normal)
Top right: in top drawer (flipped)
Bottom left: in bottom drawer (flipped)
Bottom middle: in wall box
Bottom right: in wall clock (flipped)
And a souvenir:
Cactus, in wall box
cool games so far, kk. can't wait for the last one.
I went ahead and did walkthroughs for both. (These walkthroughs might be still unpolished, because playtesting is too tedious.)
General tips and reminders
The games will be long, so check the options and make sure autosave is on (and change the text speed if you can handle it, but it doesn't make things much faster). You can also turn off the music there (under "environmental sound").
Some puzzles have randomized clues. I've noted the ones where I've noticed the clues change, but there may be some I've missed.
If you character says "I have no reason" to do something, you're probably skipping over a conversation. Those conversations have important clues too, so pay attention!
While the cursor changes over items you can get, it doesn't always change over the places you need to use them.
Failing most timers will lead to a game over, but without any progress lost. Sometimes it's safe to fail the timer, and the timer might not even appear if you're in a conversation.
Geraldine and the Small Door
(Coraline and the Secret Door)
Both the original and its "remake" have almost identical gameplay, but there are very tiny improvements in Geraldine so I recommend you play that one if you don't mind having purple hair.
Exploration
After a super-short intro, you're thrown right into the action. Well, there isn't actually much action.
In this living room, the changing cursor helps you find a large box (next to a cross marked on the ground) and a small painting (on the right wall).
Go left to exit the room. The main door is to the right of this corridor, but you're not allowed to leave.
Go left. You see a staircase, a locked door under it, and a bump in the rug that refuses to go away no matter how much you jump on it.
Go left. There's a mirror which you're not interested in, and a door that you can open.
So open that door and go up/forward. Your dad is in the room and you can talk to him about stuff.
Leave the room (go right) and then down to reach the kitchen, where you can talk to your mom. You also see a pot and plate you can take from the counter, a fridge that contains cheese, corn, sugar, an orange and sausages, and perhaps something else that you can click but not use yet.
(The right arrow from the kitchen goes back to the screen with the mirror.)
Go down from the kitchen to reach the dining room, which is completely boring except for a screwdriver on the floor.
(The right arrow from the dining room goes back to the kitchen.)
Go down to return to the bottom of the stairs, then go up the stairs. You can't enter the right doorway because you're banned from that bedroom.
Enter the left doorway to reach your room. You can click on the bed and the light switch, but your character doesn't feel like using either of them.
Talk
Talk to your mom and select the first option.
Then talk to your dad and select the first option.
(If you're playing the remake, you should see a clear indicator of what to do next.)
Click the door to annoy your father, who gives you a quest involving a notebook and a pencil.
Seek
Let's get the easy drawings done first. Grab the notebook and use it on each of the following items:
A piece of art: the painting in the living room where you started
A rounded window: the window beside your bedroom door
A picture of yourself: the mirror at the end of the corridor
Weight
You now have the tools to deal with the rug bump in the corridor.
Weigh it down with the pot (which makes it move) then jump on it.
The staircase door opens up!
Inside, you see a very old water heater, an open safe and a broom.
Use the notebook on the water heater to draw it.
Behind
You now have the tools to deal with the large crate where you started.
(Hint: there's a clue on the wall in the remake. Think about those shapes, but in 3D.)
Place the pot on the cross, and use the broom to form a lever.
Once you're done, you see a weird door covered by the wallpaper (and another wall clue).
Use the screwdriver on the door to pierce the wallpaper and get to it.
Key / Unlock 1
The dialog mentions that the weird key is with Mom.
And indeed, you can talk to her and select the second option to find where it is.
Open the kitchen drawer and take the button-shaped key.
(For a brief moment you can see that the drawer is full of normal keys, making this the only weird one.)
Use the key to unlock the small door in the living room, which gives you access to… a wall of bricks.
Without doubt, this brick wall is "something very weird". Use your notebook to draw it.
Found
Give the finished notebook (you may want to read it again) to Dad, who agrees to let you out.
Exploration 2
Click the new arrow that appears, which brings you out through the back door!
In front of some dying/dead trees, some bushes have question marks on them, and after searching them you find an oak branch. Pick up a battery from the ground, which starts a conversation with Wybee who lives nearby.
Go left to find a garden full of dead trees. A bridge over a leaf-covered lake ends in a cupid statue.
Go up (either side) and then up again. At the end of the bridge is a stone gateway topped with gold.
Go left to find a weak-looking cow and an anvil you can't move.
Go right and up to find a path of dead trees with some kind of cart on the side.
Go right to find a circle of colored rocks, a tree stump and one dollar. Clicking the middle of the circle uncovers an old deep well (okay, it still has a wooden cover that's stuck).
Backtrack to the house (go left twice, down thrice) and go down. A tree is split in half and you can pick up a small bench (more like a stool).
Go left to find Angi Delgado, a contest winner who you can talk to.
Go right twice to reach the front of your house. The front door is locked. (The leftmost arrow here goes back.)
Click the downward arrow on the left side, which leads down some stairs to a door that you can open… and get attacked by angry dogs. Game Over!
Back out to the front of the house and click the upward arrow along the right stairs. There's a locked door here with a keypad beside. Take a beet from the ground.
Go right to find a hamster balanced on a rope tied between two trees, high out of your reach.
Milk
It turns out there's not much to do out here, so you end up milking the cow.
Feed the cow the beet to strengthen it, then use the bench and plate on it.
In just "a few minutes", it turns night and you automatically return home.
Night
After receiving the package from Wybee, open it to find a note and a doll that looks like you.
Go to the kitchen to have dinner.
And then it's time to sleep! Go to your bedroom, turn off the lights, and lie on the bed.
After being awoken by a mouse, follow it all the way to the living room, where it disappears behind the door you opened.
Click that door to fully open it and reveal the tunnel, then crawl in!
In case there's any doubt that this is a different room, you can look at the painting here.
Exit the room and you automatically walk to the kitchen, where you find someone almost like Mom preparing dinner.
After that conversation, the only thing you can do is open the study door and talk to someone almost like Dad.
And now all the lights are on and you can walk around. But let's leave the exploration for later, and just go to the dining room.
After your "other dinner" you get another chance to explore, but you can also just go to your bedroom, turn off the lights and sleep on the bed.
Day
You're back in the normal, straight, boring house, which is exactly like before, even including the tunnel!
Talk to Mom and choose her second option, and she tells you about your retired actress neighbors.
Then make your way out of the house through the back door.
Everything looks the same until you reach the front door, where you might notice a familiar blue cat on the roof.
Climb up the stairs, and a grayish man leaps onto the balcony and introduces himself.
Talk to him, and choose the first option to learn about his acrobat mice and him getting locked out of the house, and even a bit about his security code.
Then talk to him again and choose the third option to get permission to use the keypad.
Inspired
As Mr. Hobbinsky said, you can look in your backyard for a clue to his keypad.
This puzzle is randomized, but the remake has a clue drawn above the keypad that should help.
Carefully count the number of brown leaves on each tree and then enter those five numbers into the keypad.
Once you're done, he tells you about the package he's waiting for. Climb down from the balcony and you'll see the postman just outside!
Delivery
Talk to the postman, who doesn't mind letting you bring the package upstairs rather than waiting, but insists that he get his tip first.
Give him the dollar you found near the tree stump, and you'll get the package.
Then give that to Mr. Hobbinsky, who accepts the package and goes back into the house.
Once you climb down, he calls you again! Climb back up to hear a message from his mice.
Also, he asks you to take care of the house, so walk in.
Other than the chicken, you see loads of things in a mess on the floor: a magnifying glass, a piece of cloth, a small umbrella and red elastic band (near the cardboard box), a small blue bottle of somniferous, and a fortune teller hat with a feather sticking out.
Now that you've cleaned up his house, just leave. There's more important things to do!
Rescue
If you haven't yet, you can talk to Angi and choose her first option and then her (new) second option.
That hamster has been up there for a long while already. It probably needs some help getting down.
Hint: You'll need something to soften its fall, and you need a way to get that thing up there.
Attach the elastic band to your Saori Wand (the oak branch you picked up from a bush), and load it with the umbrella.
Then use it on the hamster to get it to the ground where you can pick it up.
Give the hamster back to Angi, who rewards you with a ladder.
Pacify
The actresses you have to visit are in the basement, guarded by dogs so fierce you can't even get in their door.
You'll need to do something from outside the door.
Pour the somniferous potion onto the sausages, and throw it through the smaller pet door (which is just behind the up arrow).
Now you can enter to find three sleeping dogs.
Pair
Go right to find the two actresses playing cards. You can't do anything else in the room, and you don't want to just talk to them.
Perhaps walking around a bit will reveal what to do?
Click the table, and Ms. Spoonk offers you a fortune reading… but she needs her hat.
Give her the fortune teller hat, and she warns you of danger, gives you some vague advice, and you get a stuffed dog and an ace of spades for good luck.
Shelves
Use the ladder on the shelf of dogs on the left, and then climb up and place the stuffed dog in the empty space.
This opens up the safe on the wall, and you get a brush for your efforts (and the ladder back).
Use the (randomized) clue from the shelves to unlock the safe.
Each shelf has dogs that face either left or right.
Click the corresponding buttons on the safe (the arrows that show up should match the dogs on the shelf) and open it to find a Polaroid camera.
Lure
Next, you need to bring the cat down from the roof, but you don't trust the ladder enough for that.
Place the milk bowl on the ground, and the cat comes down by itself.
(Feeding day-old milk to cats is fine by video game logic, I guess.)
That's a cute cat! Use the camera to take a picture of it.
Scare
Climb back into Mr. Hobbinsky's house, and use the picture on the chicken, who releases an egg in fear.
When you return to the front of the house, Wybee is standing there! Talk to him to learn a bit about the cat, the doll, and your house.
And then it's night time again! You return to the house to have dinner.
Another night
After dinner, you return to the bedroom, where there's an X on the floor.
You can turn off the lights and lie in bed, but you can't sleep!
Lure the mouse by placing cheese onto the X, and then sleep on the bed.
When the mouse appears, follow it into the tunnel.
Now in the Other house, head to the kitchen, where your Other Mom asks you to look for your Other Dad.
Exploration 3
Before we go out, there's one room in this house we haven't visited.
Enter the storeroom under the stairs, where you find a pedal on the floor under the boiler.
The front door is unlocked, so leave through it. The lawn is nice but weird!
Climb up to the balcony. The door is closed and there isn't any way to open it.
Go down and climb down to the basement, where there's now a single dog with a top hat preventing you from entering. (You can try anyway but that's a Game Over.)
Back out to the front door (there's a very tiny glitch on this screen that you can ignore) and go right. The trees are still there, but there's now a blue bird and a bird nest too. You can climb up with a ladder but you can't untie the rope or do anything to the nest yet.
Go left twice to the broken tree, and left once more to Other Angi, who's missing her Other Hamster.
Go right and forward to your back yard. The trees are alive and there are more bushes!
Go left to the garden, which is much more beautiful, and watch as Other Dad rides in on a mantis. Let's leave him alone for now.
Go up (on the right side) and up again. More trees and bushes here.
Go left to find an old man. You can talk to him to ask for his cane, but he needs it for balance.
Go right twice to find an apple tree.
Go left and up. The path is now lined with apple trees, but there's also a hole in the ground where Other Hamster hides out of reach.
Talk to Other Dad and choose the third option, then interact with him (clicking the hand icon) to take a ride.
After dinner, you end up at Other Hobbinsky's place with Other Wybee.
Necessities
The mouse in front of the tent asks you for two items necessary and indispensable to enjoy the show.
The hint is in the wording: without these items, watching the show would not be as enjoyable.
What you need is food, and there are exactly two items in your inventory that can be made into classic fun snacks.
Another hint: You should not need to leave this room. Pay close attention to what's in it.
Connect the two wires along the floor to the pedal and battery.
Then use the corn on the wheel to produce popcorn, and use the sugar on the cannon and step on the pedal to produce cotton candy.
Combine those two items and give it to the mouse to proceed.
You watch the amazing circus show, then go home and go to bed, and wake up in the normal house.
Another day
The key is missing! Talk to Mom about it, and (her second option) she says she hid the key.
If you choose her first option, both parents leave the house to go grocery shopping, and give you permission to go out if you're bored.
Exploring everywhere reveals that two things have changed. One of them is the most obvious place to look for the key…
Open the kitchen drawer to find a normal-looking but familiar key.
Also, the safe in the storeroom is now locked with a dial that you can turn left and right.
Use that key to unlock your parents' bedroom door (the one on the right).
The bedroom is boring because you can't touch anything, so go to the bathroom, which has a caterpillar on the wall and a window you can't reach.
Ventilation
Place the bench under the window, then click the bench to climb up, then click the window to open it.
The caterpillar leaves, and leaves behind a clue that you can read with the magnifying glass.
Enter that (randomized?) clue into the safe to unlock it and find the secret key!
Return
This time, using the button key on the living room door reveals the tunnel, and you can go through it to the Other house.
It's apparently night time there, and after some exploration all you find is dinner on the kitchen table with a letter that tells you what to do.
After eating the dinner, you keep a cupcake for later.
Feline
The moment you step out the front door, Wybee's cat shows up.
Talk to it, and after a short conversation it runs away.
Go left to find it, and talk to it again.
After the cat shows you a neat trick, pick up the stone it dislodged onto the ground.
(The cat now hides from you, so let's do something else.)
Lure 2
Go to the path lined with trees, and use the cupcake on the hole to lure Another Hamster out.
Give it to the Other Angi, who rewards you with a ticket to the show.
Performance
Make your way to the basement, give the ticket to the dog, and proceed.
After a short cutscene, you're now part of the show, swinging back and forth with Spoonk and Furcibel!
But if you Drop at the wrong time things will turn out badly. Game Over!
Click Drop when you're in the middle, and you'll hold on to a ledge while the actresses dive into a barrel.
Shortly after, you'll fall but the barrel isn't there, Game Over!
When you're about to fall, an arrow appears on the barrel. Click it twice (but not more), and it ends up in the right position to catch you!
With the show over, you walk home (ignoring something that dropped on the floor), and your Other parents offer you a little gift. But it's not one that you can accept!
Last night
Maybe if you sleep it off, things will be a bit better.
Nope, that doesn't work, but you get a hunch that Other Dad can help.
Find him in his study, and talk to him.
That doesn't really help (although you should now have a clear idea of what's going on), so go look for the cat.
(On the way out, you notice that the living room door is closed tightly.)
Leave the house through the front door and make your way to the stone arch.
The cat takes you on an eye-opening trip, ending at the front of the house, then captures a mouse and runs away with it.
Dropped
Return to the theater and pick up the button glasses from the ground.
Wood
Walk to the stone arch, and then go right. The tree here is dead, and there's a chair next to it, but picking it up leads to a Game Over.
Attach the stone to your slingshot and fire it at the evil tree, hitting it in the eye.
With the tree out of the way, you can take the chair.
Give it to the old man (after you've talked to him) to get his oak cane.
Force
Go back into the house and use the cane to pull open the living room door.
The handles come off and you can enter.
After a brief encounter with bugs, you anger your fake Mom, who suddenly gets a lot taller and throws you into the mirror.
Trapped
This dark room has the outline of a doorway on the left as well as a bed that's much smaller than your own.
Place the doll on the bed, and three ghost children emerge from it. Turns out you shouldn't have been carrying that around!
After you talk to them (the third option ends the conversation), they leave you with a simple request and vanish into the ground.
Friend
And now you're controlling fake Wybee! But somehow you still have your entire inventory.
The house door is locked, which is an issue. But for now, let's explore.
Go left to the broken tree, and take the bucket of blue paint.
Go up and left to the garden, where you can take a shovel.
Prop
Return to the front of the house and go right.
Dip the brush in the blue paint and use it to paint the egg blue.
Then place the ladder against the right tree, climb up and place the blue egg in the nest.
The blue bird flies onto the nest, revealing an X on the floor.
So (climb down and) use the shovel on the X to uncover a key.
Untie
But also climb up the ladder and untie the rope, then climb down, pick up the ladder, place it against the other tree and repeat.
Pick up the rope from the ground.
House
Use the key to unlock the front door. You're free to explore the house, but there's nothing else to find.
Focus on getting Geraldine out of the mirror!
Throw the rope at the mirror, then (as Geraldine) pick up the other end.
Now that you (Geraldine) are out, you walk to the living room.
A bug is blocking the door, and pushing it over starts a ten-second timer that, when over, causes fake Mom to enter the room, Game Over.
So make sure you hurry, open the door, and leave through the tunnel.
Last day
As you leave the real living room, you realize that your parents aren't there.
And then the doorbell rings, and it turns out to be Wybee, who tells you that the doll was his grandma's.
Which means the witch (Other Mom) is also Other Wybee's Grandma.
…I think? I haven't watched the movie and this is getting confusing. Anyway, look for someone else to help you.
Go to the basement where the two ladies are still playing cards, and talk to them.
(Choose the second option.) All that they can do for you is present you with a triangular stone with a hole in it.
Back out to the front door, and talk to the cat who is now waiting for you.
It goes into the house, so follow it.
The cat sits in front of the mirror and points at it, so look in the mirror to learn the truth.
Now unlock the living room door and get back in there!
Challenge
Despite your best efforts, the witch gets the key back, locks the door, and eats the key.
Find her in the dining room, and challenge her (second option) to a game of finding things (third option).
All you get is the hint that all the ghost eyes are in plain sight.
Since the eyes have to be done in a specific order, I'll won't waste time pointing them out until it's necessary.
Make your way to the garden, now guarded by the mantis, and make sure you stick to the left side or else it's Game Over.
Keep going up to the arches, and then go right twice, where you get captured by some guy. Game Over.
Disguise
Just before you enter the screen with the witch's soldier, put the button glasses on.
Then go right and choose the second option in the conversation.
Now it's safe to pick up the flask of liquid to make wood weak on the right.
Soften
Go back to the garden, and use the triangular stone on the carriage to confirm that there's an eye there.
Then figure out how to use your items to defeat Other Dad.
(Hint: there's an X under the wheel.)
Throw the orange at the carriage, then climb up on the left side and run onto the bridge before the timer bar fills up.
Once you're on the bridge, an X becomes visible and you have to use the liquid on it.
The entire mantis falls in! But make sure you take the ghost eye too or it's Game Over!
Pick up the flashlight on the right side.
Darkness
Next, go to the basement theater. The lights are off and a giant candy occupies the stage.
Use the stone on it to confirm that there's an eye there.
Now you can attempt to open up the candy, but it (or rather the fake actresses within) fights back, eventually leading to a Game Over.
While the timer is running, use the flashlight on the walls to awaken the bats, which swarm onto the stage and pounce on you.
Wait, they're bat-dogs? That's the cutest Game Over so far!
Just make sure you duck when the arrow appears next to you.
You get the ghost eye, and can pick up a sheet of paper with a clue on it.
Luck
Climb to the balcony, where you see what happened to Other Wybee.
The door here now has a keypad, and you have the (randomized) clues for it.
Look at the ace of spades to find colored arrows.
Then look for the closest circles to the matching-colored dots on the sheet.
Enter those four numbers into the keypad, and you're in!
Fake circus man holds out an orb that looks very enticing, and you use your stone to verify that it's an eye.
But then he disappears into the tent. Follow him in!
The fake Hobbinsky stands on a pile of cheese. All you have to do is click his hat.
But then the rat holding the eye runs away.
Chase the rat out to the front door, where you find that the cat has the situation covered.
Talk to him, and then pick up the green ghost eye from the ground.
Ally
Chase the cat down (just go left) to the broken tree, and talk to it. You got Wybee's cat!
Victory
All that's left is to find your real parents, and what you saw in the mirror is a very good clue: they're frozen and trapped behind glass.
As you reenter the living room, you spot them in the snowglobe above the fireplace!
But the only way to them is through confrontation with the witch. (She definitely looks like a spider now.)
(Timers are active from here on.)
The witch refuses to acknowledge you unless you present her with eyes. Use any eye on her.
(5 seconds later, you lose for not coming up with an answer to where your parents are. Game Over.)
You won't get anywhere by giving the correct answer, so just point to the door instead.
The witch opens the door (and closes it 5 seconds later, Game Over).
Buy yourself some more time by throwing the cat at her.
(You have 10 seconds to collect everything and leave before it's a Game Over.)
Pick up the middle snowglobe, as well as the key from the door, and now you can crawl through.
Struggle
It's not over yet, but this is a checkpoint.
You have 3 seconds to stop the witch from opening the door and causing a Game Over.
Grabbing the door handle helps, but it only delays your failure.
While holding on to the door handle, use each of the ghost eyes on it. (There's a 3-second timer on each step but you can't see it.)
Finally, the door slams shut…
And then you have 3 seconds to lock it. Whew!
Paranoia
Your parents are back, and they don't remember any of it! You enjoy a nice dinner and go to sleep with Wybee's cat, and then the ghosts show up in your dream…
Bad news: you have to hide the key away from the witch. Worse news: you have only 1 minute to do it or it's Game Over. Also, the cat is sleeping so soundly you can't bear to wake it up. (But if you really want it around, there's a certain game bug that lets you get a second cat.)
(Re-entering the living room immediately ends the timer and gives you a Game Over.)
Go right, down, left, up, down to exit the house. Pick up the stone here.
Then go left, up, up, up, right to reach the well, and brush the sand off of it.
How do you get the cover unstuck?
Place the stone beside the well, and use the oak cane to pry the cover off.
Next, you need to set a trap using the well.
Cover the well with the cloth, and place the key on top of it.
This stops the timer, and Wybee comes to help, and the timer restarts at 30 seconds!
(Not only does this timer give you a Game Over, it makes you redo the section all over again.)
You're now playing as Wybee and have no inventory left, but there's only one object remaining in the game to pick up!
Go left thrice. You now have enough strength to carry the anvil.
Go right, up, right and drop it into the well.
And you win! Simply watch the remaining dialogue to finish the game.
Geraldine and the Return of the Witch
As far as you can get from the evil of the first game, there is no escape. But you can point and click your way to the recently revived witch for rescue and revenge.
Exploration
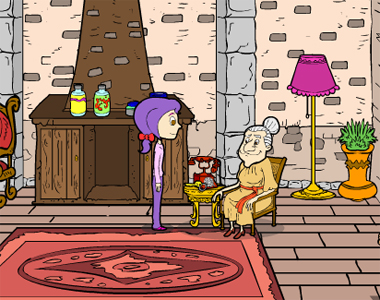
As the intro mentioned, the only neighbor left in your old house is Wybee's grandmother. But all you can talk to her about is the house key next to the phone (which she refuses to lend you). Take the honey she offered from the fireplace (and then the game lets you leave), the black and white markers from the left chair, and the scotch tape from the table on the right.
Go left to the outside of grandma's house. Take the coil of long rope. The changing cursor helps you find the woodpecker on the roof, but it's way too high to reach.
Go left to reach a junction, where you see a familiar cart. The trees around are all bare.
Go right to find a well surrounded by stones, and a tree stump.
Go left twice to find a fancy golden arch gateway.
Go right to find Luz Isabel, who asks you to help look for her bunny.
Go left twice to find a hole in the ground. Regardless of which option you choose, you get to see but not touch the bunny inside.
Go right and down to a garden full of dead trees. A bridge over a leaf-covered lake ends in a cupid statue.
Go down (either arrow) to the bottom half of the garden area. Both the down arrows turn into up arrows leading back.
Go down once more to reach the back door of your house, which is locked. Pick up two leaves from the ground.
Go down to reach a tree split in half.
Go right to reach the front door of your house. The front door is also locked.
Go up the stairs by clicking the arrow there. You can't even interact with this door!
(To return to your starting screen, go left, left, up, left, up, up, up, down, right.)
Well
Return to the well (go right at the cart), and find a way to safely go down.
Tie the rope to the tree stump, and then descend.
Well, this is a disturbing sight. If you haven't played the first game then it might make no sense (and is kind of a spoiler).
Anyway, you have to take the Wybee doll before you climb back up. Once you're out of the well, you automatically reclaim the long rope (and can't go down anymore).
Fake
(Go left thrice.) You can wave the doll on the hole, but it's certainly not attractive enough for the bunny.
So there are some things you need to do first, each requiring a very specific order.
Use one leaf on the other to combine them, then attach the tape to them, then stick them onto the doll.
That's still not convincing enough!
Use the black marker on the doll to draw big teeth, then the white marker to whiten them.
Finally, use the doll on the hole and quickly pick up the little rabbit when it crawls out.
Give it back to Luz Isabel, who gives you a small bamboo branch.
Puncture
If you were paying attention to the conversation, you may have picked up a hint about how to use the bamboo.
The bamboo is often used to make flutes, which suggests that you need the woodpecker to help make holes in it.
On the screen outside of where you started, place the bamboo branch on the ground and apply the honey to it.
Once the woodpecker is done, pick up the finished flute.
Song
Use the flute on Wybee's grandmother to play a relaxing tune.
After she falls asleep, pick up the old house key.
Entry
Use the key to unlock the front door (it won't work on the back door).
The house is pretty much exactly the same, but most of the furniture is missing, all the room doors are locked, and the rug is weird rather than annoying.
This means the only place to go is the room nearest to the main door, where you can crawl through a small door in the wall.
Exploration 2
As you exit into a forest and emerge from a weird tree with hands, the door closes permanently behind you, leaving just a clue with a zigzag arrow. Pick up the purple photo camera and fresh grass, as well as the blue box glove remote control.
There are five paths here, so let's start with the far/top right one. A giant chessboard is guarded by a white rook, but the moment you step onto it you get attacked by three evil elves. Game Over, but you can easily continue from a safe spot. (From here on, I'll indicate game overs by [!!].)
Back out (left) and take the right path. A bird sits on a coconut tree.
Go further right, and you'll get attacked by a four-eyed six-legged purple monster [!!].
Return to the entrance by going left twice, and take the bottom path. There's an odd collection of grassy platforms with animals on top, and a gardener explains that the last one's supposed to be a kangaroo but he's never seen one. His watering can is on the ground beside but you can't take it.
Back out (left) and take the left path. There's a tree with a banana peel in front, and instead of a hole it has a panel with left and right arrows controlling a central dial. A path lined with lollipops ends at a gingerbread house, from which you can take a very large button at the far left.
Open the door of the house, and you'll get zapped with magic almost instantly [!!].
You can click the pet door to look through it, in which case you'll be perfectly safe but can't do anything further.
From the candy path, go down. A purple kangaroo sits on top of a cliff, facing away. Take the long section of pipe from the ground.
Back out (up and right) and take the upper-left path. This looks like the entrance to a baseball pitch. Take the large wooden box on the left and the wooden bow on the right.
Go forward. Now you're standing behind the bench where a father and son are seated. Pick up a blank sheet of paper from the left side.
Go forward and you find yourself standing on the pitch. You can pick up the baseball bat to start a game, but no matter what you do it ends with you getting hit in the head with a baseball [!!].
Two trees
Use the (randomized!) clue from the tree where you entered to unlock the tree outside the house.
Matching the six hands on the tree to the six points of the arrow, you find that the sequence alternates between left and right. A hand with three fingers means you need to push the button thrice, and so on.
Push the buttons according to the clue (a total of 12 times), which unlocks the tree, then reach in to pull out an orange key.
Likeness
Return to the kangaroo (south of the house), and find a way to record its appearance.
Place the grass on the ground to lure it down, then use the camera to take a photo of it.
Pass the photo to the gardener, who skillfully creates a kangaroo out of the bush, rewards you with 2 magic seeds, and walks off. Pick up the watering can he left behind.
(You can also mess around with the bush animals, but that's a puzzle for later.)
Projectile
With the help of the gardener's stuff, you can set up a weapon against the mutant octopus.
On the screen before the octopus (with the coconut tree), use the magic seeds on the ground to plant trees, and then use the watering can to grow them.
Also, use the long rope on the coconut tree to climb up and tie it there. Do you see what to do yet?
Use the pipe on the magic trees to secure it between the loops, then tie the end of the rope (through the hole in it).
Finally, fit the very large button on the end of the pipe and click it to rotate the pipe, which pulls the rope, bends the coconut tree, and makes the bird flee onto the magic trees.
The trap is ready but you have no way to spring it. Thankfully, help is just nearby!
While the coconut tree is held down (and the timer is ticking), toss some honey onto the pipe.
The bird pecks out the rope, releasing the tree, flinging the coconuts out onto the octopus and blinding it (four times!).
Exploration 3
Now you can go right (where the octopus was) and pick up the vine and hook-shaped twig from the ground.
Go right once more to find an ominous castle guarded by a timid-looking raven. It's surrounded by a moat, and you can't open the drawbridge from here. Pick up the box glove from the ground.
Message
As you learnt from your (unavoidable!) failure at the gingerbread house, some planning is needed before you enter. How do you calm down the gingerbread man?
Write a message on the blank sheet of paper (using the black marker pen).
Then (reading it is optional) fold it into a paper plane, and look through the pet door and toss the plane into his cage.
You can now enter the house, but the green-skinned witch won't stay asleep for very long [!!].
Deflect
Learning from that failure message, you realize that metal is strong enough to reflect a lignification spell. How do you set this up within the three-second timer?
Combine the vine and hook, and use it to hook the oven door to the cage. But if that's all you do, then you'll still get zapped [!!].
So after you set up the vine, make sure you quickly click the end that's in the cage to make the gingerbread man pull it.
Done correctly, the oven door opens and reflects the spell, so you now have a witch turned into a tree. This also gives you access to her wooden cane and pet electric eel.
Release
Use the orange key to unlock the cage and get Gingerbread Man.
Gambit
The chessboard elves are quite tough even with the game's clues, so:
Hint: There's only one thing you have that's capable of confining three elves.
Hint: As a stack of elves, their weakness is gravity. See if you can trick them into falling over.
Hint: You'll need to use the bow, but you don't have a normal arrow. What needs to be fired, and why?
Before you start, use the cane on the bow to load it. (Not strictly necessary, but very helpful.)
Place the boxing glove on the chessboard (Geraldine automatically slides it to the end) and then the large box against it. (Fail to do so, and you'll eventually get attacked even if you trick the elves [!!])
Now, there are a total of 3 timers you need to beat…
Walk onto the chessboard and immediately use the camera on the elves to ask for a picture.
(After the elves fall, you have 3 seconds before they recover [!!])
Use the remote control on the glove to activate it, slamming the box shut.
(You have 3 seconds before they escape [!!])
Use your loaded bow on the front of the box to bolt it shut. The entire puzzle vanishes and you can proceed.
Exploration 4
Further right, you find a cat turned into stone. It's not helpful anymore, but the things around it are: a hand drill, a screwdriver, a small stone and a bottle of glue.
Go right once more to find some stacks of filing cabinets and a red-haired guy who looks too tied up to even answer his phone. He gives you a simple challenge.
Observer
Mr Buro's memory challenge is randomized, but only between a few simple patterns.
So while you only have 3 seconds to click each drawer, you can just keep trying (and writing down the patterns) until you get one that's easy or familiar.
Once you succeed, he gives you a sheet with symbols, and then vanishes into the cabinets forever.
Animals
Use the clue from the sheet with symbols to swap the bush animals correctly.
The shape of each platform (possibly rotated) matches the shape of a grid, containing the animal that's supposed to be placed on that platform.
Clockwise from top, they are: Elephant, Ostrich, Kangaroo, Rabbit, Giraffe, Monkey, Panda (bear), Lion.
Once you've placed them correctly, all the bushes disappear and a pumpkin appears at the bottom.
Foul play
Return to the baseball pitch, and find a way to rig the game to your favor.
Hint: Do it while they can't see you.
Use the hand drill to punch a hole through the glass behind the bench, directly above the kid's glove.
Then apply the glue through the hole. Now all you need to do is play reasonably well!
(Failing to do all of these steps in time gets you the same game overs as if you hadn't cheated [!!])
Get on the pitch, and pick up the baseball bat. Once the ball is pitched at you, quickly click the bat in your inventory to swing it.
Then click each of the bases (corners of the square) in counter-clockwise order to run to them.
The boy struggles to get the ball out of his glove, and eventually throws the whole glove to his dad, who pulls out the ball and gets ready to throw it at you… but it's too late, you've completed a whole round and it's a home run!
They walk away, and five items appear: a purple hat, a thin wooden stick, a life jacket, a stool, and a pot.
Crow
What's the best way to get rid of a crow?
Carve the pumpkin with the screwdriver, place it on the witch-tree, and complete it with the hat.
Place the finished scarecrow on the ground in front of the castle.
Click the scarecrow to hide behind it, then toss the small stone at the scarecrow.
Entrance
Now that the crow is gone, it should be easy to access the inside of the castle.
For example, you could pole-vault your way into the castle… wall, for a hilarious failure [!!]. Not that way, then.
Instead, use the stick on either window to brace it against the castle door.
While this meaningless timer runs, send the gingerbread man up the stick.
The door is now open, but unfortunately it's guarded [!!]. Why have you done this, Ginger?
Flank
Checking the window confirms that you'll need to climb into it.
Place the stool on the bridge (near the doorway), then click the arrow to climb in.
You can't move from the window, so you'll need to use an item.
Use the stick on the gargoyle to tip it over.
With the path clear, you can now climb back out and walk in.
Exploration 5
After bidding farewell to the gingerbread man, you're free to explore the castle.
Go right to a room with four doorways (things are starting to get really distorted here) and pick up an elastic rope, a metal paper clip and a wooden table.
Go down. The wide camera view show you the size of the pool with the treasure chest in it. You may be a good swimmer, but there are other dangers in there [!!]. So stick to dry ground, and pick up the fishing line, and look at the orange wall panel with the four-rune lock.
Go back (left) and then right to find a well in the middle of the room. It actually has walls!
Go right once more, and you find your path blocked by a suit of armor which, when you talk to it, turns out to not be empty [!!]. Crossing the red line on the floor is also fatal [!!].
Back out to the distorted room (left twice) and go up. This room has several paintings and an antique-looking vase, but what catches your eye is the magnifying glass on the ground and the stack of books by the mirror, which turns out to be a trap [!!].
Mirrored
The best way to defeat evil-you is with evil-yourself. And the best way to help you is with yourself.
(Hint: you've already escaped a mirror in the previous game!)
Tie the elastic rope to the table under the books, then pick up the books and immediately grab the end of the rope.
Evil eradicated with the power of elastic potential energy!
With your doppelganger gone, you can now jump into the mirror yourself.
The other side of the mirror is a very similar room, but with two changes: there's a feather on the floor, and the knight painting holds a key that you can't just pick up [!!].
Pilfer
Fold the paper clip, then attach the fishing line to both it and the wooden stick.
Use your completed fishing rod to steal the golden key off the painting.
Chase
Return to the distorted room, and follow the east path to the possessed suit of armor. If you shout at it, you get the chance to quickly sneak into the left room (with the well), but then it chases you into that room [!!].
The failure message there helps you understand what plan you need. And it had better be a good plan, because there are three or four timed steps to complete!
Shout at the armor and then immediately run left.
(You have 5 seconds to set up this trap, or you can do this beforehand!)
Place the banana peel on the ground near the doorway, making the armor fall in.
(After 5 seconds, the rats emerge from the well and start chasing you [!!])
Cover the well with the wooden table.
(After 5 seconds, the rats move the table aside and escape [!!])
Weigh the table down with the books. You're finally safe.
Exploration 6
Continuing your exploration, you walk through the now-empty room into a room with a spider-shaped door having a spider-shaped lock. (Obviously a bad idea, so let's leave that door for later.) There's a ladle on the ground, and a stone hand tightly grips a scepter.
Gentle
Since the stone hand is too strong for you, you'll just have to take the soft approach.
Use the feather you picked up to tickle the hand, which releases the scepter.
Depths
Follow the south path to the room with the huge pool. Your first task here is to get rid of that nasty sea monster.
Simply dump the electric eel in and watch the action unfold, done!
And surprisingly, the water is now perfectly safe, as the game prevents you from drowning as you click the treasure chest to jump in and dive all the way to it. (Once the timer runs out, you hang on at the edge ready for another attempt.)
Clearly the chest is too heavy to move, even underwater, unless you can think up a clever trick. Or maybe two clever tricks.
The first is to set up a lever system. While the timer is running, place the pot next to the chest and use the ladle on it. It looks like the chest is still too heavy, or perhaps Geraldine just refuses to move it without the next step already prepared.
The second is to use air. Also while the timer is running, place the life jacket onto the chest. If you try clicking the life jacket, you'll find it just floats away when inflated, which leads to you drowning [!!].
Instead, once you've placed all three items, click the ladle to flip the jacketed chest over before you inflate it!
Now that the chest is on shore, you notice a small code printed on it.
Tiny
Use the magnifying glass to read the code on the chest, then enter that (randomized) code into the panel near the door. Inside it, you find a silver key.
Use that key to unlock the chest, which contains the three ghost eyes from the first game.
Companion
Walk all the way back outside and follow the northeast path from the tree until you reach the cat.
Then use the scepter to restore Wybee's cat back to living.
Battle
It's finally time! Reenter the castle and then go right all the way to the spider door, then unlock it with the golden key.
The entire game after this runs on timers, so prepare yourself. (Also, the Game Over screens are slightly different depending on what you do, so feel free to experiment.)
The spider witch, now much more bony, easily grabs you [!!]. Using the scepter on the witch doesn't help, as she can disrupt your attack by summoning the scepter of your hand [!!].
This means you have to distract both her hands, but you can only do that when the cat covers her eyes. Where are you going to find three assistants to control all those areas?
Start by using the cat to free Wybee.
While they're both attacking the witch, use the ghost eyes on her too.
Now finish her off with the scepter! And enjoy your victory by watching the ending.
I made it on Geraldine up to
the memory game. he opes those doors and closes them so fast i can't keep up.
looks like i'm going to end it here i think. not bad as a lot of inkagames aren't too bad but i wish the dying thing wasn't as frequent and the 3 second timer thing is sad. but oh well hehe.
I also wish there wasn't the 3 second timer. I thought I wasn´t able to get through but I did, somehow. It's easier than it looks but still not fun.
yeah but that part is hard as i have no skills for that part. oh well. :(
Update