
 Welcome! The new Weekday Escape is out!
Circus Atos just wants you to fix few things in their lovely room, and offer you a reward for that - nice bottle of wine. Whether you deserve it or not is another question. Then you get to Shigeyuki Kagamura's cabin, escape it and materialize in Pixel Kobo's spaceship capsule. The last comes Nicolet. You won't be disappointed. Their latest game is cute, clever, colorful and even perhaps a bit longer than previous ones!
Have a good time and enjoy!
Game development team Circus Atos made this game during Global Game Jam 2020; and it's much fun even though it's short. Your goal is simple. You get a list of errands, quite easy ones, and you're kindly aksed to fix everything. At the beginning you feel confident about it; then, the reality strikes...
Luckily, the team's programming skills are much much better than the fixing ones (probably, the plot is based on real-life events). The resemblance with Amanita Design's creations isn't a coincidence, there are personal links between both studios.
The cursor is changing, no save button, one ending.
P.S. What's the do-it-yourself man saying you can guess easily, he's very expressive. It's going from "Oh that's easy." and "Pfft, it's done in a second!" via "Oh." or "Oh no!" to "F**k! It's broken!" or "Fine. I'm not doing this." etc. He speaks Czech.

Shigeyuki Kagamura locked you in a wood cabin and to open the door, you need to find the correct code. There aren't many obstacles to overcome, but it may take a while to find a proper clue and understand it. One would happily stay longer in the room, listening to a pleasant tune, if there were more puzzles to solve...
The cursor isn't changing, no save button, one ending.
This first part of Pixel Kobo's series isn't a new game but wasn't posted when it was its time. Let's play it now! You find yourself inside a spaceship and you're supposed...hmm, I'm not sure what exactly you're supposed to achieve so just start with usual routine. You know, exploring the place, and looking for items and hints. If some puzzle isn't active, you're missing a clue. Can you escape the ship? Well, that's not the right question, more important is to get the screen working. Not so easy, right?
The cursor isn't changing, autosave - saves (after certain actions only), one good ending and one bad (which you may provoke anytime during playing).
P.S. Here is the link to the next chapter: Reoda: Chapter 2. I'm posting the link only, because the game is very short and completely without any puzzles. Your only task is to find five buttons.
Nicolet's fox suddenly feels an urge to eat some honey. However, the cabinet is empty - and this part isn't very clear - did the fox eat all the honey and forgot about it or did the honeypot dissapear like poof, it's gone? No matter what happened, you need to get some honey to make the fox and his friends happy as the fox isn't mean and wants to share the honey with them. If only there was any - can you find it? The whole village needs to be explored, very thoroughly, including private areas.
The cursor isn't changing, autosave, one ending.
The game (as a part of a bundle) is available for Android and on Steam. Here is the coffee button.
We love escape games, and our readers love talking about them and sharing hints! How about you? Let us know what you think, ask for clues, or help out other players in the comments below.


Hey! The css problem has been fixed! Many thanks!
Trust Me, I Got This doesn't run in Firefox v72. I get this error: Your browser does not support any of the required graphics API for this content.
That game also gives the same message using Safari and the itch.io app. Escape from the Mysterious Cottage just gives me a frozen screen. Not my day, I guess.
To play Mysterious Cottage you need to scroll down. The game is below the large image and the wall of text.
I have Firefox 72.0.2 and the game runs fine, tried vers. 73.0.1 and Chrome and also works without problem. But in Edge I get the same error.
these look good. especially Nicolet game. Can;t wait :)
Two super-short games to start. You can even finish both in five minutes! (Assuming you can get the first game to load. If all else fails, download the game to play it.)
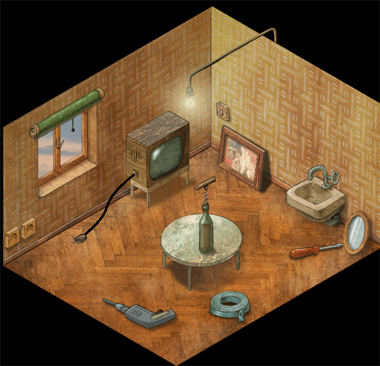
Trust Me, I Got This!
But do you really?
Last things first
You've carefully read to the end of the errand list, right? (If you need to reread it, click the bottom of the screen.)
Or perhaps you just looked at the table and decided that it's time for a drink, for good luck of course.
The corkscrew is already embedded in the cork, so just drag it upwards (and hold for a bit) to take it and uncork the wine.
Now you're all ready to work! Back out by clicking the arrow at the top left, and then pick up the cordless drill, the electrical tape and the screwdriver from the floor.
Hang the mirror!
Zoom in on the right corner of the room where the mirror is. Since you've got the tools, red marks appear where the support and the mirror need to be.
Click the cross to prepare the drill, which you can move back and forth by dragging.
No special technique is needed. Just hold on to the drill, drag your mouse far to the right, and hold it there.
Oh no, the wall is broken! Clearly, living in the tiniest room was a bad idea.
Click the hole to fix it.
Then click the mirror to hang it up. We're still good!
Pull down the blind!
Hey, at least this task doesn't require any of those dangerous power tools.
Just grab the handle on the blind and pull it down to cover the window.
The blind doesn't stay down even on your second try, and third time's certainly not the charm.
Gotta cross it out anyway, so we can forget that this was ever on the list.
Check on the TV!
Yeah, this one's completely foolproof. It just needs to be plugged in.
Drag the plug onto the socket and hold it until it sticks. Easy peasy.
Back out to find the TV smashed on the floor. It was too good to be true!
Click the TV to fix it.
Hang the painting!
Click the corner where the painting is to zoom in and make the markings appear.
Then click the cross to pull out the drill.
Just like before, drag the drill far to the right and hold it to make a deep hole. Oops, that was too deep.
Click the hole to fix it with the screwdriver.
And finally, click the painting. That dog is looking fabulous!
There, all done. You totally got this!
Escape from the Mysterious Cottage
Just as with the previous games, the game is further down on the page (this time, below the table of contents) and there's hints and solutions in Japanese under that.
The developer (perhaps we should just call him Potato-sensei or Potato Teacher based on his twitter handle) also says that future escape games might use this compact/short game format.
Exploration
From right to left, we have the locked door with ten buttons, a window with letters drawn in the frost, a mug with water that spills onto the table when you touch it, and a stopped wall clock that's at least consistent between its analog and digital displays.
You also see an upper floor, and all you need to do to get there is click it! There's another window with letters, a television with four outlines you can fill in by clicking, and a six-letter box.
Trail
Use the clue from the spilled water to unlock the TV.
Click the outlines 2, 1, 3, 4 times to make them match the lengths of the water trails.
This makes the TV show a clue consisting of a series of images.
Visual
Use the clue from the TV to unlock the box under it. (外 is "outside".)
Each broken window pane shown on the TV represents one of the eight panes visible inside the house. For example, the first one seems to be on the upper right of the bottom window but since you're inside the house you'd see it on the upper left of the bottom window, marked with the letter f.
Following the same logic for each window pane (or just doing a few and then making a lucky guess), you find that the code is
forest. Enter that into the box and open it to find a piece of paper with a single digit on it.Stain
The digit on the paper is visible in a wet spot, so (click the paper to select it and) dip it in the spilled water to make all the numbers appear.
Escape
Use the remaining clues from the game to unlock the door.
The clock helpfully gives you a four-digit time, and those four digits (1035) appear on the paper in the bottom-left, bottom-right, bottom-middle, top-left positions.
Push the buttons in those positions, then open the door and leave!
Reoda: Chapter 1
Chapter-01: Prologue
If you've played Pixelkobo's previous series (yes, this is a sequel to them), you might know that the FPS-style navigation isn't the only gimmick in this series.
Background story summary
If you were playing this from the home page you'd have to scroll through two huge walls of Japanese text to get to the game. Feel free to put those pages into a translator yourself, but anyway…
Tika (not an AI) has given you, Hanto (not an American secret agent) a mission to save Dr. Reoda (not a Renaissance genius), who's gone missing together with his lab chief while researching a new energy source.
He's been spotted at a famous area in the Solomon Islands where people gather for cycling, but satellites show a mysterious structure on a nearby island.
Oh also, you're on a spaceship leaving Mars and Tika is checking you have your wits intact by asking you to find a hidden photograph on the ship. By the way, she says, it's a fully nude photo of her.
Fail
You start off facing an airlock with a bright red light next to it. Pushing it opens the airlock and sucks you out into space, Game Over!
(Text on game over screen:
Truly unfortunate, but you have died.
Top→Continue to return to your latest save point.
If you have passed at least one save point, Top→New Game to play from the start.)
Making sure not to click the power button (which kicks you out to Pixelkobo's homepage), carefully click Top and New Game to restart.
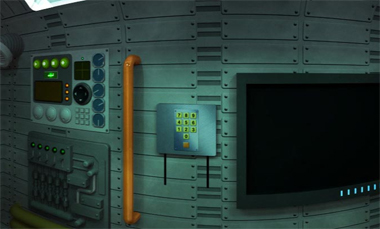
Exploration
Let's try again. There's a red light beside the airlock, don't push it!
Turn right to look at chairs with numbered boxes above them.
Turn right to look at another airlock with letters around its edge. The button on this one doesn't work, thankfully.
Turn right to face a wall full of control panels, none of which you can activate. The top-left panel has lots of controls and displays, the bottom-left panel has pipes, sliders and screws, the middle panel is just a plain old keypad that's mounted on vertical tracks, and the right panel is basically just a television screen.
We're not done yet! On each screen, you can also look up and down, but there's only one new thing to look at.
Look at the keypad and then look down to find a three-button box. Those buttons don't work either, but you can click the cap on the box to reveal a screwdriver.
Unscrew
Look at the bottom-left panel (with the five green lights), and find out where you can use the screwdriver on it.
(Note: while you can examine items, you cannot select them because they're automatically used. For example, when you have the screwdriver, you only need to click on the screws.)
While zooming in on the lower half of the panel, unscrew the box with the yellow border on the right to reveal a key, which the game helpfully labels 1.
Unlock (1)
Unlock the 1 box (above the left chair), revealing a torn clue and a button with an interesting symbol on it.
Push that button. What happened?
That button adjusted one of the chairs, so examine the left chair and click it to shift it aside, revealing a clue that hides a key. (Taking the key updates the item icon.)
Oh, and the game records the clue for you, which is kind of a save point. If you leave/die and continue the game you'll restart facing that clue. But as far as gameplay goes each puzzle already autosaves normally.
Unlock (3)
Open the box above the right chair, move its torn clue aside, and push the button.
Then examine the right chair and swivel it to reveal another clue.
Icons
You've seen both halves of the "recorded" clue, which means the game will now let you solve a puzzle with that clue. Which puzzle is it?
Mentally piecing the clue together, you find that you need to provide digits corresponding to the lights, handles, seats, windows and airlocks.
Careful examination of the room reveals that:
There are 2 lights, next to the front and back airlocks
There are 9 handles (2 at eye level, 2 on each airlock, 1 on ceiling, 2 on floor)
There are 3 seats
There are 4 windows (2 on each side)
There are 2 airlocks
so enter 29342 into the keypad which slides aside so you can take the remaining key.
Unlock (2)
Open the remaining box above the middle chair, move the torn code there and push the button.
Then move that chair aside to reveal a letter keypad.
Hex
Use a clue from the top left panel to unlock the letter keypad.
The dials along the right edge of the panel are pointing in neat multiples of 60°, which neatly lines up with the letters on the harmless airlock.
The top-right, top, bottom-left, top-right, bottom letters on the airlock form the code FACFD. Entering it opens up the keypad, revealing a clue that the game records.
Green
Use the clues from the torn notes (one you just saw and three in the boxes) to unlock the top left panel.
Start with the piece in box 3 which has the arrow on it and shows green circles with square and triangle holes.
It's connected to (i.e. its tear matches) the piece in box 1, which adds two diamonds and a square.
That's connected to the piece behind the middle chair, which (completes the square and) adds three circles.
That's connected to the piece in box 2, which adds a diamond and a circle.
Combining all those parts, you find that the code has a square, triangle, two diamonds, square, three circles, diamond, circle.
Numbering the buttons on the panel from 1 (for the left triangle) to 4 (for the right diamond), you need to push them in the order 3144322242.
Lines appear across the display, along with dots that flash from left to right.
Spots
Use the dot/line clue you just saw to unlock the three-button box under the digit keypad.
The dots appear on the top, bottom, middle, bottom, top, top, middle lines, so push those buttons to open the box and then take the remote controller from inside.
Screen
Turn on the big screen, which displays the photo!
Reoda: Chapter 2
Chapter-02: Small Island in the Southern Pacific
(This game lagged for me, but you can just do a regular page reload when that happens.)
After a quick recap of the story, you and your trusty assistant land on the mysterious island known to locals as Awatoku. (I'm sure it's an inside joke.) But a building right next to the helipad can't possibly be a secret base, right?
Exploration
(For reasons that may be quite clear, there are more screens in this game than you need to look at. So this is an almost-complete but not quite complete exploration.)
After landing on the helipad, you can take a look around. There's a rather obvious path lined with large and small trees, but you can also
click just to the left of that path to take a look at mysterious fragmented structures on top of the building.
The tree path has horizontal yellow lines painted across it, each connecting one tall and one short tree.
On the fourth line from the helipad (fifth from the end), click the short tree on the left to zoom in and find a RE piece. Is it a stone? button? badge? medal? Who knows.
As you reach the end, you see three small trees ahead and eventually come face-to-face with the rightmost one. Unfortunately, it's completely boring.
Turn right and make your way up the hill. Nothing here, so click the ground again to go forward, and the left arrow should appear.
Turn left to find stone steps leading up to a locked door (near a weird rock). You can also click the bottom of the steps to find some large rocks. Let's see… the left one covers a manhole, the back one covers an OFF piece, and the right one covers a fierce snake!
Game Over, but you can just click TOP and then Continue. And your last checkpoint should be at the deadly rocks anyway.
Back out, turn left and make your way back down until left and right arrows appear. At this point, you can turn left and backtrack to the helipad, but there's nothing new to see there.
Instead, turn right to face the middle tree, zoom in on it and pick up the ICE piece.
Turn left and walk towards the building, where the staircase has two holders in front but only one has a tiny pitchfork in it.
A white platform to the right of the building catches your attention, and you move the rock on it to reveal a GOTO piece.
Entering the building, you find nothing on either side so make your way to the middle where a manhole cover(look down) is surrounded by arrows.
Turn left to face two pedestals and a rectangular cannon. The left pedestal has a circle of buttons on its top, five blue and one pink.
Back out, turn right, and continue to the end of the building. In front of the locked double doors, you see a grid of letters (actually a keyboard) locked by three numbered keyholes.
There's nothing to do on either side, so just turn around and move forward onto the manhole.
Turn left here, and you see a rock on the right that hides an ODA piece.
Ending
Collecting all the pieces gives you an abrupt ending where you get really confused. This place is all puzzle but no clue!
Tika points out that it might not even be a good idea to break in if whatever's inside is so heavily protected.
And what do those stones say anyway?
Goto and Oda may sound like Japanese surnames, but obviously the stones are telling you to go to Reoda's office.
No time to waste on this island, proceed onward!
the first 4 games were interesting. I'm sure the Nicolet game will be cool too.
Here it is! And yes, it's a great game.
Honey
Fox was following Bear's video tutorial when he realized there was no honey in the cupboard.
Exploration
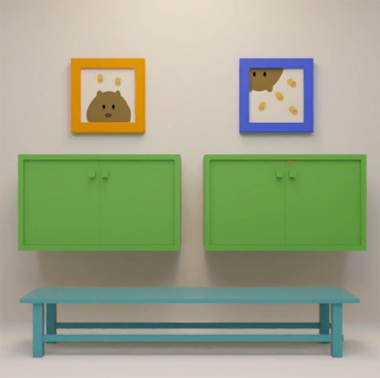
You start off facing two green cupboards, the left one only having a pair of yellow mittens and the right one locked with a keyhole. You can also zoom in on the cute picture frames above.
Turn right to face the fireplace. On top of it, there's a four-button box with snowflake buttons that change size, as well as a plain yellow box with a keyhole on its side.
Turn right to face a comfy rocking chair and coffee table. The trapdoor on the right is secured with nails.
Turn right, open the door and leave.
The nameplate straight ahead tells you that this door belongs to Cow. Open it and talk to her to get a request for a candle. (You can also zoom in on the lamp beside the door.)
Turn left to face some huge balls of snow.
Turn left to face the doorway back.
Turn left to face a hole in the wall. A small panel is barely visible on the left, and it has some sort of hole under it.
Inside, you find three snowmen with different-colored hats partying against a wall with snowflakes.
Flakes
Use the clue from the snowman room to unlock the box on the fireplace (in your room).
Paying attention to the size of each type of snowflake on the wall, you find that you need to click the buttons
2 1
3 0
times. Open the box and take the candle.
Wax
Light the candle in the fireplace, then walk over to Cow and give it to her.
She gives you a bottled drink and lets you explore the room. The counter here has a five-slider box and the back wall has two framed pictures as well as a shelf with stacks of colored plates (that you can click to examine better).
Don't forget to open the oven and take the pink mittens from inside.
Stacked
Use the clue from the plates to unlock the box next to the candle.
Count the plates that match (in color and circle count) each slider, and you find that there are 4, 2, 4, 3, 1.
Click the sliders 3, 1, 3, 2, 0 times and open the box to find a winding key.
Unlock
Use the winding key on the yellow box (in your room), which contains a gold key and a row of colored rectangles beside a white round peg.
Use this key to unlock the right cupboard, which contains a pair of purple mittens as well as a box with four bee buttons next to a circle.
Bees
Use clues from the yellow box and the bear/bee pictures to unlock the box in the right cupboard.
(The peg indicates that those clues match and are read in the same order.)
The yellow, green, blue, yellow pictures have 2, 1, 4, 2 bees, so set the buttons accordingly and open the box to find a clear glass with a straw.
Mitts
Following the large framed picture in Cow's room, give the mittens to the snowmen in the order purple, yellow, pink.
They reward you with a shovel, and then the middle one asks for a pink popsicle/ice pop.
Dig / Exploration 2
Use the shovel to clear out the snow, revealing a whole new area.
In front of you are four birds (adequately and colorfully dressed) tied to a blue basket. (You can also zoom in very closely on the screws where they're attached.) Zooming in on the red plate next to it, the game helpfully tells you what's missing.
Turn right. Bear's door is locked, and the tiny door on the right has weird shapes on its buttons.
Turn right to face the way back. On the left, a weird shadow on the floor turns out to be a bottle opener.
Turn right to find two almost identical doors. The right one is locked.
So enter the left door, where a mouse with a green bowtie asks for a drink in a glass. For some reason, he has three pencils on the nearby table.
Behind him, there's a giant (but not life size) poster of Bear with a shovel, and clicking the poster removes it to reveal a hole in the wall! This room also has a heart-shaped rug on the floor and a cupboard with shape buttons labeled by animals that has a pair of sunglasses sitting atop.
Cross
Use the clue from the bird basket to unlock the tiny door.
The screws with vertical, circle, cross, horizontal slots are connected to the birds wearing yellow, purple, green, maroon jackets.
Click the buttons 2, 3, 1, 4 times and open the door to release a worm who asks for a leaf.
Serve
Examine your bottle and open it with the opener, then examine the glass and pour the drink out.
Give it to the mouse, who rewards you with the acorn pair.
Shapes
Use clues from around the game to unlock the cupboard in the left mouse room.
The lamps around the snowy area are almost identical, differing only where they connect to the wall. Specifically, the area above each lampshade is a different shape.
The rooms marked with the fox, cow, mouse (green), mouse (red), bear nameplates have lamps with circle, square, pentagon, octagon, hexagon shapes.
Push the buttons 4, 0, 1, 3, 2 times and then open the cupboard to find a spanner and an even shinier key.
Unlock 2
Use this key to unlock the other mouse door.
The mouse with the red bowtie asks you for a latticed pie. This room also has a bear poster covering a hole in the wall, and it has a star shape on the floor as well as a cupboard with a hat on top. The cupboard is locked with some picture buttons having different-colored outlines.
Choice
Use the clues from the mouse rooms to unlock the cupboard in the right mouse room.
The rooms differ in four places, and each button can be toggled between a pair of differing objects.
Looking at those differences, you find that the green, red, red, green rooms have the heart, two pencils, cap, shovel, which means you need to push the first and last buttons.
(In other words, every button starts off matching red so you only need to click the ones with green outlines.)
Open the cupboard to find an envelope and a crowbar held in place by bolts.
Tools
Use the spanner to free the crowbar in this new cupboard.
Then use the crowbar to remove the trapdoor in your room (the starting room!) and find an apple.
Message
Examine the envelope and flip it over to find that it's a letter to Cow from Red Mouse.
So walk over to Cow and give the mail to her. She reads it and immediately asks for an apple.
Give Cow the apple, and she immediately makes you an apple pie.
Give the pie back to Red Mouse in exchange for a peach pair.
Ride / Exploration 3
Place both the acorn pair and the peach pair into the plate beside the birds, who give you a ride out of this snow hole. Maybe you've escaped, but that's not the goal!
Five small snowmen line up in a row surrounded by weird markings on the ground, and they talk a lot about snowmen with hats and then a sled.
Behind them, a tree stump has three colored buttons under a row of lights. The tree on the left has something stuck into a tree branch, but it's too high to reach.
Colors
Use the clues from the little snowmen to unlock the tree stump.
The speech bubbles show hats that are green, red, brown, red, green.
So push the CLRLC buttons and open up the tree stump to find a wheel.
Spin
Climb back down, make your way to the hole with the three snowmen, and place the wheel under the panel beside.
The wheel automatically turns and the panel rises to reveal a hammer.
Smash
In both mouse rooms, use the hammer to smash the walls behind the bear posters.
You find a pair of scissors and a pink popsicle.
Grape
Give the popsicle to the snowman with the green hat, who consumes it immediately and gives you a sled.
Ride 2
Take the bird ride back up, and give the sled to the little snowmen.
At the end of the cutscene, they get to meet their idols who give you a ladder and give them tiny scarves.
Tall
Take the bird ride back up yet again and place the ladder against the tree.
Now you can zoom in on the leaf and detach it using the scissors.
Give the leaf to the worm, who climbs up and unlocks Bear's door.
As you enter, you notice that he's sleeping soundly. Worm is standing on the headboard and asks you for a rope. Also, a purple poster on the wall tells you where Bear hides his honey, and the trapdoor on the floor has five buttons that seem to have pineapple shapes under a row of six lights.
Trail
If you return to where the little snowmen were, you can click on the ground to find out where all those markings came from.
Use that clue to unlock the trapdoor in Bear's room.
The marks on the floor are pawprints that start from the bottom and end at the right.
Along the way, they pass through the 3rd, 2nd, 1st, 2nd, 4th, 5th circles.
Push those buttons on the trapdoor to open it and find the rope.
Give the rope to the worm, who ties it around the headboard and asks for three more animals.
Team
Talk to Cow, Green Mouse and Red Mouse to get them to join you, and then use each of them on Worm.
With all your powers combined, the bear bed slides aside to reveal a green cupboard that has five animal buttons.
Patterns
Use the clue from the small snowmen to unlock the green cupboard.
From left to right, the patterns on the scarves are horizontal, vertical, diagonal-left, diagonal-right stripes and then circular dots.
Those appear on the nameplates for Green Mouse, Cow, Fox, Red Mouse, Bear.
Set the lock accordingly and open the cupboard to find the honey and end the game! Everybody gets honey toast, and the still-sleeping Bear gets the apple pie.
The area is not suited for this kind of commercial or agricultural use. No such use is in the
surrounding area of family homes. lt is an incongruent use of property. Historically, the land
was originally used for cattle and then subdivided for small non- commercial family homes with
backyard hobby farms MyPrepaidCenter
Update