
 Hi, it's escaping time!
With Amajeto's light and fresh room we move closer to spring and all the cute tiny birds support that feeling. TomoLaSiDo reached us a bit late for Valentine, but never mind it's fun - actually, it's not much difference whether you're collecting hearts or holly branches. Your journey with Pixel Kobo continues, and this time you get into another office which isn't boring at all - the entering it is rather exciting. Rinnogogo brings beautiful and emotional story, and quite a long one, too.
Have a good time and enjoy!

Amajeto (one more from last year's supplies) locked you up in a room decorated with birdies and one very small fisherking. Your goal is the same as usual - collect ten greyish tiles and complete the picture which gives you the key from entrance door. Can you escape?
The cursor isn't changing, no save button, one ending.
P.S. Another Amajeto's room with birdies can be found in WE N°179.
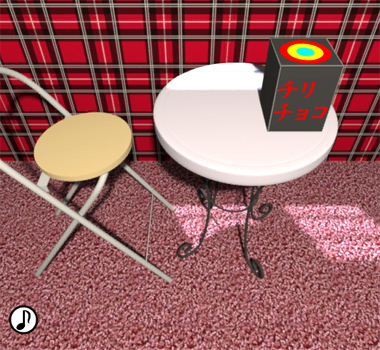
TomoLaSiDo's tartan room hides six chocolate hearts. It would be nice to find all of them, however, more important is to get six parts of the key from entrance door - that doesn't take long and depends on you whether you wish to stay a little longer and try to solve more cunning puzzles (and enjoy a merry ragtime tune) or just leave.
The cursor isn't changing, no save button, one ending.
Last week you left behind Pixel Kobo's office, triumphant, holding the discovered chip. Now you need to explore a storeroom, but getting inside may not be that easy and for an escape game surprisingly dramatic. It's the only 'action' part, though, and when you get in you're safe and you may even leave the room and return without being bothered. Otherwise it's standard escape room with puzzles, hints and clues. To be continued next week!
The cursor isn't changing, autosave, one ending.
Rinnogogo, spring in mind already, tells us a simple story about a promise and a dandelion bouquet. And also a persistence as the path to fulfill the promise is rather long and demanding. Many obstacles are in your way, you'll find puzzles with missing hints and clues for unknown puzzles, locks without keys and keys without locks, too, but remember, all puzzles are clever and intuitive - if stuck you probably overlooked something. No need to tell that the art is lovely and unique, and the tune is relaxing; high playability granted!
The cursor isn't changing, autosave, one ending.
We love escape games, and our readers love talking about them and sharing hints! How about you? Let us know what you think, ask for clues, or help out other players in the comments below.


looking forward to these.
Escape Challenge 103: Room with Chili Chocolate
Exploration
Window Gazing
1. On the first screen, you'll be facing a table with a chair, a tree, and a window.
2. Click on the table, then open the box to get your first piece of chocolate. Back up.
3. Click on the small tree, and click on the blue ball to get the first piece of the key. Back up and turn left.
Tables and Trash
1. On this screen, you'll be facing a table next to a bin, a poster, and a safe with a dial.
2. Click on the bin, and inside is your second piece of the key. Back up.
3. Click on the table, and you'll see a scale. Nothing we can do here now, so back up.
4. Click on the poster above the table. Again, nothing to do here.
5. Back up and turn left.
Cooking and Clocks
1. On this screen, you'll be facing the door and a small stove, as well as a strange clock above the stove.
2. Click below the stove to get the third piece of the key. Back up.
3. Click the stove. You'll see a pot as well as several buttons. Nothing to do here yet, so back up.
4. Click the clock. Not super useful for telling time, but I bet it's a hint for a later puzzle. Back up and turn left.
Drawers and Drawings
1. On this screen, you'll be facing a cabinet, a picture, and a familiar alcove.
2. Clicking on the picture will give us an additional piece of chocolate, though this one isn't quite ready yet. Back up.
3. Clicking on the cabinet reveals three puzzles - one on each drawer. But this is the exploration section, so we'll come back to these later. Back up.
Bathroom Doodles
1. Click on the alcove, and enter the bathroom.
2. Click on the toilet and follow the instructions.
3. Eventually, you'll see a stick figure holding some familiar chocolate labeled "before." Exit the bathoom - it's time to solve some puzzles.
Puzzles
Cabinet Screen Puzzles
Top Drawer
You'll see here the flame heart from the picture on this screen, with four buttons on it.
The puzzle here is to draw the shape with one connected line.
If the buttons are 1, 2, 3, and 4 from bottom to top, the solution is:
1 4 1 2 4 2 3 2
Solving this puzzle gets us another piece of chocolate and another piece of the key.
Middle Drawer
You'll see a red and white grid, and you can change the white squares between red and white. Where have we seen a similar grid?
The poster above the table!
Click on the center button to turn it red, and then click the large button to open the drawer.
Inside the drawer, you'll find another piece of chocolate and another piece of the key.
Bottom Drawer
You won't be able to complete this puzzle until you've solved the stove and scale puzzles.
Where have we seen some three-digit numbers?
The scale!
Subtract the two numbers you got from the scale to figure out the code for this drawer.
214
Inside this drawer, you'll find yet another piece of chocolate and another piece of the key.
Stove Screen Puzzle
Looking at the stove, the three buttons point to different sections of the eye. Where else have we seen a similar shape?
The box on the table by the window!
Click the buttons to have the color match the pattern from the box:
Click the first button once, the second button twice, and the third button four times. Then click the large grey button to activate the stove.
After you've solved the puzzle, you'll have the ladle (which is apparently full of water?).
Scale Screen Puzzles
Water Weight
Using the ladle you got earlier, go back to the table with the scale.
Pour the water into the scale, and then add the unfinished piece of chocolate.
This gives us two numbers: 745 and 531. Wonder what these could be for?
Saving (Safe-ing?) Face
Go back to the dial screen above the scale. Where have we seen something familiar to this?
The clock!
Using the hint from the clock, set the dial to SW, NW, NE, and SE, pressing the large button between settings.
This opens the door above the dial, revealing a piece of chocolate and a ball with a face.
Go back to the scale, and drop the ball with a face into the water (RIP) and get your piece of chocolate back!
Congrats! You've escaped!
Thanks Thomas. I enjoy your walkthroughs.
Birdies Room Escape
Exploration
Chair and Cabinet
1. On the first screen, we can see a chair, a cabinet with several square drawers, and a picture frame with several missing pieces.
2. Click near the plant on top of the cabinet, and you'll be able to pick up the first puzzle piece.
3. That's all we can do on this screen, so back up and turn left.
Windows
1. On this screen, we see five black cabinets, some decorations on top of them, and four windows with blinds at varying heights. Not very useful for keeping out the sun!
2. Clicking on the center decoration with the titular birdie, you can find another puzzle piece. Back up.
3. Clicking on the cabinets reveals five puzzles we don't have the clues to yet, unfortunately. Turn left.
TV
1. On this screen, we've got a small bookshelf, a TV with a light above it, and the door we'll hopefully escape through.
2. Click on the string on the lamp to turn it on. A blacklight - how groovy!
3. Click on the bookshelf to see quite a few clues, as well as a puzzle piece.
4. Take note of the color of the eggs as well as the lit-up letters, back up, and turn left.
Couch
1. On the fourth and final screen, we see a couch and coffee table, another bookshelf (though this time on the wall), and four picture frames showing a variety of birds.
2. Click on the coffee table, pick up the fourth puzzle piece, and take note of the direction the birds are facing on the decoration. Back up.
3. The only other thing of note here is the fact that the third picture frame moves when you click on the corners. I'm sure there's nothing more to that.
Now that we've explored, let's see what puzzles we can solve!
Puzzles
Cabinet 1
1. Turn left twice to get back to the cabinet screen, taking note of the square drawers which are now purple.
2. The first cabinet has two squares. Where have we seen a hint that could help us with this one?
The birds on the log!
L R R L L R
3. Solving this puzzle gives us another puzzle piece.
Cabinet 2
This cabinet is the last to be opened.
1. Clicking on this cabinet reveals four dials that cycle from 0-9 and are yellow, blue, orange, and green, in order. What puzzle do we have left that could reveal the combination? We have a TV remote.
1. Go to the TV screen, and use your newfound TV remote to turn it on.
2. Take note of the pattern that appears. Where could this be useful?
The picture frames above the couch!
Use the pattern to click on the right corners, causing all the frames to go slack.
Bottom left
Bottom right
Bottom right
Top left
Top right
3. The picture frames can now be flipped, revealing colors on the back, as well as a puzzle piece behind the third frame.
4. The colors look familiar - the second cabinet's numbers are the same set. How can we figure out what number correlates to each color?
Flip the frames back and use the number of birds to figure out what color should be what number.
5 9 6 4
2. Opening this cabinet gives you the tenth and final puzzle piece!
Cabinet 3
1. Click on the third cabinet gives us four dials that cycle through a (limited) set of letters.
2. Where have we seen a set of letters?
Under the TV!
Entering them in order doesn't help though, so there must be more to it. Use the dots on the letters to figure out the real order.
B U S H
3. Solving this puzzle gives us another puzzle piece and the TV remote.
Cabinet 4
1. Clicking on the fourth cabinet reveals four buttons that cycle through colors when you click on them.
2. Where have we seen something that could indicate the right combination?
The eggs under the TV! Just like with the third cabinet, just putting the colors in the first order doesn't work. Use the size of the egg cages to figure out the right order.
Red (3) Yellow (1) Green (6) Blue (2)
3. Solving this puzzle gives us our seventh puzzle piece.
Cabinet 5
1. Clicking on this cabinet reveals a 4x4 grid of white squares that turn purple when clicked.
2. Where have we seen a similar grid before?
On the first screen!
O X O O
X O O O
O O O X
O O X O
3. Solving this puzzle gives us an eighth puzzle piece.
Final Puzzle
1. Turn right to return to the initial screen, and place your ten puzzle pieces in the picture frame to "complete" the picture.
2. It doesn't look quite right. Let's see if we can fix it.
3. Click on the picture frame, and rotate the pieces to put the picture together
1 2 3 2
1 3 1 2
2 3 2 1
1 2 3 1
After this, you'll have a hummingbird!
4. Solving this puzzle automatically backs you out, where you can see the newly opened alcove holding the gold key. Take it, turn left twice, and use it to open the door and exit!
Congratulations, you've escaped!
thanks again, Thomas. Another great walkthrough.
Hey, long time fan here. A while ago I came across a really cute escape type game and I'd love to see it featured on JayIsGames! What is the best way for me to submit the website?
Firefox workaround: wait a minute for all 4.29MB of the game files to load, then open the console with Ctrl+Shift+K and type
init()to make the game load.Reoda: Chapter 4
Chapter-04: Doctor's Message
Intro
(This scientist's not a fan of the whole five-second self-destructing message gimmick, so he has prepared a ten-minute speech for you on the memory card you retrieved.)
Doctor Reoda explains that he's already completed the new battery prototype, but to protect it from misuse he's implemented multiple layers of security, with the code for the final lock split into SD cards hidden in various places.
Unfortunately, every single card has been stolen. Fortunately, he's designed them to require a special card reader, of which he's made one for himself, one for his chief, and one that's a secret… but that's not the only secret about them!
Anyway, each of the stolen cards has a GPS tracker, and the video message you're watching comes with a helpful app to find them. As for actually retrieving the cards… all he has to offer you is an awkward prayer dance.
The GPS information shows one tracker at your location, as well as another in Chiba near Narita Airport. You've got to stop them from just flying away with it!
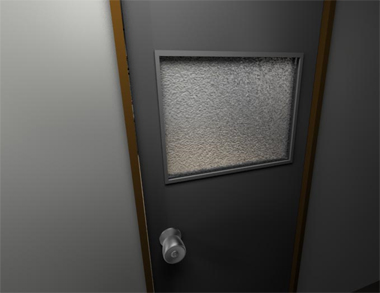
The location for this game is an abandoned shopping arcade, at the top of a suspicious flight of stairs. Good luck!
Danger
Climb the stairs and turn left to find a door. Opening it leads to death.
Good thing you can respawn right outside the door. What do you need to do?
After opening the door, quickly click the Back button in the bottom right to close it. As the cutscene shows you, this gives you enough preparation time to win the battle.
Exploration
Let's finish exploring this stair area. Turn left to face the landing, where you find
that one of the floor tiles hides a yellow J plate.
Click the stairs that lead downwards, where you see some gray squares marked. You can't leave through here.
Turn right to face the corridor again, now with an unconscious body on the floor. Zoom in on the door, open it and enter the room.
Let's start with the desk on the left, which has a stuck drawer, a locked drawer, and three unlocked empty drawers. (Opening them too many times freezes the game, so I recommend you back out after you're done.) There's also a weird note on the floor that you need to put back after reading, as well as a book on the table with a blue D plate hidden in it.
Look at the window (the game autosaves), where you can close the shutter to find a clue with colored squares and letters.
Under the window, one of the tiles looks slightly different. Check it to find a plate with an unusual diagram as well as a dial that can be turned between the ON and OFF positions.
To the right of that, there's a locker on the floor with both handles tied and padlocked together.
Turn right to face the lockers. The left one has keyholes on each door, and the middle door already has a key in it but it's locked by a keypad instead. The right one has two doors locked by one keyhole.
Turn right to face the doorway back.
Turn right to face a stack of cardboard boxes. It looks like a poster has been ripped off the wall and only a cross mark remains. Move the top left box to get to the bottom-left box, which contains a safe with three shaped buttons. You can also move every box in the middle stack to find a green A plate at the bottom.
You're not done yet! Look down at the floor in each direction and you'll find nothing.
Face the door and look up to find a trapdoor in the ceiling.
Face the window and look up to find a clue attached beside the ceiling light.
Unstuck
Let's deal with the left desk drawer first. As the clue on the floor suggests, it's possible to open two of the drawers at the same time.
In particular, if you open the second drawer from the bottom, you can also open the left drawer to find a red B plate.
Numbers
Use the clues from the ceiling and stairs to unlock the keypad locker.
The ceiling clue looks rather vague, but it's actually telling you to consider the stair treads from nearest to furthest. (The nearest stair to you is physically at the top but appears at the bottom of the screen.)
The numbers of squares on those treads form the code 142512, so enter that in the keypad (and press Enter) to open the locker and find a folded note with a hole in it.
You might also notice that the bottom half of the locker looks different. It's actually a plank that hides a wire cutter!
Wireless
Use the cutter (i.e. just click) on the small padlocked locker and open it to find a four-symbol box.
Symbols
Use the clue from the folded poster to open the box you just found.
Hint: what's missing from the poster?
The poster is missing its corners and center, because those parts are on the wall near the stacked boxes.
This means the middle symbol is actually a cross, and the whole code is
🞵#🞵×●×#
Push those seven buttons and then Enter. Even though the game tells you this is an ERROR, you can back out and open the box to find a key.
Unlock 1
Unlock the locker door to the left of the keypad door, which contains a hook (actually, a pole with a hook).
Trapdoor
(Use the hook to) open the ceiling trapdoor, where you find an unusual gold marking above a long rectangular display.
The gold marking refers to the dial hidden under the floor on the window side, which you need to turn on. (The clue covering the dial is of course a side view of the trapdoor with something glowing from the display.)
After doing so, the display now shows glowing green symbols. Where can you enter that code?
Click the ▲⬤▲■▲⬤▲ buttons on the safe in the lower-left cardboard box, and open it to find a second key.
Unlock 2
(Use the new key to) unlock the locked door to the right of the keypad door. Inside, you find a safe with a letter keypad.
Letters
Use the colored letter clues around the game to unlock the letter keypad safe.
The colored squares on the window match the plates:
Red B plate in desk drawer
Blue D on book on desk
Yellow J under floor on stair landing
Green A under cardboard boxes
Push the FBDJAG buttons, then open the box and take a third key.
Unlock 3
(Use this key to) unlock the remaining locker, which contains a tied-up man!
Ending
This man is Dr. Reoda's lab chief! He's also got a weird name so I'll just call him Mr. Thomas.
He tells you his story of having to leak the memory card locations after being kidnapped by terrorists, and getting immediately recaptured after release because they needed one of those special readers.
It turns out that his reader is the watch he wears. It only works after verifying the wearer's DNA and checking that their biological activity is normal, so that in order to decode the cards they had to both kidnap the chief and keep him alive.
This abandoned office was indeed where the cards were stored, but just before you arrived the terrorists returned with the chief and the cards were missing!
No problem, all you have to do is check the tracking app again…
Now there are three locations, and two of them are moving! (The other one is the tablet you're holding, of course.)
While Mr. Thomas speculates about the cards being stolen again from the thieves and how to track down all these sets of thieves, you figure out that both of the missing cards are moving very fast over the sea, and are therefore being carried in planes.
Before you leave to chase after them, he tells you that you're actually wearing the same watch as him. You had the third reader all along!
Hello, you can send to [email protected]
Dandelion
Exploration
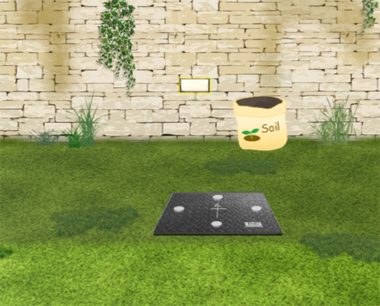
The game starts with a bouquet of blooming sunflowers (actually dandelions ). You also start off facing a wall with a vine leading up, a button on the wall, and a wooden box with tall buttons that can be filled up with red halfway or all the way.
Clicking the top of the vine, you find four sets of red flowers growing out from it.
Turn right. There's a metal plate on the floor with four buttons around a compass arrow, which points towards a button on the wall as well as a bag of soil. You can also zoom in on the vines hanging from the top of the screen.
(For obvious reasons, we'll call this direction North.)
Turn right. Something appears to be extending from the dirt patch on the ground. Along the wall, you see a blue box with white and green buttons, a tall ornate stone door, another button and a tree which hides a red spade behind it.
Turn right. There's an empty stone pool here with a button above it, and on the right is a blue board with a keyhole in it.
Dig
Use the spade to remove the topmost bit of soil from the bag, revealing a note with numbers and pictures.
(The game won't let you solve the next puzzle without this item. In fact, if you observe what behaves differently you can figure out where to enter the code.)
Layout
Use the clue you just found to push the wall buttons correctly.
The pictures on the clue indicate objects in the garden, each appearing on a different screen. In fact, the note layout matches the garden layout, with top being north.
Since 1, 2, 3, 4 appear on the RUDL sides of the note, push the buttons on the ENSW walls. The last button opens up to reveal a blue key.
Unlock (blue)
Use the key to unlock the blue board, which turns out to be a cover for a slightly rusted pipe with a flower-shaped handle.
Bloom
Use the clue from the tall vine to correctly turn the handle you just found.
The groups of 1, 2, 3, 4 flowers are on the RRLL sides of the vine.
Turn the handle accordingly and the pool fills up, and a bird picture floats on top!
Flying
Use the clue from the bird picture to unlock the blue box on the east side.
From left to right (as the top arrow indicates) the birds are green, white, white, green, white, and they appear on the top, bottom, top, bottom, top rows.
Push the ⌝ ⌞⌜⌟ ⌜corners on the box, which opens to reveal a pair of shears.
Trim
Use the shears to remove the vines on the north side, revealing a sequence of letters.
Spell
Use the letter clue you just found to unlock the metal panel.
Clearly the letters represent cardinal directions, but what's D?
The letter D appears on the panel as part of the END button. Therefore, you have to read the clue as
W, S, N, END, W, E
Push those buttons to open the metal cover and reveal stairs leading down. Before you go anywhere, pick up the metal jug on the stairs.
Also click the top of the trapdoor to find a lighter taped to it.
Exploration 2
Welcome to the basement! There's a picnic table here with some colorful coffee cans on it.
Click the left side of the screen to view an unusual green box. The cup in front of it tells you that you can enjoy tasty soup by just adding hot water.
Back out and click the pillar to look behind it. The black box has a picture of drink containers, a space for you to type, and a rectangle divided into colored squares.
Click the area to the left of the black box and pick up a coffee cup from the white saucer.
Back out and click the right edge of the screen to look in the corridor. The red door at the end has another password lock under some white stains.
Back out and click the door on the right wall of the corridor. This panel has four screws and a picture of a potted plant.
Back out all the way until you see the stairs leading back up. Behind the pillar, you find a fireplace with only the rack inside.
Grande
Use the clue from the coffee cans to unlock the brown cupboard on the west side of the garden.
The sliders on the lock are red, so you should only consider the red cans. There are five of them, and the third and fifth ones are shorter than the others.
Click the sliders 2, 2, 1, 2, 1 times and open the cupboard to find some firewood.
Boil
Fill the jug in the pool on the south side of the garden.
(Go down the stairs, turn around and face the fireplace.)
Place the wood in the fireplace. Next, it needs kindling.
Examine the note and crumple it up, then add the paper ball to the wood pile.
Light the wood pile using the lighter, then place the full jug on the rack.
Now you just have to let it boil…
Back out and zoom in on the fireplace again, and pick up the jug of hot water.
Pour it into the cup on the table, which releases some steam with a weird assembly of lines.
Steam
Something seems incomplete about the steam clue. Where is all the steam going?
Climb back up to the garden, and you'll see steam emerging from the chimney on the east side.
Use both these steam clues to unlock the red door at the end of the corridor.
The sets of lines on the steam clues are the top and bottom halves of the word FLOWER.
Type that into the password box and open the door.
Exploration 3
You're now at a cafe that's closed. A keypad in the wall needs a four-digit code, and it has drawings of food items on top. You can also zoom in on each of the tables, and the one in the far right has a blue cup on a blue saucer.
Turn right to face a doorway to the residential area. You can't open the door until you enter a PIN code into the nearby keypad. On the left, a bell hangs from a tall frame.
Turn left to face the entrance to the bar as well as the doorway back. Along the brick wall, there's a gray four-color panel with a shoe picture on top, and a leather board with some squares drawn on it. Each square has a different amount of its edges colored in.
Turn right to visit the shoe shop. It's also closed, but the window display is lit up.
Turn left and enter the bar, where a girl in a bunny suit serves you and then vanishes leaving the food and drink on the bar. You can also examine the drink menu on the back wall.
Shoes
Use the clue from the shoe shop to unlock the shoe panel outside the bar.
From top to bottom, the shoes are brown, black, red, blue.
Click the buttons 2, 4, 3, 1 times and push the Enter button to make one of the bricks pop out. It's a secret compartment containing a screwdriver!
Unscrew
Even using the screwdriver, the screws on the red door (in the corridor) just spin round and round instead of coming off.
Use the clue from the cafe to solve this puzzle.
With the potted plant at the top (exactly how you already see it), the lines on the tables point
- |

\ /
so turn the screws
0 2
1 3
times and open the door to find a ladder.
You can examine the ladder and click its top right corner to find some hexagonal nuts on the side.
Order
Use the clue from the drink menu to unlock the black cupboard in the basement.
Each drink contributes one letter to the password as indicated by the prices on the menu. For example, Cocktail 1 refers to the first letter of Cocktail, which is C.
The purple, blue, green, red, black pink drinks give you six letters that spell out the password CHERRY.
Type that into the cupboard and open it to find a piece of paper with holes.
Served
Use the remaining clues from the bar to unlock the keypad at the cafe.
The colors of the squares on the leather board match both the food at the bar and the plates they're served on.
For example, strawberries are red but served on a green plate, and placing the red square on top of the green square makes the digit 4.
Doing this for all the dishes gives you
something that roughly looks like
|.| ..| --- ---

|.| ..| |.. |.|

--- ..| |.. ---

..| ..| --- |.|

..| ..| |.| |.|

..| ..| --- ---
which is 4168, so enter that into the keypad and push ENTER to find a chain.
(Solving the puzzle makes the dishes disappear from the bar.)
Ring
Place the ladder under the bell, zoom in on it and attach the chain, then back out, pick the ladder back up, and pull the end of the chain.
A note falls out!
PIN
Use the paper with holes on the note with digits. Now you know which digits need to go into the keypad.
But the game lets you slide the hole paper off, to remind you that the digits appear in a spiral pattern.
In the order given by the arrow, the four remaining digits form the code 9834. Enter that into the keypad and you can proceed into the residential area!
Exploration 4
You stand on a paved road with doors on the sides. Each door has a colored sign but none of them will open.
On the floor, you se a cross mark and zooming in on it you see a circle of color-changing buttons. You can also click the stairway at the opposite end which has a spanner on it.
Back out and turn left (by clicking to the left of the cross). Three benches are placed around a table with four empty spots. On the back wall is a noticeboard with lots of notes you can't zoom in on.
Look under the table to find a pink cup on a pink saucer.
Back out and turn right. Your path forward is blocked by a canal, and on the other side there appears to be a laundry rack under a long window.
Finally back out until you face the doorway back. The window on the right has red and green bells you can ring.
Octagon
Use the clues around the residential area to unlock the cross on the floor.
Matching the button positions to the sign/door locations, you find that (in order, from bench to rack or from stairs to entrance) the top two are red and white, the bottom two are green and yellow, the left two are green and white, and the right two are yellow and white.
Make the buttons
- R W -

G - - Y

W - - W

- G Y -
by clicking them
- 1 0 -

2 - - 3

0 - - 0

- 2 3 -
times, and a key appears on the cross!
Bridge
Examine the side of the ladder and use the spanner to release it.
With the ladder unfolded, you can now place it over the canal.
Cloth
Now you have access to the colorful blanket, but it refuses to move aside when clicked.
Instead, hold your mouse button down on the blanket and drag it aside to reveal a locked wall panel.
Use the key to unlock this panel, and take a three-digit pink box from inside.
Three digits
Use a clue somewhere in the residential area to unlock the pink box.
The uncovered areas of the noticeboard form the code 817, so enter that in the box to find a red ball.
Ring 2
The window at the entrance is now lit up, allowing you to see the yellow cup on a yellow saucer beside the bells you can now press under a string of red and green candy wrappers.
Perhaps you already know what to do for this puzzle, but it's not quite trivial.
Clicking on the wrappers, you find that you can remove two of them: the second from the left and the second from the right.
Following the sequence of the remaining wrappers, click the RRGRG (LLRLR) bells, and a note with a diagram appears on the window.
Shapes
Use the clue from the diagram to place the cups on the table in front of the noticeboard.
Matching the cup colors to the symbols on the saucers of those colors, and remembering that the diagram is sideways compared to how you'd view the table, you find that you need to arrange the cups as follows:
Blue Pink
Yellow White
Open the table drawer and take the black box from inside.
Shoebox
Open the black box and look inside. What's this?
The only thing you need to do with this box is to place the red ball into its top right corner, which works some magic with lasers.
The box is a scale model of the residential area, which means the door marked with a red spot is the green sign door to the right of the benches.
Greeting
Click the door to knock on it, and after a short delay a mouse opens the door to greet you.
He's not very impressed with you just showing up and asking for a meeting.
You'll need something more than just the flowers you're holding. Thankfully, there's someone around here who can help you out.
Go back to the bar and talk to the bunny girl, who gives you a platter of wine and cheese.
Knock on the door again, and use the wine and cheese on the mouse to end the game!
Thanks to Thomas for the other two walkthroughs, including Chili Chocolate which I'd gotten stuck on for the optional puzzle.
Thanks! I think I had sent an email, but unfortunately the link expired. I have a new link I will email right away :)
DQFanSurvey
hello thanks for sharing this its means lot to a gamnmer
and we wolud love to read more
.
Update