
 Hi, the latest Weekday Escape arrived!
Selfdefiant trapped you in a strange factory - not many factories have a pool with purple liquid in the middle of a shop floor - but finding the way out is quite easy. Then you end up locked in tomoLaSiDo's tiled living room where is hidden one lily of the valley only and six capsules with key parts. Purple Cable introduces a demo longer than standard escape games (these days), strangely beautiful and whimsical. Rinnogogo too knows very well how to build atmosphere and deepen players' experience, and they prove it again in this game.
Have a good time and enjoy!

Selfdefiant imprisoned you in a factory, a secret one they say, and you're supposed to escape it. Factory security system is so flimsy that a child would be able to overcome it. Good. You really don't want to know what they produce here and to wait until someone responsible arrives. Just leave!
The cursor is changing, autosave, one ending.
Note: if the first link does not work you can use this one as well
The side quest in tomoLaSiDo's latest game is to find one flower. Easy peasy. However, six capsules are more difficult to get since to figure how to open drawers and cabinets may take a while. Puzzles aren't difficult, just twisted. Will you escape?
The cursor isn't changing, no save button, one ending.
![Domino House [Demo]](https://jayisgames.com/images/Domino House.jpg)
Last year we played very well executed surreal game by Purple Cable (Lilou Cormic programming, Hamsterspit design and art, Joshua McLean music) in WE N°226, and now we got a demo for much bigger one, coming hopefully later this year. The demo can be played as a standard escape and if there weren't (few) unused hints players wouldn't find that the game is a part of bigger unit. It's awesome - magically atmospheric and intriguing. We have something to look forward to!
The cursor isn't changing, no save button, one ending.
This time Rinnogogo wants you to deliver an important letter to a family living in fancy sea house. After short intro you stand in front of the house - they let you in, true, but soon you find you're locked inside and nobody's around. The only way how to fulfill your promise is to work your way through the house and that means to solve many puzzles and open many doors. Awareness and patience are crucial - can you pass the letter?
The cursor isn't changing, autosave, one ending.
P.S. Here is nice puzzle game Love (24 levels) by Epic Earth Games.
We love escape games, and our readers love talking about them and sharing hints! How about you? Let us know what you think, ask for clues, or help out other players in the comments below.


looking like cool games this time. Can;t wait for the walkthroughs to these.
domino house is neat. i like the atmosphere and the amount of details. however, i did get stuck after awhile! i'll revisit it later i suppose. i also noticed it made my computer heat up pretty quickly
Hope they will be here soon.
Escape Secret Factory
Maybe it's just a weird but not-secret factory.
Exploration
In between a large electronically-locked shutter and a normal-sized door with a black keyhole, you see a wall panel you can't open because it's jammed. You can't do anything with the tank on the right or the cardboard box of glowing green things.
Go right to find a large purple burbling pool. Behind it on the left are four tanks with numbered colored diamonds. A large blue rack on the right appears to have ten thin drawers, but no matter where you click you get a lock with seven plus-shaped buttons that change where they're lit when you click them.
Go right. In the background, a forklift blocks the door but it doesn't have enough fuel to be driven away. Next to the water cooler, there's a clue with a bent line with triangles connecting two colored circles. In the foreground, clicking the red box shifts it aside to reveal a light bulb.
Linear
You'll need the help of the clue
on the wall near the forklift.
For the stack of blue drawers:
The line on the clue runs from the green circle to the blue. From the start (green) to end (blue), the triangles on the line point
DURDLUR.
Take the screwdriver. Since there's nothing to unscrew, you'll have to use it
to open the wall panel on the first screen.
Inside, you find a black key. Use it to
unlock the door.
Exploration 2
The first challenge that awaits you in this area is not the sudden language barrier, but the darkness that you need to drive away by
using the light bulb on it.
You see a complicated machine with lots of light panels on the front, and the FLOW display has a lever and four geometric buttons that rotate when clicked. The cabinet on the left has four colored diamonds and a four-digit lock. The table on the right has a drawer that contains a colored pencil clue partially covering a dollar bill.
Codes in four colors / Drive
You'll need the clues
from the desk drawer, and from the tall gas tanks by the purple pool.
For the large machine:
Based on the color pencil drawing, the up-pointing triangles should be yellow, green, blue, red.
Click the buttons 0, 2, 3, 1 times, and then the lever.
For the metal cabinet:
The gas tanks which are blue, red, yellow, green have digits on them that form the code 9573.
Inside it, you find a propane tank, and when you return to the purple pool you find it drained. The drain cover has a hexagonal bolt in the middle.
Move the forklift by using the
propane tank on its rear part.
Beside the doorway, you can now access a wall panel with a very weird circuit missing three fuses.
Exploration 3
Finally, some color in the walls! This corridor has doorways to the front and right, as well as a locked door requiring an access card on the left. There's a vending machine on the right, and the noticeboard on the left is completely uninteresting.
Go forward to a simple-looking office. You can't do anything with the wall clock and filing cabinet on the right. From the desk on the left, you can examine the drawers which are unlocked and empty except for the top one. The envelope above them contains an access card. Shifting the desk chair doesn't reveal anything else you can interact with.
Back out and go right to a more elegant office with a view of the nighttime cityscape. The phone on the table doesn't seem usable in the normal way, but you can still interact with it by clicking the left and right edges to turn it over and find a battery compartment secured with a screw. You can also move the two chairs nearer to you. Behind the right one, there's a keypad panel with a red light.
Use the access card to unlock the door on the left side of the corridor.
This laboratory has lots of flasks and cupboards you can't touch, and in the middle is more equipment blocked by a row of bright red lasers. On the left, you can pick up a folder and open it to find a math problem.
Science
For the keypad under the table, you'll need the clue
on the wall in the lab.
Solution:
Work out the sum to get 534108.
Nothing appears to happen while you're entering the code, but at the end the green lamp lights up…
and the lasers in the lab are gone!
For the safe in the lab:
Carefully count the yellow, green, red, blue flasks.
Since there are 4, 3, 3, 2 of them, click the buttons that many times.
Inside, you find a fuse.
More fuses
You'll need the
dollar and screwdriver.
For the phone on the conference room table:
unscrew the battery compartment
to find a fuse.
For the vending machine:
use the dollar in its top slot
to get a wrench.
This lets you
remove the drain cover from the purple pool
to get another fuse.
Now that you have all three fuses, place them into the wall panel near the forklift and push the button.
This opens up the exit
all the way to the left where you started.
Domino House was fun. I almost got stuck at the very end because I didn't know where to use an item, but I got it eventually. It's very atmospheric.
Domino House is cool, but something happened I've never seen before: After loading my saved game from yesterday, two of the rooms seem to be glitched, with most of the background elements missing. I can no longer see the bookcase, for example. Various items seem to floating in a void rather than fixed in a room. It's bizarre. I don't know if I feel like restarting in another browser.
Thanks KK. looking forward to the others.
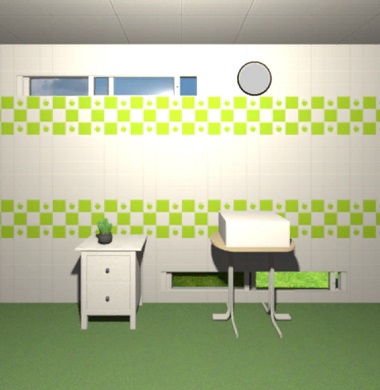
Escape Challenge 109: Room with a Lily of the Valley
Perhaps it's just me, but these wall tiles look really familiar.
Exploration
In addition to the usual window, table and potted plant, you see a smaller narrow window higher up that's ajar. On the table, there's a green scratch card.
Turn right to a screen with more narrow windows. There's a wall clock that seems to point this out, and under it is a three-digit box with colored buttons and some flowers sticking out of it. The box also has a square button that makes the flowers glow. On the left, the chest of drawers has a three-color drawer and a three-digit drawer.
Check under the small table to find a clue with numbered arrows and green shapes.
Turn right to face the locked exit door (and another narrow window). There's a three-digit wall box, and under it is another chest of drawers. The top has two identical rectangular buttons one above the other, and the bottom has one square button and one circle button.
Turn right to face a machine with slots at the top right and bottom left, with a row of lights above a horizontal channel over some colored rectangular parts. There's also a painting and a blue bin,
and moving the bin aside reveals a hole with a flower coin and a view of a narrow window on the other side.
Enter the corridor leading to the toilet. In addition to the things you saw earlier, you can look up to find a lily of the valley hanging above. Of course, you can sit on the toilet, look right, look up and look left to find a drawing of someone playing the bells.
Flower box
You get the code for this box by
pushing the leftmost button on it repeatedly.
Specifically,
connecting the flowers in the order that they light up each time gets you the digits
265.
This gets you the capsule, which contains a key piece.
Drawers on clock side
The clues for this are from
the large machine beside the toilet entrance.
Place the coin in the top slot, and it rolls to the left while the white lamps light up.
For the top drawer:
As the coin rolls from right to left, the flower appears upright a total of three times, over (from first to last, i.e. from right to left) blue, yellow, red strips.
Click the buttons 2, 1, 3 times.
For the bottom drawer:
The lamps light up in three groups before and after the coin rolls.
From left to right, there are 2, 1, 3 lights in those groups.
Inside them, you find 2 key pieces.
Drawers on door side
The clues for this are
throughout the room, including the wall clock, and under the table beneath the wall clock.
For the top drawer:
The wall clock tells you to look at each narrow window and read them from right to left.
In each narrow window, the right pane has been opened a different amount, and it turns out that the least open (under the clock) and the most open (in the toilet) are near the floor, while the others are near the ceiling.
Click the bottom, top, top, top, bottom buttons.
For the bottom drawer:
Under the small table, read the clue in the directions of the arrows (i.e. near and then far):
1: Square Circle
2: Square Square
3: Square Circle
Altogether: ■●■■■●
Inside, you find 2 key pieces.
Gamble
Use the coin
on the scratch card on the first screen.
Looks like you lost! But you gained a code.
Enter 315 into the wall box
You get a key piece.
You've assembled the key and unlocked every lock in the room, so you can just leave through the door!
Item list
6 key pieces:
Top left: in top drawer on door screen
Top middle: in bottom drawer on door screen
Top right: in top drawer on clock screen
Bottom left: in bottom drawer on clock screen
Bottom middle: in wall box
Bottom right: from flower box
1 lily of the valley
from the toilet
and one other item:
a flower coin behind the blue bin.
Domino House [Demo] (beta 3)
Back into the world of black and white, lone dots in plain boxes, life on a straight edge poised to fall once again. Engulfed by light and darkness, led by covert potent trails, a logical push brings the rhythm of release.
Lots of help
There are no options available for this demo. Sound will always be present but if you don't like the music you have to turn if off from the title screen (or using your browser's mute function).
Once you're in the game, you can press Esc to return to the title screen. If you need to take a break from the game, remember to save there!
You can always use the fullscreen button to get a better look at the game details. Remember that you use items by dragging and dropping. Not everything will change color when hovered, so do try clicking if you find something really suspicious.
Most puzzles have a time limit to enter codes (as well as a click limit!). Wait too long and the puzzle will reset. Often the audio cue is the easiest way to notice.
Inventory can fill up beyond the screen and you can't scroll it, which may mean that depending on how you've played you may have to solve puzzles in a different order from this walkthrough.
Secrets are visible from the About screen. Completionists should take note that
the game has "secrets" but only 3 of them are available in demo. Similarly, there are some clues that will only be usable in the full game.
Exploration
To start the game, click the black dot where the arrow points, and suddenly the game doesn't seem so uncertain.
You find yourself in a corridor with three doorways blocked by dominos. In the middle, a record player is empty, and the brick beside it moves aside to reveal a clue with three dots. Along the walls you see a window, a moose which grows an air freshener (that's a secret achievement!), a cat clock stopped at 3:00, and a light switch that makes a chiming sound. Did something change?
You see a shadow in the window. Push the light switch again, and it moves closer. Push it again, and it vanishes… and then pops up super close in the window.
The mysterious guy asks you for something triangular.
Beginner dominology
Unlock all three dominos using clues in plain sight!
For the left domino:
The dots are numbered. Click the bottom one and then the top one.
For the right domino:
The markings on its side tell you to ignore the middle dots on each half.
This means you have to click the second and fourth dots from the top.
For the top domino:
Follow the order indicated under the brick: top-left, top-right, bottom.
All three dominos vanish, opening up three passages.
Exploration 2 (left/front/right)
Let's start by observing the room and then interacting with objects.
The left room is a library, with a lamp above an armchair and fishbowl, a stairway blocked by smoke from a mask wearing weird earrings, a shelf with dots on its books, a pot on top of that shelf and a cupboard below, a candle above a TV connected to a gaming console, and three spiders hanging above a domino.
The lamp doesn't work, the puffer fish in the bowl only gets big, and the cupboard at the bottom of the bookshelf hides a clue on its door as well as a box with a button that makes the armchair skulls go wacky. Buttons coming out of the skulls now play musical notes.
That leaves the pot on top of the bookshelf, which you can click on to go inside! Three snails wearing bowties are missing their shells, and near a central dark spot you see a drawing of a house.
The front room is a bathroom, where you see an unhappy clown sitting in a full tub with his duck, but he's bleeding from the wrist. The pipe leading past the sink to the shower has bulged in two spots near the valves, and there's a domino box on the wall as well as some black worms on the floor. The ceiling is completely missing and there's a monkey and a floating light switch against the spinning starscape. Above the toilet, there's another worm.
Move the piece in the corner to reveal another switch. The switches control the valves on the pipes, and clicking them both releases a cloud from the shower with a happy tooth and a dot clue. Clicking the monkey makes him move beside the sink, and then in the toilet where he looks about to flush himself. One more click reveals that he wants a flower hat.
The worm in the top left has a white tail, which turns out to be a different white worm!
The right room is a kitchen, where in the middle a pig head sits among several items. Under the pipe on the left, there's a switch and a music box. You can't do anything with the chest of drawers on the left. The fridge has a dial that's controlled by two semicircular buttons. A cat sits on a cabinet with some cookies. On the right side, a leg of meat sits on the stove near a domino.
The light switch makes a leg extend through the window and change the pattern of its sock. One of the patterns includes a tiny white worm. The music box plays a slow tune. The eyes of the pig are also buttons. The knife can be picked up, and the cork of the wine bottle turns out to be a stick with dots and crosses on it. Opening the cat cabinet reveals clues on its doors as well as a cereal box and salt and pepper shakers that hide a light bulb.
Inside the coffee cup, three marshmallows wear hats that can be lifted. The middle one hides a happy tooth.
Bathroom puzzles
You'll need the clue
that you revealed from the shower.
For the wall cabinet:
click the buttons in the order indicated.
The cabinet opens up to reveal a band-aid and stars on the door buttons.
Now you can save the clown
by putting the band-aid on his wrist.
and you can use the star clues by
pushing the three unstarred buttons on the open cabinet, from smallest to largest.
(Top left, second from bottom, third from bottom.)
That gets you a triangle and a secret.
Kitchen puzzles
You'll need
the knife, the clue from the kitchen cupboard, the clue from the wine bottle and the clue from the stove on the right.
For the meat leg:
cut it with the knife
to reveal an eye, which you can place
on the pig.
There are now two codes you can use for the pig:
the sequence on the opened wine bottle, clicking the LRLLLRRL eyes that were already there
and the sequence on the pipe, clicking the bottom-right eye 5 times, the bottom-left 2 times and the top 9 times.
This gets you a key and a bird holding a worm.
For the fridge:
the clue from the cupboard shows the right button on the right, and the left button on the left. In order from 1 to 6, they form the code
RRLLLRRRLLLRL
Inside, you find cake that you can eat entirely (another secret) as well as two fat monsters who want three bugs and four worms.
For the domino:
The circular areas on the stove, from smallest to largest, appear on the bottom-right, bottom-left, top-right, top-left.
You get a happy tooth.
Library puzzles
You'll need the clues from the
music box in kitchen, the books, and the bookshelf cupboard door.
For the skull chair:
There are a total of five buttons, each of which shows/plays a different note.
Using either your visual or auditory memory, you find that the correct sequence of buttons to press is:
(I'll number the buttons from lowest pitch to highest pitch. Top left and top right are 1 and 2, middle left and middle right are 3 and 4, and bottom right is 5)
1243454
For the fish bowl:
Feed it the cereal.
For the lamp:
place the light bulb and turn it on.
For the domino:
follow the path on the cupboard door by pressing the buttons from top down and left to right.
After all that, you find two scarabs, a handle with a heart shape, and two snail houses with one and three lines.
For the smoky mask:
The earrings are triangles pointing up and down, so based on the dots on the books, you need to click the buttons on the
LRRRLRLLLLLRL.
This clears out the smoke so you can move on.
Exploration 3
You're in a bedroom! A bird is resting in a bed with three rotated faces in its frame. In front, a white guy is missing several teeth, and there's a toy squirrel next to a locked briefcase. The left wall has a lot of weird stuff, including an empty holder beneath the skull. The right wall has an elephant spewing out all that smoke, a light switch near the ceiling, a stuffed toy hanging on a closet, and a pet-sized glass dome with a tiny button.
Clicking that button makes a clue appear on the wall nearby. Clicking the light switch makes some of the stars in the window light up. The squirrel hides a vinyl record.
Beginning
Return to the starting corridor with your
vinyl record and triangle.
For the record player, use
the record on it
and take the happy tooth to release the music, and for the mysterious stranger use
the triangle
and he holds out a puzzle box. Now you can use
the handle on the box
to open it and find a monkey hat.
Monkeying around
Give the monkey in the bathroom the hat, and a huge hand extends from the toilet wearing a watch.
Just in case it wasn't clear enough, clicking the ring makes it read out the time.
Return to the corridor and set the clock to the correct time:
Since the clock starts at 3:00, you need to click it 32 times.
(Since you have to wait a bit at the end, it's possible to overshoot the answer. If so, simply leave the corridor and come back to reset the puzzle.)
A hidden panel appears with a scarab among four round symbols.
Trio
You should have all 3 scarabs:
2 from the library and 1 from the corridor.
Give them one by one to the top monster in the fridge, who rewards you with a 2-line snail house.
That completes your collection of three houses:
2 from library and 1 you just got from the kitchen
which you need to place
in the snails in the pot in the library.
Specifically:
each snail has a different number of lines on its back, and each house has a different number of lines on its roof.
Place the houses accordingly (you'll know it's correct when you can't remove them and the snails are happy).
You get a happy tooth.
Bedroom puzzles
You'll need the
key from the kitchen, the candle from the library and the clue from the elephant.
Unlock the briefcase
with the key
to get a happy tooth.
For the bed frame:
Rotate each smiley to match the elephant, clicking the left one 6 times, the right one 4 times, and the top one 2 times.
The smoke dissipates (after a moment) and you see a box of matches.
Now you can perform a ritual
where you place the candle under the skull and light it with the matches.
This makes a clue appear next to the window, which you can use immediately
by clicking the stars in the same order on the window:
2 3
1
5 4
7 6
The closet breaks open and you find a worm.
Finale
You should have all 4 worms:
1 in bathroom, 2 in kitchen, 1 in bedroom
Give them to the bottom monster in the fridge, who rewards you with a happy tooth.
You should now have all 7 teeth:
1 in each room except for 3 in the kitchen
Give them to the guy in the bedroom. The end screen of the demo appears!
on Domino house, i'm stuck on
fridge code. the LRLLLRRRLLLRL but it didnltwork. the drawer shows a different code, which sounds like to me it;s random, but anyway i followed that clue and it still don;t work.
i'm confused.
The fridge code
RR LLL RRR LL R L
yeah i misread the clue. I got it now. Sorry about that.
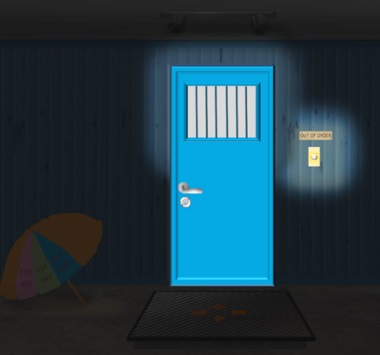
The Letter
While delivering a letter from an injured father to his family, you get unexpectedly trapped in the house by demonic forces! Oh wait, it's just his son being overly cautious.
Exploration
The darkness of the room means the only things you can look at are the light switch, which seems to be out of order (why's it lit then?) and the locked door which has a weird clue on it.
The clue tells you to
look for a set of three zeroes and then click them from left to right
so you turn on the light by
clicking each O in the sign above the light switch.
You see a colorful umbrella with numbers as well as a metal plate on the floor with four orange buttons.
Under the umbrella, you see a box with four fish buttons.
Click the right edge of the screen to zoom in on a tall potted plant against a colorful background.
Back out and turn round to face five orange balls tied together. The locker on the right has a keypad lock that takes six digits.
(Small reminder: the game will prevent you from reaccessing puzzles you no longer need. Some puzzles can be skipped, most can't.)
First puzzles
You'll need uh… pretty much every item and clue from the previous spoiler.
For the locker,
the leaves on the plant appear in clumps of different numbers, and each rectangle represents a digit on the umbrella. So for example the smallest clump appears at the bottom left of green, so it represents the 9 in the green area.
Following the clumps from 1 leaf to 6 leaves, you find that they represent digits forming the code:
946150
Inside, you see a bathyscope (underwater viewer) that allows you to view the sea.
For the metal panel,
looking at the balls in the direction of the string (starting from the loop and ending at the arrow), you find that their handles are on the ULRLU sides.
Pushing those buttons removes the panel, revealing some water in which you can
use the sea-view to watch a clownfish swim.
Finally, you can unlock the box using that clue:
The fish swims to the left and then up, then reappears swimming up and turns towards the right.
Push the LUUR buttons.
That gets you a key, which you can use to open the door.
Exploration 2
Now you're facing another door. On the right hang three pieces of embroidery(?) featuring different animals.
Turn around to find a flower pot, with its name helpfully written on the wall.
Go up the stairs on the side to reach a door with a keypad that takes an 8-digit code.
Turning around, you see a green ring on the right wall. It seems too far to reach.
Another keypad
You need the clue from the
flowers.
Hint/Solution:
The digits on the buttons are red, which means you should be looking at the letters in red.
To convert the red letters to digits, you need to read the clue upside-down.
This gets you the code 37730717.
Exploration 3
Immediately after entering the room, you face the door you entered from. The shelf on the left has several items, including three cute toy… animals?
Turn right to face a fridge with three shape buttons, a box on a table with a branched shape in its lid, and a closet locked with three dials.
The blue door on this screen is different from the previous, as you can tell from the position of the handle.
Zooming in, you see a card reader on its left.
Turn right. Above a chest of drawers, you can take a small scroll, and remove the string from it! The top drawer contains some sort of colored rectangle resembling the Lithuanian flag, while the middle drawer is locked with a keyhole and the bottom drawer won't open. On the table, there's a wooden panel with four arrow buttons, and you can move the chair to reveal a screwdriver. And on the right, a calendar has several dates circled.
After moving the chair, check under the table to find a key stuck on a hexagonal bolt.
Turn right. This living room area facing the sea has a weird blue clue with white shapes on the table.
Look up to find a compass rose drawn on the ceiling.
Second puzzles
In this spoiler, you'll need
the colored rectangle thing and clues from the calendar and the previous room.
For the wardrobe:
The giraffe, pig, cat appear on the bottom, left, top of their pictures.
Inside, there's a dish rack with some colored plates. A box on the left has three colored buttons (and a very faint hint nearby). Also,
the bottom-left plate hides a spanner.
For the three-button box:
The circled numbers on the calendar contain seven different digits.
Reading through those digits in ascending order from 1 to 7, you find that you need to push the
BTTBTMB
buttons.
That gets you a hook.
For the fridge:
Place the item with colored rectangles on the shape grid, where they color the shapes.
The second red, third yellow and fifth green shape are:
sun, star, circle (solid).
The only meat in the fridge is a plate of shrimp.
And for the table,
use the spanner to remove the hidden bolt
which gets you the key, then use that to unlock the drawer and find a rod with some screws.
Assemble
Based on the scroll, you need to
examine the rod and add the string, the hook and the shrimp.
Then use it on the water pool downstairs, and fasten it with the screwdriver.
Back out, turn around, and turn around again.
The rainbow color is the fin of a mermaid. Now that you no longer need the rod, click to remove it.
Back out, turn around, and turn around again, and the mermaid gives you some canned food to open.
When you back out once more, the mermaid pushes a button on the wall.
Third puzzles
What did the button do?
On the stairs when you turn around from the keypad door, you find a faint beam of light shining green letters onto the right wall.
For the table puzzle:
(Based on the compass rose, north is up on the button panel.)
The clue WWEOSNE tells you which buttons to press, except that O represents the circle in the middle:
LLRCDUR.
You get a can opener, so use it to open the can and give it back to the mermaid. As she sinks back into the water, she leaves some coral behind.
For the box on the round table,
insert the coral and open the lid
to find an IC key card. You can also
click the lid again to flip it over
which gets you another clue.
For the door beside the fridge, use the card on the reader to activate a keypad, and use the clue you just found to unlock it:
The red and light blue strips represent the left and right edges of the calendar, and based on the positions of the dividing lines you figure out that smaller numbers (nearer the top of the calendar) appear at the right ends of the strips.
The squares pierced by the arrow represent the Sunday on the second row (7), Saturday on the third row (20), Sunday on the fourth row (21), giving you the code:
72021
Exploration 4
This bedroom has a huge bed and a wooden door you can't open because of the spring attached to it. There's a hole in the wall on the left through which you can see a clue.
Turn around to face a wardrobe missing a handle.
Fourth puzzles
For the bottom drawer in the previous room, you need the clue
visible through the hole in the wall
which tells you to
click the bottom-left, top-right, bottom-right, top-right corners of the drawer.
Inside, you find a handle. Attach it to the wardrobe, and you can open the left side but the right side remains stubbornly stuck.
There's some baskets, clothes that prominently feature leopard print, and among them is a colorful remote control. You can also
click the latch near where the remote is
to unlock the right wardrobe door. Inside it is a large white box with a grid of small less-white buttons, as well as a bluish marble five-letter box with colored squares.
You can get clues from the large white box by
placing the remote to the right of the grid and then pushing the remote buttons,
and you can use those clues to unlock the blue box:
Each color makes a different pattern of squares light up, and each letter in the code is formed by combining the patterns according to the colors that appear above the button.
For example, the last two letters require you to combine red and green, which makes the letter L.
Following the same logic, you find that the code word is SHELL.
After all that tedious clicking, you are rewarded with a pair of pliers.
Finale
Use your pliers on the wooden door to cut the spring.
Then open the curtain to find the son. Looks like he has nowhere to hide.
Give him the letter to end the game. It's good news!
For the bonus game.
Love
While most players might compare the manipulation puzzles to Bart Bonte, I like to think of this as Hoshi Saga except with words. Either way, it's a great change of pace from this developer's usual output of idle games.
For the spoilers, I'll assume that you're reading the in-game hints first. The hint button also gives you a limited number of level skips, in case you find some levels too unfair.
(May 17, 2020: The notorious (?) level 19 has been replaced, turning this from a great pain to a better game.)
Level 1: in plain sight
Click on the word love.
Level 2: a search for love
Find and click each of the four letters l, o, v, e in order.
For me, these appear at the following positions:
- - - - - - - -

- - - - - - - -

- - - - l - - v

- - - - - - - -

- - - - - o - -

e - - - - - - -
Level 3: the orange line
Clicking the line makes it tilt.
9 clicks makes love appear.
Level 4: antilove
Click the letters to change them.
The answer is love.
Level 5: blackout
Clicking each letter blocks out all the others in the same row or column, but also unblocks it.
Leave only love behind! (Only one e.)
You'll need more than four clicks for this.
The slow way:
Cover the grid as much as you can, then move the uncovered spots onto love.
Memorize the positions of these letters, then click them:
Across the top row:
a b c d e fIn the grid:
l o v eThe fast way:
If you get a letter correct you can ignore its row and column.
Click
l o v, thena b eacross the top row.Level 6: a message
That's a lot of letters! Let's move the unnecessary ones away.
Drag each group of letters. Thanks moves up, players moves down, be moves left, and d moves right.
(Drag each group as far as it will go. For d, you should click near the top of its bowl when you drag.)
Level 7: quickness
Click l, o, v, e in order.
If your reflexes aren't too good, I suggest simply not moving your mouse at all, and just waiting for the correct letters to appear in the middle.
Level 8: what it looks like
This level has two hints, which is your hint that it comes in two phases. First:
Click either the rectangle or circle until there are a total of four rectangles on screen.
For the second part, here are some additional hints:
The shapes won't move no matter how you interact with them.
The spin control is somewhere else.
Solution:
Click the restart button in the top right to make the whole thing spin.
Level 9: you have alternatives
The black buttons are math symbols, which means the letters are numbers.
Yes, it's the classic alphanumeric cipher where each letter represents its position in the alphabet:
L=12
O=15
V=22
E=5
Now you can do the math.
Using / produces fractions and x produces big numbers, both of which are bad for equating.
That leaves +, - and =. Some quick experimentation reveals that the first operator must be +, giving you two answers:
L+O=V+E
L+O-V=E
Level 10: blackout
Don't panic! All the controls are still in their original places.
That includes the hint button…
which lights up a corner of the screen! If you actually open and read the hint, it tells you why.
Click the love that's only a bit visible in the light.
Level 11: the stubborn switch
You have to keep turning the light on! And the heart keeps moving.
This time, you really need good reflexes or a lot of patience. Just click the heart while the light is on.
You might have better success if you use the restart button instead of the light switch.
Level 12: some numbers
You'll need to click four numbers in the correct order. And these numbers look familiar!
L=12, O=15, V=22, E=5
But one of them seems to be missing.
Start by clicking the level number 12 at the top of the screen, then click 15, 22, 5.
Level 13: one fewer
Find the v. There can't be that many places to hide!
The back button doesn't seem to do anything, which is your hint that the V is there.
Drag it to the gap in love.
You're not done yet!
Once the V is in place, click it thrice to make it point down.
Level 14: dot dash
If you don't already know this code, you can figure it out from the screen.
(Clicked wrongly? Just reset the level.)
Paying attention to where the spaces are, you manage to combine the front half of lots and the back of have.
.-.. --- ...- .
Note that the game will automatically provide a space after each correct word.
Level 15: da capo
This seems too simple to be a level 15 puzzle.
To get to level 15, just click the level number 14 times.
Then click on love.
Level 16: trapped inside
Somewhere there's a heart in isolation and we need to find it.
Step 1:
The hint tells you that you need to leave the level.
Back out all the way to the title screen, which is the real puzzle.
Step 2:
There are four unusual buttons at the top of this heart. Click them.
Then Select level 16 and click the button there.
Level 17: drawing a blank
Move your mouse slowly over the screen until you find all the letters.
love is written in the shape of a heart, in clockwise order.
Level 18: head over heels
There are two specific things to do in order to not fail the level.
The hint only tells you one of them:
You have to click the left word first, then the middle, then the right.
The other requirement is
that each word be upright when clicked.
And the only way to do that is the spin control!
Click the restart button twice, then left love.
Click the restart button thrice, then middle love.
Click the restart button thrice, then right love.
(If you mess up anywhere, clicking the right love restarts the level.)
Level 19: fragments
(This is the recently updated level.)
You see a jumble of shapes. What about love?
Each pair of shapes, from left to right, forms a letter.
Click the shapes
1 2 - - 3

- - 2 0 -

1 2 - - 2
times.
Level 20: sticky pairs
Drag and drop. Black onto white. Don't mess up. Take your time.
Having a problem with hearts going offscreen? You can plan ahead to avoid it.
L has to go in last because it pushes every other letter off the screen when you place it.
O has to go second last, because both V and E push L offscreen.
Based on that logic, the easier way to do this is
to drag e to e, v to v, o to o and then l to l.
Level 21: losing it
You should think of the buttons as Cycle Left, Shrink, Cycle Right. Two hints:
The starting 10 letters are all you get, but all you need is love.
You can't change the cyclic order. velo is good, veol is not.
Logic and then solution:
Therefore love must be formed from the 3rd, 4th, 7th, 8th letters in the initial position.
We should try to get rid of 5 and 6!
LLLLLCLove takes center stage again.
LLLLCC.Level 22: building up
You should think of the buttons as Shrink, Forward, Extend.
Based on how the puzzle is laid out, you can't move the letters 11, 14, 21, 4 times to get love.
But you don't have to because each letter returns to a after z.
The strategy here is
to settle the last letter first, then you can leave it alone for the rest of the solution.
Press the right button thrice, then + 4 times to get eeee.
Press the left button once, then + 17 times to get vvve.
Press the left button once, then + 19 times to get oove.
Press the left button once, then + 23 times to get love.
Level 23: a is for addition
This is a numerical puzzle! For every pair of letters you click, the numerical value of the first is added to that of the second.
It's possible to do this mechanically:
Here we use a variation of Euclid's algorithm.
The final numbers we need are
12 15 22 5
so if we get to
2 5 2 5 (bebe)
then we can just add the fourth number to the others repeatedly. By the same logic, we just need to get to
2 1 2 1 (baba)
first, before adding the first number to the others. But this is easy!
After some manual simplification, here's a shorter solution.
Buttons are numbered by their position, from 1 on the left to 4 on the right.
Click 2 then 1: baaa
Click 1 then 4: baac
Click 1 then 4: baae
Click 4 then 1: gaae
Click 1 then 2: ghae
Click 1 then 2: goae
Click 1 then 3: gohe
Click 1 then 3: gooe
Click 1 then 3: gove
Click 4 then 1: love
Level 24: like a record
Experiment or read the hint to figure out the clockwork.
Each click rotates clockwise on whatever you click and counterclockwise on its neighbors.
This is quite difficult to work with, but you can combine moves to get simpler effects.
Dials are numbered by their position, from 1 on the left to 4 on the right.
Clicking dials 1 and then 2 rotates only 3 counterclockwise.
Clicking 1, 2, 4, 4, 4 rotates only 4 counterclockwise.
By symmetry:
dial 1 counterclockwise = 1+1+1+3+4
dial 2 counterclockwise = 3+4
From the starting position, the number of counterclockwise rotations needed for each dial is 3, 3, 2, 1.
This means it's possible to solve this using the moves
[11134][11134][11134]
[34][34][34]
[12][12]
[12444]
After removing sets of 4 from the above (because four clicks on any dial has no effect), you get just the following:
Reset the puzzle, and click the dials 0, 3, 2, 1 times.
Don't forget to click the heart button!
Update