JayisGames.com is now available ad-free!
Jay is Games recommends Cheat Happens with 8,000+ games and 35,000+ trainers!

Weekday Escape N°53


Comments (10) | Views (19,404)

Weekday Escape

elleOnce again we come to that time in the week that I like to call "Wednesday." You might have heard of it before? No? Okay then, sit right here beside me and let me explain: This is the day that men, women and children around the world everywhere gather to pay homage to an entity called The Escape Game. In this universally uplifting ritual, we play at being trapped inside a room (or a boat, mushroom, or any old such thing), forced to seek out employable objects and solve random puzzles all for the sake of regaining freedom. It's pretty cool. It may be that, someday, it will help save the world. Don't believe me? Well, here then, have a look at a few samples from Hottategoya, Tototo Room, and FunkyLand, then try to tell me you still hold doubts in your heart...

Fruit Kitchens No.14: Muscat Green
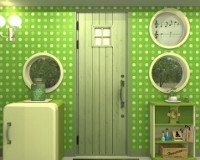
Fruit Kitchens No.14: Muscat Green - If a FunkyLand game does one thing with impunity it is this: It makes all other claims to the adjective "whimsical" seem feckless and vain. Perhaps this quality is more ineffable than that, but as you poke around this cheerily verdant kitchen in pursuit of seven bunches of green grapes, don't you feel something bubbling up and making your lips twitch in a grin? I do. I want to pretend this is my kitchen, these riddles made of musical notes and colors and pink frogs all mine. It's midway down on the FunkyLand scale of game difficulty; most your efforts will likely go toward figuring out the frog and notes code but it's less devious than it first appears.

Button Escape 27
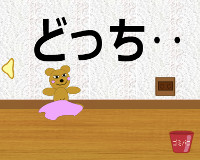
Button Escape 27 - Amongst the quirky, hand-drawn artwork of Tototo Room, eleven buttons are hidden: find and click on them. If you don't read Japanese, or even if you do, the Japanese words strewn around the room function effectively as red herrings. But there are no language barriers preventing a successful escape, only a bit of cunning and pixel hunting. Which is nice for seekers of that sort of thing, the completion of the button collection giving that silly burst of gratification that only an achievement unlocked can do, and another successful escape must surely mean something in our pursuit of escape game thrills. Right?

Escape from the Similar Rooms 16
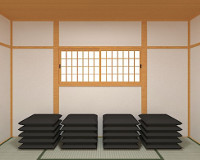
Escape from the Similar Rooms 16 - The beauty of this rooms-that-look-samey series is the way Hottategoya uses the beautifully rendered design to convey the puzzle clues. Figuring out each code, thus unlocking that door and escaping, depends almost entirely on your powers of observation. Ergo, it's tricky. But fair. It's easy to be caught up in the pursuit of answers and overlook just how aesthetically pleasing these minimally decorated rooms are, but the small details such as sun rays against the panels do add to the immersion factor. And it adds to the deception because those small details hide some significant clues...so look close!

We love escape games, and our readers love talking about them and sharing hints! How about you? Let us know what you think, ask for clues, or help out other players in the comments below.

Walkthrough Guide


(Please allow page to fully load for spoiler tags to be functional.)

Walkthrough for Fruit Kitchens 14: Muscat Green

Goal: find 7 bunches of green Muscat grapes.

If you've played FunkyLand escape games before, this one shouldn't pose serious problems. Charming as it is, it has no surprises; the musical notes puzzle was the only one that put me on the wrong foot initially, but not for long.

Bunch #1

Zoom in on the left hand wall.
Zoom in on the picture on the right hand side.
Note the distribution of the sizes and colors, and the word "table".
Zoom all the way out.
Zoom in on the table.
Notice the coasters in different sizes?
Click them to set the correct colors.

From small to large: green, yellow, pink, blue, green

Take the bunch of grapes that appears on the table.
Zoom out.

Bunch #2

Zoom in on the left hand wall.
Zoom in on the wall cupboard on the left.
Open the left hand door.
Take the water cooker.
Zoom in on the countertop.
Use the water cooker on the teacup.
Write down the number code.
Zoom out.
Zoom in on the wall cupboard again.
Click on the code box.
Enter the code from the teacup.

8247

Click OK.
Open the cupboard.
Take the bunch of grapes.
Zoom out all the way.

Bunch #3

Zoom in on the right hand wall.
Zoom in on the refrigerator.
Open it.
Take the bunch of grapes from the door of the refrigerator.
Zoom all the way out.

Bunch #4

Zoom in on the right hand wall.
Zoom in on the porthole with musical notes.
Note the green line in the middle.
Note the length and position of the notes (below or above the green line).
Zoom all the way out.
Zoom in on the left hand wall.
Zoom in on the right hand side, then on the frog.
Click/drag the note buttons in the right order:

Middle button down
Left button down
Left button down
Middle button up
Right button up
Right button up

Take the key.
Zoom all the way out.
Zoom in on the right hand wall.
Zoom in on the jar on top of the refrigerator.
Use the key.
Open the jar.
Take the key from its lid.
Click on the jar to take the bunch of grapes.
Zoom all the way out.

Bunch #5

Zoom in on the right hand wall.
Zoom in on the shelves on the right.
Use the key from the lid of the jar (see Bunch #4) on the lock.
Open the doors.
Take the bunch of grapes.
Take the handle from the top of the upper right compartment.
Zoom all the way out.

Bunch #6

Zoom in on the left hand wall.
Zoom in on the little door below the wall cupboards.
Use the handle (see Bunch #5) on the door.
Open the door.
Take the bunch of grapes.
Zoom all the way out.

Bunch #7

Zoom in on the right hand wall.
Zoom in on the shelves on the right.
Zoom in on the box on the bottom shelf.
Click on the box and take the can opener.
Zoom all the way out.
Zoom in on the can on the small table in the foreground.
Use the can opener on the can.
Take the bunch of grapes.
Zoom all the way out.

Escape

When you take the 7th bunch of grapes, the bunches are transformed into a key.
Take the key.
Zoom in on the right hand wall.
Use the key on the door.
Open the door.

10 Comments

hans.vogelaar December 10, 2014 8:23 AM

Walkthrough for Fruit Kitchens 14: Muscat Green

Goal: find 7 bunches of green Muscat grapes.

If you've played FunkyLand escape games before, this one shouldn't pose serious problems. Charming as it is, it has no surprises; the musical notes puzzle was the only one that put me on the wrong foot initially, but not for long.

Bunch #1

Zoom in on the left hand wall.
Zoom in on the picture on the right hand side.
Note the distribution of the sizes and colors, and the word "table".
Zoom all the way out.
Zoom in on the table.
Notice the coasters in different sizes?
Click them to set the correct colors.

From small to large: green, yellow, pink, blue, green

Take the bunch of grapes that appears on the table.
Zoom out.

Bunch #2

Zoom in on the left hand wall.
Zoom in on the wall cupboard on the left.
Open the left hand door.
Take the water cooker.
Zoom in on the countertop.
Use the water cooker on the teacup.
Write down the number code.
Zoom out.
Zoom in on the wall cupboard again.
Click on the code box.
Enter the code from the teacup.

8247

Click OK.
Open the cupboard.
Take the bunch of grapes.
Zoom out all the way.

Bunch #3

Zoom in on the right hand wall.
Zoom in on the refrigerator.
Open it.
Take the bunch of grapes from the door of the refrigerator.
Zoom all the way out.

Bunch #4

Zoom in on the right hand wall.
Zoom in on the porthole with musical notes.
Note the green line in the middle.
Note the length and position of the notes (below or above the green line).
Zoom all the way out.
Zoom in on the left hand wall.
Zoom in on the right hand side, then on the frog.
Click/drag the note buttons in the right order:

Middle button down
Left button down
Left button down
Middle button up
Right button up
Right button up

Take the key.
Zoom all the way out.
Zoom in on the right hand wall.
Zoom in on the jar on top of the refrigerator.
Use the key.
Open the jar.
Take the key from its lid.
Click on the jar to take the bunch of grapes.
Zoom all the way out.

Bunch #5

Zoom in on the right hand wall.
Zoom in on the shelves on the right.
Use the key from the lid of the jar (see Bunch #4) on the lock.
Open the doors.
Take the bunch of grapes.
Take the handle from the top of the upper right compartment.
Zoom all the way out.

Bunch #6

Zoom in on the left hand wall.
Zoom in on the little door below the wall cupboards.
Use the handle (see Bunch #5) on the door.
Open the door.
Take the bunch of grapes.
Zoom all the way out.

Bunch #7

Zoom in on the right hand wall.
Zoom in on the shelves on the right.
Zoom in on the box on the bottom shelf.
Click on the box and take the can opener.
Zoom all the way out.
Zoom in on the can on the small table in the foreground.
Use the can opener on the can.
Take the bunch of grapes.
Zoom all the way out.

Escape

When you take the 7th bunch of grapes, the bunches are transformed into a key.
Take the key.
Zoom in on the right hand wall.
Use the key on the door.
Open the door.

Reply

I really REALLY like the "similar rooms"-series...

This one was fairly straightaway, but not untricky ;)

A few hints for the safes?

First room

Piles of pillows

Suppose you start with all black?

and then press a button to change the color?

Second room

You will get the clue from another safe

Third room

There's one shape changing from room to room.

At the windows

Fourth room

This is a clue...

Have you checked all the calendars?

Fifth room

Oh, just try to solve the other safes first, will you

Reply
stuckinabasement December 10, 2014 9:14 AM replied to Ristina Nielsen

@Ristina

Agreed. The "similar rooms" puzzle/clue combinations are usually very clever.

They test both observational and lateral thinking skills.

Reply

Woohoo, first time completing a Button Escape without help! Walkthrough time! As ever, I’m assuming that if you’re looking at a walkthrough, you’ve had a look around the room already.

Buttons in more or less plain sight

There are six buttons you can get without solving any puzzles.
Facing the door

Behind the corner of the poster

In the ampersand on the framed picture

Facing the cupboard

Behind the false panel inside the cupboard

Facing the teddy

Behind the teddy

Under the fire bucket (click it twice)

Looking at the rug

Top-left corner of the screen

The computer

Check the picture above the computer for a list of useful words.

The password is “zero.” (To be honest, I’m not quite sure how you were supposed to know that – I just tried each in turn.)

This gives you a desktop with one file. Click the file and scroll through the images. Note that they are close-up images of walls in this room. They’re also labelled ABCD. So I suppose they could only be useful for…

The ABCD code

Click on each of the locations indicated by the images on the computer. (They only become clickspots when you look at the computer file). At each spot you’ll see an emoticon.

Each emoticon has a different mouth. Note down the symbol for each.

▽ 皿 ω д

You need to turn these into numbers. You can probably guess how.

Look at the books in the cupboard. The symbols on the spine correspond to the volume numbers, giving you a four-digit code.

6132. Enter the code in the panel in the cupboard. It opens. Click to look inside.

Crosses and arrows

Well now what? These symbols don’t seem to mean much. But then, there are only two of them…

… which would imply that this is a clue to something with two buttons. Where have you seen that?

The red and blue buttons on the teddy bear wall.

Now of course you could just brute-force it. But that would be uncalled for. Have you seen a guide to symbols anywhere? Do those red and blue buttons resemble anything?

They’re minimalist representations of a man and a woman.

The crosses and arrows represent the symbols for man and woman (which are on the picture above the computer). So the code is…

Red, Blue, Red, Red, Blue, Blue. Take the key and press button #7 (in the door). There’s also a clue in here.

The percentage sign. We’ve seen one of those before.

That arrow is pointing specifically at the top circle of the symbol. Go back to the picture and click on the top circle of the percentage symbol to reveal button #8.

The box

Come now, you don’t need a clue for this. For shame!

Use the key to open the box. Take the extension cord and press button #9.

The blanket

Use the extension cord to plug in the blanket (you need to click on the plug, not on the socket). Turn left to see that the display on the blanket reads OFF. Click to switch it on.

Look down. Aww, these animals are dozing. Can you do anything with them?

Yep! Click on the mouse to examine it. Click on it again to see that it isn’t real. It has a note stuffed inside it. Examine the note for a clue.

But before you head off, take another look at that mouse. That’s right, its nose is button #10.

Final clue

This clue is a bit similar to one you saw earlier…

… in that it indicates a place in the room.

It’s a representation of the cupboard view (the yellow square is the cupboard).

Facing the cupboard, click the spot in the middle of the floor, as indicated on the note. That reveals a button. Press the button to, uh, reveal another button (?!). Press button #11. Fanfare!

Turn back to the door, click Open, and walk out.

Reply

thanks pheeze :)

Reply
october.hare December 10, 2014 5:08 PM

Thanks, Pheeze! I had found all of them except

the mouse nose.

Reply

Oops, I got a little stuck in the Fruit Kitchen game because

at first I didn't realise the buttons needed to go up/down, and then I couldn't drag them properly.

If you're a little um, challenged like myself, just click the yellow part just above the note if you want it to go up, or just below if you want to go down.

Reply

Oh go on then! I actually blitzed this one – I think I’m getting a bit too used to Hottategoya’s tropes!

Escape from the Similar Rooms 16 Walkthrough

Best foot forward

There’s no pixel hunting in this game, so there seems no harm in simply listing off what’s here, to save you looking for non-existent clues.

There are five rooms, and let’s say you start facing north. Each room contains a door on the north side, a pile of cushions and a window to the east, a safe/cupboard to the south, and a note on the west wall with the date on it. If you’ve examined each of those in each room, you’ve found everything.

Room 1

The safe has four buttons. That’s not many. By my reckoning, that’s only 14 combinations, so if this were a simple combination lock, any idiot could brute-force it. Clearly it isn’t a simple combination. And then there’s that arrow.

Never mind. What else have you seen that comes in fours?

The cushions are in four piles. And they’re all identical – except for the ones in room 3.

If you don’t know how to apply the clue to the puzzle, remember the arrow pointing down.

The four piles correspond to the four buttons. Reading downwards, they form a sequence. Let’s call the buttons ABCD from left to right. Start by pressing D. The display on the safe now matches the top row of the cushions. Continue in this fashion down to the bottom row.

D, A, B, A, C. Take the red gem.

Room 2

This is the only puzzle that requires you to combine two clues.

Four buttons up top, six below. And they’re red. Looks like this might have something to do with…

… the cupboard in room 4, which says “RED” in mirror writing.

Is anything else in mirror writing?

Look at the date on the wall of room 5. Three of the letters are written backwards.

There are four letters up top and six below. Click the buttons which correspond to the backward letters.

..x.
.x...x
Take the green gem.

Room 3

Five buttons with quadrilateral shapes. As ever, look for something that comes in fives. There’s actually only one clue left.

The windows have panes in rows of five. Look at those panes closely.

The panes are shaped differently in each room. Note the shapes – portrait, landscape, and square.

Now look on top of the safe. What would that arrow mean?

The arrow points south (towards room 1). So you need to enter the shapes in order from room 5 to room 1.

Square, landscape, landscape, portrait, square. Take the blue gem.

The end

OK, literally nobody is reading by now, so here’s as good a time and place as any. I have a hard time admitting this, but… I never actually saw The Lion King. I know, I know. Don’t judge me.

Oh right, the exit. Insert the shapes into the safe in room 5. Take the key, open the door, escape!

Reply

Pheeze, regarding how to get the computer password:

If you click around the area where the text is on the computer (with the N in the box), you zoom in on it to read "not contain N = Password". Only one of those words doesn't have an N, and that one's the password!

Reply

Thanks Metacom! There should be a word for something you're TOTES sure you clicked on, yet it turns out you didn't. Moby Click?

Reply

^ Scroll Up | Homepage >

Leave a comment [top of page]

Please consider creating a Casual Gameplay account if you're a regular visitor here, as it will allow us to create an even better experience for you. Sign-up here!
  • PLEASE UNDERSTAND SITE POLICIES BEFORE POSTING COMMENTS
  • You may use limited HTML tags for style:
    (a href, b, br/, strong, em, ul, ol, li, code, spoiler)
    HTML tags begin with a less-than sign: < and end with a greater-than sign: >. Always. No exceptions.
  • To post spoilers, please use spoiler tags: <spoiler> example </spoiler>
    If you need help understanding spoiler tags, read the spoiler help.
  • Please Preview your comment before posting, especially when using spoilers!
  • No link dropping, no domains as names; do not spam, and do not advertise! (rel="nofollow" in use)
chrpa Jayisgames needs your help to continue providing quality content. Click for details Hi! Weekday Escape and Weekday Puzzle are here! First we have two new cans from tomoLaSiDo and then two small rooms from isotronic. That's all for this...  ...
6,365 Views
0 Comments
chrpa Jayisgames needs your help to continue providing quality content. Click for details Welcome to Mobile Monday! We have another beautiful game from Nicolet and it's a winter game as it should be. Tasuku Yahiro have released another of their...  ...
6,161 Views
2 Comments
chrpa Jayisgames needs your help to continue providing quality content. Click for details We've got a new game from Rinnogogo's magical world and this time it really is magical.. Not only do you get to meet cute animals that express themselves...  ...
chrpa Jayisgames needs your help to continue providing quality content. Click for details After a few weeks of patient waiting, we have been rewarded - the new game from Ichima Coffeedo is here. We got a wonderful new game - it's...  ...

HELP Jayisgames.com

Recent Comments


Display 5 more comments
Limit to the last 5 comments

Game of the week


Dark Romance: Vampire Origins Collector's Edition

Your Favorite Games edit

add
Save links to your favorite games here. Use the Favorites editor.

Monthly Archives