

![]() Serious question: if you were a failed experiment of genetic engineering, what would be your weakness? In the case of the poor critter from this week's game Abandoned, it's a limited supply of oxygen. Personally, I would be unable to comb my hair without first dislocating my left shoulder. Think about it. That'd be a rough life.
Serious question: if you were a failed experiment of genetic engineering, what would be your weakness? In the case of the poor critter from this week's game Abandoned, it's a limited supply of oxygen. Personally, I would be unable to comb my hair without first dislocating my left shoulder. Think about it. That'd be a rough life.
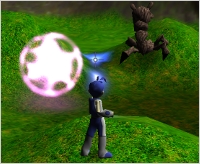 Caster (Mac/Windows, ~20MB, demo) - A 3D action adventure game that brings back a lot of memories from the Nintendo 64/PlayStation era. Dash, jump, fire, super jump and walk your way through a series of missions as you destroy bug-like creatures and collect energy orbs they leave behind. After each level you can upgrade your abilities tower defense-style. You (and some enemies) can even deform the terrain, which is a nice (and epically dramatic) touch.
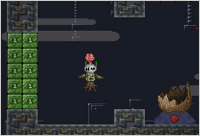 Abandoned (Windows, 12MB, free) - A simple game of exploration that brings back fond memories of Super Metroid. You play a creature who is the result of a failed genetic experiment trying to escape the lab. You have a limited supply of air and must move quickly to find the right power-ups to clear the way to freedom.
 greenTech (Windows, 15MB, free) - Eliminate global warming in this deliciously retro strategy game from the creator of Shellblast. Steer the wind by moving the hurricane (cursor) to pull clouds of pollution from factories into the cleaning facility. If only it were this easy (and fun) in real life!


Where is the Rape The Earth game?
Abandoned: It seems to work fine on Mac + Crossover. It has a 10 minute time. I didn't like the music- it was eerie & creepy. Use arrows to move, "z" to use the laser once you find it. That's all I know so far :-)
hmm..I appear to have hit a dead end in Abandoned...
so far I have 4 laser powerups, the first radioactive light and have found three oxygen tanks. What I need is a way to get in to the room with to change laser colour, and I can't. I can't find either a direct or hidden pathway into where I need to go in the red rooms.
Anyone offer any help?
Hm.
Don't know if its just my version of abandoned but... I seem to have found a slight error (nothing big)
the readme says z to shoot, x to change abilities, and c to interact, but I found for me, that z was shoot, a was change ability (one that I wasted precious minutes trying to find out, only to find my mistake) and x to interract.
other then that, good game.
Is the chat working? It says Unable to connect : jave.net.ConnectExeption : Connection refused : connect
For some reason, I have also hit a dead end in Abandoned. I have:
the Laser, Hyperspeed, truth torch(?), and maybe 2-3 lights. Not sure how many o-tanks.
How would I get to
the blue weapon?
To get to the blue weapon you first have to get the triple laser.
To get the triple laser you have to play around with the red arrows (so that they will change position in one of the areas of the map)
[Edit: Spoiler tags added. -Pam]
Oh god, I forgot about spoiler tags... I can just hope it was vague enough so it doesn't spoil the fun for anyone :-/
You have to get the triple laser, and by triple laser I didn't mean the third level of the laser, but another skill - a laser that shoots 3 beams at a time.
I seriously have to find another oxygen tank.
I have 2 minutes left and I'm in the red room with the really large flowsing bluee arrow streams...
I find this game really hard to navigate so any help appreciated!
I got pretty far.
lots of oxygen tanks, radioactive light, truth torch lvl 1, hyperspeed three, laser 4 and triple laser 1, TK 1. I got 50% done, and how you use the computer 1B thing in the pink heartbeat area? also great game! i got a total 82 min b4 i died, good thing I saved ^^
They also mixed up X and A and S. A and S change weapons, while X interacts with objects, and saves at savepoints.
@Zace
Those are not computers. And to use them you have to activate them with a panel somewhere first.
73% and 80 minutes when I got outside. I could have explored a bit more...
Am I the only one having problems downloading Abandoned? When I open the zip file, I get a message saying "Unexpected end of archive", and nothing is there but the music folder. (using WinRAR) Any ideas?
@VicousChicken:
I had exactly the same problem with both Chrome and Firefox. The download only worked for me once I switched to IE!
Success! Thanks!
Yeah, I've been thinking about making a game with a time limit for a long time, thinking it would be an interesting mechanic. It certainly is, but not for an exploration game. The point of an exploration game is to explore, and that is hurt by a timer, even if the timer is very loose. However, I'm not sure the same applies to RPG games, especially the ones that are like "OMG SAVE THE WORLD... But if you could do my errands first, that'd be great." Those need a timer in order to be considered a "role-playing" game. You know, in which you PLAY A ROLE. Sorry, done ranting now.
Walkthrough for Abandoned:
Walkthrough:
Keys: Arrows, Z, X, A, S
Map: Rooms are listed as A1, B3, and so on. The room you start in is A1,
the letters increase as you head right, and the numbers increase as you go down.
Once you get the map, the upper-left corner will be A1. Z and 0 will be used for
off-map excursions.
This walkthrough is based more on "where do I need to go" than "how do I get there".
It's also not the most efficient, because in most cases, you start at a savepoint, get one item and return.
Also, I may have confused directions a couple times....
Light:
From the start (A1), head right one screen, up one screen, and left one screen (A0).
Pick up the light, head right, down, (B1) then save.
Laser level 1:
From the savepoint (B1), head right, then down one screen (B2).
Go through the arrows, down, then left one screen, left some more, then down one screen (B3).
Pick up the laser, then go back up, then to the upper-right. Use your laser to destroy the green blocks.
Head up one screen, up some more, then left to the savepoint (B1). Save.
Laser level 2:
From the savepoint, head to the upper-right and though the green blocks to the next screen.
Go to the lower-right exit.
Use your laser on the green blocks, then go though the arrows and to the right.
Go through the lower-right exit, pick up the green laser powerup, (E1) and return.
Go through the green blocks again, use the upper-left exit, then the upper-left exit on the next screen.
Go through the green blocks, and head to the left to the savepoint (B1).
From the screen with the savepoint (B1), head to the upper-right and though the green blocks to the next screen.
Go to the lower-right exit.
Use your laser on the green blocks, then go though the arrows and to the right.
Go through the upper-right exit, destroying the level 2 blocks.
Go right one screen, then through the arrows, then right another screen.
Head down and right, through the red arrows, and save (G1).
Oxy tank:
There is a secret passage to the upper-right, that leads to the right.
Go through, pick up the tank (H1), and return to the savepoint (G1).
Hyperspeed level 1:
From the savepoint (G1), head down one screen, then left one screen.
Take the second exit in the top, head left more, then head down through the arrows one screen (F2).
Head left one screen, then up one screen.
Pick up the hyperspeed (E1), then pass through the arrows, then leave to the left.
Go through the green blocks to the left again, use the upper-left exit, then the upper-left exit on the next screen.
Go through the green blocks, and head to the left to the savepoint (B1).
Laser level 3:
From the savepoint, (B1) head to the left one screen, then continue until you see the green blocks. Destroy them, and the level 2 blocks behind them.
Exit through the secret passage to the left.
Use your hyperspeed to pass through the laser traps quickly, go through the secret passage to the left, then head down to the Laser upgrade (Z1).
Leave through the arrows, back the way you came.
Go right one screen, and save (B1).
Map:
From the savepoint (B1), head left one screen, destroy the green blocks to the left, and flip the switch.
Return to the right, and use the arrows pointing down.
This bit is fairly simple, just keep hitting the switch, and going through the arrows.
When you get the map, return, then head right to save (B1).
Laser level 4:
From the savepoint (B1), head left one screen, destroy the green blocks to the left, and head down.
Use your hyperspeed to destroy the red blocks, and head down one screen.
Pick up the laser upgrade (A2), and go up and right one screen to return to the savepoint.
Truth torch:
From the savepoint (B1), head left one screen, and up one screen through the red blocks.
Loop around, and when you get to the dead end, use the secret passage in the floor.
Destroy the green blocks, and go to the right one screen, then down one screen.
Pick up the truth torch (B1), then return to the savepoint (B1).
Oxy tank:
From the savepoint (B1), head right, then down one screen through the red blocks.
Keep heading down through the red blocks, pick up the tank (B2), then return to the savepoint (B1).
Oxy tank:
From the savepoint (B1), head left one screen, then down one screen.
From the savepoint (A2), head right one screen through the green blocks, then up and left.
Grab the tank (A1), and return to the savepoint (A2).
Oxy tank:
From the savepoint (B1), head down, then right one screen, grab the tank (B2), and return to the savepoint (A2).
Hyperspeed level 2:
From the savepoint (B1), head down, then right one screen, and through the red blocks down a screen.
Go down, through the green blocks, and down two screens (B5).
Flip the switch, and head to the lower-left exit.
Go down one screen, right one screen, up one screen, right one screen, and pickup the hyperspeed upgrade (C5).
Return to (A5), then go through the level 2 red blocks.
Go through to the upper exit, right one screen, through the arrows (B4), and up one screen.
Go through the green blocks to the left, up one screen, left, then return to the savepoint (B1).
Light:
From the savepoint (B1), head down, then right one screen, and through the red blocks down a screen.
Go down, through the green blocks, and down one screen (B4).
Use the truth torch on the upper-left wall, use hyperspeed on the invisible red blocks, then go around and out the left exit.
Go up one screen, down the other exit, then through the hidden passages, then exit to the upper-left.
Go through the green blocks, and go up one screen.
Go to the left, pick up the light (A2), and go through the hidden arrows. Save (A2).
Oxy tank:
From the savepoint (B1), head down, then right one screen, and through the red blocks down a screen.
Go down, through the green blocks, and down two screens (B5).
Go right, down, flip the switch, up, then down to the next screen.
Pick up the tank (B6), go back up a screen, then go up, down, flip the switch, up, and left.
Go up two screens, and go back through the upper-left exit back to the (A2) savepoint.
Spark of Life:
From the savepoint (B1), head down to the (B5) hub.
Go through the lower-left exit, then down, right, and up to the lower-right of (B5).
Use the truth torch to go through the invisible lower-right exit.
Go down, then go through the upper-left exit. Stick to the left wall, and go through the truth torch area, then down a screen.
Go through the right-hand wall using the torch, then down a screen. Pick up the Spark of Life (B8).
Go back up, left, up a screen, right a screen up a screen, left a screen, down a screen, and then return to the savepoint (A2).
Oxy tank:
From the savepoint (A2), head down to (B3). Go through both green block sets this time, and exit to the lower-right.
Go through the green blocks, pick up the tank (C3), and return to the (C3) savepoint this time.
Oxy Tank:
From the (C3) savepoint, go up one screen, use the torch on the right wall, then follow the path to the tank (C3).
Return to the (C3) savepoint.
Oxy Tank:
From the (C3) savepoint, go down one screen, left one screen, then use the lower-right exit.
Go down two screens, through the arrows, up, right, down, right, then up through the arrows.
Go up two screens, go right, flip the switch, go left, flip both switches.
Go down, down, left, up, left, down, left, up, up and left to (B4).
Go through the two sets of red arrows, then go down and right, and flip the switch.
Go up, left, up, and right, through the arrows, up, then left.
Go up-right, flip the switch, then go through the red arrows, and up. You'll be back at (C1).
Exit to the lower-right, then use the upper-right exit, and keep going to (G1).
Go down to (G2), use the spark of life on the statue, and take the tank.
Exit to the upper-right, and save (G1).
Triple Laser:
From the (G1) savepoint, go right through the now-reversed arrows.
Go right, right, up, right, down, right, right, down, left, down, left.
Go down one screen. Take the left path, then go left one screen.
From the switch, go down one screen, flip the switch, then go down.
After stopping, go up through the red arrows, go left, and pick up the triple laser.
Go right to the switch, hit it, and go up then left then up to return to the savepoint (G1).
Light:
From the (G1) savepoint, go right through the now-reversed arrows.
Go right, right, up, right, down, right, right, down, left, down, left.
Go down one screen. Go through the secret passage below the right path.
Go right, up, and left, and pick up the light (H2). Return to the path.
Go up, left, left, down, left, and go down one screen. Go left, up a screen, and save (G1).
Light:
From the (G1) savepoint, go down a screen, left a screen.
Head left, and break through the invisible red blocks. Follow the path, using the torch.
Flip the switch, go to the right, and flip the other switch.
Break through the other invisible red blocks, and flip the final switch.
Return to the upper-right section, and use the now-correct arrows to grab the light (F2).
Return to the (G1) savepoint (right then up).
Light:
From the (A2) savepoint, head to (B5), and then to (A5).
Use your triple laser to break through the green blocks.
Go left, and down a screen. Pick up the light (A6).
Go back up a screen, go through the green blocks again, and go straight down a screen.
Take the center path, then the left path, flip the switch, take the left path, then the center path, then the right path.
Loop around and save (A7).
Hyperspeed level 3:
From the (A7) savepoint, start from the top, and make your way through the arrows.
Use hyperspeed to go through the next arrows, and go down a screen.
Pick up the hyperspeed powerup (A8), and return to the savepoint.
Oxy tank:
From the (C3) savepoint, head down a screen, left a screen, and through the two red arrow sets.
Go down and right, flip the switch, and go left, up, and up.
Go through the green blocks, pick up the oxy tank, and save at the (C3) savepoint that's right there.
1B Transporter:
From the (C3) savepoint past the red arrows, go right through the red arrows, then down through the green blocks.
Head right through the blue arrows, and leave to the lower-right.
Use your torch to go through, and leave to the lower-right.
Use your torch to destroy the traps, and go down through the arrows.
Leave through the hidden passage, go through the arrows, use the touch of life on the statue, and activate the console (D4).
Return to the savepoint in (E4).
Telekenesis, Oxy tank:
From the (E4) savepoint, hit both switches, and leave to the lower-right.
Go back to (F3), then return to (F4) to deactivate the traps.
Use your triple laser to go through, and leave to the left.
Pick up the telekenesis (E4), and go left.
Use the torch to see the hidden passage, and use tele to move the block out of the way. Pick up the tank, and save (E4).
1A Teleporter:
From the (F3) savepoint, (from G1) go down the path, and take the right path to the brain blocks. Take the right exit.
Move through the maze, and head down two screens.
Point the switch down, go left, and loop around to the lower part of (H5). Turn the switch right, go left and down to (G6).
Point the switch up, and use the lower-left exit, then go down a screen.
Go through the path to the switch. Point it right, then go back through the maze to (G7).
From there, there's only one path; activate the 1A teleporter switch, go up, turn the switch right, and reenter (H6).
From the center switch, go right, right and around, and down a screen. Save (H7).
Warping:
From (H7), take the upper-left exit, go left a screen, and go through the teleporter.
Go through the blocks, get the warp powerup (E6) and return.
Exit:
From (H7), take the upper-left exit, loop around back to (H7), and take the lower-left exit.
Point the switch to the left, and loop around to the other entrance.
Make your way through the maze, through the teleporter, and use the warp to get past the next maze.
Go down a screen. The exit is in the lower-right (H8).
(There's more stuff to do, though.)
Oxy tank:
Once you have the warp, head to (A5), and use it to grab the tank.
Medicine:
from the (I2) maze, take the bottom teleporter. Follow the path ending at (E8).
Head to the dying ... thing ... at (A3) to have it follow you.
Triple laser level 2:
Head to (E4), where the statue was before.
With your warping power, go through the arrows, and get the triple laser upgrade.
Oxy tank:
From (E4), where the statue was, head down and left, then exit to the lower-right.
Watching for hidden passages, head right, then down. Tank is in (F6).
Oxy tank:
From (E4), where the statue was, head down and left, then exit to the lower-right.
Head right, then through the hidden blocks upwards. The tank is in (F4).
Statues:
Aside from the ones you need to revive in order to exit, the following birds can be revived:
(G8):
From the exit room (H8), go left, and go through the blue blocks. (Bit tricky.)
(A1):
At the start of the game. Just grab it sometime.
(C4):
Behind level 3 red blocks.
(A6):
Start from (C6), then (B8), then explore. You'll need telekenesis.
(E5):
Start from (D7), go through the arrows, and follow the path. You'll need warping.
(D5):
Start from (E4), after getting the triple laser upgrade, go left and down.
(D2):
From (D3), go up and through the level 2 green blocks.
(I2):
From the (E3) maze, exit up through the hidden passage.
Go through to the teleporter, and go through the maze.
You'll need tele, warping, and to have activated the 1B teleporter.
I think this should be very helpfull :
If you want to play with ulimited time go here -
DOWNLOAD GAME FROM CAIMAN and rename their 'cheat' file into 'save_game'
Update