
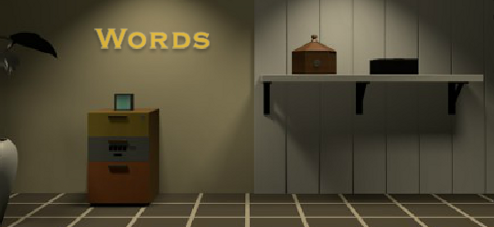
![]() Earth. Music. Honey. In this room, these are some of the words you will find. These random words might seem unrelated but they have this much in common: they're stars in Robamimi's latest escape-the-room creation, Words. The trick, you'll find, is figuring out the ways in which these words do relate and how they will be your clue-wielding friends throughout your puzzle solving ventures. Make the right connections and you'll solve your way out the door.
Earth. Music. Honey. In this room, these are some of the words you will find. These random words might seem unrelated but they have this much in common: they're stars in Robamimi's latest escape-the-room creation, Words. The trick, you'll find, is figuring out the ways in which these words do relate and how they will be your clue-wielding friends throughout your puzzle solving ventures. Make the right connections and you'll solve your way out the door.
 Most the time, you'll need to point-and-click around the room, studying the furnishings and objects therein from every angle possible, but there is one instance in which a keyboard will be needed to input a code. Robamimi's user friendly interface of changing cursor on a clean design works well with a "HINT" button to avoid excessive frustrations. The hints themselves are semi-riddles, so it might be fun to peek at them even if you're someone who likes to solve escapes sans aide. The presence of almost-too-easy puzzles makes the more challenging ciphers deceptively abstruse, as if the designer is playing good cop/bad cop with us. Yet, along with the serenely pretty background music and artistically photo-realistic graphics, this is just another reason why Words is clever and fun, well worth the work to solve.
Thanks to Cyberjar88 and Celli for sending this one in!


Walkthrough Guide
(Please allow page to fully load for spoiler tags to be functional.)
Words Walkthrough
Starting Out: Initial Explorations and Clue Gathering
As you begin, you're facing a wall with a sink and, down a short hall, a green door.
Zoom in twice on the door to examine it:
It has two handles on either side, pushing each you find its locked tight.
As you're at the door, back up and then click the panel on the left way to look closer:
"LOCKED" with five tiles missing. The first, "M", suggests you'll need more letters perhaps?
Back up twice then check out the sink area:
The faucet can be turned either left or right by clicking on the buttons on either side of it. Notice the asterisk in the top position.
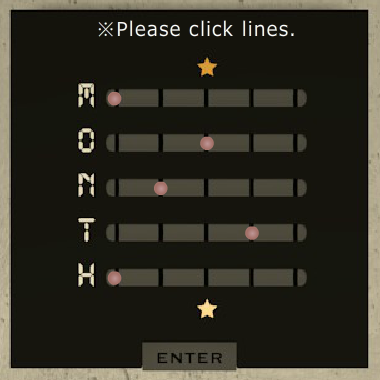
A black box next to the sink has "MONTH" spelled out vertically along five rows of slider buttons.
There is also a place to enter a 3-digit code along the front of the sink.
Turn right and you'll see a recess in the floor and a picture of Earth on the wall.
Examine the "earth" picture:
Clicking on different corners of the picture causes it to tilt different directions.
If you click the bottom right corner, a symbol on the wall behind the picture will be revealed. Make a note of what it looks like.
Look down the hole in the floor:
On one side you have the word "HONEY" and on the other side, further down, you can see a bucket. It seems a way to bring the bucket up is needed.
Turn right from the earth picture to find a low table with a suitcase on it and a potted plant. Examine these things:
Opening the case, you find there's room for 10 word cards: five pink and five blue.
Searching around the base of the potted plant, you'll find...
... a KNIFE.
Make a note of the symbol you see on the knife, too.
Leave the case/plant area and turn right to see the last wall: a three-drawer cabinet and a shelf with some items on it.
Examine the items on the shelf:
The hexagonal box needs a key to be opened.
The square black box has a 3x3 grid of push buttons on it.
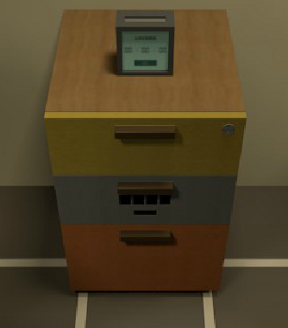
Examine the digital clock on top of the cabinet:
The time still needs to be set. Currently it reads 00:00:00.
Click the right side of the clock to view it from another angle: now you see it has a symbol on its side, similar but slightly different than the ones behind the picture and on the knife.
Now look at the three-drawer cabinet itself:
The top drawer needs a key.
The middle drawer needs a 4-digit code to be opened.
Open the bottom drawer:
Get the HONEY POT.
Examine the underside of the honey pot to see it also has a symbol marked on it.
Now you're ready to solve some puzzles.
The Honey Pot, a Bucket and Its Key
After finding the HONEY POT in the bottom drawer, use the KNIFE (found behind the potted plant) to cut the string holding it closed.
Open the honey pot and you can look through the clear liquid to see a key at the bottom of the jar.
Not wanting to be like Pooh Bear, you'll wait until you have appropriate utinsels for reaching the key...
But, what else is this pot of honey good for? Where else did you see "honey"?
Turn to the wall with the earth picture and peer down into the hole in the floor.
Put the HONEY POT on the word "HONEY" and it will sink down, bringing the bucket up to the top.
Get the BUCKET. Look inside it for another clue.
There's something else on the platform where the bucket was:
Pick up the TONGS. Now you have a way to get the key from the honey...but no honey pot!
Go over to the sink and examine the faucet:
Using the clue on the bucket, click the buttons on either side of it in the correct sequence.
SOLUTION:
It's all about moving the asterisk to the correct positions...
LEFT, LEFT, LEFT, RIGHT, LEFT, LEFT
Now the water is running:
Fill up your BUCKET with water from the faucet.
Go back over to the scales in the floor:
Put the BUCKET FULL OF WATER onto the left platform, causing the honey pot to rise up on the right platform.
Retrieve the HONEY POT again.
Now you can use your TONGS to reach the KEY at the bottom of the honey.
As a key covered in honey is not very usuable, go back over to the sink:
Turn on the faucet and wash the KEY under the water.
Go left from the sink and zoom in on the three-drawer cabinet:
Use your new KEY to unlock the top drawer...
Get the CD.
Clock and Five Pink Word Cards
After getting the CD from the top drawer, look at it more closely:
On its cover, it reads "NUMBER=325173" and "UN:MB:RE"
Inside the case, you see another symbol, similar to those for earth, honey, knife and clock.
Examine the clock:
Using your mouse to highlight the digits and your keyboard to type in the numbers, input the correct time.
The cover of the CD gives the answer...
SOLUTION:
Each letter in "NUMBER" on the CD case corresponds to a number. So, UN:MB:RE=
23:51:37
When correct, the front of the clock will read "unlocked."
Look inside the top of the clock to see what was opened up:
take the KEY from inside the clock.
Go over to the shelf, zoom in on the hexagonal box and use the KEY to open it:
Get the ENVELOPE.
Open the ENVELOPE for two more things:
five pink CARDS (honey, clock, knife, music, earth)
and a clue (under the flap) "no need a sweetener"
Turn around twice from the shelf so you're facing the suitcase again. Zoom in on the suitcase and open it:
With the five pink cards highlighted, click on the "cards" slots inside the suitcase.
Now you need to drag and drop the cards where they belong.
To figure out where they go, think about the one way these cards can connect together.
HINT:
"Word chain". If you were laying these cards out on the floor, making a chain of words, how could you overlap them without changing any word?
SOLUTION:
Connect the letters at the beginning and end of each word:
MUSIC
CLOCK
KNIFE
EARTH
HONEY
When you have them in the correct order, click "enter." If you are right, you'll hear a chime and some of the letters will light up green.
The "MONTH" Box
After solving the pink word cards in the case, take note of the order of each word.
See the star above and below the words? That tells you these words somehow relate to the "Month" box by the sink. So, go over to the month box and examine it:
Clicking the appropriate lines, slide each of the buttons to the correct position.
Your clue is the word "month".
SOLUTION:
From top to bottom, the words in the pink cards each have a letter in the word "month". Wherever that letter is located, that's where the pink button needs to go...
x - - - -
- - x - -
- x - - -
- - - x -
x - - - -
Screenshot: Month Box Solution
If correct, when you click the "enter" button, the box will open:
Get the "E" PANEL.
Middle Drawer: 4-digit code
You'll need to solve the word cards to get your clue...
Notice what happens when you click each of the words, flipping the cards over?
But, you have more information than needed. What do you do? Look inside the envelope.
Go over to the three-drawer cabinet and zoom in on the middle drawer.
Using the clues you found, enter the correct 4-digit number.
SOLUTION:
Flip over music, clock, knife and earth, but not honey ("no need the sweetener") to get five numbers, highlighted in green...
5 7 1 3
If correct, when you click "enter" the drawer will open.
Take the blue CARDS from inside the middle drawer.
Blue Words
Now that you have the blue cards (from inside the middle drawer) return to the suitcase. Put the blue cards in the case:
Drag and drop the blue word cards into their correct slots.
To solve this puzzle, think of how each blue card relates to the words in the pink cards.
SOLUTION:
This is a word association game...pair the two words that best fit together:
MUSIC-SOUND
CLOCK-TIME
KNIFE-CUT
EARTH-PLANET
HONEY-BEE
If you're correct, when you click "enter", the panel in the top corner of the case will open:
Get the "Y" PANEL.
Tilting Earth Picture
Examine the picture of Earth:
Earlier in our explorations, we noticed how each of the items—the CD (music), clock, knife, honey pot and the wall behind the earth picture—each had a strange symbol marked on it.
Those symbols looked exactly like the symbols on the corner of this picture frame.
Look around the room and examine your inventory, making note of which item corresponds to which corner. Then, check out the pink word cards.
Return to the Earth picture:
Click the corners of the picture frame in the correct order.
SOLUTION:
The pink word cards in the suitcase give the order. The symbols on each item indicate which corner...
TOP RIGHT, BOTTOM LEFT, BOTTOM RIGHT, BOTTOM RIGHT, TOP RIGHT
When done correctly, the picture will fall off its axle.
Back up and examine the back of the earth picture.
Make a note of the clues written on the back of the picture.
Get the "K" PANEL.
Sink: 3-Digit Number
Once you have the three letter PANELs (gained from solving the earth picture, month box and blue word cards), you have everything you need to unlock the front of the sink's vanity.
Look at the back of each panel and you'll see a number.
Now you narrowed down the possible solution for the 3-digit number to just 9 possibilities. How can you connect these three panels in a way that makes sense?
SOLUTION:
Spell the word "KEY"...
8 2 5
Zoom in on the front of the sink's vanity and enter the code. When correct, the panel will open:
Get the "C" PANEL.
Square Black Box: 3x3 Grid
Examine the square black box on the shelf next to the hexagonal box:
Here you need to push the correct buttons in the proper sequence.
The clue to this puzzle is on the back of the Earth picture.
HELP IN SOLVING:
For each button you click, think only about that button and what the grid looks like at that exact instance you're clicking it. See how 1 has unshaded areas along its right side and bottom? And 2, 3 and 4 also have unshaded areas in certain places around them? Where can you click on the grid where this would be possible?
Next, see that 5, 6 and 7 are in certain positions on the grid where, when clicking, there'd be a shaded area in just those particular areas in relation to them. When you work out how all this is possible, you have the correct pattern and sequence.
SOLUTION:
1 x 3
6 4 5
2 x 7
x=don't click
When you have clicked them all in the correct order, an "H" shape will be left on the grid (although, simply making an H in the wrong order won't work). Click "enter" to open the box.
Get the "H" PANEL.
Unlocking the Door: Five Letters
To unlock the door, you need to put your 5 letter tiles in the proper sequence on the panel to the left of the green door.
Ignore the notches on the panels' edges; they don't mean anything for this puzzle.
Look inside the suitcase for a reminder.
Your hint is "word chain" so think of how these letters will link together with the words...
SOLUTION:
Start with "M" for music, "C" for the end of music and beginning of clock, "K" for end of clock...and so on, until you reach the "Y" that ends honey:
M, C, K, E, H, Y
When placed in the correct spots, the panel will read "UNLOCKED"
Opening the Door
Although the door is unlocked, no matter which side you press it, it won't open. Maybe there's a trick to opening it?
Go back to the UNLOCKED panel to the left of the door and study the letters.
Now, press either the left or right side of the door in the correct sequence:
SOLUTION:
The notches on the edges of the letters represent either the left or right handles on the door...
RIGHT, LEFT, LEFT, LEFT, RIGHT, RIGHT
When you've pushed the sides of the door in the correct sequence, it will swing open, ending the game.
Congratulations!
Posted by: elle |
February 1, 2014 3:30 PM
|
February 1, 2014 3:30 PM
Walkthrough
1.
face the plant, take the KNIFE from behind it. make note of the direction of the corner mark.
2.
face the drawers, open bottom one to find the HONEY. take a good look at the jar
use the knife to remove the cord. make note of the direction of the corner mark on the bottom, and note the key inside, we'll get to it later.
3.
face the earth picture, and
look down into the two pits in the ground
place the honey jar on the "HONEY" side
then
pick the BUCKET and the TONGS
4.
look inside the bucket. if you looked around, that would be the solution for -
opening the tap over the sink.
if 0 (zero) is the starting point, check out the direction you have to go to get to the next number. solution:
clockwise=R, counterclockwise = L:
L L L R L L
fill the bucket and let's move on
5.
head back to the pits in the ground next to the earth picrute
place the bucket on the left, and pick the honey from the right
use the tongs to get the key from the honey jar
wash the key in the sink
you got key 1
6.
use the key to open the
top drawer. pick the CD box, notice the code on the front cover. open it and make a note of the corner mark direction.
now look at the clock on top of the drawers
click the front panel, "please put the number". the hint is
on the CD cover.if NUMBER=325173, then
UN:MB:RE = 23:51:37
type it in place
you'll hear a click
look at the top of the clock - pick KEY 2
before you leave, examine the right side of the clock and note the direction of the corner mark.
7.
examine the wooden box on the shelf next to the drawers
open it with KEY 2 and get an envelope. open the envelope and get the 5 pink bordered cards. examine the envelope again and see what's written inside. i actually didn't find a use for that..
8.
head towards the suitcase on the table next to the plant and open it
place the 5 pink cards on the left column, and you'll be directed to drag them each to its place. the order is
simpler then you might think
notice the letters at the beginning and end of every word?
can you make a chain from those words? solution:
musiC ClocK KnifE EartH Honey
on each card, one letter is hilighted now.
did you try clicking the cards?
rotate them until they make sense as a numerical code
57130
9.
back at the drawers, examine the middle one. it requires a 4 digit code
but we just got a 5 digit numerical code. what do we do?
we enter it anyway. the last digit was either a mistake, or just an attempt to confuse us. enter:
5713
take the blue bordered cards.
10.
back to the suitcase on the table, drop the blue cards into place on the right column
next to the right pink card, by association. solution:
music > sound
clock > time
knife > cut
earth > planet
honey > bee
hit the "ENTER" button and get the "Y" panel
11.
examine the black box next to the sink. it has "MONTH" written on it. notice the stars over and below those sliders?
something from inside the suitcase?
the pink cards column also has those stars. take a look. what can we do with those cards?
the "MONTH" puzzle has those pink pins on sliders. each has 5 possible locations
each word on the pink cards is a 5 letter word
with one of the letters used to spell "MONTH"
count the location of each letter in each word, in order to spell "MONTH" from top to bottom. maybe write it down.
return to the box next to the sink
solution:
M = 1
O = 3
N = 2
T = 4
H = 1
click the button to open the box and get the "E" panel
12.
take a look at the earth picture. it's a four corner puzzle. when you click it once, over the right top corner you'll see another corner mark.
take note of its direction, this is the last one.
what now?
notice those exact corner marks as the ones we've noted so far, on the corners of the picture's frame?
so what's the order? we have the hint by now
back to the cards in the suitcase
and to the order of the pink cards
music = inside the CD box in our inventory
clock = the alarm clock on the drawers
knife = in our inventory
earth = the marking on the wall over the picture frame
honey = on the bottom of the honey jar
solution:
1. top right
2. bottom left
3. bottom right
4. bottom right (yes, again)
5. top right
the frame fell down. take a step back and see it on the floor.
click it to turn it around. get the "K" panel, and look closer on the drawings on the bottom left.
make a note of those drawings.
13.
examine the black box on the shelf next to the drawers. it's a 3x3 grid puzzle. where did we see that grid before?
in the drawings on the back side of the frame. what do they mean?
the drawings give us the order in which to click the buttons on the 3x3 grid
each drawing shows us a 2x2 grid, with the situation on-board as we click the next button.
the first 3 are easy, since they appear to take place in a void, but you have to start thinking ahead and plan for the next click, so it would be possible to fit it in.
click the "ENTER" button on the box
solution:
1. top left
2. bottom left
3. top right
4. center
5. middle right
6. middle left
7. bottom right
(the result should look like an "H". if you did something wrong, click the "ENTER" button on the box to reset)
get the "H" panel from the box.
14.
the next unsolved puzzle is the three digit code, on the front of the sink - shelf thing
i couldn't resist asking for a hint at that stage, which was "KEY". what can we do with that hint?
where do we have a "KEY"? or more precisely,
do we have the letters, to spell "KEY"?
examine the letter panels we've collected in our inventory, flip them and mark the numbers behind "K", "E" and "Y"
solution:
825
get the "C" panel.
15.
on the wall to the left of the green door, examine the puzzle with the letter "M" in it. underneath we're informed that something is "locked".
the "M" panel looks like our other letter panels. when you try, you find that you can place those panels in those free slots. but what's the order?
could it be, that the hint is..
again..
no, it can't be.. really?
the pink cards in the suitcase? yes.
we're back to the 1st and last letter of each word, in a chain.
solution:
MCKEHY
we hear a click, and the panel declares "UNLOCKED".
16. get out!
now we just need to turn to the green door, only to realize it didn't open.it just rotates slightly and bounces back.
you can try to open it from either side. if you click for a hint, it only says
"panels". which panels? what about them?
the letter panels from our last puzzle. look at them closely.
in the frame of each letter panel, there's an opening, hinting a direction.
solution:
R L L L R L
use that on the door and you're out.
Posted by: yaneev |
February 1, 2014 4:52 PM
|
February 1, 2014 4:52 PM