
Princess Isabella:
Return of the Curse
Platform: Mac, Windows
![]() A long time ago, in a land far, far away, lived a lovely princess by the name of Isabella. Isabella was not your typical princess. Rather than spending her days languidly awaiting rescue by a handsome prince, Isabella took matters into her own hands and strode forward to unlock the curse, fight the evil witch, and rescue her intended prince herself. Now, a year later, the same witch is back and wreaking havoc again. The castle is again cursed, Isabella's true love the prince is missing, and worst of all, the evil hag has kidnapped Isabella's new baby for some nefarious purpose. In Princess Isabella: Return of the Curse the titular heroine is back and badder than ever in this fantastical adventure/hidden object hybrid by Gogii games. Oh, it is on, witch!
A long time ago, in a land far, far away, lived a lovely princess by the name of Isabella. Isabella was not your typical princess. Rather than spending her days languidly awaiting rescue by a handsome prince, Isabella took matters into her own hands and strode forward to unlock the curse, fight the evil witch, and rescue her intended prince herself. Now, a year later, the same witch is back and wreaking havoc again. The castle is again cursed, Isabella's true love the prince is missing, and worst of all, the evil hag has kidnapped Isabella's new baby for some nefarious purpose. In Princess Isabella: Return of the Curse the titular heroine is back and badder than ever in this fantastical adventure/hidden object hybrid by Gogii games. Oh, it is on, witch!
 A bewitching animation at the beginning of Princess Isabella: Return of the Curse lays out the story in broad strokes — accompanied by a haunting version of "Twinkle, Twinkle Little Star" — and is guaranteed to pull you right in. The horrendously cute (and fantastically annoying) fairy guide from the first game immediately shows up and the player is off and rolling. With the help of your fairy companion (and another surprising addition along the way) it is up to the gamer to find their way out of the castle and through the kingdom, searching for the witch's lair and removing the curse upon the land along the way. You must find the missing prince, defeat the witch, and rescue baby Bella, all of the usual tropes of a classic (yet twisted) fairy tale.
Exploration is as simple as the click of a mouse as Princess Isabella: Return of the Curse plays out like a classic point-and-click adventure game. There are objects in each scene that may become useful later; some found immediately, some found within classic hidden object scenes, and some objects which can only be retrieved with the help of your companion(s), who have special powers that allow them to reach items that you are not able to. These objects will go into a handy scrolling inventory to be used at a later point in the game, whether it be to break a curse, rescue a villager, or unlock a helpful character whom the witch has frozen with another curse.
 You will also pick up useful bits of magic left over when you break a curse, mini-spells that can transform the world around you in helpful ways. The useful and logically designed control system also includes a changing cursor to indicate areas of interest, a scrolling "task" screen which helps you remember what needs to be done, a useful diary that keeps track of information learned, and your companions themselves who among their abilities count the talent of a recharging hint feature. Rounding out the experience are a plethora of puzzles and mini-games that must be solved as well, although they can be skipped after a certain amount of time.
Be prepared, also, for other fairy tale icons to pop up unexpectedly, their stories intersecting with your own as Isabella fights her way to her ultimate goal. Can she rescue her family and save the kingdom in time? Will there be a happily ever after? Only time will tell.
Analysis: The first game in the series, Princess Isabella: A Witch's Curse hit the scene back in 2009 with a stunning array of fun puzzles and exceptional graphics, setting a standard that has not often been topped. Well, Gogii has definitely topped it with this amazing sequel. Attention has been poured into every detail of Princess Isabella: Return of the Curse, be it the backgrounds, voice acting, characters, storyline, animations, and gameplay.
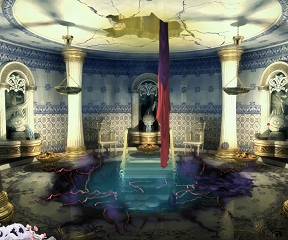
 Some might miss the over-the-top baroqueness of the original castle, but the scenery this time around is still magnificent with each view having two different versions: the cursed and the cleared. Enough cannot be said about the ravishing graphics, from the control designs to the adorable animations and everything in-between. Princess Isabella: Return of the Curse is at once lighter (with much more sarcastic humor than the original) and darker (with the intense storyline of a kidnapped child) than the original. The darkness is especially ramped up with the musical accompaniment which weaves classic childhood songs into its themes. Once you've finished the game you may never listen to "Mary Had a Little Lamb" the same way again.
If there is one complaint that can be leveled against Princess Isabella: Return of the Curse it is that, like so many other adventure/hidden object hybrids on the market today, it is rather short. Playing time will depend upon the experience of the player, the choice of mode (easy or difficult), and whether or not you decide to spring for the Collector's Edition with its extra gameplay. On average the gamer can probably look forward to about three hours of solid gameplay, although the hefty "extra" gameplay in the CE will probably add another hour or so. For those debating whether or not the extras in the CE are worth it, in this case they most definitely are. The "extra" gameplay is extensive and includes some fantastic challenges and puzzles, along with a chance to revisit parts of the original lovely Baroque castle from Princess Isabella: A Witch's Curse.
With its darker and more powerful storyline and haunting music Princess Isabella: Return of the Curse still delivers the goods of involving, entertaining, challenging gameplay. The ability to chose two different modes of play makes Princess Isabella fun for both beginners to the field and seasoned adventurers looking for a challenge. Beautiful beyond belief and exciting to play Princess Isabella: Return of the Curse is a definite hit. Now how long do we have to wait this time around for a sequel?
A Collector's Edition is also available. It includes wallpapers, concept art, the music soundtrack, an amazingly hefty extra adventure that blends into the regular gameplay seamlessly, a wonderful animated teaser for the planned sequel, and a built-in strategy guide. Remember that Big Fish Game Club Members pay only $13.99 for Collector's Editions (or 2 club credits), and collector's editions count 3 card punches of 6 total needed for a free game.
![]() Windows:
Windows:
Download the demo
Get the full version
Also available: Collector's Edition
![]() Mac OS X:
Mac OS X:
Download the demo
Get the full version
Also available: Collector's Edition


Walkthrough Guide
(Please allow page to fully load for spoiler tags to be functional.)
Princess Isabella: Return of the Curse Walkthrough
General Information
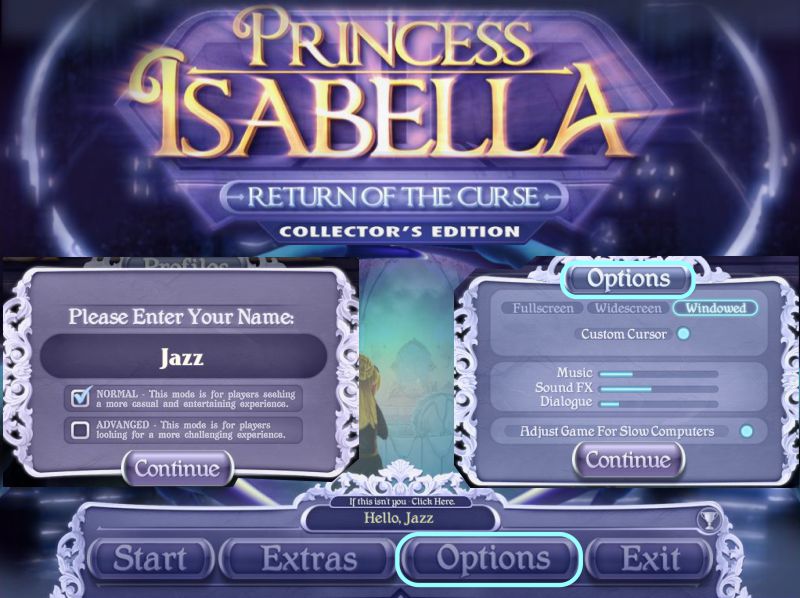
When you choose your profile, you will be asked to choose a mode of play. Normal is a casual mode and Advanced is the more challenging mode.
From the Main Menu, you Start or Exit the game; choose your Options; and get access to Extras, if you purchased the Collector's Edition.
Options include Full versus Windowed screen; Custom Cursor; Music, Sound FX and Dialogue volume; and an adjustment for slow computers.
Once you choose your Options, they are the same for all profiles you play, but you do have the option to change one or more from the scene Menu.
Screenshot
Scene Navigation
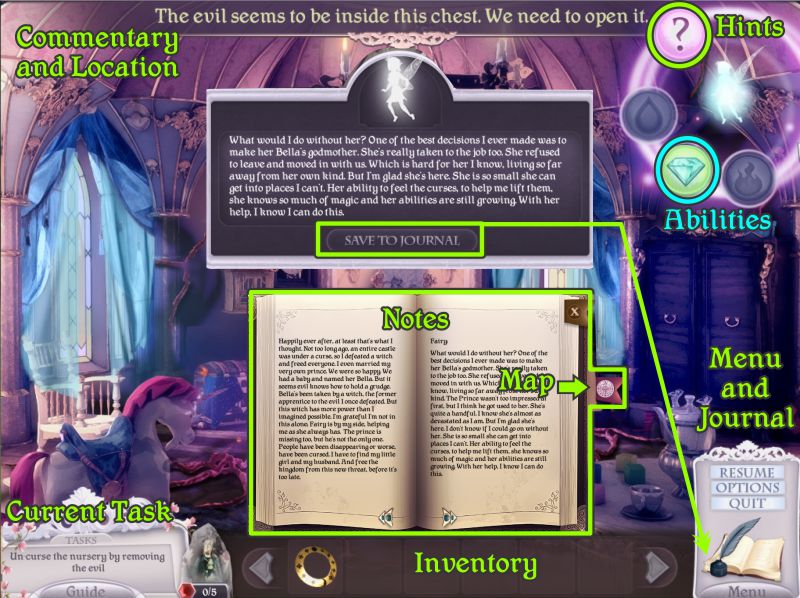
There is no timer or click penalty, and hints are unlimited once the Hint button refills.
Once you rescue the Fairy, she will provide you with Hints in her Abilities circle. She will develop Abilities as the game progresses to provide more help.
The bar at the top of the page is where you will receive comments from your helpers about a scene or item. This bar is also where you get instructions for Mini Games, or where you can find your current location.
Your current task is shown in the lower left corner.
Just to the right is where the Fairy will deposit items you collect.
In the lower center of your screen is your Inventory.
Next to your Inventory is access to the Menu, where you can change your options, resume the game or quit to the Main Menu.
If any of the chatter bothers you, I suggest clicking on the Menu and turning off the dialogue option.
The book with the feather pen is your Journal, which contains notes and a map to follow your journey.
As shown in the screenshot, you will collect notes to add to your Journal.
Scenes where you remove all the evil have the same objects for everybody.
Hidden Object Scenes are random, but some of the same items can always be found, so are marked in the screenshots.
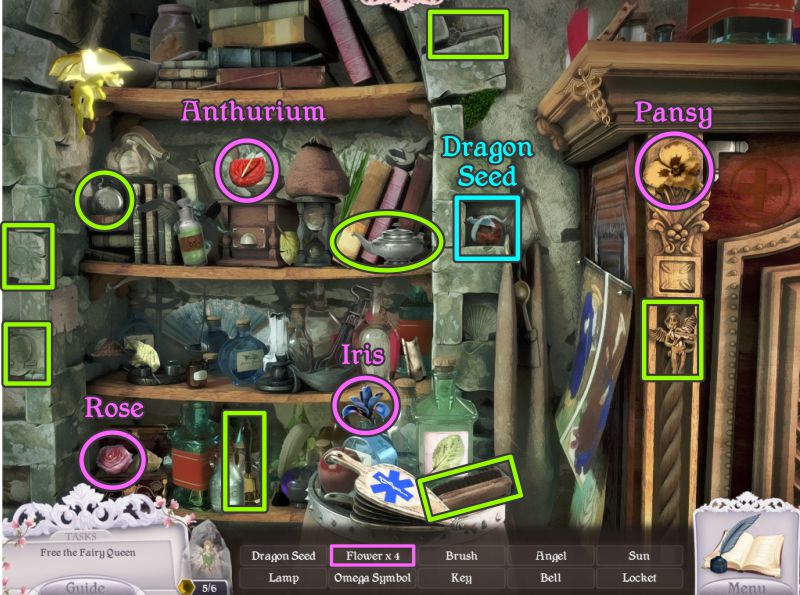
Some of the characters you meet along the way will need you to paint their tattoos in order to revive them from the witch's spell. Before you can play these Mini Games, you need to collect flowers.
Screenshot
Cursor Attachments
Your cursor will get various attachments to help you with your journey.
A Hand means you should pick up the object.
A Magnifying Glass is for close-ups.
A Lock means you need to perform another task to have access to the locked area.
Gears say there is a task to perform.
A Bubble wants you to talk to the character.
Your helpers' picture with "Ability" written under it suggests you use an available ability.
Each ability also has its own cursor attachment when it is in use.
The Transformation Potion even has its own cursor attachment.
Sometimes, there will be an attachment of what the object is, such as Dragon Berries.
Potions and Abilities
When you come upon an object that requires an Ability, click on the object and the object ring will appear around one of your helpers.
If they already have that ability, select it and go back to the object to use it.
When you are in a scene where only the Fairy or Dragon can fit, their abilities and hints will appear on the top right for the Fairy or top left side of the screen for the Dragon.
Fairy Diamond Ability: Use to break objects.
Fairy Water Ability: Use to fill objects with water or other ways water might be needed.
Fairy Fire Ability: Use to burn objects.
Dragon Lift Ability: Use when strength is required.
Dragon Smoke Ability: Use anywhere a puff of smoke is useful (The Dragon is too young to breathe fire).
Dragon Frost Ability: Only becomes available in the Collector's Edition Bonus Chapter.
Transformation Potion: Use to make objects grow, shrink, or otherwise change.
Map
The Map can be accessed through your Journal. It tracks your progress and can show you which areas are still cursed and which have been cleared.
Your current location is also marked on the Map.
Screenshot
Chapter 1: The Castle
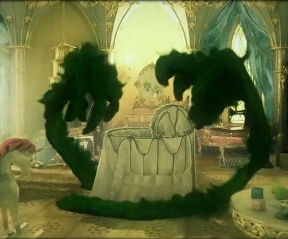
Cursed Nursery
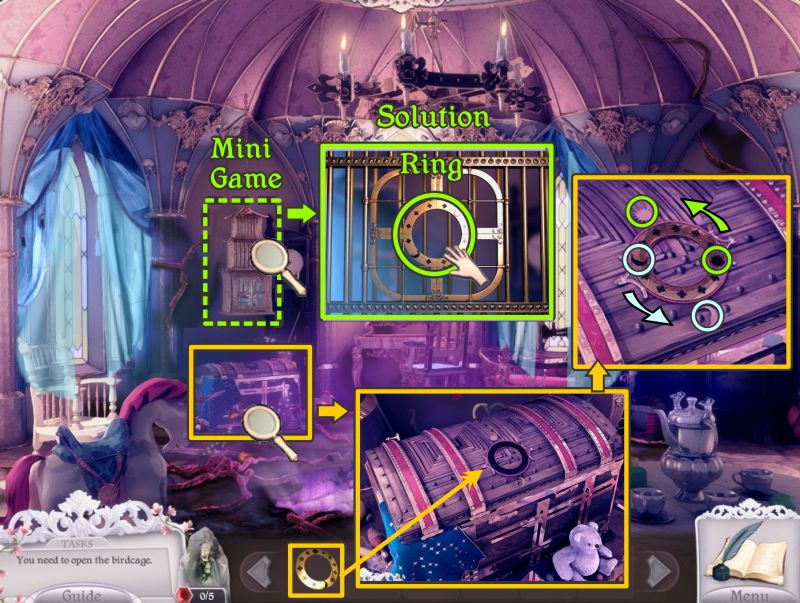
Your first task is to free the Fairy by opening the birdcage, so zoom in and flip the doors to form a ring in the center.
Take the ring and the Fairy will be free.
Zoom in on the chest below the birdcage and place the ring on it.
Rotate the ring until the sun and moon line up with the same symbols on the chest, and the chest will open.
Screenshot
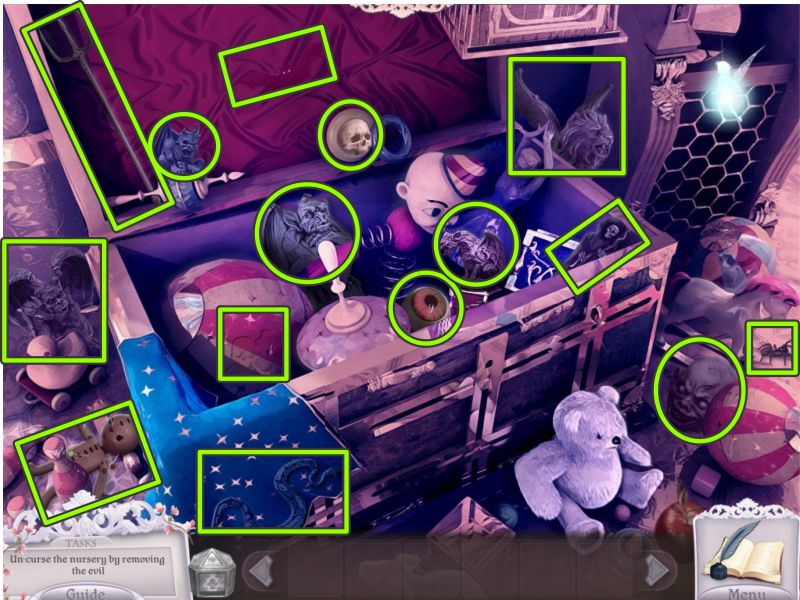
Chest Hidden Object Scene
Remove all the evil items in the chest and the room will be cleared.
Screenshot
Cleared Nursery
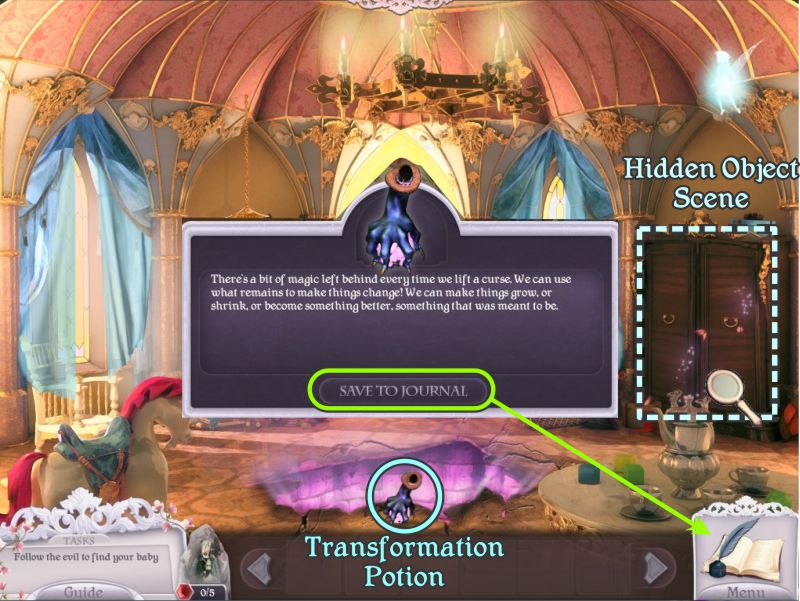
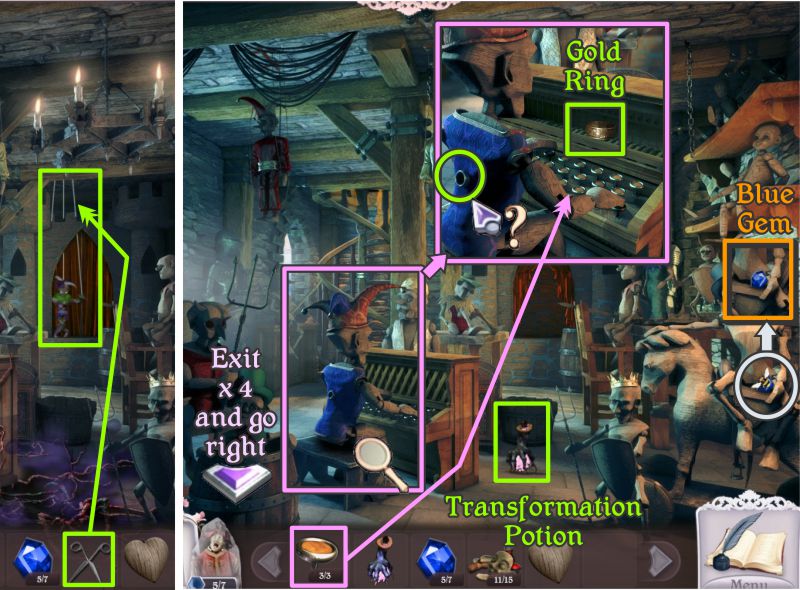
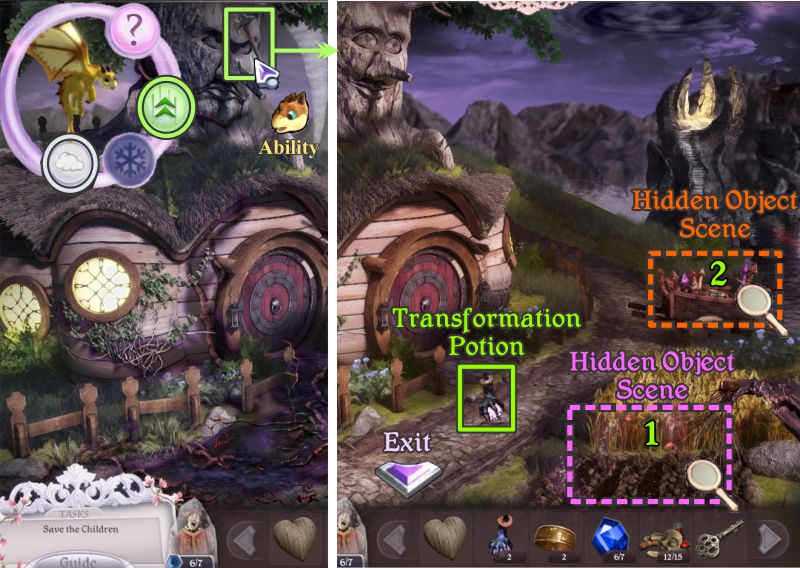
Even though you clear various locations as you follow the trail of evil, there will always be a little something left over. This time the leftover is a Transformation Potion, so collect it and save the notation to your Journal.
Zoom in on the wardrobe and open the doors for a Hidden Object Scene.
Screenshot
Wardrobe Hidden Object Scene
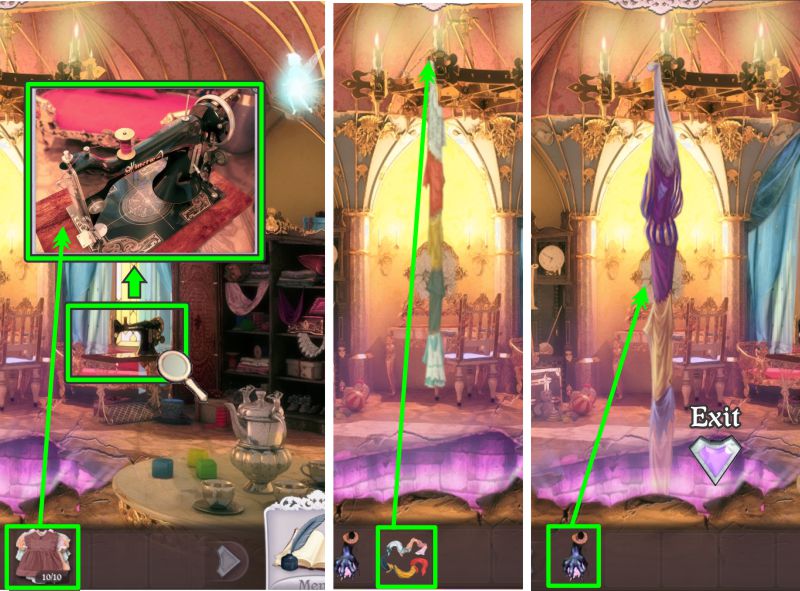
Find 10 of Bella's dresses.
Screenshot
Dress Rope
Zoom in on the sewing machine and sew the dresses together into a rope.
Place the dress rope on the chandelier, and use the Transformation Potion to lengthen it so you can go down the hole in the floor.
Screenshot
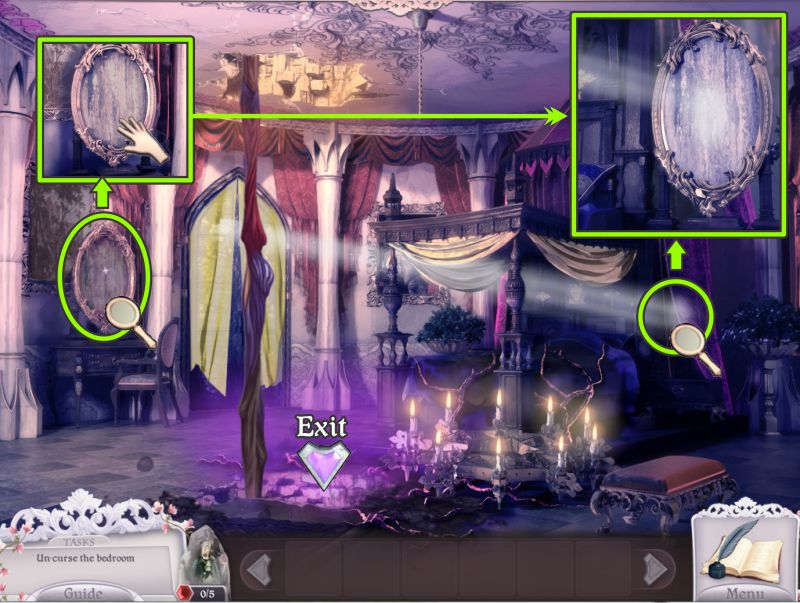
Cursed Bedroom
It's too dark to see what's going on, but there is one ray of light shining on the bed.
Zoom in on the mirror at the left and take it.
Place the mirror where the beam of light is shining.
The mirror is too dirty to reflect, but the Royal Bath is downstairs, so climb down the rope.
Screenshot
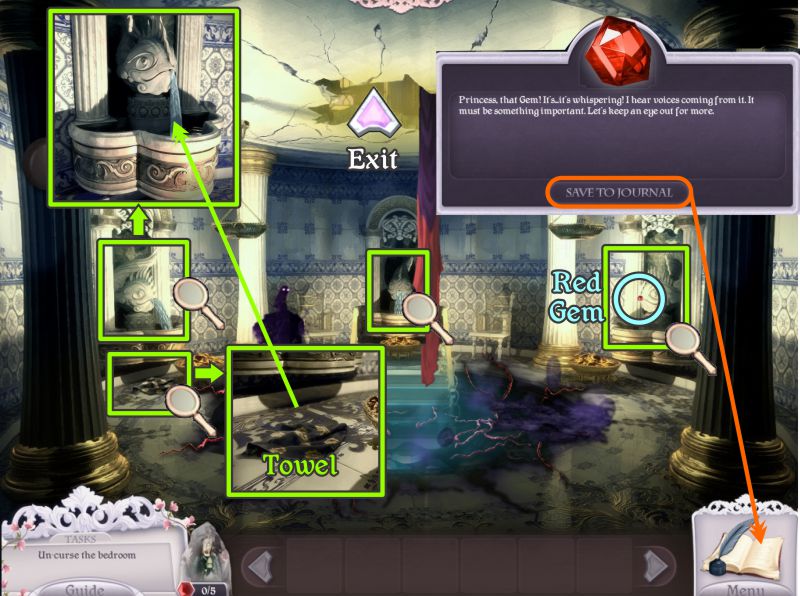
Cursed Royal Bath Pool Room
The only water left is in the fountains.
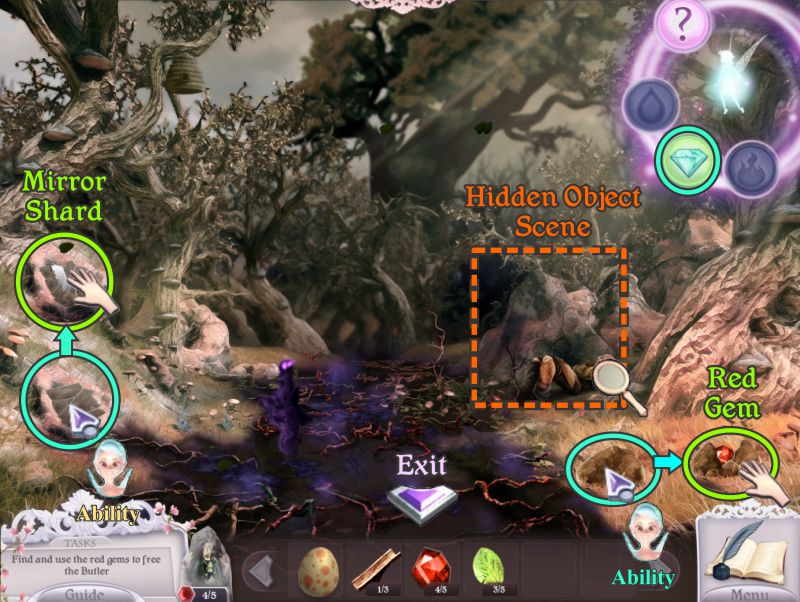
Collect the first of 5 Red Gems in the fountain at the right, and the towel on the floor at the left.
Read the notation and save it to your Journal.
Dip the towel in your fountain of choice, and go back up the rope to the Bedroom.
Screenshot
Cursed and Cleared Bedroom
Use the wet towel to clean the mirror, and the light will reflect to cleanse the room.
Take the Transformation Potion and zoom in on the bed.
Remove the covers for a Hidden Object Scene.
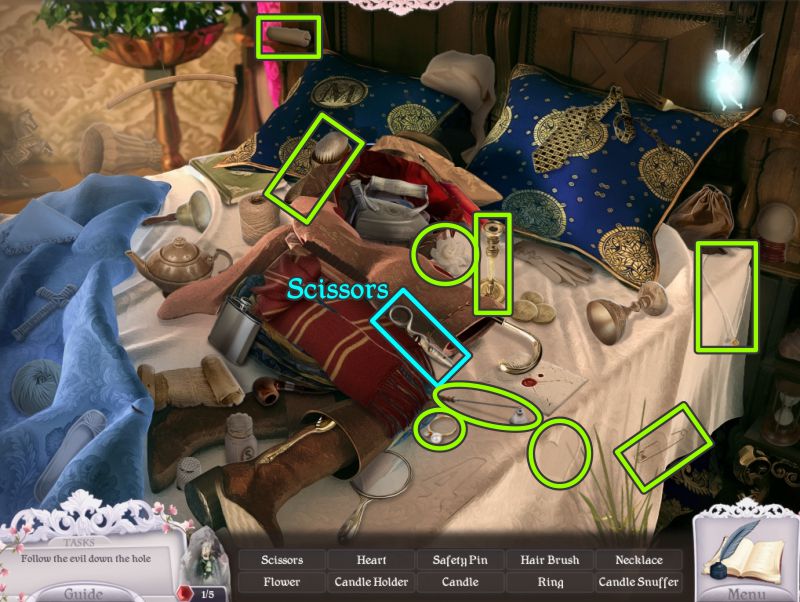
Screenshot
Bed Hidden Object Scene
When you have collected everything on your list, you will have a Scissors for your Inventory.
Screenshot
To the Cave
Use your scissors to cut down the window curtains.
Go down to the Royal Bath Pool Room. Add the window curtains to your dress rope so you can descend below.
Screenshot
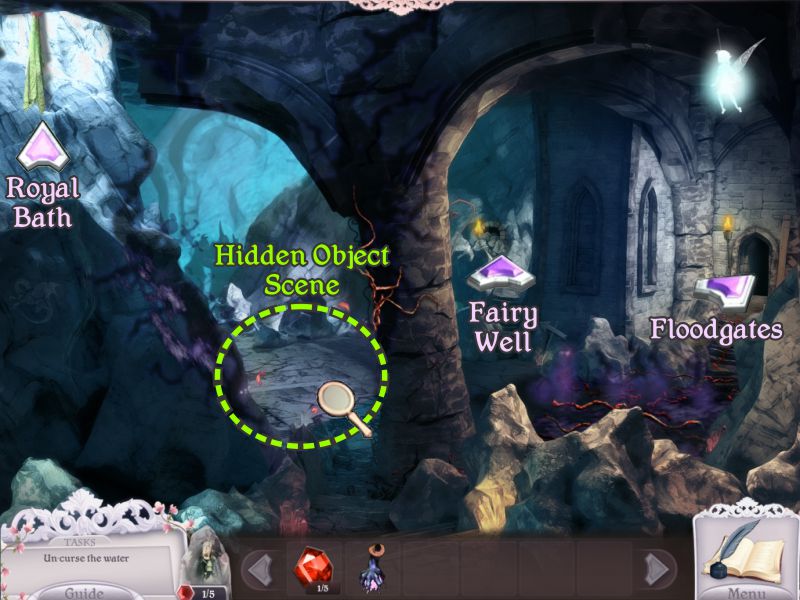
Cursed Cavern
There are two other rooms off the Cavern and your rope exit to climb back upstairs.
Play the Hidden Object Scene.
Screenshot
Cursed Cavern Hidden Object Scene
Collect all the evil objects to clear the cave.
Screenshot
Cleared Cavern
The evil left behind this time appears to be Bella's rattle.
Pick it up and save the page to your Journal.
Collect the red gem that is behind the rattle and zoom in on the dragon hand in the rocks.
Take the egg, then go play the Hidden Object Scene.
Screenshot
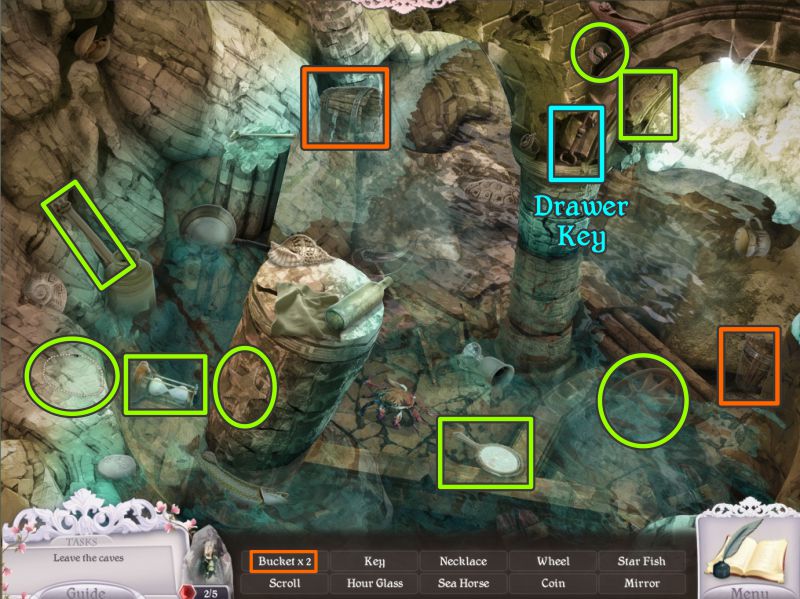
Cavern Hidden Object Scene
Collect everything on your list to get 2 buckets and a Drawer Key.
Screenshot
Bedroom
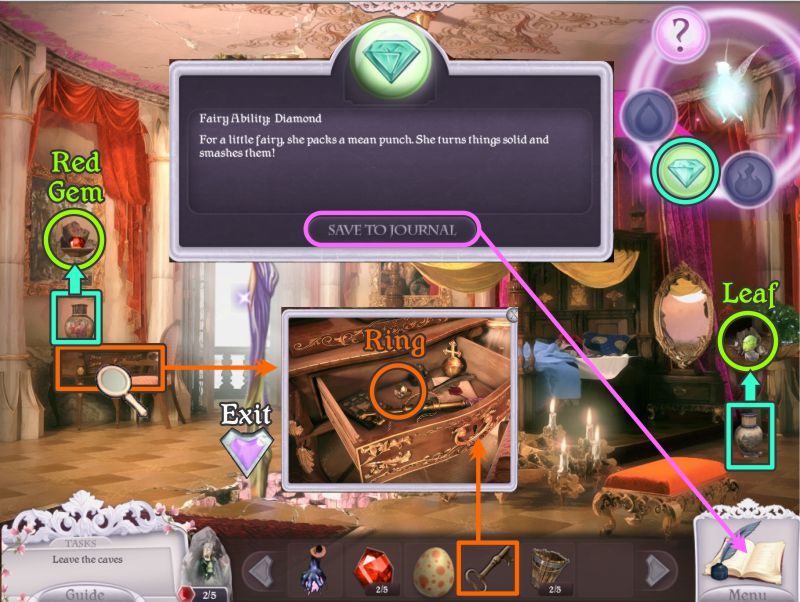
Return to the Bedroom and use the key to open the drawer at the left.
Take the Ring, and the Fairy will acquire her Diamond Ability that turns things solid and smashes them.
Save the notation to your Journal, and then try out her new ability.
Click on the Fairy and choose the Diamond.
Smash the two vases marked in the screenshot to collect the Red Gem and Leaf.
The leaf is one of 5 you will collect.
Screenshot
Cursed Royal Bath Pool Room
Exit down to the Royal Bath.
Use the Diamond ability on the 3 fountains and the round disc on the left pillar. The water will flow and cleanse the room.
Screenshot
Cleared Royal Bath Pool Room
Pick up the Bamboo from the pillar and the Transformation Potion by the pool.
Zoom in to the fountain on the right to find a tiny tadpole swimming around.
Use one of your Transformation Potions to turn him into a Frog you can collect.
Go down to the Cavern.
Screenshot
Cleared Cavern
Use the Fairy's Diamond Ability on the rock at the left and take the Leaf.
Go to the room with the floodgates.
Screenshot
Floodgates
Place your frog on the giant fly.
The frog isn't big enough, so use your Transformation Potion on him and he will grab the fly.
Use the Fairy's Diamond Ability on the two places shown in the screenshot.
Screenshot
Collect the Red Gem, Transformation Potion, Chain and Leaf.
Note the one locked floodgate and play the Hidden Object Scene.
Screenshot
Floodgate Hidden Object Scene
Collect everything on your list to get the Crank.
Screenshot
Fairy Well
Go back to the Cavern and enter the Fairy Well.
The Fairy is the only one who can fit there, so you won't see her, but Hints and her Abilities will be posted on the right of the scene.
Zoom in on the pulley and place your chain.
Zoom in on the gears and place 4 buckets on the rope and 1 on the hook.
The bucket on the hook isn't big enough, so use a Transformation Potion on it so it will hold more water.
Place the crank on the post and watch the Floodgate open.
Go to the Floodgate room and exit the Castle.
Screenshot
Chapter 2: The Forest
Witches Tree
Click on the Witches Tree to find out more about it.
Check all the captives before continuing up the path.
Screenshot
Forest Line
You come across a cursed area with the Forest Lumberjack who seems to be under a spell.
Use the Diamond Ability on the two areas marked in the screenshot to collect the Mirror Shard and Red Gem.
Play the Hidden Object Scene.
Screenshot
Lumberjack Hidden Object Scene
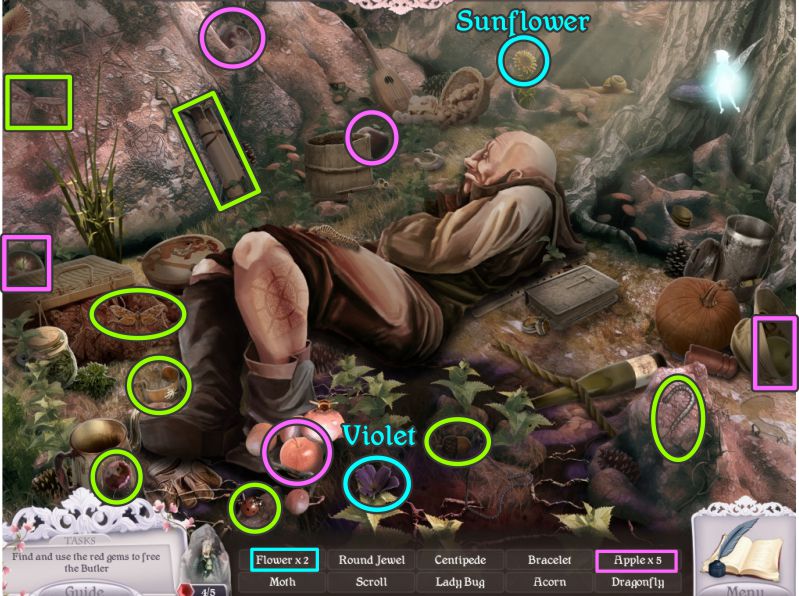
Collect everything on your list to get the two flowers.
Screenshot
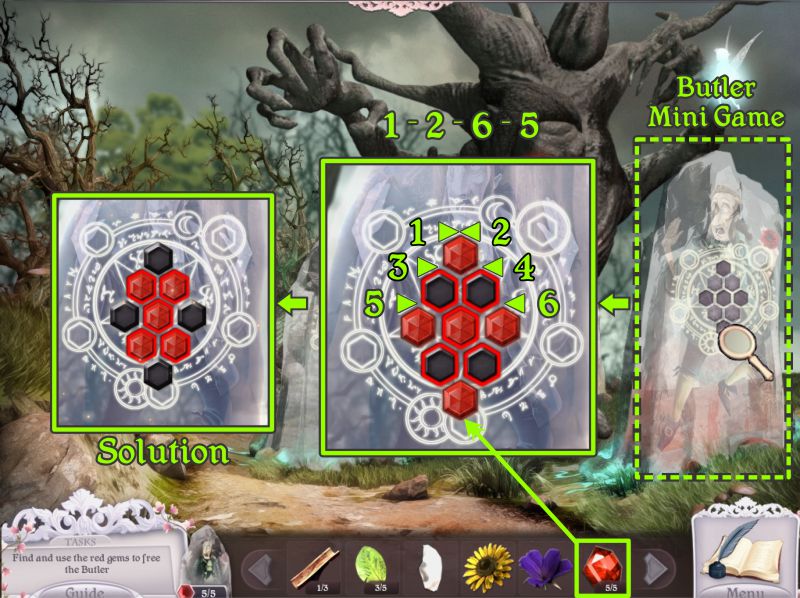
Free the Butler Mini Game
You have all the gems to free the Butler, so return to the Witches Tree.
Zoom in on the Butler and place your Red Gems to activate the Mini Game.
Your goal is to move the gems into the spaces outlined in red. The solution and how to get there is shown in the screenshot.
The Butler is grateful for being released and gives you a rose he got from the Prince.
Return to the Lumberjack.
Screenshot
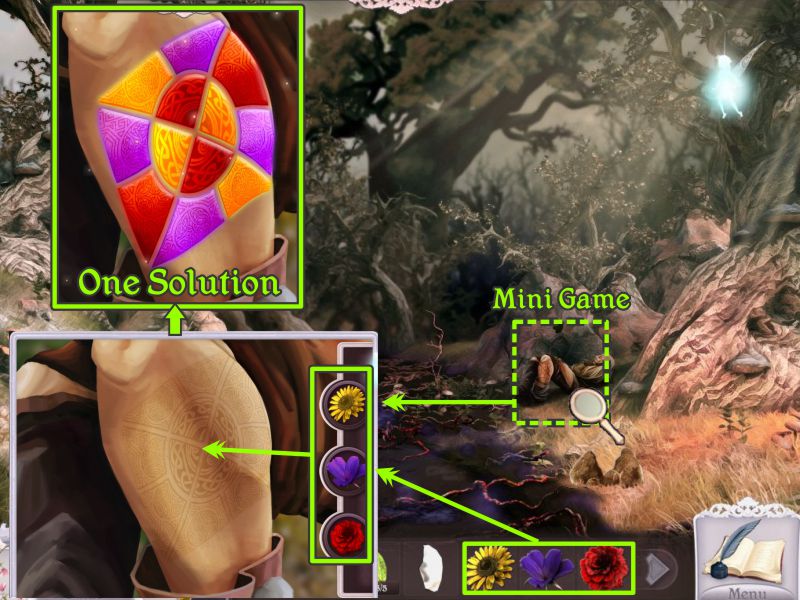
Lumberjack Tattoo Mini Game
Zoom in on the Lumberjack and place your 3 flowers.
Use the flowers to get creative and color his tattoo.
No color can be next to itself. See one solution in the screenshot.
He is grateful for being awakened from the spell and give you some rose seeds.
Screenshot
Forest Line
The area has been cleared, so pick up the Transformation Potion.
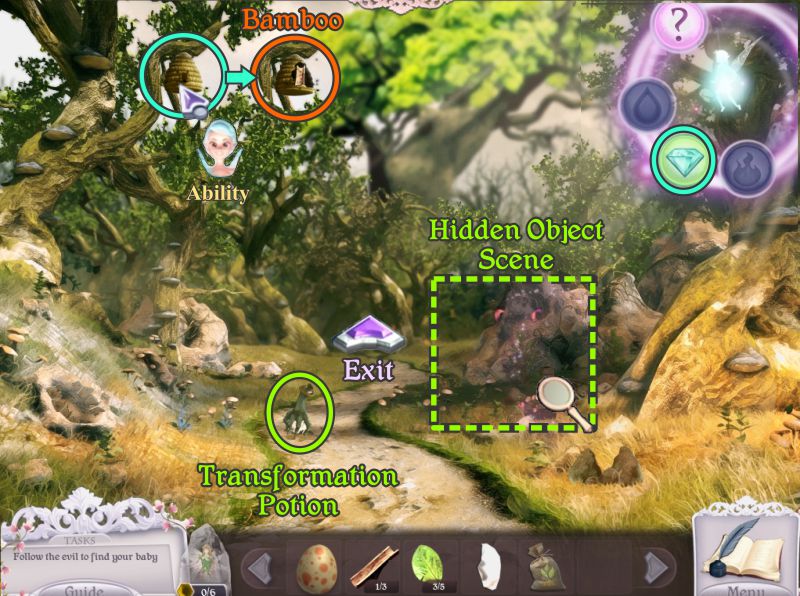
Use the Diamond Ability on the beehive to collect the Bamboo.
Play the Hidden Object Scene before traveling up the path.
Screenshot
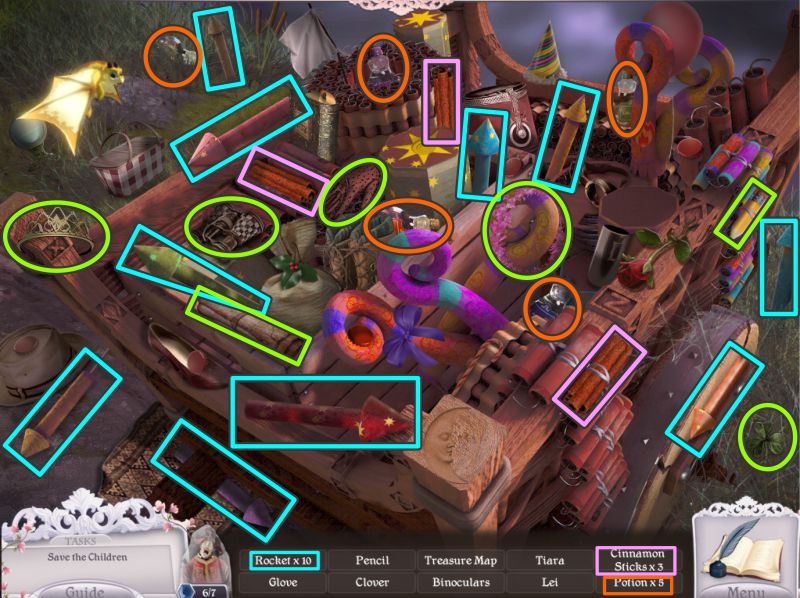
Forest Line Hidden Object Scene
Collect everything to get a Shovel and 1 of 15 Puppet parts.
Screenshot
Fairy Village Path
The path and the village where your Fairy grew up are cursed.
Use her Diamond Ability on the two places marked in the screenshot.
Collect the Mirror Shard and Bamboo.
Screenshot
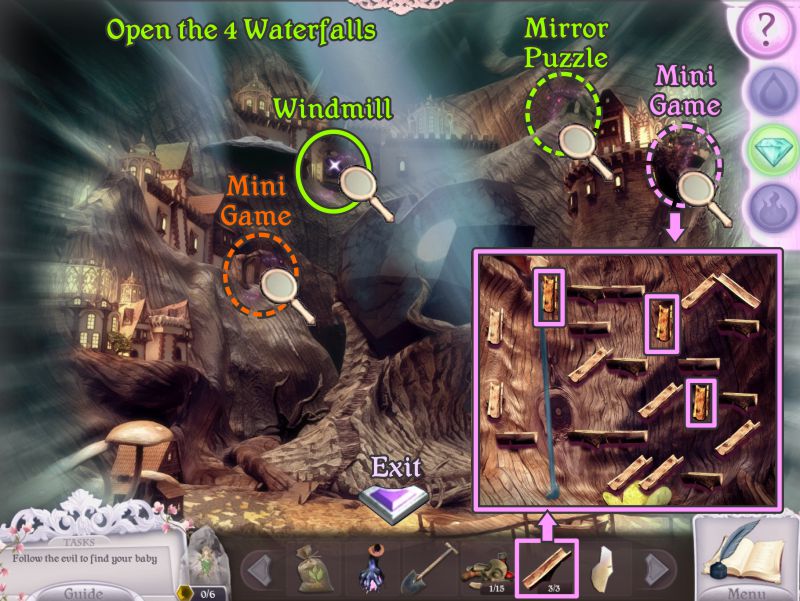
Fairy Village
The Fairy is the only one who can fit in her village.
In order to remove the curse from the village, she will need to open the 4 waterfalls marked in the screenshot.
Place your 3 bamboo troughs as shown to activate the Mini Game.
Screenshot
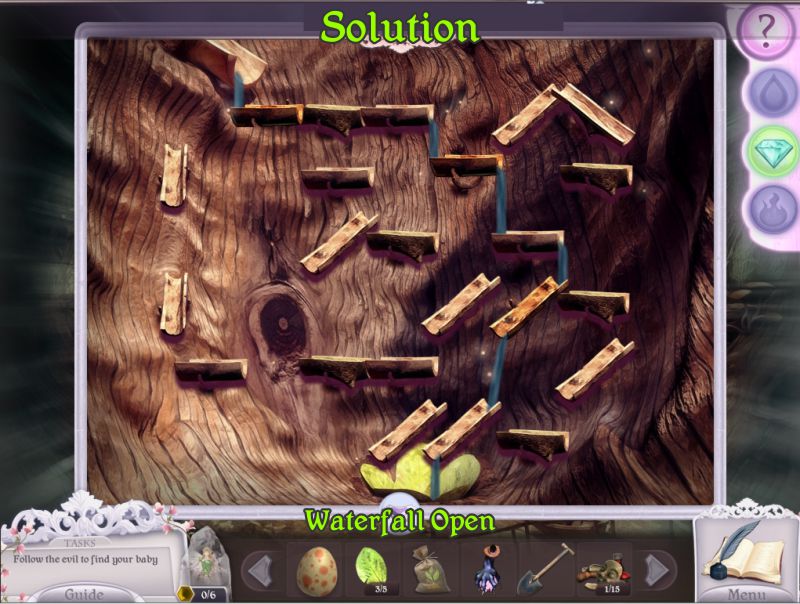
Waterfall Bamboo Mini Game
Your goal is to rotate the bamboo so the water will flow to the bottom.
The solution is shown in the screenshot.
Screenshot
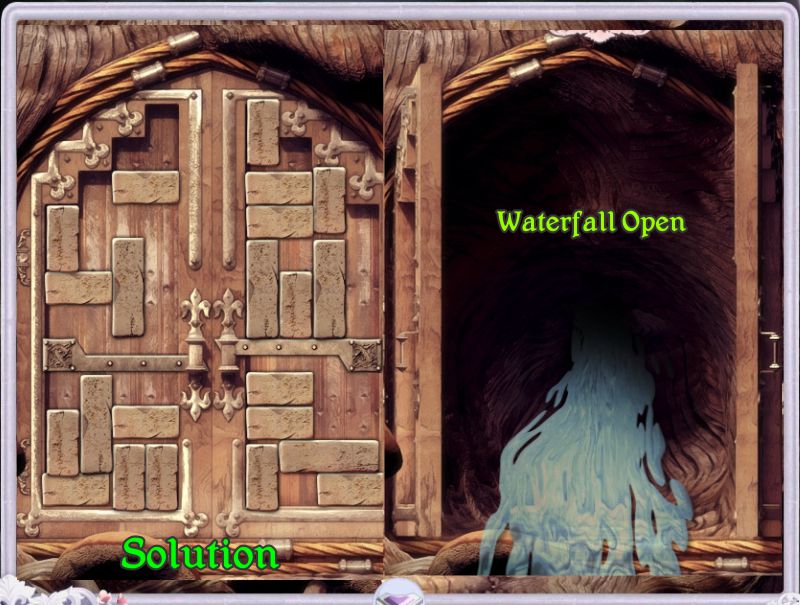
Waterfall Slider Mini Game
You can open one more waterfall this visit, so zoom in on the Slider Mini Game at the left.
Your goal is to slide the blocks so that both sides of the lock can be open.
A step-by-step guide to the solution is shown in the screenshot.
Screenshot
The solution screenshot shows how the blocks should look for the waterfall doors to open.
Screenshot
Forest Path
Go forward on the path to the Mother Tree that is blocking your path to continue.
Use the Fairy Diamond Ability on the two areas marked in the screenshot.
Zoom in on the area in front of the tree and use your shovel to dig a hole.
Plant the rose seeds and use a Transformation Potion to make them grow.
Screenshot
The area in now cleared, so pick up another one of Bella's things to collect the Yellow Gem behind them.
Collect the Mirror Shard and Leaf before continuing to the Town.
Screenshot
Forest Exit
You've come to the edge of the Forest with the Town Gate in sight.
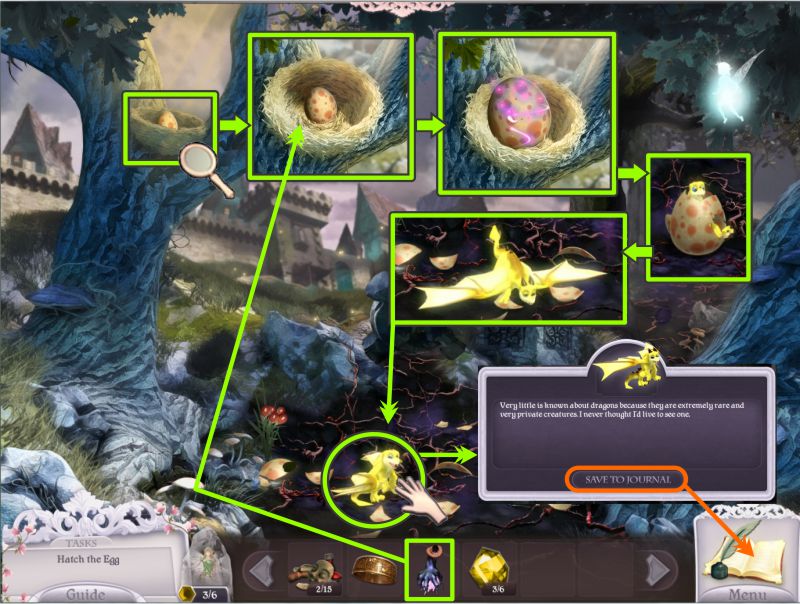
Zoom in on the nest in the tree and place the Dragon Egg in it.
Use the Diamond Ability on the 3 areas marked in the screenshot to collect the Lily, Mirror Shard, and Leaf.
Take the right path toward the River.
Screenshot
Gate to Snapping River and Troll Bridge
Check out all the skeletons and zoom in on the gate.
Your goal is to make each row of skulls with matching color eyes turn forward so they will disappear.
When they have all disappeared, the gate will open and you can go to Troll Bridge.
Talk to the Troll, who wants honey before letting you pass.
Use the Diamond Ability on the spot shown in the screenshot and take the White Daisy.
Exit down twice and go forward to the Town Gate.
Screenshot
Guard Tattoo Mini Game
Use your Diamond Ability on the areas shown in the screenshot.
Collect the Puppet Part and Pink Daisy.
Zoom in on the guard and place your 3 flowers.
Get creative with your flower colors, and remember that two areas that touch cannot have the same color.
One solution is shown in the screenshot.
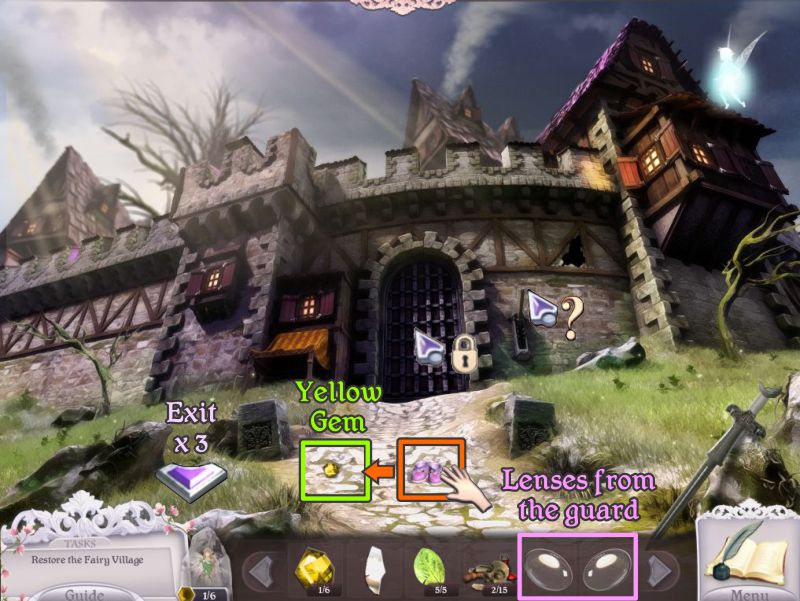
The area is cleared and the grateful guard gives you a pair of lenses for your efforts in removing the spell on him.
Screenshot
Town Gate
The leftover this time is a pair of Bella's booties.
Pick them up and take the Yellow Gem behind them.
The gate is locked, so you can't get inside the Town.
Exit down 3 times to the path outside the Fairy Village.
Screenshot
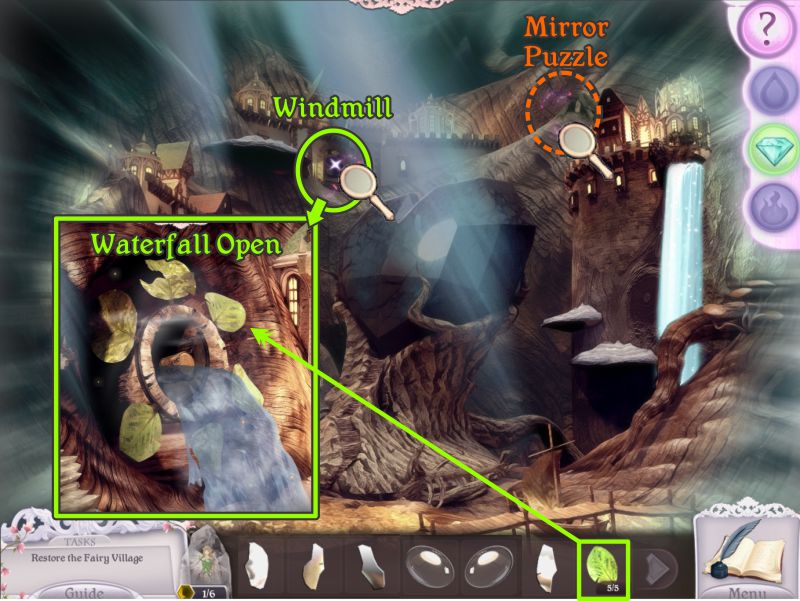
Fairy Village
Your Fairy will go inside the Village at your direction.
Zoom in on the Windmill and place your 5 leaves to start the mechanism to open the waterfall.
Zoom in on the area for the Mirror Puzzle.
Screenshot
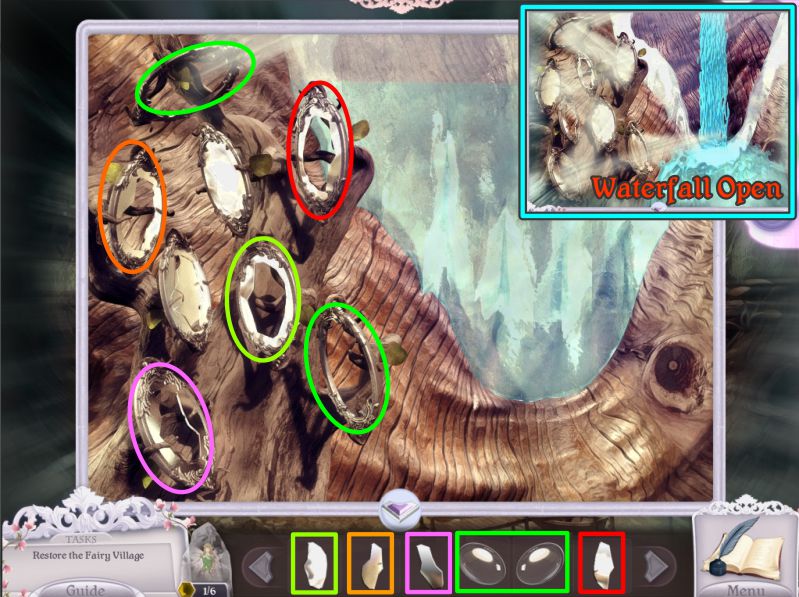
Mirror Puzzle
You have 4 mirror shards and two lenses, so place them as color coded in the screenshot.
All 4 waterfalls are now open and the Fairy Village is cleared of the curse.
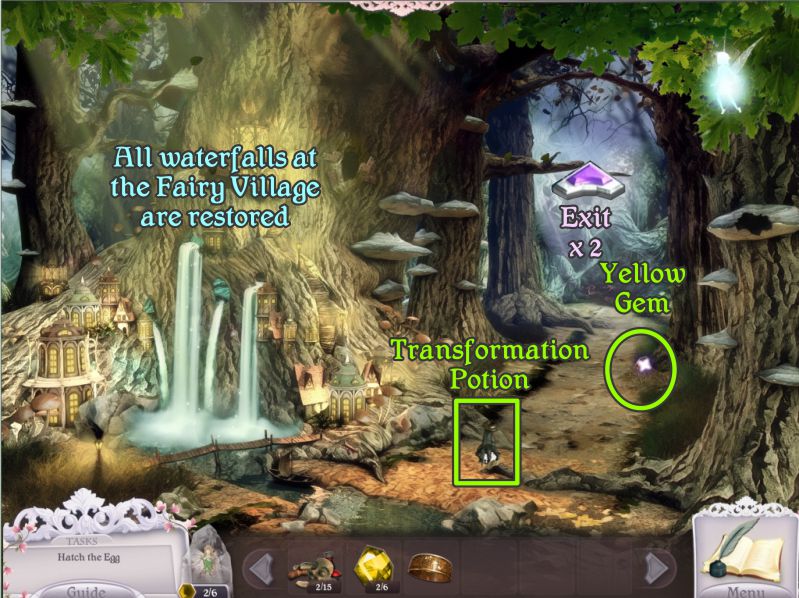
Screenshot
Restored Fairy Village
The King of the Fairies shows up and gives you a gold ring.
You Fairy acquires the Water Ability, so save the notation to your Journal.
Screenshot
Pick up the Transformation Potion and Yellow Gem on the path and head back toward Town.
Screenshot
Birth of the Dragon
Stop at the edge of the Forest and zoom in on the egg in the nest that has been warmed by the sunlight.
Use a Transformation Potion on the egg and watch what happens as the little dragon hatches.
Save the notation to your Journal.
Screenshot
Forest Exit
Your Fairy needs to go back and help her people, but you now have a new sidekick.
Feed your Dragon with the dragon berries, and he will get a strength Lift Ability.
Save the notation to your Journal and try out his new ability on the monument.
Screenshot
Cleared Forest Exit, Dark Path, and Town Gate
The Forest Exit is now cleared and you can collect a Yellow Gem.
Take the Dark Path and use Nessie's Lift Ability on the skull on the ground to get a Puppet Part.
Return to the Forest Exit and go to the Town Gate.
Nessie will fly over the wall to see about opening the gate for you.
Screenshot
Chapter 3: The Town
Dragon's Eye View
The Dragon will go down the chimney at the right for a Hidden Object Scene before tackling the gate mechanism puzzle.
Screenshot
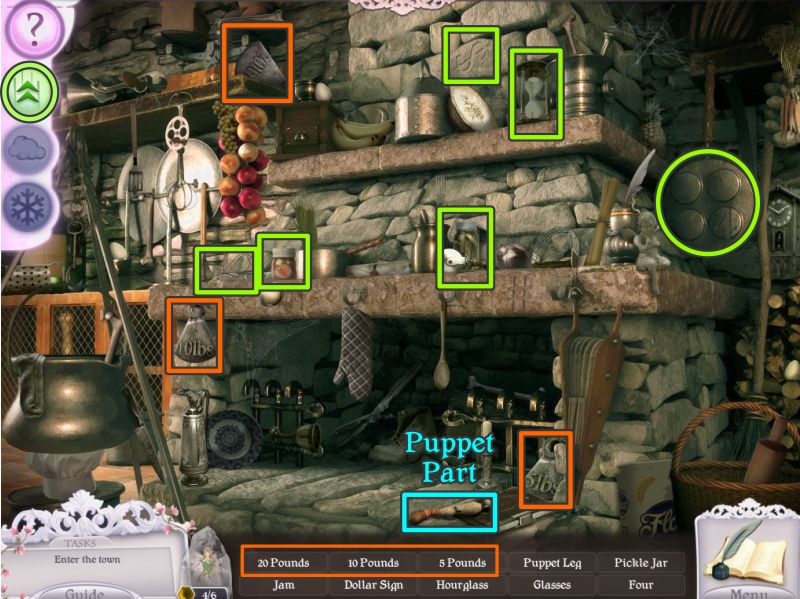
Down the Chimney Hidden Object Scene
Collect everything on your list and you will come away with 3 weights and a Puppet Part.
Screenshot
Open the Town Gate
Go to the gate mechanism and place the weights as shown in the screenshot.
Click on the handle outside the gate to pull it down and open the gate for the Princess to enter.
Screenshot
Cursed Town
Use the Lift Ability on the barrel at the left to collect a Yellow Gem.
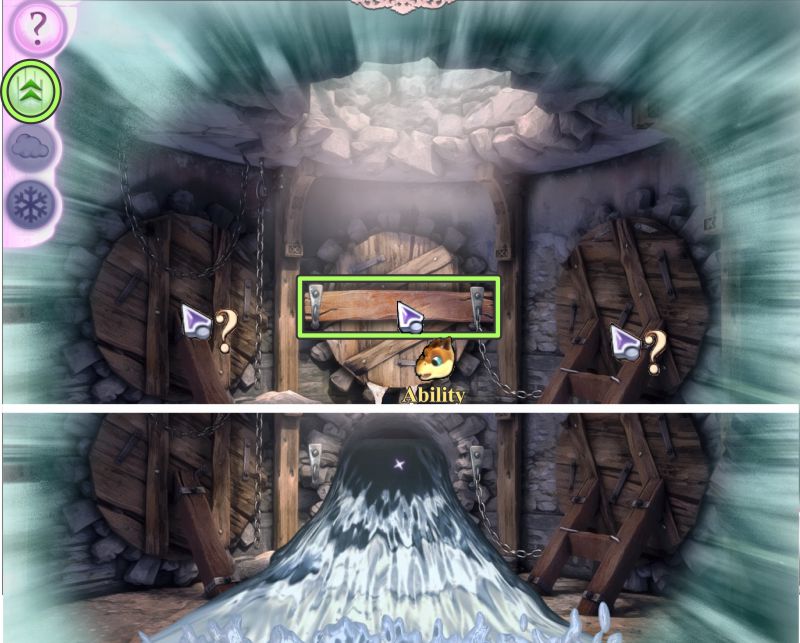
Have Nessie go down the Well.
Screenshot
The Well
The two outer openings seem to be permanently installed, but using the Lift Ability on the board in the middle will cause the water to flow into the Well, cleansing the Town Square.
Screenshot
Cleared Town Square
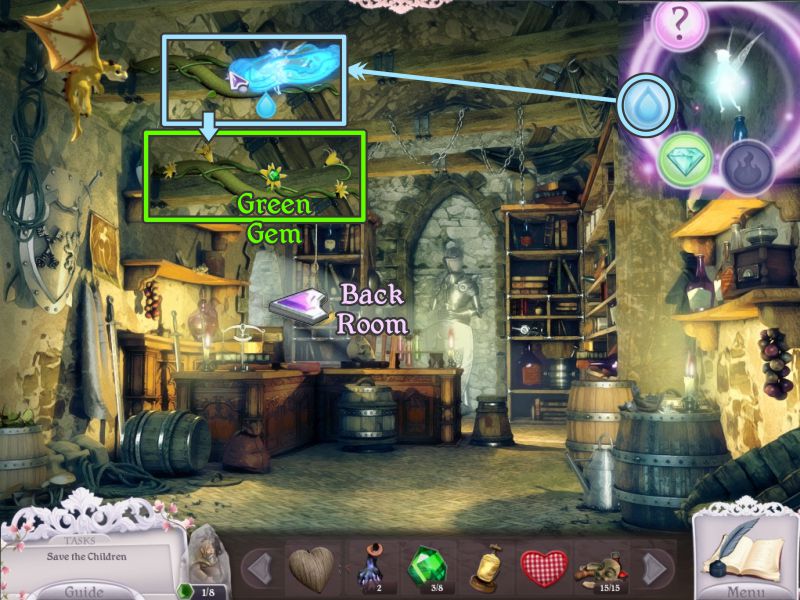
Pick up the Heart Key and Transformation Potion before entering the Herbal Shop.
Screenshot
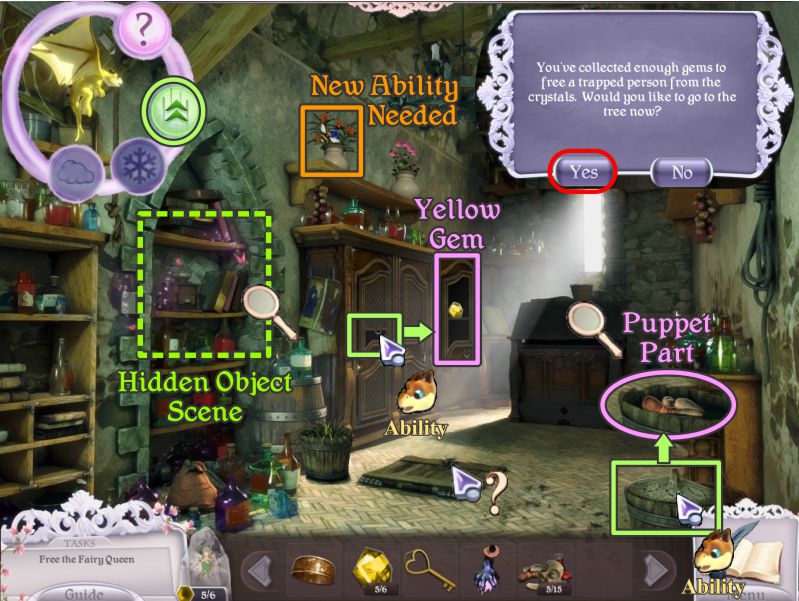
Herbal Shop
Use Nessie's Lift ability on the area shown in the screenshot to get another Puppet Part.
The Herbalist is under a spell, but you don't have the flowers to remove it, so go into the Back Room.
Screenshot
Herbal Shop Back Room
Play the Hidden Object Scene, and then use the Lift Ability on the areas shown in the screenshot.
Collect the Puppet Part and the final Yellow Gem.
You will be asked if you want to free the trapped person; say "Yes," and you will be transported to the Witches Tree.
Screenshot
Herbal Shop Hidden Object Scene
When you have collected everything, you will have a Dragon Seed and the flowers necessary to awaken the Herbalist.
Screenshot
Free the Fairy Queen Mini Game
Zoom in on the Fairy Queen and place your 6 Yellow Gems as shown.
Your goal is to move the gems to the yellow outlined spaces to achieve the solution shown in the screenshot.
The Fairy Queen will give you a jar with a rose in it, with the warning not to open the jar.
You will be asked once the Fairy Queen is free if you wish to go back where you were, so say "Yes."
Screenshot
Herbalist Tattoo Mini Game
Go to the front room of the Herbal Shop and zoom in on the Herbalist.
Place your flowers to trigger the Mini Game.
Once again, creatively place the colors so like colors don't touch. One solution is shown in the screenshot.
The Herbalist will give you a recipe book.
Screenshot
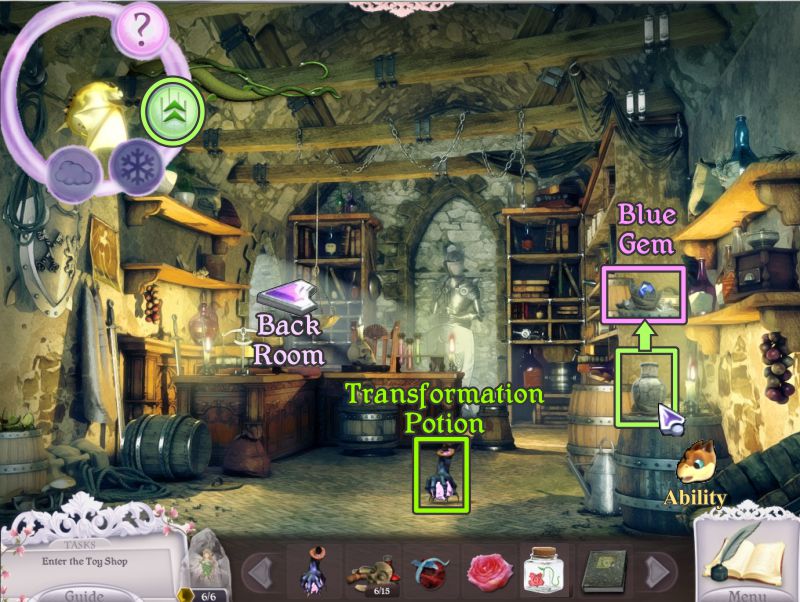
Cleared Herbal Shop
Use the Lift Ability on the jar at the right to collect a Blue Gem.
Pick up the Transformation Potion and go to the Back Room.
Screenshot
Herbal Shop Back Room
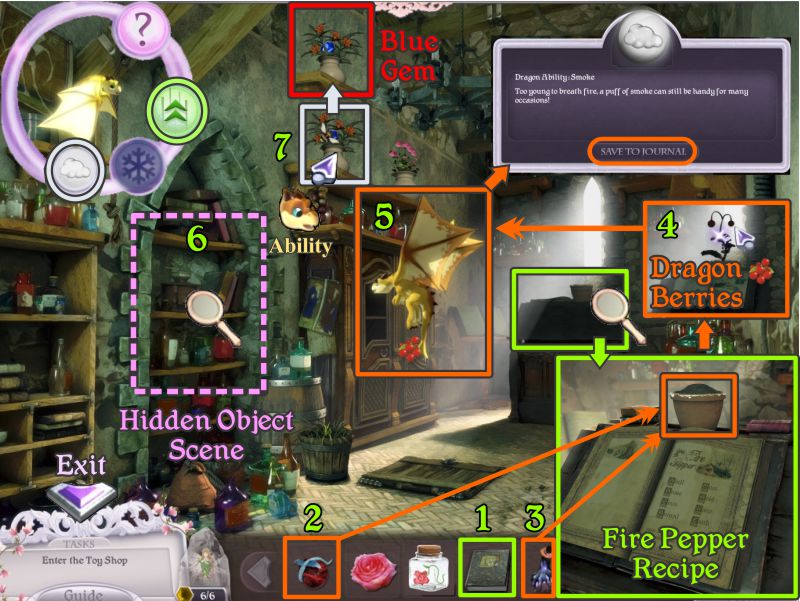
Zoom in on the desk in the back, place the recipe book on the stand and open to the page with the Fire Pepper recipe.
Place the dragon seed in the pot on top of the desk and use a Transformation Potion to make it grow.
Click on the berries. Nessie will come pick them up and get Smoke Ability.
Use his Smoke Ability on the flower pot on top of the shelves to reveal a Blue Gem.
Play the Hidden Object Scene.
Screenshot
Fire Pepper Ingredients
Collect everything to get the ingredients for the Fire Pepper recipe.
Go to the front room.
Screenshot
Fire Pepper Mini Game
Click on the vials on the table in front of the armor.
Place your ingredients on the table and create Fire Pepper according to the chart.
Collect the finished product.
Screenshot
The screenshot below shows the step-by-step process to create Fire Pepper.
In the back row, combine shell and stone; grass and animal; moss and acid; water and earth.
In the next row, combine limestone and fertilizer; bacteria and mud.
Combine salt peter and sulpher and you've got Fire Pepper.
Screenshot
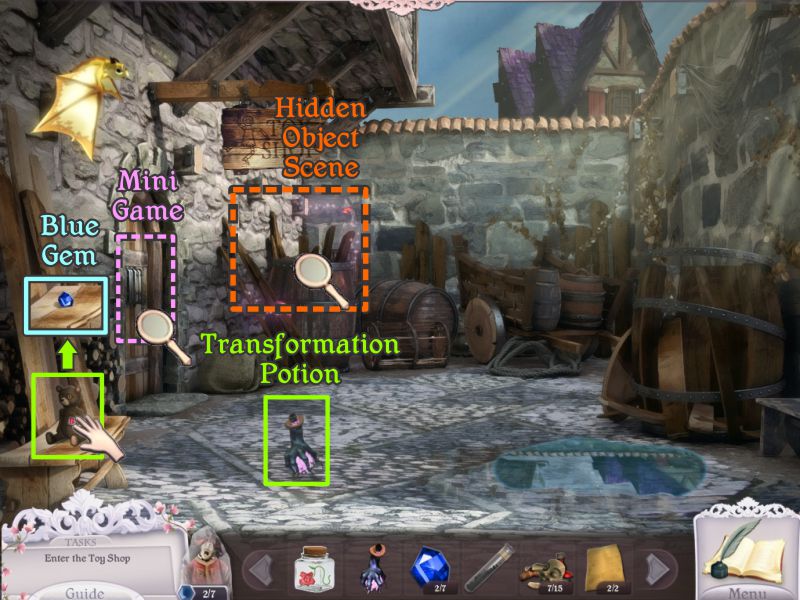
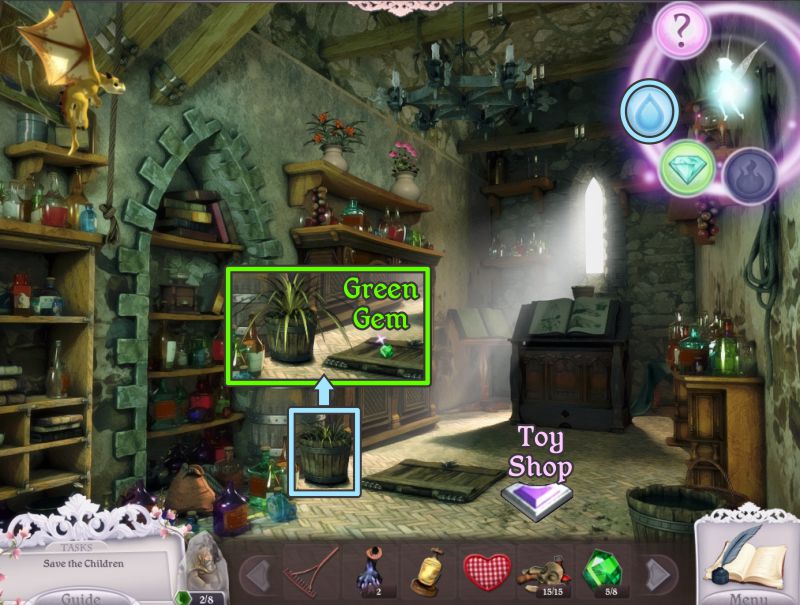
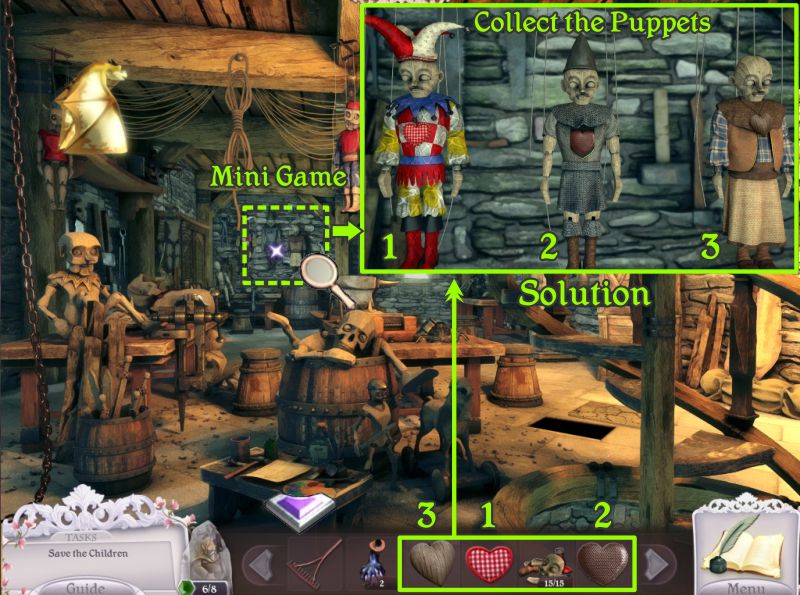
Toy Shop Entrance
Go to the Town Square and access the Toy Shop.
The Toy Maker is under a spell, so use the Lift Ability to remove the ball and chain from his arm.
Also use the Lift Ability on the other area marked in the screenshot to find a Puppet Part.
Play the Hidden Object Scene in the barrel.
Screenshot
Toy Shop Entrance Hidden Object Scene
Collect everything to get the rest of the flowers for the Toy Maker's tattoo.
Screenshot
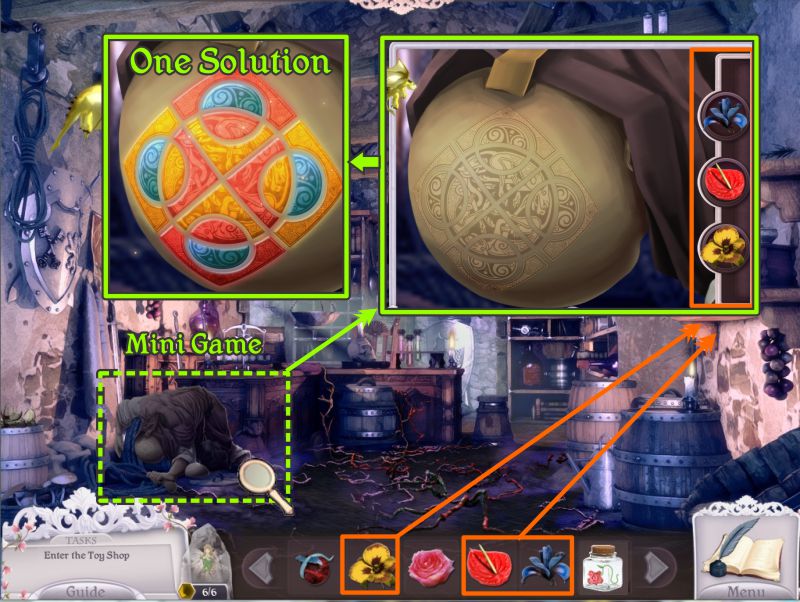
Toy Maker's Tattoo Mini Game
Zoom in on the Toy Maker and place your 4 flowers to trigger the Mini Game.
Use the flowers to fill in the tattoo any way you like, as long as the same color doesn't touch itself. A sample solution is shown in the screenshot.
The Toy Maker will give you some sketches.
Screenshot
Toy Shop Entrance
The area has been cleared, so pick up the Transformation Potion.
Use the Lift Ability on the teddy bear at the left to get a Blue Gem.
Play the Hidden Object Scene in the barrel.
Screenshot
Toy Shop Entrance Hidden Object Scene
Collect everything, and you will come away with 3 Push Buttons.
Screenshot
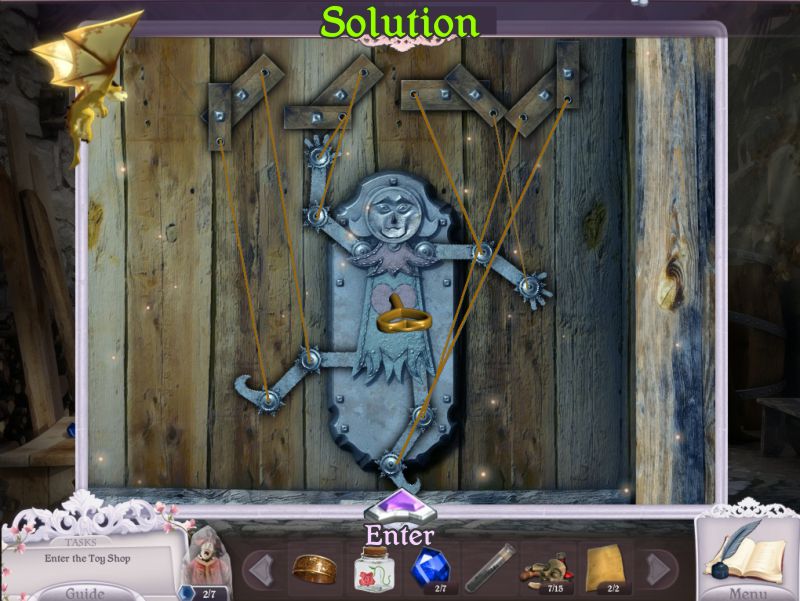
Toy Shop Door
Zoom in on the door for a Mini Game.
Using the wooden pieces at the top of the strings, arrange the puppet's arms and legs as shown in the screenshot solution.
A keyhole will appear, so use your heart key and enter the Toy Store.
Screenshot
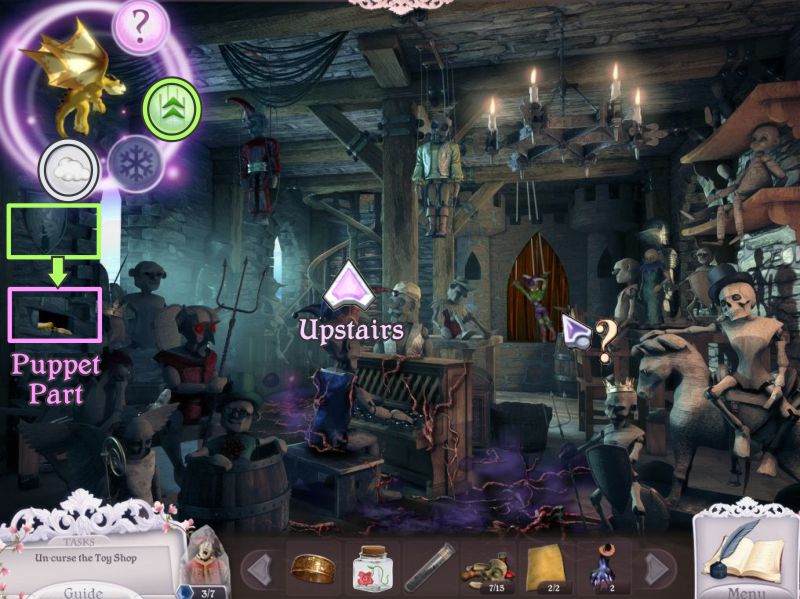
Toy Shop First Floor
Use Nessie's Lift Ability on the area marked in the screenshot to get a Puppet Part.
There is a demon puppet on the stage that you will need to get rid of, so go upstairs in search of something to help.
Screenshot
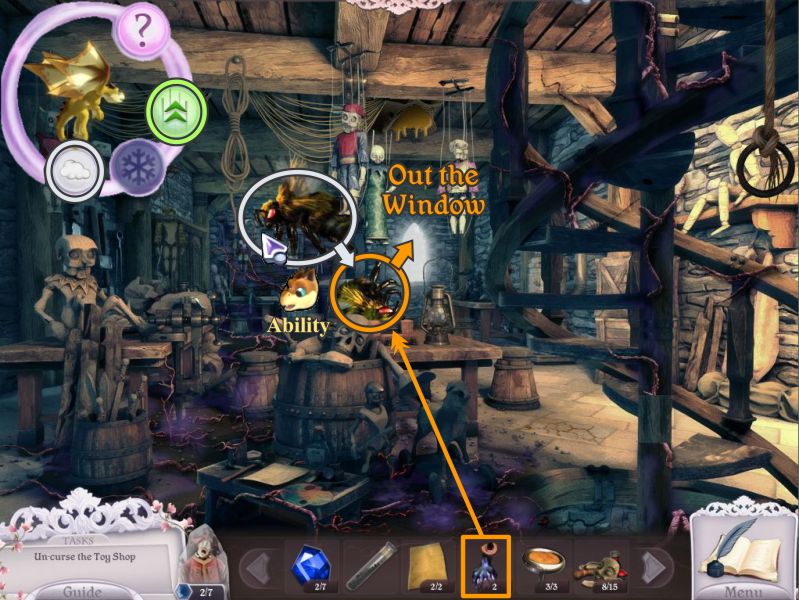
Toy Shop Second Floor
There is a giant bee on the Second Floor, so use Nessie's Smoke Ability on him and he will land on the table.
Use a Transformation Potion on him so he will shrink and fly out of window.
Screenshot
You have cleared the Second Floor, so pick up the Transformation Potion.
Use the Lift Ability on the lantern and floor board to collect a Blue Gem and Puppet Part.
Use the jar with the rose to collect the honey left by the bee.
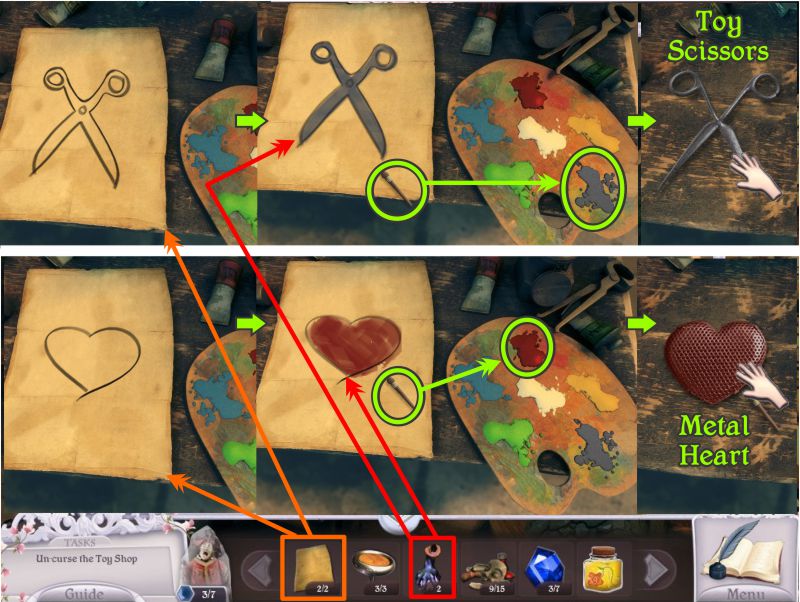
Zoom in on the painting table with the palette for a Mini Game.
Screenshot
Painting Desk Mini Game
Place the first sketch you got from the Toy Maker on the table.
It is a pair of scissors, so dip the brush in the gray paint to paint the scissors gray.
Use a Transformation Potion on the scissors drawing to turn it into a Toy Scissors you can collect.
Place the second sketch of a heart on the table.
Dip into the red paint and use it on the heart.
Place a Transformation Potion on the heart and it will turn into a Metal Heart for you to pick up.
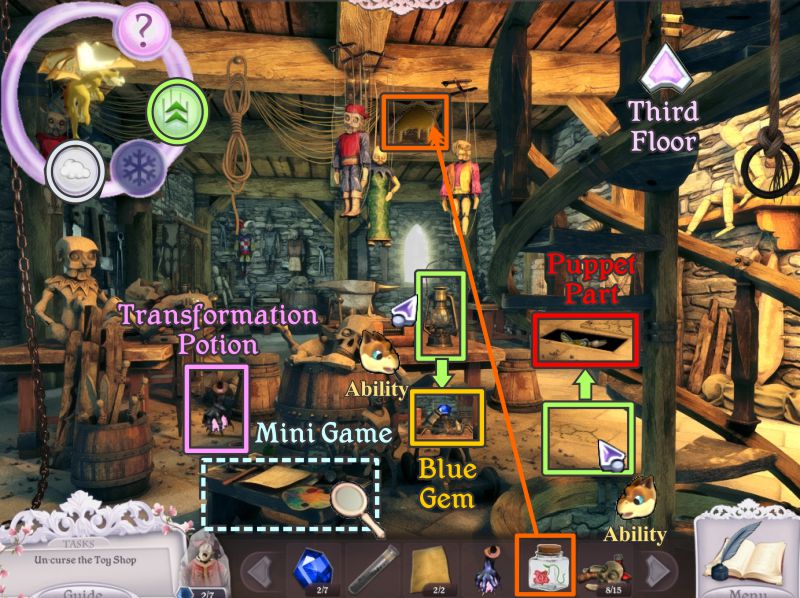
Go up the stairs to the Third Floor.
Screenshot
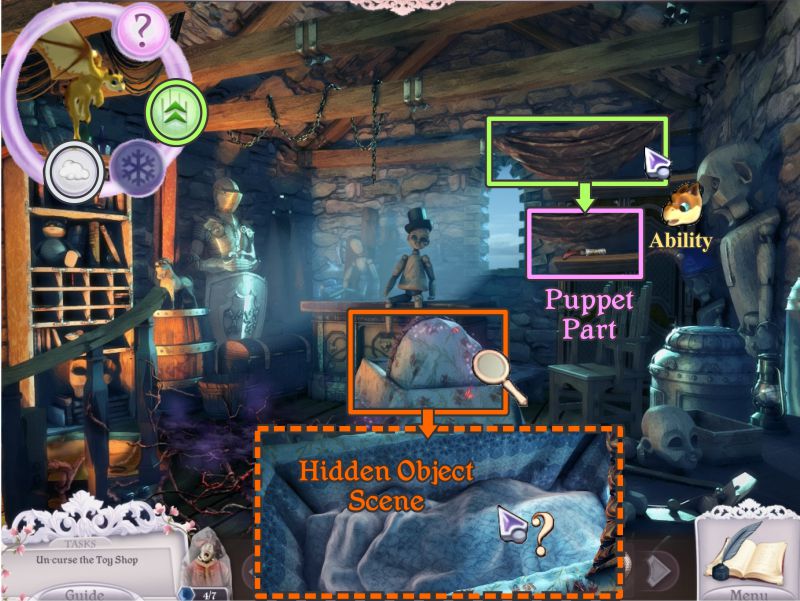
Toy Shop Third Floor
Use the Lift Ability on the drape and take the Puppet Part.
Zoom in on the crib and remove the cover for a Hidden Object Scene.
Screenshot
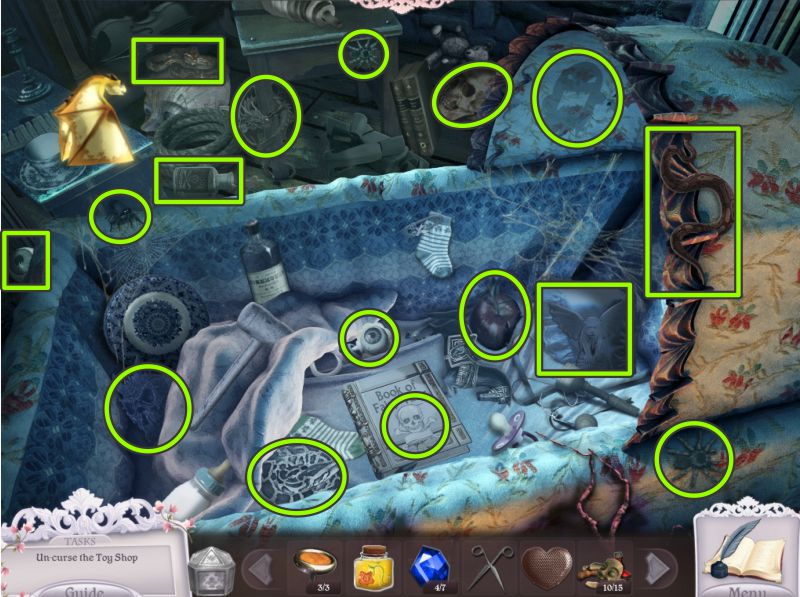
Crib Hidden Object Scene
Remove all the evil marked in the screenshot.
Screenshot
Cleared Third Floor
The Third Floor is now cleared, so pick up your Transformation Potion and the Blue Gem.
Have Nessie lift up the floorboard so you can collect the Puppet Part.
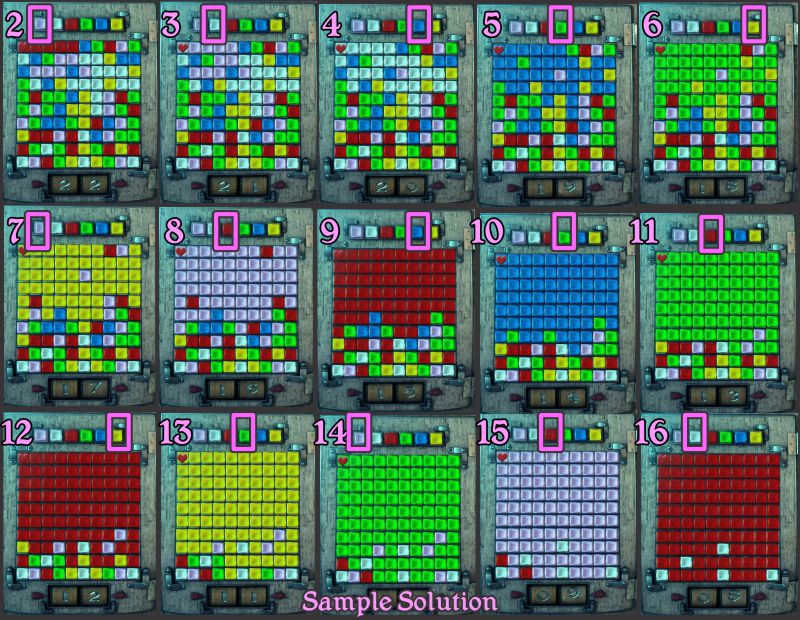
Click on the puppet at the right for a Mini Game to get the Wooden Heart.
Your goal is to click on the row of colors at the top of the game to change the color of all the tiles surrounding the heart.
You need to have only one color other than the main color to open the front of the puppet.
You have 25 chances to make it work before you have to start over.
The colors are rando,m but I've provided a sample solution to hopefully help you understand how the game works.
The first button in the sample that you would press is red.
Screenshot
Puppet Mini Game Sample Solution
The first selection turned the background of the heart to red.
The following choices in the screenshot are the colors you would need to select in this scheme in order to arrive at the conclusion.
Screenshot
Toy Shop First Floor
Return to the First Floor and use your scissors to cut the strings on the demon puppet.
Use Nessie's Smoke Ability on the bee at the far right to get a Blue Gem.
Pick up the Transformation Potion and zoom in on the puppet at the piano.
Note the windup hole and place your 3 push buttons on the keyboard.
The piano will open for you to collect a Gold Ring.
Exit down 4 times and go right to Troll Bridge.
Screenshot
Troll Bridge
Give the Troll his honey, and he will fall over the edge of the bridge into Snapping River's Piranha invested waters.
Use the Life Ability on the globe at the other side of the bridge to pick up the Puppet Part.
Enter the Troll's house for a Hidden Object Scene before returning to the Toy Shop.
Screenshot
Troll House Hidden Object Scene
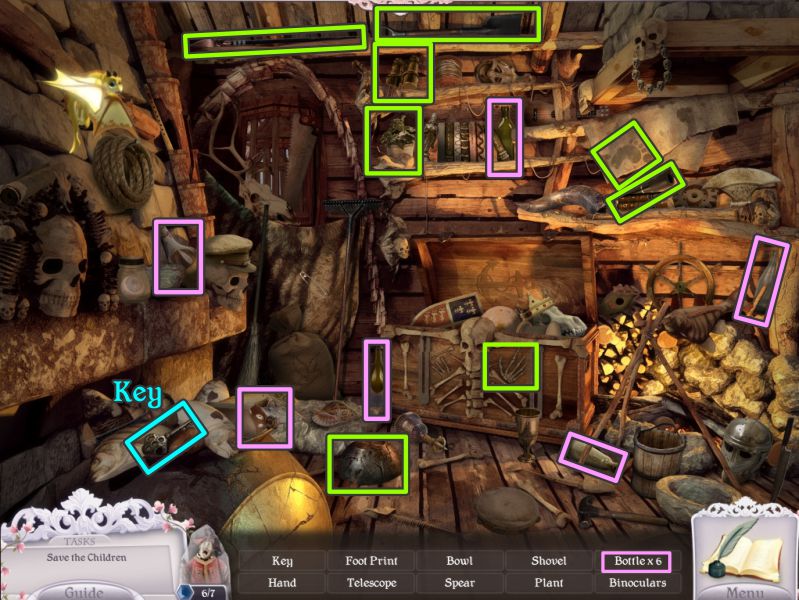
Collect everything to get a Key.
Screenshot
Outside Dwarf House
Go over the Troll Bridge and past Rapunzel's Tower to the Dwarf House.
Use the Lift Ability to remove the axe from the tree above the house.
The area is now cleared, so grab the Transformation Potion and play the two Hidden Object Scenes in the order marked in the screenshot.
Screenshot
Garden Hidden Object Scene
Collect everything to get some Hay and a Rake.
Screenshot
Fireworks Cart Hidden Object Scene
Go to the Fireworks Cart and collect all of the objects to get the Rockets.
Screenshot
Rapunzel's Tower
Exit down once to Rapunzel's Tower and place the Fire Pepper on Rapunzel's hair, which is wound around and stuck to the tower.
Use the rockets to ignite is and burn it off the tower.
Pick up the Transformation Potion and check out the Troll's sign.
No need to worry anymore since he's swimming with the piranha, so play the Hidden Object Scene.
Screenshot
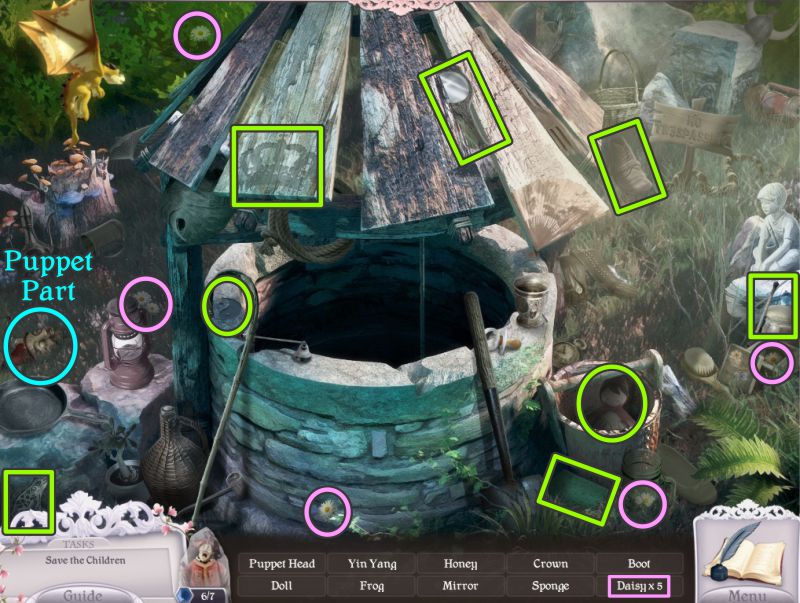
Well Hidden Object Scene
Collect everything for another Puppet Part.
Screenshot
Rapunzel's Tower and Room
Enter the tower to Rapunzel's Room.
She is hiding her face this time because of what happened to her hair. Ignore her and check out the painting on the right that is suppose to have a fox in it.
When you zoom in, you find out he is hiding in his hole. Use the Smoke Ability to drive him out of the hole so you can take the Puppet Part he is holding.
Use the Lift Ability on the pillow on the bed to get the last Blue Gem.
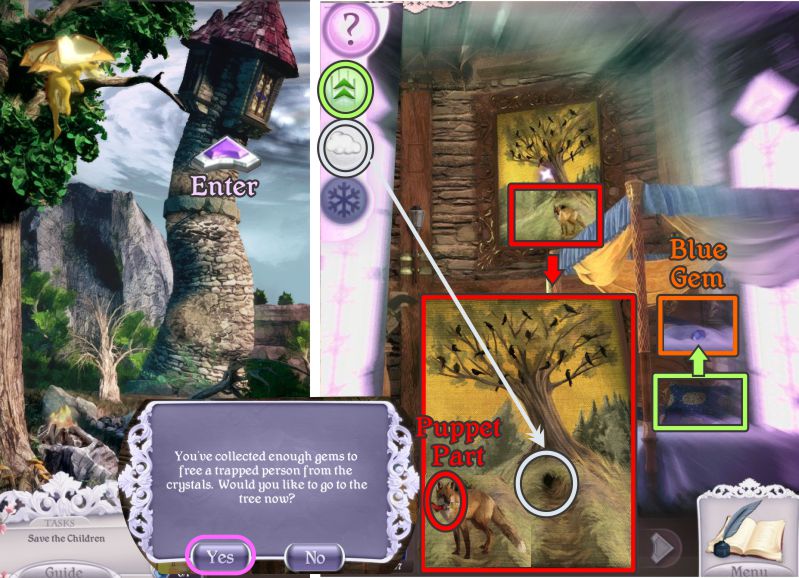
You will be given your choice to return to the Witches Tree to free a captive, so say "Yes."
Screenshot
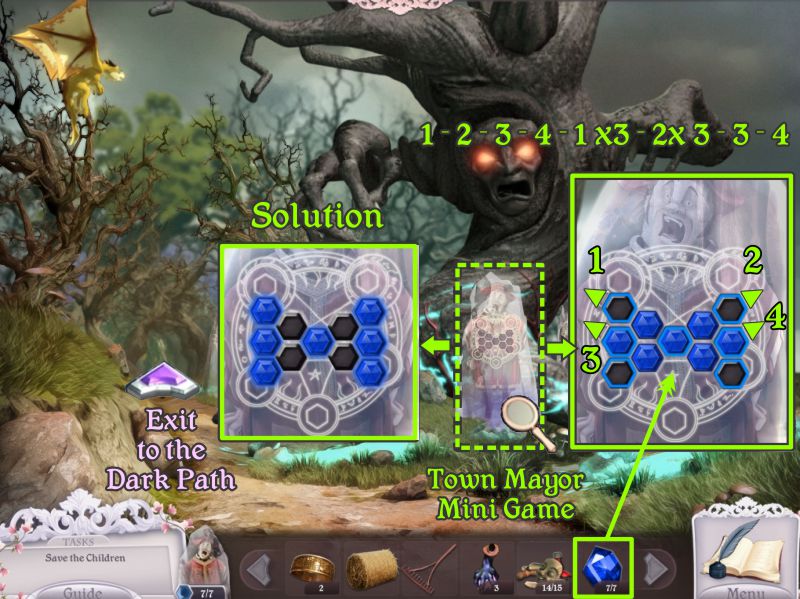
Free the Mayor Mini Game
It's the Mayor's turn to be free, so click on him for a close up.
Place all your blue gems in the missing spaces and then move the gems all around so they are in the blue outlined spaces.
The solution is shown in the screenshot.
The Mayor will give you a wig.
The Fairy is back, so this time you aren't given the option to return to where you were.
Exit up the Forest Path to the Forest Exit and turn right to the Dark Path.
Screenshot
Dark Path
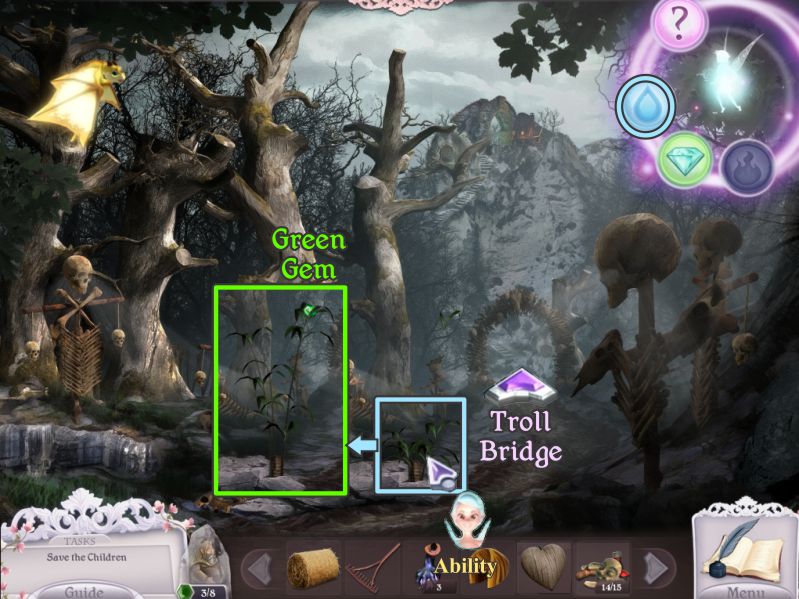
Use the Fairy's new Ability of Water on the plant, and it will grow to produce a Green Gem.
Go through the gate to Troll Bridge.
Screenshot
Troll Bridge
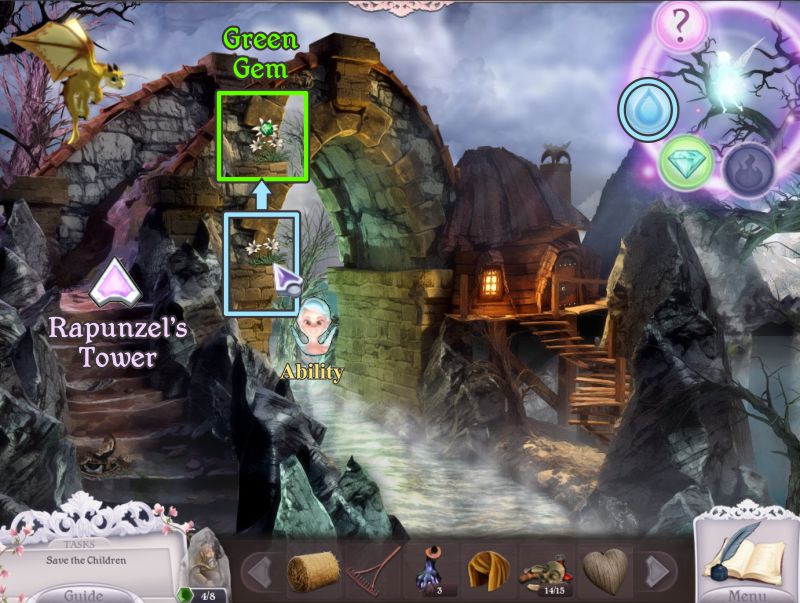
Use the Fairy's Water Ability on the Daisies to get a Green Gem.
Cross the bridge to Rapunzel's Tower.
Screenshot
Rapunzel's Tower
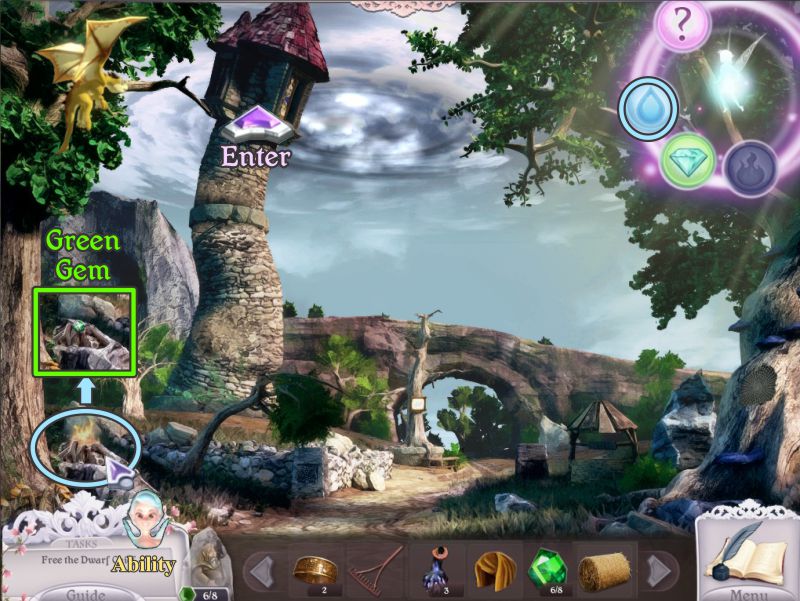
Use the Fairy's Water Ability to douse the fire and collect the Green Gem.
Tell your helpers to enter Rapunzel's Tower.
Screenshot
Rapunzel's Room
Rapunzel is still crying about her hair, so give her the wig the Mayor gave you.
Use a Transformation Potion to make her hair grow.
She is such a happy camper that she uses her hair to slide down and escape the tower.
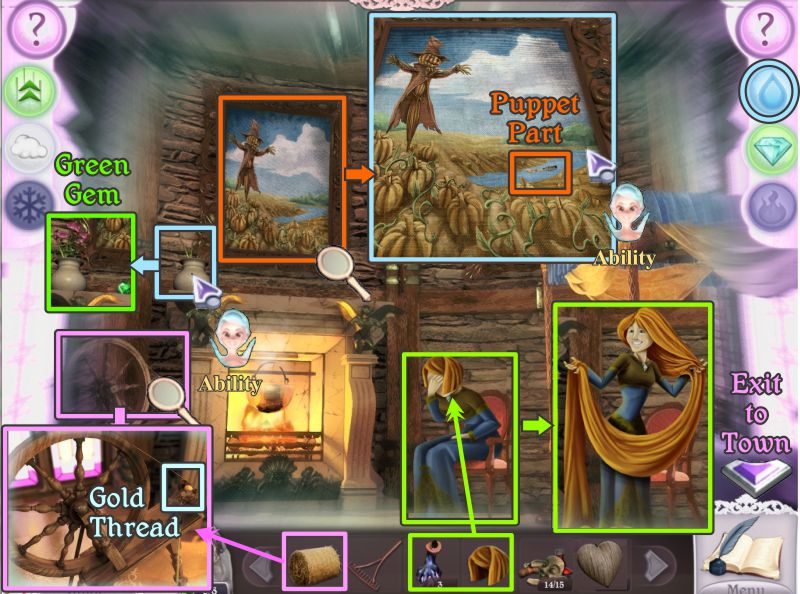
Meanwhile, zoom in on the spinning wheel and place the bail of hay on it to spin it into gold thread.
Use the Fairy Water Ability on the plant on the fireplace mantle and collect the Green Gem.
Zoom in on the picture of the scarecrow and use the Water Ability to fill the river so you can collect the Puppet Part.
Screenshot
Town Square
Return to the Town Square and use your Fairy's Water Ability on the dead looking tree next to the sign for the Herbal Shop.
It will grow and give you a Green Gem to collect.
Enter the Herbal Shop.
Screenshot
Herbal Shop
Use the Fairy's Water Ability on the vine and collect the Green Gem before going to the Back Room.
Screenshot
Herbal Shop Back Room
Water the plant next to the shelves with the Water Ability, and collect the Green Gem.
Go to the Toy Shop.
Screenshot
Toy Shop Second Floor Puppet Mini Game
Go to the Second Floor, as you now have all the Puppet Parts.
Zoom into the back wall for a Mini Game and place your Puppet Parts there.
Place each part with its puppet according to the color scheme solution shown in the screenshot solution.
Once your have completed the puppets, place the hearts as shown in the screenshot, and then collect the puppets.
Go downstairs to the First Floor.
Screenshot
Toy Shop First Floor
Zoom in on the piano puppet and place the key to wind him up.
He will start playing for the act on stage, so zoom in there and place your puppets.
They will start to dance and the Toy Maker will appear. He will give you a Handle that will become useful.
Screenshot
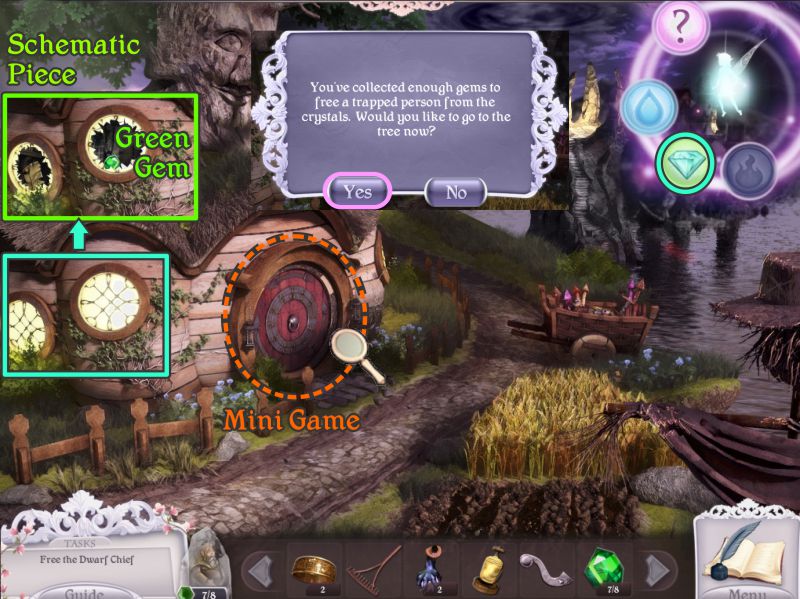
Chapter 4: The Dwarfs
Outside the Dwarf House
Leave town and go back to Troll Bridge. Cross it and go past Rapunzel's Tower to the Dwarf House.
Have your Fairy use her Diamond Ability on the two windows of the house so you can collect a Schematic Piece and the last Green Gem.
You will be give a choice to go to the Witches Tree to save a soul, so do it.
Screenshot
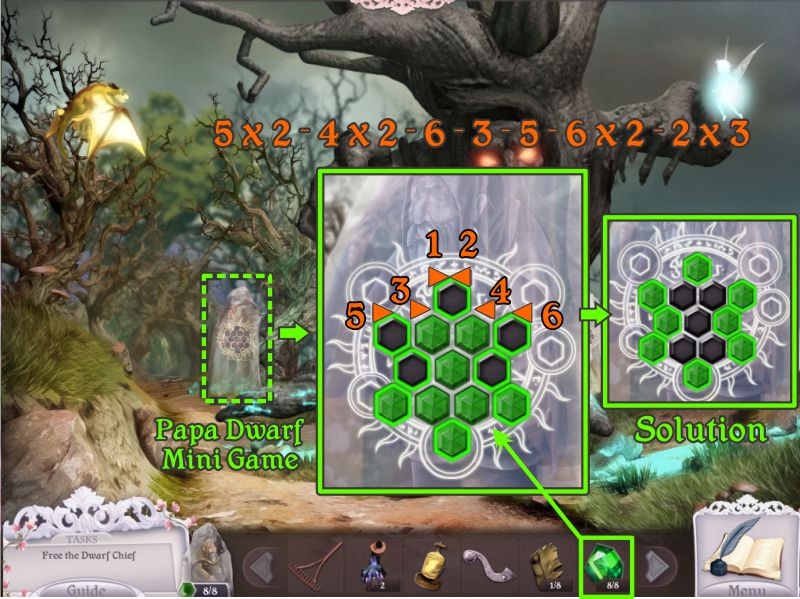
Free Papa Dwarf Mini Game
Zoom in on Papa Dwarf and place your Green Gems.
Your goal is to move all the gems to the spaces outlined in green.
The solution and how to do it is shown in the screenshot.
Papa Dwarf will give you some coal.
Screenshot
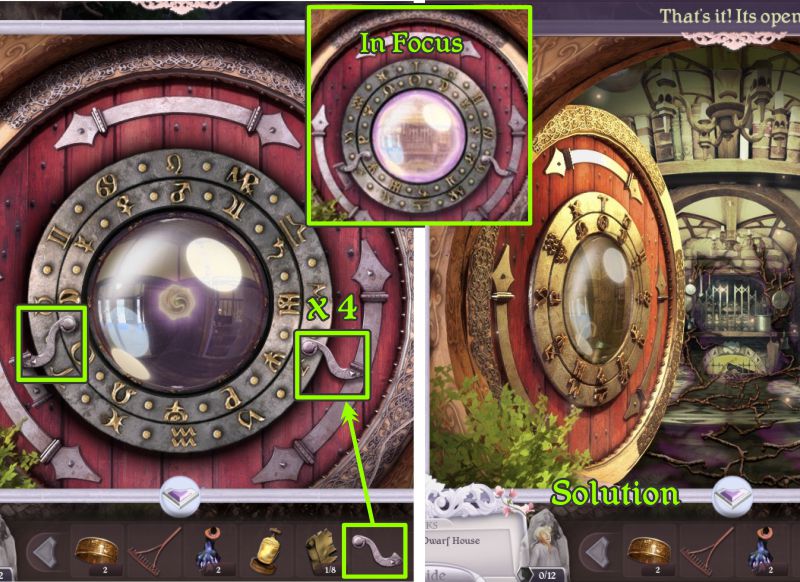
Dwarf House Door Lock Mini Game
Go to the Dwarf House and zoom in on the front door.
Pace your handle to trigger the Mini Game.
Click 4 times on the right handle you placed to bring the vision into focus and open the door.
Check the screenshot for what needs to happen, then enter the house.
Screenshot
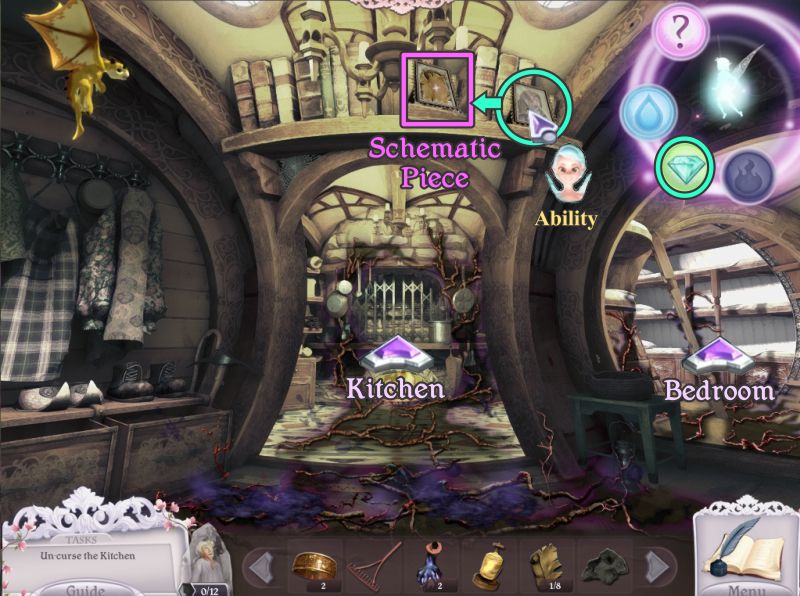
Cursed Entry
The whole house is cursed, so you have your work cut out for you.
Use the Fairy's Diamond Ability in the Entry to get a Schematic Piece.
Go forward to the Kitchen for now.
Screenshot
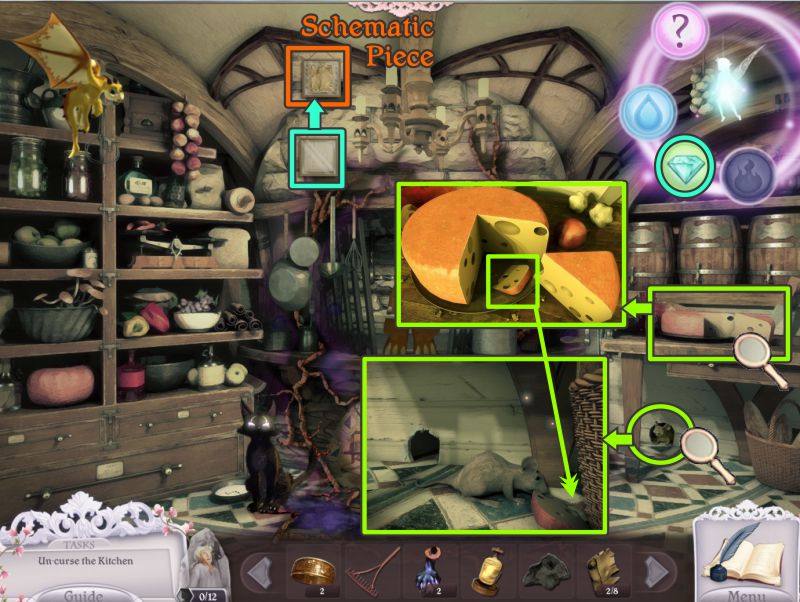
Cursed Kitchen
Use the Diamond Ability as marked in the screenshot to get another Schematic Piece.
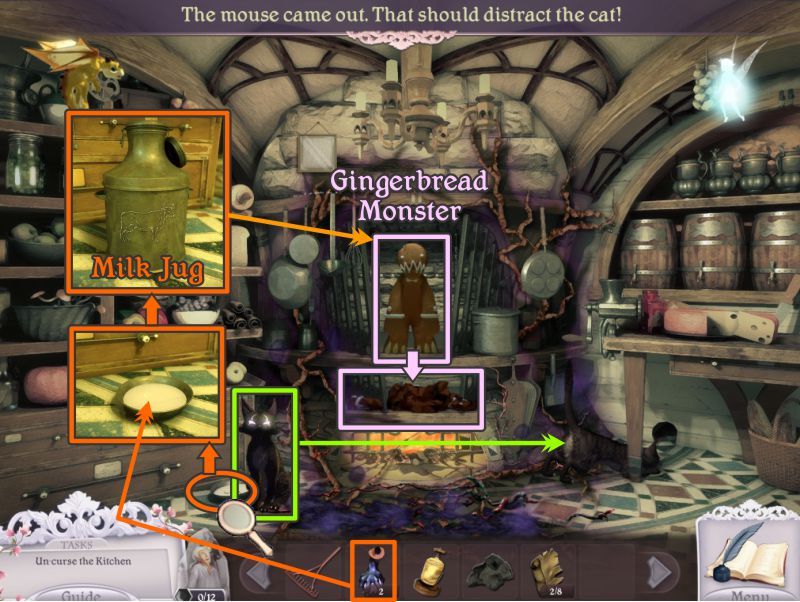
There's a mouse in the hole, and you need to distract the cat. Zoom in on the cheese on the counter and pick up the slice.
Zoom in on the mouse hole and place the piece of cheese for him to come nibble.
Screenshot
The cat thought the mouse was a good distraction so went for it.
Now you have a Gingerbread Monster to deal with, so zoom in on the cat's dish.
Use a Transformation Potion on the dish to turn it into a Milk Jug.
Pour the milk on the Gingerbread Monster to melt it.
Screenshot
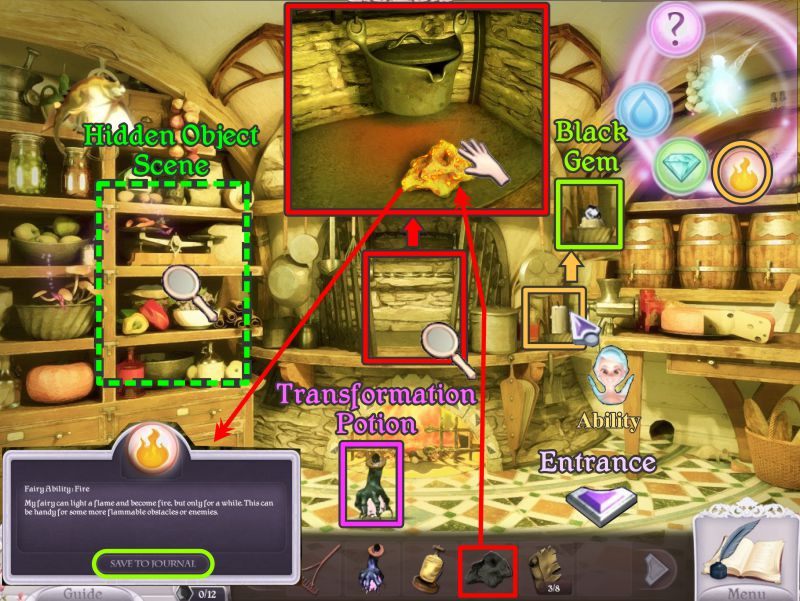
Cleared Kitchen
The Kitchen is now cleared, so pick up the Transformation Potion.
Zoom in on the oven and use the piece of coal from your Inventory.
Place it in the hot oven so the coal will turn molten and give your Fairy the Ability of Fire.
Have her light the candle to the right of the oven and pick up the Black Gem.
Play the Hidden Object Scene.
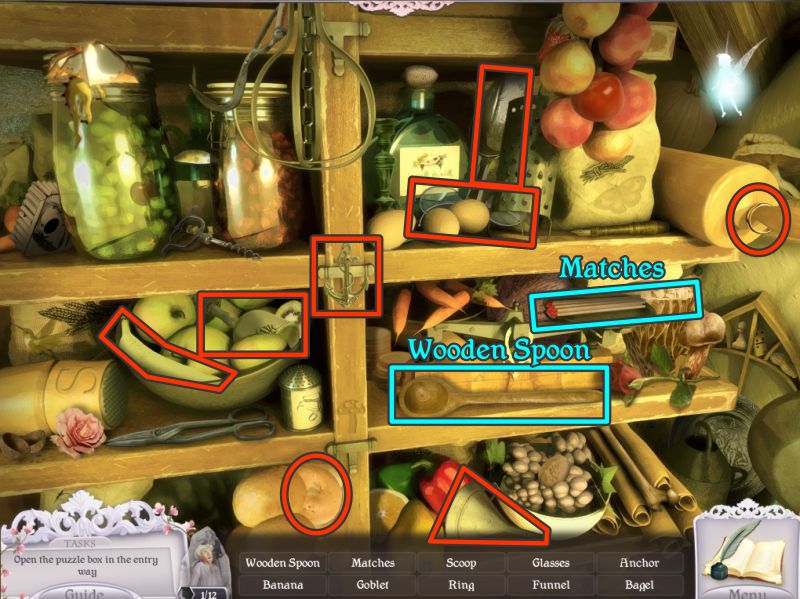
Screenshot
Kitchen Shelves Hidden Object Scene
Collect everything to get the Matches and the Wooden Spoon.
Screenshot
Cleared Entry
Pick up the Transformation Potion, click on the area under the shelf to use the Fairy's new Fire Ability and pick up the Black Gem.
Have Nessie lift the carpet to play a Mini Game. Your goal is to move the center triangles to the outer corners, as shown in the screenshot.
You will get another Gold Ring. Now play the Hidden Object Scene in the drawers.
Screenshot
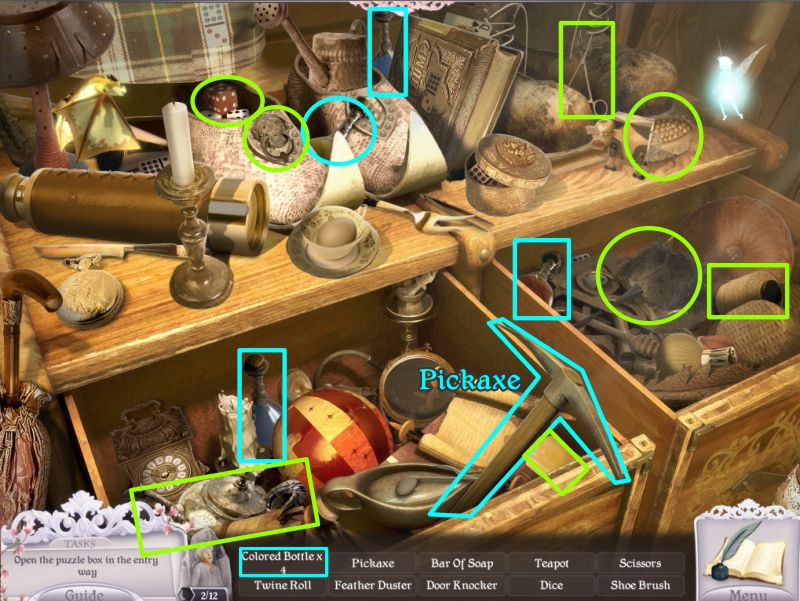
Entry Hidden Object Scene
When you have collected everything, you will get the 4 colored bottles and a Pickaxe.
Screenshot
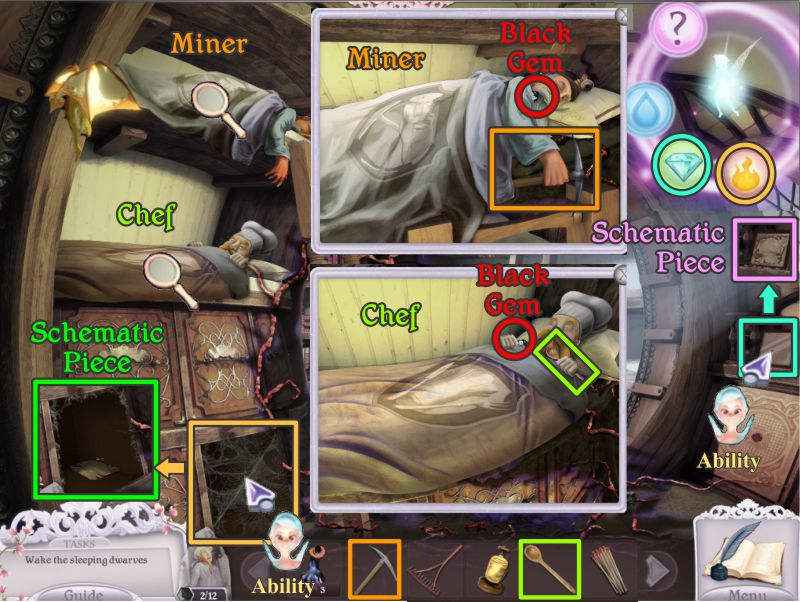
Cursed Bedroom
Enter the Bedroom and zoom in on the areas that need the Fairy's Abilities.
Collect the two Schematic Pieces.
Zoom in on the Miner and place the pickaxe so you can collect a Black Gem.
Zoom in on the Chef and place the wooden spoon to get another Black Gem.
Screenshot
Zoom in on the Soldier, place the matches and collect the Black Gem.
Zoom in on the Gardener, place the rake and collect the Black Gem.
Screenshot
Cleared Bedroom
The Bedroom has been cleared and all the Dwarfs are peacefully sleeping.
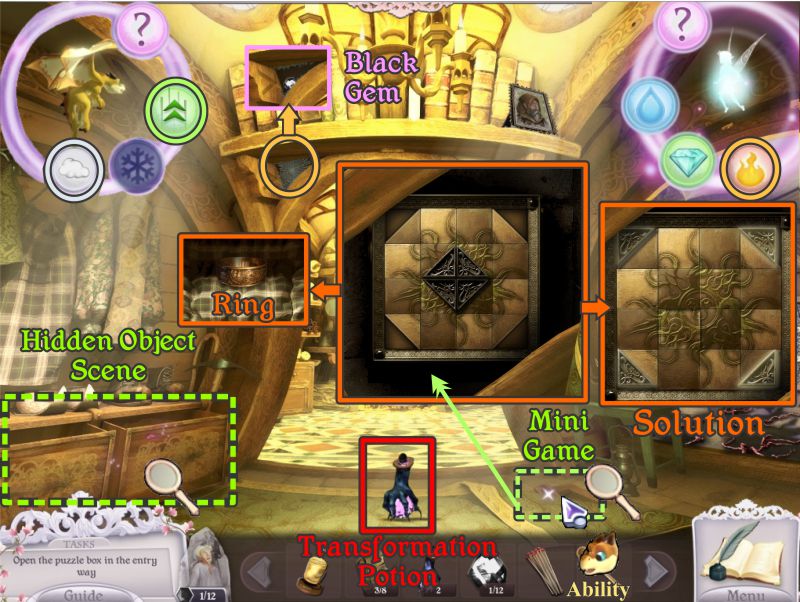
Pick up the Transformation Potion and climb up the ladder to the Library.
Screenshot
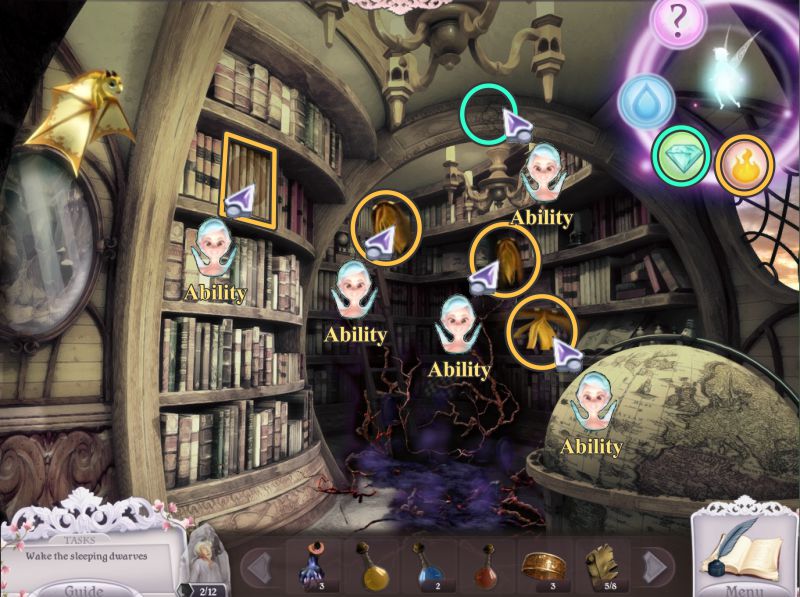
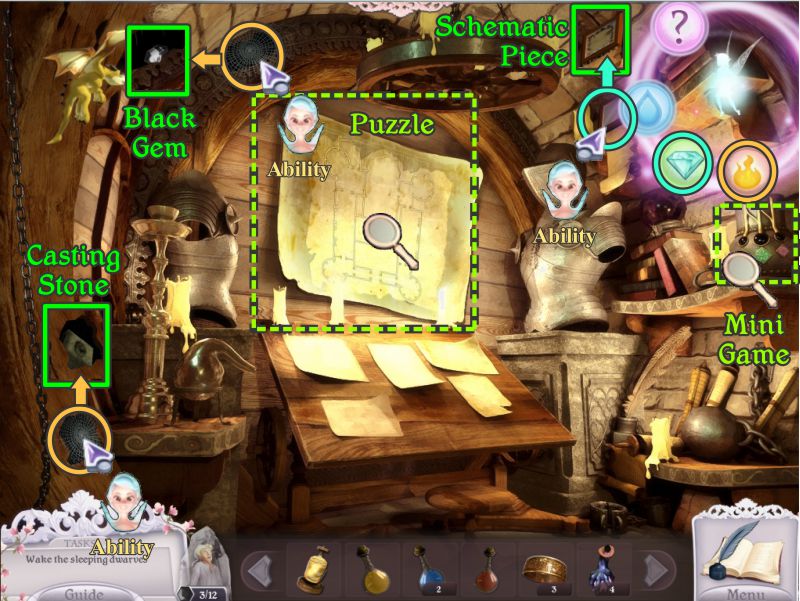
Cursed Library
Use the Fairy's Fire Ability on the floating books as well as the books marked on the shelf to the left.
Use her Diamond Ability on the archway.
Screenshot
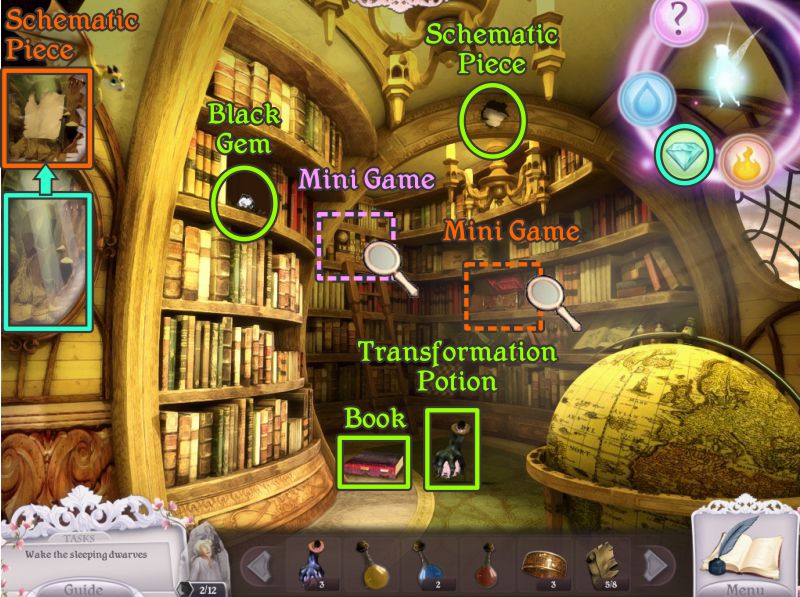
Cleared Library
The room is cleared, so collect the Transformation Potion and book on the floor.
Take the Black Gem and Schematic Piece, and use the Diamond Ability on the mirror at the left to get another Schematic Piece.
There are 2 Mini Games to be played, so take your pick as to which order you wish to play them.
Screenshot
Library Book and Colorful Box Mini Games
Zoom in on the top of the ladder and place the red book from your Inventory to trigger the one puzzle.
Swap the books so they look like the solution in the screenshot, and the area behind the ladder will reveal a secret room.
Zoom in on the box on the right shelf for the other Mini Game.
Your goal is to move the leaf in the upper left corner to the center tile on the box.
Use the buttons on the side of the box to move the leaf.
See the solution in the screenshot.
Screenshot
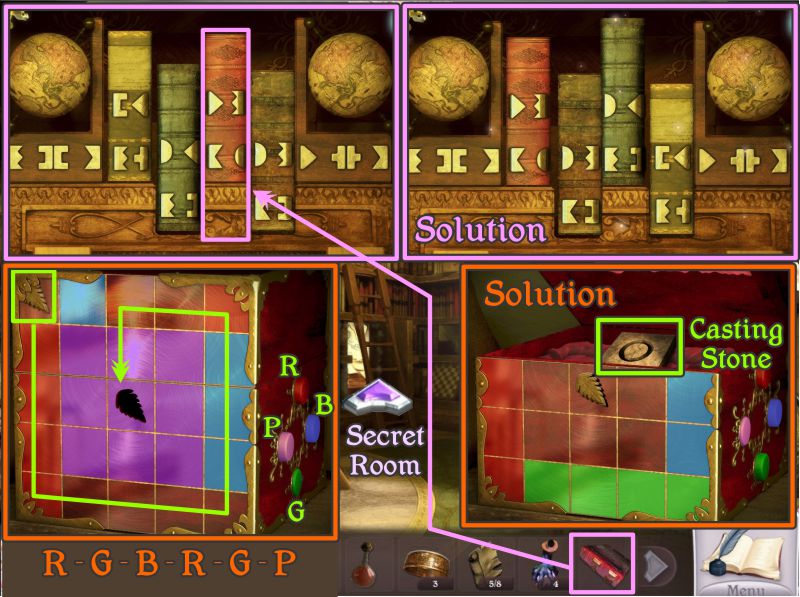
Secret Room
Enter the Secret Room and use the Fairy's Abilities, as shown in the screenshot, to get a Black Gem, Schematic Piece, and a Casting Stone.
Play the Mini Game at the right, and then zoom in on the map on the back wall for a puzzle.
Screenshot
Colored Bottles Mini Game
Place your 4 colored bottles to start the Mini Game.
Pour the liquids in the tubes as shown in the screenshot.
The top of the container will come off for you to collect another Gold Ring.
Screenshot
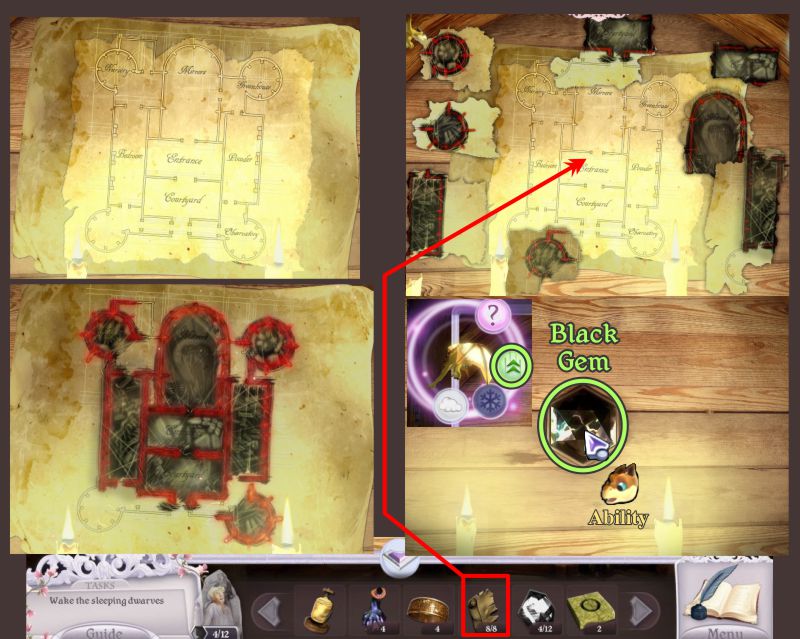
Papa Dwarf's Schematic Puzzle
The map is actually a floor plan of the Princess' castle.
Place your Schematic Pieces on the drawing and piece the puzzle together to find out that the Witch's castle has the same floor plan.
Have Nessie use his Lift Ability to collect the Black Gem underneath.
Screenshot
Kitchen Oven Mini Game
Go downstairs to the Kitchen and zoom in on the oven.
Place your 2 casting stones in the oven and the gold thread from you Inventory into the container in the back.
The gold thread will melt and cast another Gold Ring for you to collect.
Exit the Dwarf House.
Screenshot
Outside Dwarf House, Rapunzel's Tower, and Rapunzel's Room
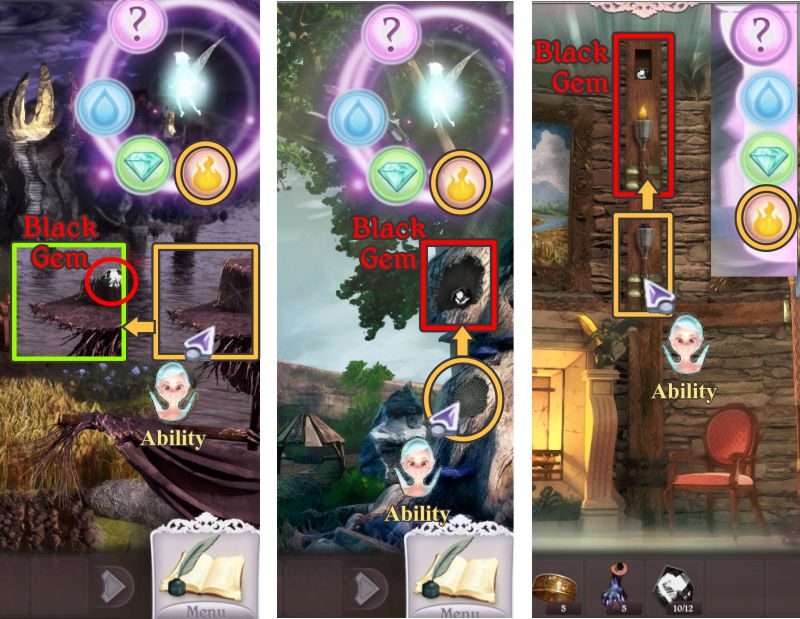
Once outside, use the Fairy's Fire Ability on the scarecrow's hat to collect a Black Gem.
Go to Rapunzel's Tower and use the Fire Ability on the area marked in the screenshot to get another Black Gem.
Enter Rapunzel's Room and light the torch with the Fire Ability to get the Black Gem.
Screenshot
Chapter 5: The Prince
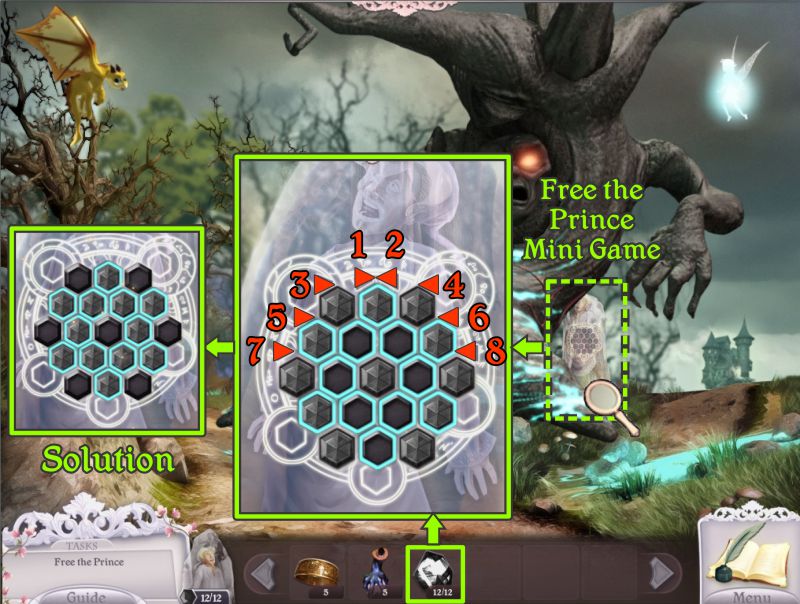
Free the Prince Mini Game
Zoom in on the Prince and place all 12 Black Gems in the vacant spaces.
Your goal is to fill all the blue outlined spaces with the gems. The solution is shown in the screenshot.
I've played the game a number of times and the numbered formula to complete the game is so complex that you can get lost in the numbers. I decide the best idea is to let you know how the arrows work.
Arrow 1 moves the right diagonal row of 4 below it and needs to be completely filled.
Arrow 2 moves the left diagonal row of 4 below it and needs to be completely filled.
Arrow 3 moves the left diagonal row of 5 below it and only needs 2 gems.
Arrow 4 moves the right diagonal row of 5 below it and also only needs 2 gems.
Arrow 5 moves the left diagonal row of 4 below it and must be completely filled.
Arrow 6 moves the right diagonal row of 4 below it and must be completely filled.
Arrow 7 moves the 3 gems in the diagonal row below it, one of which must be filled.
Arrow 8 moves the 3 gems in the diagonal row below it which only needs one filled.
Just play with it, use rows 7 and 8 to help fill 1 and 2. Think of it as a challenge that seriously works, or if you get too frustrated, ask one of your helpers to skip it.
Screenshot
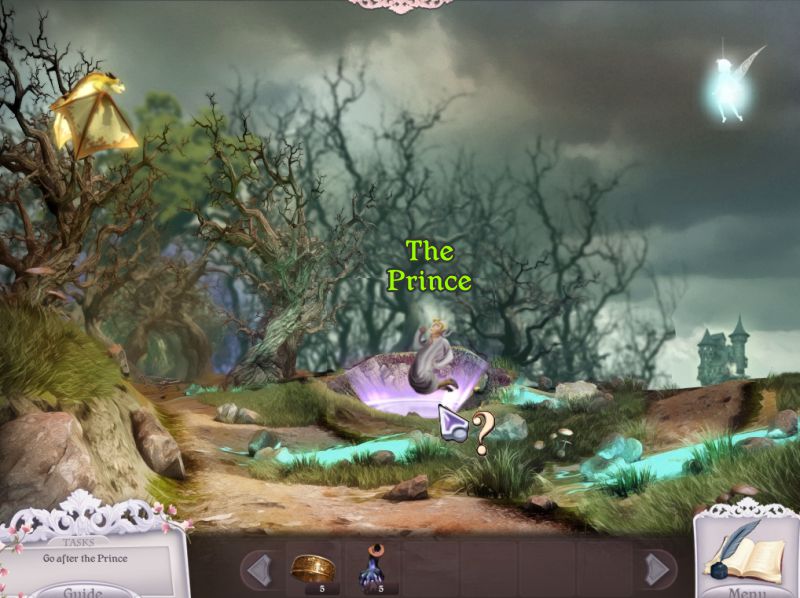
Witches Tree Portal
The Prince does not appear happy to see Isabella.
After a brief conversation, he jumps into the portal that appears when the Witches Tree disappears.
Follow him to see what is going on.
Screenshot
Chapter 6: The Witch
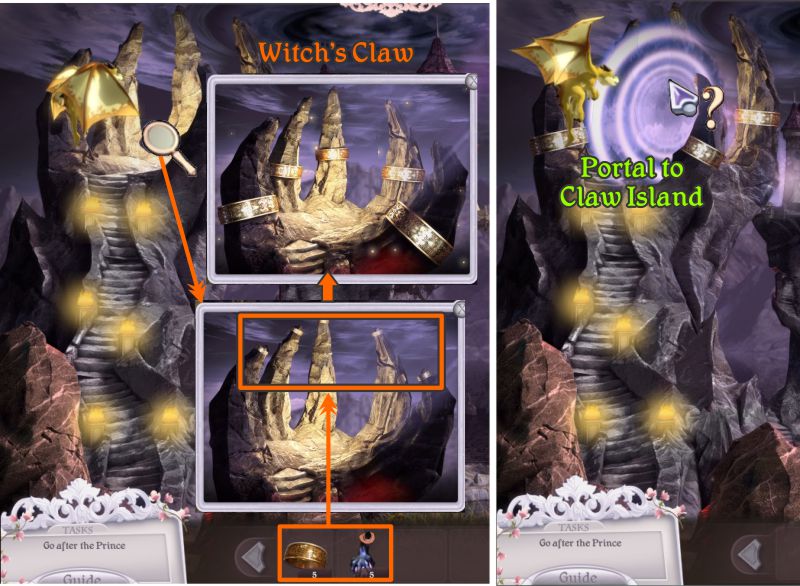
Witch's Claw
You have arrived at Witch's Claw, which is the first island on the way to the Witch's castle.
Zoom in on the claw and place your 5 gold rings on each claw finger.
They don't exactly fit, so use your remaining Transformation Potions on each ring.
Another portal will appear, so click on it to see what happens next.
Screenshot
The Collector's Edition is the only version currently available, so you will be given your choice if you wish to continue to the bonus content now or access it later from the "Extras" menu.
If you say "No," you will be taken to the Witch to fight for Bella, so watch the cut scene and play the duel.
If you say "Yes," you will be taken to the bonus content.
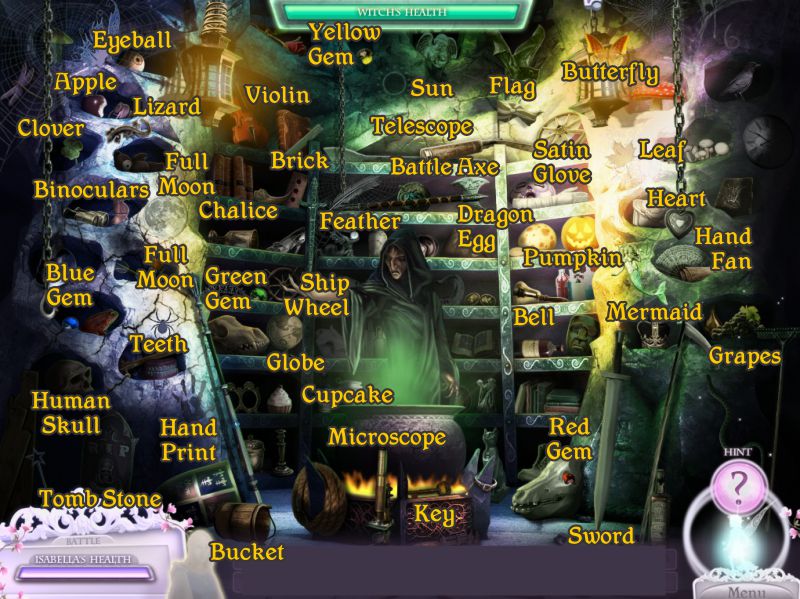
Defeat the Witch Hidden Object Duel
In order to defeat the Witch, you will need to find all of your objects in the 5 rounds faster than the Witch.
Your health monitor is in the lower left of the scene, and hers is in the upper center.
Whoever loses a round also loses part of their health.
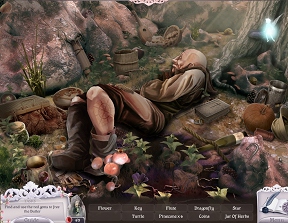
I have marked all possible objects I could find in the first screenshot. A list of the items is shown at the bottom of the scene.
Screenshot
This screenshot has the names of all the items shown by there location. Use whichever screenshot helps you the most.
Screenshot
I suggest playing the duel in Windowed Mode so you can stop the scene, without pausing it, in order to give yourself time to look around. Just place your cursor on the very top bar that shows the game's name.
The End
When you have defeated the Witch, watch the ending cut scenes to see what may be in your future with the next saga of Princess Isabella.
Posted by: Jazz |
June 6, 2011 9:20 PM
|
June 6, 2011 9:20 PM
Princess Isabella: Return of the Curse
Collector's Edition Bonus Chapter Walkthrough
General Comments
If you chose to play the Witch's Lair duel before the Bonus Chapter, you now have access to all the "Extras" in the Collector's Edition.
When I said "No" and played the duel right away, I found I still had to play the duel again after I played the Bonus Chapter.
Nessie's Frost Ability becomes available in the Bonus Chapter, so you can freeze objects.
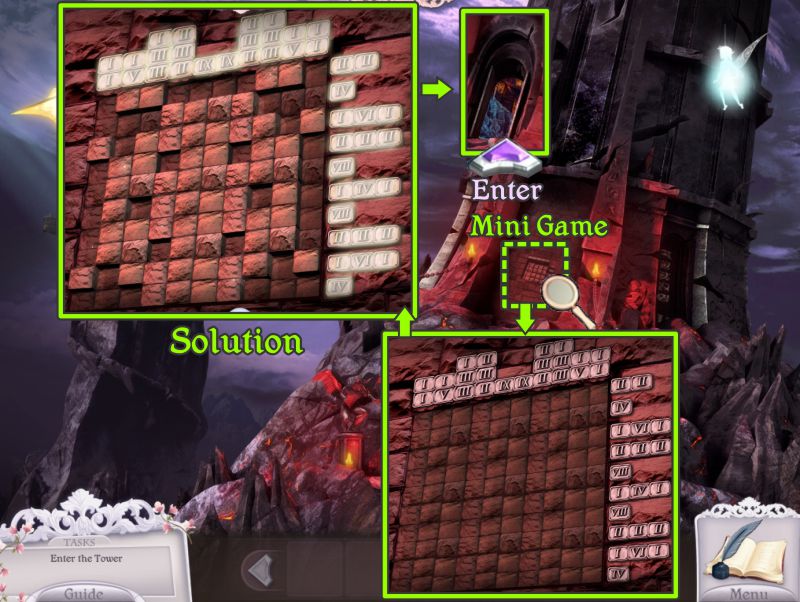
Part 1: Outside Witch's Tower
Enter the Tower
When you enter the Witch's Claw Portal, you will be taken to the Tower.
Zoom in on the door for a Mini Game to unlock the door and enter.
Your goal is to raise the blocks according to their vertical and horizontal numbers.
For instance, if a vertical row says "I - III - III", you need to raise that number of blocks with spaces in between each group of blocks.
Make certain that your horizontal block also match for each row.
The solution is shown in the screenshot.
Once you have completed the game, the door will open for you to enter.
Screenshot
Part 2: The Witch's Trophies
The Paintings
The Witch has collected a number of trophies which she has stored in paintings.
Painting 1 is the Mushroom Forest.
Painting 2 is a Ship's Deck.
Painting 3 is a Gingerbread House.
Painting 4, which isn't accessible as yet, is an Ice Palace.
Climb the stairs and check out each painting before going to the Gingerbread House to begin your journey to fix the mess the Witch has created.
Screenshot
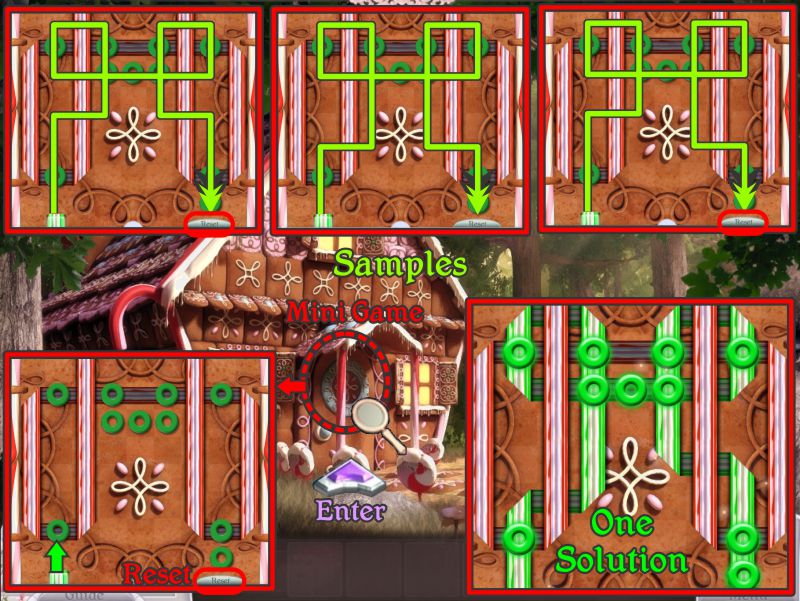
Gingerbread House Entrance Mini Game
When you go to the Gingerbread House, you will need to complete a Mini Game to enter.
Your goal is to connect all the lifesavers with just one ribbon candy.
There are several solutions, so I have shown a some samples in the screenshot, and provided you with one completed solution to see what it looks like.
Screenshot
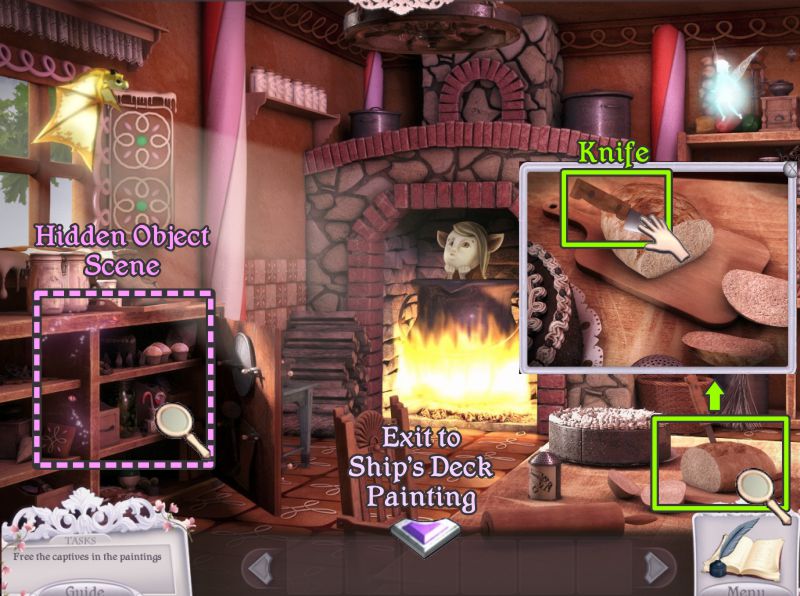
Gingerbread House Kitchen
Enter the Gingerbread house and note the fire boiling somebody in a kettle.
You need to put out the fire to save the character but you don't have the means at the moment.
Zoom in on the bread on the table and take the Knife.
Play the Hidden Object Scene on the shelves.
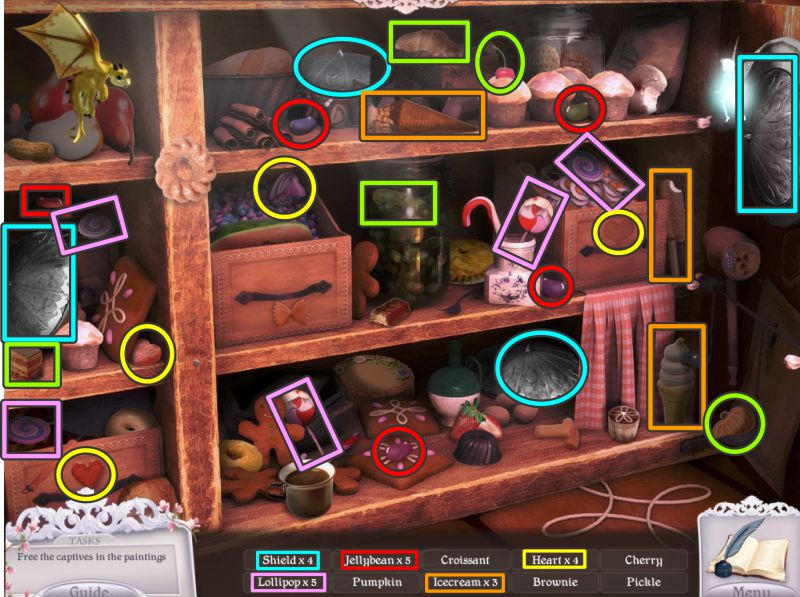
Screenshot
Gingerbread House Hidden Object Scene
Collect everything on your list, and you will get the 4 shields for your Inventory.
Screenshot
Ship's Deck
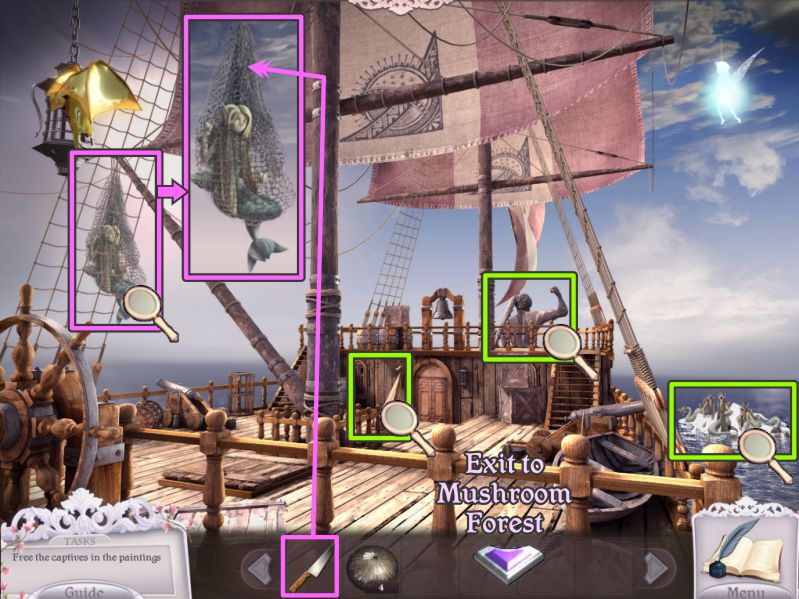
Go down to the Ship's Deck painting, and zoom in on the Mermaid hanging at the left.
Use your knife to cut her down, and she will give you some of the Sirens' Fish Oil.
Check out all the magnifying glasses, and then exit down to Mushroom Forest.
Screenshot
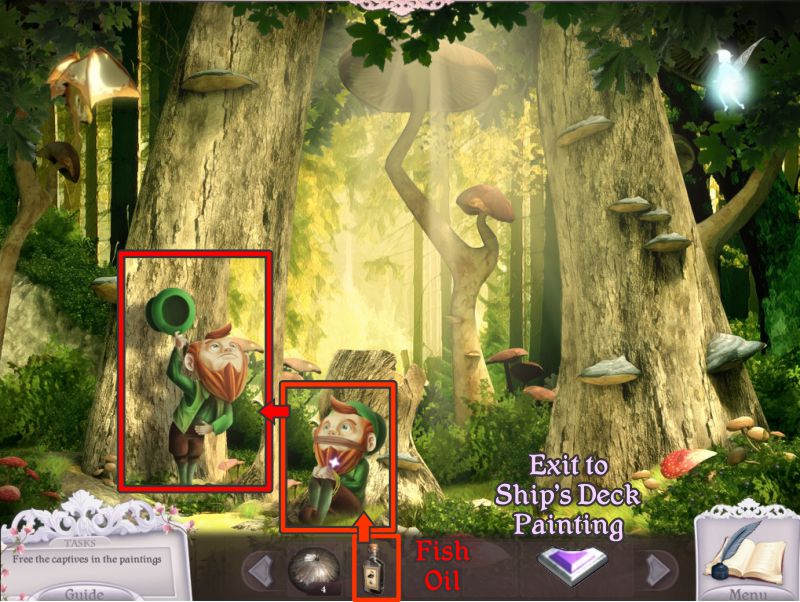
Mushroom Forest
Use the fish oil on the rusty wire binding the Leprechaun to free him.
You will get the wire for your Inventory.
He has lost his pot of gold, so go in search of it back up at the Ship's Deck.
Screenshot
Harp Mini Game
Zoom in on the Harp and place the wire from the Leprechaun to trigger a Mini Game.
This is a repeat the sequence game with 6 rounds.
The sequences are always the same, but with an additional string added each round.
The strings are numbered in the screenshot and the sequences are as follows.
Round 1: 4 - 6 - 4 - 5.
Round 2: 4 - 6 - 4 - 5 - 6.
Round 3: 4 - 6 - 4 - 5 - 6 - 3.
Round 4: 4 - 6 - 4 - 5 - 6 - 3 - 2.
Round 5: 4 - 6 - 4 - 5 - 6 - 3 - 2 - 1.
Round 6: 4 - 6 - 4 - 5 - 6 - 3 - 2 - 1 - 5.
Once you have completed the game, the Sirens will be asleep, so zoom in and grab the pot of gold.
Screenshot
Mushroom Forest
Return down to the Mushroom Forest, and zoom in on the stump.
Place the pot of gold in the stump and a rainbow will appear.
Follow the rainbow up to the Ice Palace painting.
Screenshot
The Ice Palace Entrance Mini Game
The rainbow has melted the ice for you to enter the painting.
Click on the entrance for a Mini Game.
Match 3 or more tiles to break the ice and enter the Ice Palace.
It takes some time until all the ice is broken.
If you like Match 3 games, just keep clearing the tiles.
If Match 3 is not your favorite, there is always the "Skip" button once it is full.
There are a few combos in the screenshot to give you the idea.
Screenshot
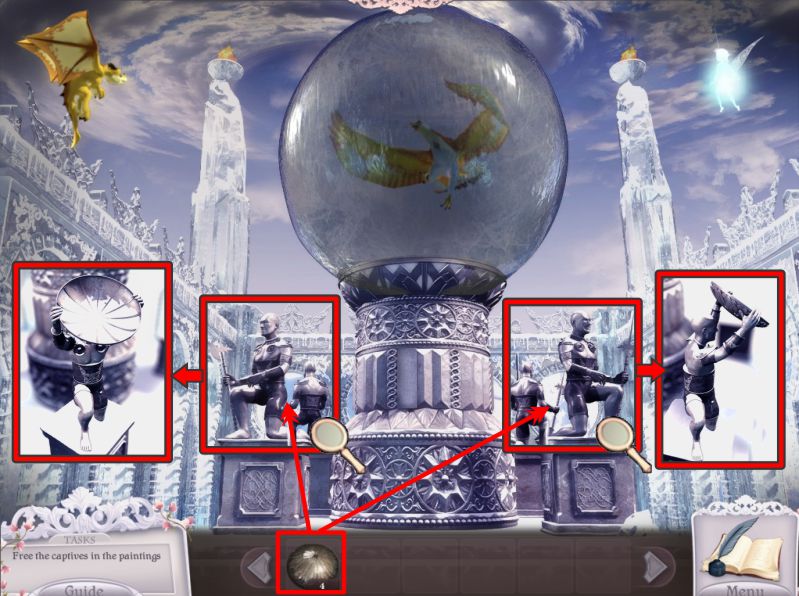
Save the Phoenix
On top of a pillar inside the Ice Palace is a huge bubble encasing a Phoenix.
Your goal will be to free him.
Click for a close up of each of the 4 guardians, and place a shield in his hands.
I've marked the left and right guardians together in the screenshot because they grab the shield in the same way.
Once you have placed all the shields, your next task will be to turn them to face the Phoenix.
Screenshot
The screenshot below shows the ultimate solution to free the Phoenix.
Your task is to individually click on each of the guardians to turn them around to face the Phoenix with their shield so that it reflects the light to free him.
Zoom in on each of the guardians and to make them face the Phoenix, you will need to turn their bodies.
I suggest turning the lower body, as shown in the screenshot, and the upper body will move with it.
Once you have freed the Phoenix, he will melt the Ice Palace sending the water down.
Click down and enter the Gingerbread House.
Screenshot
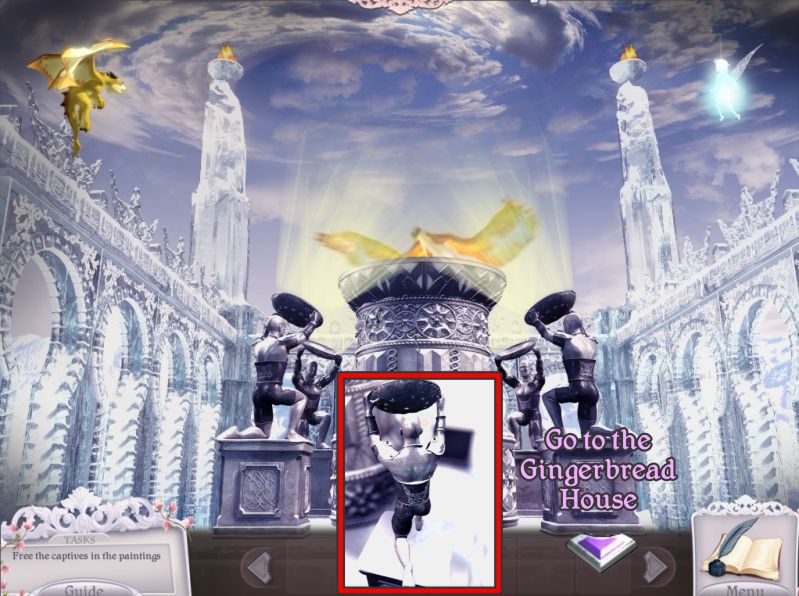
Gingerbread House
The water from the melting Ice Palace put out the fire under the caldron.
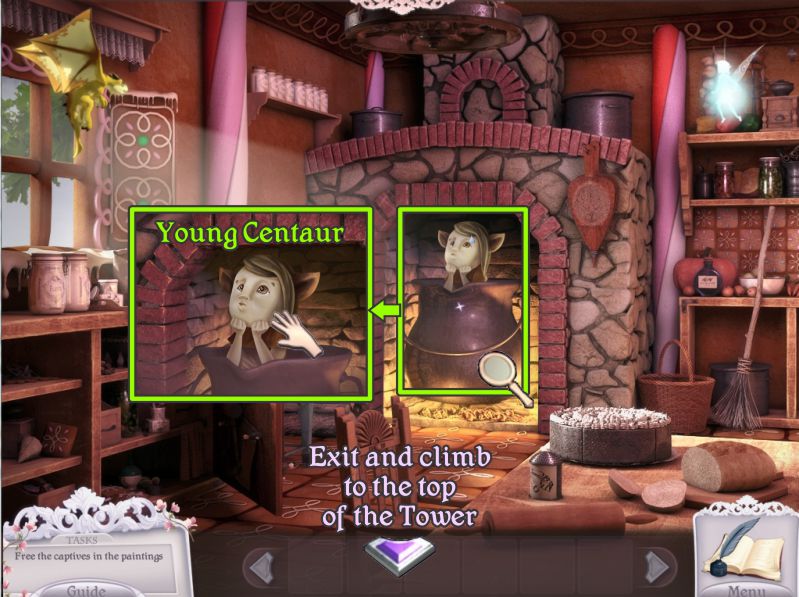
Zoom in to collect the young Centaur and take her to the top of the Tower.
Screenshot
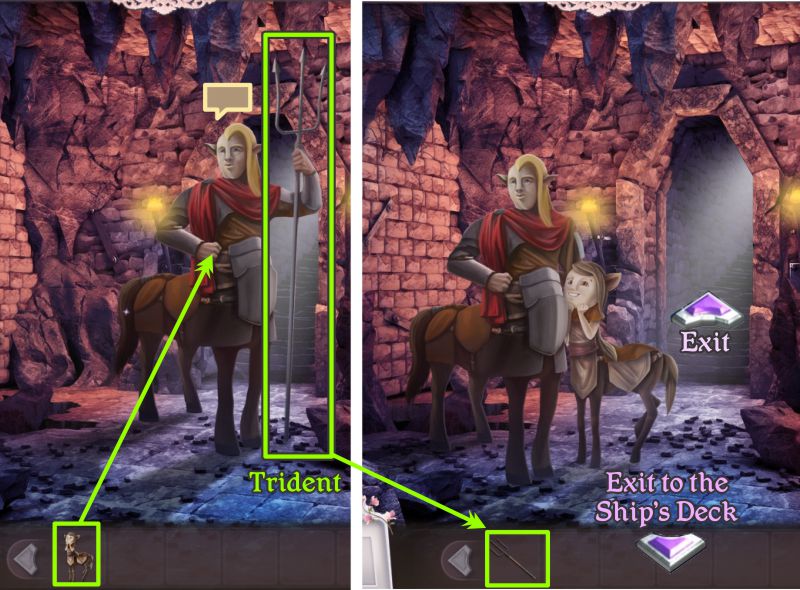
Top of the Tower
Talk to the Centaur and give him his child.
He will give you his Trident, so exit down to the Ship's Deck.
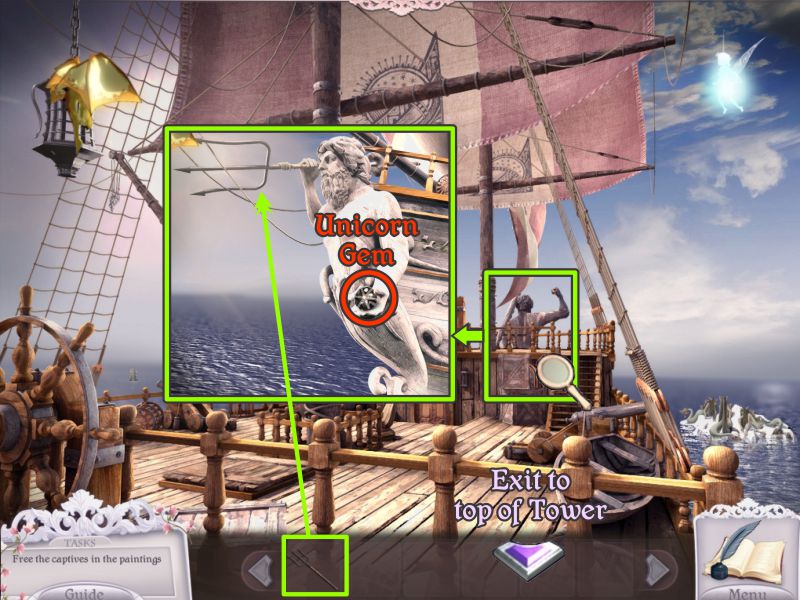
Screenshot
Ship's Deck
Zoom in on the ship's figurehead and give him the trident.
In exchange, you can collect a Unicorn Gem from his hand.
Return to the top of the Tower.
Screenshot
The Unicorn Mini Game
Go through the archway to the Roof.
Zoom in on the Unicorn and place your gem to trigger a Mini Game.
Your goal is to create the pattern shown in the screenshot.
Move the gems around the outside circle by clicking on them.
Use another gem as a buffer to get the second one to pop into the middle circle.
First, try removing one gem to the outer circle and then moving the others around the middle circle to see how many matches you get.
When you have completed the game, click on the Unicorn to fly to the door of the Witch's Castle.
Screenshot
Part 3: The Witch's Castle
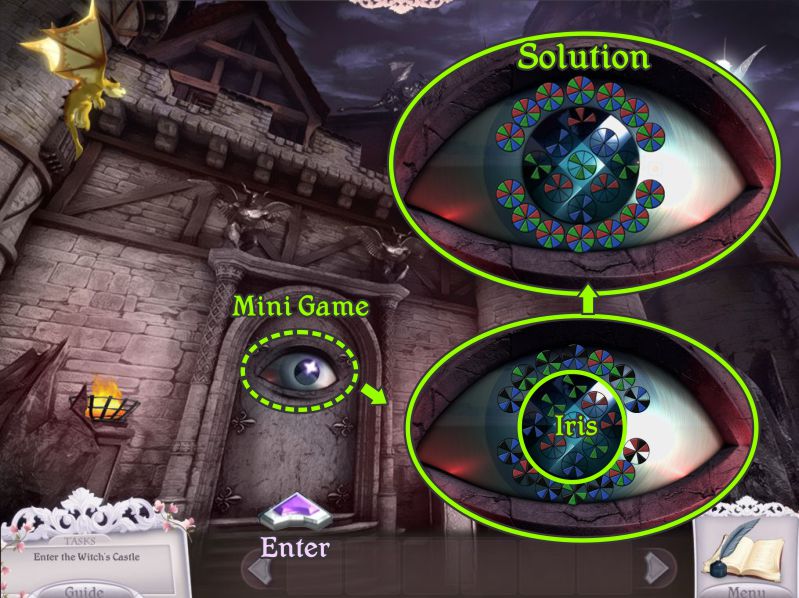
Castle Door Mini Game
Slide the circles around inside the iris so that all the outside circles no long have black sections in them.
The solution is shown in the screenshot.
Enter the Courtyard of the Castle.
Screenshot
Courtyard
Zoom in on the street light and take the Candle.
Collect the Flies, play the Hidden Object Scene, and solve the Mini Game at the Castle Door.
The solution to the Door Mini Game is shown in the screenshot.
Screenshot
Find the Flies
Collect the 10 flies shown in the screenshot.
After I played it and the Hidden Object Scene, I noticed it had another magnifying glass, so I played it again and ended up with 20 flies.
I see no reason to play it twice because you are only going to need 6 flies later on.
Screenshot
Fountain Hidden Object Scene
Like it says, this could be tricky.
The items you will get for your Inventory are the sponge and 3 makeup containers.
The tricky part is that the hands holding the objects keep disappearing into the fountain and then pop up with a different object.
Since there is no click penalty, I suggest to begin with that you keep clicking all over the scene in hopes of making your list to find smaller.
Then you can wait for an item to pop up and grab it.
Screenshot
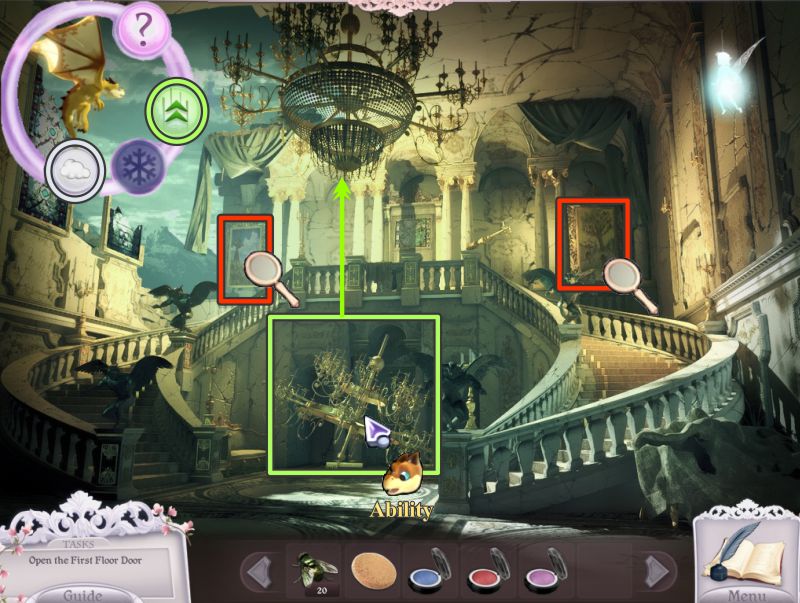
Entrance Hall
The chandelier is blocking a door, so use Nessie's lift ability to put it where it belongs.
Zoom in on the painting at the left.
Screenshot
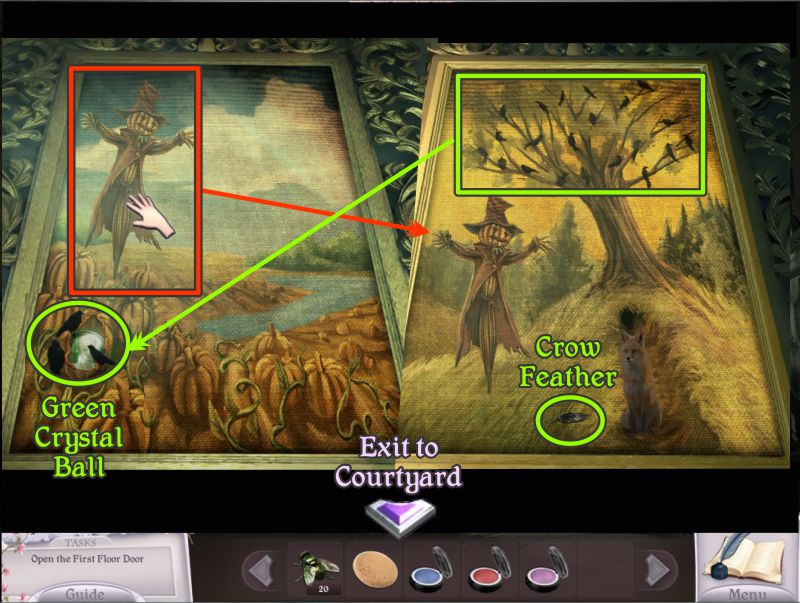
Entrance Paintings
Collect the scarecrow and then zoom in on the painting at the right.
Place the scarecrow to scare the crows away.
Pick up the Crow Feather and go back to the painting at the left.
Collect the Green Crystal Ball from the pumpkin surrounded by the crows.
Return to the Courtyard.
Screenshot
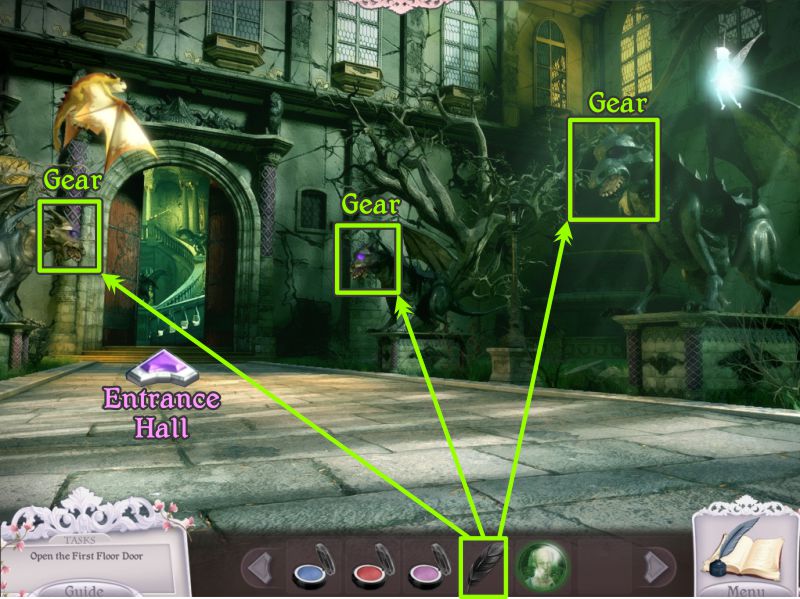
Courtyard
Tickle each of the gargoyles and they will smile with a gear.
Collect all 3 gears and go back inside.
Screenshot
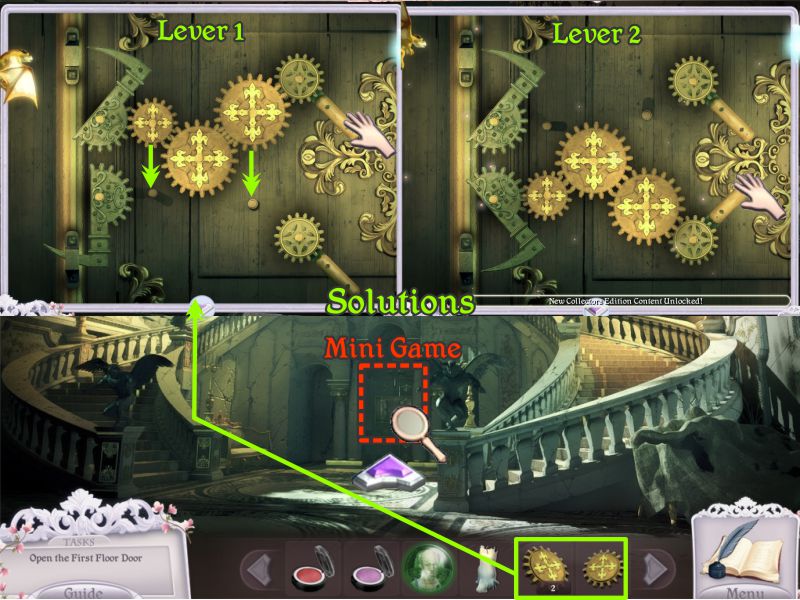
Portrait Gallery Door Mini Game
Zoom in on the door in the back for a Mini Game to open it.
Place your 3 gears as shown in the screenshot for Lever 1, and move the lever down to open the first stage of the lock.
Pick up the 2 gears and move them to the positions shown for Lever 2.
Move the lever to open the second portion of the lock.
It doesn't really matter which lever you open first as long as both of them are opened so you can go through the door.
Screenshot
Part 4: The Portrait Gallery
The Mirrors
There are 5 mirrors in the Portrait Gallery that are all twisted versions of Princess Isabella's household staff and family: the Gardner, her father the King, the castle Chef, her mother the Queen, and her Maid.
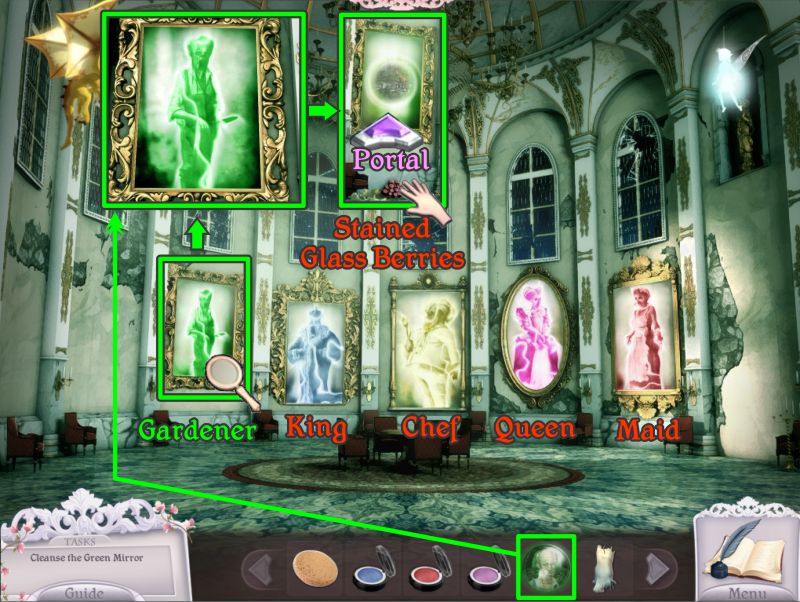
Gardener
Since we have a Green Crystal Ball, our first choice is the Gardener.
Click for a close up and place your crystal ball.
The mirror will break leaving Stained Glass Berries on the floor, so collect them.
A portal has opened in the mirror so go through it.
Screenshot
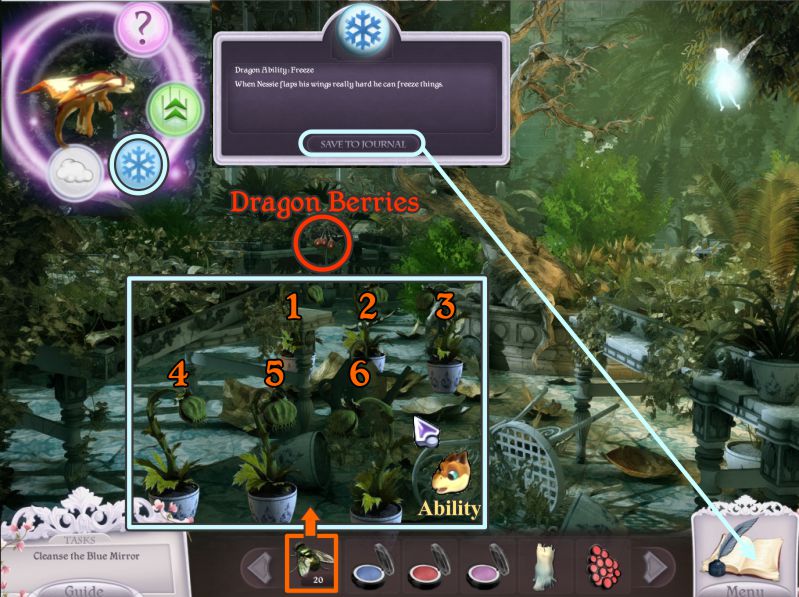
When you enter the portal, you find yourself in the Greenhouse.
The Witch's favorite plants, Venus Fly Traps, are in abundance, so your first task is to feed the critters with the flies you previously captured.
Click on the Dragon Berries and Nessie will get Frost Ability.
Try out his new ability by freezing all the plants.
Screenshot
Once all the plants are frozen, use the Fairy's Diamond Ability to smash them.
The whole scene wasn't even real but an illusion created by the Witch.
Once you destroyed the illusion, the room becomes an empty shell.
All that is left is a Blue Crystal Ball for you to collect.
Return to the Portrait Gallery.
Screenshot
King
Zoom in on the portrait of the King and place your Blue Crystal Ball.
Collect the Stained Glass Dragon and enter the Portal.
Screenshot
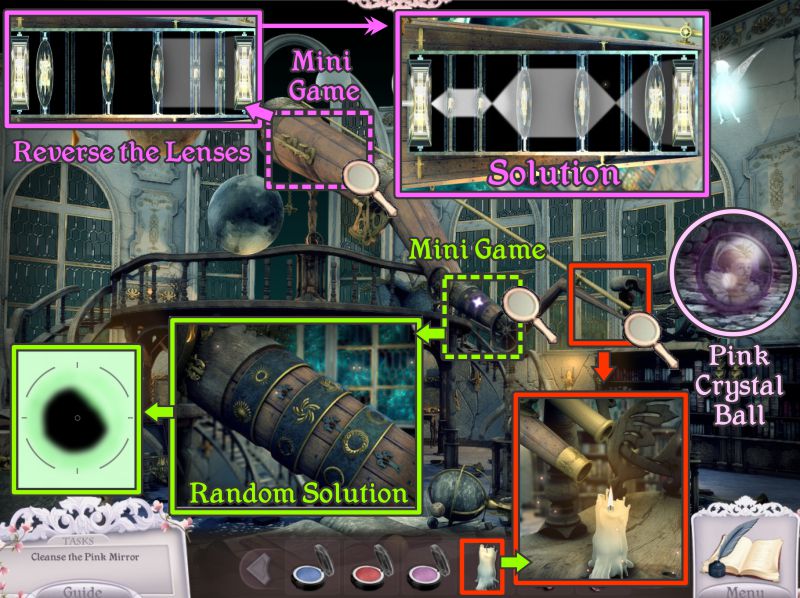
You are transported to the King's Observatory.
Click on the portion of the telescope marked in green in the screenshot.
The solution to this Mini Game is random, but your goal is to move the rings to line up a black hole as shown in the screenshot.
Click on the eyepiece of the telescope and place your candle on the bookcase.
Zoom in on the upper portion of the telescope for a Mini Game.
Your goal is reverse the lenses as shown in the screenshot solution.
Once again you have destroyed the illusion and are left with an empty shell of a room.
Collect the Pink Crystal Ball and return to the Portrait Gallery.
Screenshot
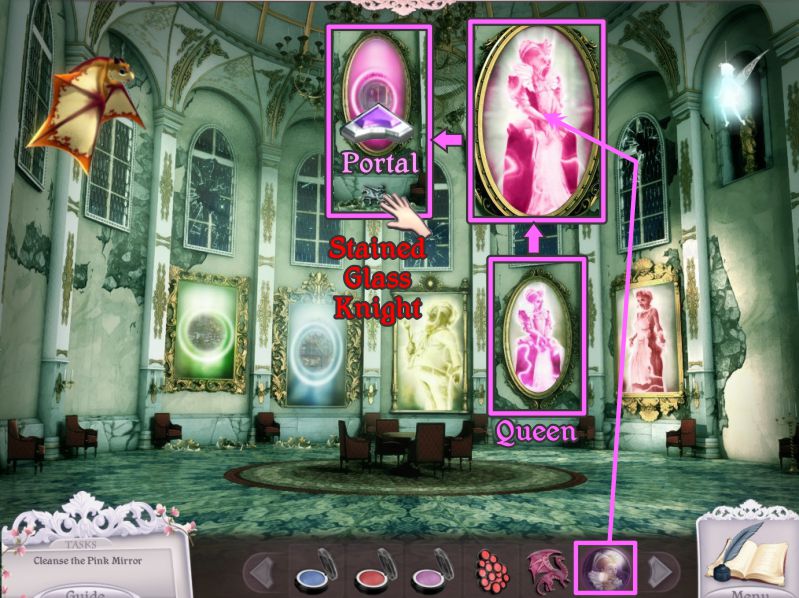
Queen
Zoom in on the Queen and place the crystal ball.
Collect the Stained Glass Knight and enter the Portal.
Screenshot
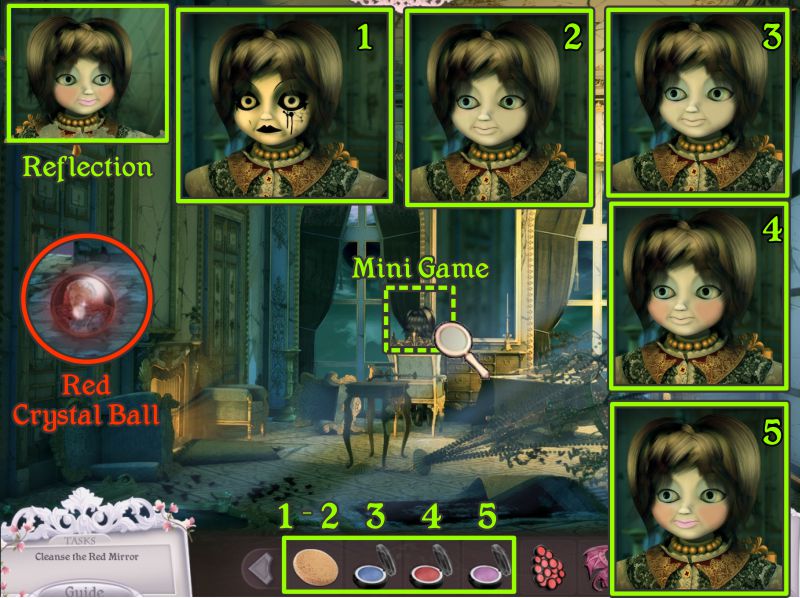
The Queen taught Isabella how to apply makeup, so zoom in on the doll sitting in front of the mirror.
Your goal is to make her look like her reflection in the mirror.
Clean her face with the sponge to see what is under the mess on her face.
Now that you have a cute clean face, apply the blue makeup to her eyes.
Place the red makeup on her cheeks, and the pink makeup on her lips.
The scene turns into a shell of the room leaving a Red Crystal Ball for you to collect.
Return to the Portrait Gallery.
Screenshot
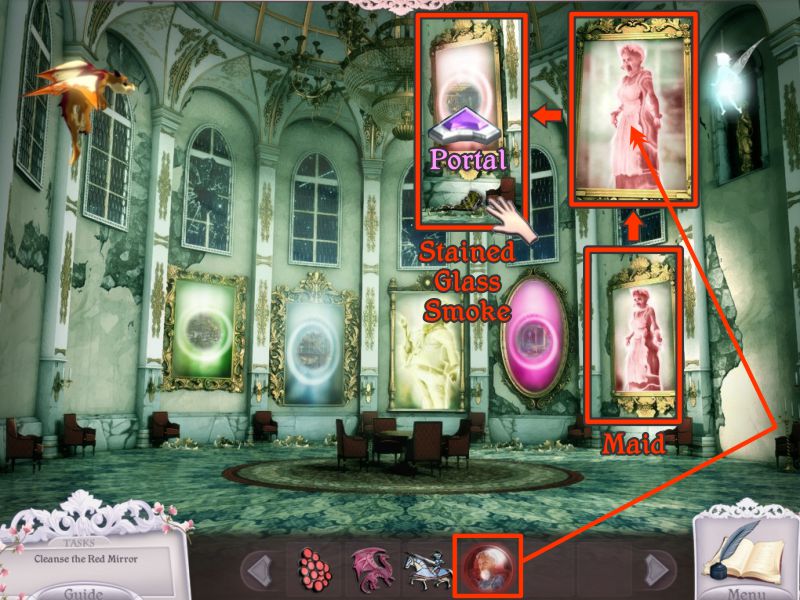
Maid
The Maid is the red portrait so click on her and use the Red Crystal Ball to create a Portal.
Collect the Stained Glass Smoke and enter the Portal.
Screenshot
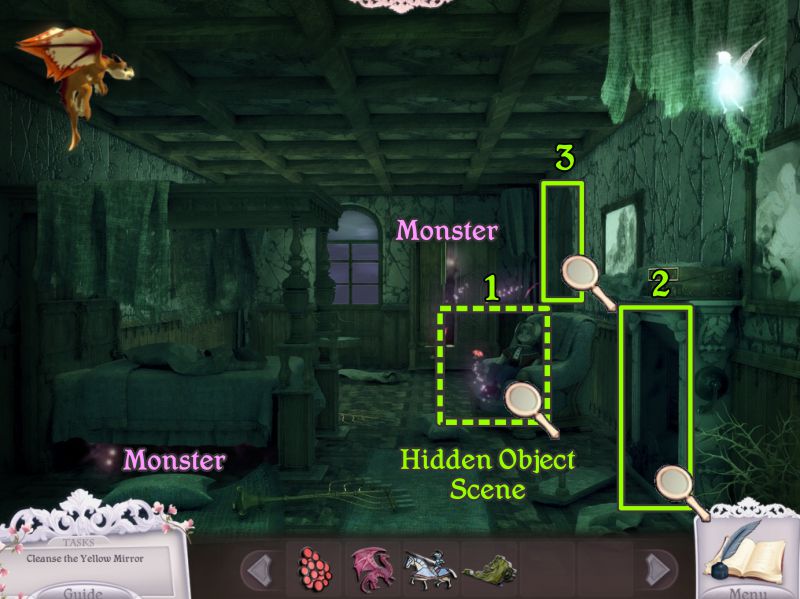
You are in a bedroom with a monster under the bed and one in the closet.
Play the Hidden Object Scene for some help to get rid of the monsters.
When you are finished, zoom in on the fireplace and then the window.
Screenshot
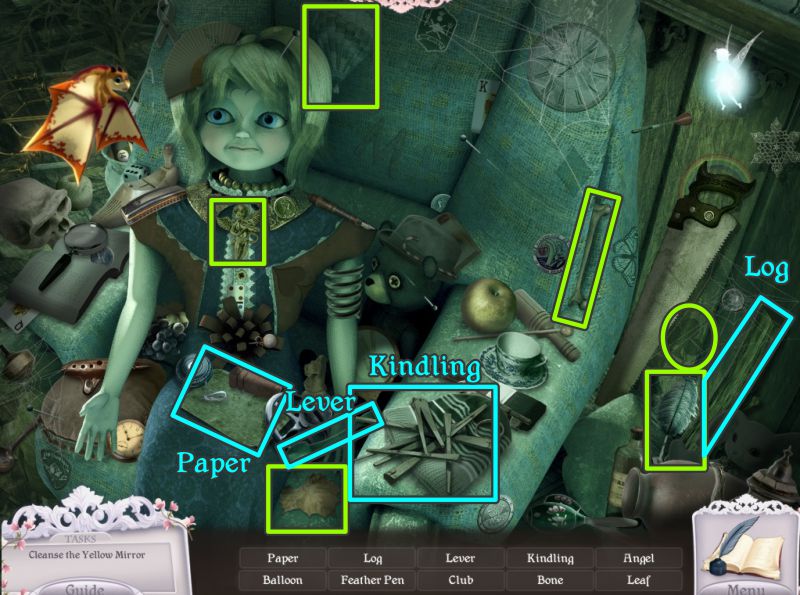
Collect everything on your list to get Paper, Kindling, a Log, and Lever for your Inventory.
Screenshot
Zoom in on the fireplace and place your paper, kindling, and log in that order.
Place the lever as shown in the screenshot and open the flue.
Use your Fairy's Fire Ability to light a fire in the fireplace to get rid of the monster under the bed.
Screenshot
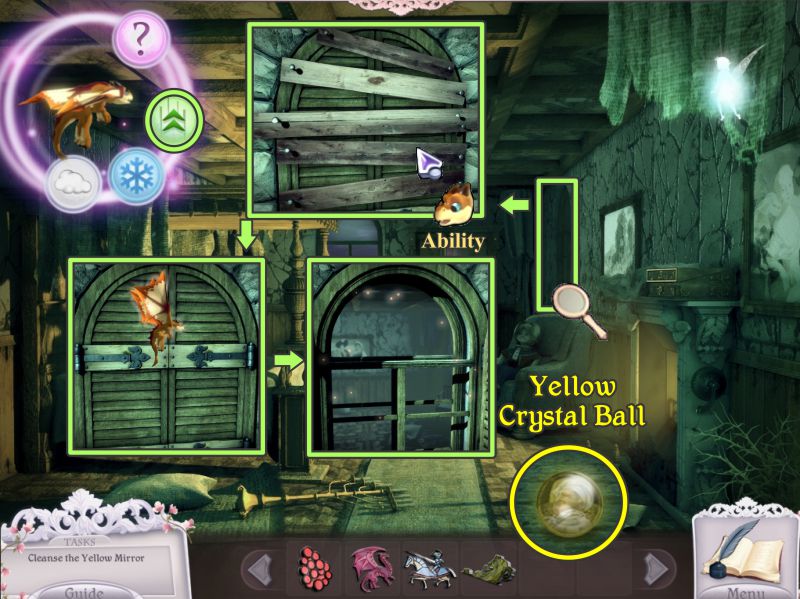
Zoom in on the window and have Nessie use his Lift Ability to get rid of the boards.
The light from the opened window will get rid of the monster in the closet.
Once again you have destroyed the illusion.
This time you can pick up a Yellow Crystal Ball before returning to the Portrait Gallery.
Screenshot
Chef
The last portrait is the Chef so zoom in and place the Yellow Crystal Ball.
Collect the Stained Glass Sun at the top of the frame and enter the Portal.
Screenshot
You are in a Nursery that looks just like the one in the Royal Castle.
Zoom in on the mirror and use Nessie's Smoke Ability to see what is written on the mirror.
It is a bar of musical notes.
Zoom in on the bassinet in search of a place to play the music.
Screenshot
Bassinet Musical Mini Game
Your goal is to use the sliders to make the second bar of notes match the first bar.
The notes in black are the ones you need to match, so slide the tabs to create the solution shown in the screenshot.
Screenshot
Your shell of a room will bring you a plain Crystal Ball, so collect it and return to the Entrance Hall.
Part 5: Entry to the Witch's Lair
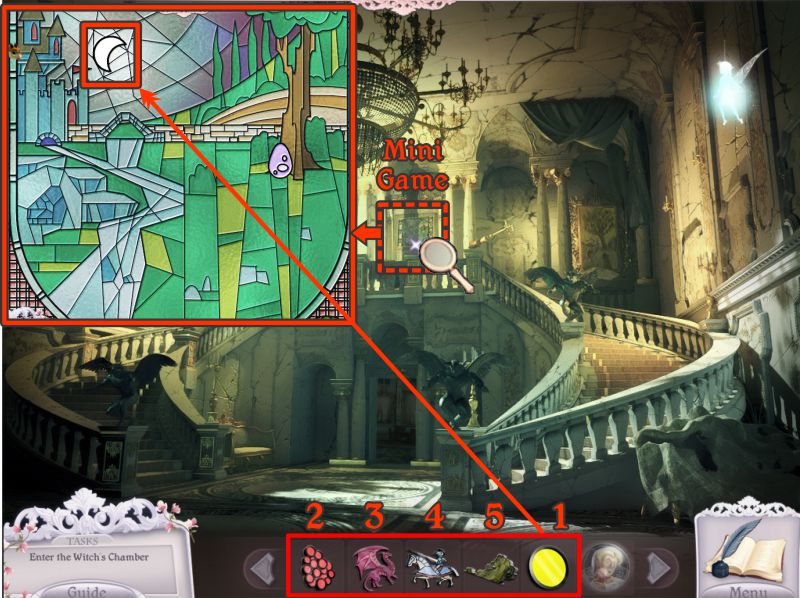
Stained Glass Door Mini Game
Zoom in on the stained glass door for a Mini Game.
The screenshot shows in what order you will place your stained glass pieces.
Place the sun over the moon for warmth to hatch the egg.
Screenshot
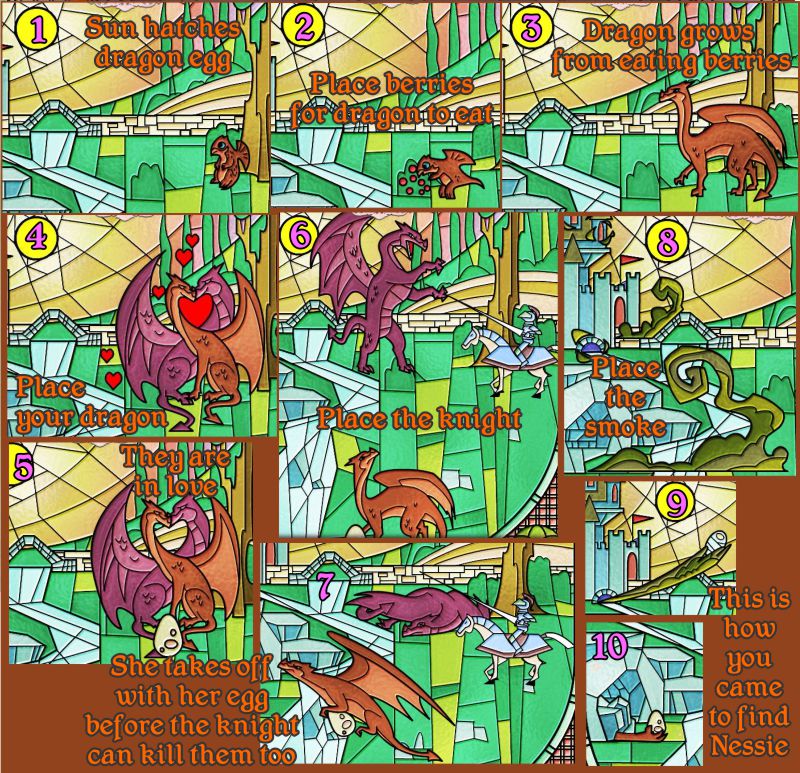
The sun hatches the dragon egg.
Place the berries for the dragon to eat.
The dragon grows up from eating the berries.
Place you dragon in the scene, and he will fly in to capture the loves of the lady dragon.
Their love produces a dragon egg.
Place your knight in the scene, and he arrives to battle the male dragon as the lady dragon looks on.
The knight slays the dragon so the lady dragon takes off with her egg before the knight can kill her too.
The knight takes off and the dead dragon disappears, so place your smoke in the scene.
The smoke comes flying out of the castle with the dragon egg.
The mother dragon's hand comes out from the rocks just like when you found Nessie's egg.
Screenshot
Witch's Throne
Enter when the door opens and zoom in on the Witch's Throne.
Place the Crystal Ball and click on Prince Adam's image.
The Witch has possessed the Prince with one of her roses.
Enter the Witch's Lair.
Screenshot
Part 6: The Witch's Lair
Defeat the Witch Hidden Object Duel
In order to defeat the Witch, you will need to find all of your objects in the 5 rounds faster than the Witch.
Your health monitor is in the lower left of the scene and hers is in the upper center.
Whoever loses a round also loses part of their health.
I have marked all possible objects I could find in the first screenshot.
A list of the items is shown at the bottom of the scene.
Screenshot
This screenshot has the names of all the items shown by there location.
Use whichever screenshot helps you the most.
I suggest playing the duel in Windowed Mode so you can stop the scene, without pausing it, in order to give yourself time to look around.
Just place your cursor on the very top bar that shows the game's name.
Screenshot
The End
When you have defeated the Witch, watch the ending cut scene to see what may be in your future with the next saga of Princess Isabella.
Go watch the Teaser in the "Extras" to see what happens to Bella.
Posted by: Jazz |
June 11, 2011 6:08 PM
|
June 11, 2011 6:08 PM