
Relics of Fate:
A Penny Macey Mystery
Platform: Mac, Windows
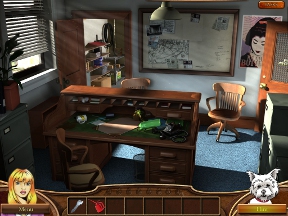
![]() Relics of Fate: A Penny Macey Mystery is a brand new hidden object adventure from Fuzzy Bug Interactive. It ditches the usual string of still scenes packed with items to find and lists to manage in favor of an adventure-style layout, freeing you up to solve interactive puzzles and stock your inventory with useful items. Top it off with a healthy dose of crime investigation and you've got a wholly enjoyable game on your hands!
Relics of Fate: A Penny Macey Mystery is a brand new hidden object adventure from Fuzzy Bug Interactive. It ditches the usual string of still scenes packed with items to find and lists to manage in favor of an adventure-style layout, freeing you up to solve interactive puzzles and stock your inventory with useful items. Top it off with a healthy dose of crime investigation and you've got a wholly enjoyable game on your hands!
 Private investigator Jack Macey seems to have been kidnapped while investigating the robberies of a set of relics. Arriving at his office one day, his daughter, Penny, notices things seem a bit less tidy than they should be. After cleaning things up a bit, she discovers a note in his filing cabinet instructing her to locate the eight relics before anyone else does. Naturally, Penny immediately sets out to investigate!
Relics of Fate: A Penny Macey Mystery follows a more adventure-oriented layout, sticking to inventory puzzles and environmental challenges as opposed to hidden object-laden scenes. Most of your time will be spent exploring still scenes with the mouse, clicking on areas of interest and looking deeper into certain areas that sparkle on the screen. Yes, you'll still find a laundry list of items or two, but these are very much secondary to the main chunk of the game and mainly serve to provide you with key items.
Relics of Fate utilizes container items made popular by the Treasure Seekers series by Artogon. When you click on certain objects, they'll display a round menu with a few grayed-out items displayed to the side. In order to activate that object, you'll need to find a few things from around the scene and place them in the container. It's immediately intuitive and is actually a lot of fun to do.
 Solving puzzles is the central focus of Relics of Fate, and they're pretty interesting from beginning to end. The usual battery of crime-related activities make an appearance, from dusting for fingerprints to searching for clues. But you'll also have to figure out more interesting puzzles, like how to put a drowsy cop to sleep. Relics of Fate also encourages you to really look around each room, checking in drawers, behind cabinets, underneath desks, etc. When you complete an area, you'll really feel like you've gutted it for clues!
Analysis: For the most part, Relics of Fate: A Penny Macey Mystery is a standard hidden object/adventure hybrid game. It leans more toward the adventure side of things with its overall design and emphasis on inventory items and puzzle solving, which works very well for the type of story being told. And if you're in the mood for a more challenging experience, you can choose Challenge Mode when you begin the game, offering fewer, more vague hints and penalties for rapid clicking.
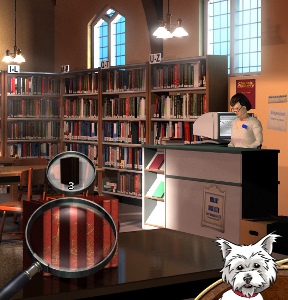
One area where Relics of Fate really stands out is visual design. We've been spoiled by modern development studios pouring money into the artistic side of games, so it takes a bit of extra creativity to stand out from the crowd. With Relics of Fate, still scenes are livened up with a number of animated characters and items, all presented in smooth, shaded 3D. From Penny's icon at the bottom of the screen to the librarian
Relics of Fate: A Penny Macey Mystery doesn't leap out from the legions of hidden object adventure games on the market, but that doesn't stop it from providing an interesting story with great visuals and strong puzzles to solve!
![]() Windows:
Windows:
Download the demo
Get the full version
![]() Mac OS X:
Mac OS X:
Download the demo
Get the full version


Walkthrough Guide
(Please allow page to fully load for spoiler tags to be functional.)
Relics of Fate: A Penny Macey Mystery Walkthrough
General Information
On the Main Menu you can select or change your profile, choose your options, check the scores, play or exit.
Options include music and sound effects volume, as well as a choice of full or windowed screen.
As you start the game, you will be given your choice to play Casual or Challenge Mode.
Casual Mode is the relaxed version with plenty of hints and no click penalty.
Challenge Mode is for experienced Hidden Object fans who prefer the challenge of fewer, more vague hints and don't mind being penalized for rapid clicking.
There is one penalty for both mode: If you choose to quit the game in the middle of a location, you will have to begin the location all over again when you next play.
In Casual Mode, your tasks will be shown at the upper right of the screen.
Hints will begin when you find Hamish in the closet of Dad's Office. Hamish is Dad's dog and will be eager to help when he can with paw prints to the object you seek.
In between help, Hamish will fall asleep, as he will during Mini Games and Puzzles, until the Hint or Skip buttons are ready for use.
There are no arrows for moving from one location to another, because there will be an automatic blackout as you are taken there.
Once you have completed a scene, you cannot go back to the previous location.
After your visit to the town Library, you will find a map to help you more easily transfer to different locations.
Cursors change into different types of hands to pick up objects; or open doors, drawers, and cabinets; or a magnifying glass addition for taking a closer look.
Hidden Object Scenes are the same for all profiles, but the order in which the items are listed will change.
Some tasks you need to perform will have a large magnifying glass surrounded by one or more circles of objects you need to collect in order to perform the task.
When you need to talk to somebody, a talk bubble will appear, and you may need to click the scene in order to see the next portion of the conversation from the other participant.
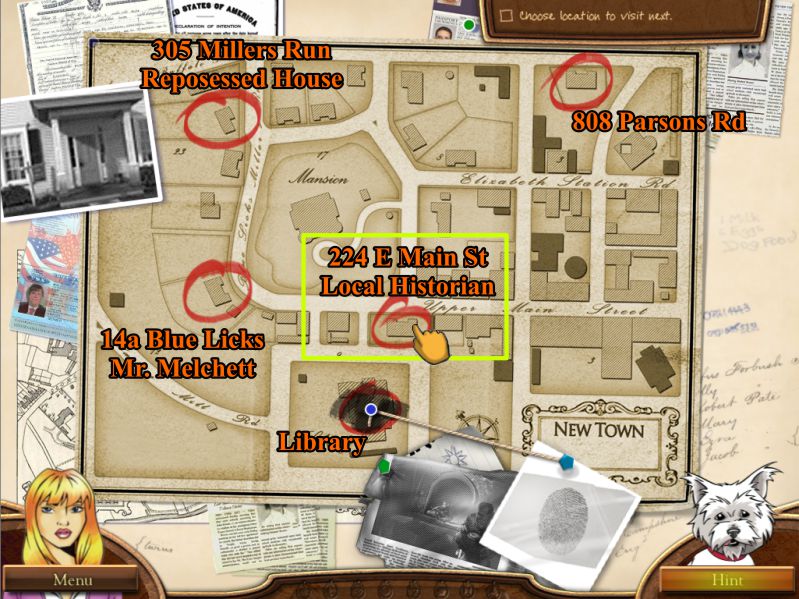
Once you encounter the Map, you will be able to choose which location you wish to visit in which order.
Locations on the Map will be added as the need to investigate different locations is discovered.
Since the developer chose to refer to sections of the game as "Acts", I will be treating the various locations as Acts as it plays out, and the in between stops at Penny's Dad's Office will become Intermissions.
Because I have arranged the walkthrough as a play with acts, you will be able to more readily find the locations you have chosen by the names of the Acts, which are the various locations.
Act 1: Private Investigation Office
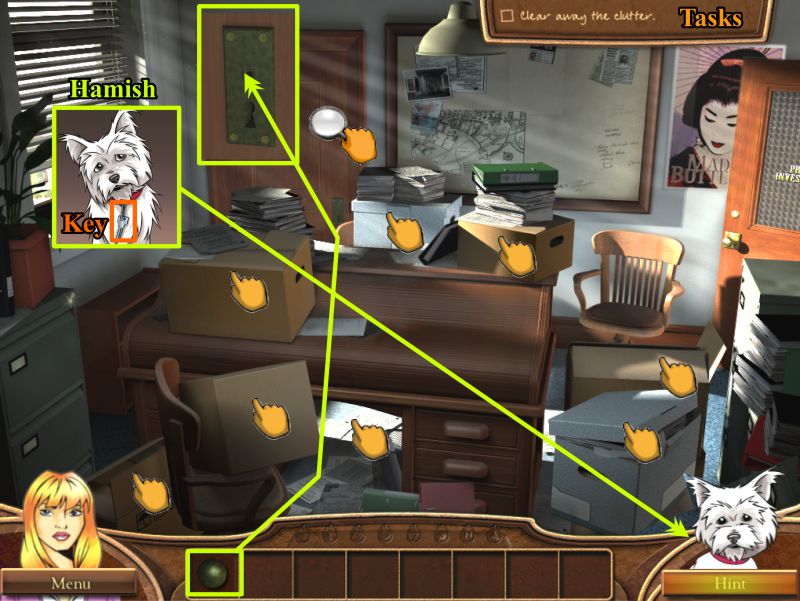
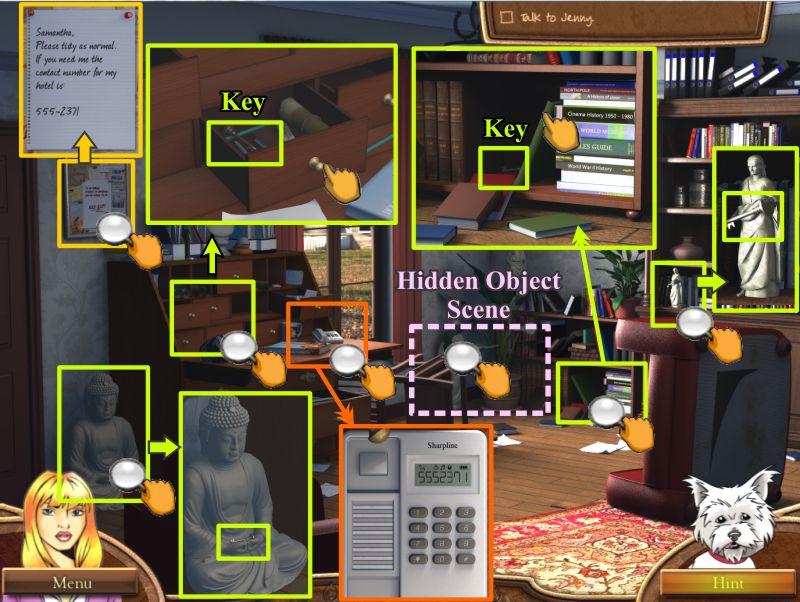
Tidy Dad's Office
Tidy up Dad's Office by removing 8 boxes to receive a Door Handle for the closet.
Zoom in on the door and place the knob to open the door and find Hamish.
Take the Key from his collar and he will take his place as your Hint system.
Screenshot
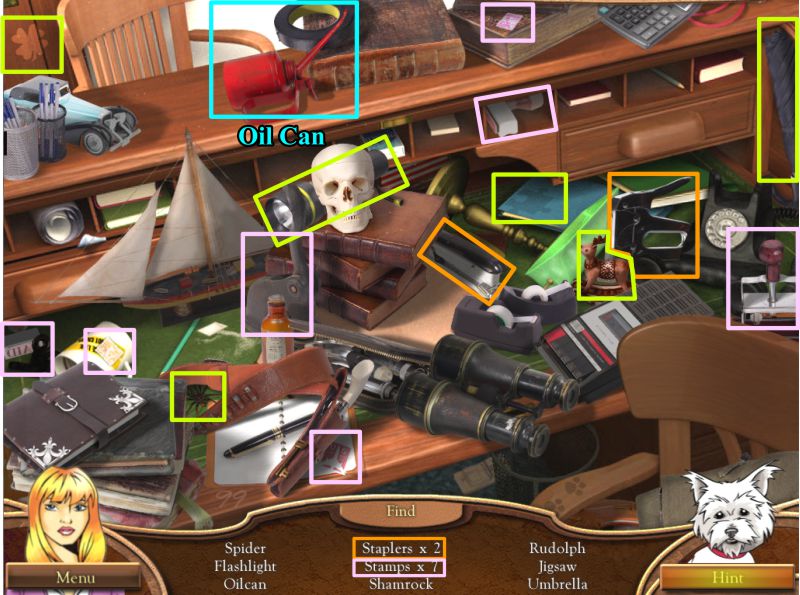
Dad's Desk Hidden Object Scene
Click on the desk for a Hidden Object Scene.
Collect everything and you will get an Oil Can.
The stamps can be either postage stamps or office stamps.
Screenshot
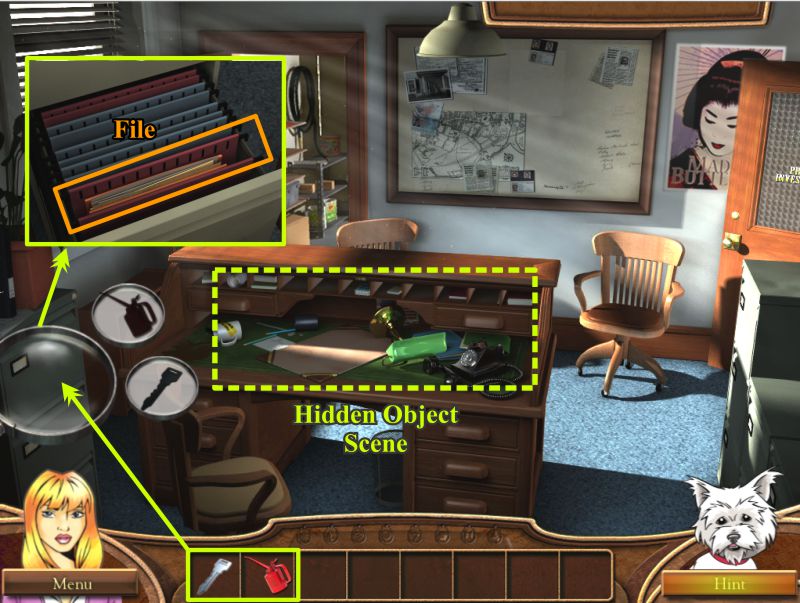
File Cabinet
Click on the file cabinet for a Key Object magnifying glass.
Place the oil can and key to open the file drawer.
Take the file marked in the screenshot.
Screenshot
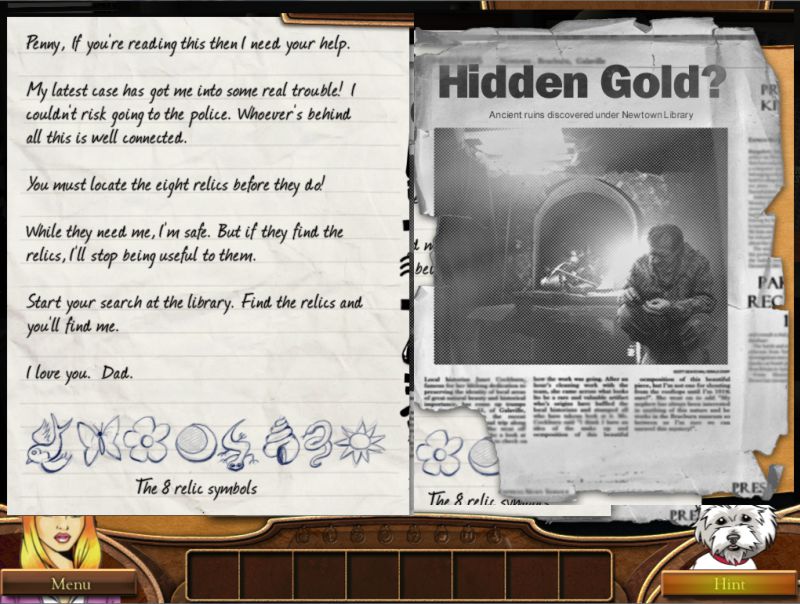
Dad's File Folder
Read Dad's letter and have a look at the newspaper article.
Exit out of the close-up.
Screenshot
Act 2: Newtown Library
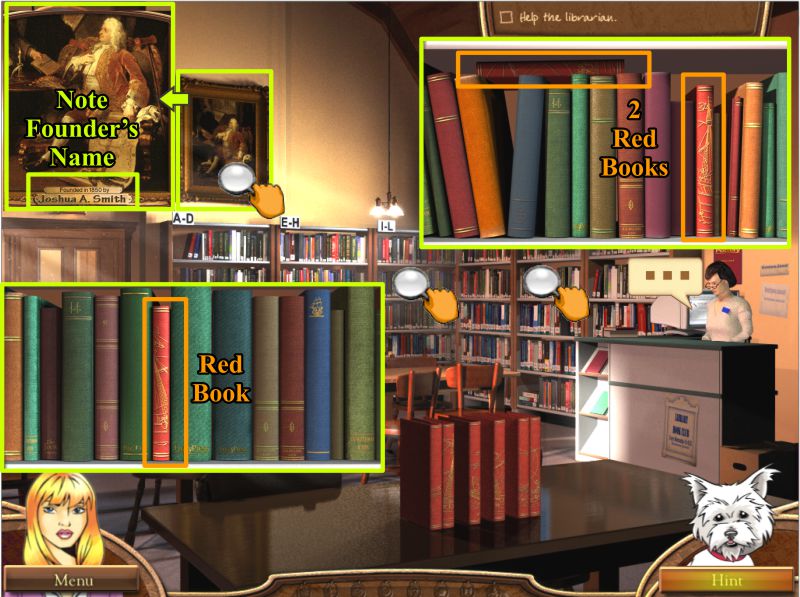
Main Room
Talk to the Librarian and offer to help her by finding the red books.
Zoom in on the bookshelves and take the 3 books marked in the screenshot.
Check out the portrait on the wall and note the founder's name.
Screenshot
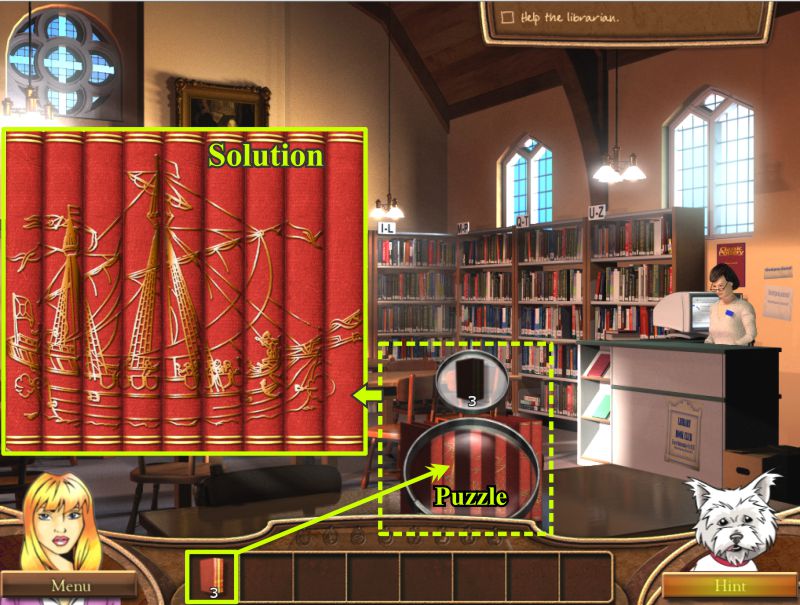
Red Book Puzzle
Click on the books for a Key Object circle to place your 3 books and trigger the puzzle.
Arrange the books as shown in the screenshot.
Screenshot
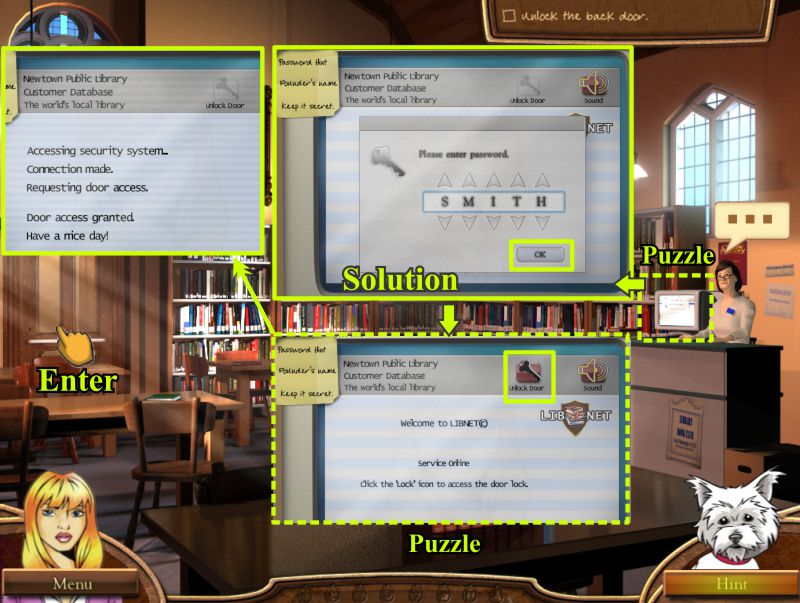
Computer Password Puzzle
Talk to the Librarian. She will tell you to see if you can find the password for the computer so you can open the door to the Back Room.
Use the arrows above and below the box to enter SMITH and then press OK.
Press the button to unlock the door and trigger another puzzle.
When you have successfully completed the puzzle, you will be granted access to the Back Room.
Screenshot
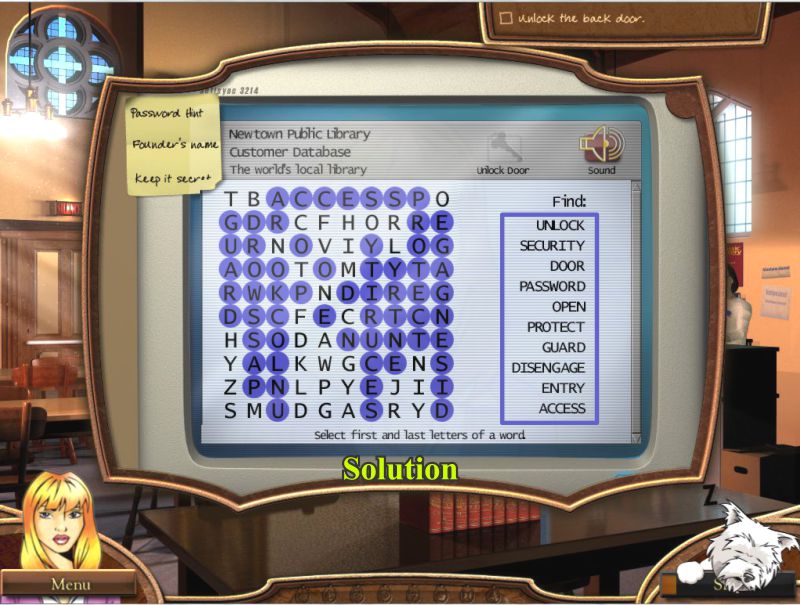
Back Room Access
Your goal is to find the list of words on the right by selecting the first and last letters of the words.
The solution is shown in the screenshot.
Screenshot
Back Room
Talk to the guard and pick up the Jug and Mug.
Open the cabinet and collect the Scissors.
Collect the 10 Coins shown in the screenshot.
Zoom in on the coat, open the pocket, and take the coin.
Open the drawer and collect the 3 coins there.
Zoom in on the books and take the 2 coins.
Screenshot
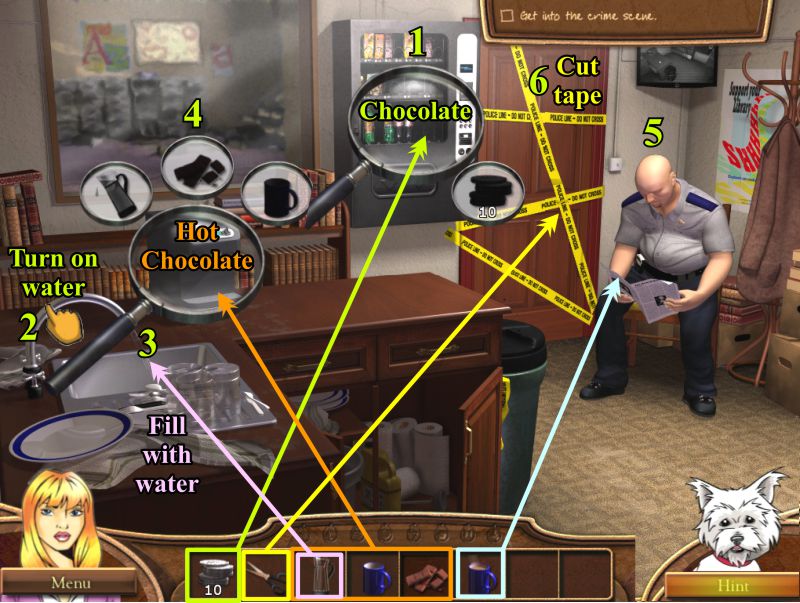
Click on the vending machine and put your coins in the Key Object circle to get the chocolate.
Turn on the water faucet.
Fill the jug with water.
Click on the coffee machine for a Key Object. Place the full jug, chocolate, and mug in the magnifying glass to receive a cup of hot chocolate.
Give the hot chocolate to the guard, who will drink it and fall asleep.
Use your scissors to cut each of the strips of tape.
Screenshot
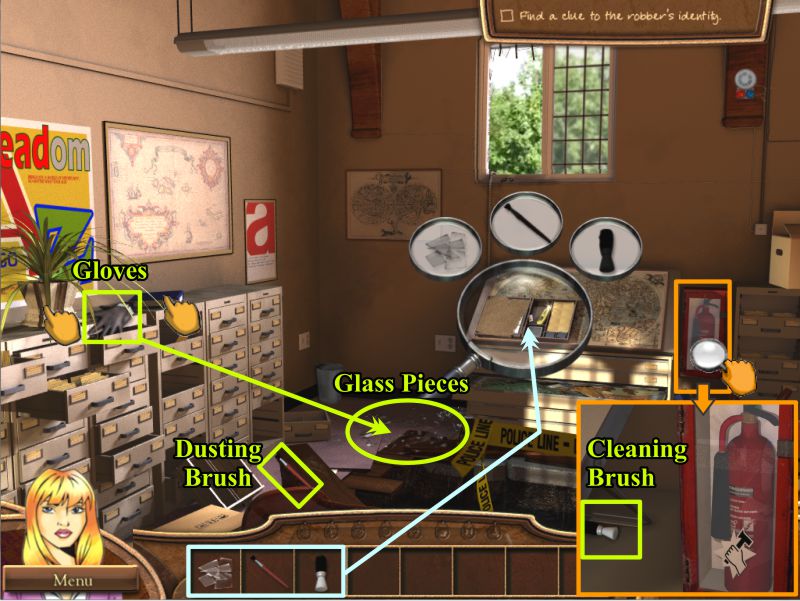
Records Room
Grab the Gloves and use them to pick up the Glass Pieces.
Take the Dusting Brush and zoom in on the fire extinguisher to find the Cleaning Brush.
Click on the fingerprint kit and a Key Object to place the glass and two brushes.
Screenshot
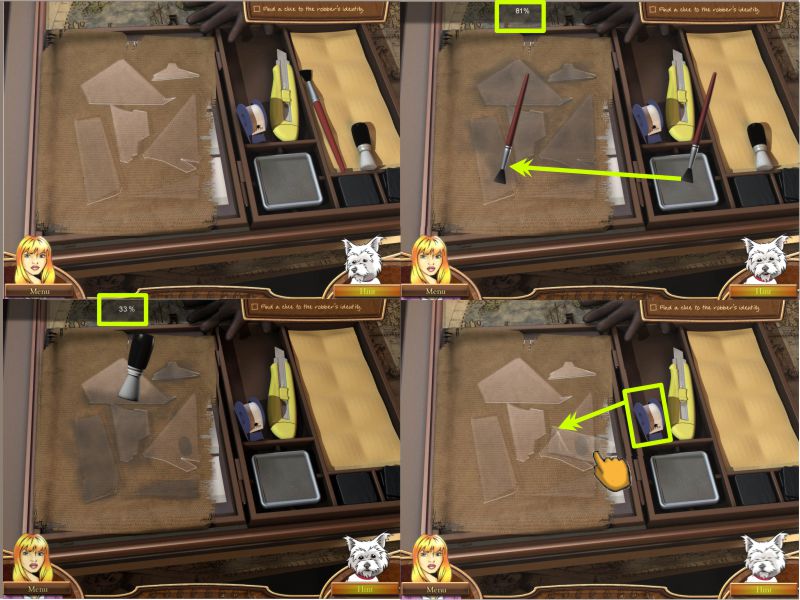
Fingerprint Kit Mini Game
Everything is arranged for you. Dip the Dusting Brush in the dust and dust the glass until the percentage above the glass says 100%.
Use the Cleaning Brush to remove the dust until the percent counter says 100%.
Place some tape on the fingerprint you find and collect it.
Screenshot
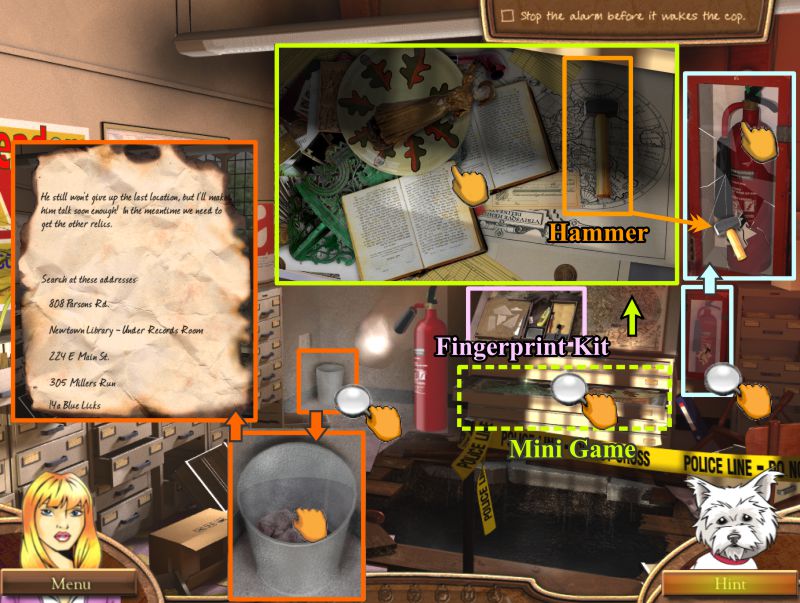
Records Room
The smoke alarm goes off, so you need to stop it before it wakes up the guard.
Click on the chest drawer and rummage through everything until you find the Hammer in the upper right corner.
Zoom in on the fire extinguisher and use the hammer 3 times to break the glass so you can take the fire extinguisher.
Use the extinguisher to get rid of the smoke in the waste basket in the corner.
Zoom in on the basket, take the crumpled paper and read it.
Screenshot
Under the Library
Zoom in on the pick axe in the middle of the screen for a Hidden Object Scene.
Pick Axe Hidden Object Scene
Collect everything and you will end up with 9 scraps of paper to put together.
Even though Hamish went out for a walk, you still have Hints if you need them.
Screenshot
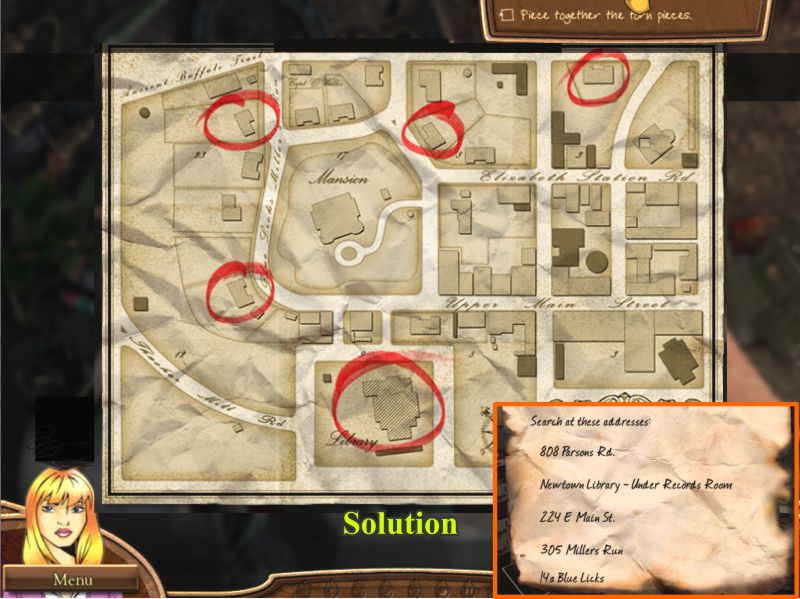
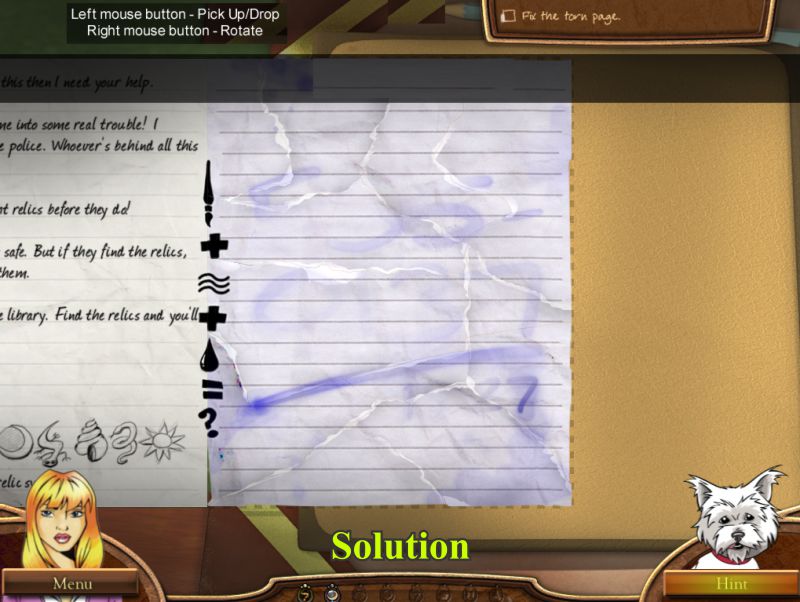
Map Puzzle
Left click to pick up and put down the pieces of the map, and right click to rotate them.
The screenshot shows the solution to the jigsaw and locations of some of the addresses on the burned scrap of paper you previously rescued.
Since the pieces are presented to you randomly, it is always best to work from the outside in.
Screenshot
Intermission
Dad's Office
Penny goes to Dad's Office to plan her next move and has an unpleasant encounter with the bank manager, who says Dad hasn't paid his rent.
After the guy leaves, Penny decides she needs to set up an Evidence Board, so she will use the bulletin board on the back wall.
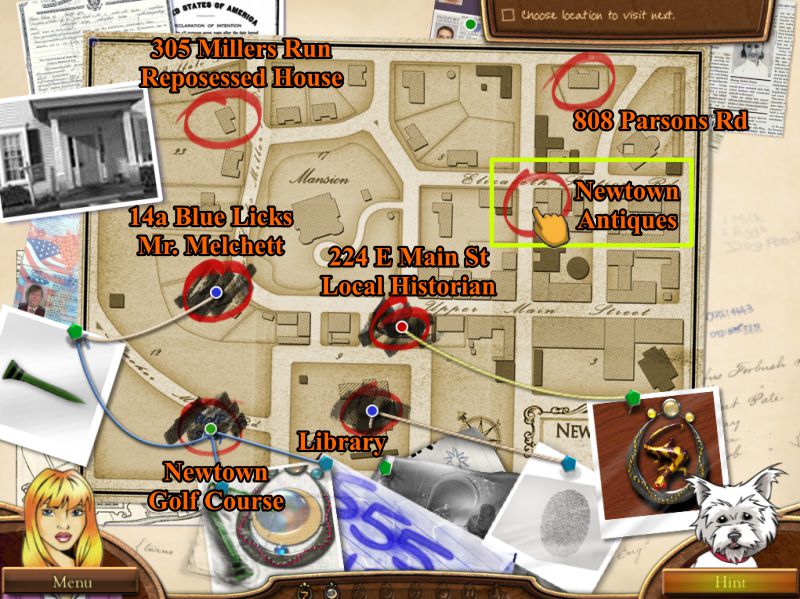
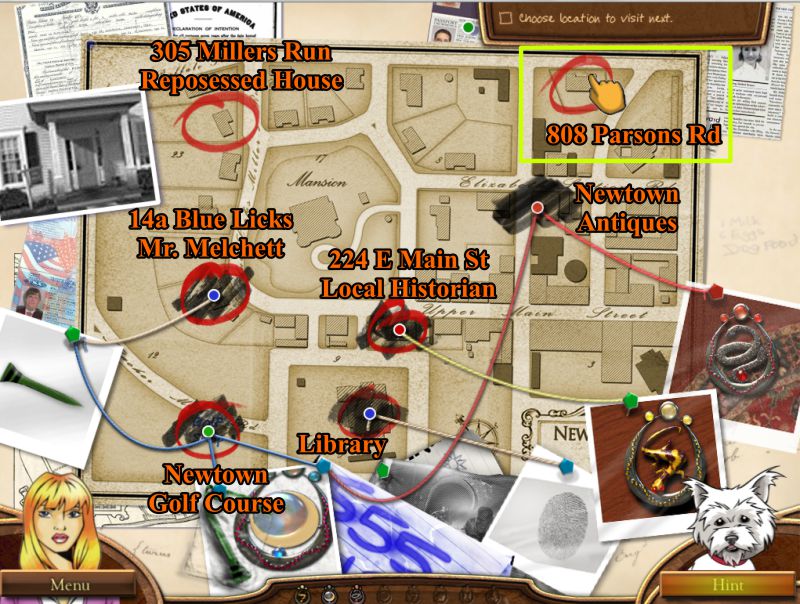
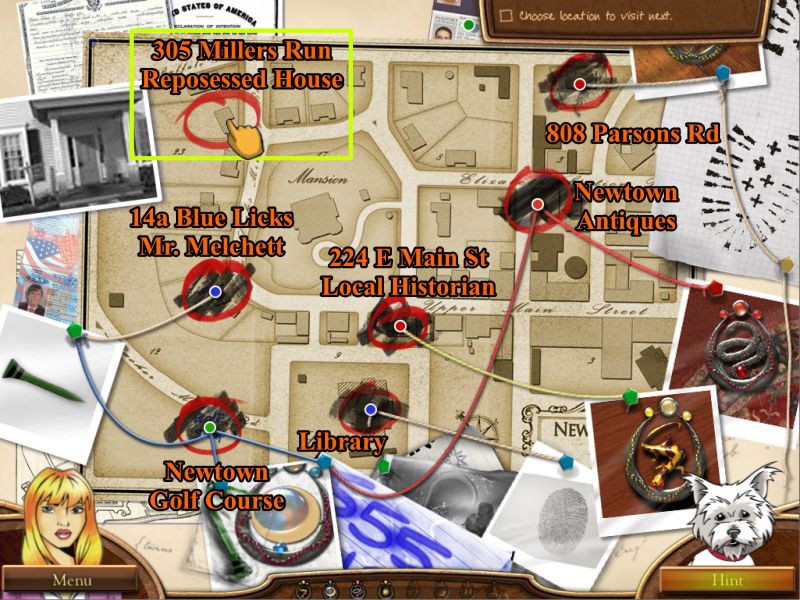
Place the map you put together on the board. It will now zoom in for you to choose a location you wish to visit next.
The basic locations you see on this map are slightly different than the map you put together.
Start with 224 E. Main Street.
Screenshot
Act 3: Jenny Harrison, Local Historian
224 E. Main Street
Check all the magnifying glasses in the screenshot and pick up the 4 animal keys.
Click on the bulletin board and find out that Jenny is on vacation.
Click on the telephone, remove the receiver and dial 555-2371.
Talk to Jenny and she will tell you where the relic is located.
Play the Hidden Object Scene.
Screenshot
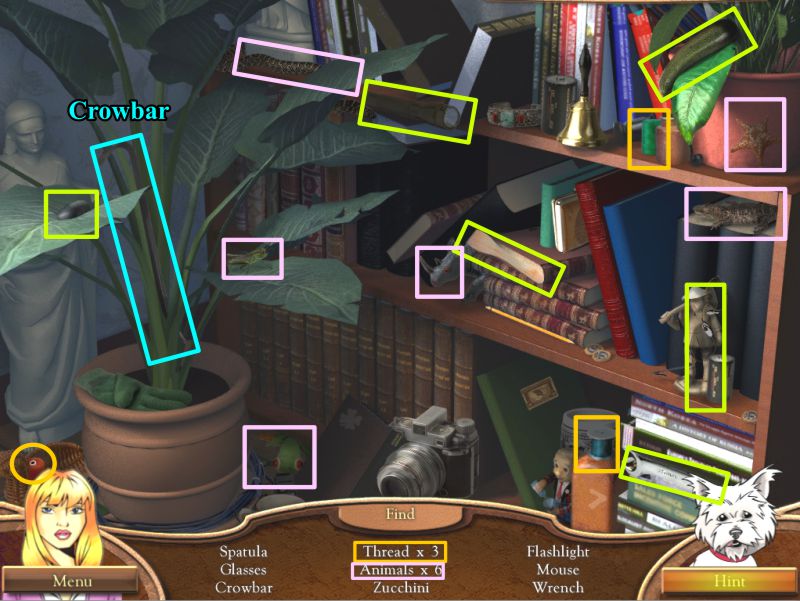
Historian's House Hidden Object Scene
Once you have collected everything, you will have a Crowbar.
Screenshot
Historian's House
Zoom in and collect the last animal key shown in the screenshot.
Move the chair so you can lift the rug.
Use the crowbar to lift the floor board and remove the box.
Zoom in on the box and place the 5 animal keys to trigger a Puzzle.
Screenshot
Salamander Relic Puzzle
Swap the animal discs according to the directions on the box.
The solution shown in the screenshot will cause the discs to turn and open the box.
Take the Salamander Relic.
Screenshot
Map
The map will appear for you to choose a new location, so click on 14a Blue Licks to go see Mr. Melchett.
Screenshot
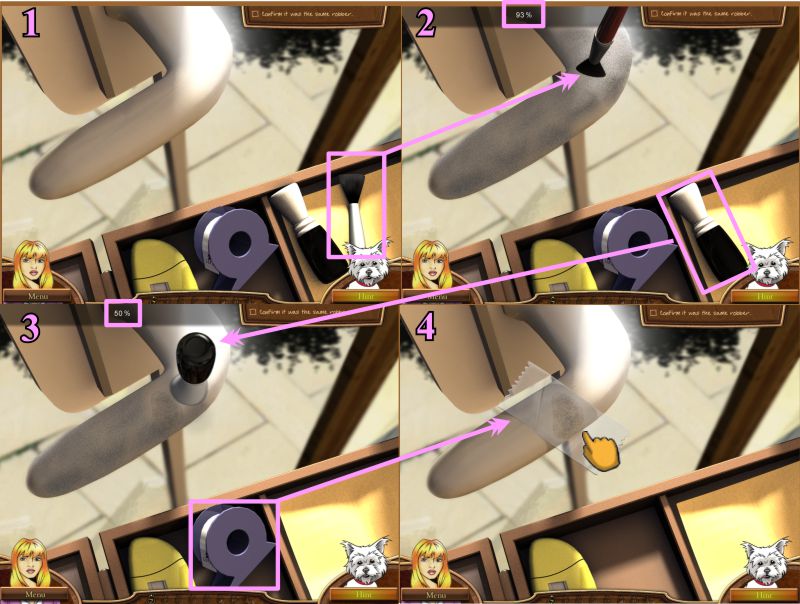
Act 4: Mr. Melchett
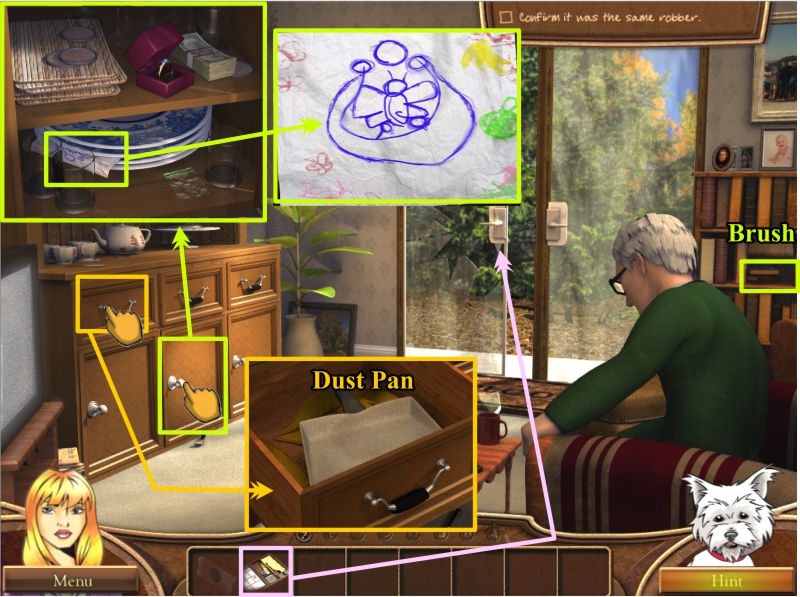
14a Blue Licks
While you are talking to Mr. Melchett, the robber escapes out the back with the Butterfly Relic.
Open the drawer and cabinet marked in the screenshot to find a child's drawing of the relic, and to collect a Dust Pan.
Grab the Brush and place your fingerprint on the door handle.
Screenshot
Dust for Fingerprints
Use your brush to apply the dust until the counter reaches 100%.
Remove the dust until 100% is gone.
Place the tape over the print and collect it.
Screenshot
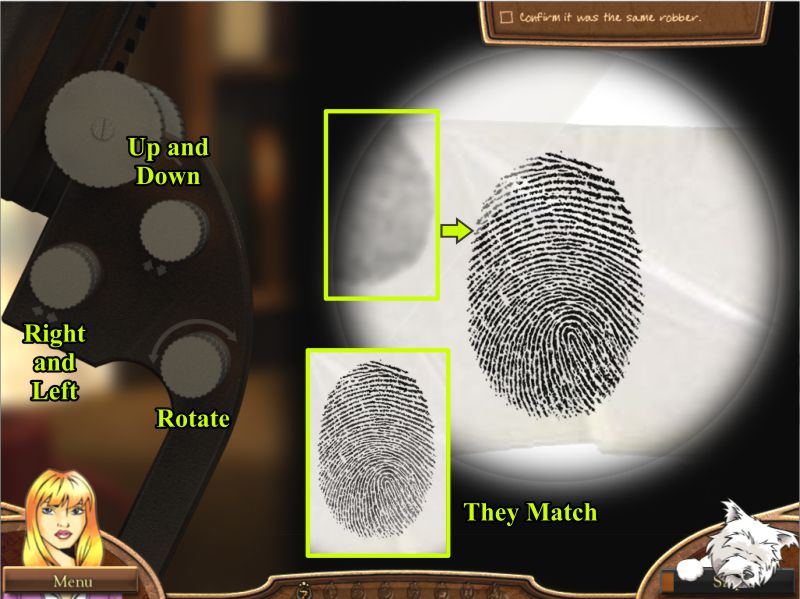
Fingerprint Comparison
Use the dials at the left to move the fingerprint on the left to coincide with the one on the right, as shown in the screenshot.
When you successfully line it up with the sample, you will find out they match.
Screenshot
Clean up the Glass
Click on the glass by the door to bring up a Key Object.
Place the brush and dustpan to clean up the glass and discover a Golf Tee.
The Tee will be in a random location by or on the Welcome Mat.
Screenshot
Intermission
Dad's Office
Answer the ringing phone and talk to the shadowy figure.
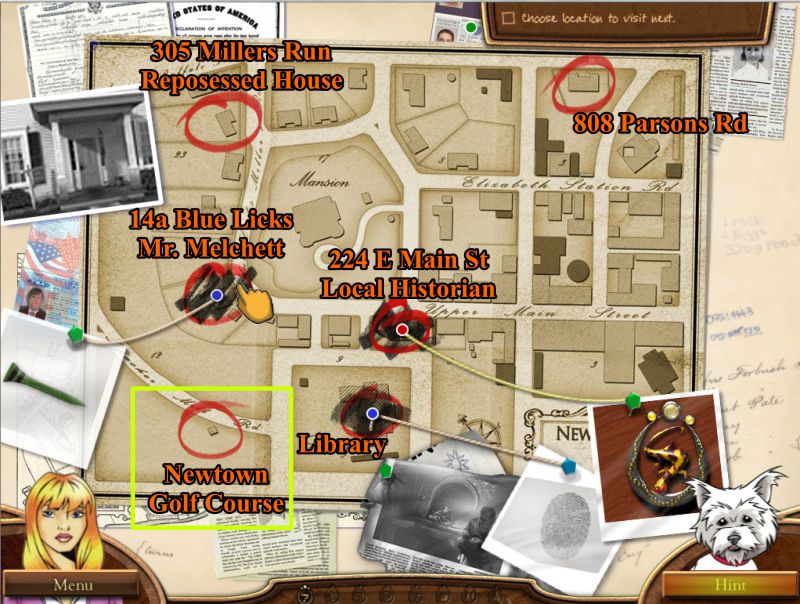
Map
A new location has appeared on your Map as a possible lead to investigate, so select the Newtown Golf Course to visit next.
Screenshot
Act 5: Newtown Golf Course
Golf Shop
Hand the clerk your bagged golf tee to start a conversation.
Click on the sparkles that appear to the left of him to play a Mini Game.
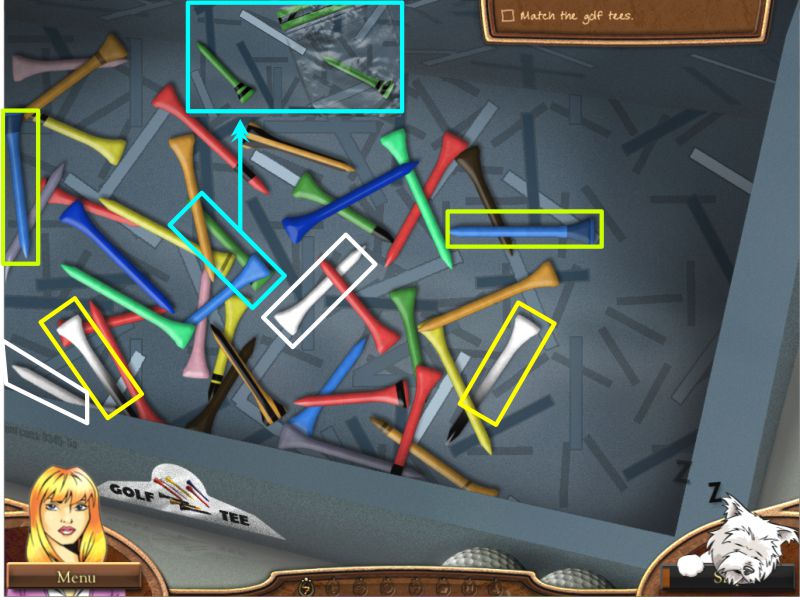
Match the Golf Tees Mini Game
Match identical golf tees until the green one marked in the screenshot is the only one left.
It will match the one you bagged at the crime screen.
Sample pairs are marked in the screenshot.
Screenshot
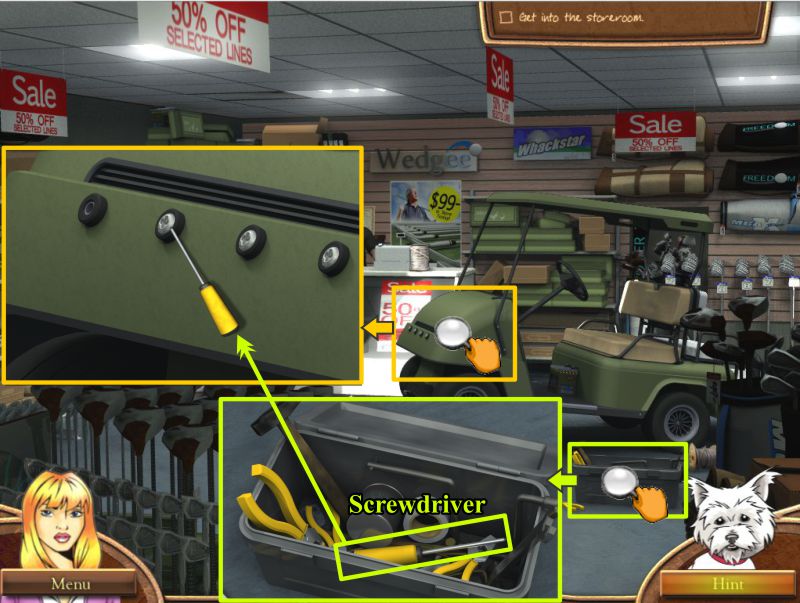
Golf Shop
Zoom in on the toolbox and take the Screwdriver.
Click on the front of the golf cart and use the screwdriver to remove the 4 screws.
Screenshot
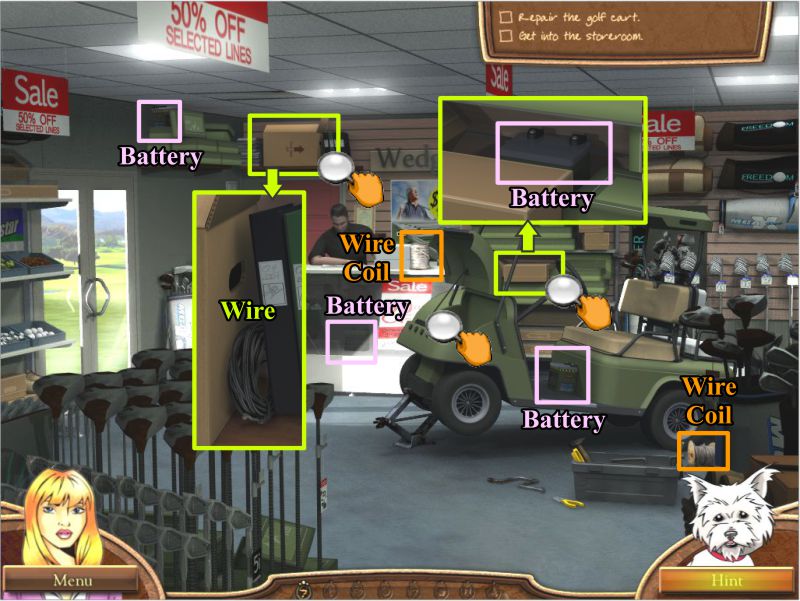
Collect the 4 Batteries, 2 Wire Coils, and the wire.
Click on the open engine of the golf cart and place what you have collected in the Key Object to trigger a Mini Game.
Screenshot
Golf Cart Mini Game
Swap the panels until it looks like the solution in the screenshot.
Screenshot
The golf cart will tremble and finally fall off the jack.
It will take off out the door and across the golf course with the clerk following it.
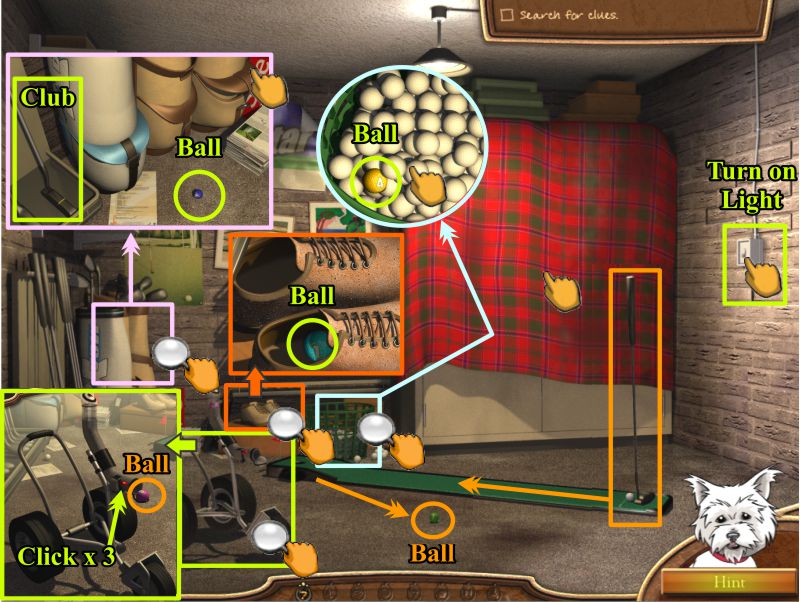
Golf Shop Storeroom
Turn on lights at the switch.
Check the screenshot to locate 5 multi-color balls.
Move the balls in the basket to find one.
Grab the club and open the bag pocket to find another.
Take the ball from the shoes.
Click the switch on the cart 3 times to find the red ball.
Use the club to sink a hole in one and find the green ball.
Remove the blanket from the cabinet door.
Screenshot
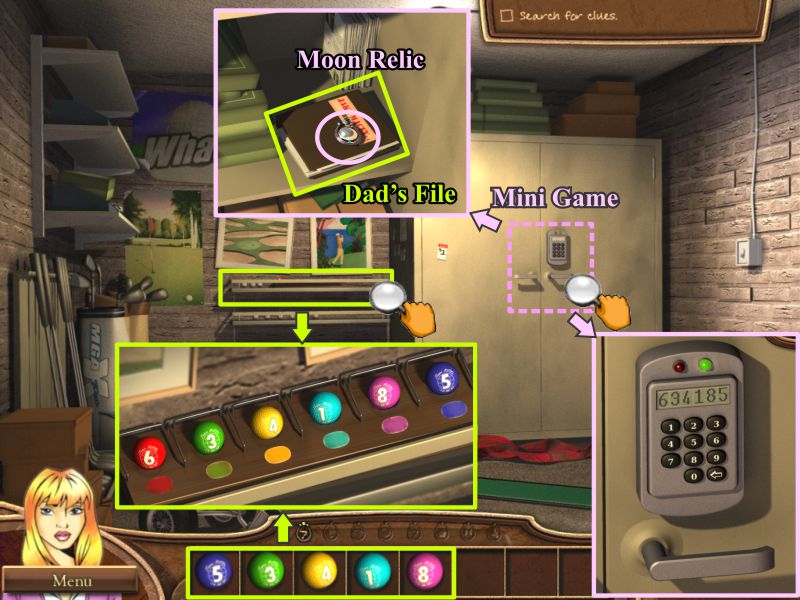
Click on the rack at the back and place the balls according to their correct color.
Zoom in on the cabinet lock and enter 634185, which is the number order of the balls.
When the cabinet opens, take the Moon Relic and Dad's File.
Screenshot
Intermission: Dad's Office
Dad's File Puzzle
Take the file back to Dad's office and open it to find a sheet of paper in pieces.
Put the pieces together as shown in the screenshot, and the edge will match up with Dad's letter.
Screenshot
Dad's Desk
You need to uncover what is written on the paper, so click it for a Key Object.
Locate the Ink, Artist's Brush, and Glass of water and place them in the magnifying glass.
Use the brush on the paper until the counter reaches 100%.
A phone number is written on the paper, so zoom in on the phone and dial it.
Screenshot
Map
A man at the Antique Store answered, so Newtown Antiques will be added to your map.
Choose it and you will be transported there.
Screenshot
Act 6: Newtown Antiques
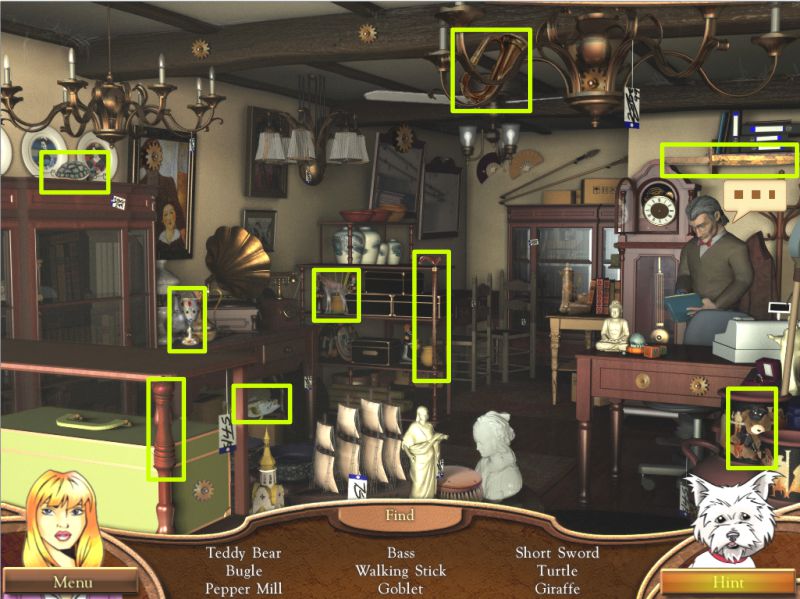
Antique Shop Hidden Object Scene
Talk to the antique dealer, who is too busy to help you. You volunteer to help find some items which turn out to be a Hidden Object Scene.
Collect everything; talk again and he will leave the room.
Screenshot
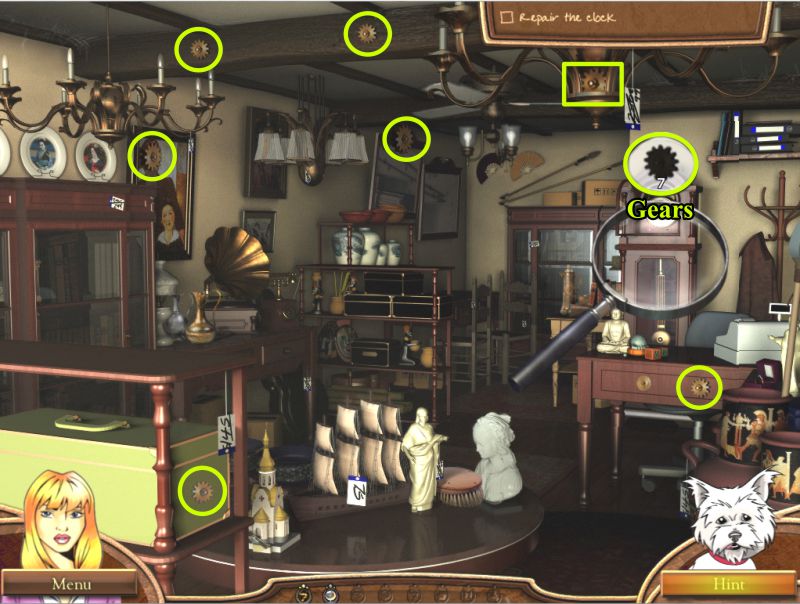
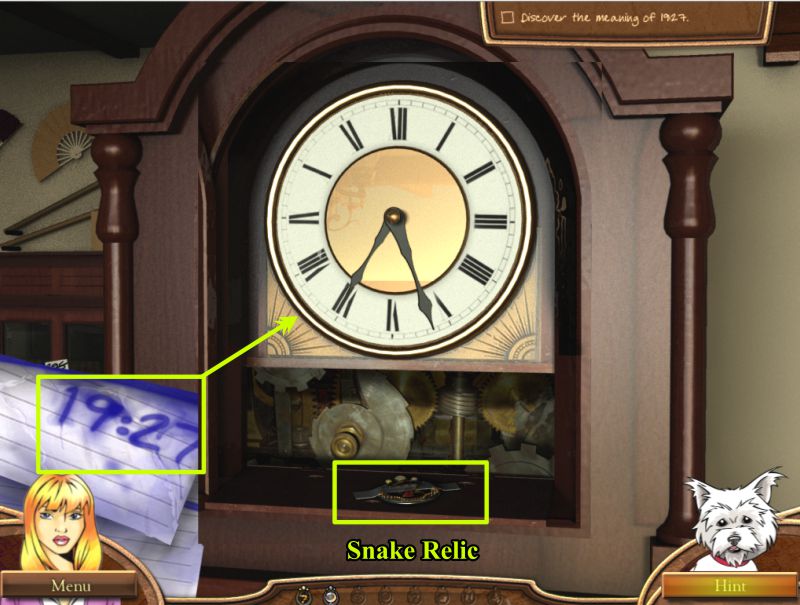
Antique Shop Clock
Find the 7 gears for the clock as marked in the screenshot.
Place the gears in the magnifying glass to complete your task.
Screenshot
Set the hands of the clock to read 19:27 (7:27 in 12-hour time) and take the Snake Relic.
Screenshot
Intermission: Dad's Office
Map
Go back to Dad's Office to decide what to do next.
Choose 808 Parsons Road from the Map to go there.
Screenshot
Act 7: 808 Parsons Road
Mrs. Miggins' Living Room
Somebody just broke in and stole a brooch out of Mrs. Miggins' safe.
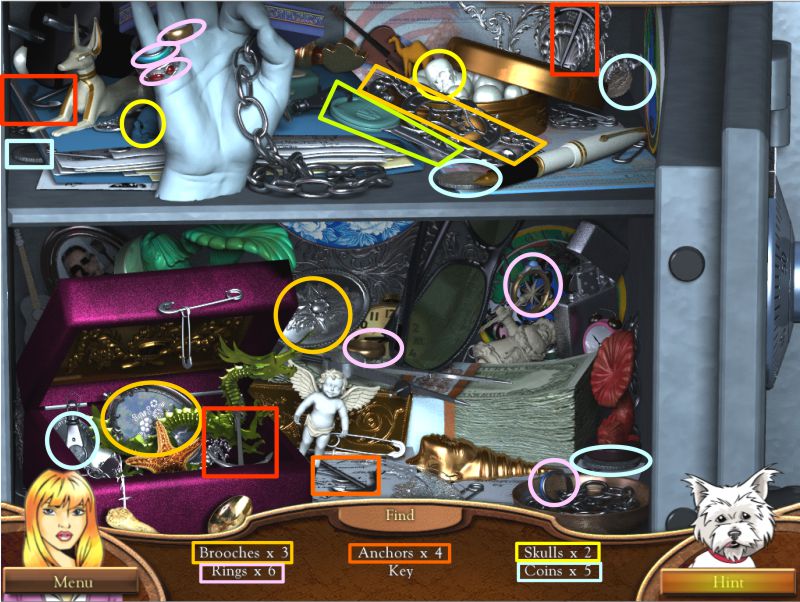
Click on the safe for a Hidden Object Scene.
Safe Hidden Object Scene
Collect all the color-coded objects in the scene.
Screenshot
Muddy Shoe Prints
Click on the muddy shoe prints for a Key Object to trigger a Puzzle.
Open the right cabinet door to find the ink.
Collect the shoes and paper to complete the Key Object.
Screenshot
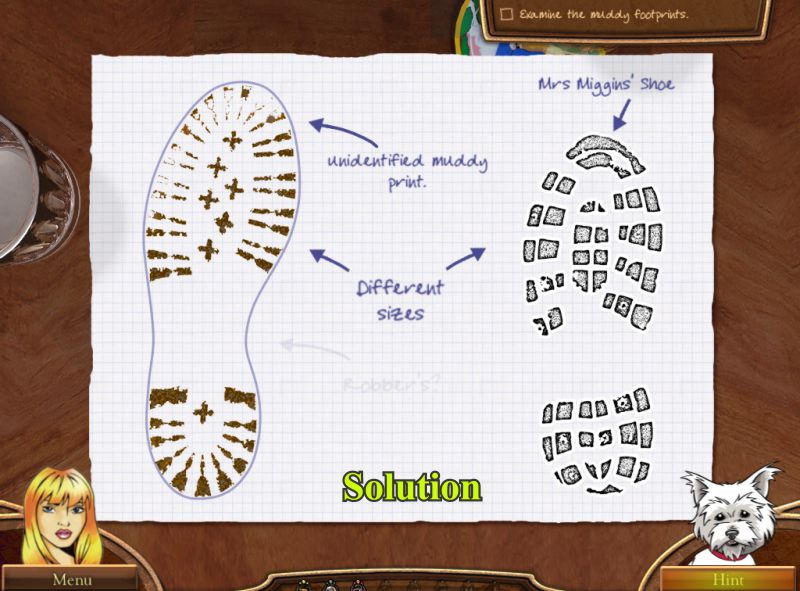
Muddy Shoe Print Puzzle
Pick up the pieces and shoe print and place them in the left diagram as shown in the screenshot.
They are quite different than Mrs. Miggins' shoe print, so must belong to the robber.
Screenshot
Look Outside
Zoom in on the key rack to the left of the door and take the key.
Unlock the door and decide you need to prune the bush to see what is there. Grab the shears and place them on the bush to trigger a Mini Game.
Screenshot
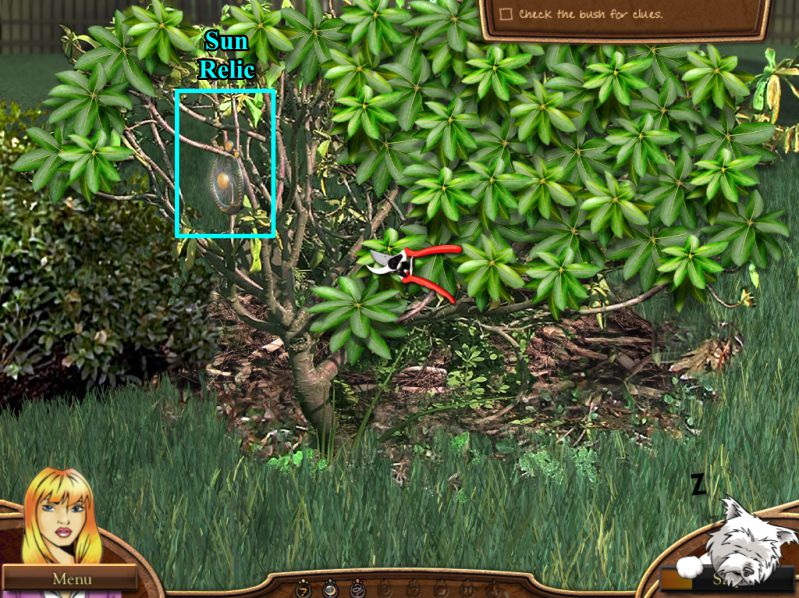
Bush Mini Game
Rather than trim the whole bush, check the screenshot and trim that area to find the Sun Relic that turns out to be Mrs. Miggins' brooch.
Penny asks to borrow it. Go back to Dad's Office to figure out the next step needed in the investigation.
Screenshot
Intermission: Dad's Office
Map
No new locations have been added so select the Repossessed House on Millers Run.
Screenshot
Act 8: 305 Millers Run
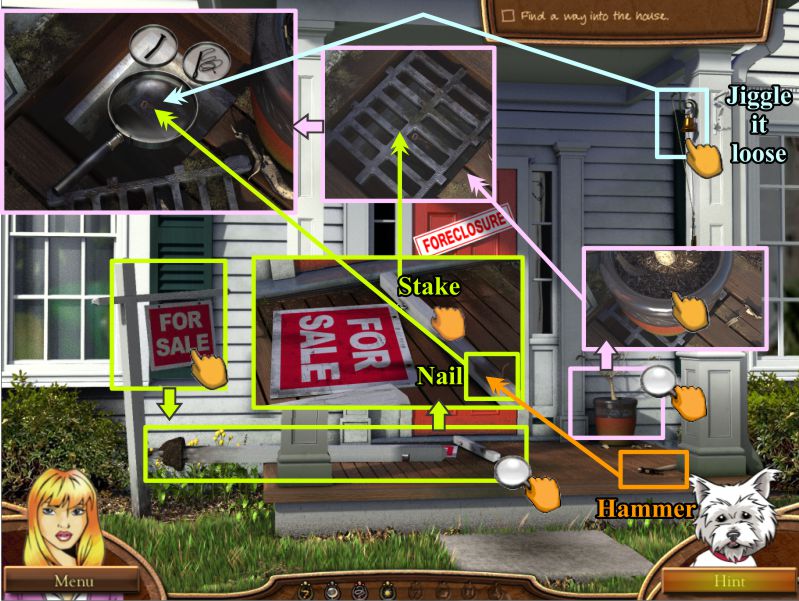
Outside Repossessed House
Pick up the Hammer and jiggle the bell cord until it goes into your Inventory.
Knock over the For Sale sign and use your hammer to remove the Nail.
Collect the Stake and zoom in on the plant pot.
Move the pot and use the stake to lift the grill.
Click on the key to bring up a Key Object.
Place the nail and bell cord to trigger a Mini Game.
Screenshot
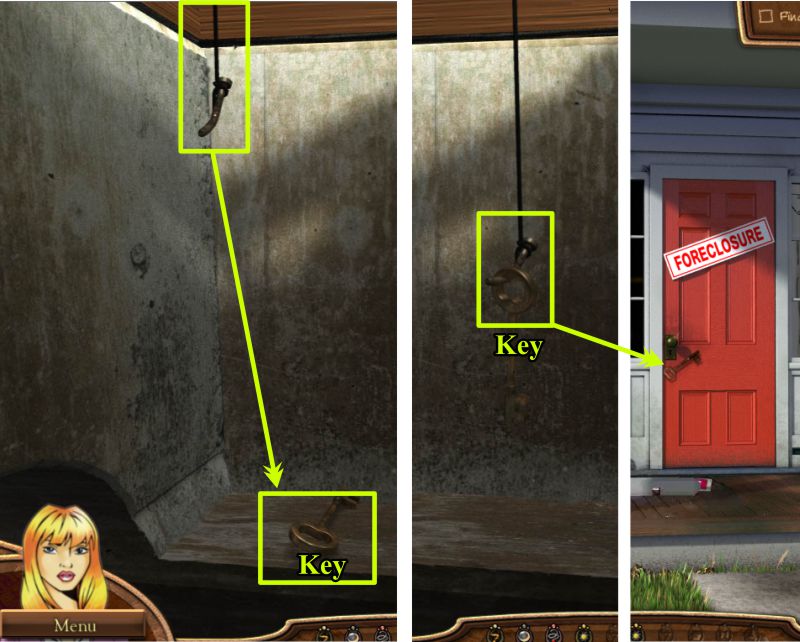
House Key Mini Game
Click on the nail and cord when it is directly over the Key so you can pick it up and retrieve it.
Use the Key to open the front door and then go inside.
Screenshot
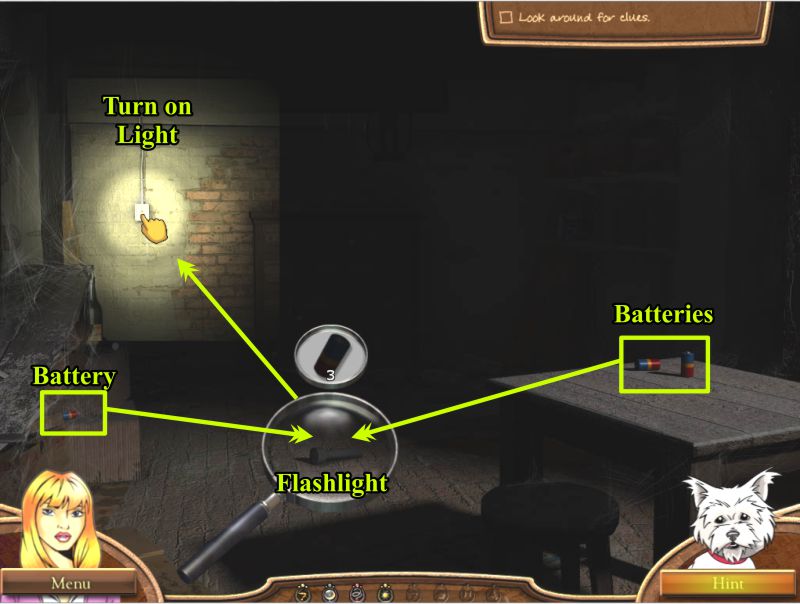
House Cellar
Go down to the Cellar and collect the 3 Batteries marked in the screenshot.
Click on the Flashlight for a Key Object and place the batteries.
Use the flashlight to locate the light switch and turn on the light.
Screenshot
Wine Rack Mini Game
Pick up the Brush, then click on the bottom portion of the wine rack for a Mini Game.
Your goal is to turn the dials to equal the 2 numbers on the outer edge of the combinations as shown in the screenshot.
6 times 3 plus 1, equals 19.
3 times 4 times 2, equals 24.
You will find an instruction note for the robber.
Play the Hidden Object Scene on the shelves to the right.
Screenshot
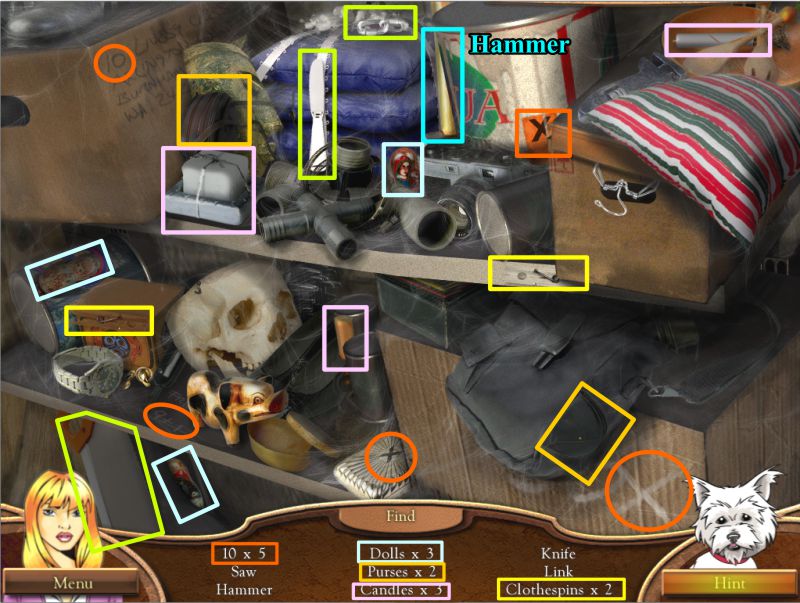
House Cellar Hidden Object Scene
Collect all the objects and you will get a Hammer for your Inventory.
Multiple items are color-coded in the screenshot.
Screenshot
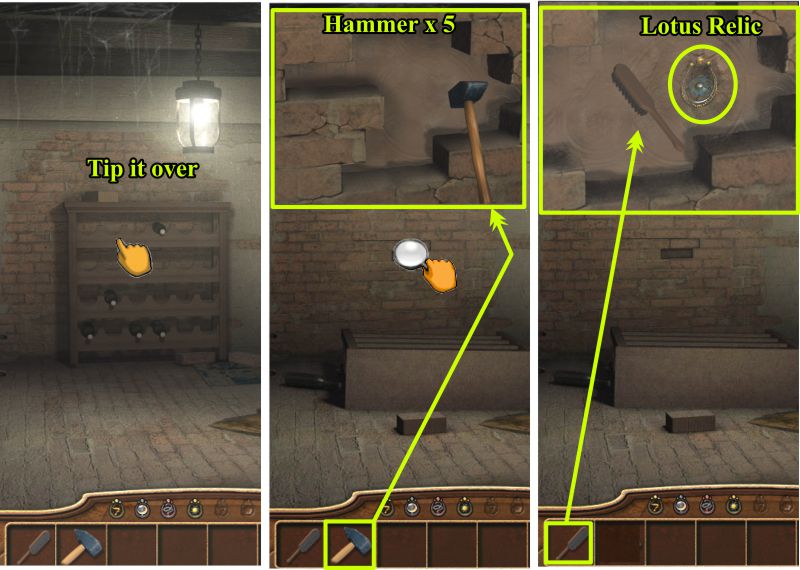
House Cellar
Tip over the wine rack to get to the wall behind it.
Use your Hammer 5 times on the wall, and then brush away the dust until the counter reaches 100%.
Take the Lotus Relic that is revealed.
Screenshot
Intermission: Dad's Office
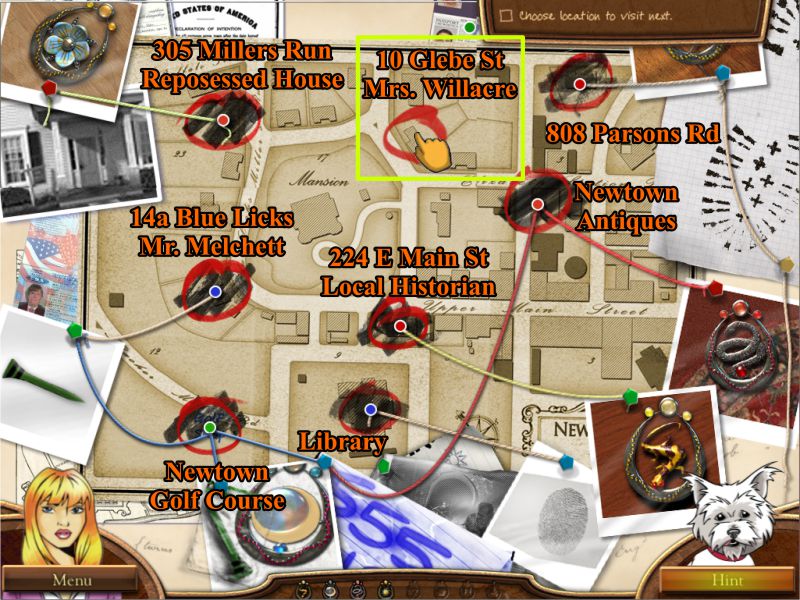
Map
Back at Dad's Office, there is a new location on the map. Select Mrs. Willacre's house at 10 Glebe Street.
Screenshot
Act 9: 10 Glebe Street
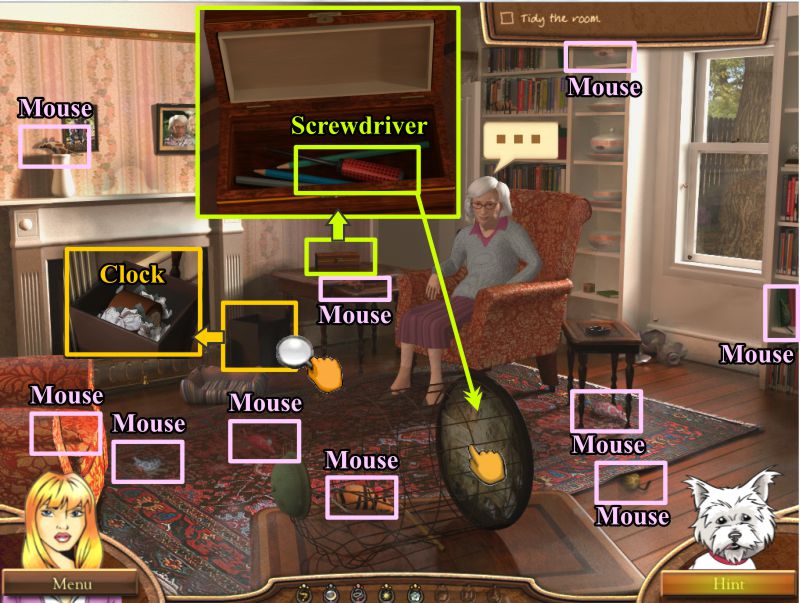
Mrs. Willacre's Living Room
Mrs. Willacre was just robbed of her brooch, so have a look around.
Collect the 10 mice marked in the screenshot.
Zoom in on the wastebasket under the table and take the Clock.
Click on the box on top of the table and collect the Screwdriver.
Uncover the parrot cage and use the screwdriver to repair the door catch.
Screenshot
Click on the cat's basket for a Key Object and put his toy mice in his basket.
Zoom in on the broken vase under the window, move the pieces, and take the Key.
Place the clock on the mantle, and the window hook on the window.
Screenshot
Mrs. Willacre's Garden
Penny can see the culprit in the tree with the parrot, so she suggests they go outside.
The cat is in the tree, so you need a ladder.
Zoom in on the bird feeder and take the Key for the shed.
Open the lock, open the door, and discover there are rungs missing from the ladder. Collect the 4 shown in the screenshot.
Screenshot
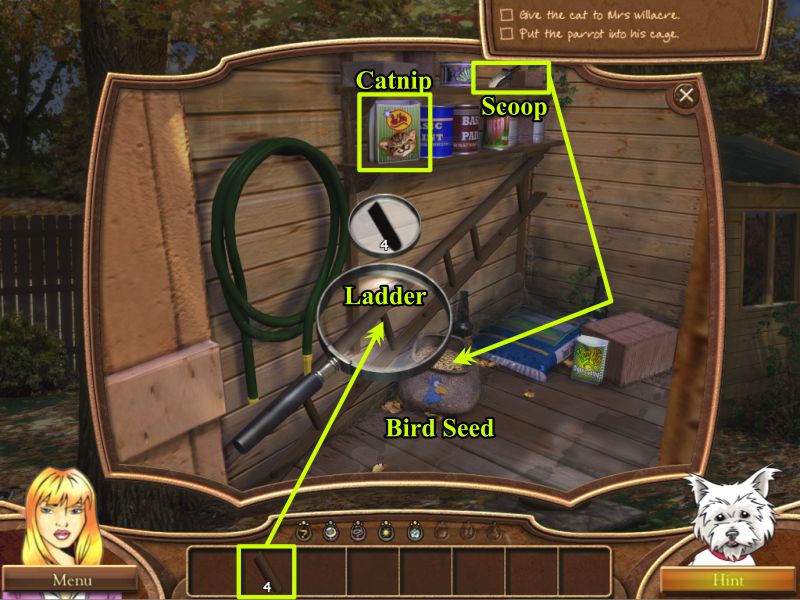
Garden Shed
Click on the Ladder for a Key Object and place the 4 rungs to collect the Ladder.
Pick up the Catnip and Scoop, and use the Scoop to get some Bird Seed.
Screenshot
Mrs. Willacre's Garden
Time to catch the culprit. Collect the Cat Toy on the Roof and place it and the Cat Nip in the Key Object that appears when you click on the Cat.
That just got you the cat, so place the bird seed in the bird house to capture the parrot.
Screenshot
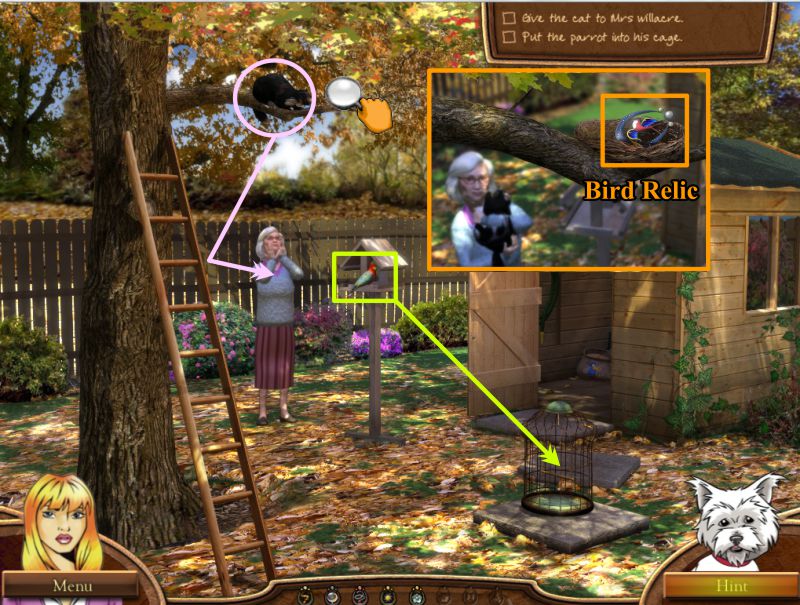
Grab the cat and give it to Mrs. Willacre.
The parrot will go for the bird seed; you can get him and put him in the cage.
Now you have a chance to look at the nest, so zoom in and take the Bird Relic.
Screenshot
Intermission: Dad's Office
You are back at Dad's Office and it is trashed, including the Map, which is now useless.
Office Garage
Go through the open door to the Garage.
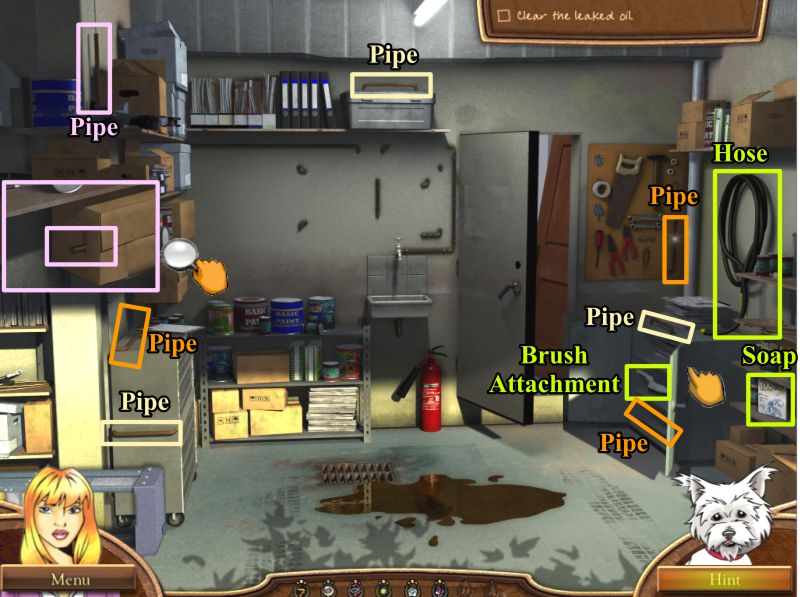
There is an oil spot on the floor that you want to check out, so you need to clean it up.
Grab the Hose and Soap, and then open the cabinet at the right. Get the Brush Attachment and take the first Pipe to repair the water supply.
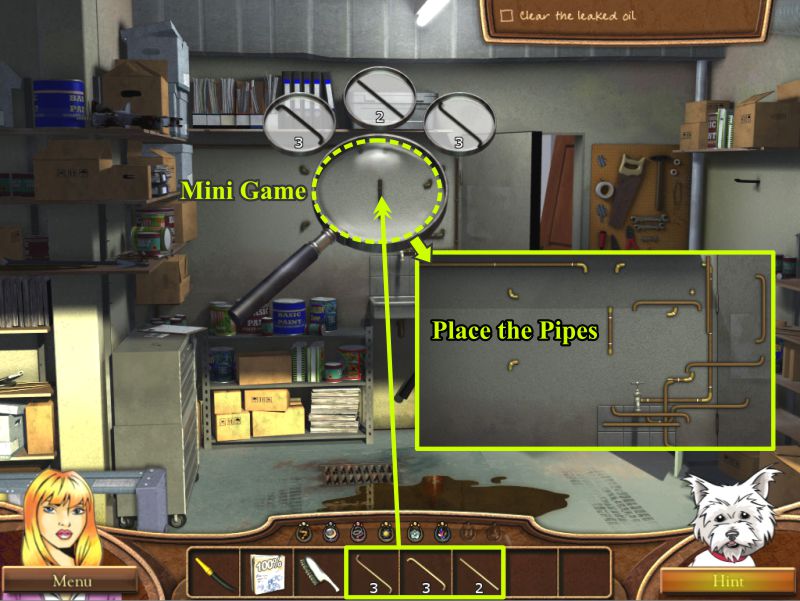
Collect all the different pipe pieces shown in the screenshot.
Screenshot
Click on the pipe area on the wall and place all 8 of the various shaped pipe pieces to trigger a Mini Game.
Screenshot
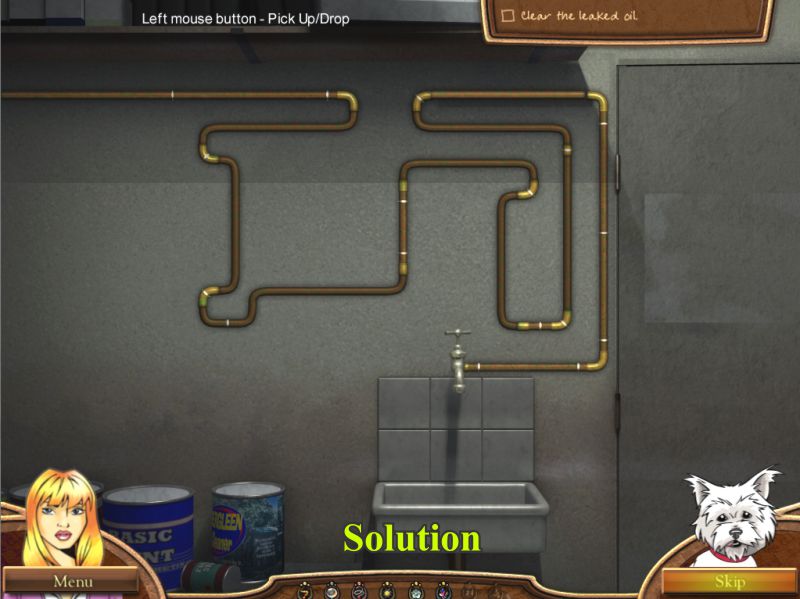
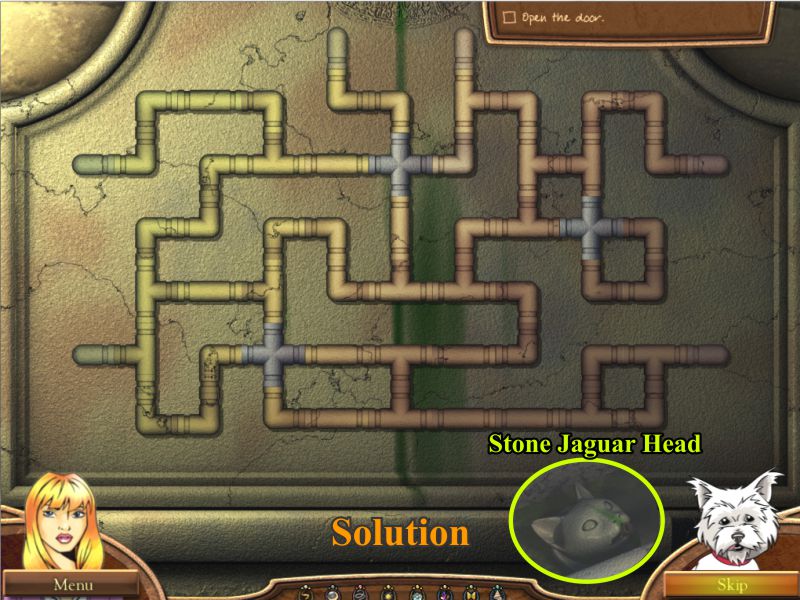
Water Pipe Mini Game
Your goal is to place the pipes so the water will flow.
See the screenshot for the solution.
Screenshot
Office Garage
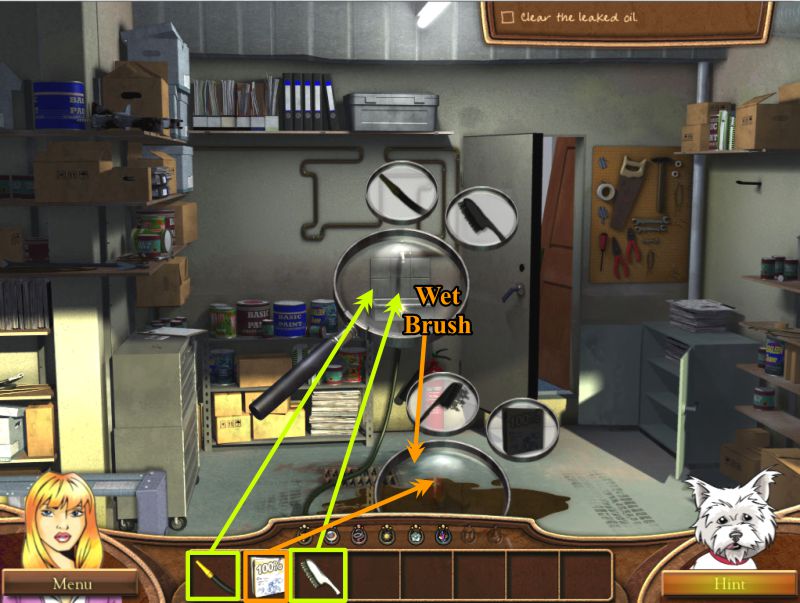
Click on the faucet and place the hose and brush in the Key Object.
You will now have a wet brush, so click on the oil spot and place the wet brush and soap in the Key Object to trigger another Mini Game.
Screenshot
Clean up the Oil Mini Game
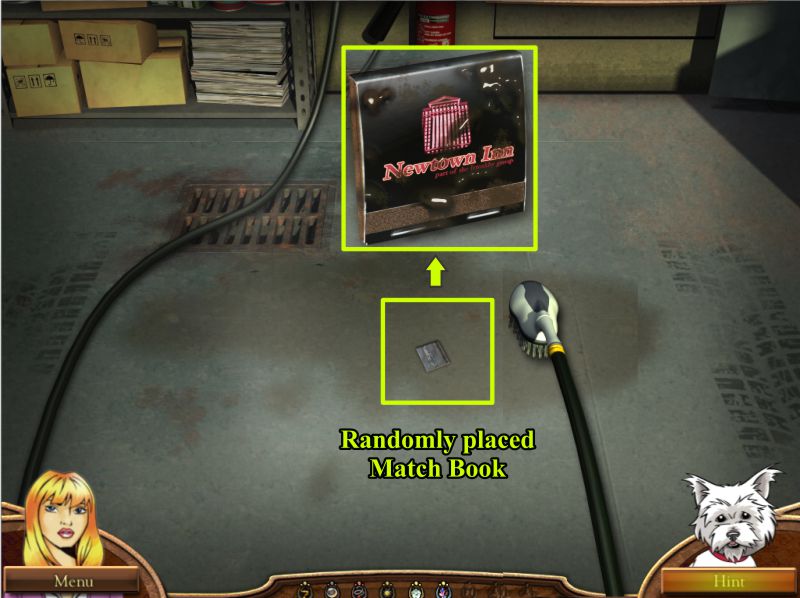
Use the wet brush to clean up the oil until your counter reaches 100%.
A Match Book will appear at a random position. Grab it to find out it came from Newtown Inn, and you will automatically be transported there.
Screenshot
Act 10: Newtown Inn
Parking Lot
First stop is the parking lot, where you will encounter a Van that has an oil leak. It looks like it might match the one in your Dad's Office garage.
Click on the back of the van and you will get a closer look. Click again for a Hidden Object Scene.
Van Hidden Object Scene
After rummaging through the Van, you get a Key Fob for Room 237 at the Inn. You are transported to the lobby of the Inn.
Screenshot
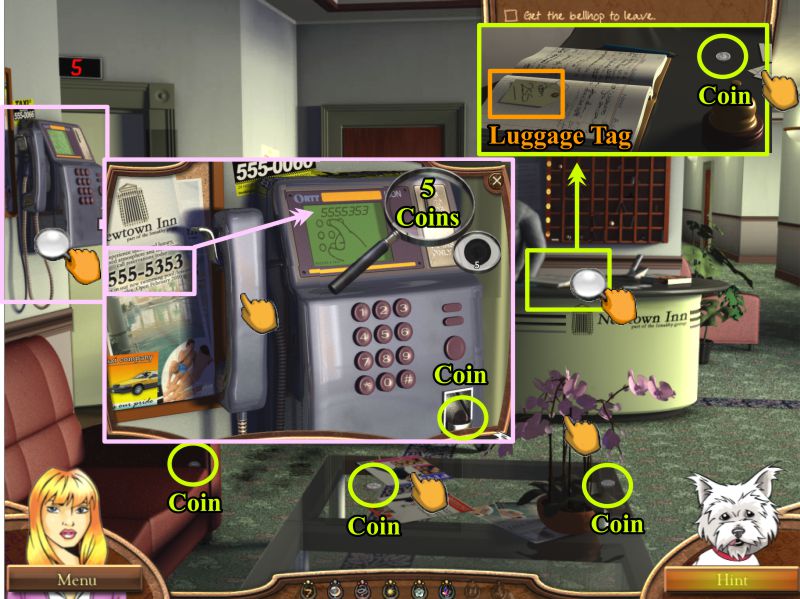
Inn Lobby
The manager and bus boy seem to be busy, so look around and pick up all the coins shown in the screenshot.
Move the items shown and zoom in on the desk to get the coin and to collect the Luggage Tag.
When you have 4 of the coins, zoom in on the telephone on the left wall.
Grab the coin in the return slot and click on the coin placement slot of the phone.
Place all 5 of your coins in the Key Object that appears, and then dial the number shown for the Inn: 555-5353.
Screenshot
Hotel Lobby
The number you dial will cause the manager to pick up the phone and have a conversation with you.
Because of you conversation with the Manager, you have achieved one of your goals and he will disappear.
Your next task is to get rid of the bellboy, so click on the elevator for starters.
When the elevator arrives at the lobby, grab the bags.
Click on the luggage cart for a Key Object and place the luggage and luggage tag.
The bellboy will now grab the cart and go off to deliver it.
Screenshot
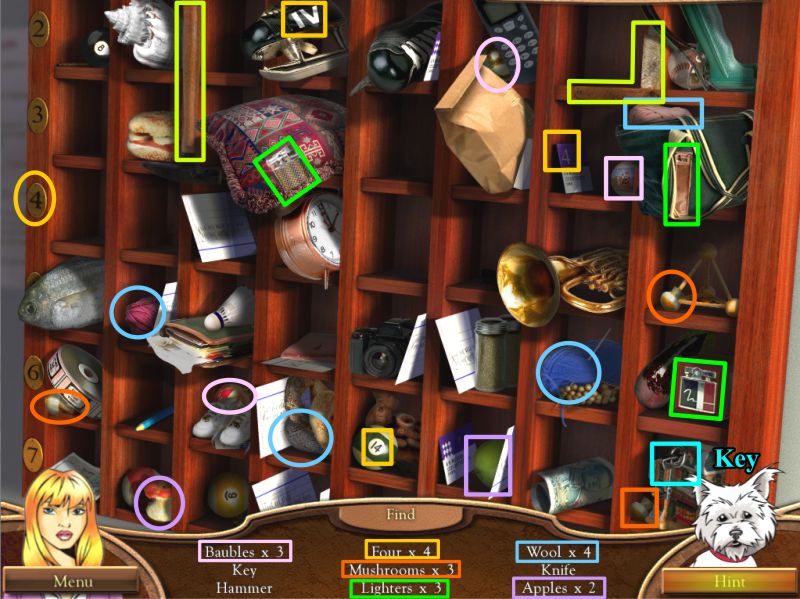
Hotel Lobby Hidden Object Scene
You are now alone. Click on the mail slot at the back of the desk for a Hidden Object Scene.
Multiple items are color-coded. Collect everything to get the key you need.
Screenshot
Room 237
You are now in front of Room 237, so click the lock for a Key Object to place your Key and Key Tag.
The door will open. Enter and determine the thief is in the shower, so you must move quickly.
Click for the Hidden Object Scene.
Screenshot
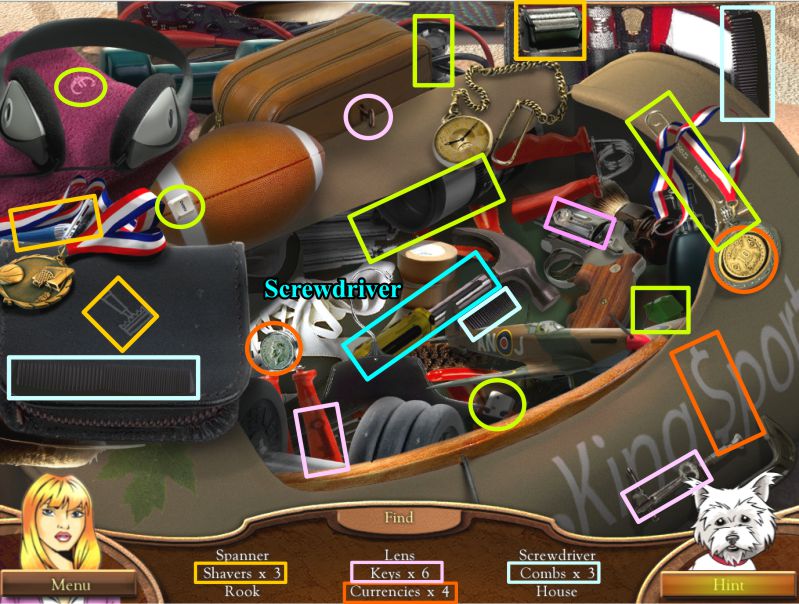
Room 237 Hidden Object Scene
Collect everything to get a Screwdriver for your Inventory.
Screenshot
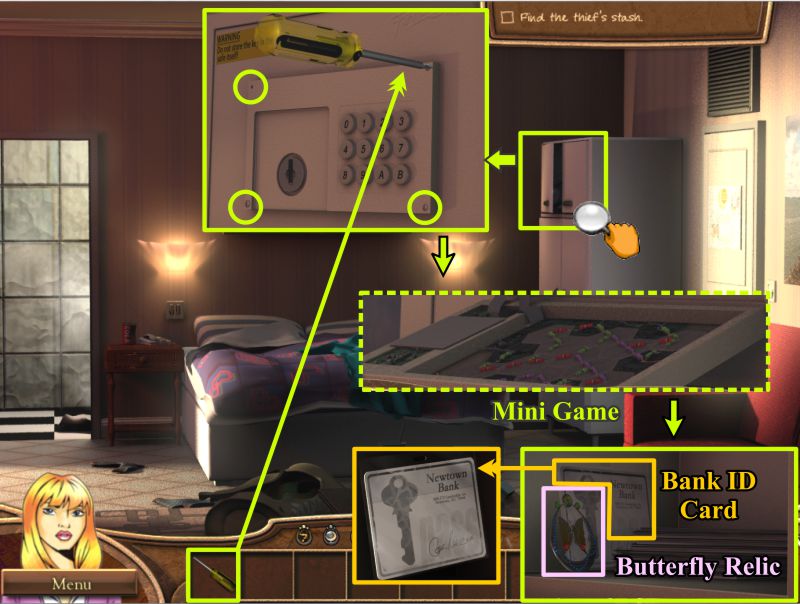
Room 237
Zoom in on the cabinet at the right to discover the thief's stash that you were looking for.
Use the screwdriver you found on the 4 screws to review a circuit board Mini Game.
When you open the safe, you will find the Butterfly Relic and a Bank Card ID.
Screenshot
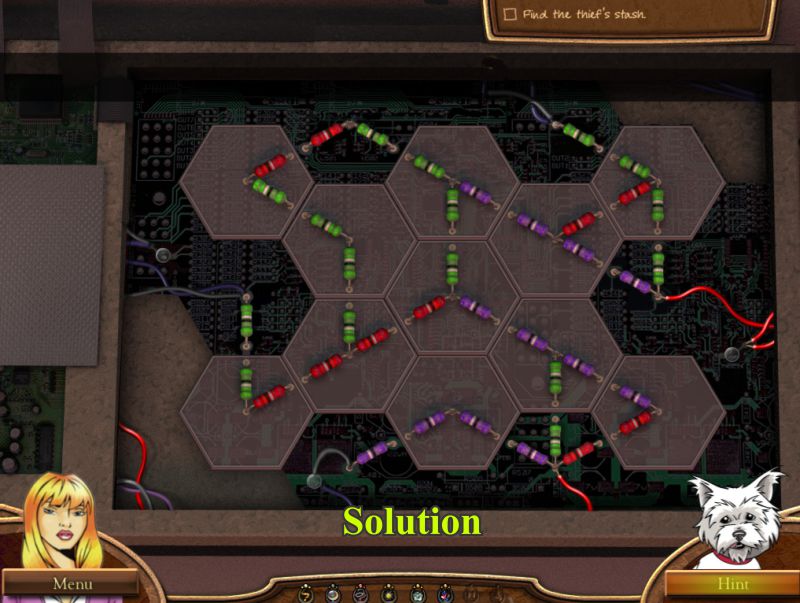
Circuit Board Mini Game
Swap the hex panels to create the needed connections as shown in the screenshot.
Screenshot
Act 11: Newton Bank
Encounter with Bank Manager
Penny has a nasty encounter with the Bank Manager so decides he is hiding something she needs to investigate.
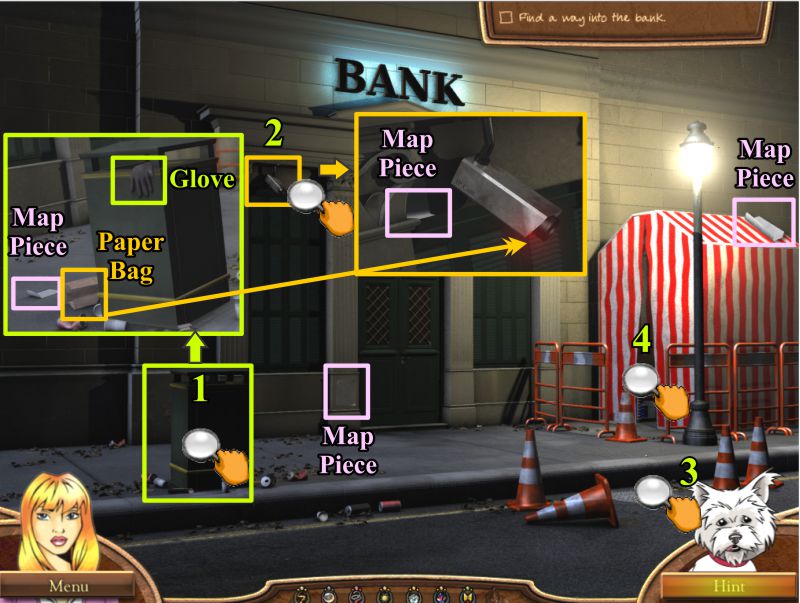
Outside Bank
Zoom in on the trash can and collect the Glove, Paper Bag, and Map Piece.
Click on the camera, take the Map Piece, and put the paper bag over the camera.
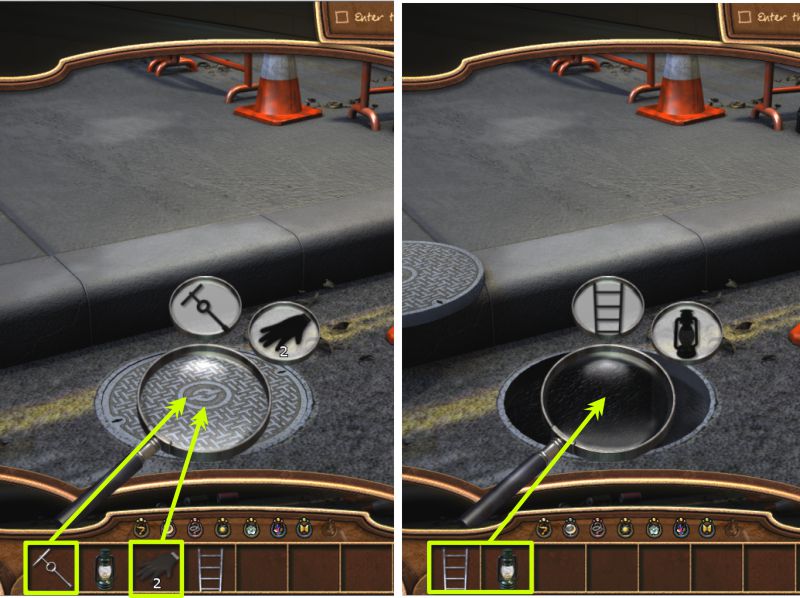
Zoom in on the manhole cover and take care of business there.
Pick up the two Map Pieces shown in the screenshot, then zoom in on the tent.
Screenshot
Manhole Cover
Zoom in on the manhole cover, move the two cones, pick up the Map Piece, and collect the lantern.
Click on the manhole cover to see you need to find something to open it.
Screenshot
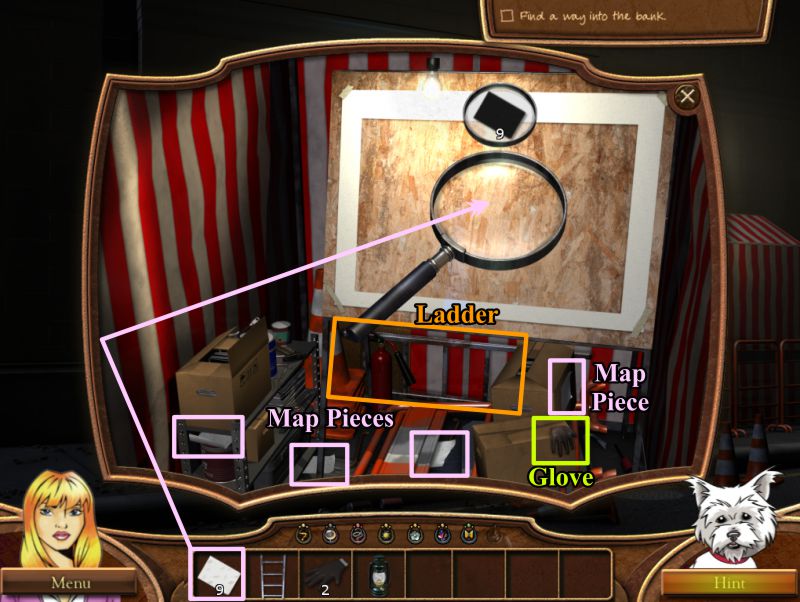
Tent Outside Bank
Collect the 4 Map Pieces from the Tent and pick up and glove and ladder.
Place the 9 Map Pieces to trigger a Puzzle.
Screenshot
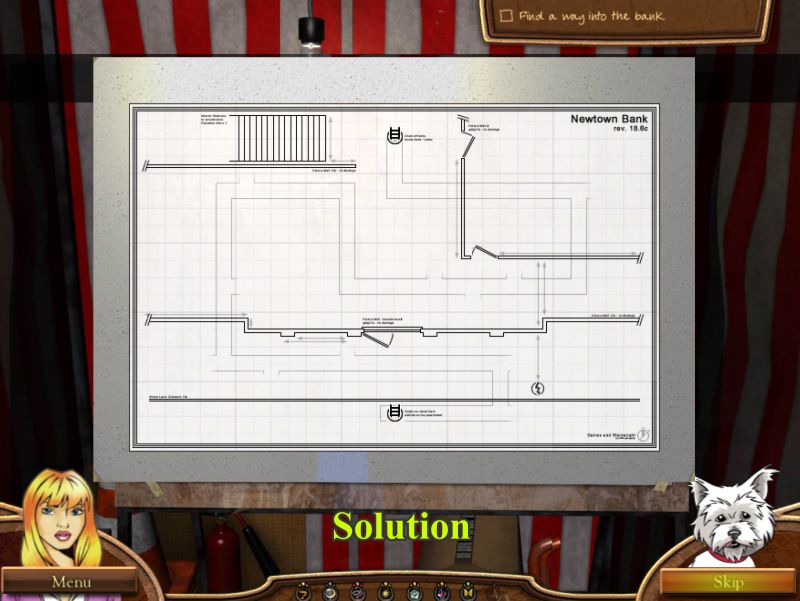
Sewer Map Puzzle
Swap the map pieces to created the sewer map shown in the screenshot.
Screenshot
Manhole Cover
Zoom in on the manhole cover for a Key Object.
Place the gloves and manhole cover remover tool.
Once the cover is open, place the ladder and lantern to trigger a Mini Game.
Screenshot
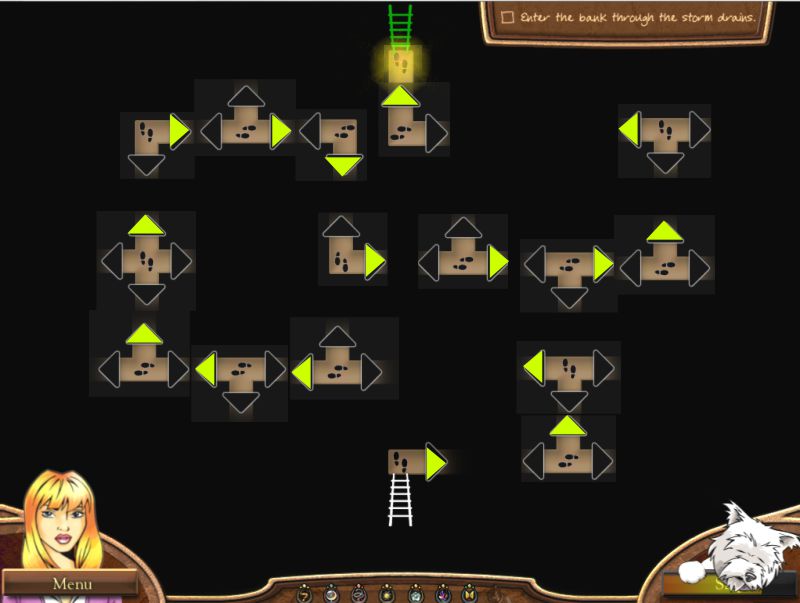
Sewer Mini Game
Your goal is to get from the manhole cover ladder to the bank ladder by going through the sewer system.
The screenshot shows the pieces of pipe and how you need to click on them to go the direction shown in the map you previously put together.
Screenshot
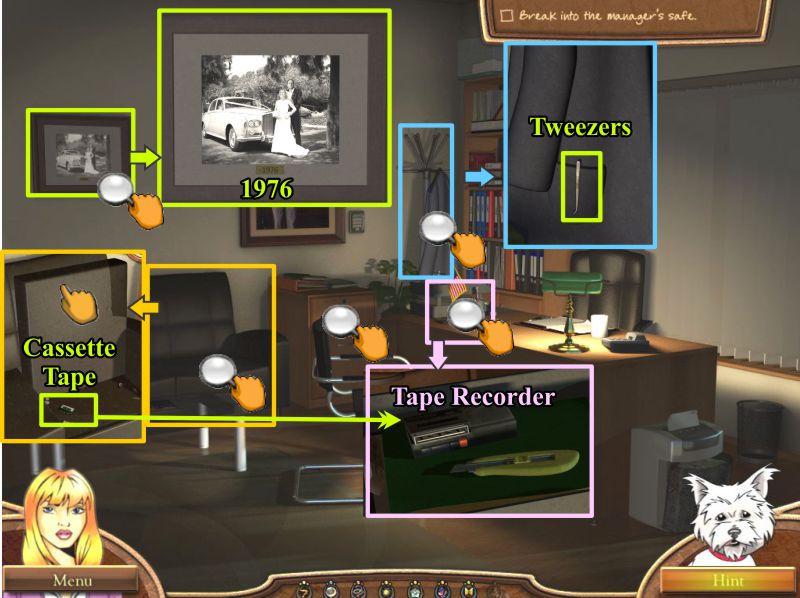
Bank Manager's Office
You have arrived at the Bank Manager's Office and need to have a look around.
Click on the wedding picture and note the year it was taken.
Zoom in on the sofa, move the cushion and grab the Cassette Tape.
Click on the In-Box, then place the cassette in the Tape Recorder.
It is a dictation tape and that is the bank manager's voice. The recorder will go into your Inventory.
Zoom in on the coat on the rack and take the Tweezers.
Screenshot
Bank Manager's Office
Read the safe instructions on the desk.
Click on the safe keypad and enter 1976, the year the manager got married.
Step 2 to open the safe requires voice recognition, so use the tape recorder to pass that test.
When the next door of the safe opens, take the key inside.
Zoom in on the cabinet, open it and take the Tape.
Place the tape and tweezers on the shredder to trigger a Mini Game.
Screenshot
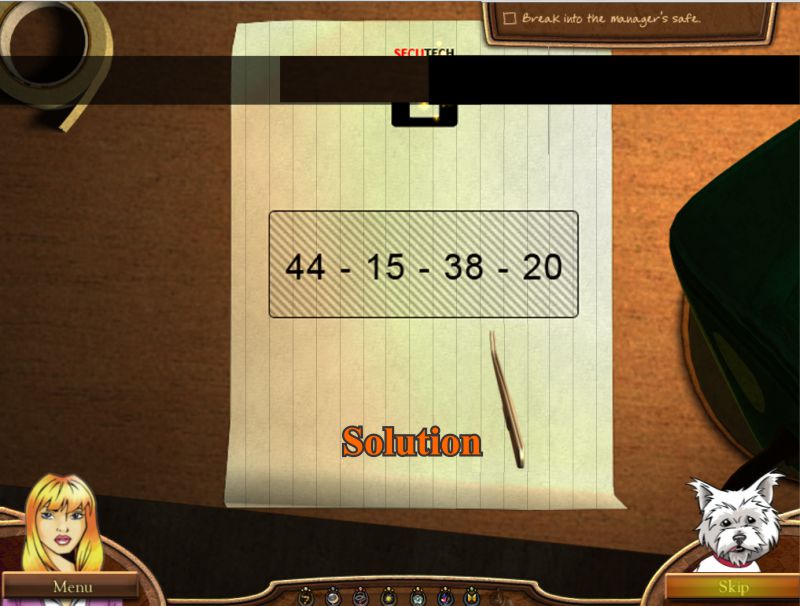
Shredder Safe Code Mini Game
Use the tweezers to swap the shredded pieces of paper to find the safe code shown in the screenshot.
Screenshot
Open the Safe
Rotate the dial left to 44, right to 15, left to 38, and right to 20.
Click on the handle to open the safe and find the Shell Relic, as well as a map.
Screenshot
Map
The map has the Miller's Mansion circled and marked with an "X", so that is your next destination.
Screenshot
Act 12: Miller's Mansion
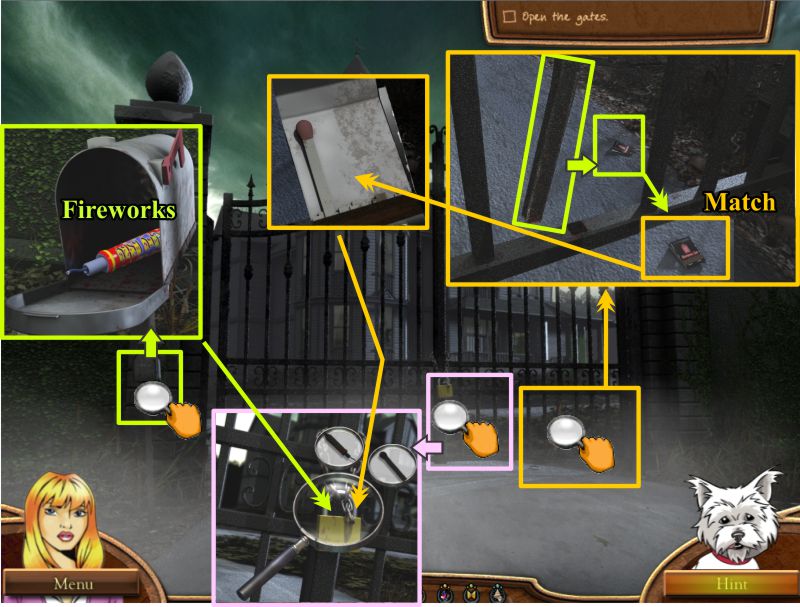
Mansion Gate
Click on the mailbox, open it, and pick up the Fireworks.
Zoom in on the right side of the gate and take the loose bar.
Use the bar to drag the matchbook under the gate and take the remaining match out of it.
Click on the gate padlock for a Key Object.
Place the fireworks and match and the lock will blow off, so you can enter the Mansion grounds.
Screenshot
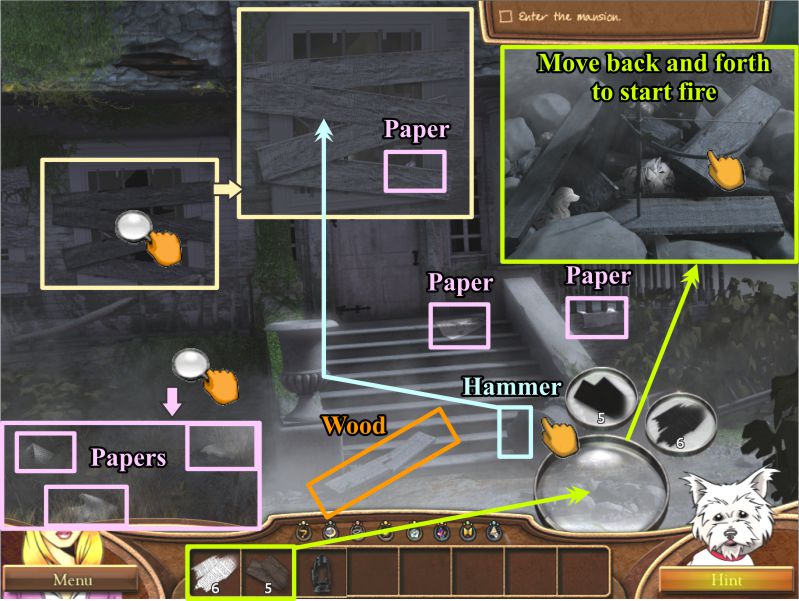
Mansion Entrance
Move the planter and pick up the Hammer.
Grab the piece of wood at the bottom of the steps.
Pick up the two pieces of paper on the steps and in the yard.
Zoom in to the left of the stairs and take the 3 pieces of paper there.
Zoom in on the window at the left and use the hammer to remove the boards.
Grab the piece of paper in the corner of the window.
Click on the pile of rocks for a Key Object, shown in the screenshot.
Place the wood and paper.
Move the bow back and forth on the stick until the fire starts.
Screenshot
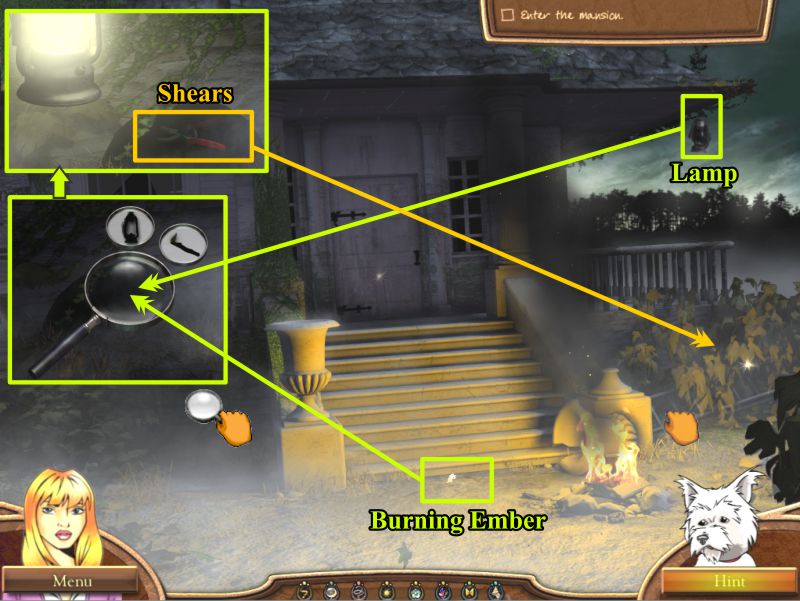
Take the Lamp on the eave and pick up the Burning Ember.
Zoom in to the left of the stairs where you previously found the 3 pieces of paper and click for a Key Object.
Place the lamp and burning ember to light the lamp and see the Shears.
Take the Shears and place them on the vines holding down the ladder.
Screenshot
Ladder and Vines
Use the shears on the vines until the ladder is free and you can collect it.
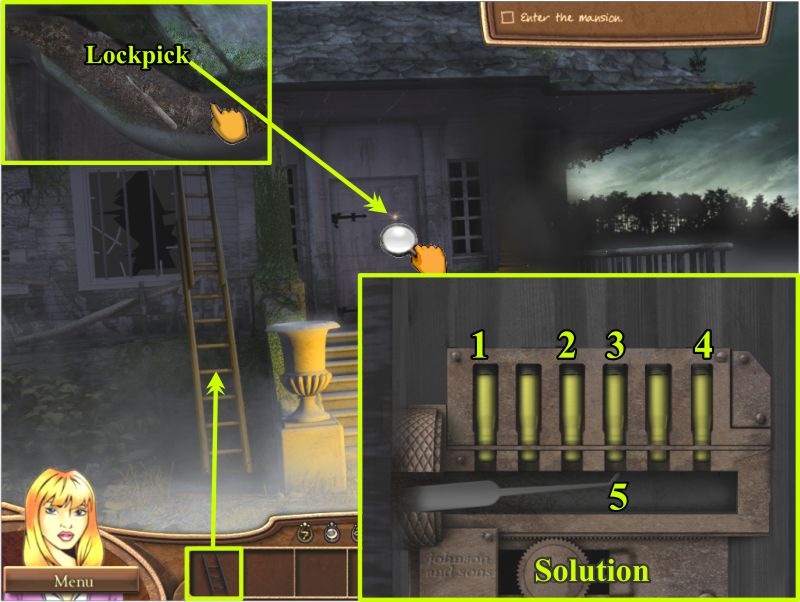
Mansion Door
Place the ladder so you can reach the roof.
Move the leaves out of the way until you find the Lockpick and can take it.
Place the lockpick on the front door to trigger a Mini Game.
Click on the tumblers in the order shown in the screenshot in order to open the door.
Note that you will need to click on one of them twice.
Screenshot
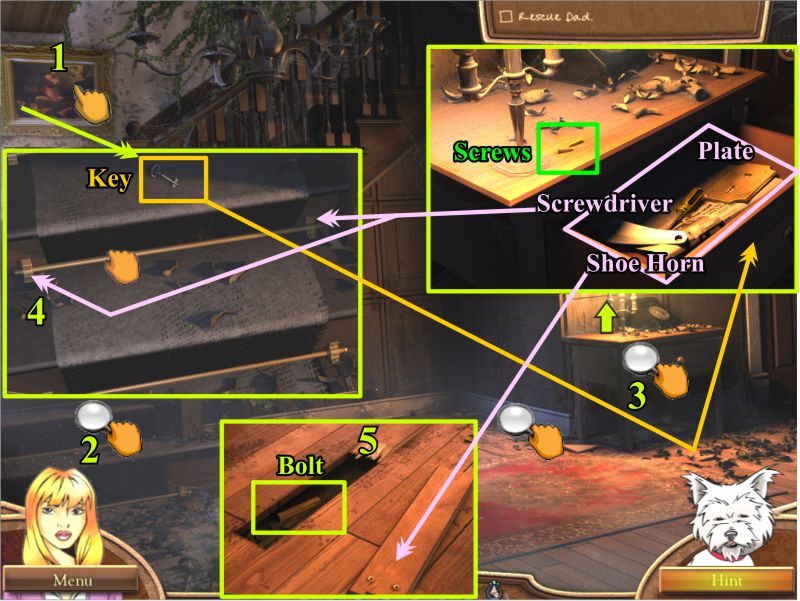
Mansion Foyer
Click on the picture at the landing, and it will drop a key onto the stairs.
Zoom in on the stairs and pick up the Key.
Click on the table under the gun rack and open the drawer with the key.
Pick up the Screwdriver, Plate, and Shoe Horn, as well as the Screws on the table top.
Return to the stairs and use the Screwdriver to remove the screw of the second rod, as shown in the screenshot.
Zoom in on the floor by the turned-up carpet. Use the shoe horn to remove the floor board so you can grab the Bolt underneath.
Screenshot
Rescue Dad
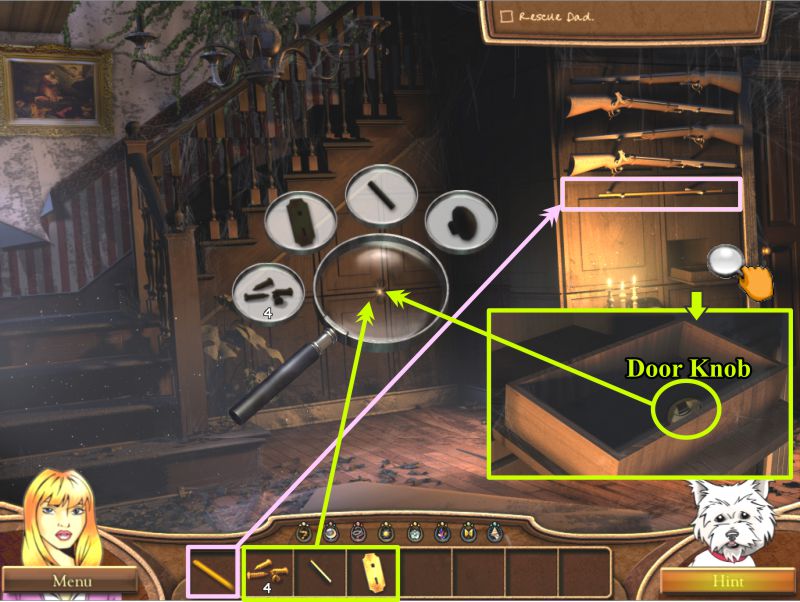
Place the rod from the stairs on the lower portion of the gun rack to weight it down and open the drawer underneath.
Grab the Door Knob and click on the door where Dad is captive for a Key Object.
Place the 4 screws, plate, bolt, and door know to open the door and have a reunion with Dad.
Dad is off to see the Police but tells you he heard something in the Kitchen and suggests you investigate.
Screenshot
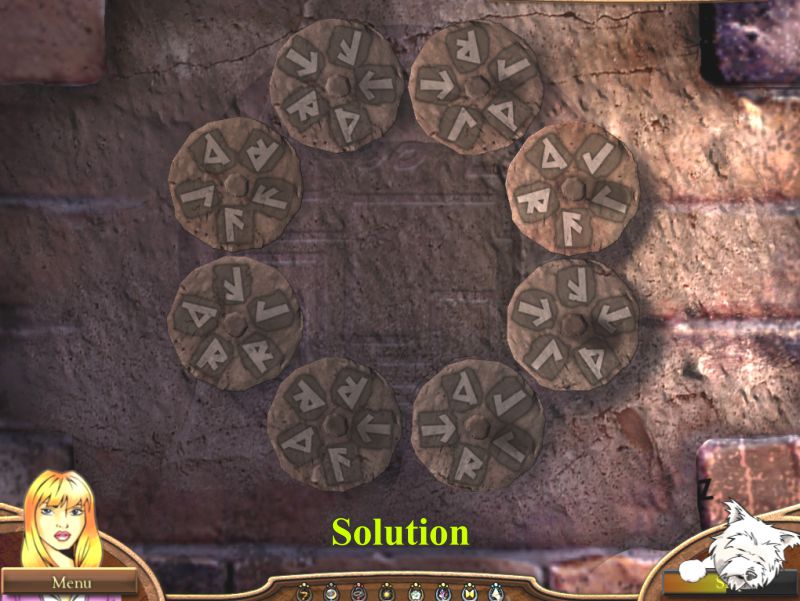
Kitchen Fireplace Mini Game
Click on the fireplace in the messy kitchen for a Mini Game.
Your goal is to match up the connecting disks around the circle as shown in the screenshot.
Symbols that connect the disks must be the same.
Once you have completed the circle, a secret passage will open.
Screenshot
Catacomb Entrance
It is very dark, but you should be able to see the fountain with the Jaguar head at the right of the screen.
Zoom in and take the Flint. Use it on the 3 torches marked in the screenshot so you can light the room.
Screenshot
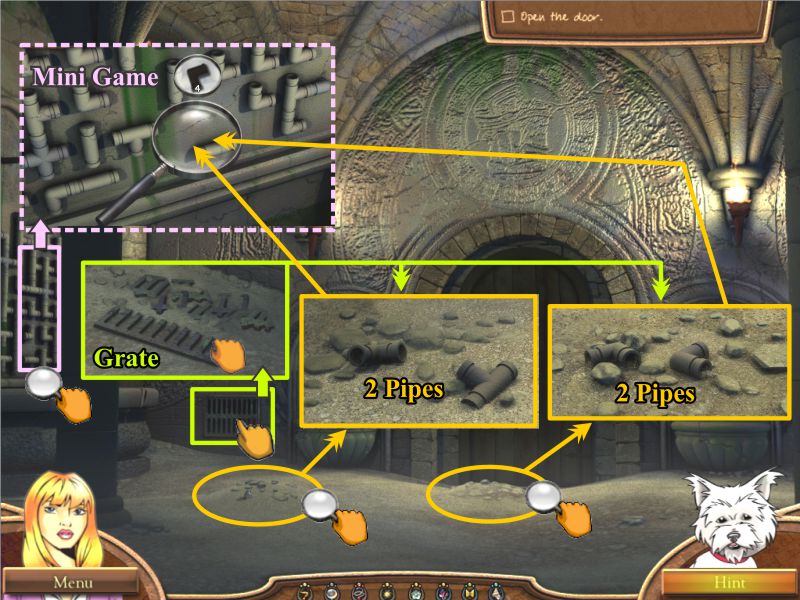
Touch the Grate to the left of the door, and it will fall off.
Collect the half of the Grate that looks like a rake. Zoom in on the two sandy rock piles marked in the screenshot.
Use the rake on the piles until you uncover 2 pipes in each pile.
Click on the pipe system at the left and place your 4 pipes in the Key Object to trigger a Mini Game.
Screenshot
Pipe Mini Game
Turn the pipes as shown in the screenshot to drain the water and recover the Stone Jaguar Head.
Screenshot
Open the Door to the Next Room
Place the stone head on the fountain to the left of the door. Water will fill both of the fountains on either side of the door, causing the door to open.
Catacomb River
There is a river between you and the next destination. Click on the skeleton at the left for a Hidden Object Scene.
Catacomb Room Hidden Object Scene
When you have collected everything, you will get a Gem for your Inventory.
Multiple items are color-coded in the screenshot.
Screenshot
Zoom in on the post by the river and place the gem you just found. The bridge will lower for you to cross to the next part of the catacomb.
Catacomb
There are two blue beams of light radiating upwards, so click on the one on the left to trigger a Mini Game.
Catacomb Mayan Circle Puzzle
There are a number of rings that need to be turned to create the picture shown in the screenshot.
When you have completed the game, a Mayan drawing image will appear and you will gain access to the next room.
Screenshot
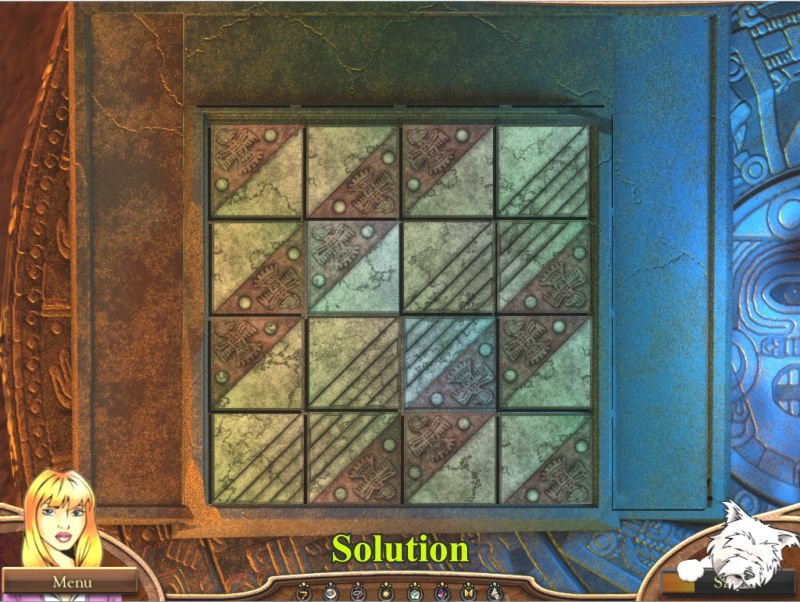
Next Catacomb Room Mini Game
The pit of fire has disappeared for you to cross, so click on the next blue flame to trigger another Mini Game.
Your goal is to place and line up the tiles as shown in the screenshot.
Screenshot
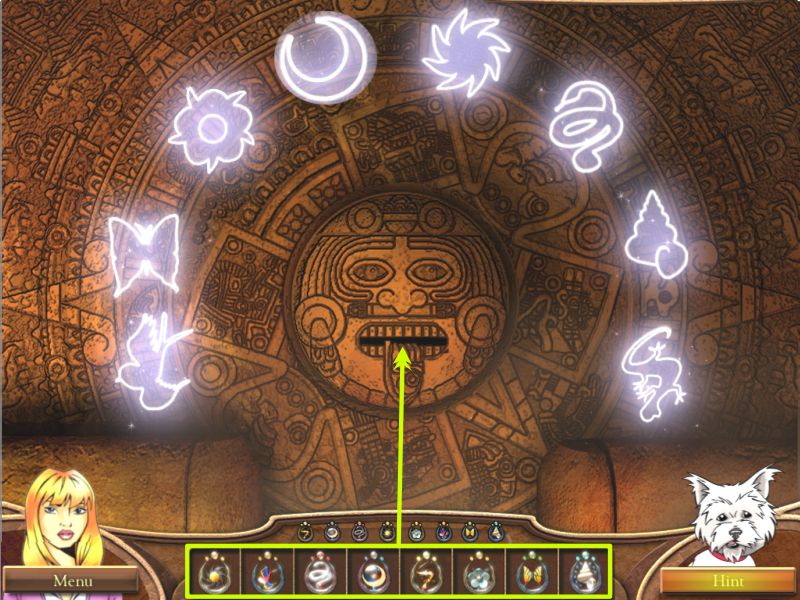
Catacomb Idol Wall
You have now gotten to the last wall with the Mayan Idol.
You will need to feed each of the relics into its mouth to see what happens next.
Screenshot
You have now completed all of your tasks, so it is time to watch the movie to see what happens next.
Posted by: Jazz |
March 11, 2011 6:31 PM
|
March 11, 2011 6:31 PM