
Rite of Passage:
The Perfect Show
Platform: Mac, Windows
![]() Kids, when mom tells you to come home before dark, do it. If your piano instructor is inexplicably late, don't wait for hours after sunset in the woods-shrouded playground. That nice man there with the puppets and the candy? Yeah, he's a creepo.
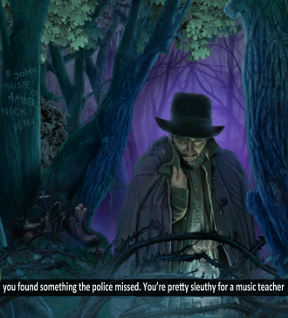
Kids, when mom tells you to come home before dark, do it. If your piano instructor is inexplicably late, don't wait for hours after sunset in the woods-shrouded playground. That nice man there with the puppets and the candy? Yeah, he's a creepo.  Run away. Little Amber didn't heed the warnings and now she's one of four children who have already disappeared. Parents are at a loss, covering the small town of Everlake with "have you seen me?" posters to no result. So what to do? Police are always so helpless in hidden object adventure games, but you are rather sleuthy for a music teacher, and who better to decode artful locks and overcome thorny barriers to save the day? Equipped with both bravado and keen shrewdness, pass into Mad Head Games' dream world of magic, mystery and surrealism in Rite of Passage: The Perfect Show.
 The game employs the standard conventions of hybrid gameplay—follow your cursor to explore breathtaking settings, search through bright yet busy hidden object scenes, and match your wits against a diverse assortment of mini-games. When you begin, you're offered a choice in gaming assistance: casual, for sparkling search areas and quickly filling hint/skip timers, or expert, which abandons the sparklies and is slow to offer help.
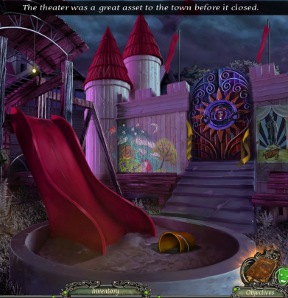
The surreal environment of Everlake, with its whimsical cut-out artwork and warehouses topped with giant doll heads, might remind you of the Drawn series. While there is an even balance between completing tasks, sleuthing, searching and solving, there are so many places to go and things to see that emphasis lies in the adventure of it all. Hidden object scenes are well-rendered yet cluttered and, along with the usual list of odd items, include a smattering of fragmented items and interactivity. As you go, pieces of the story will be revealed to you in a number of ways. One, a very enjoyable puppet-show mini-game, depicts the antagonist's background story and his descent into evil sorcererdom. These shows also serve to divide the game into five acts, providing both structure and the necessary rising action toward the climatic final showdown.
 As all those details you uncover begin to add up, glance at your journal to review what you've learned and also to get your bearings on what to do next. Helpfully, the journal is divided up—one section stores clues and plot details while another section keeps tabs on your objectives, both completed and still undone. As you pick items up along the way, bottom-loading inventory bar safely keeps your increasing collection of trinkets and tools.
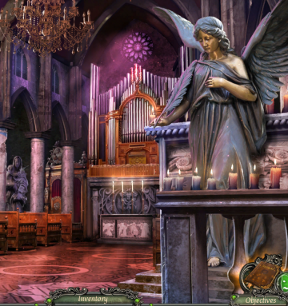
Analysis: New development team, Mad Head Games, have as their initial offering an impressive production that will leave you looking forward to more of their games. Every scene in Rite of Passage: The Perfect Show is rich in interest-grabbing details, secrets to uncover, and puzzles to solve so that a game that is, by the clock, slightly on the shorter side, ends up feeling like an epic journey. The dimensional effects of the multi-layered graphics make real an environment that blends fantasy with ordinary. You rarely encounter other characters but, when you do, it's a treat because of superior voice acting and a skillful blend of live action with computer generated imagery. It's hard to find any fault in such amazing graphics though, if pressed, I'll admit that sometimes proportions are off; poor Amber's arms are chimp-like as she rocks her doll, for example, and your neighbor lady looks as if she had a bad series lip injections as she talks. These are tiny things, though, in a production that is exceedingly high quality.
 Perhaps another shortcoming is the game's failure to answer all your questions about why and how this place exists. There's no explanation for why the theater district is locked by a life-sized wooden soldier brandishing a giant key; instead, such oddities better explain how all has gone so awry. That this game is able to make you so interested these answers is a mark of its magic and ability to keep you enthralled. Despite your unrequited curiosity, there's really an abundance of information here and no true magician will give away all his secrets. Just sink into the surreal experience and let go of lifelike pragmatism.
Don't be mislead by the title, Rite of Passage: The Perfect Show, thinking it's overly spooky or horrific. Stylistically, it's hard-to-define in any other way except "quirkily preternatural." David Lynch's Twin Peaks can't top the strangeness of Everlake, and that's either immensely delightful or incredibly maddening, take your pick. Does this make you frustrated as your search for answers only unearths more questions? Or are you in awe of the wonders you behold and the deep satisfaction of playing town hero? You may never fully understand the obsession to perform the perfect show, but you'll be too busy to care.
A Collector's Edition is also available. It contains bonus content not found in the standard edition. Remember that Big Fish Game Club Members pay only $13.99 for Collector's Editions (or 2 club credits), and collector's editions count 3 card punches of 6 total needed for a free game.
![]() Windows:
Windows:
Download the demo
Get the full version
Also available: Collector's Edition
![]() Mac OS X:
Mac OS X:
Download the demo
Get the full version
Also available: Collector's Edition


Walkthrough Guide
(Please allow page to fully load for spoiler tags to be functional.)
Walkthrough Rite of Passage: The Perfect Show
Part One
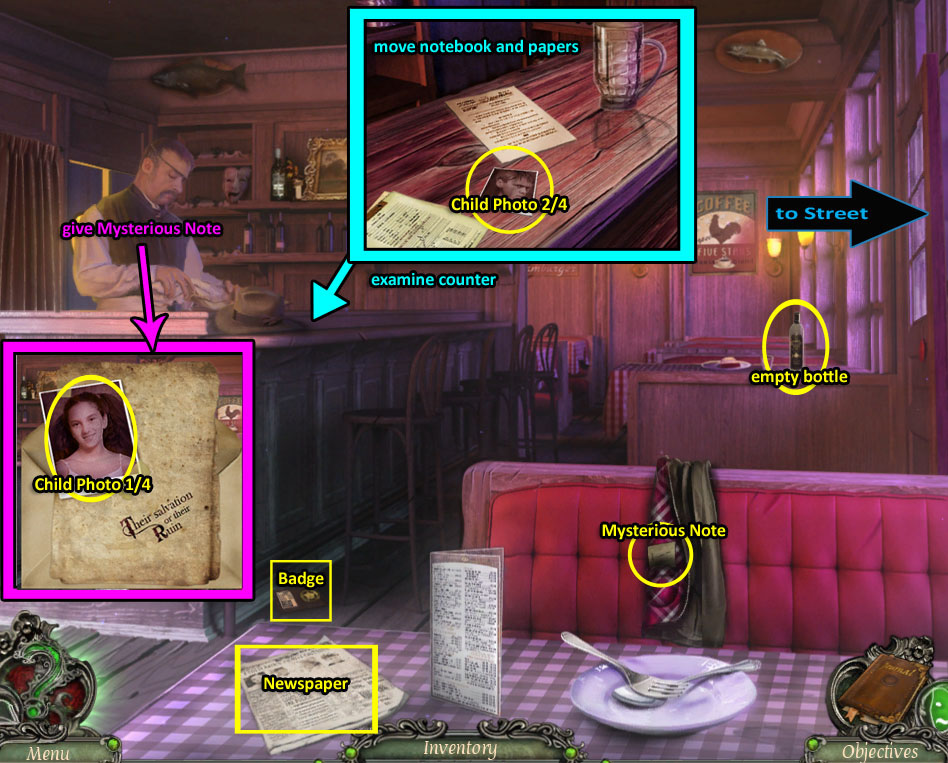
Starting Out—The Diner
Screenshot: The Diner
Pick up the NEWSPAPER from the table and the MYSTERIOUS NOTE from inside the jacket.
Get the BADGE from the floor by the barstool.
Zoom in on the back table and take the EMPTY BOTTLE.
Give the mysterious note to the BARTENDER, and he'll give you an ENVELOPE:
Open it to get CHILD'S PHOTO (1/4).
Zoom in on the BAR now that the bartender is gone:
Pick up the notebook to look inside.
Move the papers over to get CHILD'S PHOTO (2/4).
Exit out the door to the right.
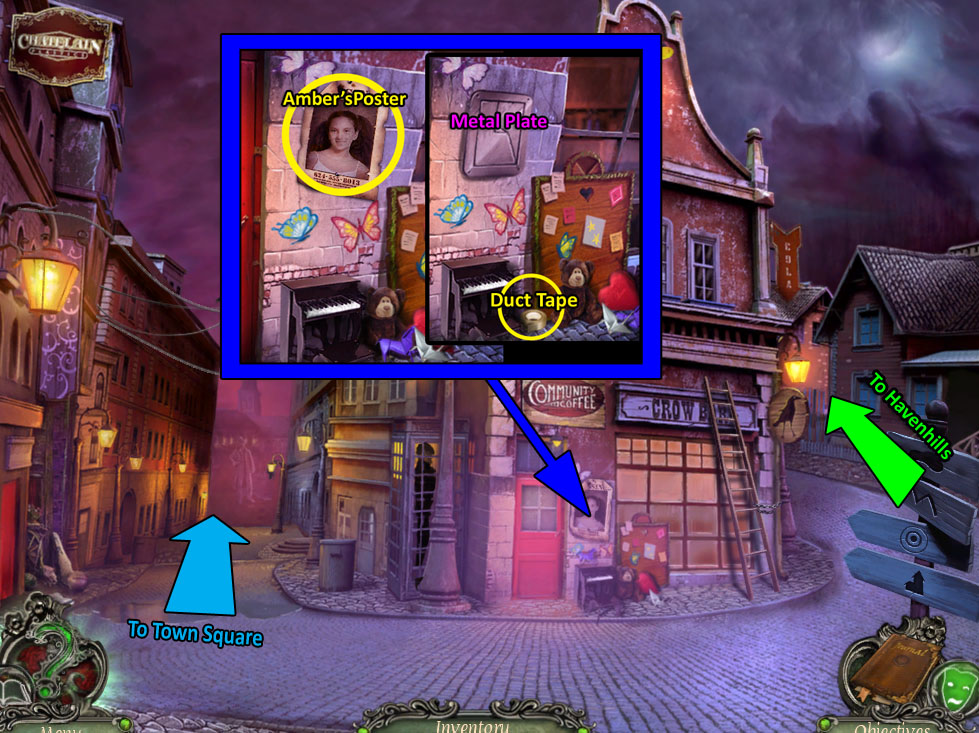
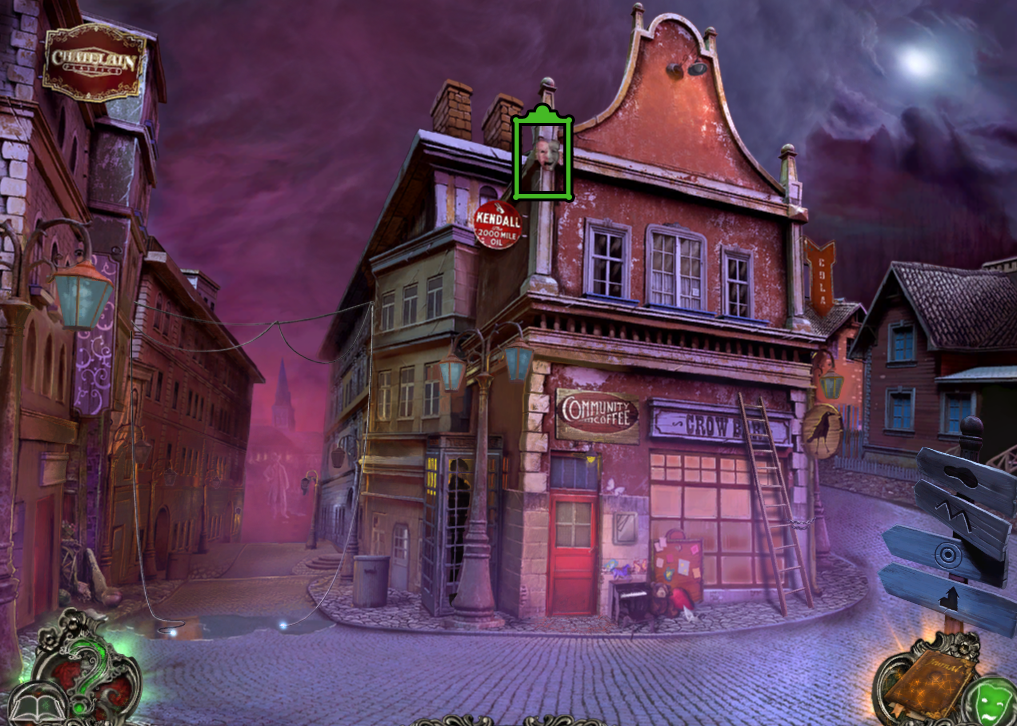
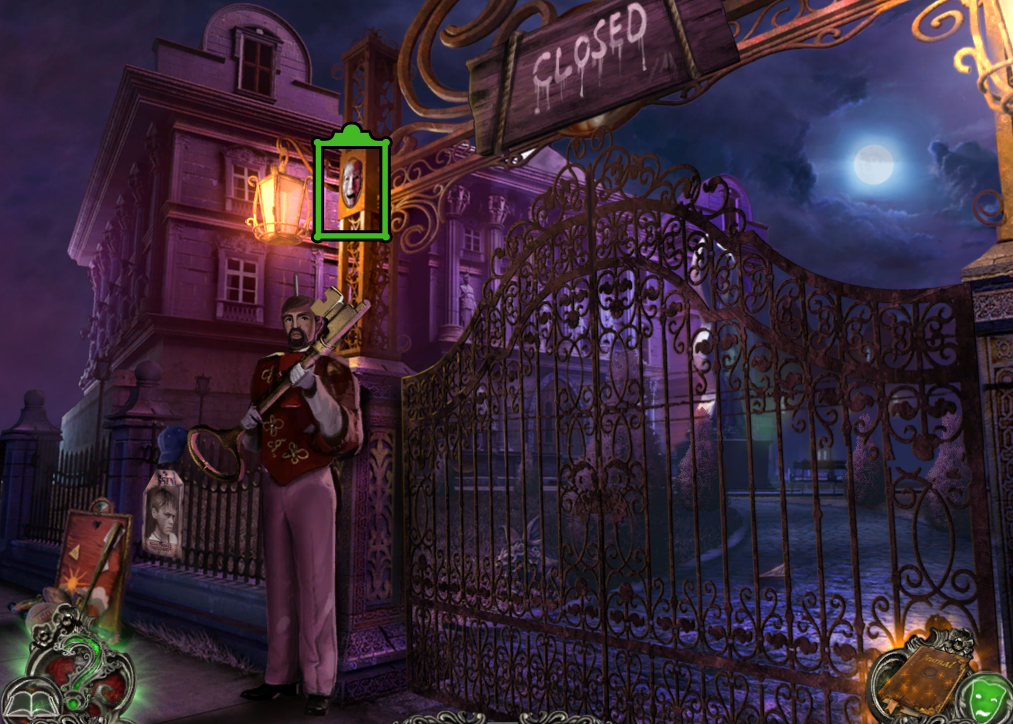
The Street—first time
Screenshot: The Street
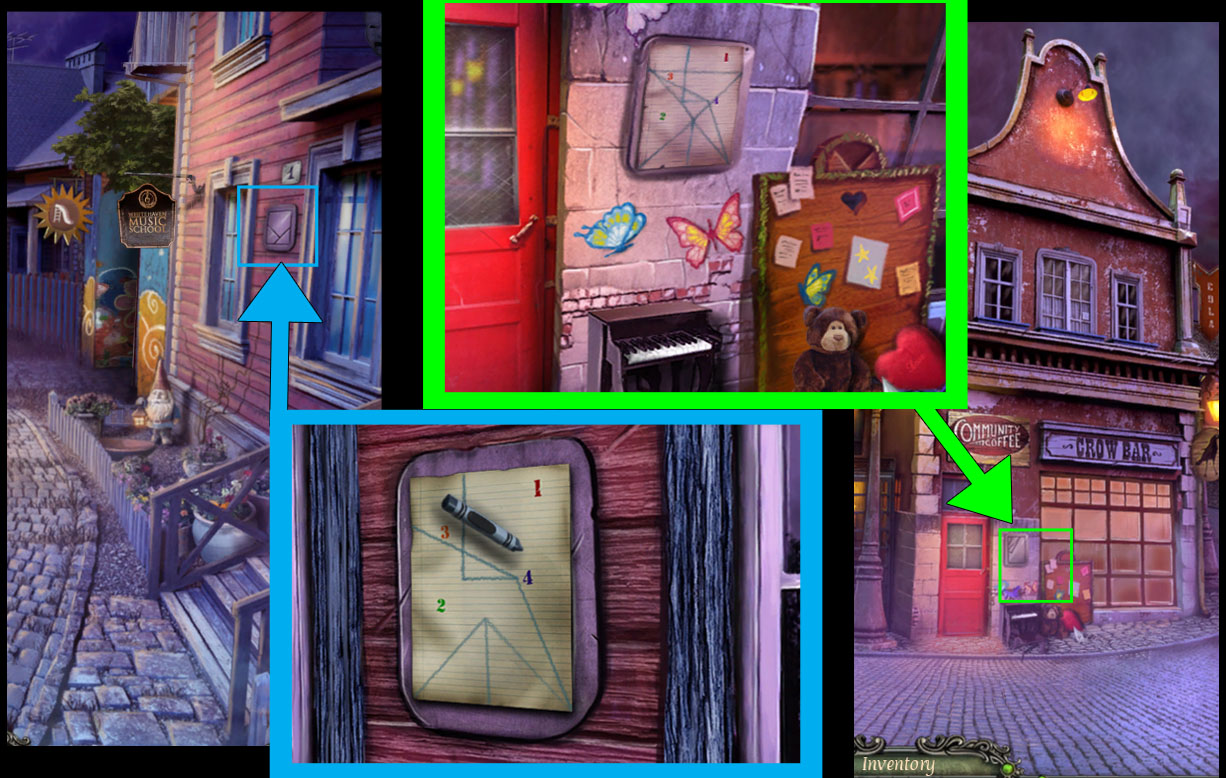
Examine the Amber poster on the wall of the coffee shop, across the street:
Take AMBER'S POSTER.
Make note of the metal plate for "how to fold" paper.
Move the toys aside to get DUCT TAPE.
Attempt to go toward Town Square. Lightning will cause the wires to fall.
Go right toward Havenhills.
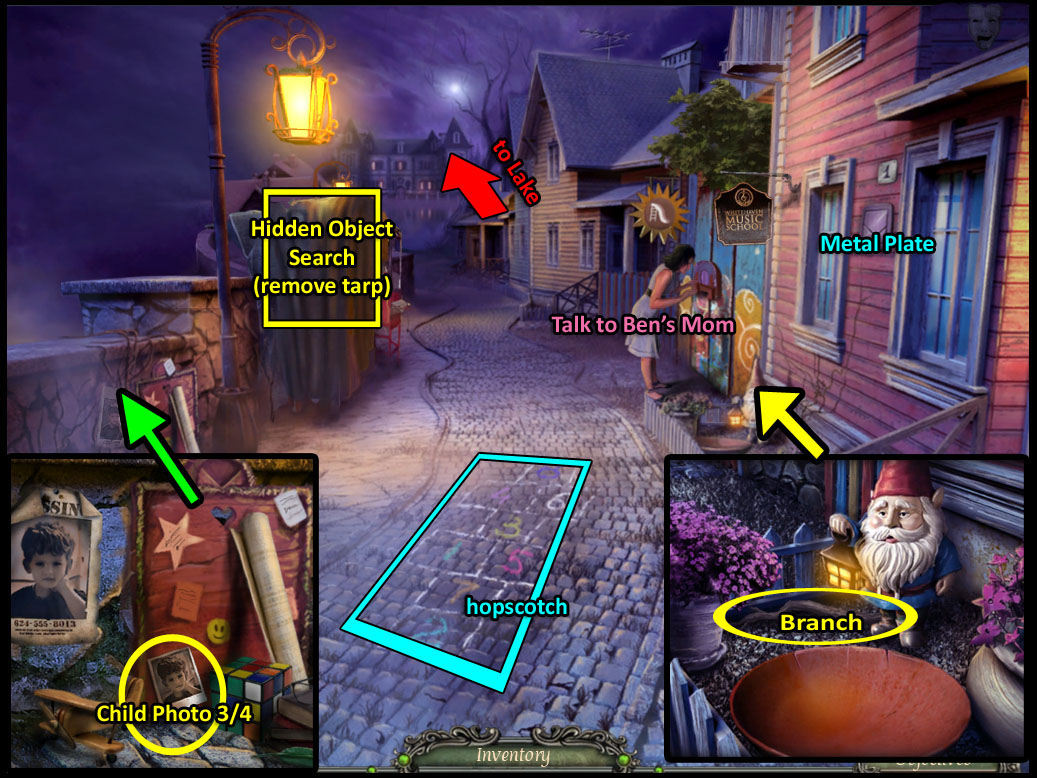
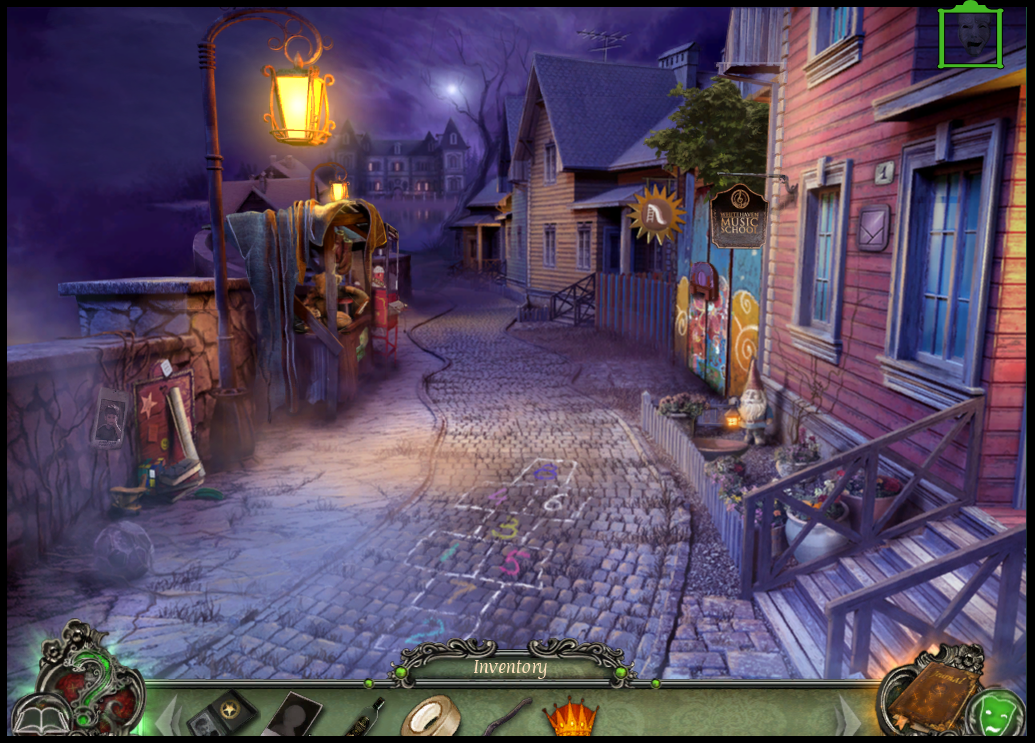
Havenhills—Ben's mom and item gathering
Screenshot: Havenhills
Click on Ben Clark's mom to talk to her. When she's gone, you'll have a new objective—find a way into the playground—added to your journal.
Inspect the HOPSCOTCH game to send a clue into your journal.
Make note of another metal plate for paper folding on the wall of the music school.
Zoom in on the Gnome just under the music school window:
Take the BRANCH.
Note that the bowl is perfect for mixing.
Examine Ben's poster on the left side of the path:
Move the toys aside to get CHILD'S PHOTO (3/4).
Pull the cover off the Toy Cart to begin a HIDDEN OBJECT SEARCH:
Find all the items listed to get the CROWN.
Screenshot: Havenhills hidden object search
Hidden Object Search Scenes are randomly generated each game. The above screenshot is only an example. Your list may vary.
Go forward to the Lake.
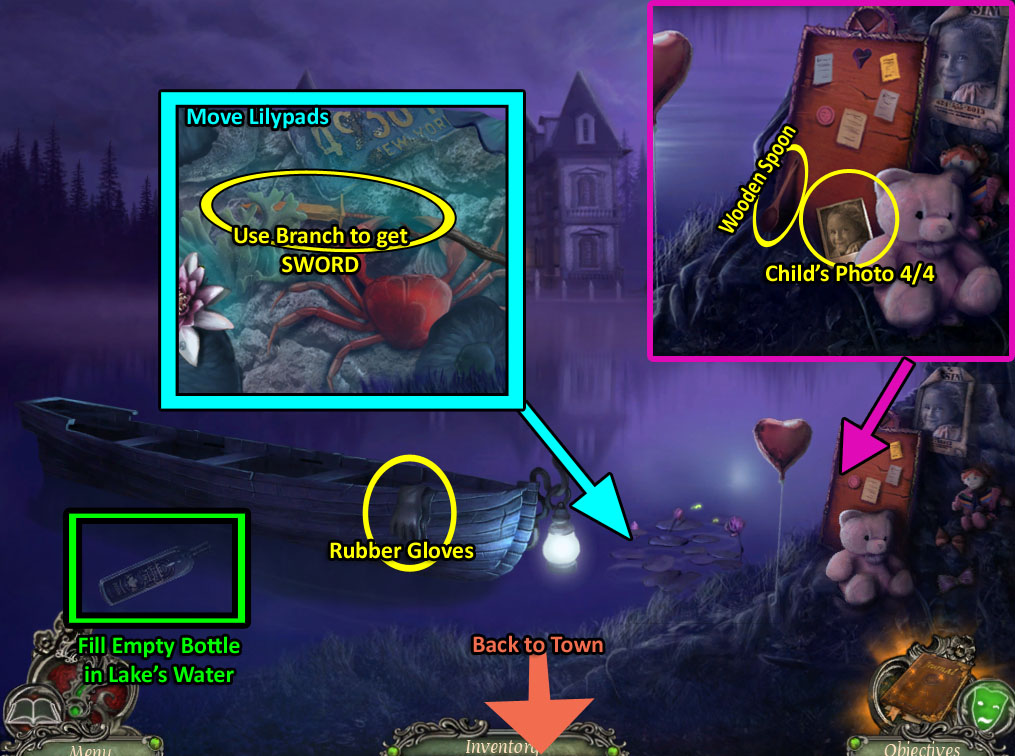
The Lake—gathering items
Screenshot: The Lake
Grab the RUBBER GLOVES off the boat.
Zoom into the poster for Melissa:
Get a WOODEN SPOON and...
CHILD'S PHOTO 4/4.
Zoom in on the lilypads at the bow of the boat:
Move the lilypads aside, then use your branch to get the SWORD.
Fill your empty bottle with lake water to get a BOTTLE OF WATER.
Head back to Havenhills then continue back to the Street.
Street and Havenhills—Making Glue
Screenshot: street hidden object search #1
Back at the Street, use your the RUBBER GLOVES you got from the lake to remove the fallen wires.
Zoom in on the doorway on the left side of the screen to start another Hidden Object Search Scene:
Find all the objects on your list (items vary each game) to earn GLUE POWDER.
Go right, back up to Havenhills.
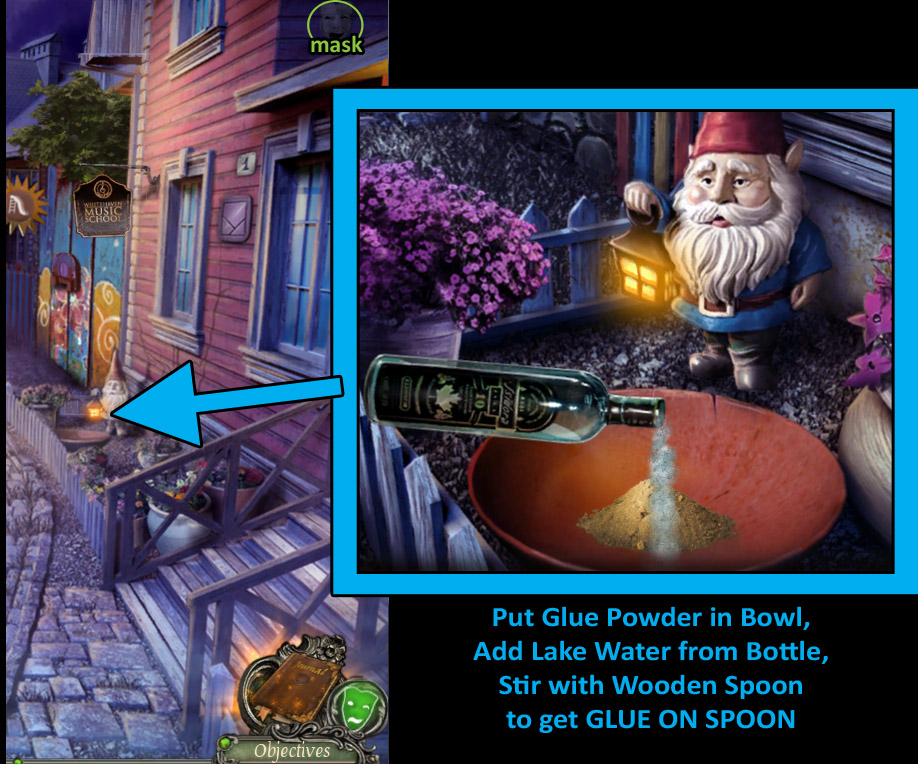
Screenshot: glue making
Zoom in on the Gnome and flower bowl again to begin making glue:
Add the glue powder you got from the last hidden object search.
Pour in the lake water from the bottle.
Then, use the wooden spoon to stir it up.
Now you have GLUE ON SPOON.
Go back one to the street, then go up the path on the left to Town Square.
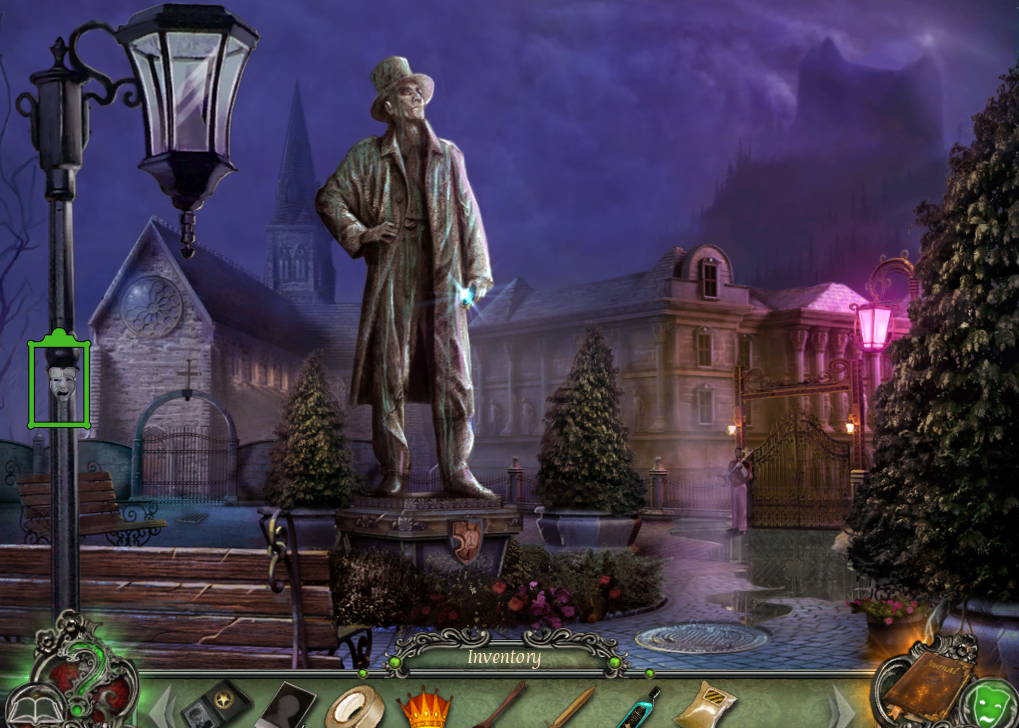
Town Square—Get Shield
Screenshot: Town Square for shield
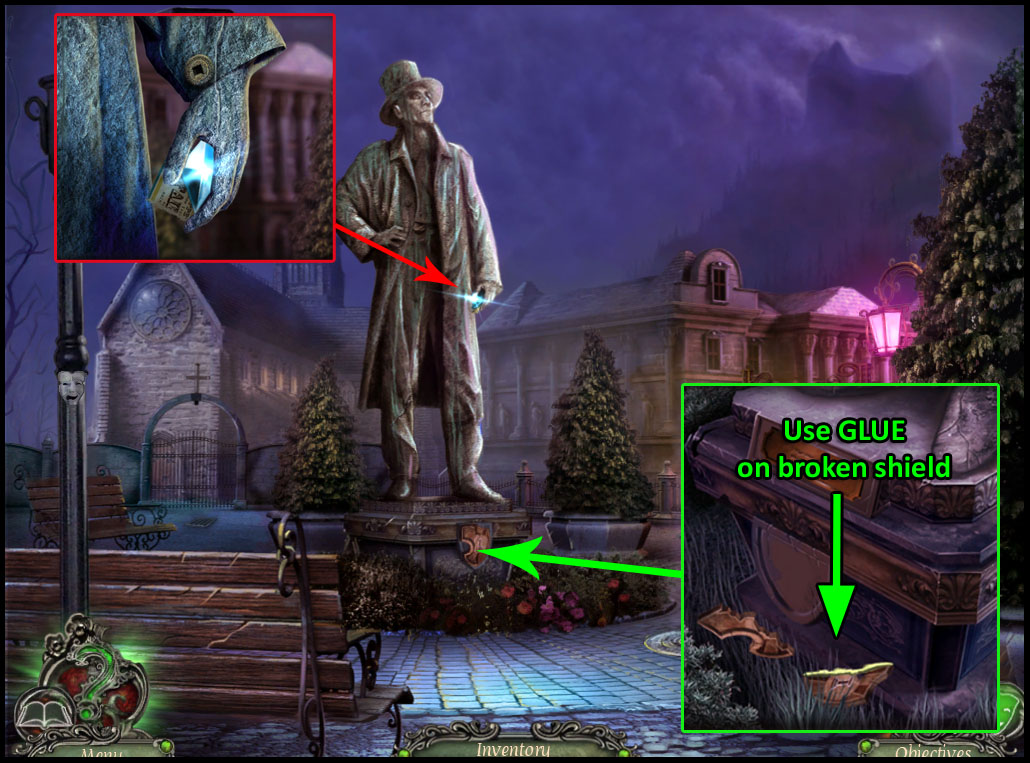
When you first arrive in Town Square, examine the statue's hand and try to take the glowing blue gem. This will start a short action scene and add a new objective to your journal.
Note the lock for a square key on the statue's sleeve.
Zoom in on the plaque at the base of the statue. When you try to grab the emblem, it breaks.
Use the GLUE ON SPOON to repair it.
Pick-up the SHIELD.
Go back one, then right up the path to Havenhills.
Opening the Playground Gate
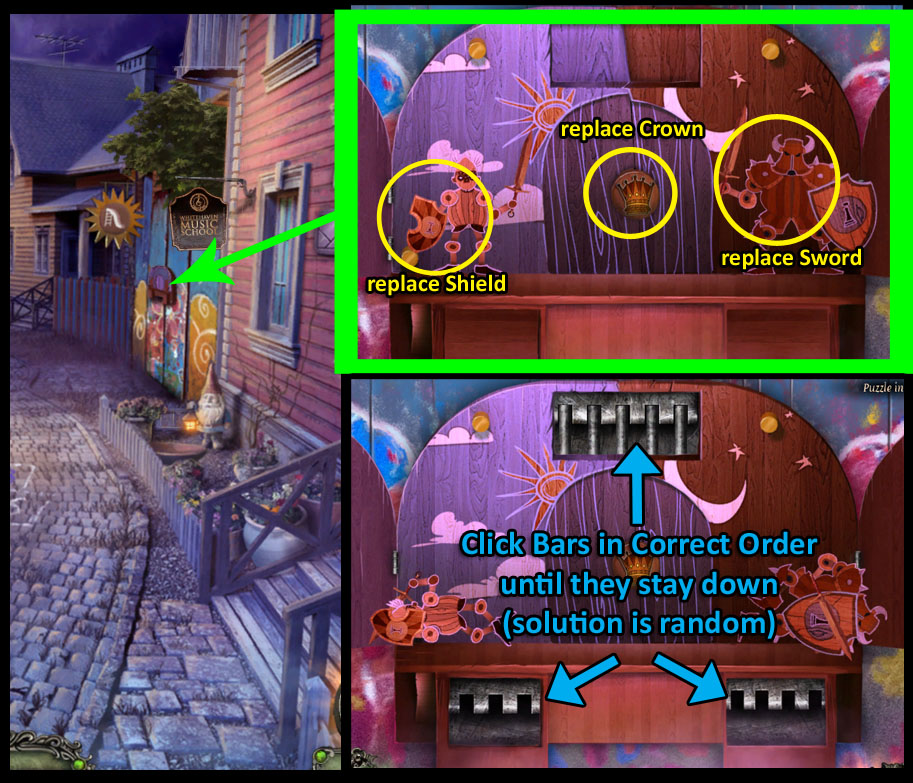
Next to the music school is the entrance to the playground. Examine the Playground Gate to set-up a Mini-Game:
Open the doors and give the SWORD to the night knight on the right.
Give the SHIELD to the day knight on the left.
Then open the iron gate to place the CROWN in the middle.
Screenshot: playground gate mini-game
Once all the pieces are in place, a slot will open on the left:
Find the pattern that will open all bars at once.
If you click a bar out of order, they will all shut.
Continue the pattern until all the bars stay open.
Repeat these two games for the next two slots.
When you have completed the mini-game, the gate will open.
Click the opening to enter the Playground.
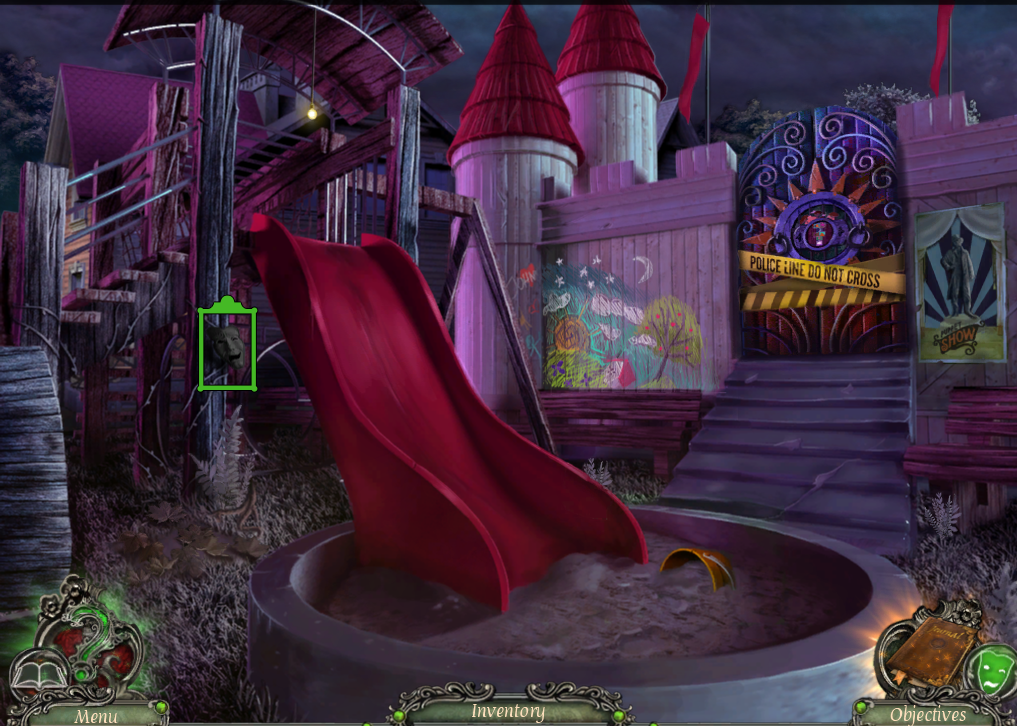
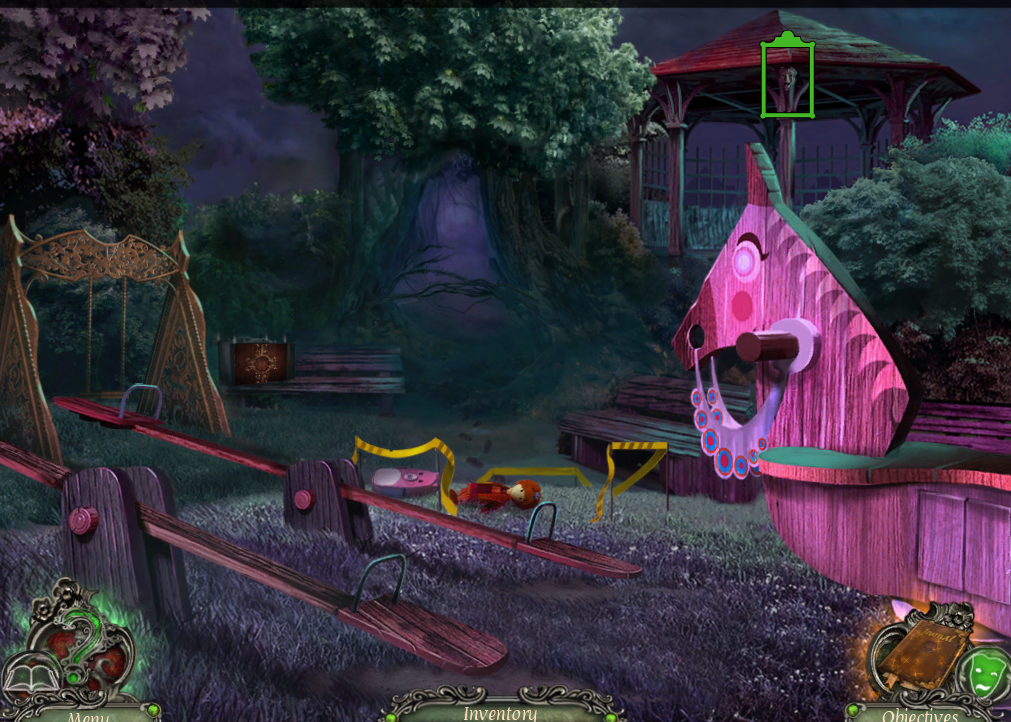
The Playground and Play Castle
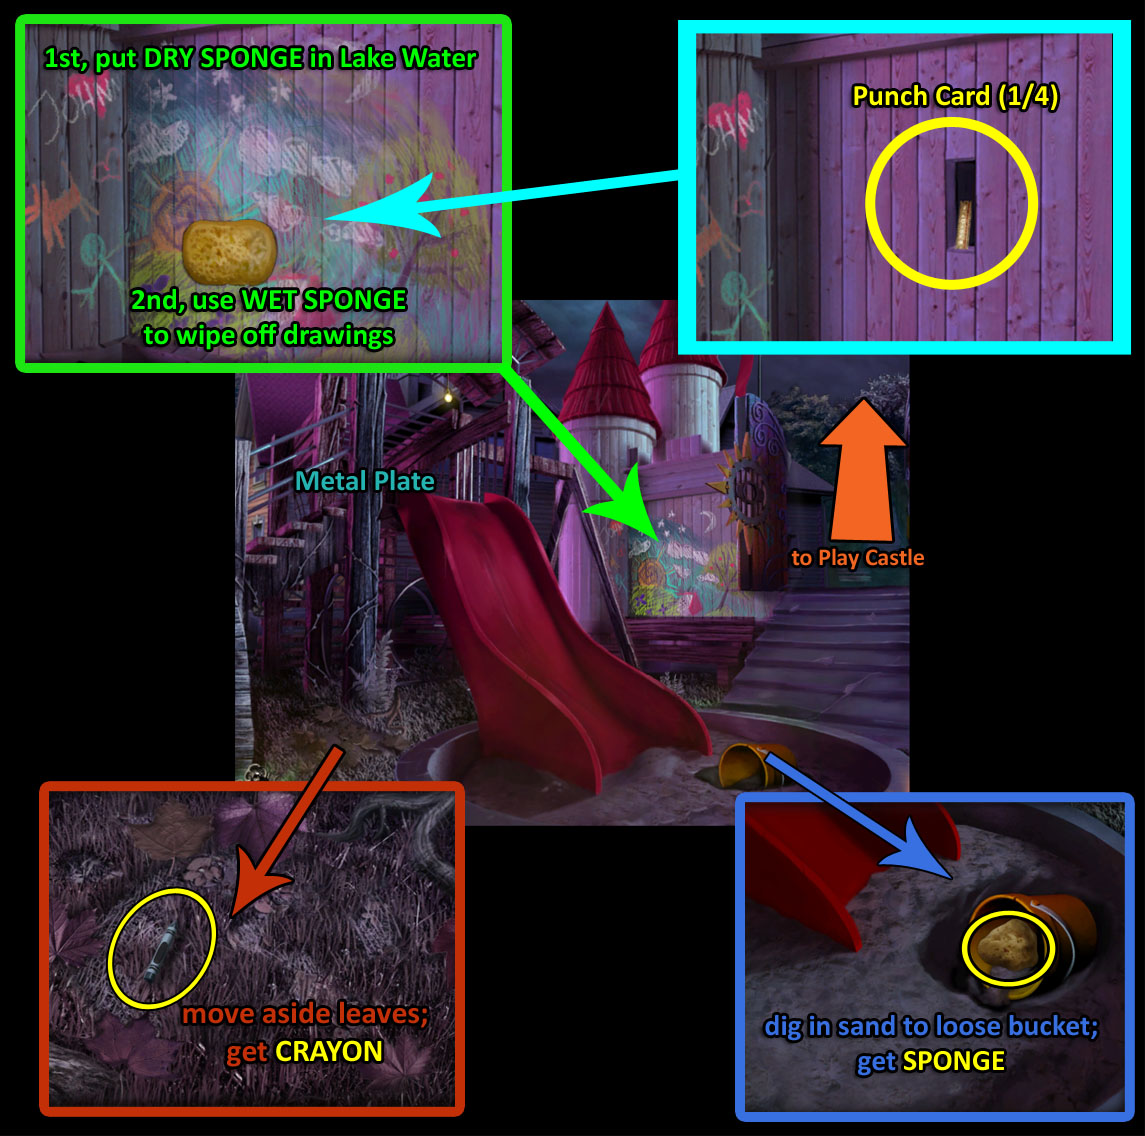
Screenshot: The Playground
Inside the playground, notice there is another Metal Plate at the top of the slide.
Zoom in on the leaves at the bottom of the slide's stairs; move them aside until you find:
a CRAYON.
Then, dig in the sand at the base of the slide. Inside the bucket you'll find:
a DRY SPONGE.
Return to the Lake by backing out then going forward.
At the Lake, dip the dry sponge in the Lake Water to get a:
WET SPONGE.
Go back and right into the Playground again.
Zoom in on the chalk drawings on the fence:
Use the WET SPONGE on the drawings 4x until a loose slat in the fence is revealed.
Click on the slat to reveal PUNCH CARD (1/4). Take it.
Pull the police "crime scene" tape off of the doors in the back and move ahead to the Play Castle.
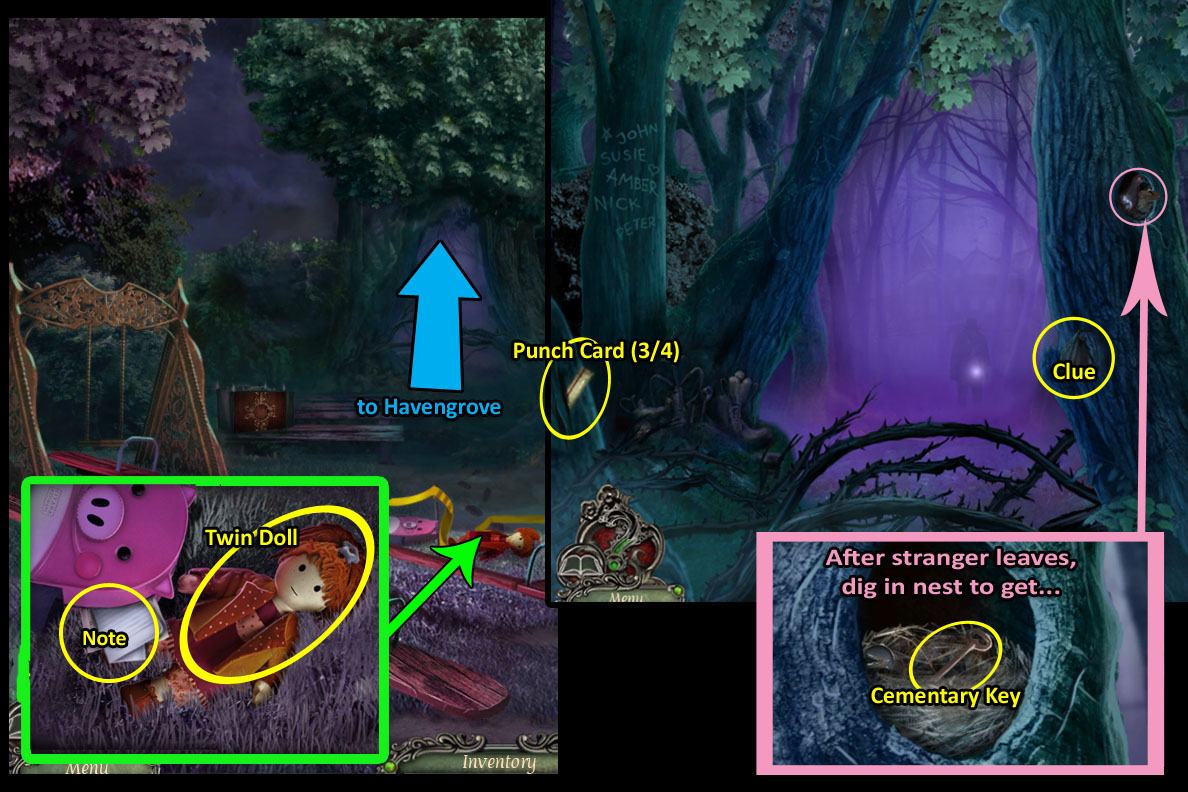
Screenshot: Play Castle
Examine the doll on the ground:
Take the TWIN DOLL
and pick up the NOTE.
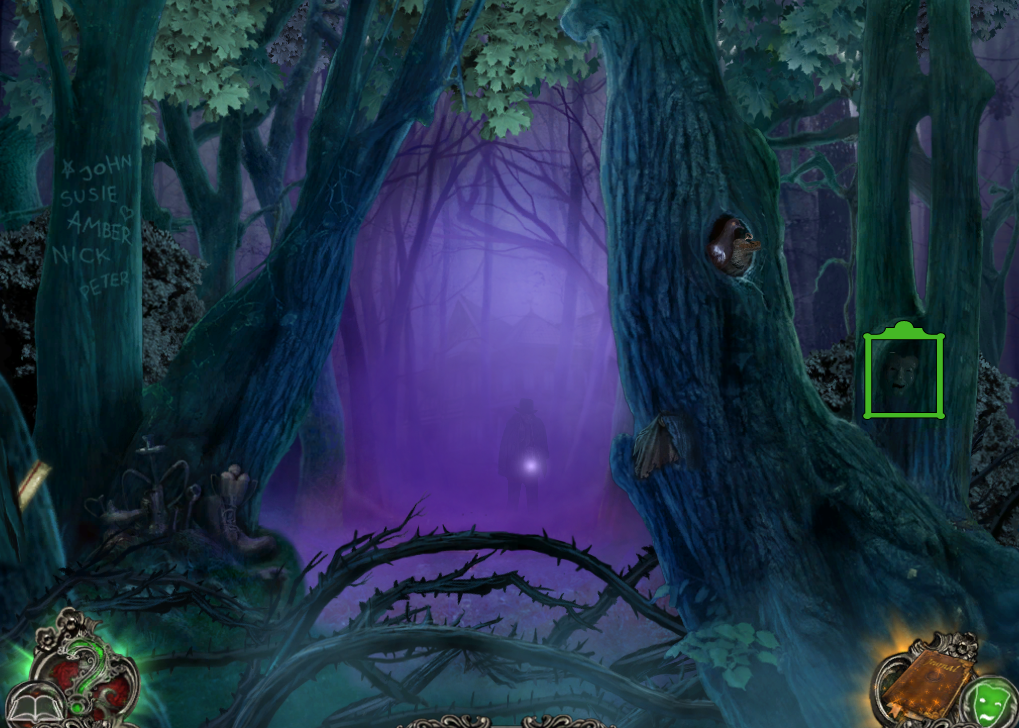
Continue forward into Havengrove woods.
In the tree on the left is another...
PUNCH CARD (2/4). Take it.
Grab the cloth off the tree to the right for a...
CLUE.
That sets off an interaction with a stranger. When he goes, zoom in on the bird's nest in the tree on the right:
Take the CEMENTARY KEY.
Back out three times to the Street.
Cementary and Act 1 of the Puppet Show
After you've talked with the stranger inside Havengrove woods, a new Hidden Object Search Scene awaits you in the street. Back out of the woods and go back two more times to The Street.
The Hidden Object Search Scene will be in the same spot as before, on the left side of the screen, across from the coffee shop.
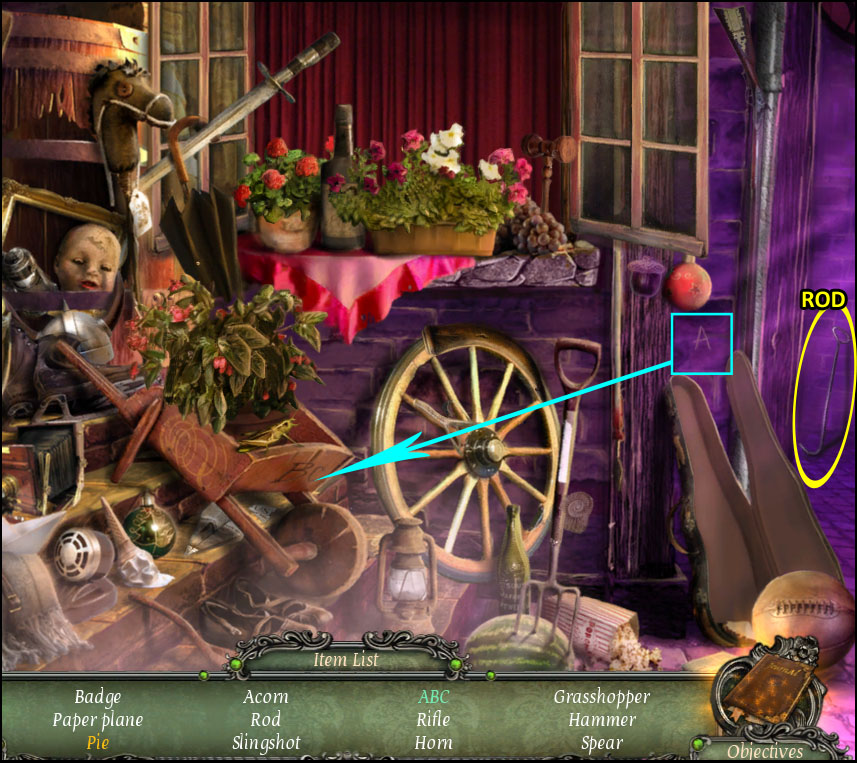
Screenshot: street hidden object search #2
Find all the hidden objects on your list to get a:
ROD.
Once you get the rod, continue forward up the left path to Town Square.
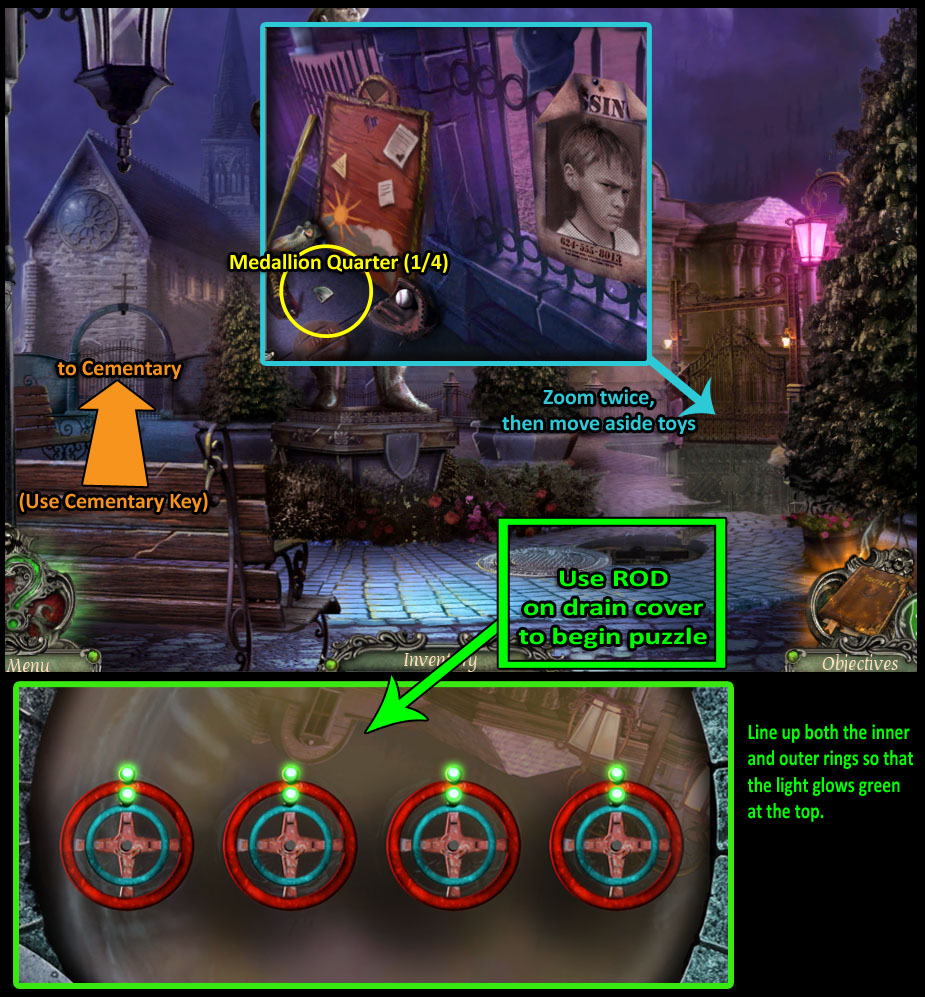
Screenshot: Town Square
Use the ROD on the drain cover to begin a new mini-game:
The goal is to line up the lights on the inner and outer rings so they all glow green. The solution varies with each game, but these tips should help you:
Work from left to right, lining up the left valve first, then going back to make adjustments as needed.
Turning a red wheel will cause both the red and blue wheels to turn clockwise one quarter turn for that valve, plus it will cause the red wheel next to it to turn as well.
Blue wheels can be turned without affecting the red wheel, but each turn of a blue wheel will also turn all the blue wheels to its right.
As you solve the left valve, continue to make adjustments to all the other valves so you can line them up for easier solving.
When you solve the puzzle, the flood will drain and you can move forward to the intricate gate:
Make note that the wooden soldier is missing his hat.
Zoom in on David's Missing Poster to the left.
Move aside the ball, mitt and cleats to get MEDALLION QUARTER (1/4).
Now back up and examine the gate on the left:
Use the CEMETERY KEY to unlock it.
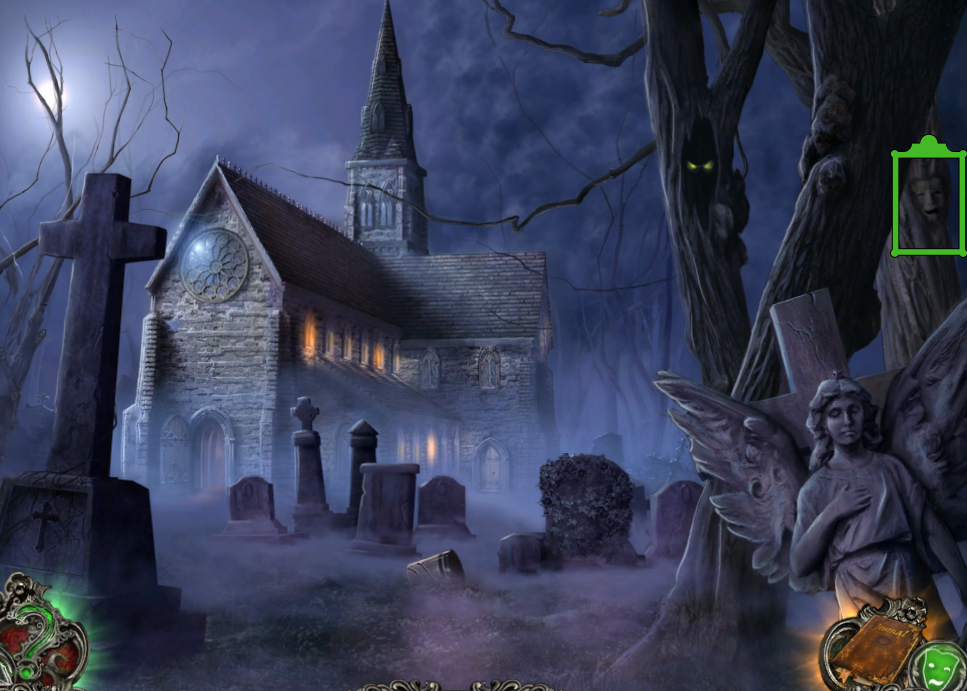
Enter The Cemetery:
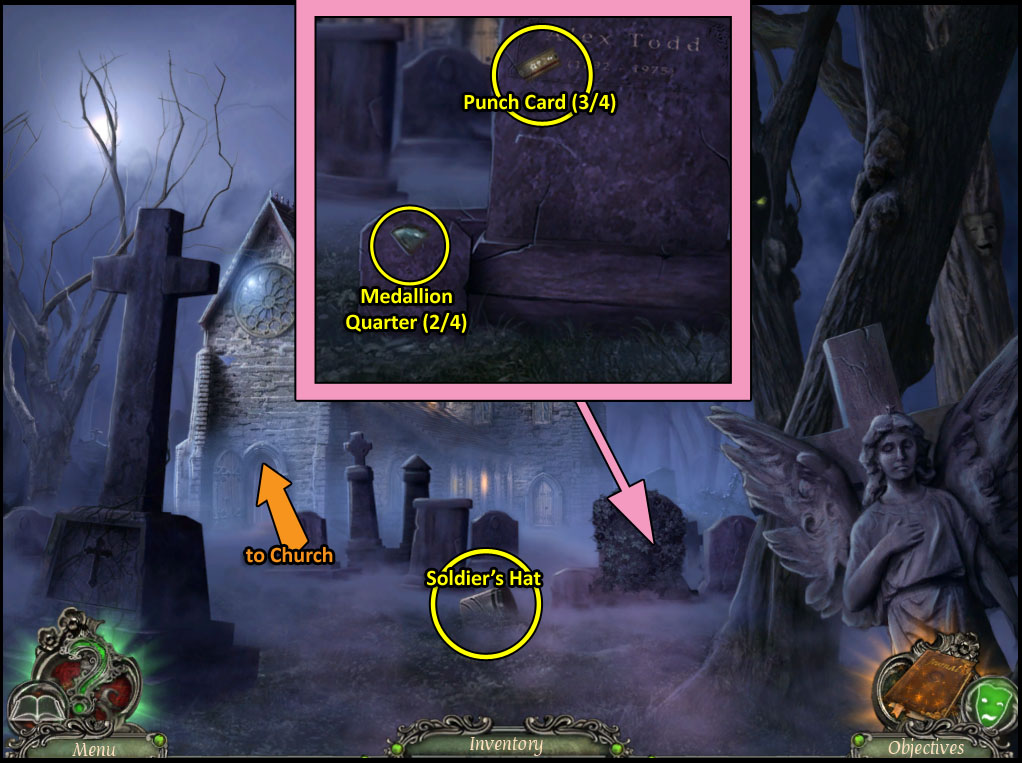
Screenshot: Cemetery
Notice that the cross emblem is missing from the large tombstone on the left.
Pick up the SOLDIER'S HAT from the middle of the scene.
Then, examine the ivy-covered headstone on the right:
Take the MEDALLION QUARTER (2/4) from the small grave marker.
Move aside the ivy on the large headstone to get the third PUNCH CARD (3/4).
Back out.
Go into The Church.
Screenshot: Church
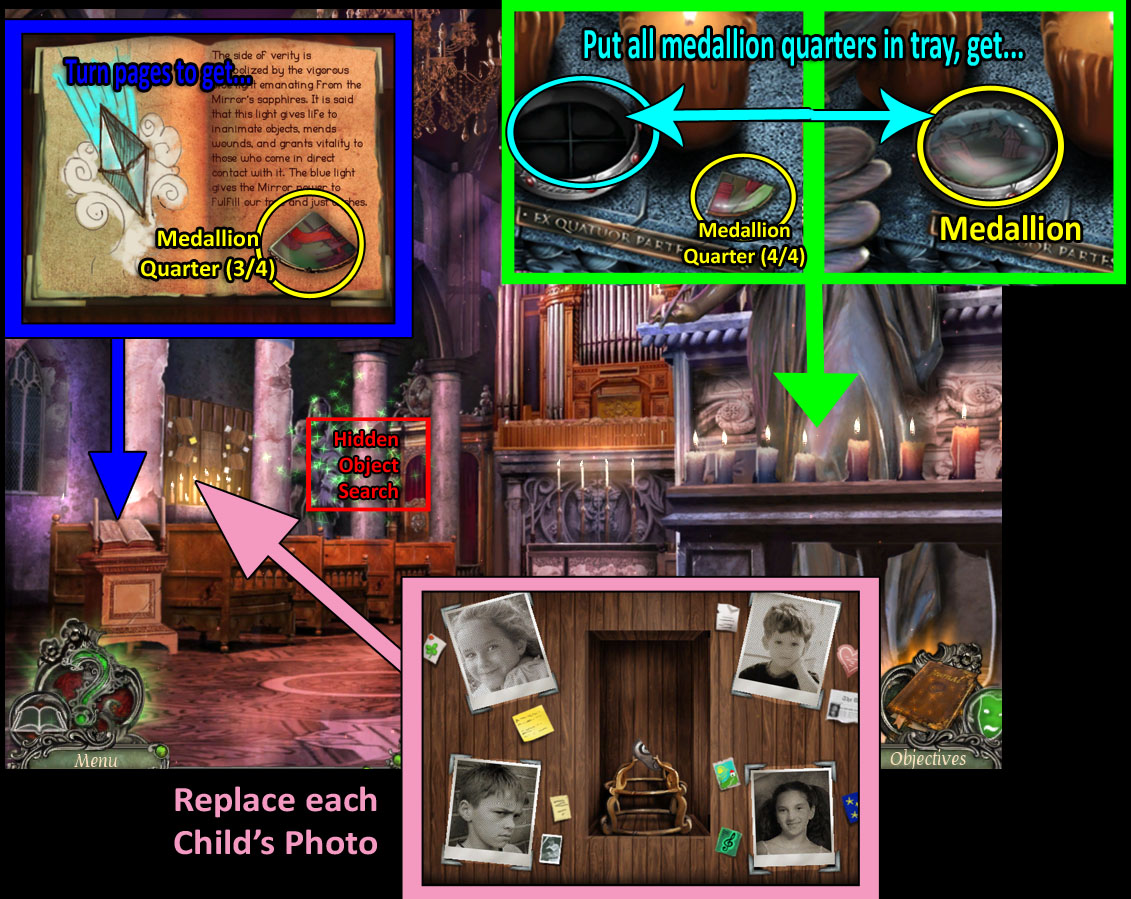
First, examine the book on the left side of the room:
Read through the pages for background information about special blue and red stones and a magic mirror. A few pages into the book you'll find another...
MEDALLION QUARTER (3/4).
Next, zoom in on the table by the large angel statue:
Pick up the fourth MEDALLION QUARTER.
Then place all four pieces into the tray. It will mysteriously reform into a complete...
MEDALLION. Take it.
Examine in on the bulletin board in the back for a puzzle:
Replace each of the CHILD'S PHOTOs according to the symbol which matches items found at their memorial/posters.
When the photos are in the correct spots, a compartment in the middle will open so you can take:
a piece of AMULET (1/2).
Before leaving, zoom in on the madonna statue in the background to start another Hidden Object Search:
Screenshot: church hidden object search
Find all the objects on your list for a SICKLE.
Return to the Play Castle:
Back out three times, take the right path to Havenhills, go right into the Playground, then forward into the Play Castle).
Screenshot: puppet show minigame
Put the MEDALLION in the opening in the box to start a mini-game:
Move each out-of-place item back to where it belongs.
See the screenshot above for the solution.
When you're finished, Act One of the puppet show ends and you can take the:
BLUE GEM.
Part Two
Amber's House and First Visit to Amber's Room
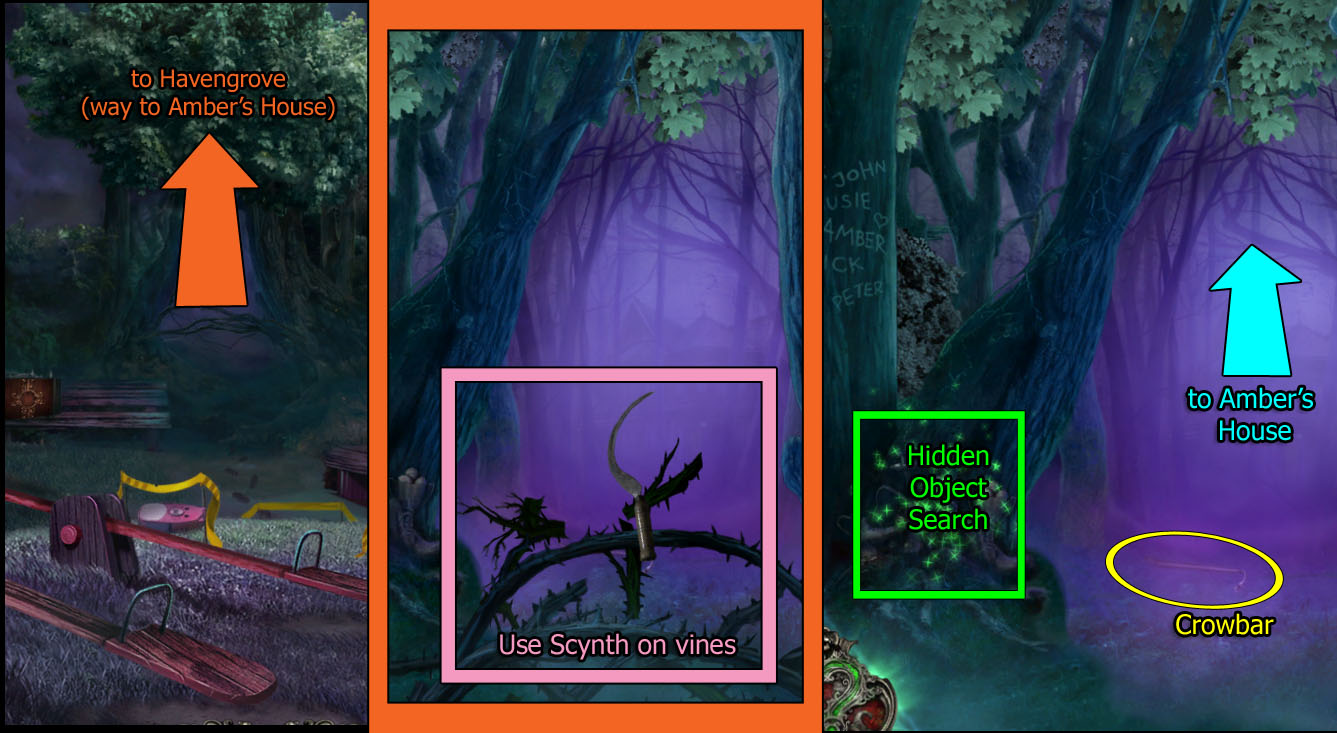
Go forward into Havengrove Woods from the Play Castle area, after completing "Act One" of the puppet show.
Screenshot: Havengrove
Use the SCYTHE twice to remove the vines.
Pick up the CROWBAR from the middle of the path.
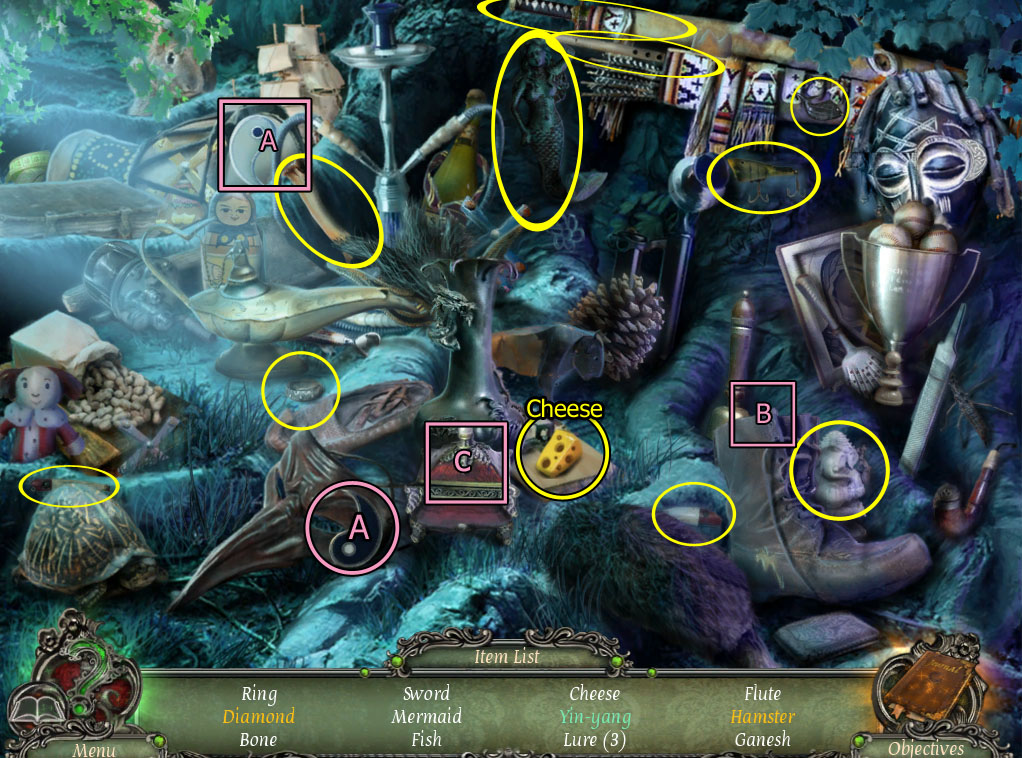
Examine the base of the tree on the left to begin a Hidden Object Search:
Find all the items listed to earn a CHEESE.
Screenshot: hidden object search in Havengrove Woods
Note: hidden object search scenes are randomly generated. The above screenshot is an example. Your list may vary.
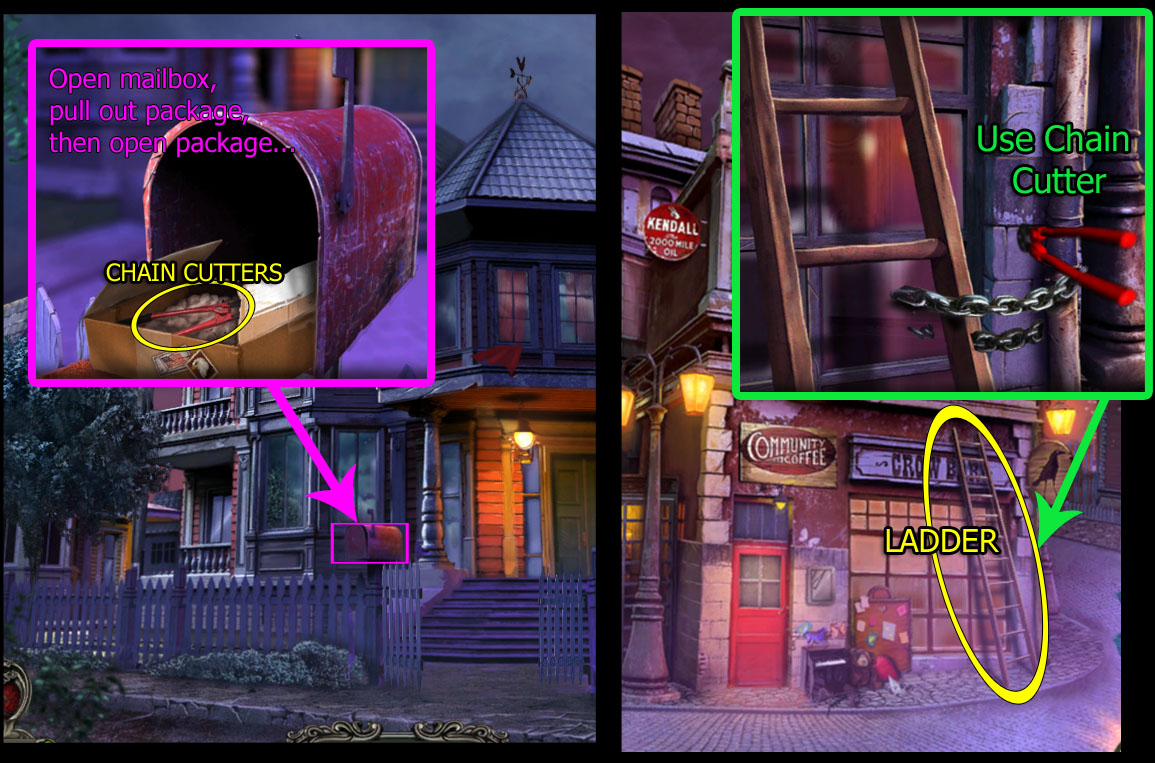
Continue forward toward Amber's House:
Screenshot: ladder to Amber's house
Open the mailbox, pull out the package, open the package and get:
CHAIN CUTTERS.
Now go back 5x to The Street:
A ladder is chained to a pole outside the coffee shop. Examine it and use the CHAIN CUTTERS on the chain.
Get the LADDER.
Return to Amber's House (forward, right, forward 3x.)
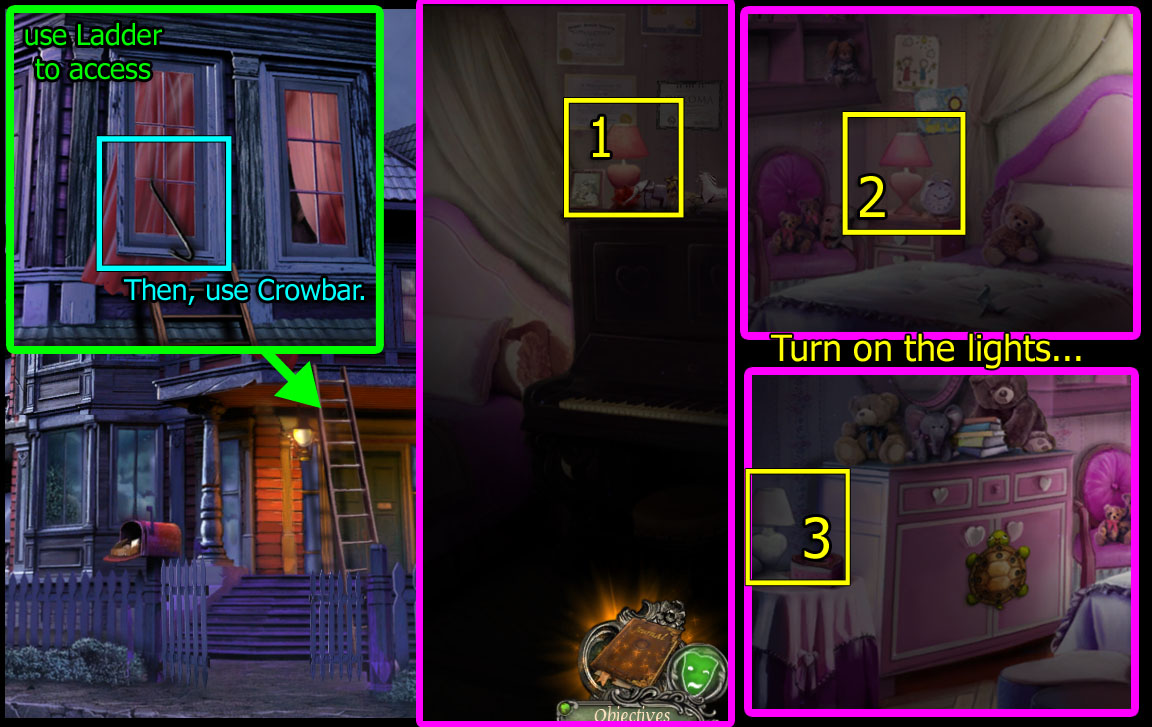
Screenshot: entering Amber's room
Use the LADDER to access the upper story window.
Then, use the CROWBAR to loosen the window and click to open it.
Go through the window into Amber's Room. When you first enter Amber's Room, turn on the lights in this order:
1st: far right lamp — 2nd: middle lamp — 3rd: far left lamp.
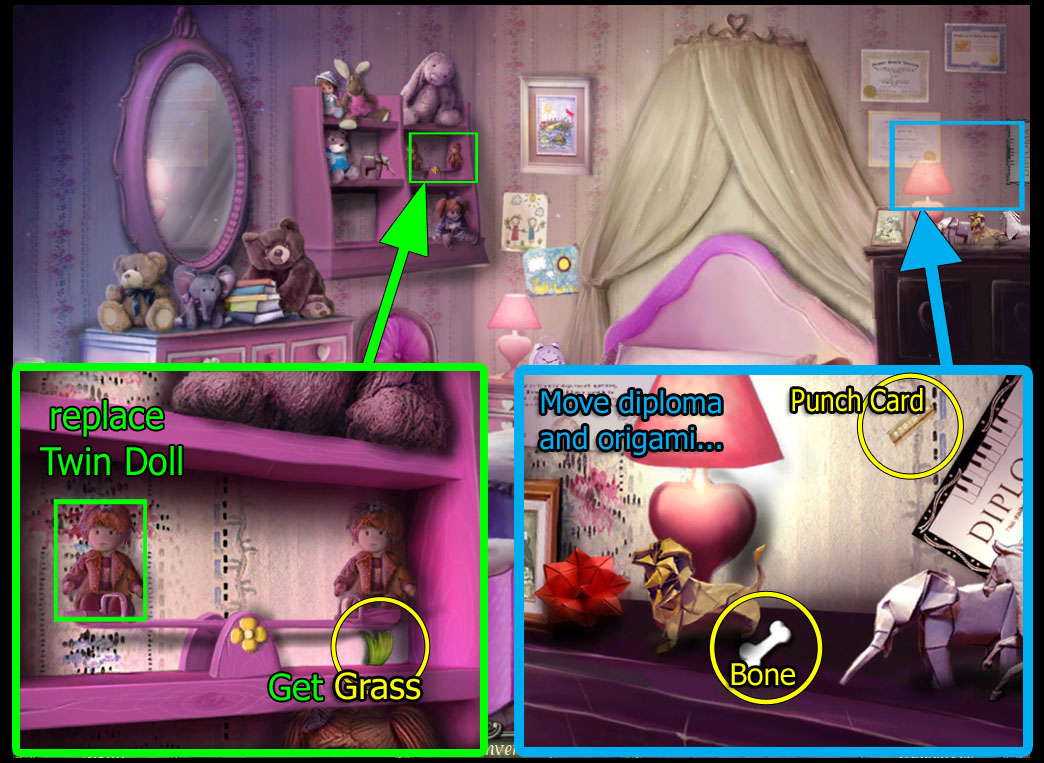
Screenshot: gathering items in Amber's room
With all the lights on, you can now gather some items from Amber's Room...
Zoom in on the chest of drawers next to the bed. Move aside the diploma and origami to get:
PUNCH CARD (4/4).
BONE.
Examine the shelves above the chair; replace the Twin Doll to get:
GRASS.
Play Castle—Hopscotch Puzzle
After getting the fourth punch card from Amber's Room, return to the Play Castle area (back up 3x).
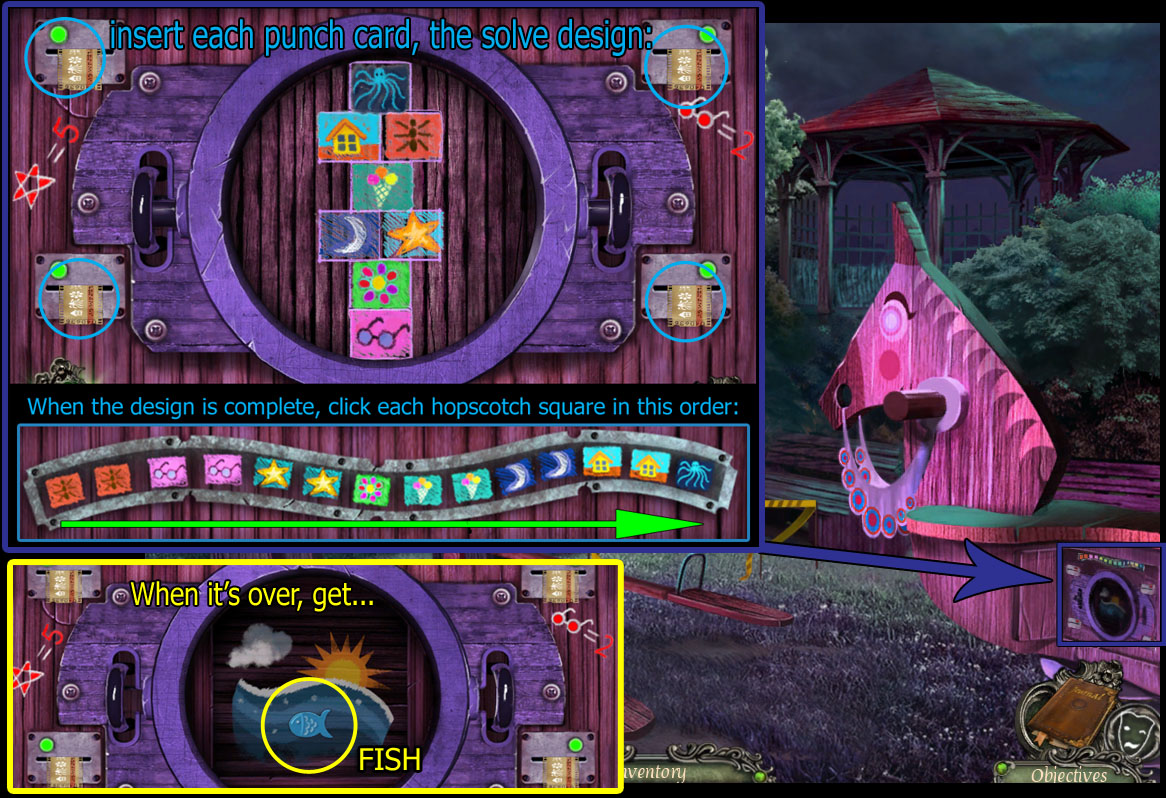
Zoom in on the pink wooden horse and insert the four PUNCH CARDS in the slots provided to start another mini-game:
Screenshot: hopscotch puzzle
The goal is two-fold—first place the symbols in the correct spots on the hopscotch drawing, then repeat the pattern as shown.
Use the clue from your journal (if you don't have the hopscotch clue in your journal, go back to Havenshill and click on the hopscotch squares in front of the music school).
Each number represents a symbol:
1=moon; 2=glasses; 3=ice cream cone; 4=windowed house; 5=star; 6=insect; 7=flower; 8=octopus.
According to the numbers you recorded from the hopscotch pattern in front of the music school, click and drag each symbol into its correct square.
See screenshot above for example.
After all the symbols are placed, click each of the hopscotch squares in the order shown at the top of the screen (it will play a song).
When you're done, the panel will open to reveal a:
FISH. Take it.
Amber's Room—Turtle Puzzle
After getting the fish from the hopscotch puzzle, return to Amber's room (go forward twice, then enter the window).
Examine the turtle design on the dresser:
Screenshot: turtle puzzle
First, replace the missing food for each animal:
Dog gets bone; Mouse gets cheese; Cat gets fish; and Cow gets grass.
Next, match up each animal inside the turtle's shell with its food item.
Click on an item in the margins to send it into the turtles mouth.
When the turtle swallows a food item, the dials inside its shell will turn.
The animal dial turns one notch to the right.
The food dial turns one notch to the left.
The trick is to put the food in the opposite order and in such as a way as the last turns of the wheels will cause the proper line-up between food and animal.
Solution:
Click the food items in this order—
1st bone; 2nd grass; 3rd fish; 4th cheese; 5th fly; 6th ant; 7th worm; 8th carrot.
Screenshot: turtle puzzle solution
When you're done with the turtle puzzle, it will drop off the dresser.
Open the dresser doors and page through the "Origami" book to get:
MAP of the town (clue).
BLANK PAPER.
Screenshot: inside Amber's dresser
Amber's Room—Origami Swan Mini-Game
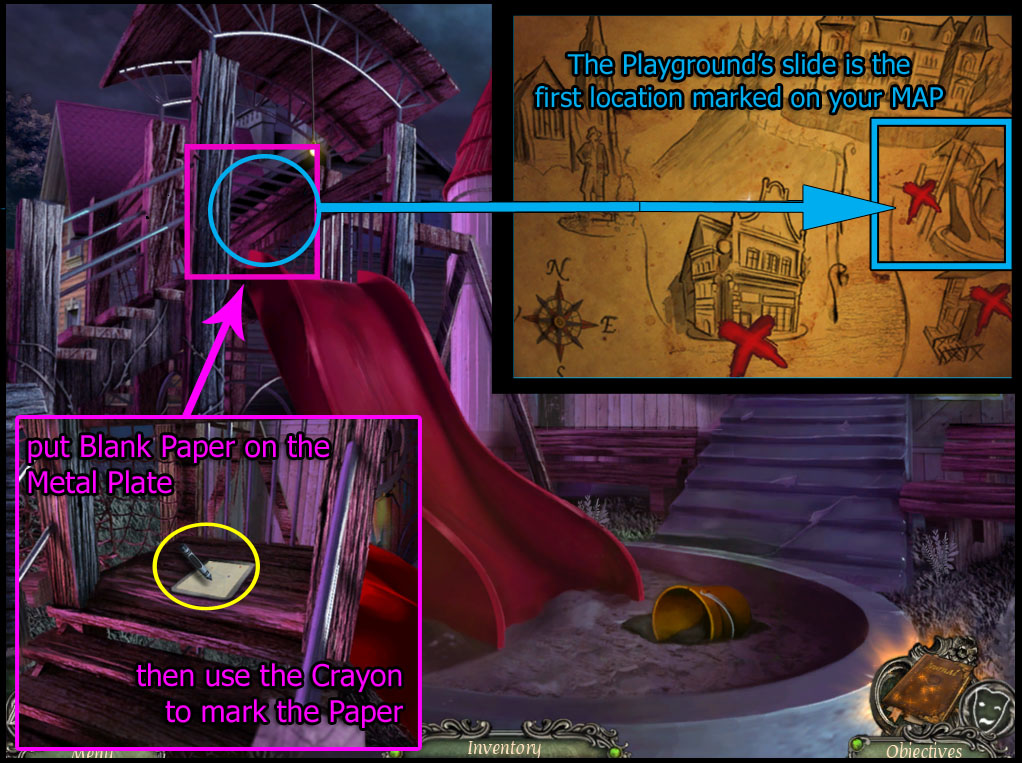
With the BLANK PAPER from Amber's dresser in your possession, check the MAP inside your journal.
As shown on the map, first head back out to The Playground:
Screenshot: map and origami at the slide
Click on the top of the slide and place the BLANK PAPER on the Metal Plate there.
Trace the pattern using the CRAYON (if you don't already have the crayon, it's found in the leaves at the base of the slide).
Now back out and go to Havenhills:
Screenshot: other origami locations
Click on the Metal Plate on the music school's wall. Repeat the same process with the crayon.
Finally, go back one more to the Street:
Click on the Metal Plate on the wall of the coffee shop. Again, use the crayon to trace the pattern.
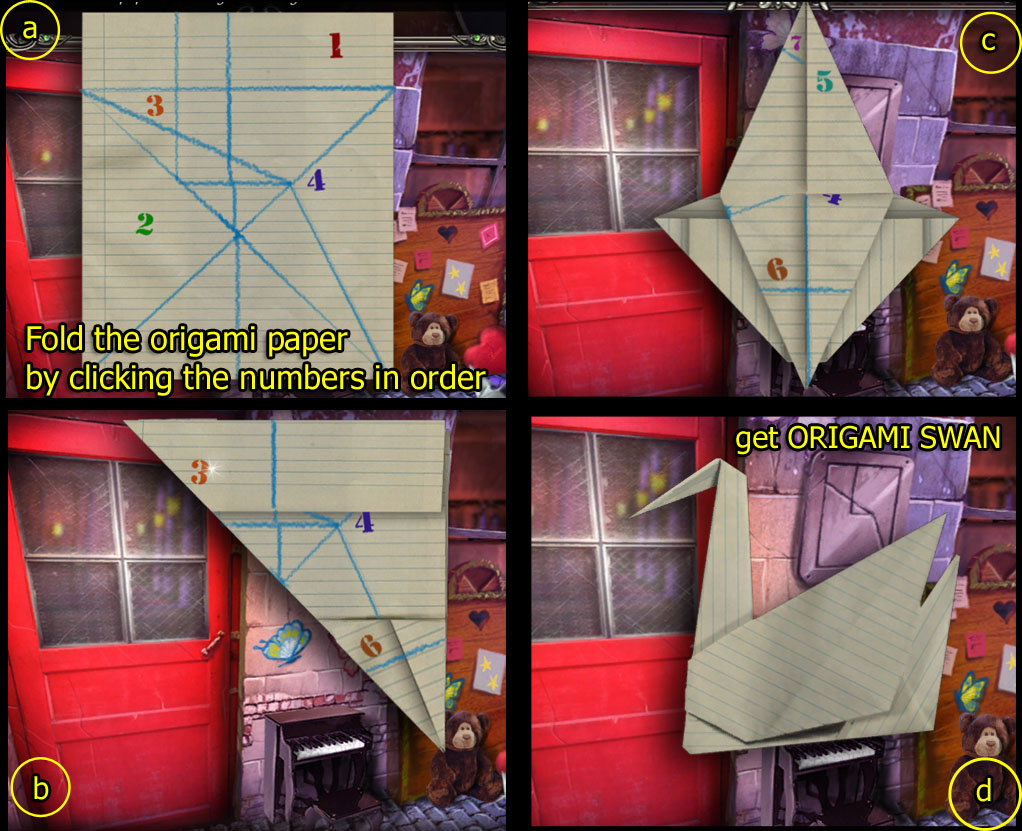
After tracing the pattern at all three spots shown on the map, you'll begin another puzzle:
Screenshot: folding origami
Click on each numbered area of the paper, in order, from 1 to 8.
If you click an incorrect numbered spot, it will either unfold or not be affected.
As you click in the correct spot, the paper will fold up, until you have:
ORIGAMI SWAN.
Go back inside Amber's Room.
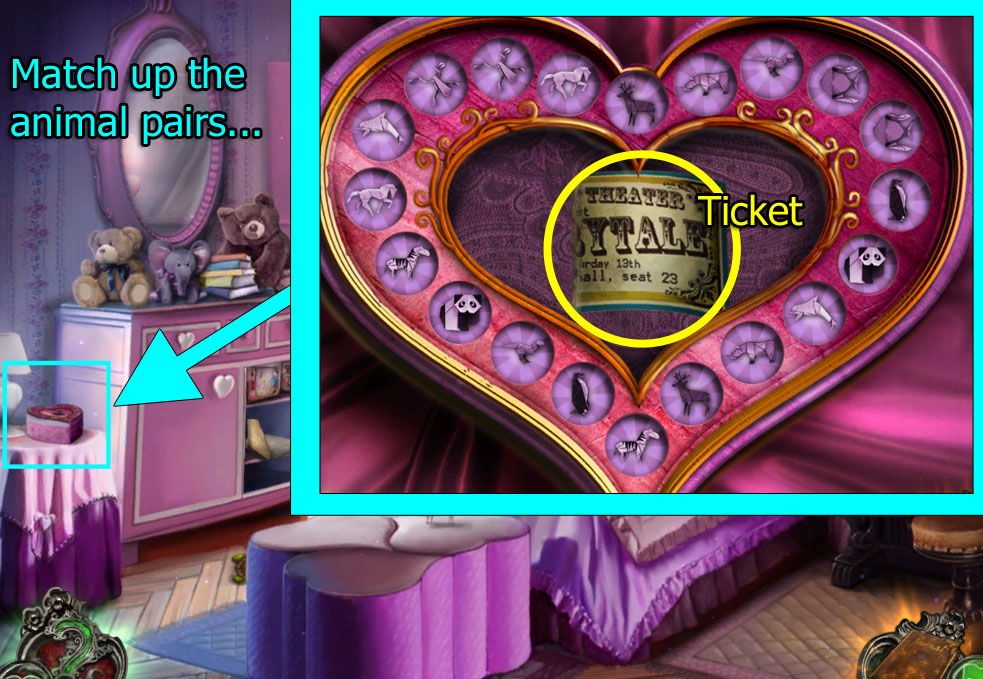
Examine the heart-shaped box on the end table to begin a mini-game:
Match up the pairs of origami animals until all are paired-up.
The easiest way to do this is to start with one spot and follow it around the track. Keep clicking that spot and successively move over until you've found its match. Now you'll have two "landmarks" to stay orientated.
See screenshot below for an example solution (yours might vary):
Screenshot: swan mini-game
When you've finished the swan mini-game, get the...
TICKET (1/2).
Then head back toward town.
Tombstone Puzzle, Mirror and Theater Ticket
Go to Havenhills, where you can talk to Ben's mom again. She explains about a red light coming from the church.
Before you leave, click on the toy cart to begin another Hidden Object Search:
Screenshot: Havenhills hidden object search #2
Find all the items on your list (screenshot above is an example, your list might vary) to get:
CROSS.
Now continue through town to the Cemetery.
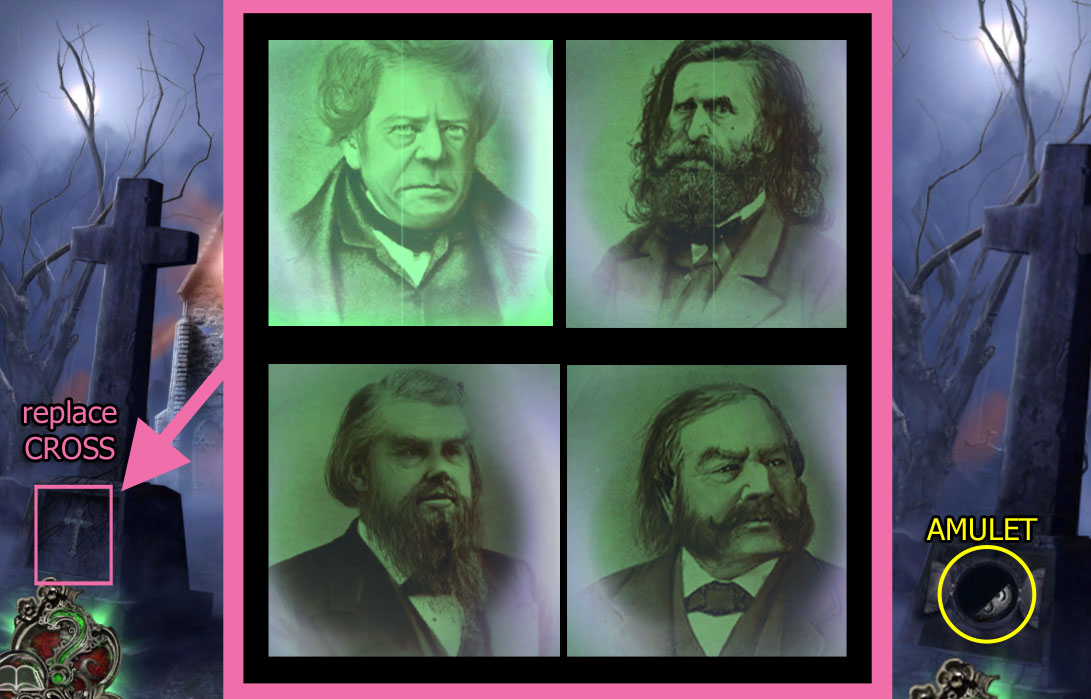
Replace the CROSS into the large tombstone on the left to begin another puzzle:
Unscramble the pictures until all four images are matched and complete.
Perhaps the best way to solve this is to focus on completing one picture at a time. It also helps to start at the top left, and cycle through each segment so that all the heads are upright before you begin.
Each click on a button will turn the images in its column or row 1/4 turn clockwise. As you click on each square, it will flip through a set of four image quarters.
The buttons at the top and sides control the direction of the images in this way:
The top, left button controls the image quarters in the left column.
The top, right button controls the image quarters in the right column.
The buttons on the side control the top and bottom rows accordingly.
See the screenshot for an example:
Screenshot: tombstone puzzle
When you have completed all four pictures, a panel in the tombstone slides open, and you can take:
AMULET (2/2).
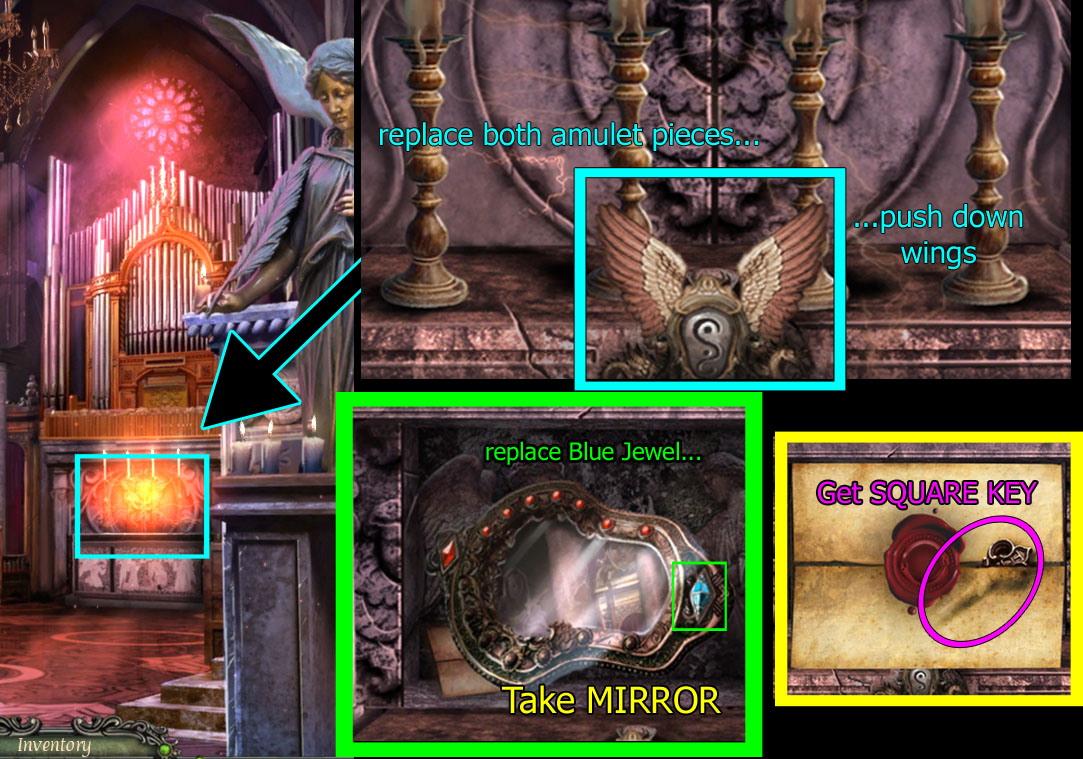
Go into the Church.
Screenshot: church altar
Zoom in on the altar in back and replace each half of the amulet into its slot.
(If you haven't gotten the first amulet half yet, click on the church bulletin board to do the Child's Photos puzzle.)
Wings will appear when the amulet is in place.
Click on the left and right wings to fold them down. This will cause the panel to open, revealing the cursed mirror.
Put the BLUE JEWEL (from "Act I") in the empty setting.
Take the MIRROR and, from behind it, unfold the note to get the SQUARE KEY.
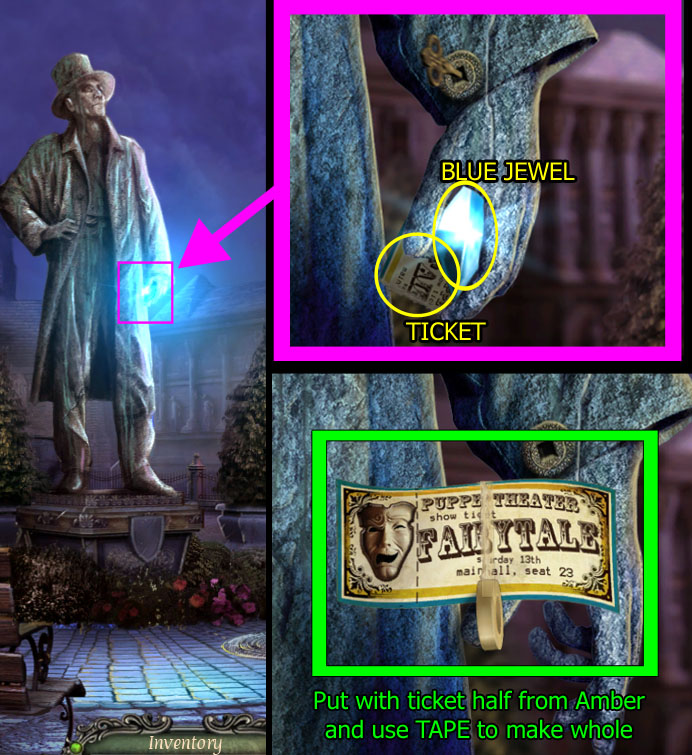
Head back to Town Square and click on the statue's hand:
Screenshot: Town Square statue
Use the SQUARE KEY on the keyhole in the statue's sleeve.
Get the BLUE JEWEL.
Then, take the other TICKET (2/2):
Put together the ticket half from the statue and the ticket half you found in Amber's room.
Then use TAPE to hold them together.
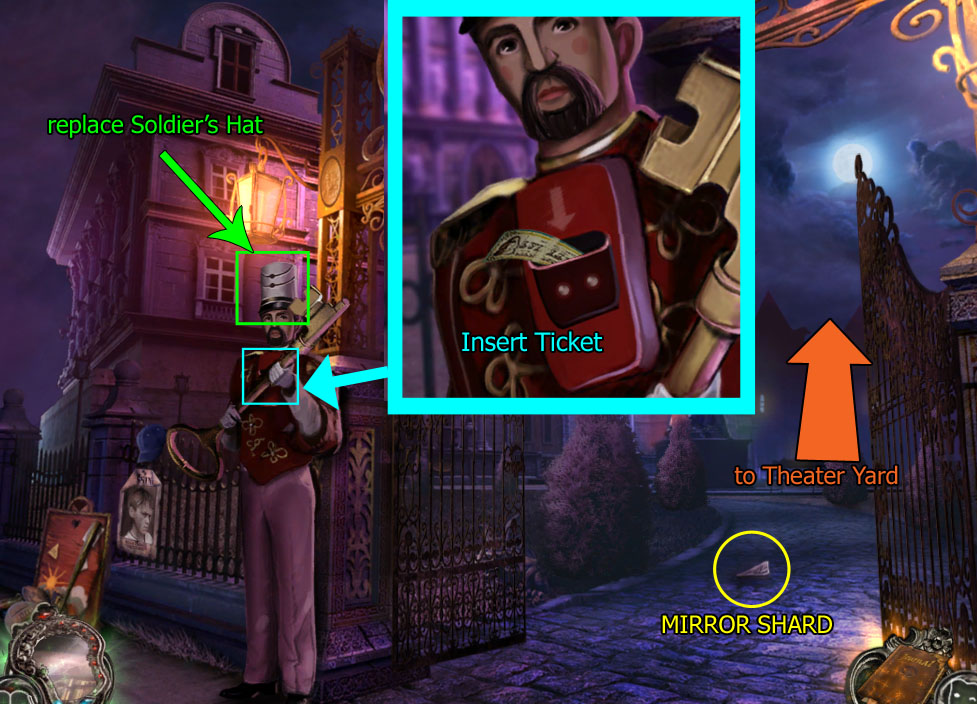
Go forward to the Intricate Gate:
Screenshot: opening the Intricate Gate
First, put the SOLDIER'S HAT back on the toy soldier's head.
Next, insert the TICKET, and the gates will open.
Pick up the MIRROR SHARD.
Go forward to The Theater Yard.
Part Three
Theater—yard, backyard and workshop
After first opening the Intricate Gate, before entering the Theater Yard, remember to pick up the MIRROR SHARD (1/5). You can see it on the Theater Yard pathway before going through the gates, but it can't be accessed from inside the yard and may be missed because of this.
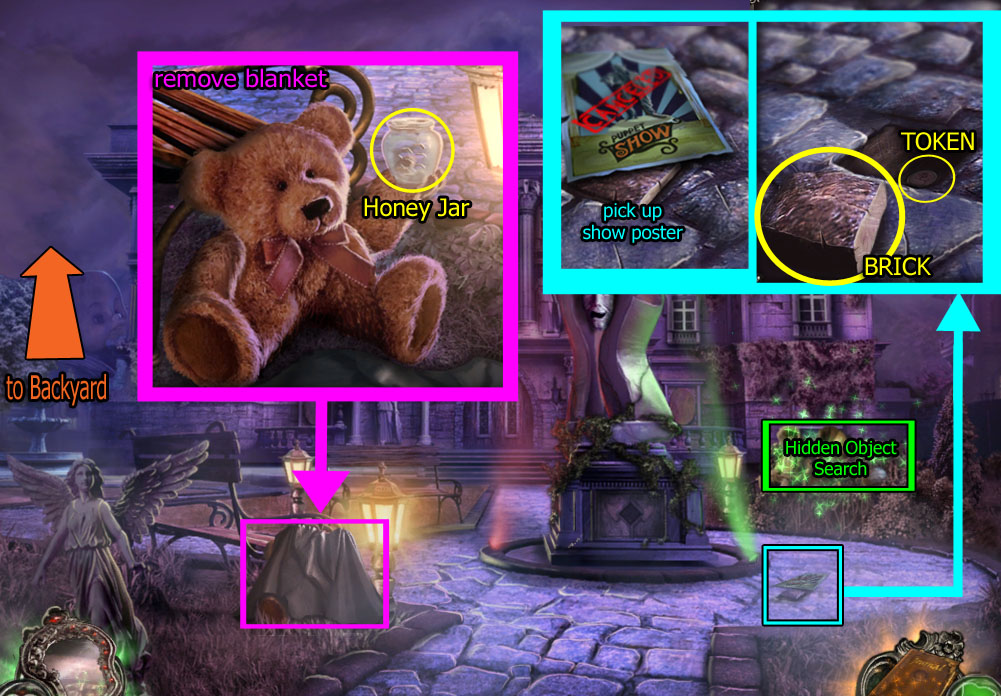
Inside the Theater Yard, zoom in on the blanket-covered teddy bear on the left side of the path:
Screenshot: Theater Yard
Click to remove the blanket.
Then, get the empty honey JAR.
Examine the poster on the ground, next to the sculpture:
Pick up the poster; underneath is a loose brick.
Use the CROWBAR 3x to remove the BRICK:
Get the BRICK,
and get the TOKEN (1/3).
Now zoom in on the bench in the background to begin another Hidden Object Search scene:
Screenshot: hidden object search in Theater Yard
Find all the objects on your list (screenshot is an example, your list may vary) to get:
PEARL (1/5).
Go forward, along the left path through the backyard, continuing forward to The Workshop.
Screenshot: workshop/bee smoker
Zoom in on the steps of the workshop:
Get the BEE SMOKER.
Also pick up the origami horse (help note).
Go back to The Backyard:
Screenshot: bees and honey
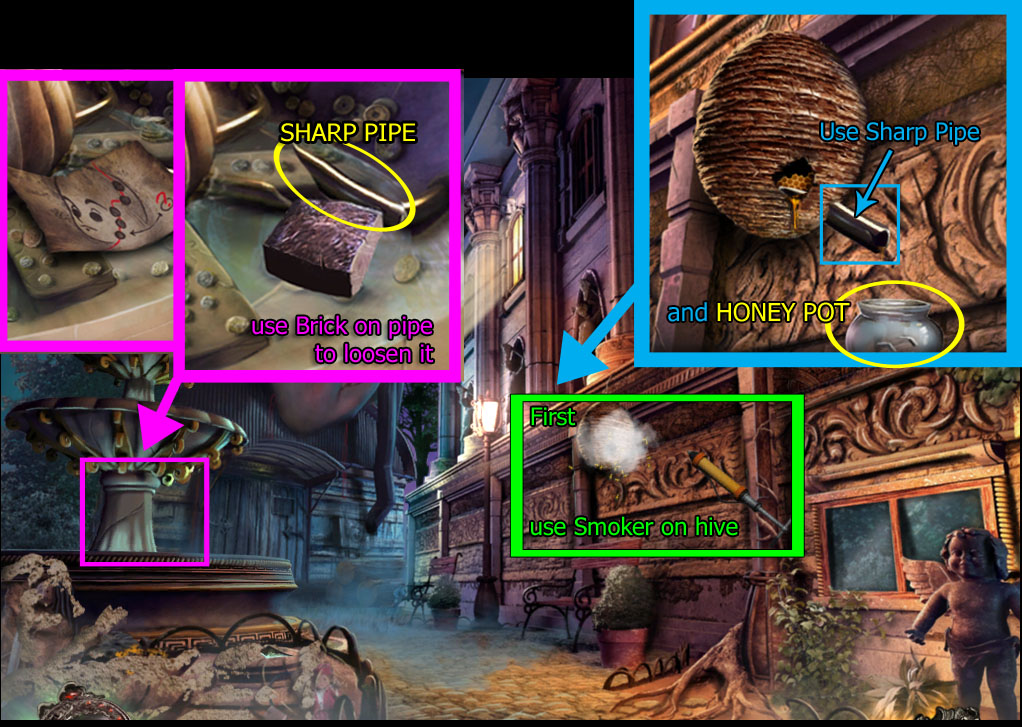
Examine the fountain:
Pick up the clue about the doll's head pearls.
Then, use the BRICK to knock loose the pipe on the right and get...
SHARP PIPE.
Back out from the fountain.
Use the BEE SMOKER on the bee hive. Then, zoom in closer to the hive:
Use the SHARP PIPE to pierce into the hive's honey.
Collect the honey in the HONEY JAR to get:
FULL HONEY JAR.
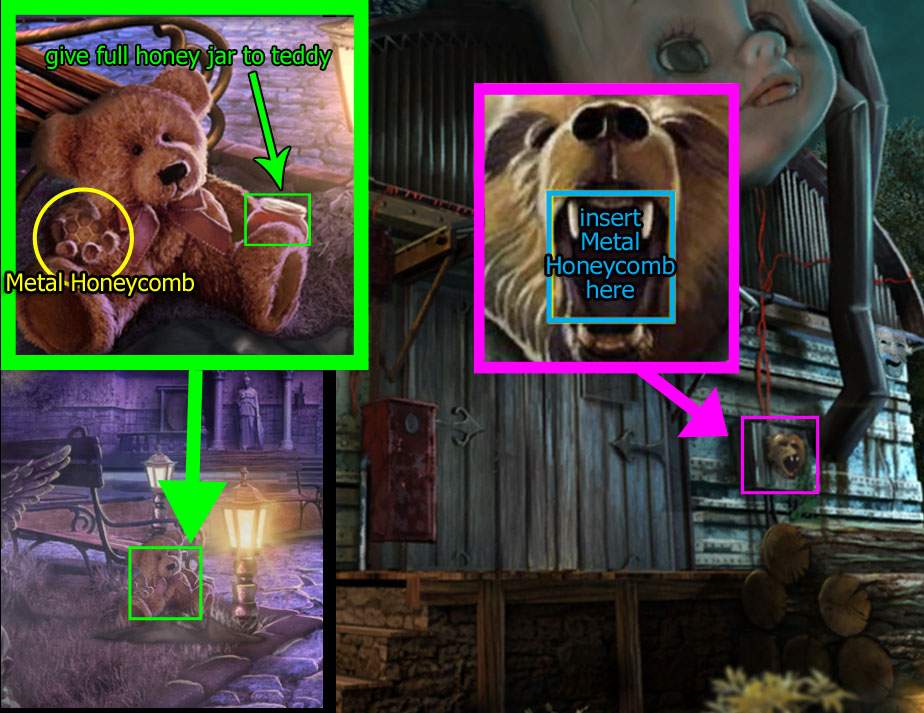
Return to the Theater Yard and give the FULL HONEY JAR to the teddy bear. He will hold out a...
METAL HONEYCOMB. Take it.
Go forward twice to The Workshop again. Zoom in on the bear's head by the workshop door:
Screenshot: workshop lights
Open the bear's mouth and place the METAL HONEYCOMB inside.
The bear's head lock falls off.
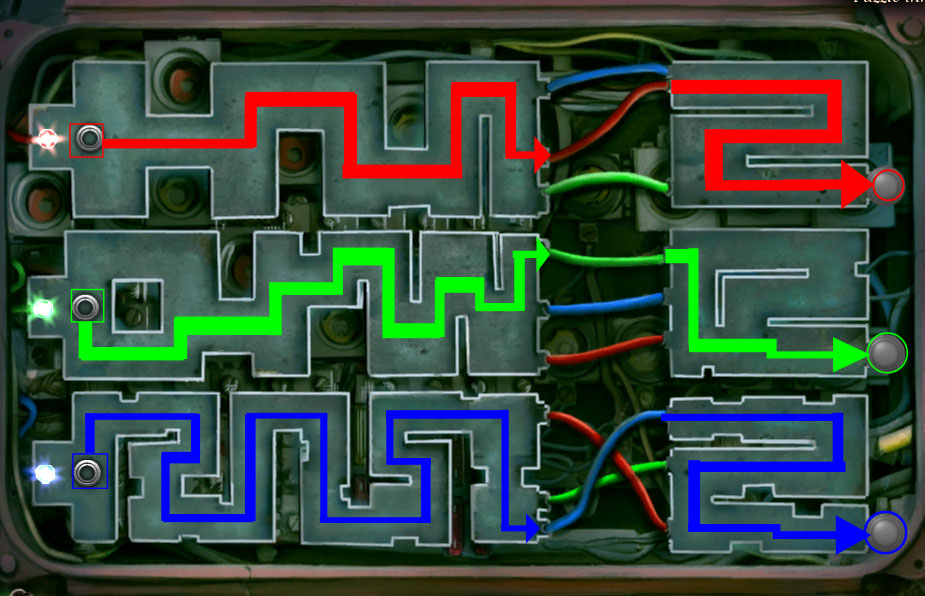
Screenshot: electric panel mini-game
Open electric panel to begin another mini-game:
The goal is to guide each of the colored lights from the left side to the sockets on the right side of the maze.
Using your mouse, click on the socket then trace a path through the maze, avoiding walls.
When you reach the wires, send the light to the same colored wire, then continue to the end.
When you've completed the puzzle, the lights on the side and back of the workshop will turn on.
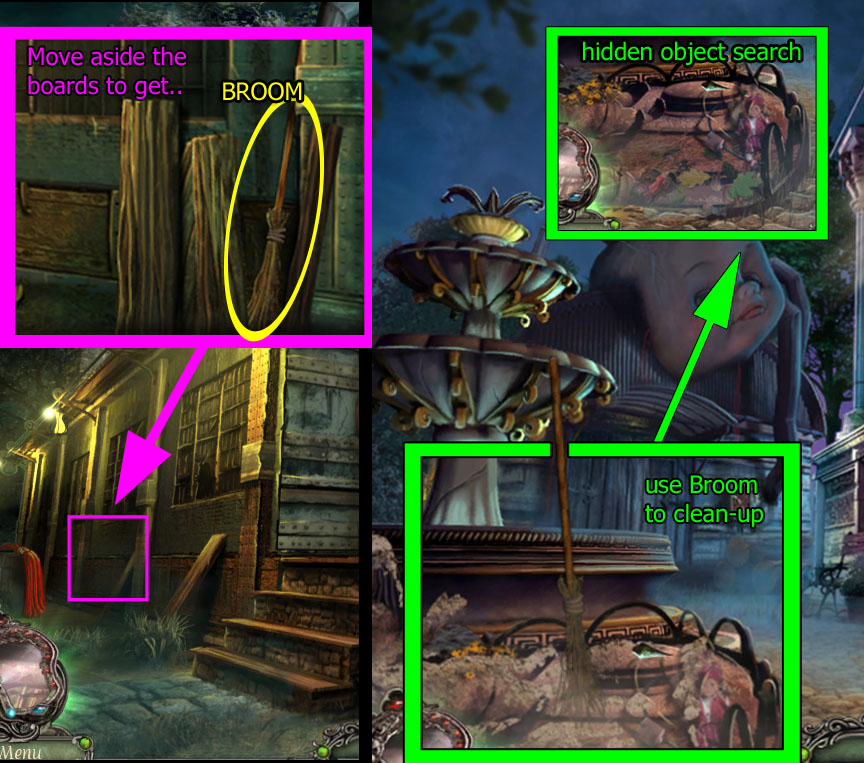
Examine the left side of the building:
Screenshot: broom and sweeping backyard
Move the boards aside to get the BROOM.
Return to the backyard. Use the BROOM on the dirty area at the base of the fountain.
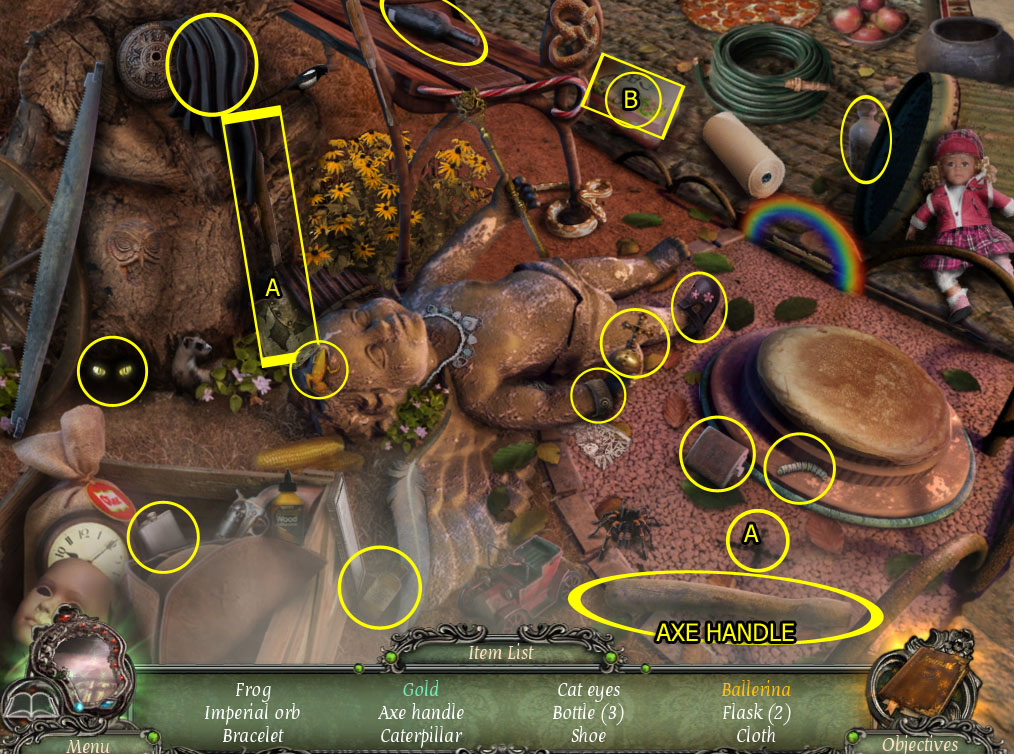
When it's cleaned, examine the base of the fountain for another Hidden Object Search scene:
Screenshot: hidden object search by fountain
Find all the objects on your list (screenshot above is an example; your list might vary) to get the...
AXE HANDLE.
Go to the Workshop again and zoom in on the tree on the right side of the screen:
Screenshot: chopping tree and reaching roof
Use the AXE HANDLE on the axe head stuck in the tree to get the completed AXE.
Then, using the AXE 3x, cut down the tree.
Now you can zoom in on the doll's head and take the:
MEDALLION.
Go back to the Theater Yard.
Theater—"Act Two" and Basement
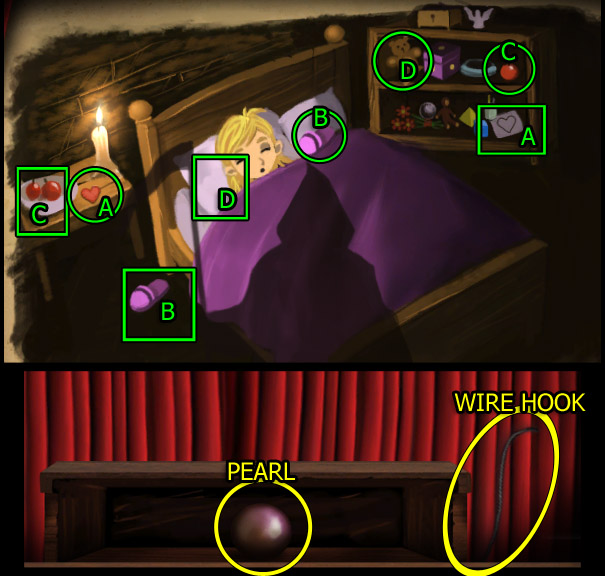
Examine the base of the sculpture in the center of the Theater Yard.
Use the MEDALLION to access Act Two of the puppet show, A Tale of Loss:
Screenshot: sculpture base/act 2 scene 1
Screenshot: act 2 scene 2
As in Act One, in each scene, replace the items in their proper spots.
When complete, you can get two things:
another PEARL (2/5)
and a WIRE HOOK.
Return to the Backyard and use the WIRE HOOK to jimmy the window open.
Go through the window into the Theater Basement:
Screenshot: into the basement
Examine the newspapers on the floor; click twice to move them out of the way then get:
CARDBOARD FIGURE
and the second TOKEN (2/3).
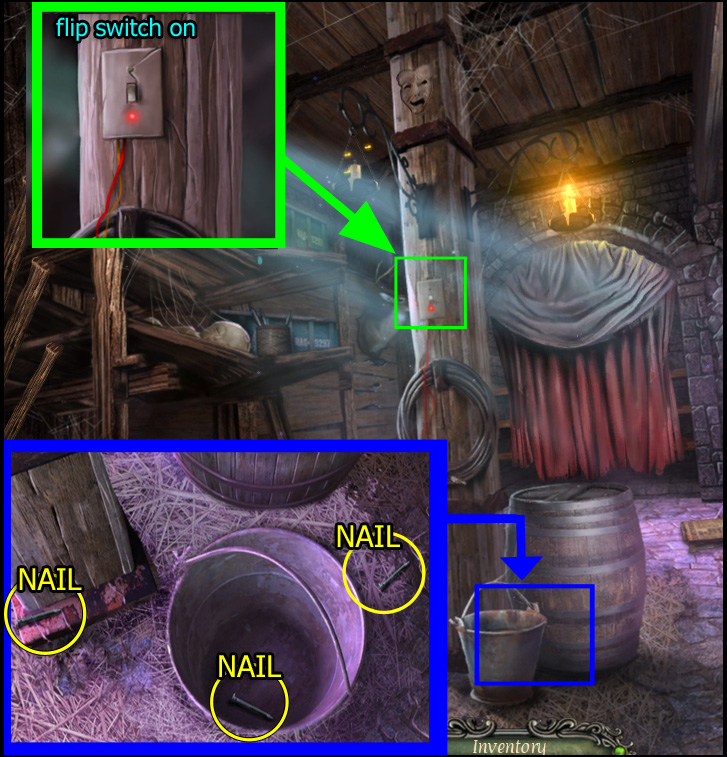
Now zoom in on the bucket at the base of the support beam:
collect 3 NAILS.
Screenshot: making a way out
Flip the light switch; this will make the ladder boards fall back into place:
Use each of the 3 NAILS to secure the boards.
Hammer the nails into place with the BRICK.
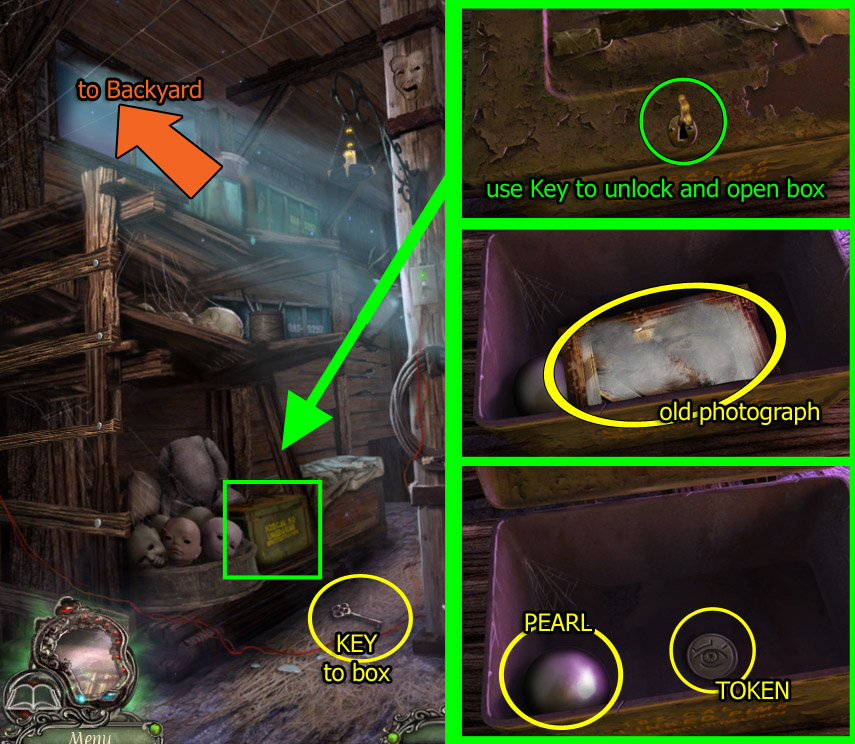
All the commotion caused the box KEY to fall down off the top shelf. Pick it up.
Zoom in on the box on the bottom shelf:
Screenshot: inside the box
Using the KEY to unlock it, open the box. Take out the OLD PHOTOGRAPH. Then you can reach two more items:
the third TOKEN (3/3)
and another PEARL (3/5).
Go out through the window to the Backyard.
Fountain Mini-Game and stairs Backstage
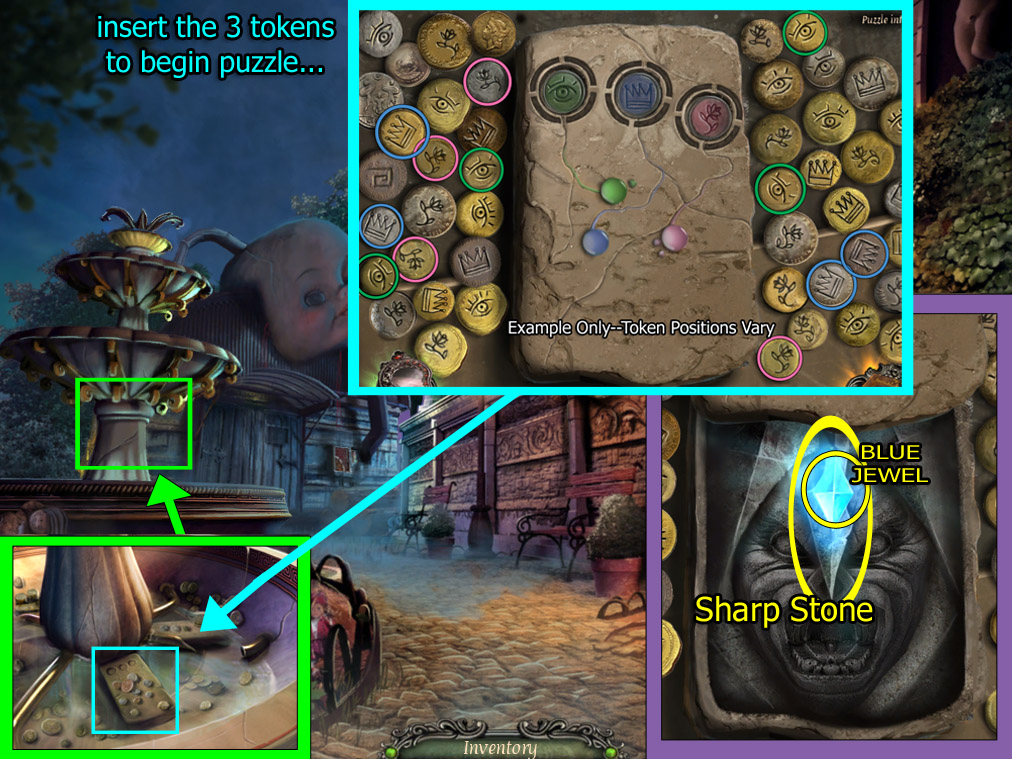
Zoom in on the fountain in the Backyard. Click on the stone covered with coins to start minigame:
Screenshot: fountain mini-game
First, insert each of the three TOKENS and rearrange them into the correctly-colored slots.
Then, click on all coins in the margin that perfectly match the designs on the three colored tokens.
Every time you make a mistake, the last token you gathered will return to the margins and mixed in.
There are four matching coins for each colored token.
Continue until all colored buttons are lit up and flashing.
When the mini-game is complete, click the three flashing buttons and the stone will open so you can take:
BLUE JEWEL
and SHARP STONE.
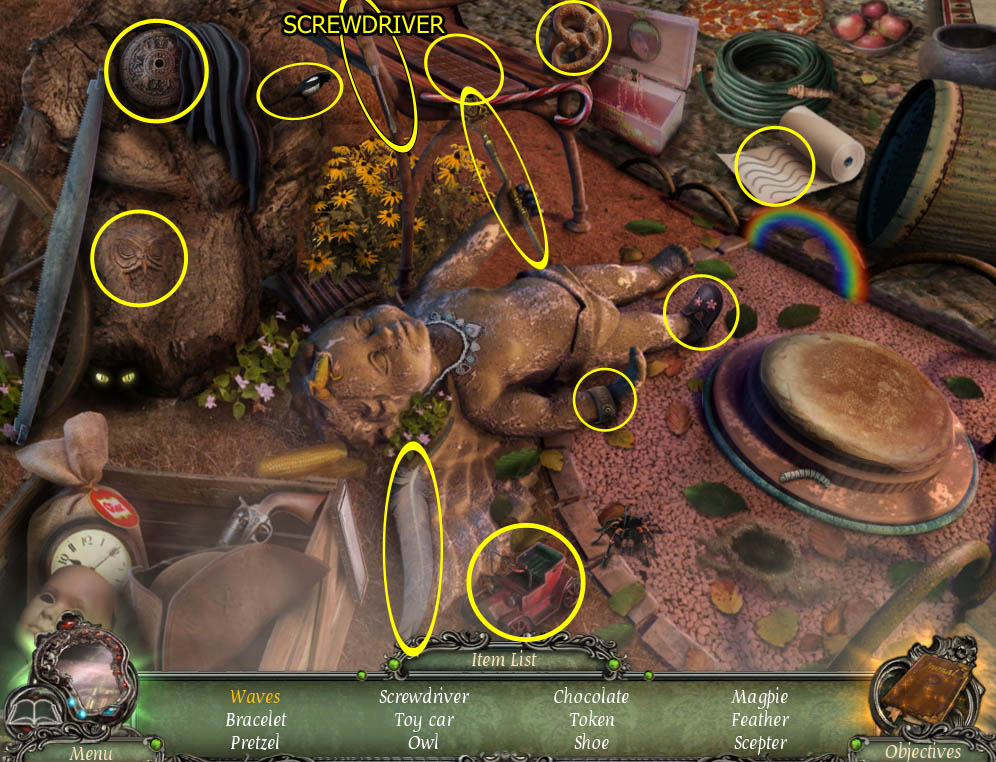
A new Hidden Object Scene is ready at the base of the fountain. Click there to begin:
Screenshot: hidden object search at Fountain
Find all the objects listed (screenshot is an example; your list might vary) to receive:
SCREWDRIVER.
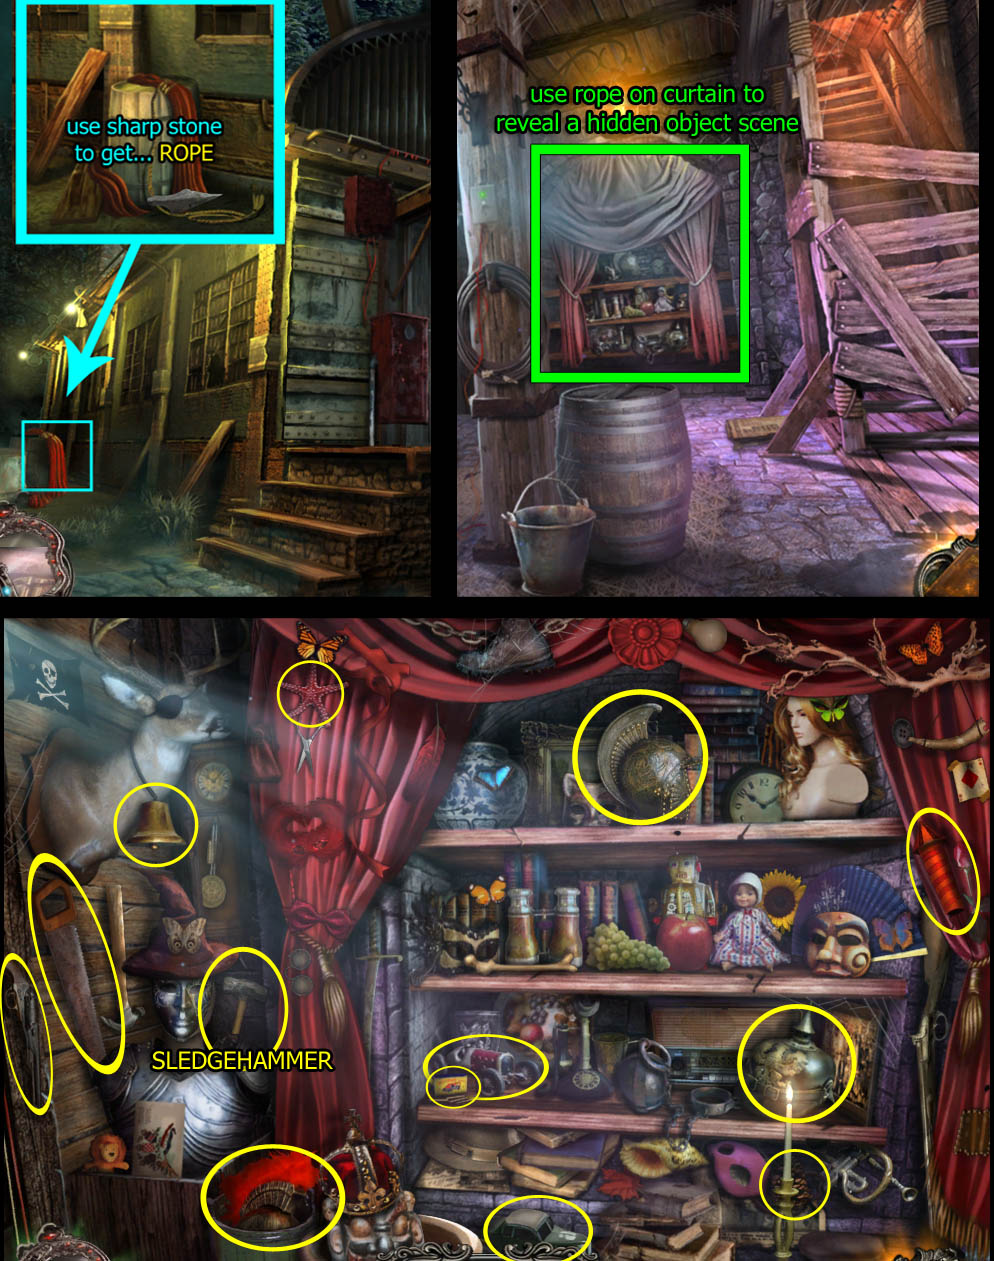
Go back to the Workshop and click on the left side of the building:
Use the SHARP STONE to cut off a section of rope from the discarded curtains.
Then go back and enter the window to the Basement:
Screenshot: Basement hidden object search
Use the ROPE to pull back the curtains in the basement.
Click the revealed area to begin another Hidden Object Search.
When you've found all the items on your list (screenshot is an example; your list might vary), you'll receive:
SLEDGEHAMMER
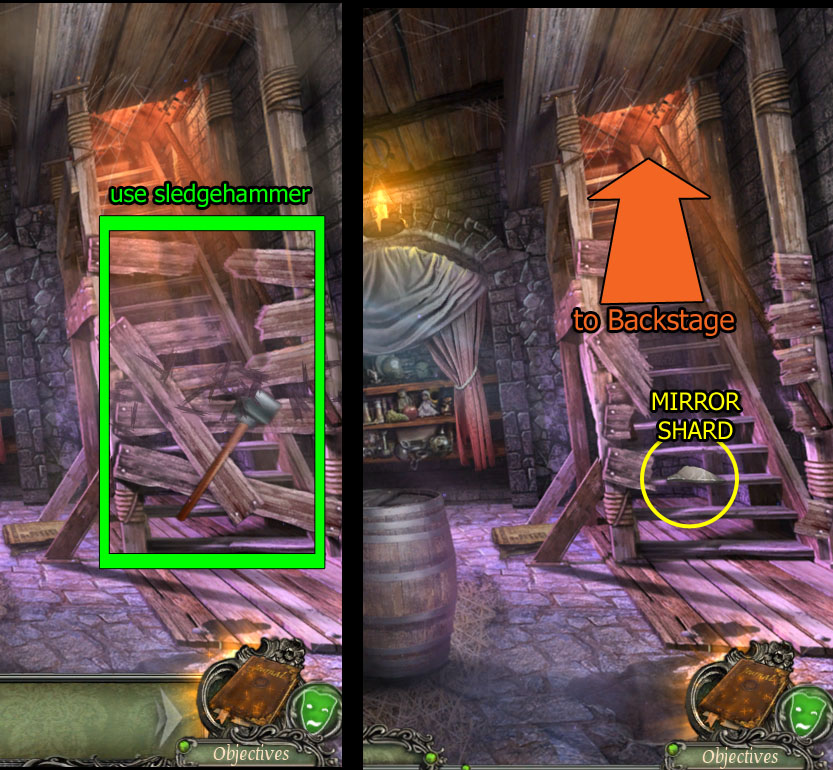
Use the SLEDGEHAMMER to break through the barrier blocking the backstage stairs.
Pick up another MIRROR SHARD (2/5) then go upstairs.
Screenshot: from basement to backstage
Backstage and Music Puzzle
When you first climb up the stairs from the basement, the curtains between Backstage and stage are closed.
Screenshot: Backstage
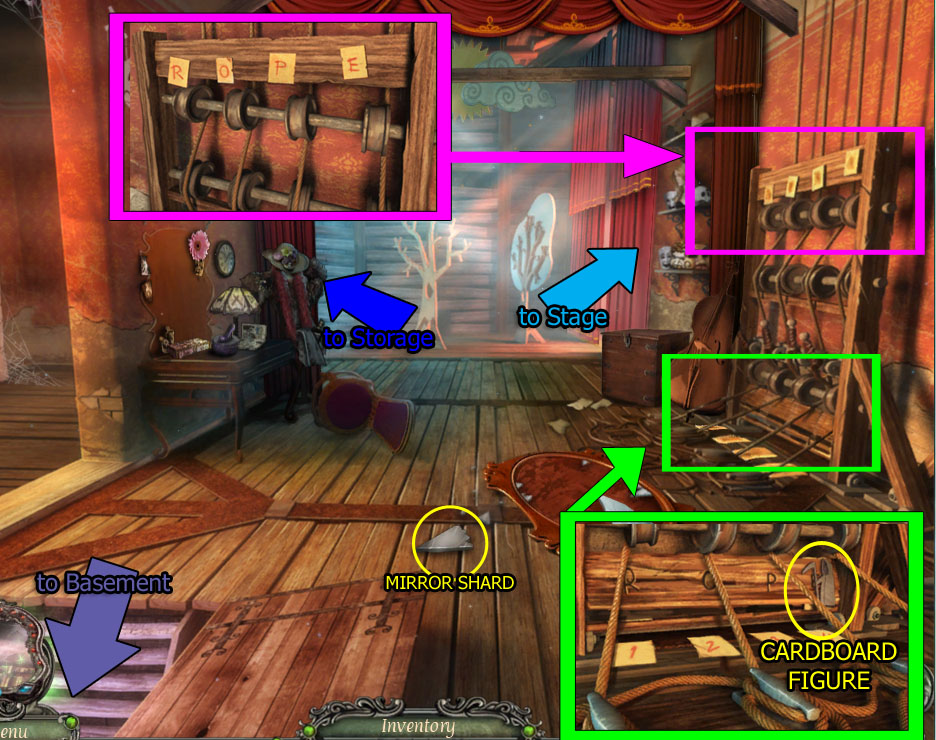
Examine the bottom half of the pullies:
Arrange the numbers in the correct order. Then, click on each to make them fall.
Grab the CARDBOARD FIGURE.
Back up then zoom in on the top of the pullies.
Arrange the letters to spell "ROPE" and the curtains will open.
Pick up the MIRROR SHARD (3/5).
Go right toward The Stage. Zoom in and pull the lever on the right side of the room, turning on the lights.
Screenshot: Stage
Then examine the boards at the base of the prop bridge:
Remove the cover and open the toolbox:
Take the NAIL PULLER.
Move the loose floorboards:
Get the MIRROR SHARD (4/5).
Go back to the Basement:
Use the NAIL PULLER to open the barrel.
Get the TRANSPARENT SHEET MUSIC.
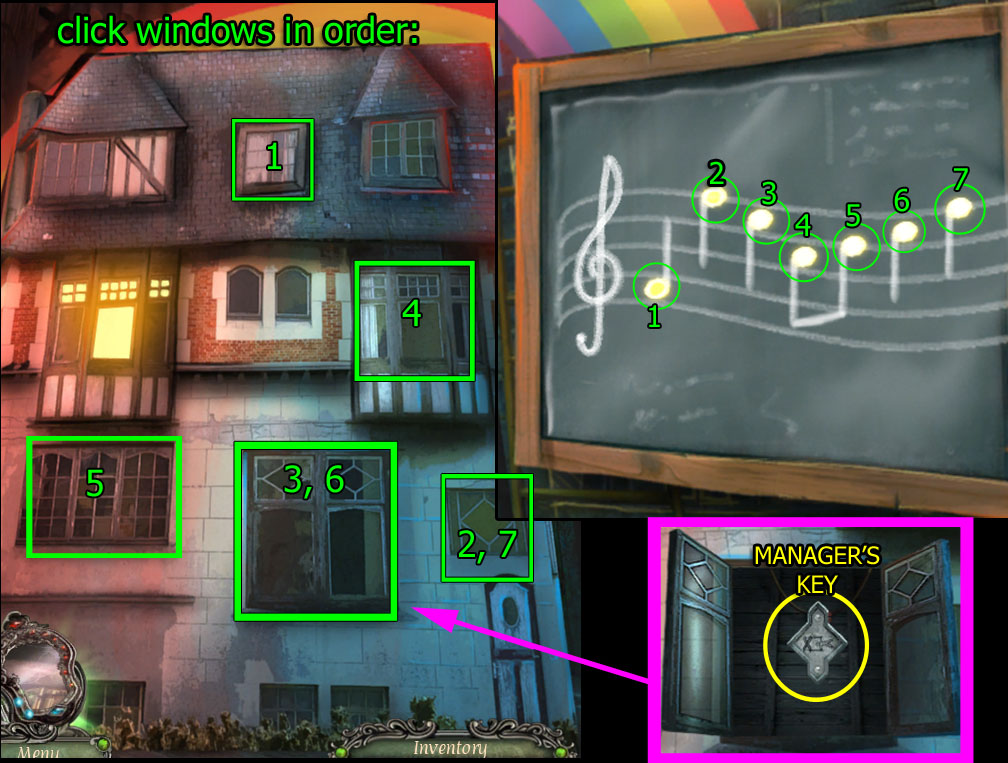
Return to the Stage and put the TRANSPARENT SHEET MUSIC on the chalkboard to begin a puzzle:
Screenshot: music notes puzzle
The goal is to light all the notes.
Each window will light one on key/note on the board. Click each window and note where its note is on the musical scale.
Then, click the windows in the proper order to light up each musical note.
See screenshot above for example.
When you've completed the puzzle, a window will open to reveal:
MANAGER'S KEY. Take it.
Storage and Vanity Mirror
Screenshot: storage room
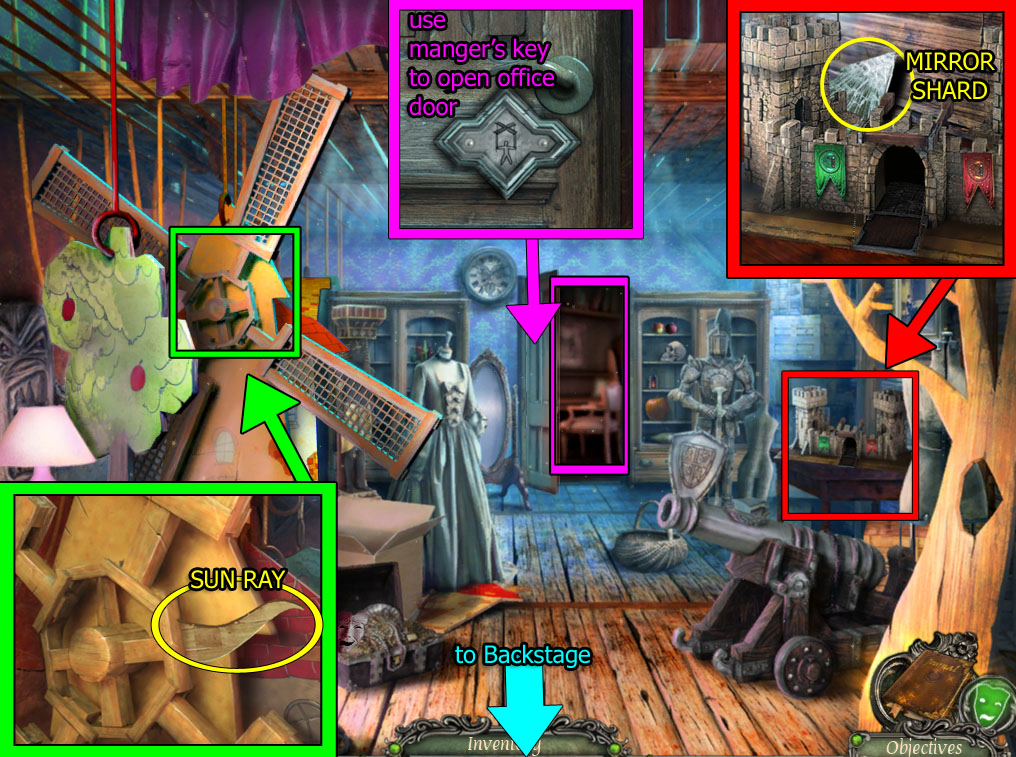
Zoom in on the door in the back of the storage room:
Insert the MANAGER'S KEY and push it into the lock.
Click the door handle to open the door.
There's nothing needed in there for now, so back out.
Examine the Windmill:
Take the SUN RAY.
Examine the Castle on the right:
Take the last MIRROR SHARD (5/5).
Screenshot: mirror puzzle
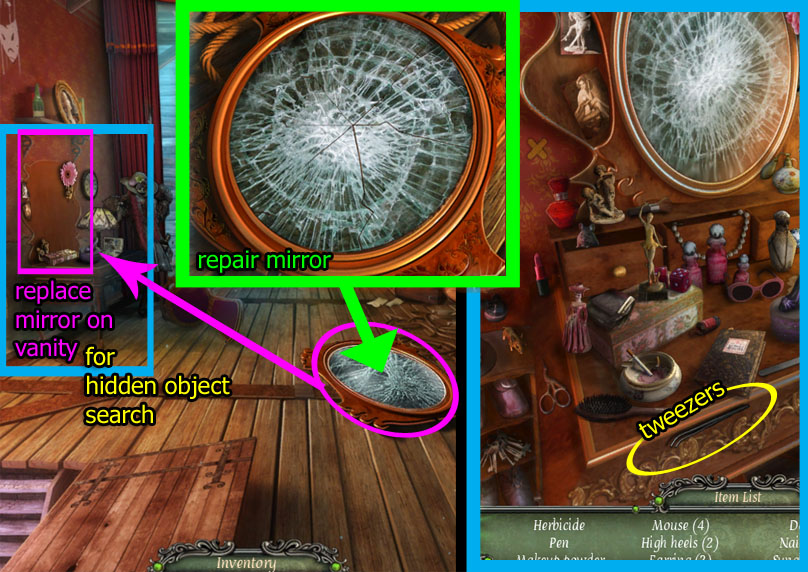
Return to Backstage. Zoom in on the broken mirror frame on the floor. Use the 5 MIRROR SHARDS to begin a puzzle:
Reassemble the broken mirror.
Left click to grab and drag a mirror shard to where you want it.
Right click to rotate the mirror shard 1/4 turn.
See screenshot for example.
When the mirror is reconstructed, pick it up and put it back on the wall above the vanity table.
A new Hidden Object Search is now available at the vanity:
Find all the objects listed (screenshot is example; your list may vary) to receive:
TWEEZERS.
Go through the Storage and through the door to the Manager's Office.
Manager's Office and Boiler Room
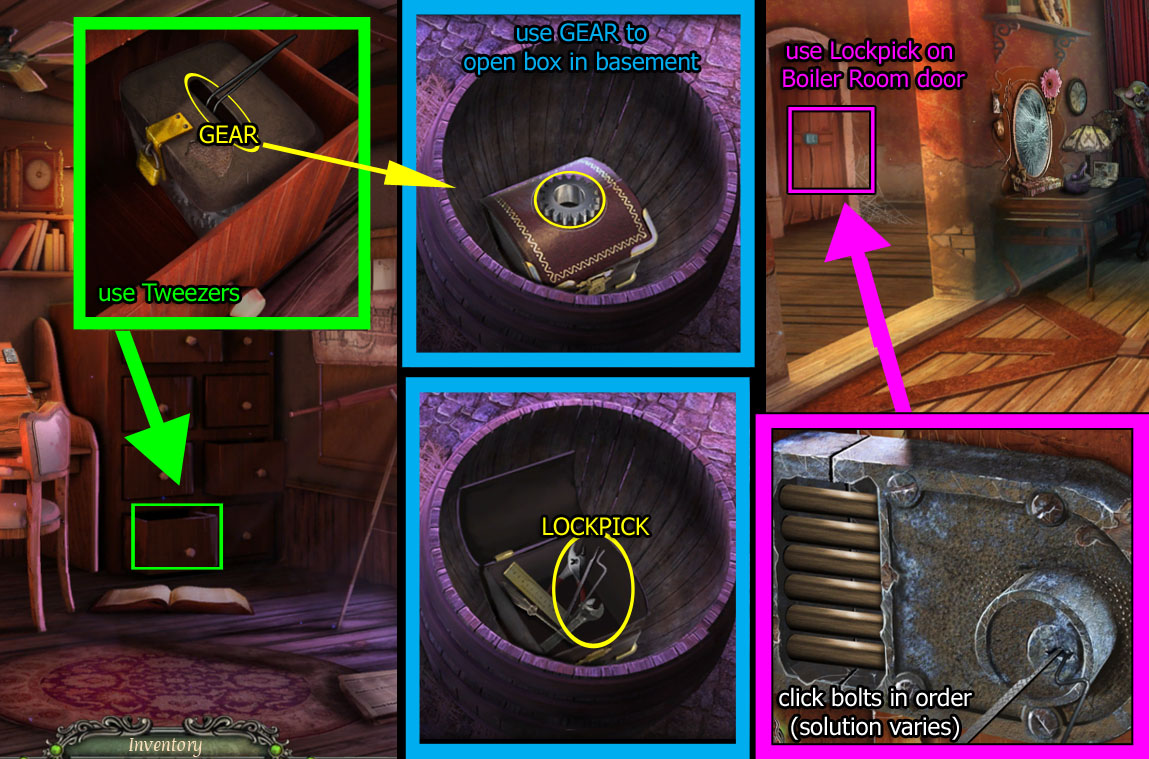
Go into the Manager's Office and look in the bottom drawer of the cabinet:
Screenshot: picking the lock
Use the TWEEZERS to get the GEAR from the box slot.
Return to the Basement:
Use the GEAR to unlock the box in the barrel.
Open the box to get LOCKPICK.
Go upstairs to Backstage and examine the door on the left:
Use the LOCKPICK to begin another puzzle:
Click the bolts in the correct pattern to release the lock (solutions vary).
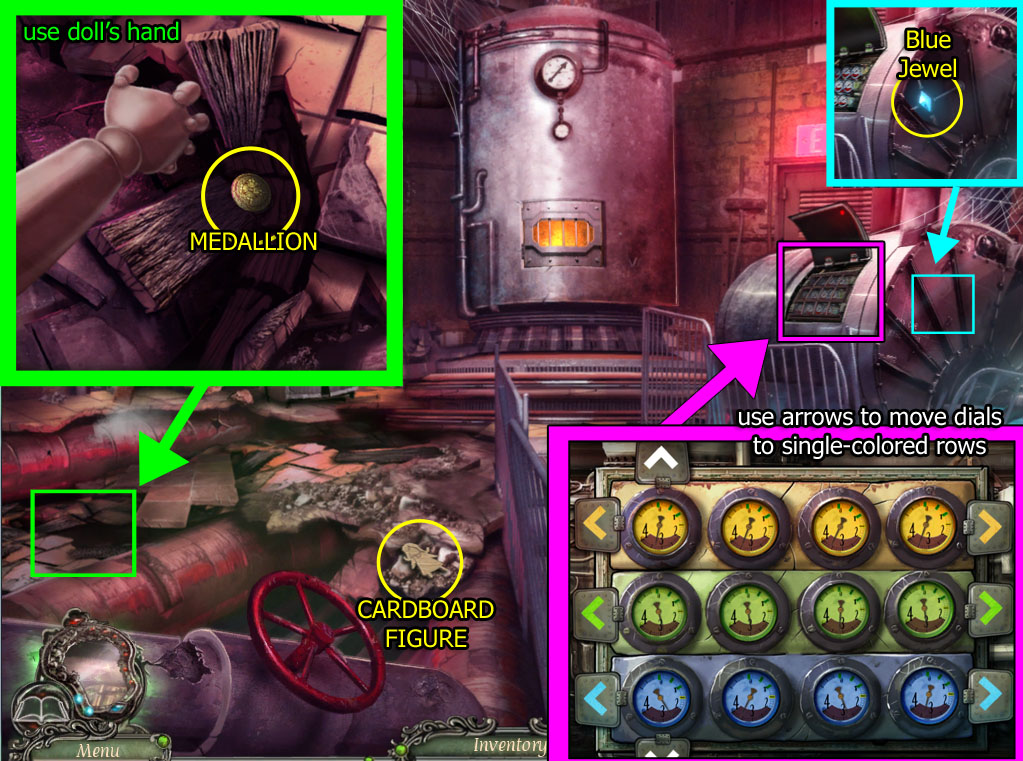
Go through the now open door to the Boiler Room:
Screenshot: boiler room
Pick up the CARDBOARD FIGURE (3/4).
Zoom in on the hole in the floor:
Use the DOLL'S HAND to get:
MEDALLION.
Examine the covered panel on the boiler on the right:
Use the SCREWDRIVER to remove the cover and begin a mini-game:
Use the arrows to shift the colored dials until all yellow are on top, all green are in the middle and all blue are on the bottom.
Your solution may vary.
When completed, a panel will open on the side:
Take the BLUE JEWEL.
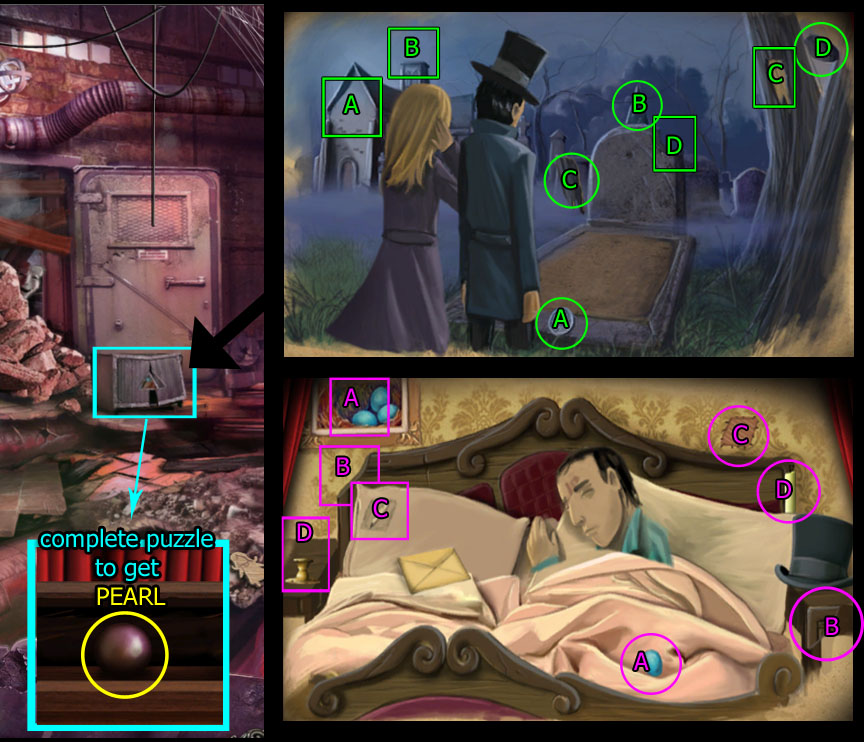
Examine the Metal Box near the rubble to begin Act Three of the puppet show puzzle:
Screenshot: act three
Put the pieces back in place to solve each of the two scenes.
When finished, a panel will open so you can get:
another PEARL (4/5).
Return to the Backstage area. Use the MEDALLION to open the trunk:
Click 3 times to move the clothing out of the way.
Get the MEDALLION.
Go back through Storage and into the Manager's Office.
Inside the Manager's Office, pick up the CLUE posted on the wall above the telescope.
Screenshot: trunk backstage and manager's office
Examine the coat on the coatrack:
Use the SHARP STONE to remove 3 buttons, adding to the one you found earlier in Havensgrove.
Zoom in on the desk:
Insert the 4 BUTTONS in the slots and open the panels.
Place the CARDBOARD FIGURES on the sketch and arrange them accordingly.
When finished, open the next slot to get...
the last PEARL (5/5).
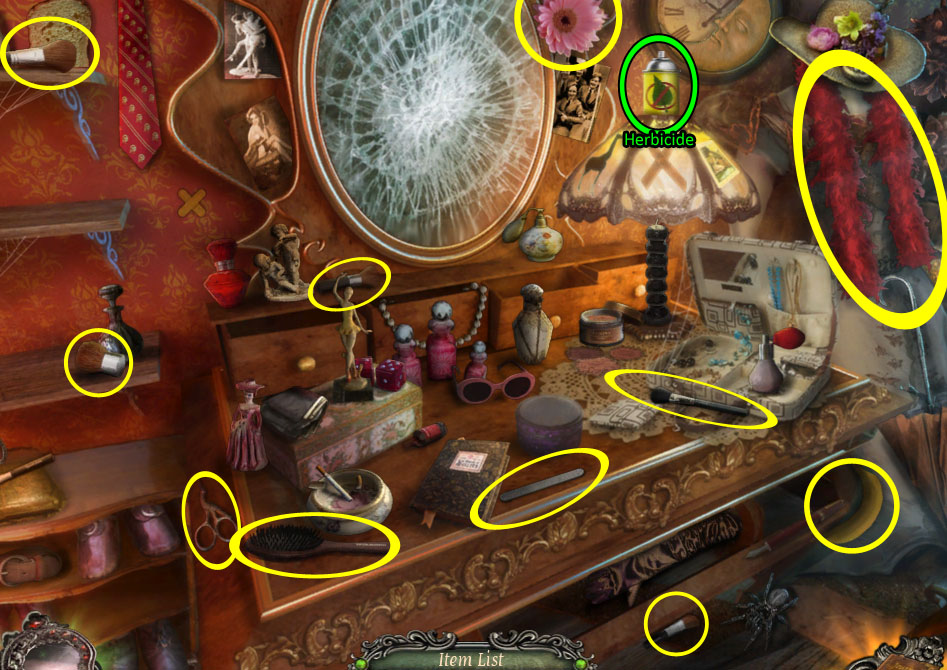
Leave the Manager's Office and back out again to the Backstage. Another Hidden Object Search is ready at the vanity table:
Screenshot: hidden object search on vanity table
Find all the objects on your list (see screenshot for example; your list may vary) to get HERBICIDE.
Go back through the basement, out the window, and to the Workshop.
The Doll's Head
Back at the Workshop, go up on the roof and replace the 5 PEARLS in the doll's head:
Screenshot: doll's head
When you first insert the pearls, they'll be out of order.
Look closely at the lines drawn into each PEARL and make sure the lines on the pearls match the lines on the doll's head.
When a pearl is inserted into its correct spot, a wave of electricity will pulse through it.
With all pearls in place, the doors to the Doll Manufactoring Room will open. Go inside.
Continued in Part Four
More walkthrough is coming soon. :)
Posted by: elle |
June 9, 2012 12:26 PM
|
June 9, 2012 12:26 PM
Hidden Masks Locations
Finding Hidden Masks:
Most scenes in Rite of Passage: The Perfect Show have a theatrical mask hidden within it.
When you enter a scene containing a hidden mask, the mask icon in the right corner of your navigation bar will glow green.
After you've found that scene's hidden mask the icon should turn grey to indicate you no longer need to search for it.**
Finding them all is a bonus side quest that has no affect on the game as a whole (it's just a fun thing to collect them!)
**Note about the "Tied Hands" scene and other mask mysteries:
There is no mask in the close-up scene when your (the teacher's) hands are tied-up. A green glowing mask in the bottom right corner is just a small glitch in the system.
*There are also reports of that green glow repeating in scenes where you have already found the mask. Again, most likely a glitch.
This list accounts for all 55 masks in both the Standard Edition (42 masks) and Collector's Edition (13 masks) of the game. If your count matches this list based on places you've visited, then you have found all there is to find.
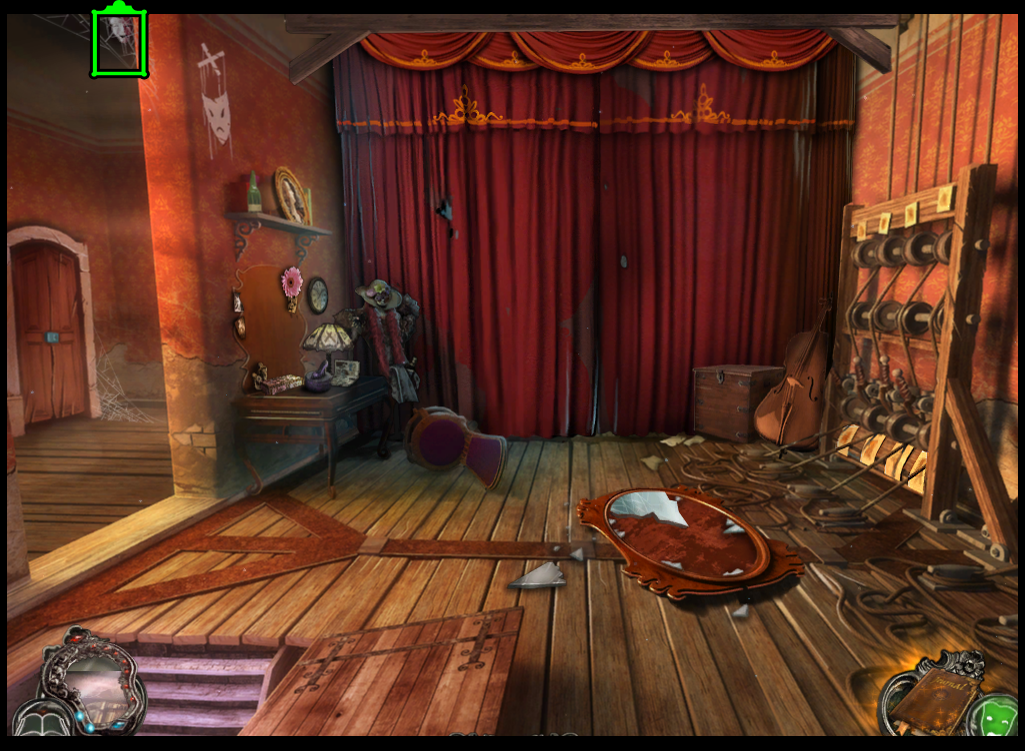
Masks in the Main Game
DINER
On the shelf above the counter, just to the left of the painting and the bottle.
screenshot: mask 1
STREET
On the upper left pillar of the building's roof, above the "Kendall" sign.
screenshot: mask 2
HAVENHILLS
In the shadows of the far upper right corner.
screenshot: mask 3
LAKE
On the right edge of the screen, between two tree branches.
screenshot: mask 4
TOWN SQUARE
On the lamp post on the left side of the screen.
screenshot: mask 5
PLAYGROUND
On the canopy's support post, to the left of the slide.
screenshot: mask 6
PLAY CASTLE
On the gazebo's center post, just below the roof line.
screenshot: mask 7
HAVENGROVE (woods)
In the burr of a tree, middle right edge of the screen.
screenshot: mask 8
INTRICATE GATE
Just above the wooden soldier's head, on the gate's frame.
screenshot: mask 9
CEMETERY
On the tree on the right right edge of the screen.
screenshot: mask 10
CHURCH
Under the angel's right wing.
screenshot: mask 11
AMBER'S HOUSE
In the round attic vent just below the front peak of the roof.
screenshot: mask 12
AMBER'S ROOM
On the chair to the right of the dresser.
screenshot: mask 13
THEATER YARD
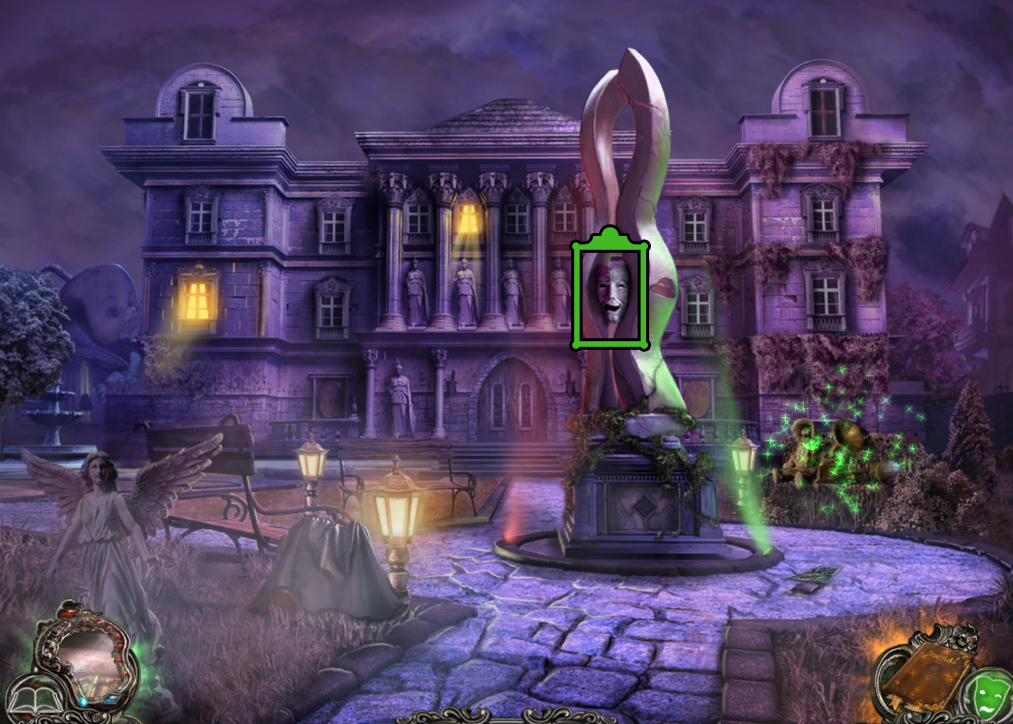
In the midle of the statue in the middle of the theater yard.
screenshot: mask 14
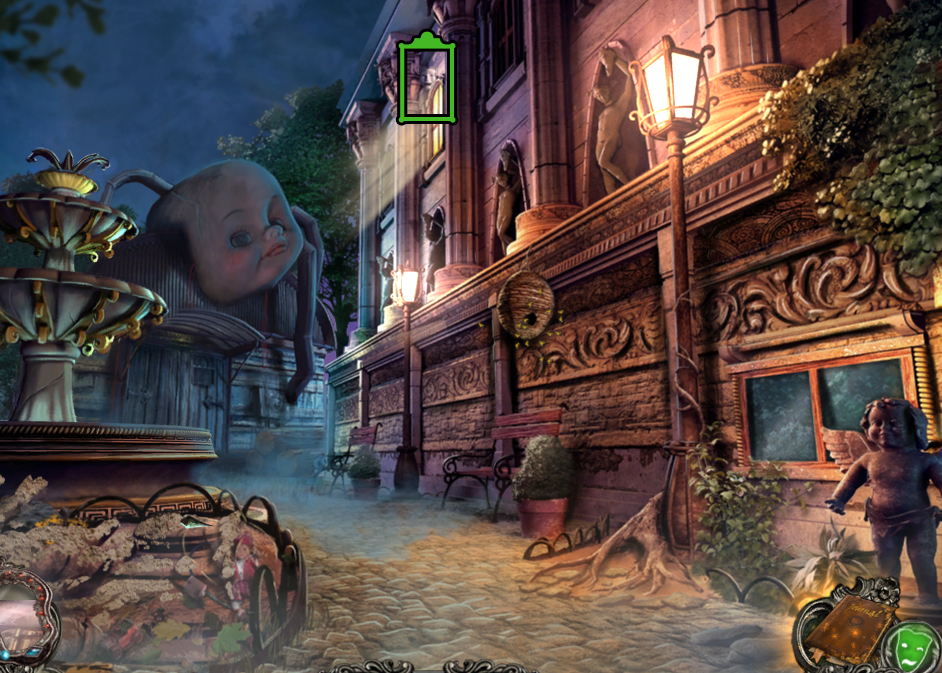
BACKYARD
On the top between the 2nd and 3rd columns, above the lit window.
screenshot: mask 15
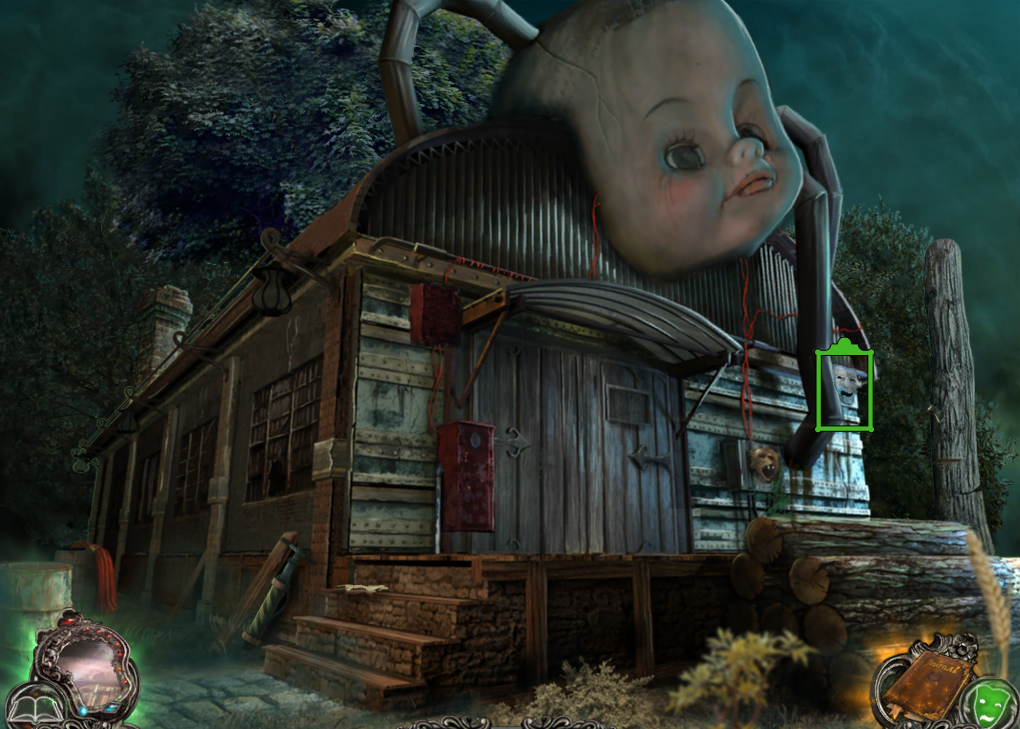
WORKSHOP
On the right side of the building, on the edge, just right of the pipe going into the bear.
screenshot: mask 16
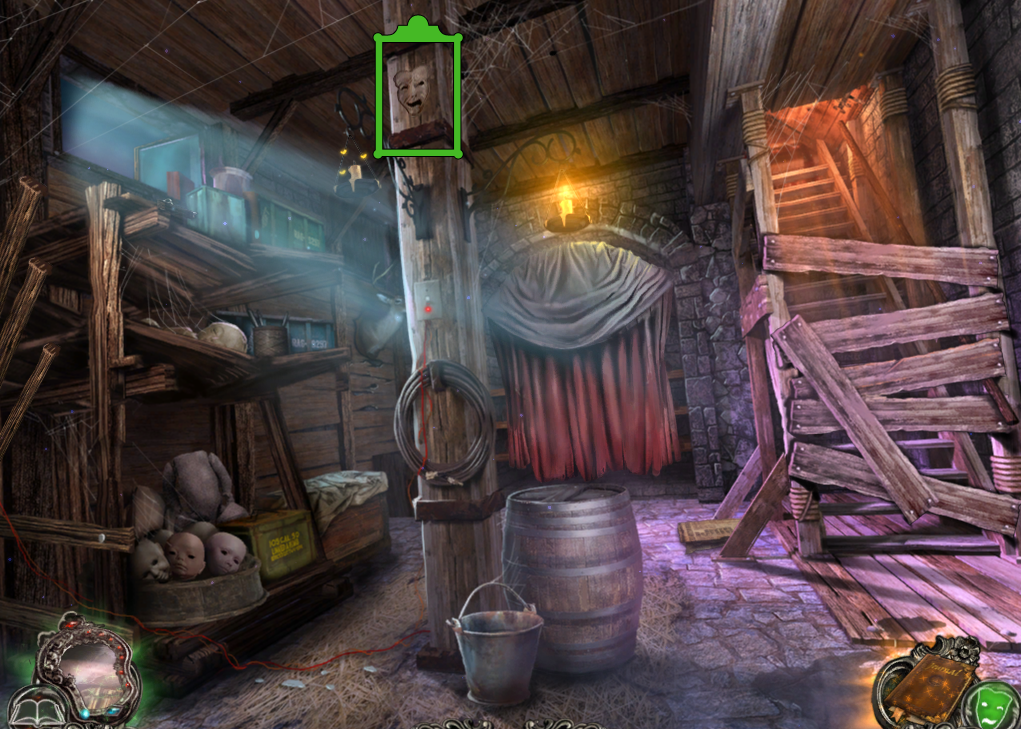
THEATER BASEMENT
On the top of the support pillar in the middle of the room.
screenshot: mask 17
BACK STAGE - first visit
Up in the left corner, in the spider web.
screenshot: mask 18
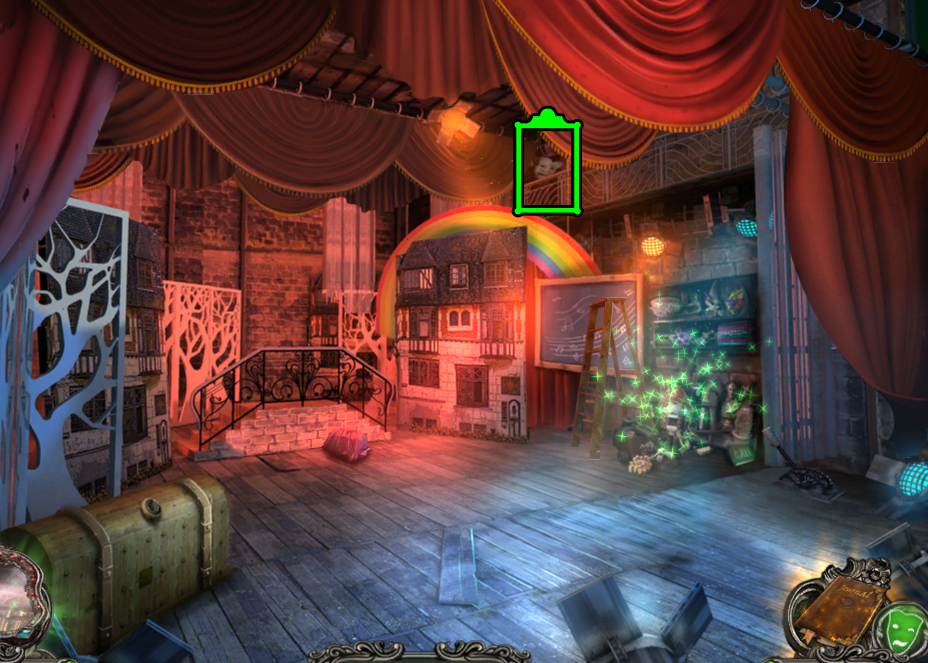
STAGE
Up in the catwalk railing, above the rainbow.
screenshot: mask 19
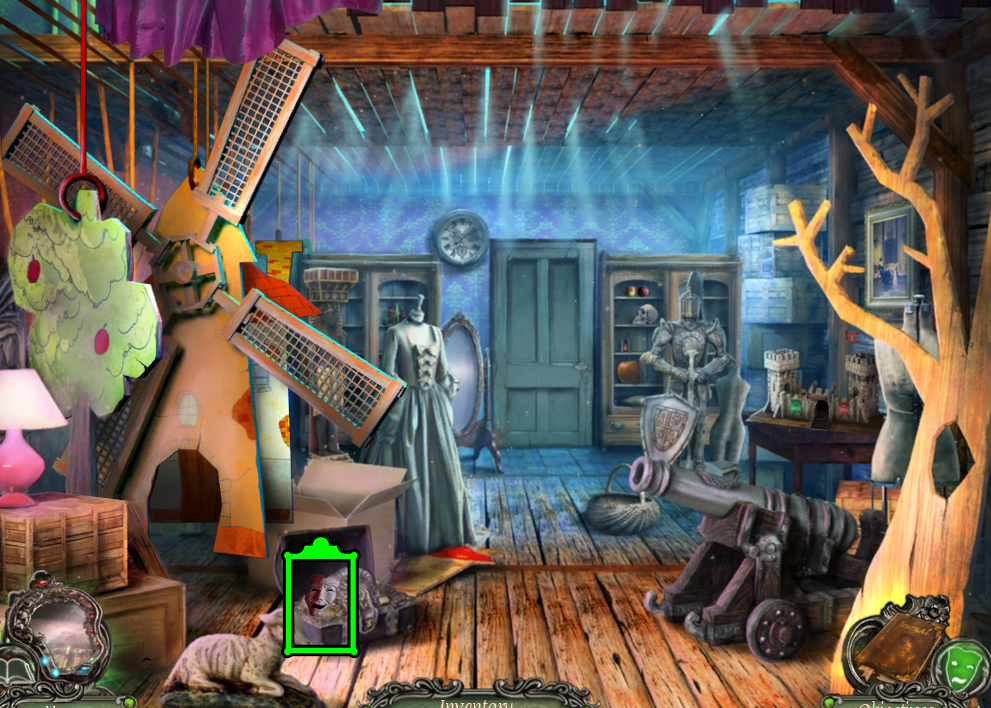
STORAGE
In the chest, just above the lamb's head.
screenshot: mask 20
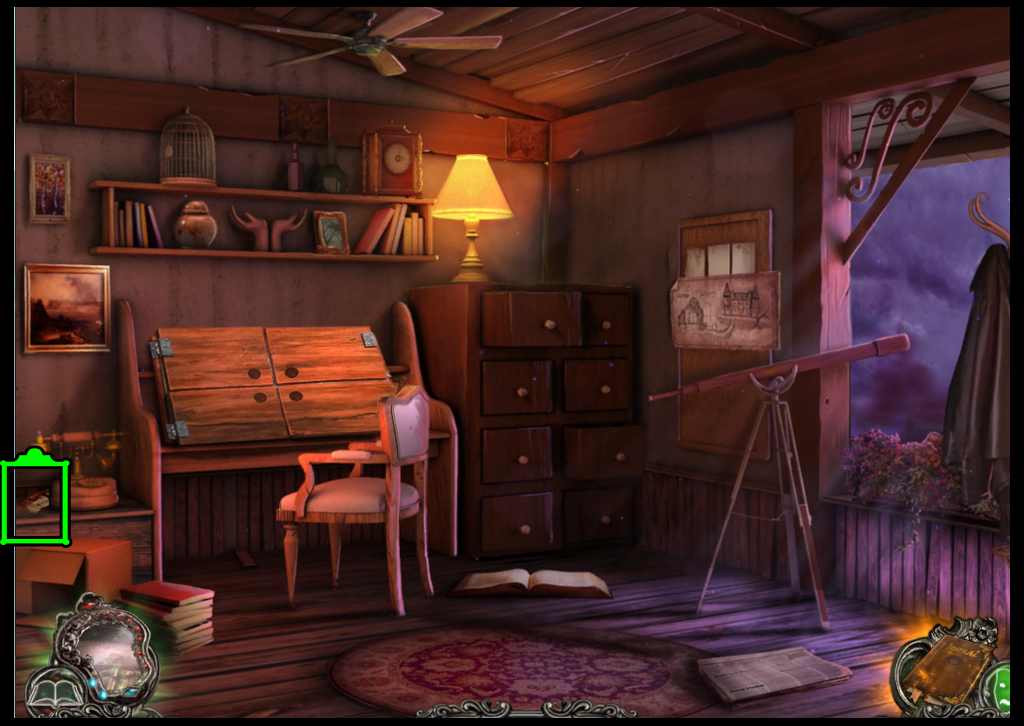
MANAGER'S OFFICE
By the telephone, which is left of the desk.
screenshot: mask 21
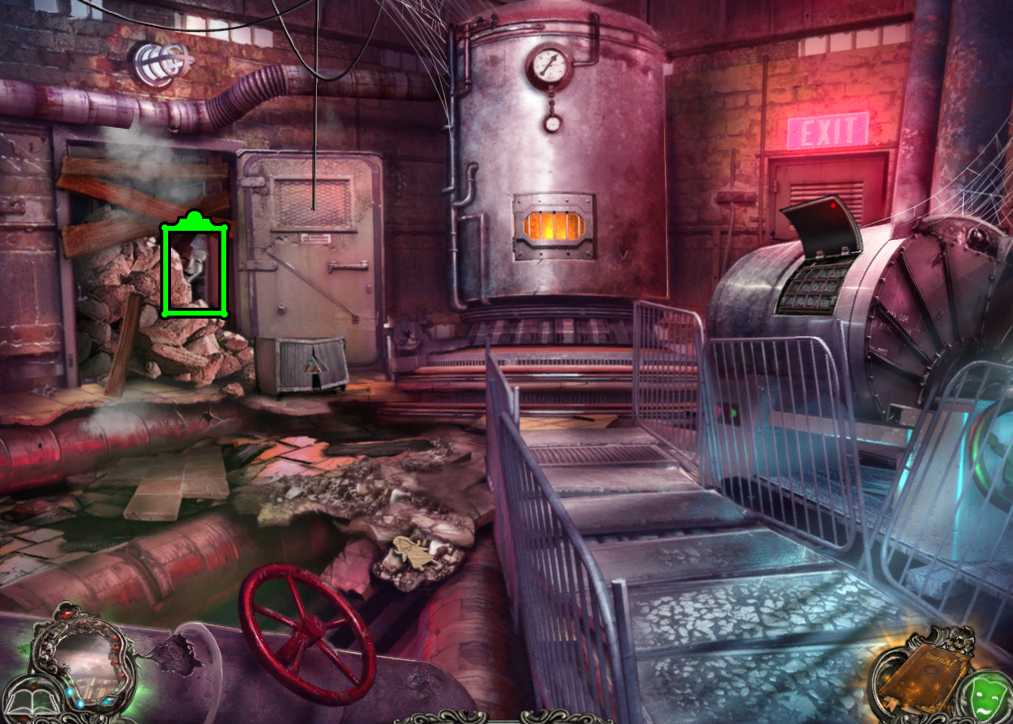
BOILER ROOM
In the rubble to the left of the metal door.
screenshot: mask 22
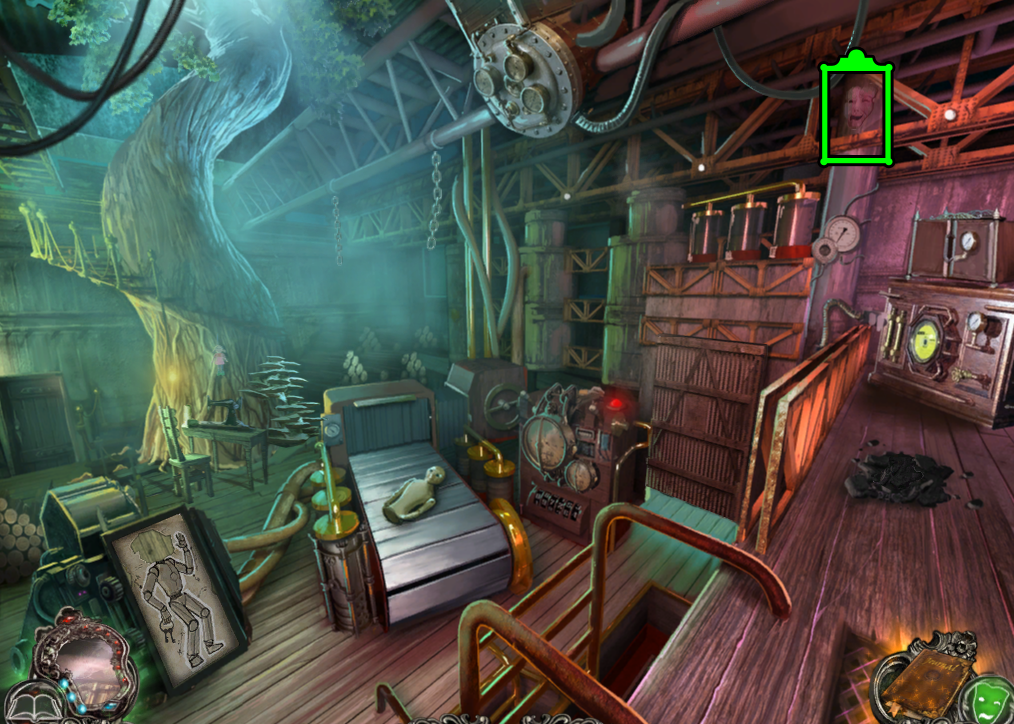
DOLL MANUFACTURING ROOM
On the first beam, up near the rafters, above the pressure gauge.
screenshot: mask 23
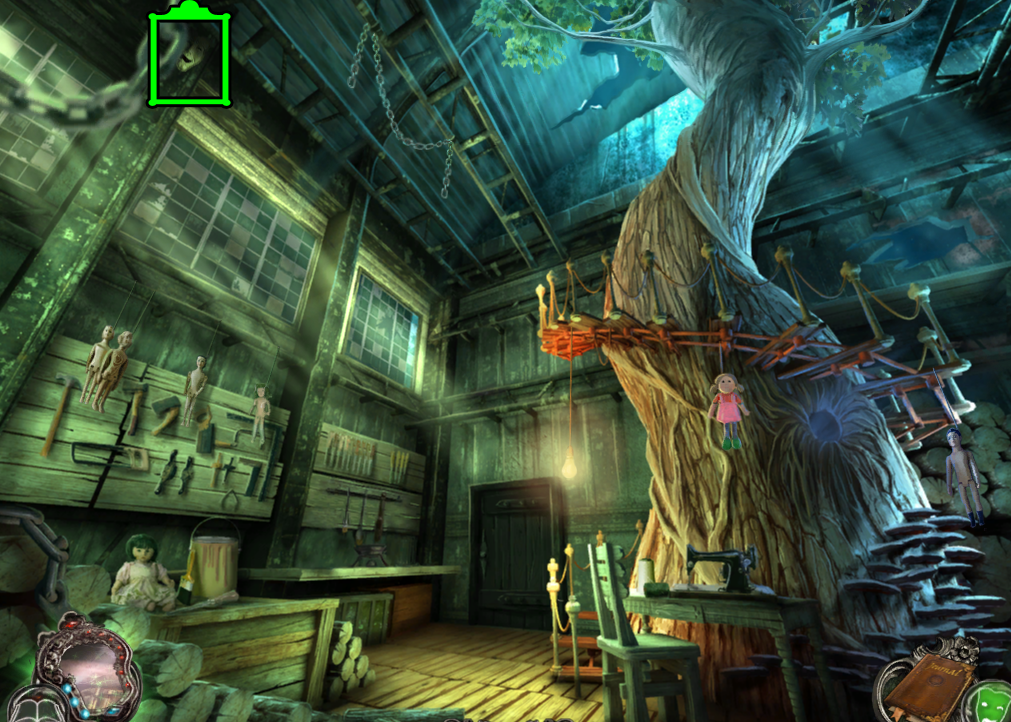
TREE OF PUPPETS
Behind the chain in the upper lefthand corner of the screen.
screenshot: mask 24
SCENOGRAPHY WORKSHOP
Behind the ship's wheal, which is next to the orange tree.
screenshot: mask 25
ATELIER
Easily visible, on the beam in the bottom right corner of the skylight.
screenshot: mask 26
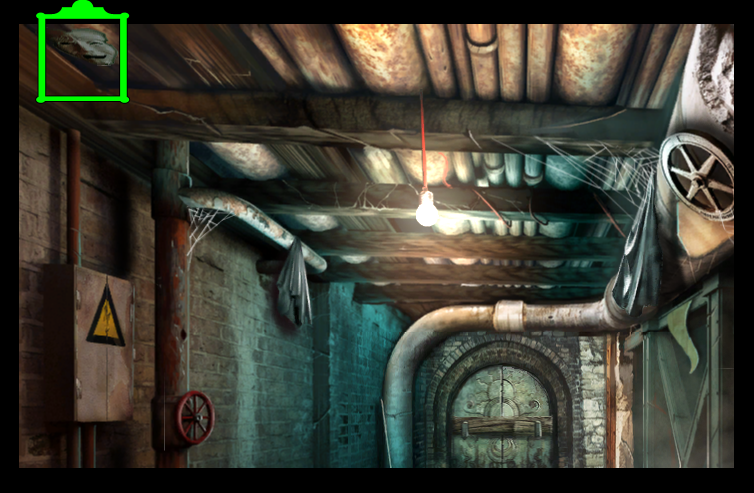
PASSAGE
On the ceiling in the upper right corner of the screen.
screenshot: mask 27
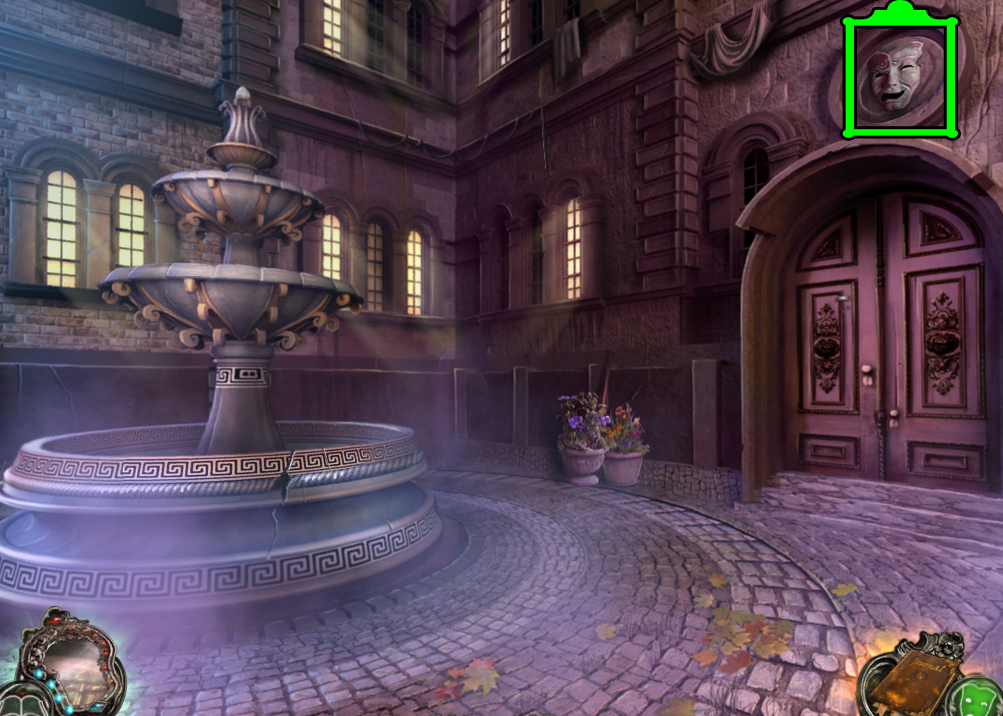
MANSION
On the right edge of the screen, next to the base of the statue.
screenshot: mask 28
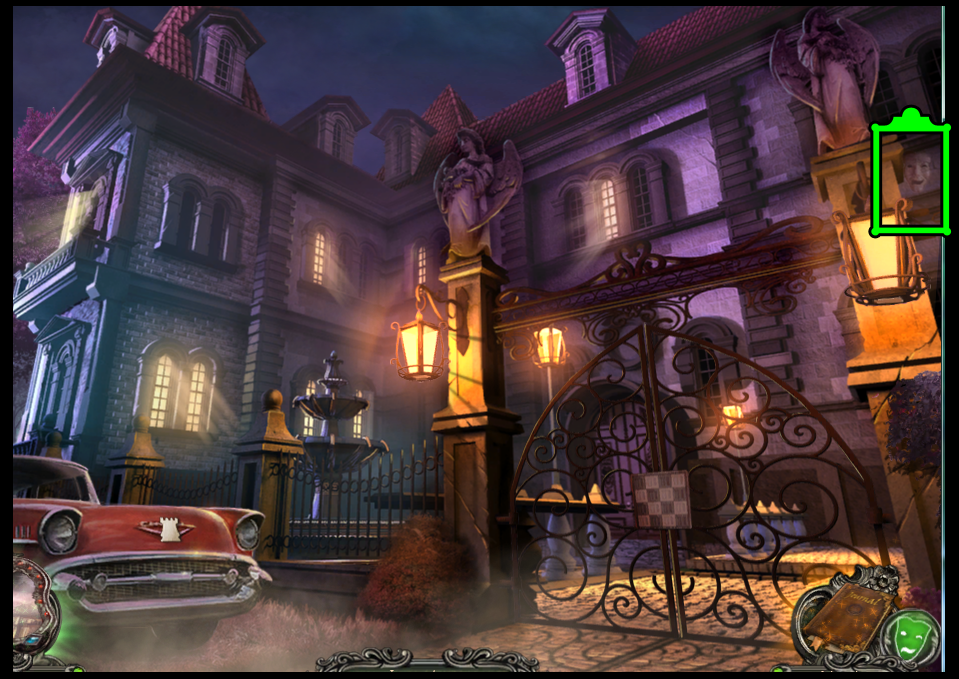
MANSION ENTRANCE
Above the door.
screenshot: mask 29
FOYER
On the gargoyle on the left side of the room.
screenshot: mask 30
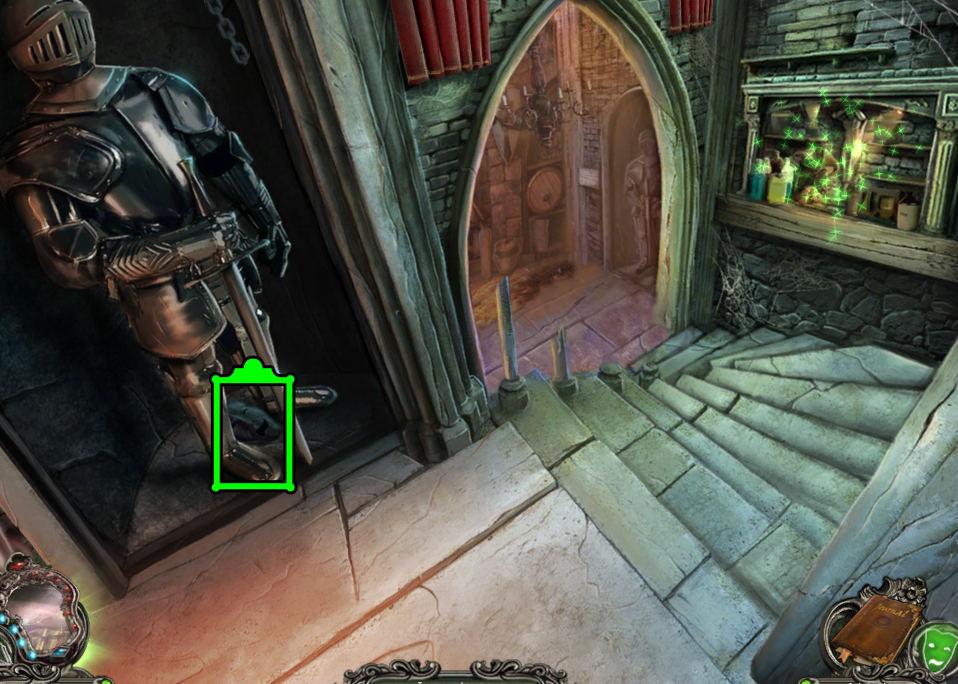
BASEMENT STAIRS
Between the feet of the statue.
screenshot: mask 31
MANSION BASEMENT
In the niche at the center of the screen, above the Grecian statue.
screenshot: mask 32
SECRET TUNNEL
On the right side, under the mushrooms growing on the wall under the rope, near the start of the tunnel.
screenshot: mask 33
UPSTAIRS
On the shield on the back wall.
screenshot: mask 34
LIBRARY
On the edge of the middle book shelf, the front bookcase on the left side of the room.
screenshot: mask 35
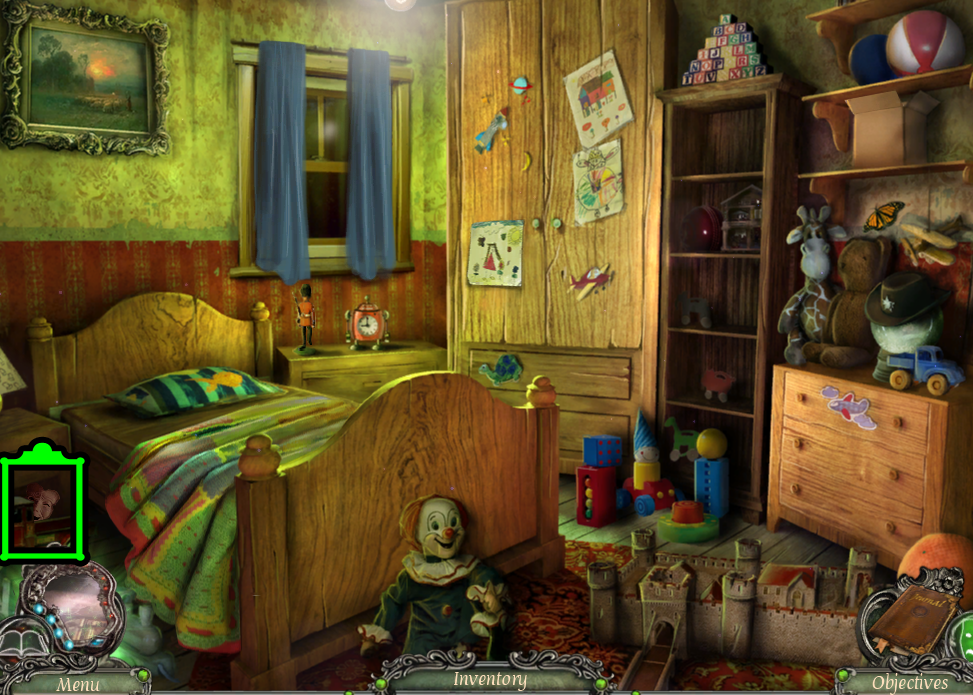
KID'S ROOM
Under the nightstand, left side of the bed.
screenshot: mask 36
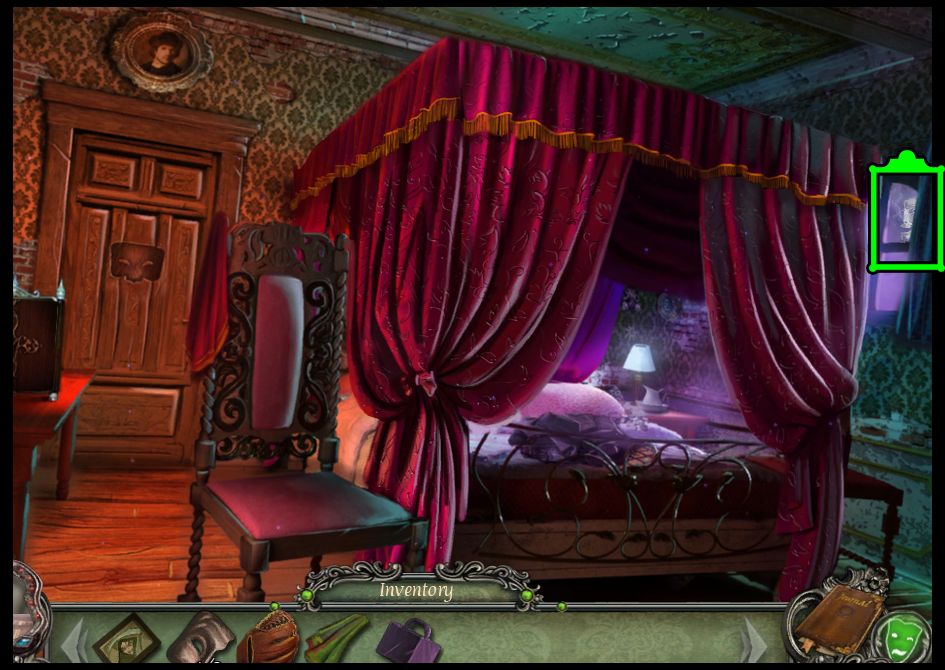
BEDROOM
Looking in through the top of the window (kind of creepy looking!)
screenshot: mask 37
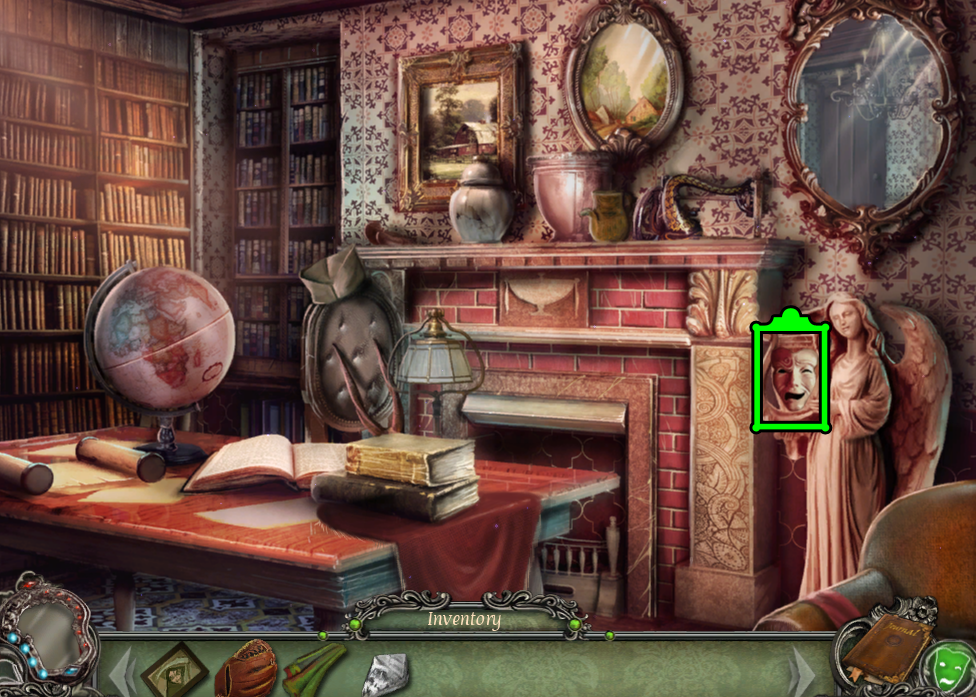
WORK CABINET
On the harp of the angel statue, on the right side of the room.
screenshot: mask 38
GALLERY
On a painting...second row down from the top, third painting from the left.
screenshot: mask 39
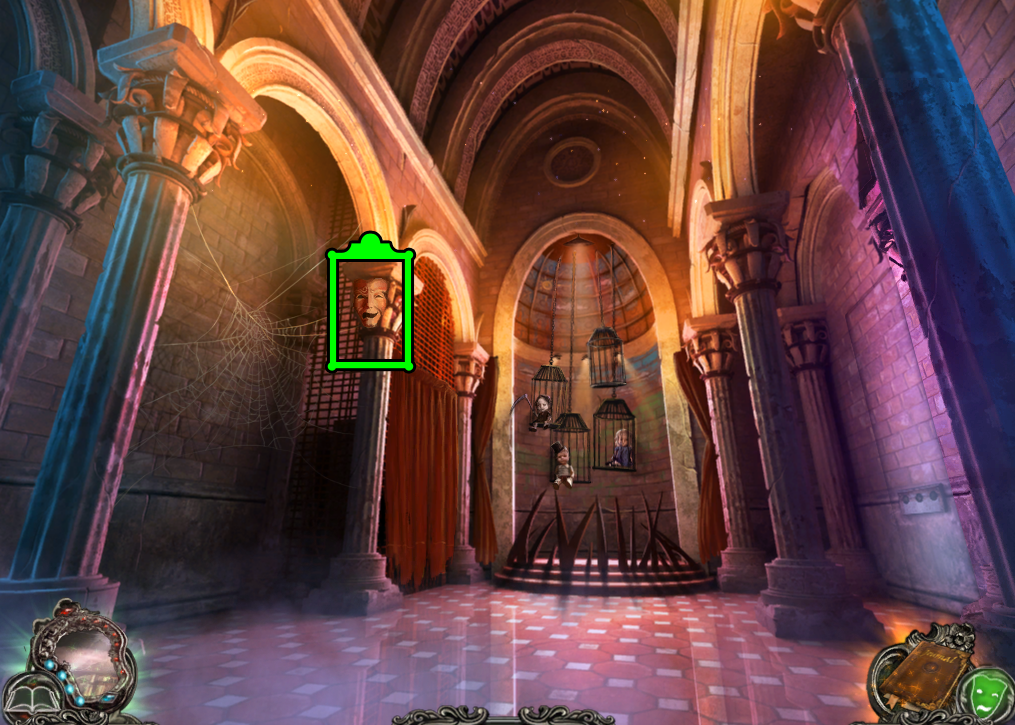
HALL OF SECRETS
On the top of the second pillar from the left.
screenshot: mask 40
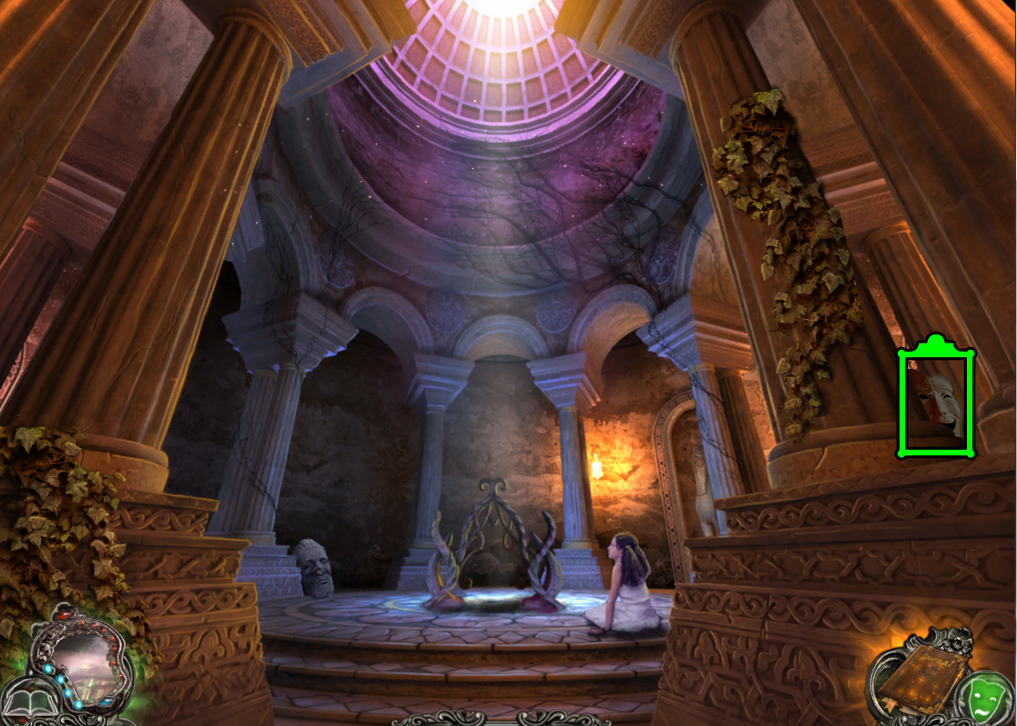
MIRROR ROOM
On the right edge of the screen, nestled between two columns.
screenshot: mask 41
BACK STAGE - second time, before using the mirror
In the upper right corner, above the curtain, on the ceiling.
screenshot: mask 42
-NOTE- Once you walk backstage at the end (after you have the mirror), you cannot turn back. If you don't have 42 masks so far, this is your last chance to turn back to get missed masks.
Masks in the Bonus Chapter
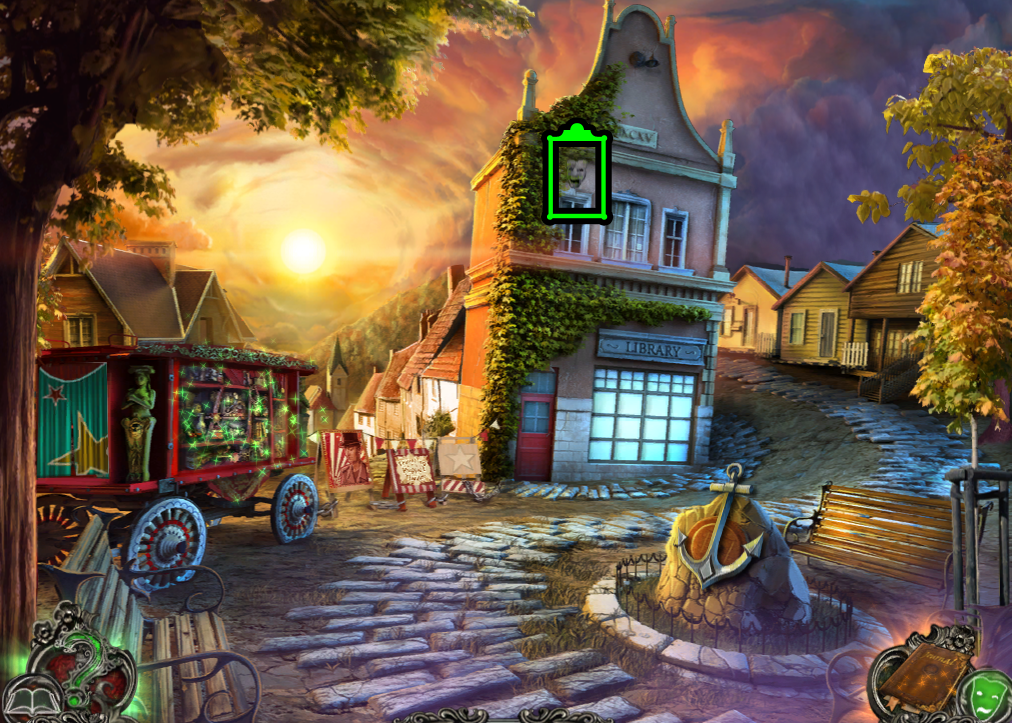
STREET - bonus version
Above the upper left winow of the library.
screenshot: mask 43
HAVENHILLS - bonus version
On the weather vane, above the door.
screenshot: mask 44
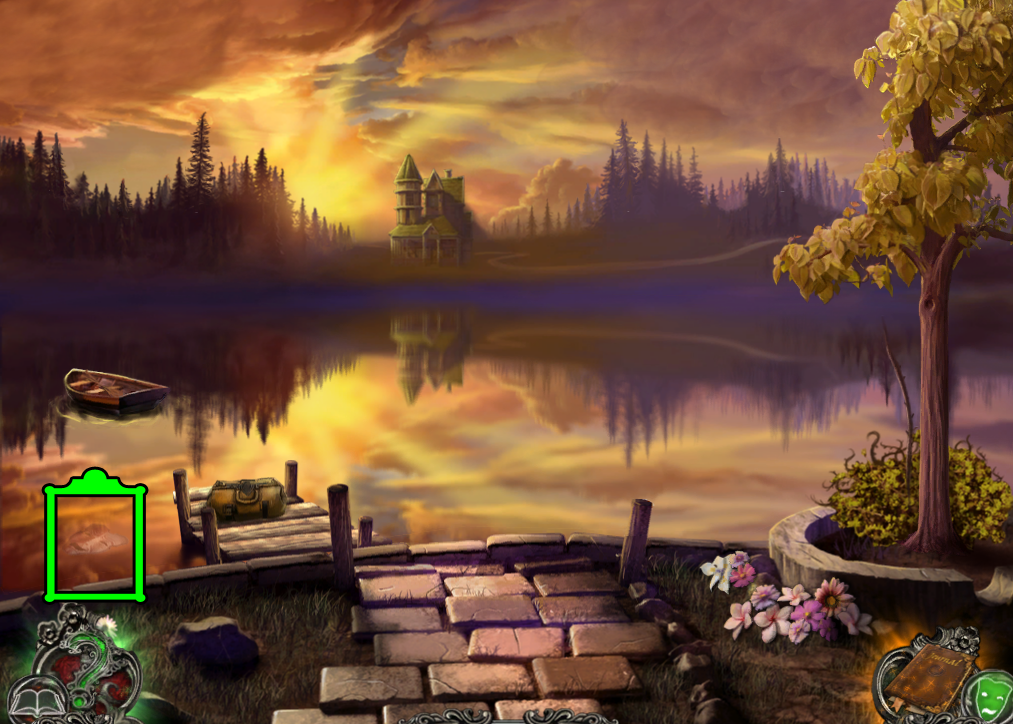
LAKE - bonus version
Reflected in the water, on the left side of the pier.
screenshot: mask 45
HENRY'S HOUSE
On the right side of the screen, on the edge of the house.
screenshot: mask 46
GRANDMA'S HOUSE
Blended into the pathyway stones, on the bottom right corner of the screen, just above the top of the journal.
screenshot: mask 47
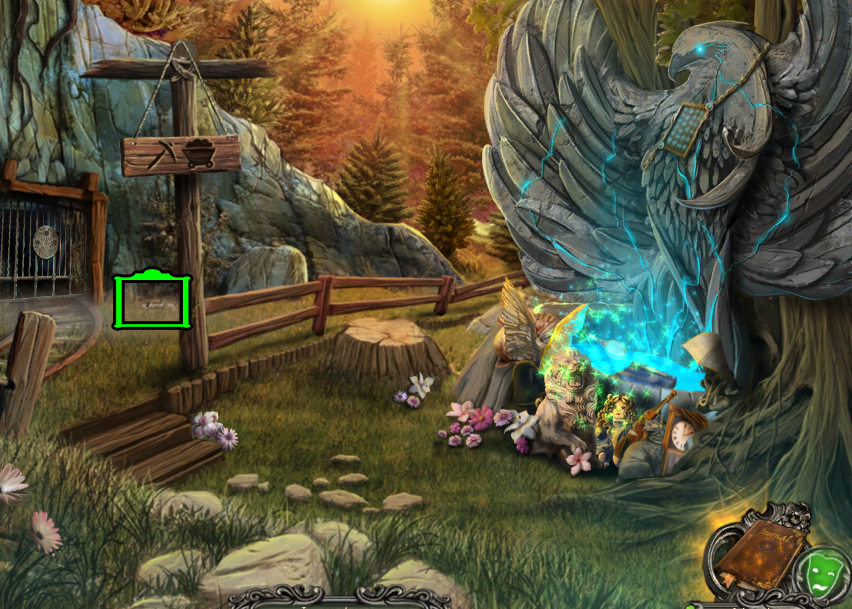
SHRINE
In this scene, the mask is an extremely tiny white blip in the grass, close to the mine entrance, about a half inch to the right of where the tracks meet the mine's opening.
screenshot: mask 48
MINE ENTRANCE
On the vertical support beam, near the top, right edge of the screen.
screenshot: mask 49
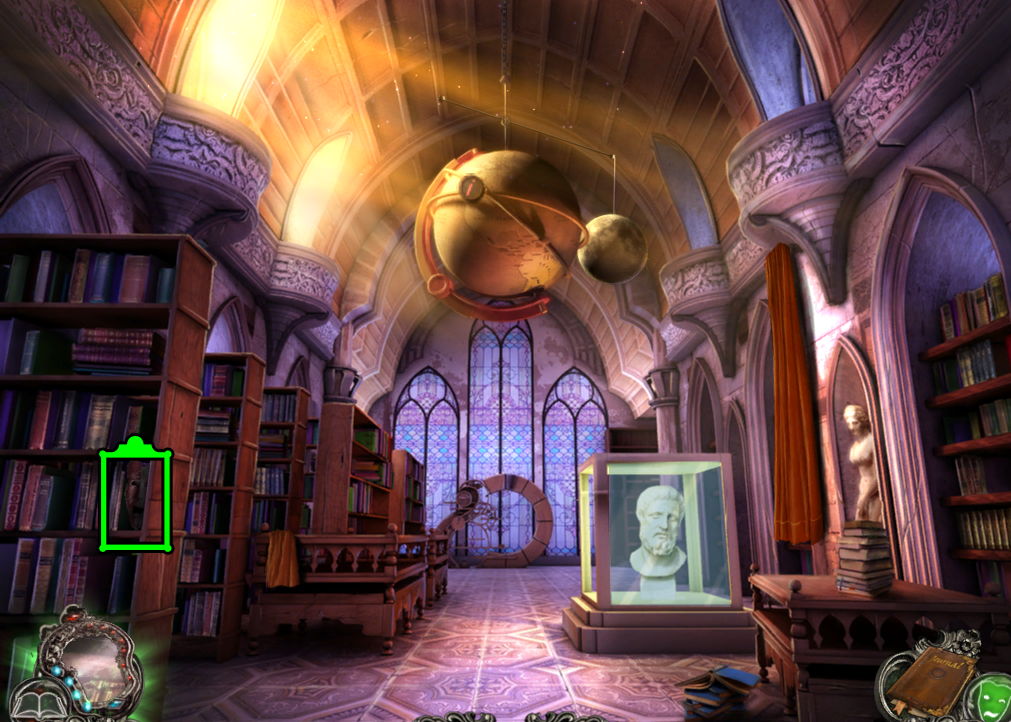
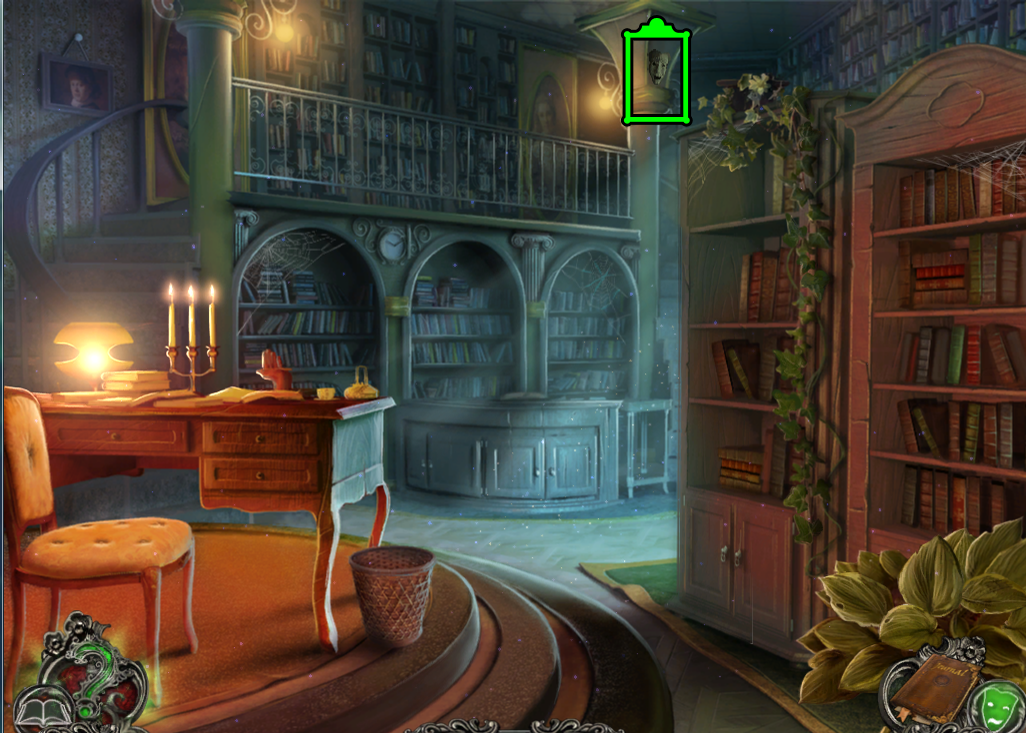
EVERLAKE LIBRARY
At the top of the right side pillar.
screenshot: mask 50
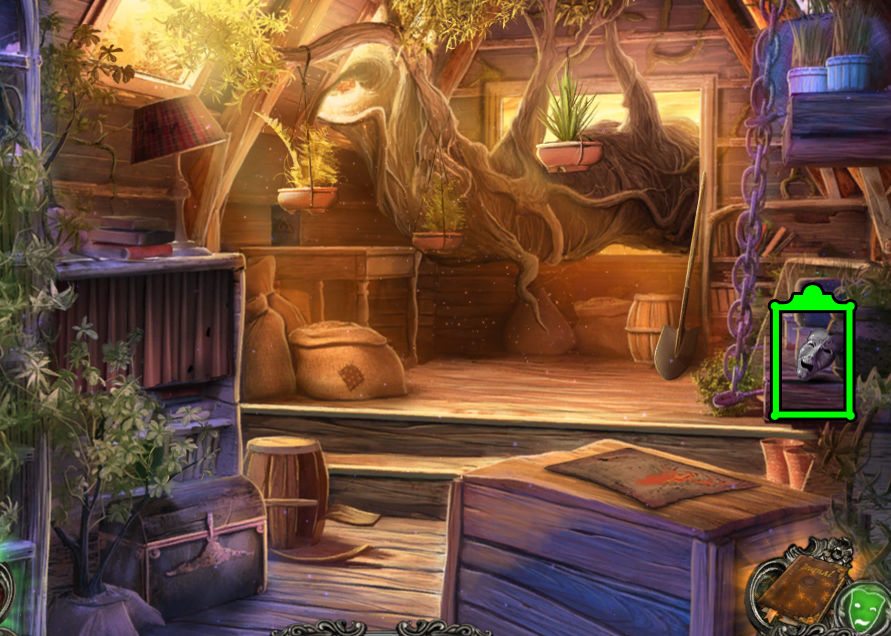
ATTIC
On the right side ofthe screen, leaning against a planting pot.
screenshot: mask 51
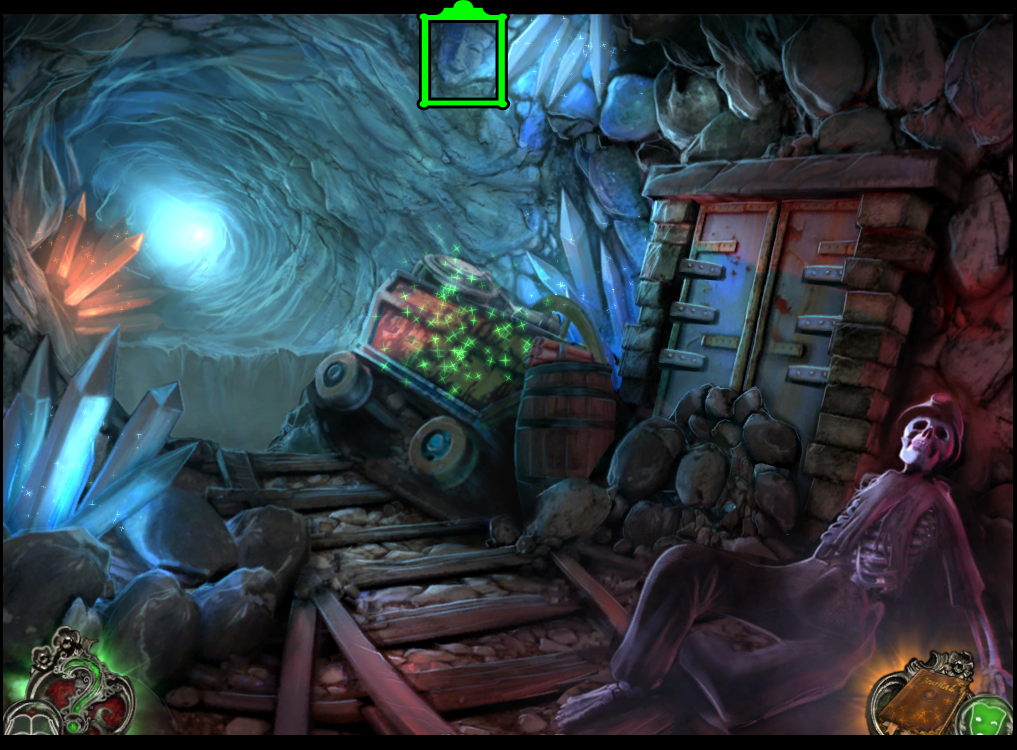
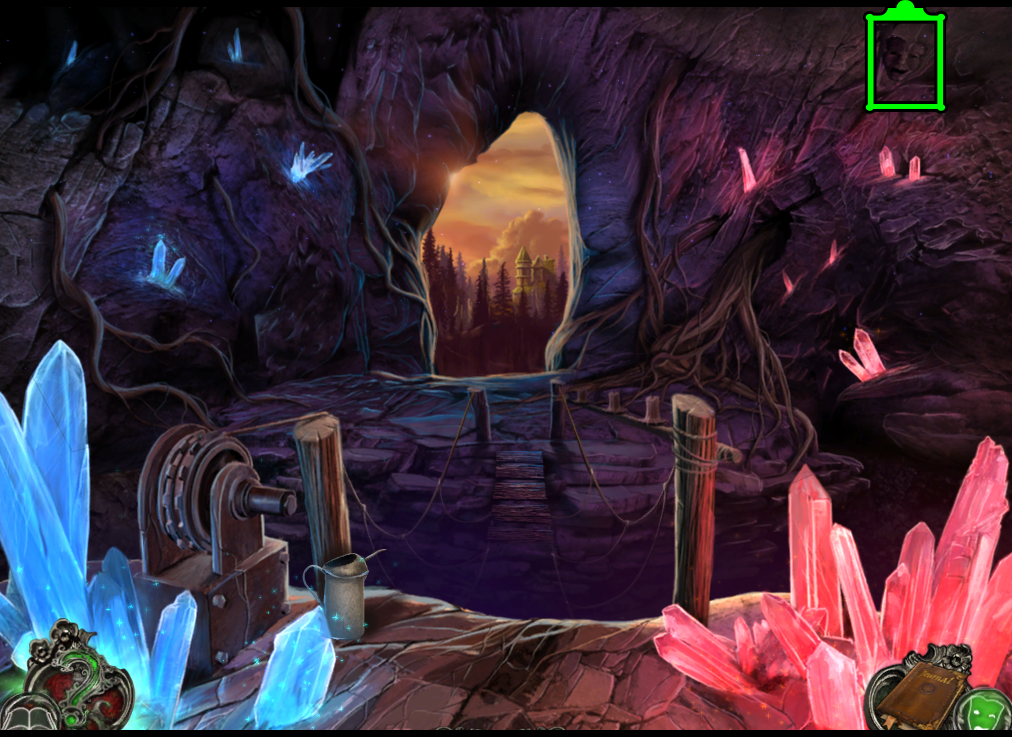
CHAMBER ENTRANCE (in mine)
Middle of the top edge of the screen, blending with the rock, just to the left of the blue, down-pointed crystals.
screenshot: mask 52
CHAMBER
Top right corner of the screen, blended into the rock, about an inch or so above two small pink crystals.
screenshot: mask 53
-NOTE- Once you walk across the bridge past the chamber, you cannot go back. This is your last chance to turn back to get uncollected bonus chapter masks.
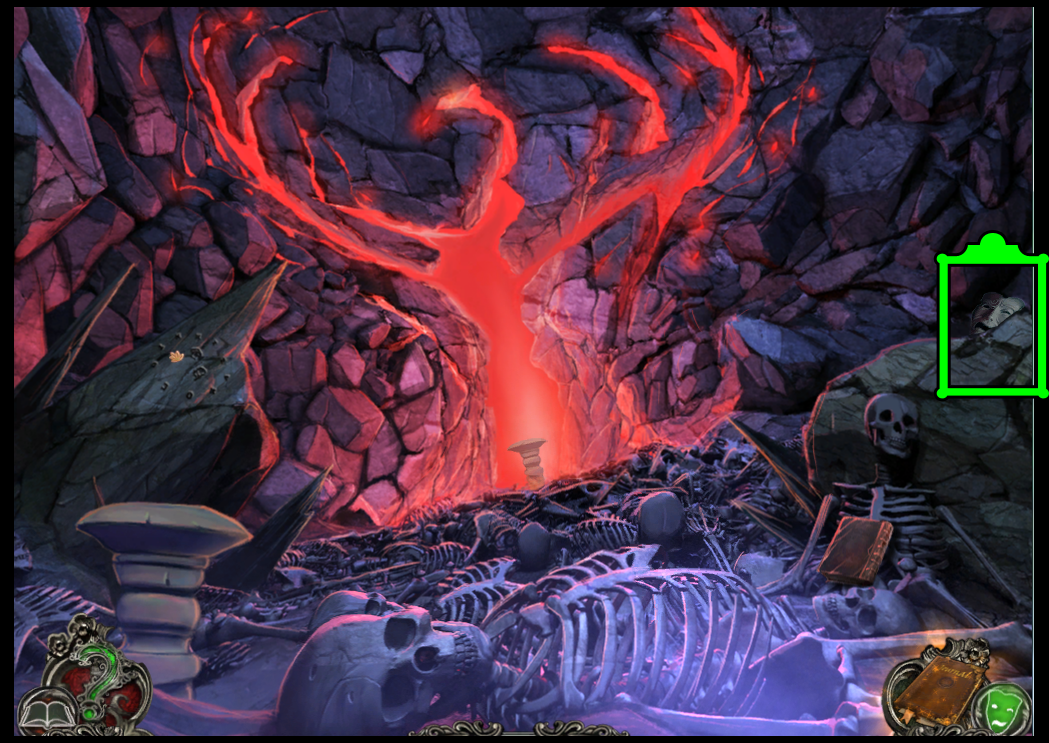
PHOENIX PIT
On the right edge of the screen, midway down, blended into the lines of the rock.
screenshot: mask 54
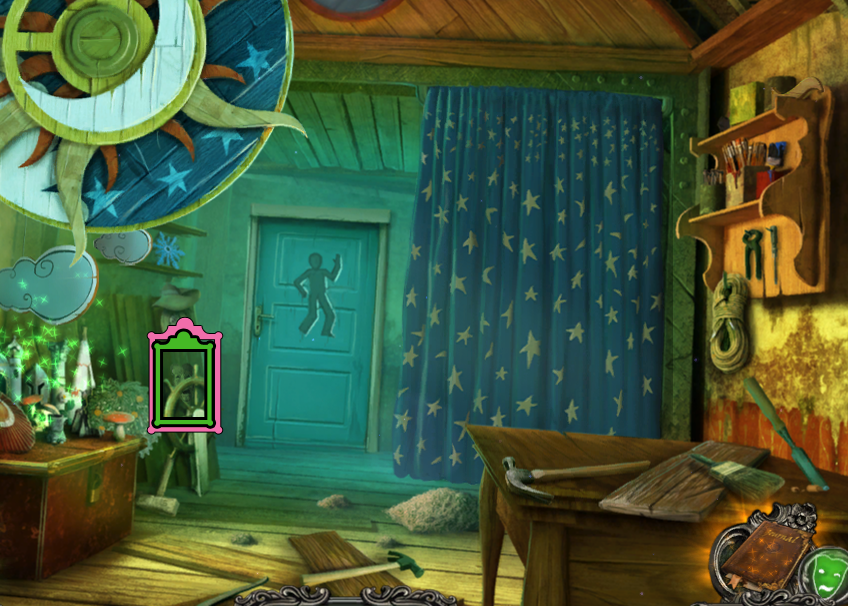
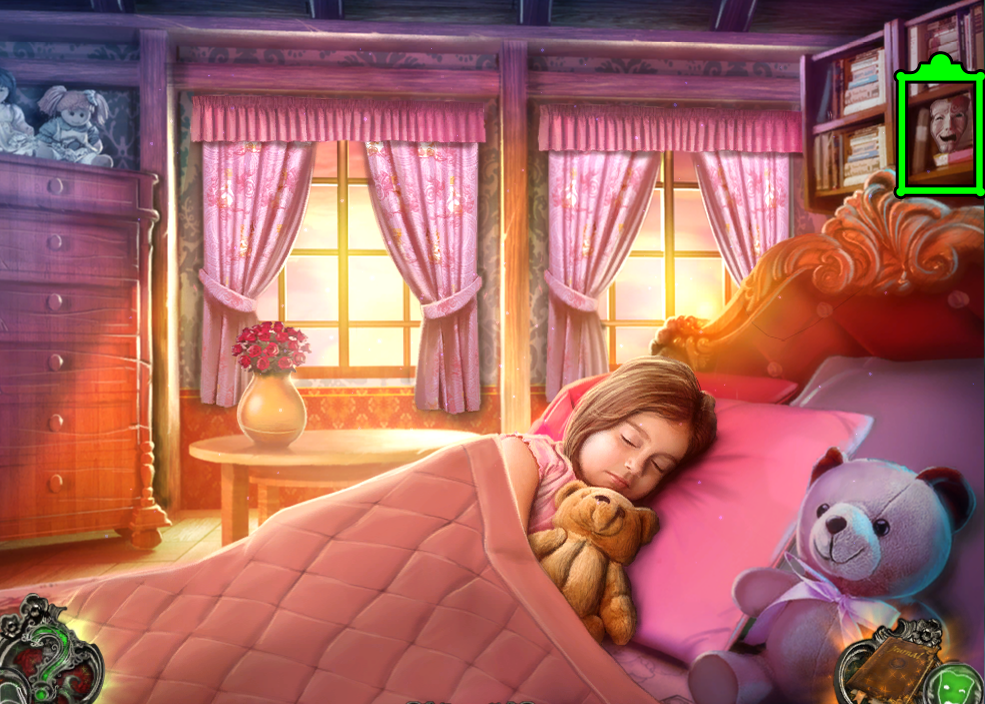
EMILY'S ROOM
On the bookshelf, just above Emily's headboard.
screenshot: mask 55
-NOTE- Must get mask before using the cure for Emily.
Posted by: elle |
June 13, 2012 3:00 AM
|
June 13, 2012 3:00 AM