
The Mystery of the Crystal Portal: Beyond the Horizon
Platform: Mac, Windows
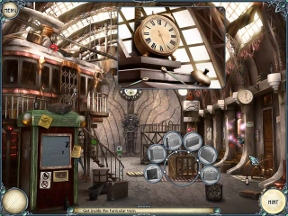
![]() You didn't really think it was over, did you? The Mystery of the Crystal Portal has returned with a brand new installment: The Mystery of the Crystal Portal: Beyond the Horizon! No more cliffhanger-like endings, either, as this game picks the story up right where the original left off. Not only that, but the gameplay and high-quality visuals also return, crafting another hidden object adventure hybrid game that will be your pleasure to dive in to!
You didn't really think it was over, did you? The Mystery of the Crystal Portal has returned with a brand new installment: The Mystery of the Crystal Portal: Beyond the Horizon! No more cliffhanger-like endings, either, as this game picks the story up right where the original left off. Not only that, but the gameplay and high-quality visuals also return, crafting another hidden object adventure hybrid game that will be your pleasure to dive in to!
 A short cut-scene fills you in on some of the background information in case you haven't played the original Crystal Portal game. Still searching for her father, journalist Nicole Rankwist arrives at a bridge outside a floating island to find someone named Igor waiting for her. He was sent by Madame Staff, an old woman who has some information regarding her dad's whereabouts. But first you need to find a way to fix the bridge. It can never be a simple walk through the cake-and-bunny-filled woods, can it?
The best feature to return in The Mystery of the Crystal Portal 2 is the container item system. Puzzles come in the form of objects in each location that require other items to function. One of the first puzzles, for example, tasks you to find items to put in a cauldron. A ringed menu appears around the object with individual slots for the things you need to find. Simply check out the silhouette, find what you need, and drop it on the ring. This method of hidden object gaming feels much more organic than stale lists of words and adds a wonderful touch of dynamism to the experience.
 Analysis: Hidden object games are becoming more and more prolific in today's casual gameosphere. Every development company is trying something different to keep things fresh, such as incorporating adventure elements into games, expanding the mini-games, or by tweaking storylines, settings, and other artistic elements. Artogon has created what is perhaps the simplest deviation of the hidden object genre with its container system (which is also found in the Treasure Seekers games). This element sets The Mystery of the Crystal Portal apart just enough for it to warrant your attention.
Of course, you can't make a game based on one gimmick alone. Well, not usually, any way. Fortunately, Crystal Portal 2 doesn't skimp on the setting, the visuals, the puzzles, or any other aspect of content. Although you may find it feels a little short at the end of the day, it's not too brief or too protracted of an experience to feel out of place.
Before the game even begins, you have the option of choosing "casual" or "normal" modes of play, the former shortening the hint delay timer and allowing you to skip mini-games at a faster pace. Even in normal mode, Crystal Portal 2 doesn't really punish you for exploring or clicking, allowing you to experience a surprisingly laid-back game even with the added challenge.
The Mystery of the Crystal Portal 2 is just as robust and impressive as its predecessor. Another hidden object game from Artogon that should not be missed!
![]() Windows:
Windows:
Download the demo
Get the full version
![]() Mac OS X:
Mac OS X:
Download the demo
Get the full version


Walkthrough Guide
(Please allow page to fully load for spoiler tags to be functional.)
The Mystery of the Crystal Portal: Beyond the Horizon Walkthrough
Overview
Throughout the game red balls are spread among the scenes. They are bonuses. When you collect enough of them your screen border gets "prettier"! These are always marked on the walkthrough screen shots by Red Squares.
To get an item, you must find all the hidden objects for that item. Sometimes the object you need will also have a series of hidden object you need to find. These are color-coded in the screen shots - one color per item.
Some rooms you will return to a few times to find additional items. Those master screen shots may be referred to more than once.
Some objects are hidden inside or behind other objects. Just follow the notes and you'll find what you need inside or behind what you see in the scene
You can always tell how many object you will have to find per item by how many small dots are around the clue circle. So, five small dots means 5 items to find
Madame Staff's House
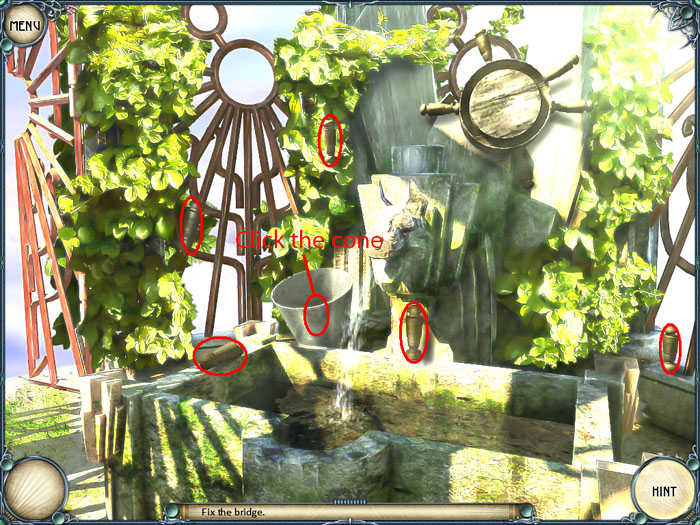
Fix the bridge. Click the Antique Cauldron. Find the Greek Jug and place it in the circle to reveal the next objects to find. You need to find 6 objects total.
Screenshot
Finishing the Cauldron opens the door to the Pavilion Gate. Click on the gate in the upper left.
Inside you will have to find 6 Pegs.
Screenshot
To find the 6th Peg, click on the metal cone. It is inside.
Collect the Winch
Take the Winch to the bridge, put it on the post and turn it to fix the bridge.
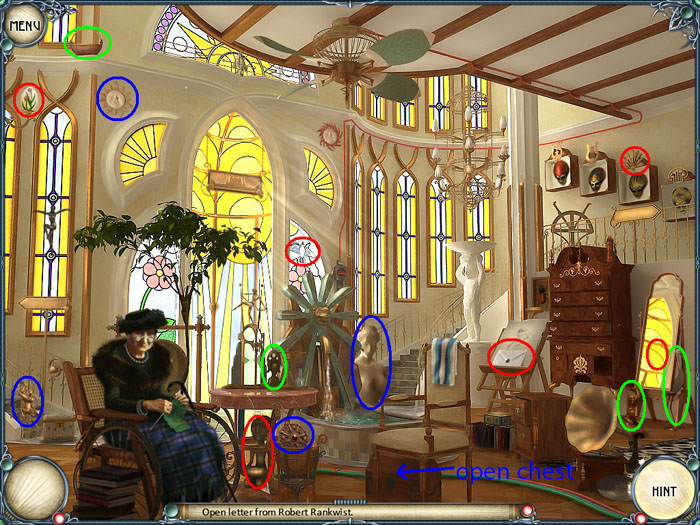
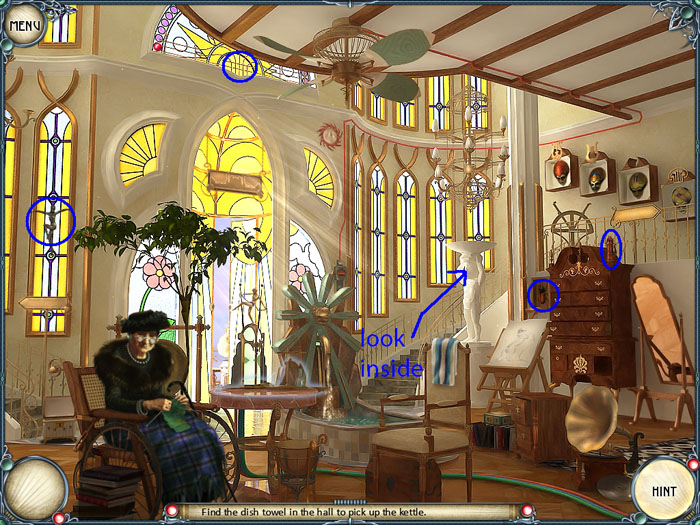
Your first task is to find Madame Staff's glasses.
Screenshot
Pick up light blue circled objects first
Click switch in center back wall to turn off fan and get Gem
To pick up Horse, use screwdriver to unscrew the four screws
Look in dresser drawer for last object
Pick up Glasses and give them to Madame Staff. Then click on letter sitting on easel
Screenshot
Start with the red circled objects for Letter, green circles for the Decoration
Click above 3rd mask on back wall to find Decoration
Click on Egret (bird) by mirror to reveal Heart Locket
To pick up Bird on stained window you must first assemble the three pieces
Click on Jewelry Box on left. You'll need a Key
Go to the Balcony and click on the Music Box
Screenshot
Find the green circled objects first, then the blue circles
To pick up the Seahorse, you need to assemble the three pieces
Finish the blue circles to get the Medallion
Now you need a handle. Return to the Hall and click on the Gramophone
Screenshot
Find the dark blue circled objects. The Decoration is inside the wooden chest in the center of the room
Pick up the handle and return to the Music Box. Use the handle on the Music Box and take the Key
Take Key to the Hall and open the Jewelry Box. Inside you'll find the Dog. Finish the letter then read it
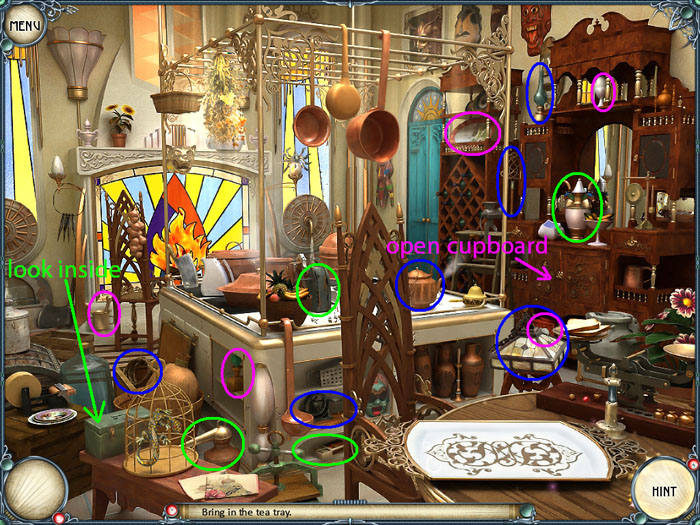
Go to Kitchen to the left to bring the Tea Service.
Screenshot
You have to find four pieces:
Tea Tray - red circles
Cup - blue circles
Teapot - pink circles
Sugar Bowl - yellow circles
To pick up Kettle, you need to return to the Hall to get the Towel
Click the Towel on the chair
Screenshot
Look inside statue by stairs for last piece, then take the Towel to the Kitchen and use it to move the Kettle
Screenshot
To pick up the Matches, put the three matches into the box
Complete the Tea Tray and take it to the Hall
To help Igor pack, go up to his room on the top right
First you need to get Sunflower Seeds from the Balcony. The door is missing its handle
Find the Handle in the box next to the bed then go to the Balcony
Screenshot
To pick up the Flask, you need to assemble the 3 pieces
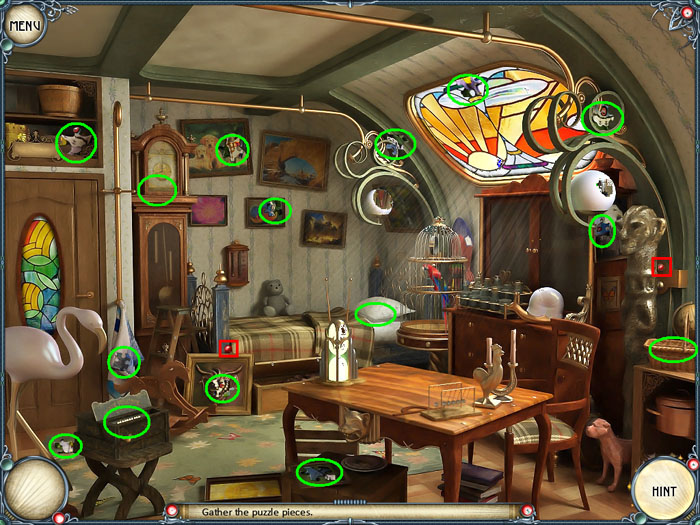
Pick up the Sunflower Seeds and take them to Igor's room. Put them in the bird cage
Find the Puzzle Pieces
Screenshot
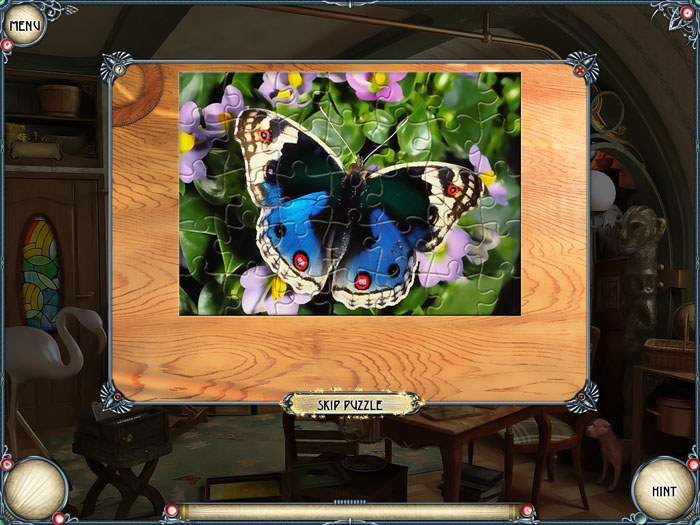
Complete the Puzzle
Screenshot
To get inside the Train you have to blow the Whistle on the right
Screenshot
Find the green circled objects for the Whistle, the pink for the Luggage and the blue for the Bottles
To pick up the Clock you will have to assemble the three parts
Fill the crate with Luggage to find the Gramophone
Collect the 8 Bottles to get the ticket and go up to the train
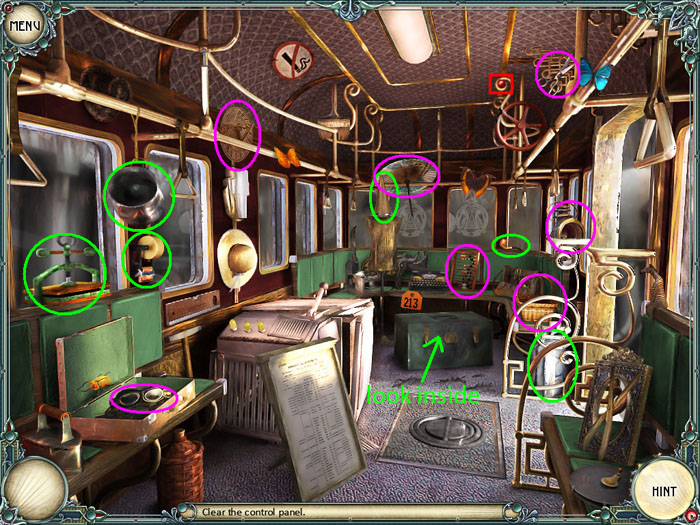
You need to clear the Control Panel
Screenshot
To get the Abacus, you need to put the 5 beads back in place
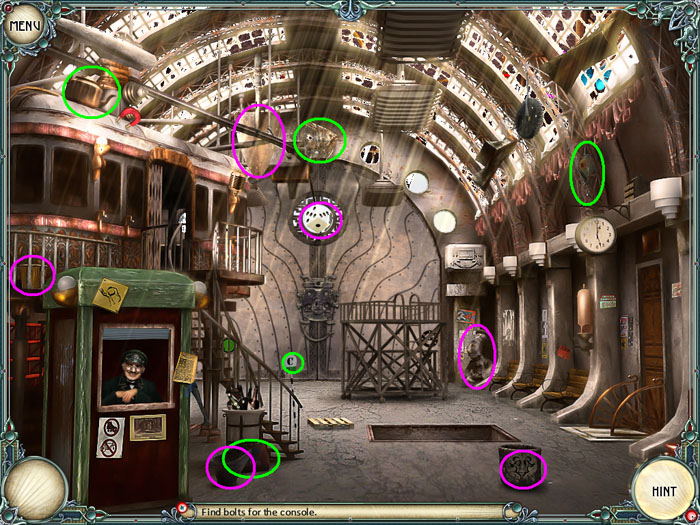
Now, you have to find the Bolts. Go back down to the door by the Whistle
Screenshot
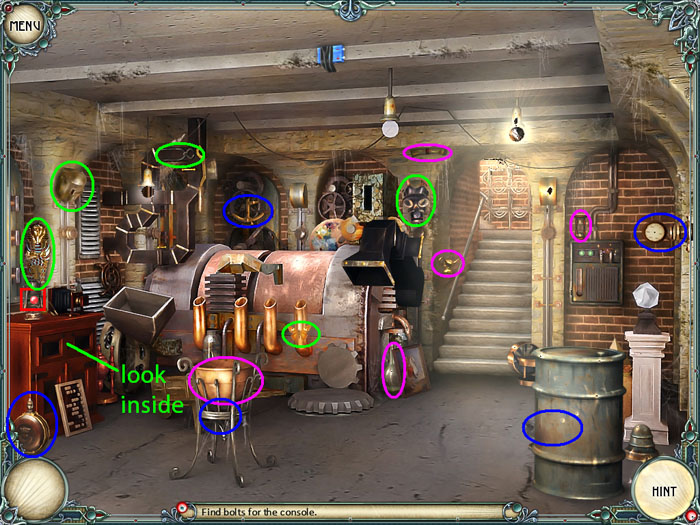
In the Engine Room, you have to fix the light. Click the Service Panel on the right
Screenshot
The green circles are for the Service Panel, the pink for the Barrel and the blue are for the Bellmouth
To get the Brass Vat, you have to use the knife inside of it to cut the 4 ropes
To pick up the Pressure Gauge, use the wrench to loosen the 6 bolts
Return to the Station to find the Magnet. (find the pink circled items)
Screenshot
Take the Magnet downstairs and click on the bolts. Pass the Magnet over the bolts. If one moves, quickly click it to pick it up
Return to the Train and put the bolts on the panel
Screenshot
To get the Gun, assemble the three pieces
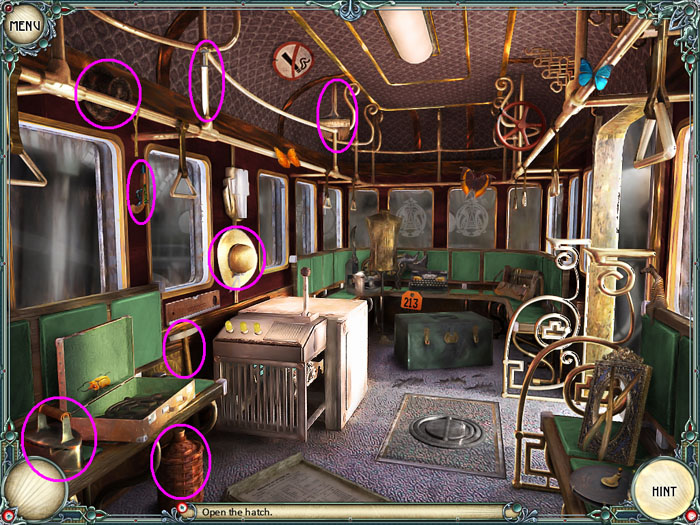
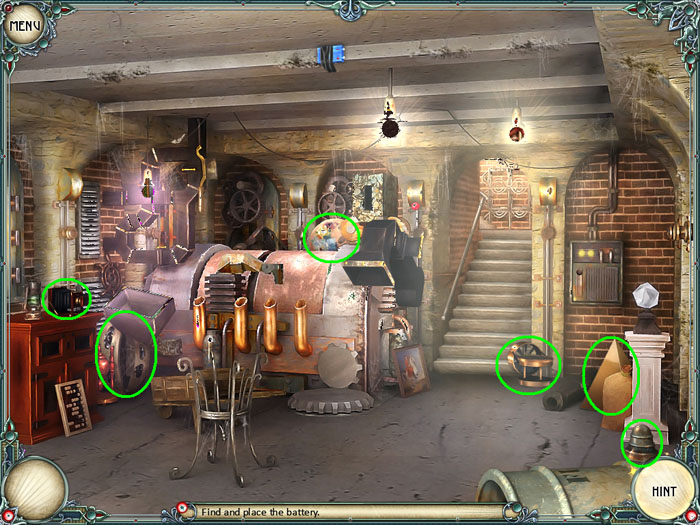
Click on the hatch in the center of the floor
To find the Battery, go downstairs to the Engine Room and look on the ceiling in the center of the screen
Screenshot
Take the Battery to the Hatch an insert it
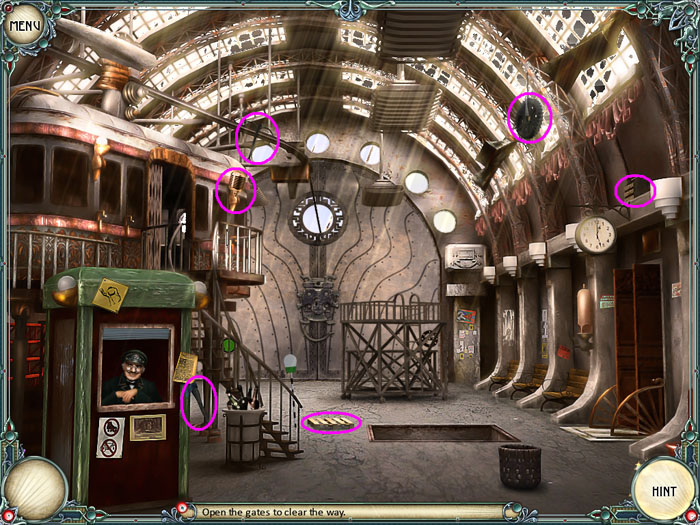
Leave the train and click on the Lock in the center of the back wall
Screenshot
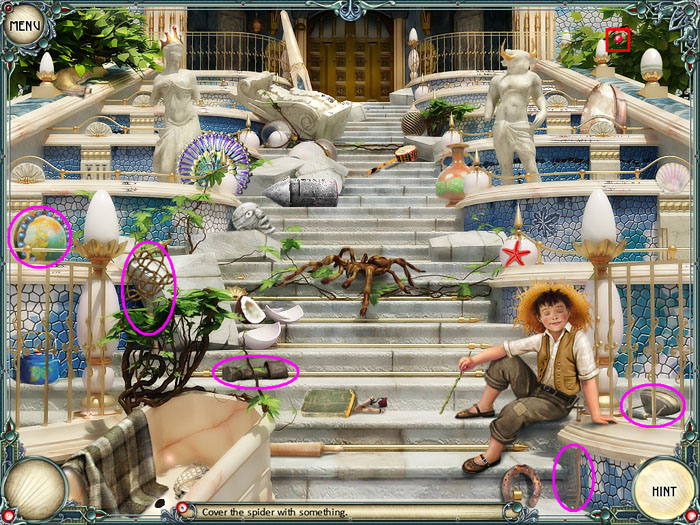
The Museum
Your first job is to cover up the spider
Screenshot
To get the Iron, you have to assemble the 3 pieces
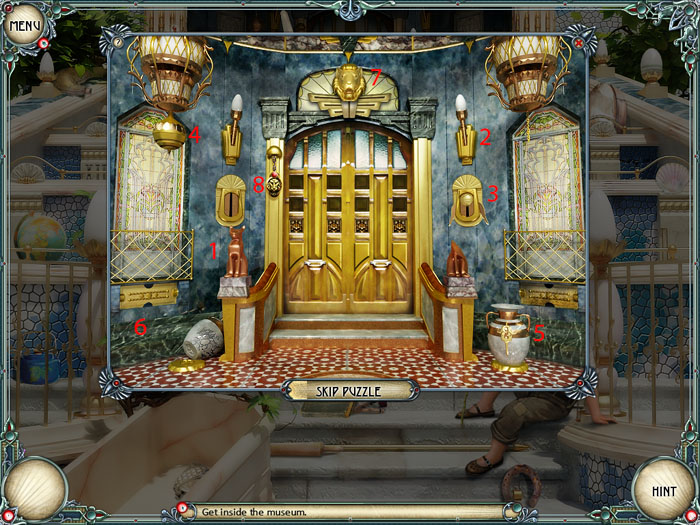
Once you get up the museum steps, you have to click on the objects to open the door. You must hit them in the correct order or the entire door resets. So, find the first one then work your way around until you find the second, etc. Or, just use this handy cheat!
Screenshot
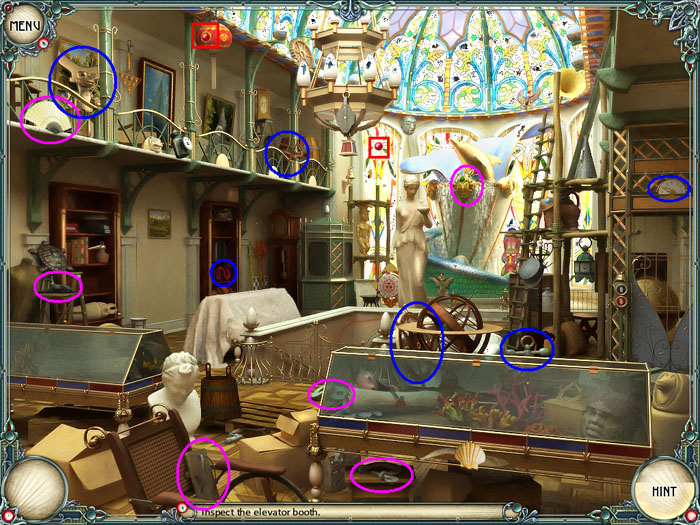
Inspect the elevator booth in the back left and find all the objects
Screenshot
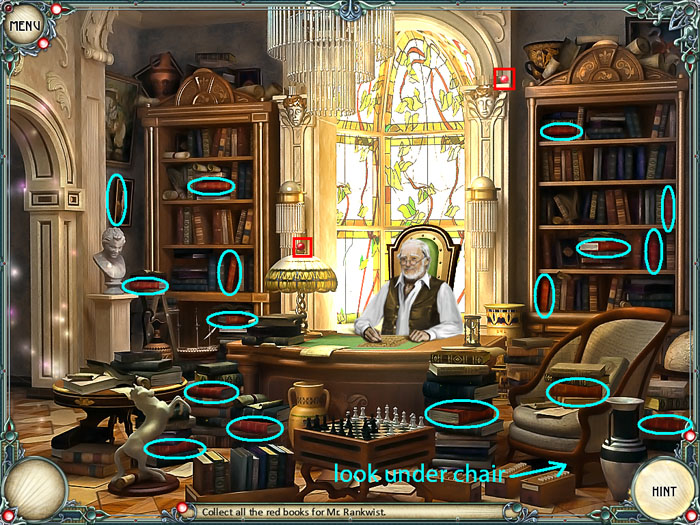
Enter the booth and pull the lever. This opens the door to the Study. Go there.
Collect 17 Red Books
Screenshot
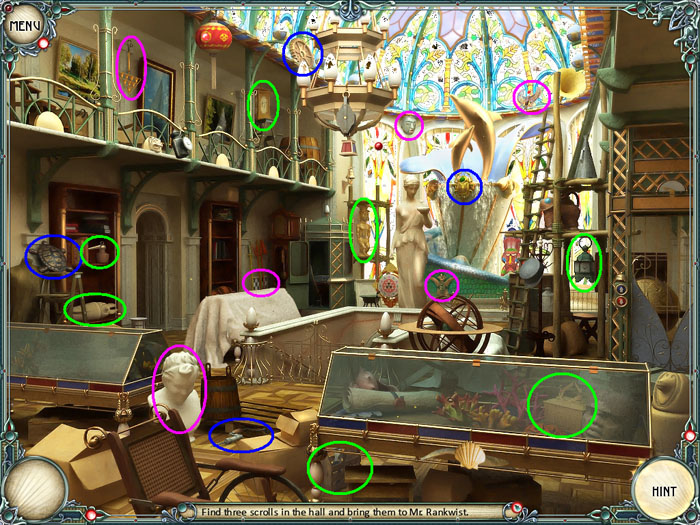
Now, you return to the Main Hall to find three Scrolls. Click on the first in the display case on the right
Screenshot
The pink circles are for the first Case, the blue for the 2nd and the green for the 3rd
To pick up the Chess Board, you have to assemble the three pieces
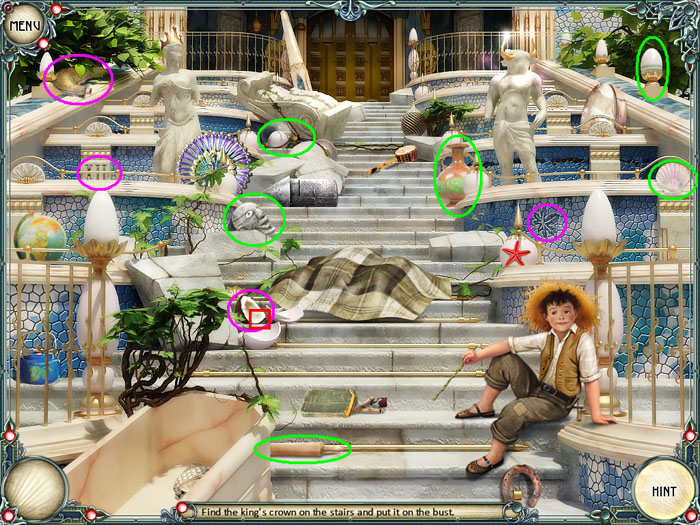
To pick up the Bust, you have to find the Crown outside on the front steps
Once outside, click on the statue on the left
Screenshot
To pick up the XII, you have to use the brush to dust off the letters
Pick up the Crown and take it inside to place on the Bust. Find the last 2 scrolls
Screenshot
To pick up the Toolbox you need to put the 3 tools inside
Bring the 3 Scrolls to Mr. Rankwist and he gives you a key to the basement to find the Maps
The Basement gate is in the center of the Main Hall. Go down the stairs
Click on the Crate to the left
Screenshot
The pink circles are for the Crate, the blue for the Weight and the green for the 2nd Weight
Get the Hook from the Crate and pick up the rope from the far left
Put the Rope and Hook combo on the blade of the guillotine, then grab the Weight from the right shelf
Pick up second Weight and put it on the scale. Pick up the Maps and take them upstairs
You'll go outside to talk to the boy on the stairs. He wants a Helmet from the roof.
Return to the Main Hall, go into the elevator booth and push the red button on the right.
Go to the far right in the Main Hall and push the elevator button (the ones with the arrows). Enter the elevator
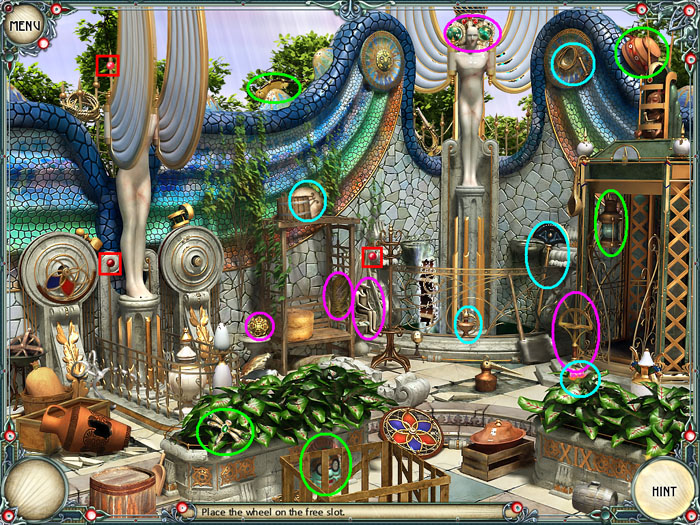
Click on the Broken Pitcher on the left
Screenshot
The pink circles are for the Pitcher, the blue for the Wheel and the green for the Sky Guardian
To pick up the Anubis, you have to repair the 3 pieces
To finish the Wheel, you have to water the Flower
Finish the Sky Guardian to get the Crown. Put the Crown on the Pitcher to fix it
Fill the Pitcher with water from the fountain and water the Flower to get the Wheel
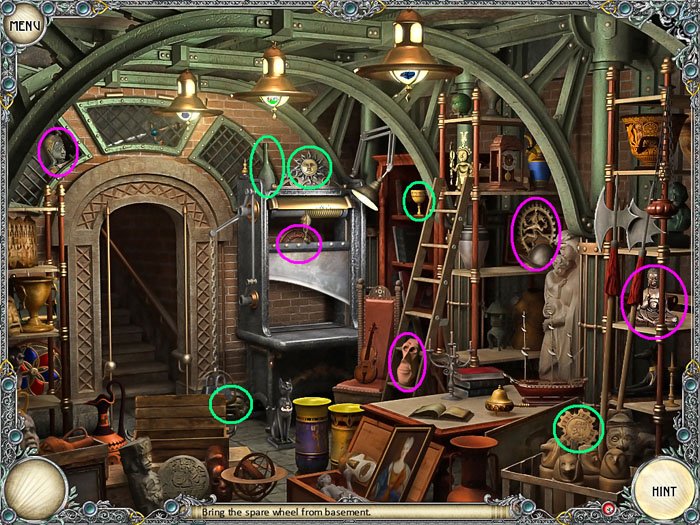
Put the Wheel on the right axle. Now, return to the Basement for the other Wheel
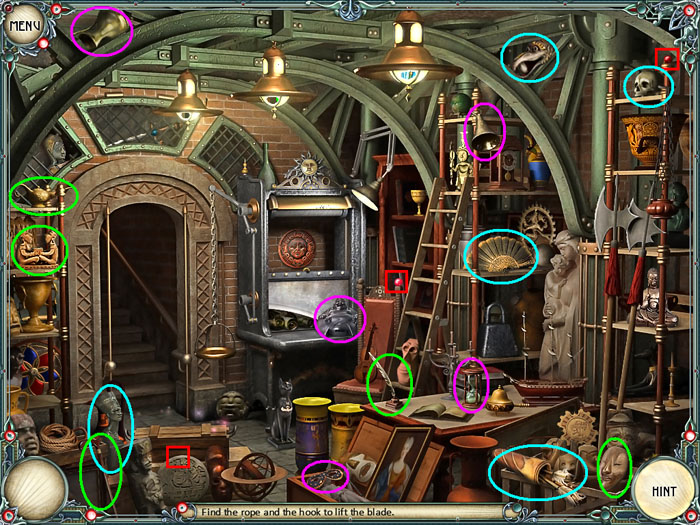
Click the Wheel on the far left
Screenshot
To get the Decoration, you need to get the Sword above the door
Pick up the Sword and cut the guillotine rope. Pick up the wheel and return to the Roof
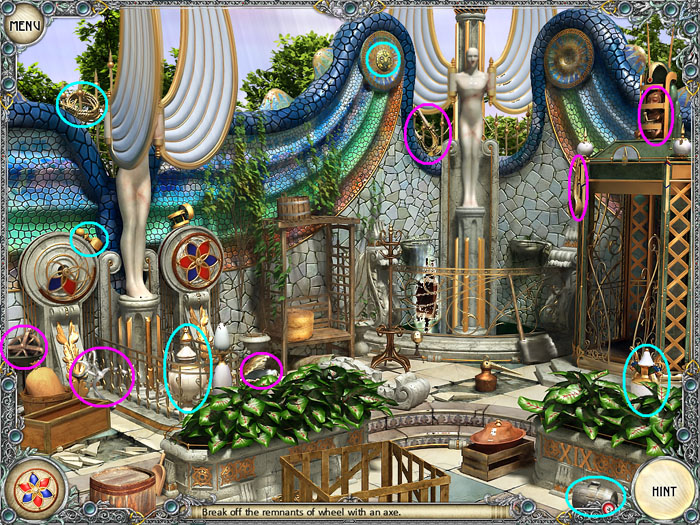
Click the Axe to the left of the fountain
Screenshot
To pick up the Mask, you must remove the 6 mounts
Break off broken wheel with the Axe, replace it with the new wheel and take the helmet to the boy on the stairs
Pusto's House
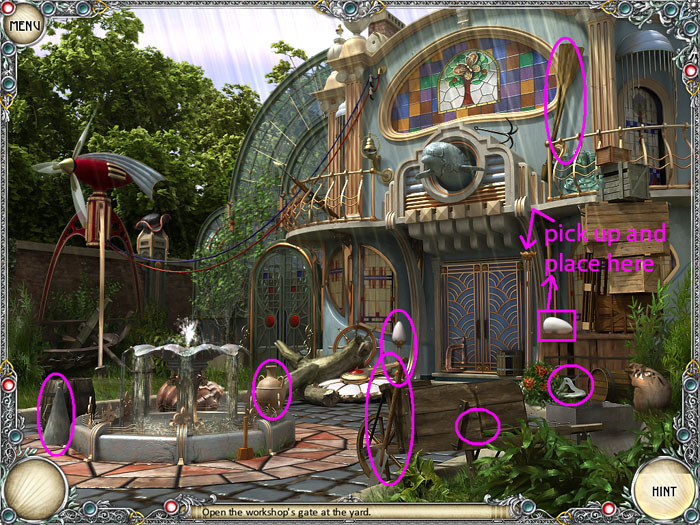
Knock on the door. There's no answer. You have to make a pile of crates to get to the balcony door. Click on the Crate to the right of the door
Screenshot
The 7th crate needs to be built from 5 boards
For the top right plank you need to use the hammer to remove the 4 nails
Climb up the crates into the house
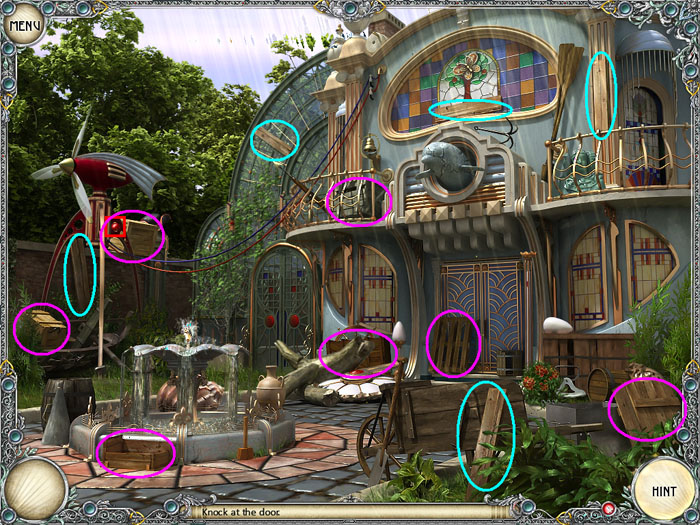
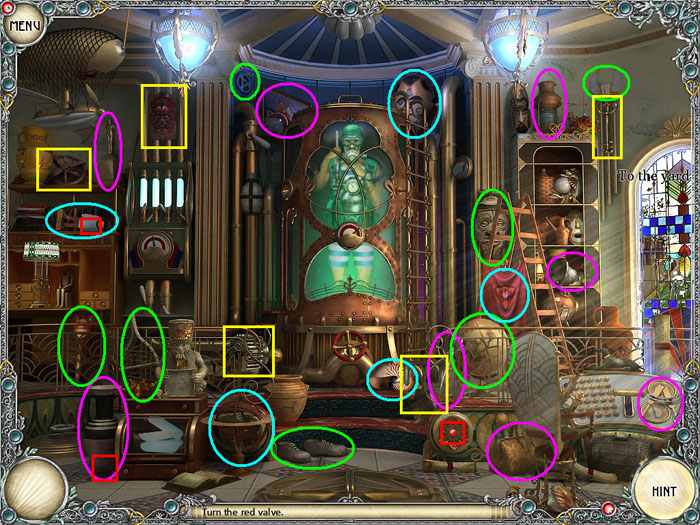
Turn the Valve
Screenshot
The pink circles are for the Valve, the green for the Statuette, the blue for the Hatch and the yellow for the Cloth
To pick up the Separator, you have to assemble the 3 parts
Go to the Basement via the Hatch on the floor to the left
Pick up 30 green glowing fireflies and bring them upstairs to Pusto
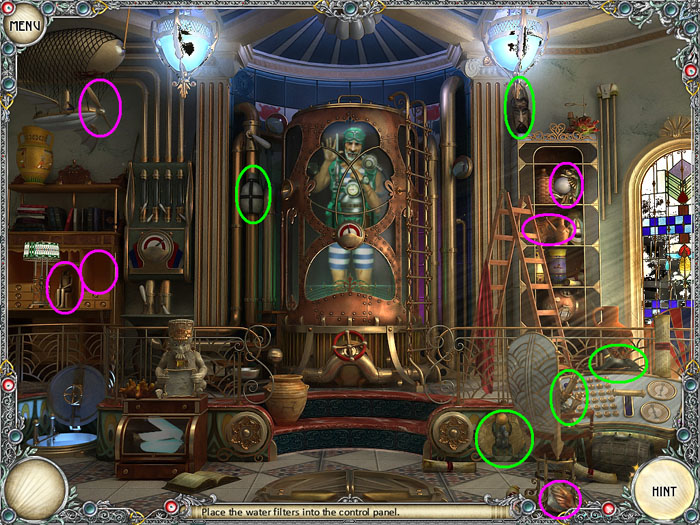
You have to place the water filters. Click on the chair to the right
Screenshot
To find the Compass, look in the "tallboy" (cabinet) on the far left
To get the Microscope, assemble the 3 pieces
Open the Crate to get the 3 Filters and place them in the pipes above
Go to the Yard and click the gates on the left
Screenshot
Click on the wheelbarrow to find the Gloves
To get the Vase, assemble the 4 parts
To get the Pulley, pick up the lamp on the right (it looks like an egg) and put it on the light post
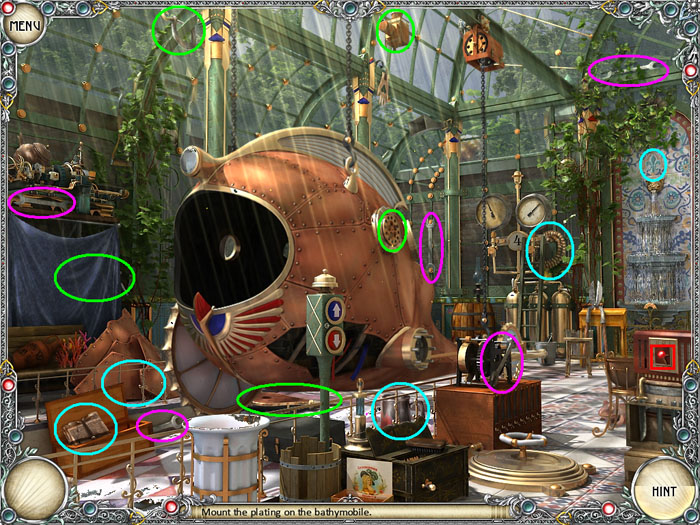
Go through the gate and fix the Bathymobile
Screenshot
The pink circles are for the Wrenches, the green for the Hatch and blue for the Rag
To pick up the Bellows assemble the 3 parts
Click on Blue Cover (or Rag, as they call it?) on the left
When the Hatch is opened, go downstairs
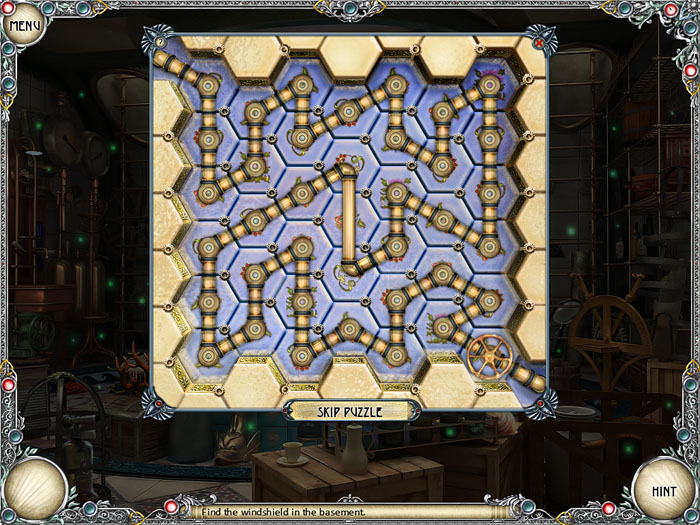
You have to turn off the water to get the Windshield. Click red and white handle in front of the fountain
Do puzzle where you have to get the water to flow through the pipes from the bottom right to the top left
Screenshot
Turn the handle to get the water to flow
Pick up Windshield, take it upstairs and place it on the Bathymobile
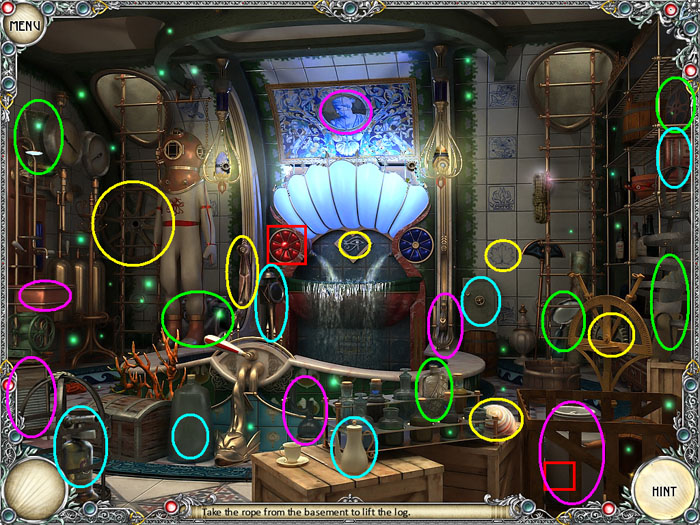
Return to the Yard and click on the Wheel beneath the log to the left of the door
Go to the Basement to get the Rope
Screenshot
The pink circles are for the Rope, the green for the Tile, the blue for the Sink and the yellow for the Bottle
Finish the Tile to find the Celtic Knot
To find the Duck, click on the sink
To pick up the Thermometer, assemble the 3 parts
To find the Funnel, click the safe
To pick up the Gear, use the wrench to loosen the bolts
Pick up the Rope and return to the Yard. Tie the Rope to the Wheel. Pick up the Wheel and take it to the Bathymobile. Now you need the Helm so return to the Yard
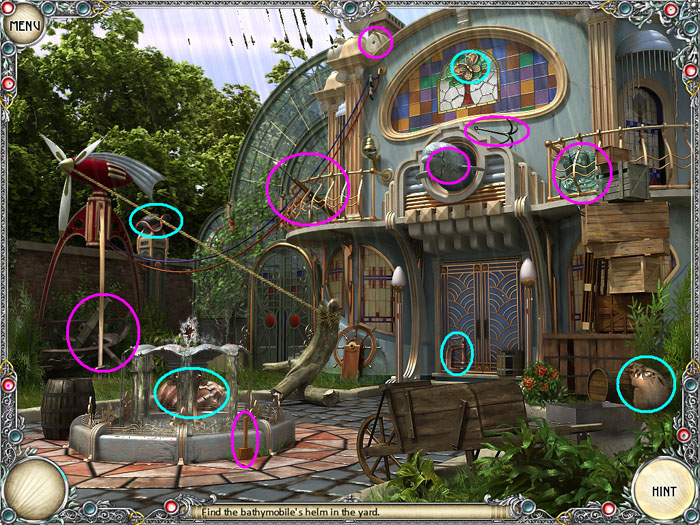
Click the Helm to the left of the doors
Screenshot
To find the Emblem, click the dolphin above the doors
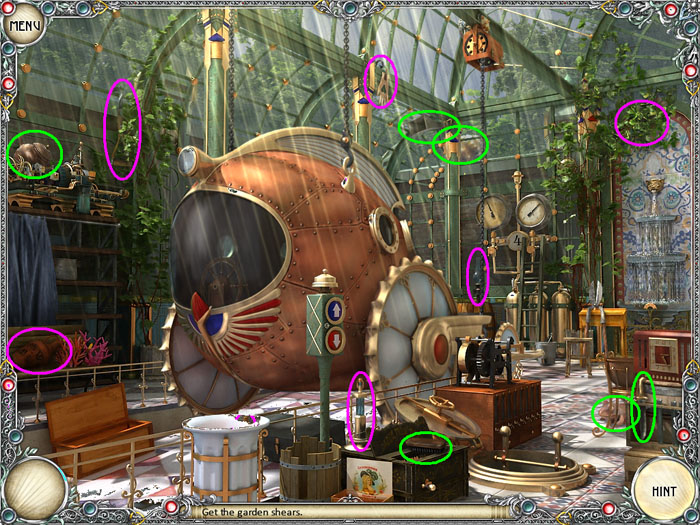
Take the Helm to the Bathymobile, but the button does not work. You have to pick up the Shears to cut the Rope in the Yard
Screenshot
To pick up the Lamp, assemble the 3 parts
To get the Megaphone, pick up the scissors and cut the 3 ropes
Pick up the Shears, got to the Yard, cut the Rope, return to the Bathymobile and press the blue "down" button
The Island
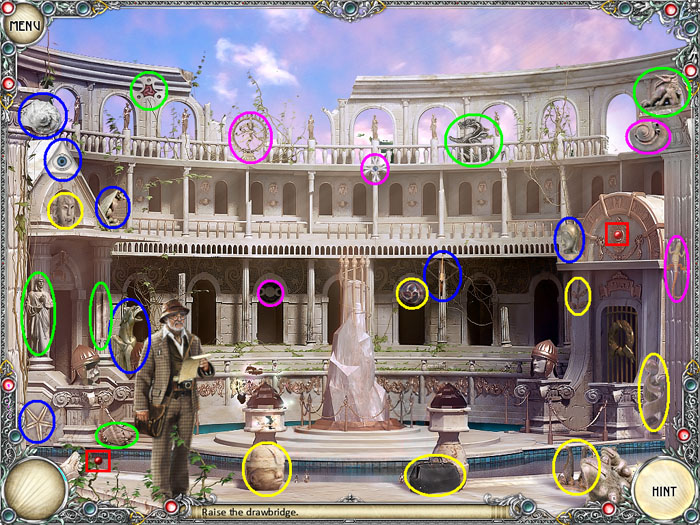
To raise the drawbridge click on the Shiva on top of the wall
Screenshot
The pink circles are for the left crystal, the green for the right crystal, the blue for the Shiva and the yellow for the Dragon
To pick up the Bag, use the key on the lower right to unlock the 3 locks
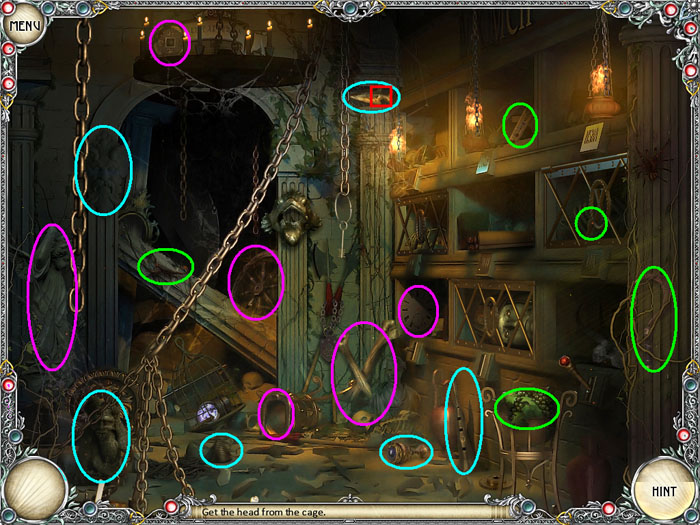
Go to the Crypt on the left to find the missing Head
Screenshot
The pink circles are for the Gargoyle, the blue for the Lever and the green for the Halberds
To pick up the Mask assemble the 4 pieces
To find the Golden Eye, look in the middle right niche
Use Halberd to open middle left grating
Inside the niche, pick up the Handle. Use it to open the lower center grating to get the Head
Return to the square and place head on the far left. Enter the room to the right
Click on the Map Desk on the left
Screenshot
To get the Grating, use the wrench to loosen the 4 screws
To get the Vase, fill it with 8 scrolls
For the last scroll, click on the red box below the Map Desk and do the puzzle
Line up the Fish so each row is the same color and each column has the same pattern
Screenshot
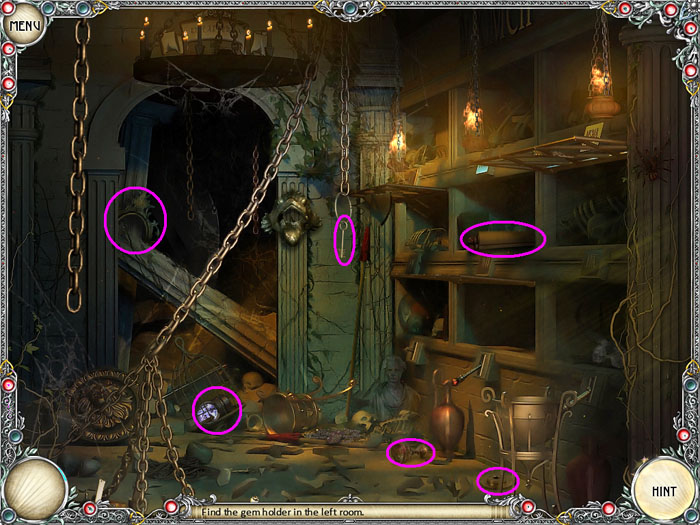
After you get the Old Coin, you'll have to return to the Crypt to get the Gem Holder for the chandelier
Screenshot
Return to the Map Room, place the Gem Holder on the chandelier and pick up the Ankh
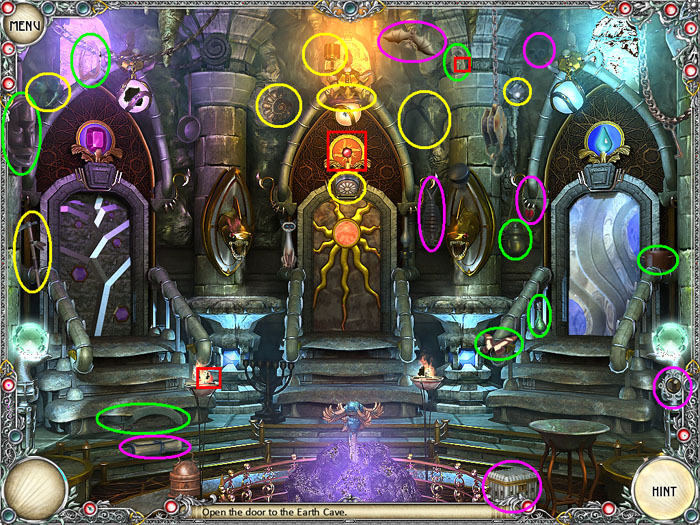
You have to open the door to the Earth Cave. Hallway Screenshot:
Screenshot
The pink circles are for the Earth Cave, the green for the Fire Cave and the yellow for the Water Cave
To pick up Chained Heart, assemble the 3 pieces
To find the Eagle, look in the white box on the floor to the right
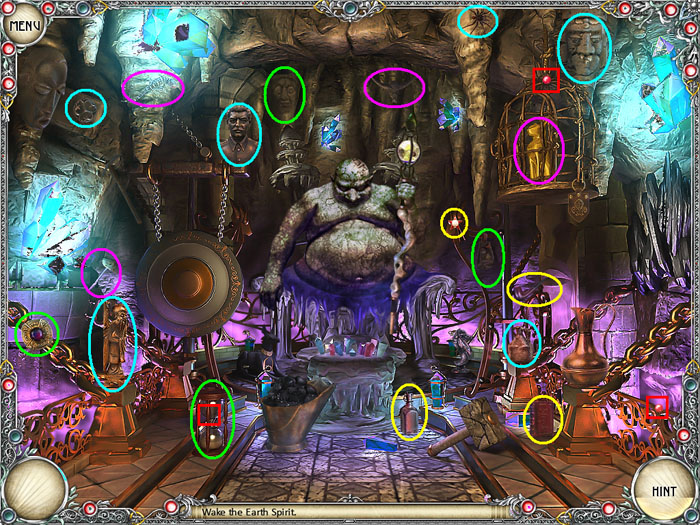
Enter the Earth cave to awaken the earth spirit
Screenshot
The pink circles are for the Stone Hammer, the green for the Door, the blue for the Coal and the yellow for the Bust. You will return for the Coal later
To get the Golden Cat, use the key to unlock the 3 locks
Click on the crystals beneath the Earth Spirit. Do the puzzle where you match the pairs of crystals. Pick up the one left. (It will be the clear crystal on the left side)
Enter the Fire Cave, click on the door and see the Earth Cave screenshot above for the answers
To pick up the Butterfly, you have to remove the 4 pins
Enter the Fire Cave and start by clicking the Dynamite on the top right
Screenshot
To pick up the Mosaic Disk, assemble the 3 pieces
Return to the Earth Cave and find the Coal, see above Earth Cave screenshot
Return to Fire Cave and revive Blower. See the Fire Cave screenshot
To pick up the Mayan Relief, use pick to break the 3 chains
Give Crystal to the Fire God and return to the Hallway
To enter Water Cave see the Hallway Screenshot above
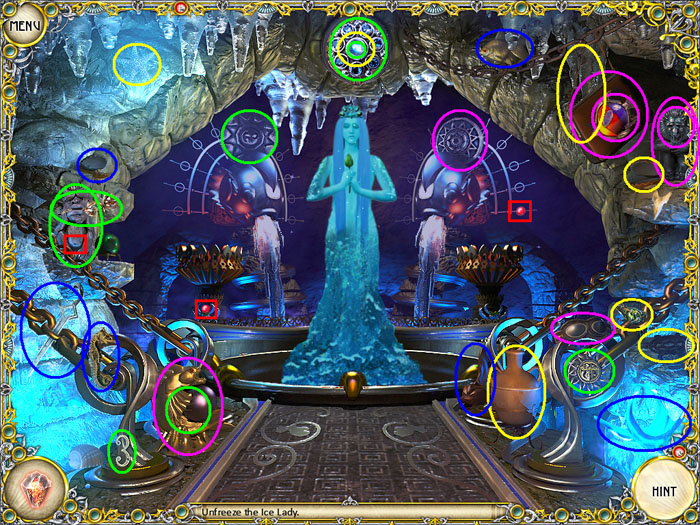
To unfreeze the Ice Lady click on the left and right Burners
Screenshot
To pick up the Bronze Medal, assemble the 3 pieces
To pick up the Turtle Stand, assemble the 3 pieces
To find the Ring, look in the clam on the top right
To find the Mask pick up the Decoration for the right Burner
To find the Safety Pin, look in the clam on the top left
To find the Ornamental Ring, move the Mask
The Canteen is behind the Gold Fish
Give the Ice Lady the Crystal
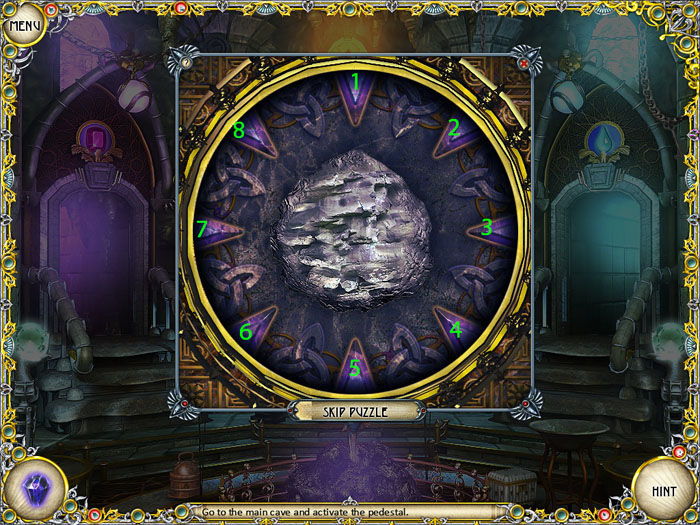
Return to the Main Hallway to activate the Crystal. Click on the pedestal and do the puzzle
Screenshot
With the points labeled 1-8, starting at the top, simply click them in order from 1 through 8
Place the crystal on the pedestal and return to Father
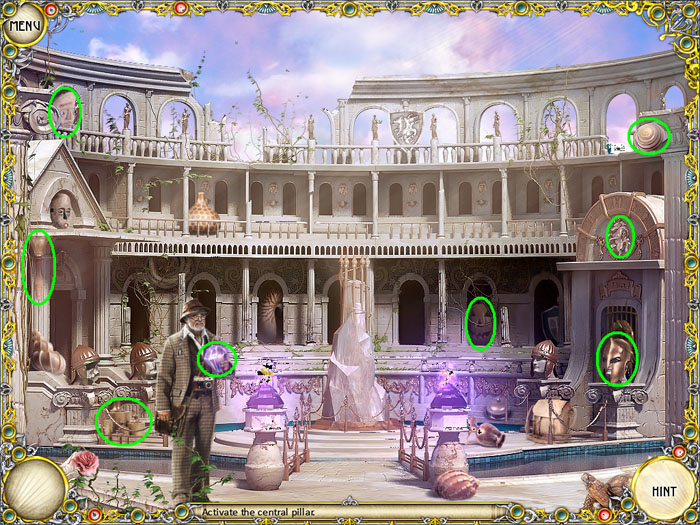
Now, activate the Portal by clicking the center above the column
Screenshot
To pick up the Unicorn, assemble the 3 pieces
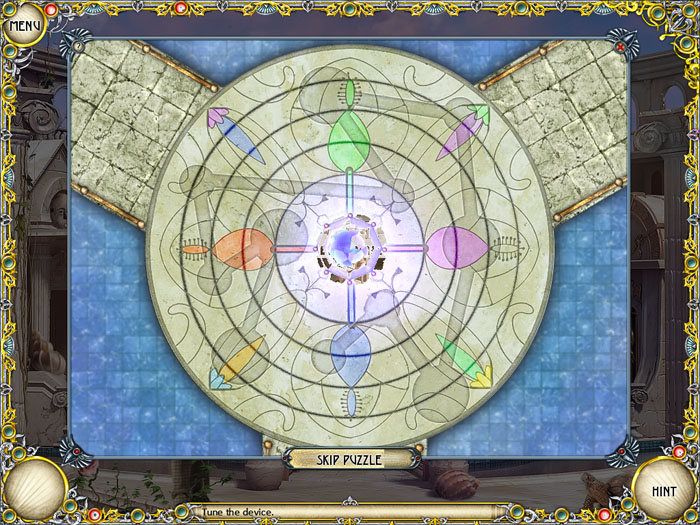
To finish, you must program the device. Rotate the discs until the pattern is complete. Hint: It is easiest to start from the outside and work in. Match the large dark patterns
Screenshot
CONGRATULATIONS!
Special thanks to Walzar for this fabulous walkthrough!
Posted by: grinnyp |
April 5, 2010 5:37 PM
|
April 5, 2010 5:37 PM