
 It's time for the trip to the past, it's Retro Weekday Escape time!
This WE is one-dev show, all games it contains are exclusively by Neat Escape (except bonus game). Few years ago they released five shorter escapes, with the rooms following one after another and located in the same building. Also, collected items are transferred from chapter to chapter so you can use them in another room. Puzzles are clever and using items very intuitive - not many creators allow you to use an item which you would use in real life, but insist, instead, on finding special tool. Not Neat Escape. Very well done!
Bonus game by Fuamu is simply gorgeous.
Have a good time and enjoy!
You find yourself in a cell of some kind, very clean, and with the impression that the cell's floor is flooded. It's not. Your bed just has very short legs and the floor is extremely polished to a mirror sheen. After short exploration you discover that you are locked here, and that though you can see some key which may fit the cell door, it's out of reach. What a surprise! So, look around again, carefully, and maybe you can solve a puzzle or two and escape...
...to the T-shaped corridor, with a door at the end of each section. All of them are closed, but you need to open only two, the third are from the cell you've escaped recently. The items you found there are still in your inventory - don't forget to check them after use, sometimes you can pick them up again and reuse! Many slots are empty yet so explore the corridor and try to get further...
...to the empty canteen with the same insanely polished floor, and with another locked doors. The kitchen visible behind steel bars of the counter is empty too and seems like deadlock, but you need to get there as the second part of strange mechanism by exit door is inside it. So, will you escape the canteen...
...and get closer to the exit? Surroundings in the fourth chapter has changed, shining floor is gone, and you find yourself in the maintenance area of the building. That's not the end yet, you pass by huge Christmas tree...
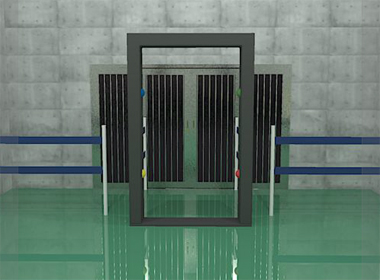
...and stay few steps from the exit, in the entrance hall, again in that stylish stainless steel-raw concrete-greenish floor design. There is something what seems like gantry metal detector in front of you - no way you'd get through unnoticed with all the stuff in your inventory! - but maybe not active. You'll see. The end is near - after solving several puzzles you're finally out!
The cursor isn't changing and there is neither save button nor autosave. One ending.
Fuamu's game is one of the most beautiful games I've ever played, its art reminds of Japanese animated movies and their magical atmosphere. It's a hard game too, partly because of a language as only Japanese version is available, and partly because of a design. Examine what you find carefully as sometimes it's difficult to click the right pixel for turning the item and seeing all its sides may be important. Notice that the room is a beginning only, and you can get further and discover more, and that it's possible to get through without understanding texts.
The cursor is not changing, no save button, two endings.
We love escape games, and our readers love talking about them and sharing hints! How about you? Let us know what you think, ask for clues, or help out other players in the comments below.


The link to Haato is broken - 404 Not Found.
Click the picture, this link works.
the final slash is missing in the top link url, click the image. Jay
End of Year Event series
If most of these rooms look like a prison, you're right: the whole of this series was later remade into a single Prison Escape with a slightly different theme.
(There are links between the games at the bottom of each game page.)
1: Confined
After hearing rumors of the last escape event of the year, you went for the challenge.
Exploration
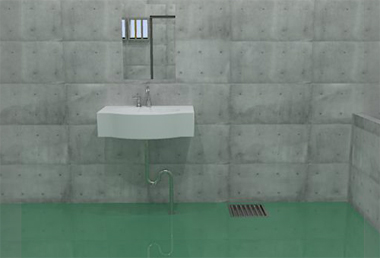
You start off facing a bed on the ground, so basic that it doesn't even have anything hidden under the pillow. However, the bedframe seems to be mounted to two grooves on the wall. The windows above have iron bars, some of which appear to be gold-plated.
Where the frame meets the wall on the left, you spot a tiny wooden piece held down by a screw.
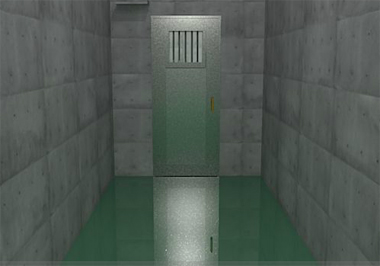
Turn right to face the locked exit door. The dark panel on the wall to the right has two large golden buttons above it.
Turn right to face the sink and mirror. Looking at the drain in the floor, you see a blue key under the grate, which is bolted down.
Turn right. There's another grate here that you can remove, but nothing there. Clicking the low wall on the left, you get a closer look at the toilet bowl, and you can close the lid to get to the compartment behind, which contains a screwdriver.
Gilded
Use the clue from the window bars to unlock the wall safe beside the door.
From left to right (while facing the bed), the golden bars are the RRLLRR of each pair. So push those buttons, and the compartment opens to reveal a big Push button.
This button repeatedly lifts the bed a tiny bit, making a soft tapping sound.
Unscrew
Unscrew the wooden piece holding down the bed.
Now you can push the button again to lift the bed up. This reveals an underground compartment with a bucket tied to a pole.
Check the bottom of the bed to find a hammer.
Destructive
Use the hammer to smash the mirror. There's nothing behind!
But you can pick up a large mirror shard from the floor on the left.
Slash
Use the mirror shard to cut the bucket free.
Slosh
Turn on the tap and fill the bucket in the sink, then pour it in the drain with the key.
The blue key vanishes, but of course you can pick it up from the other drain.
Use it to unlock the door and leave. In the next game, we'll have a corridor!
2: Corridor
After easily clearing the first room, you come to a corridor. What's in front?
Exploration
(You start with the items from the previous game: an empty bucket, a hammer, a screwdriver and a mirror shard.)
It's a wall! To be more specific, the corridor forks to the left and right.
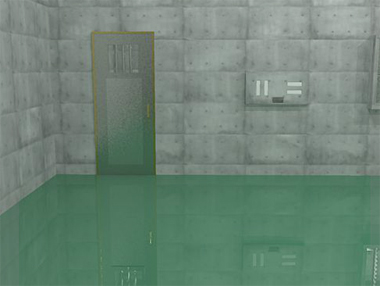
On the right, we have a more fancy door, but the keypad next to it appears to be disabled.
On the left (the other direction), it's a plain locked steel door with a shutter at the top. Taking a closer look at the shutter, you find a spanner.
The game won't let you go back, but it will let you look at the door you entered from, which has a high shelf to its left.
Reach
You don't have anything really long in your inventory, so your best hope of reaching the shelf is to climb on something.
Place the bucket under the shelf (automatically inverted), and click the shelf to climb up and find a security card.
Access
Scan the card on the (red light on the) keypad to activate it. Each of the buttons now shows a diamond shape which disappears when clicked.
Hmm, the code must be around here somewhere.
The diamonds on the door appear in the (from top down) center, right, left, center positions.
So click the buttons in the other eight positions to leave only those four diamonds lit up:
b-b

bb-

-bb

b-b
After pushing the Enter button, you hear the door unlock. Now you can proceed.
Exploration 2
You face sliding frosted glass doors (wonder what's up with their reflection?) with a cardboard box on the right. Look closer at the wall above the box, and you'll find a T-shaped hole.
There's no turning left or right, so there's only one thing you can do here. What is it?
Place the hammer in the wall hole, opening the doors to the next room.
It's a public bath, kind of. There's no one to stop you jumping in the huge wooden tub of green water and swimming to the inlet at the end: two red buttons above a wooden chute with a wooden bar across the right half.
Anyway, let's check out the shower area. The left wall of mirrors have different numbers of dots, and on closer look you notice the other difference between them: the hot and cold taps are swapped on some! Also, the drain at the right end has its cover fastened with a screw. On the right side, the mirrors all look identical except for the middle one, which is covered in foam.
(In case you're thinking about having another smashing time with the mirrors, too bad! The hammer is now stuck firmly in the wall.)
Clear
Fill the bucket in the bath, and then use it to wash the foamy mirror.
This reveals a clue with a dot, and arrow, and some digits.
Red
Use the clues from the mirrors and taps to do something in the bath.
Since the hot (red) water taps alternate between the left and right sides, the mirrors with 3, 4, 2, 1, 5 dots have them on the LRRLL sides.
So push those buttons, which makes two objects slide down the chute. The blue key is lost in the bathwater for now, but you can pick up the valve handle that remains.
Unwrap
Use the mirror shard to open the cardboard box. It's empty except for a single bolt!
Drainage
Use the screwdriver to unscrew the drain cover, then attach the valve handle to the pipe and secure it with the bolt (and spanner).
Then turn the handle, and the entire bath drains away!
It doesn't take long for you to find the blue key in the empty bath.
Backtrack to the other end of the corridor, and use the blue key to unlock that door and escape!
3: Cafeteria
After spending all that time breaking through locked doors, it's finally time to take a break!
Exploration
(In addition to the empty bucket, spanner, screwdriver and mirror shard, you also have the empty cardboard box you picked up last time.)
You see a locked door and a wall panel with four buttons- wait, it's two buttons each divided into two halves!
Turn right to face the tables. You can click each one to take a closer look, and find that they differ only by the shape of the chairs beside them. Along the back wall, you see another locked (double) door, some sort of stone block hooked up to a pulley and tied shut with wire, and a very high window with something you can't reach. Also, the left wall isn't much of a wall, having a set of iron bars in the middle of which you find some kind of panel and card slot.
Turn right to face the doorway back, and also a three-digit stone wall safe with inset geometric shape buttons.
Shapes
Use the clue from the chairs to unlock the wall safe.
Each table has two circular chairs, but only one of the tables has two square chairs instead of one square and one hexagonal.
Counting them up, you find a total of 8 circles, 3 hexagons and 5 squares. Enter that in the lock to find a red key.
Unlock (red) / Exploration 2
Use the red key to unlock the door on the first screen. Now you can enter the kitchen.
There's not much space to turn around, so let's look from left to right. There's a fridge (rendering metal is hard!) with an ice cube inside. There's sinks which don't work and covered pots above, including a frying pan that looks more like a saucepan. There's a stove with room for a pan and some fuel. There's a metal block hooked to the other end of the pulley rope, but it has another hook on the bottom. And there's a number written on the wall between the sets of iron bars.
Parallel
Use the clue from the pot covers to unlock the two-button panel just outside the door.
The 1st, 3rd and 6th covers from the left have their handles placed "vertically".
So push the LRLRRL buttons, and the panel dispenses a box cutter.
Slit
Having no further use for the shard of glass, you decide to shove it into the card slot.
Surprisingly, this works and the panel opens to reveal a three-digit lock.
Passcode
Enter the code (736) you saw inside the kitchen into the three-digit lock on the other side of the wall, which dispenses a matchbox.
Warm
Place the ice cube in the pan and then the pan on the stove. It just refuses to melt however long you wait, so find some way to light the stove.
The cardboard box is to big to fit in the stove, so use the box cutter to cut it into sheets.
Now you can place the sheets in the stove and light it with the matches.
The ice melts instantly, so you can pick up the pan full of water, which has some kind of rod in it.
Extend
The rod extends to become a pointer, which is just perfect for you to retrieve the nippers from the high window.
Raise
Use the nippers to cut the wire. Now all you have to do is move the pulley.
Go back to the kitchen, pour the water from the pan into the bucket, and hang the bucket on the metal block.
This lifts the stone lid so you can reach the blue key inside. Use it on the double doors to leave.
The sun has set, and you come out in a fenced courtyard!
4: Courtyard
Whoa, what's this festive music?
Exploration
(From the previous game, you take along the spanner, pointer, nippers, screwdriver, frying pan, matchbox and box cutter.)
Your path forward is blocked by a green gate, and the box beside it has a switch missing its handle.
Also, you see something red on the starting screen, which turns out to be two barrels hidden behind the corner. On the cap of the upright one, you find some sort of instrument? With a vertical tube stabilized by two finger loops, you figure out that it's a candle holder.
Switch / Exploration 2
Only one item fits in the switch: the screwdriver.
After moving it to the on position, you can open the gate to enter the courtyard proper. There it is! A large Christmas tree on the left isn't lit up. The shed on the left is also really dark inside, so you should enter the one on the right. But first, check the back wall of the yard between them to find a locked door.
Inside the right shed, you see a stone wall with two locks. One is a three-digit lock labeled Generator but upside-down, and the other is a four-color lock marked with a star. The table is laid out with a small chicken meal, but there's something extra: an unlit candle next to the placemat.
Light / Exploration 3
Place the candle in the candle holder and then light it. Now you can explore the left shed, using the candle to clear the darkness.
A large generator has a Start button that doesn't work. Presumably it's low on oil and you can fill it with the Oil pipe beneath the dials.
Check to the left of the generator to find a tap!
Inverted
Use the clue from the generator to unlock the three-digit lock.
If you examine the generator again while looking at your screen upside-down (okay, maybe just imagine doing that rather than turning your screen) you'll find only one thing that can be a three-digit number.
It's the oil cap, and the label OIL becomes the code 710 when inverted.
Enter that in the lock to dispense a funnel.
Fill
You're almost ready to get the oil out of the barrels, but the tap you found doesn't seem to work right.
On closer examination, you find that the bolt on it is loose. Fix it with the spanner, and now you can attach the tap to the horizontal barrel and fill the frying pan under it.
Inside the generator shed, attach the funnel to the oil tube and pour the oil in!
Now that the oil level is High, you can start the generator, which lights up the Christmas tree outside.
Show
Use the clue from the Christmas lights to unlock the four-color lock.
The tree flashes red, green, yellow, blue, green, red, so push the 1st, 3rd, 2nd, 4th, 3rd, 1st buttons from the left.
The lock drops a blue key, so use that to open the lock and leave! You've entered another building, but the exit is so close.
5: Conclusion
Your epic journey is almost at an end, but of course it's foiled by another locked door.
Exploration
(You've come a long way since the cell, leaving all your inventory behind. But you still have the unlit candle in its holder, the spanner, nippers, frying pan, funnel, matchbox and box cutter.)
The gray doorway is almost certainly a metal detector, but it doesn't seem to do anything when you walk through towards the locked exit door. It has four colored lights on the sides.
Turn left to face the doorway back (neatly disguised as another door), as well as two safes on the wall, one with a grid of four colored buttons and the other with three labeled indentations.
Turn left to face another locked door. The panel beside it has white squares and rectangles on the buttons, and there's a device on the right with a small cup fixed above a heater with a small tube running down from it.
Turn left to face a dirty window and a counter with a clipboard on it. This clue is informational but not really helpful at the moment.
Enter through the door to find a wall with four high red shelves above a four-digit lock. On the left, a cupboard in the wall contains a weighing balance with a 1kg weight on the right.
Turn around to face the door you just entered as well as the other side of the dirty window. Looking in the desk facing the window, you find a blue ball in the drawer.
Four colors
Use the clue from the metal detector to unlock the four-color lock.
The lights on the metal detector are
Blue(2) Green(3)

Yellow(1) Red(4)
so click the buttons that many times to make the lock dispense a red key.
Unlock (red) /Exploration 2
Use the red key to unlock the door on the same screen as the heater.
It's a visiting area. Each booth has glass with small holes in it, but you notice that the patterns of the holes are different, there's a clue in the left booth, and an item in the right booth; let's just call it part A.
Cutout
Use the clue from the visiting area to unlock the panel just outside.
Reproduce the patterns of rectangles of holes (three tall, two wide, three wide, five squares) by clicking the buttons 1, 5, 4, 3 times, then push the big button to dispense part B.
Balance
Use the clue from the clipboard to balance the scale.
None of the items on the list weigh exactly 1kg, but there's just one combination of items which does: the pan and the funnel.
Place the funnel in the pan and then the pan on the scales, and the box underneath opens so you can take a blue towel.
Transparent
Use the towel to clean off the window. (If you try cleaning it from the outside, the game will tell you the dirt is on the inside.)
This leaves some red symbols on the glass. What is this a clue for, and how do you read it?
The red color of both the symbols and the high shelves match the digits on the four-digit lock.
This suggests that you need to view the symbols and the shelves together, and you can do so by looking at the window from outside.
Doing so, you see the clue 7025 which you can enter in the lock to receive a red ball.
Drip
The heater setup suggests that something liquefies when you heat it up. What would that thing be, and why would you do that?
Assemble the two parts of the mold by placing part A on part B, then place it under the tube.
Then remove the candle from its holder and place it on the heater.
Once done, pick up the mold again and open it to find a white ball of wax.
Initial
There's only one wall panel left to solve. Place the blue, white, red balls in the hemispherical indentations there, and push the button to dispense a blue key.
Use that blue key to unlock the main door and escape.
You win a prize of new year's food! And a message from Neat Escape! And a THE END screen to go with your Congratulations!
As usual, I'll take more time for the bonus game walkthrough due to translation, but it'll be worth it!
I'm stuck in the second year. I've completed the others. Can someone help?
Thanks for the walkthrough kktkkr,
Unfortunately it didn't cover the one problem I had:
Finding a certain spot in chapter two:
The drainage. I finally found it:
It's at the end of the showers on the left side, just before the bathtubs
This is actually the third game in the series. Even though it's connected to the previous game(s), I would only recommend playing the second one if you know Japanese, since it's really difficult otherwise.
Haato — 3-Chōme no Yorozuya
Quick translation of the title:
Haato = Heart
Chōme = smallest subdivision of a Japanese address
Yorozuya = general store (but also the name of the game website)
Choose the left option to play (or the right one to skip) the intro animation:
Long ago, someone told me something like this.
Sleeping people can't talk.
In dreams, you can't see your right hand.
Things in dreams can't be taken out.
At twilight and falling asleep, I remembered it.
At that moment, I just thought about it
Wouldn't there be no escape from this sepia world?
When it's done, you get the option to turn graphical effects (just crossfading, as far as I can tell) on and off, and you can reopen this dialog in-game using the checkbox in the inventory.
Exploration
But first, the interface. In addition to the corkboard inventory from the previous games, this one shows you the floor plan of the current room, including where you're facing and looking at.
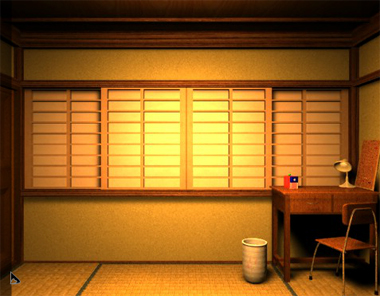
So right now you're looking north at a blank wall, and there's a desk on the right with a colorful sharpener on it. The right drawer is locked, but the left one can be opened, and you find a hand mirror, complete with powder puff, and a lipstick, red as dried blood. The bin beside seems to have some crayon marks, and you can lift it up to find nothing beneath.
Click the top-right edge of the bin to turn it around and find a note with numbers.
By the way, you've probably noticed that you can drag items around in your inventory. Most objects in this game/series actually have two pieces of text when you click them, one more common than the other. Sometimes these are hints for puzzles, in which case I'll only mention them when needed.
Turn left to face the door marked on the map. It's unlocked and you can open it… but all that's there is a wall with a wooden block. There are two cupboards on the left, and every compartment of the larger one is locked. However, the shorter cupboard has an empty vase and bird ornament, as well as a door you can open to find a wooden box.
Turn left. There's a toy piano on the ground, missing two of its keys. The clothes rack on the wall is missing one of its knobs.
Open up the top of the toy piano to find a bear(mouse?)-shaped knob which is shaped like a bolt on the other end.
Turn left. The sliding door here has a four-digit lock.
But is it really locked? Click the bottom right corner of the door to find a wooden latch that unlocks the door.
Ears
Place the knob on the hole in the rack above the toy piano.
It seems a little wobbly though.
Turn the knob clockwise by clicking the right ear.
Still loose? Keep going until it's upright again, and then you hear a click.
The game tells you that you heard the click behind you.
The only locked place on the north wall is the right desk drawer. Open it to find a white key for the piano. That just leaves one more to find!
There's also a diary under it.
Dear Diary
August 13
Today we did a physics experiment. After painting a paper black, we went outside and held a magnifying glass over it and the painted part burned up. Sensei said the curved lens gathered the light. I wonder if spectacles work too.
August 14
Today's weather was great. It was warm and I had a nap. I think I had a dream but I don't remember. I think there was a torii and shrine.
August 15
I had a weird dream today. I was in a classroom, trapped. It wasn't scary, but I was a bit scared.
August 16
I had a weird dream again. I became a mouse and around me were a long-nosed elephant, a long-eared rabbit, a big-eyed tarsier, and a big-eyed duck. They stared at me.
August 17
Somebody scribbled in my diary today. Only I know where I hid the diary. Maybe it was me?
August 18
The scribbles are getting worse. I want it to stop. Tomorrow, I'll burn it, and the pouch too.
Exploration 2
On a lighter note, you've cleverly defeated the real lock of the sliding door, so proceed to the next room.
This isn't a room, it's a train car! You can see out the windows, but there's nothing to see because it's pitch dark.
Click the chair directly on your right to zoom in on the corner and find a pair of glasses.
Step forward to the middle of the carriage. Now you have options to turn left and right, but all you see are building lights through the left window (clearly, the train isn't moving) and a hammer on the right between the seats.
You can also check the door at the end (locked) and to the left of it (also locked). Is that all there is here?
While looking at the side (north) door, the map shows that you're standing at the end of the carriage.
So turn left to face west, and you find another note on the seat.
Stain
Open up the mirror and look in it. It's so clean that you almost want to dirty it.
Open up the lipstick and smear it all over the mirror to find a clue.
There's only one place this code can go…
The uncovered parts of the mirror form the digits 9027, so enter that in the four-digit lock in the door. (To change the digits on the buttons, click their top and bottom edges.)
This gives you a slightly rusted key.
Unlock / Exploration 3
In the train, use the key to unlock the side door (you have to click the keyhole).
Stepping out, you find that it's daytime! You see purple curtains between two doorways, but let's look around first.
Turn left to face the train, which looks really old.
Turn left to face the station sign, in front of the fence and the blue sky. What does it say?
おもいで
想い出
かこ | こころ
Memory
Past | Heart
(If you squint at the signs above the doors in the train, you can kind of read かこ on the east side and こころ on the west.)
Turn left to face the purple curtains again. Let's start by entering the left doorway. A path between rice fields leads forward out the back of the station.
Turn left to face some benches and a clock you can't read. There's a red box on the ground, some sort of empty toy package.
Turn left to face the platform, then turn left again. You can see that nobody's in the office, and the back room has its red curtains drawn. At the end of the shelf on the left, there's a pencil holder from which you can take a earpick with a rabbit handle.
Return to the platform, and enter the other door. You immediately face the door to the back room, but for some reason you don't have the courage to open it. There's also a huge set of seemingly empty drawers and a black rotary phone (looking at it, you fear that it's about to ring).
Turn left. There's a swivel stool in front of the counter, which has a coin "stocker" (counter tray) with 10 yen coins being most common, as well as a box whose four-digit padlock has some shapes drawn on it.
Turn left to face the curtains and the door back to the platform, then turn left to face the noticeboard. The timetable shows many trains to Heart and only one to Past, but there seems to be another marking on it.
Stash
The diary in the drawer told you about a secret hiding spot. Maybe you should follow the clues to find that spot.
The drawing on August 17 has a grid of brown lines and a red spot.
Four brown lines in each direction means five columns and rows, just like the drawers in the office.
So look in the drawer in the second column from the left, second from the bottom. The hidden item in it is not a diary, but a white key.
No toy
Maybe you're still curious about that toy box. Let's take a look.
The name on the egg logo is pretty much unreadable, so turn the box over to find graphical instructions. Aha! It's a flower pot!
Read the label at the bottom. Parking allowed, recycling, only 400 yen huh?
"Notice: This product is a fictional object. Too bad."
Anyway, you can continue to click the right side of the box to find another panel. That's an interesting melody…
Puzzle box
You now have all three items you need to unlock the wooden box in your inventory.
How do you do that?
The note with digits has its bottom-left corner marked, while the one with shapes has its top-left corner marked.
After mentally rotating them to match, you find that each of the shapes on the box buttons corresponds to a number from 1 to 4.
The digit note is kind of randomized (basically, chosen from a few options), so the numbers you get should be 3412, 3421, or 4123. Just click the buttons in that order, starting with 1 and ending with 4, and you should hear a click.
But wait, that's not all!
Back out (click the bottom of the examine frame) and click the right edge of the box to look at the back, where there's a small hole.
Use the earpick on that hole. Now the box is unlocked and there's an egg inside. It's real!
Tune
Fix the toy piano in the room, and play the music printed on the box.
(I experienced a glitch with this puzzle where the correct code wasn't being accepted. If that happens, your only choice is to restart.)
If you're trained in music, reading either the sheet music or the solfege (la la ti la la la) below it will help you figure out which keys to press.
Otherwise, you should know that the keys you replaced are the 10th and 11th white keys from the left or the 6th and 5th from the right, and you need to press the LLRLLL keys.
The melody echoes into a familiar tune, and the cupboard on your right unlocks.
You see a hexagram in a circle passing through four holes. The top one has a miniature torii in it.
Break in
Still in the first room, use the hammer on the wooden block behind the northwest door.
The block disappears into the hole, and something unsettling appears when you look in it.
Burn up
Well, at least that explains another page of the diary. (It really doesn't.)
That leaves just one more thing to check out: do spectacles work?
It just might. After all, this pair of glasses has a really high power.
You still have the shape note, so apply lipstick over it, and it neatly paints the shapes you saw on the box(es).
Go out in the sun (that is, on the station platform) and use the glasses on the note to burn holes in it!
Read out
Place your modified note over the timetable in the office, and drag it to match the outline. The circles neatly line up over four of the numbers.
So use that to unlock the padlocked box.
The diamond, circle, triangle and square on the note end up over the digits 9965, so enter that in the padlock to open it. (Like before, you need to click the edges of the metal rings to change the digits.)
The box contains a white disc with a dent in the middle, which turns out to be a seed!
Miracle
Use the hammer to crack open the egg, which was filled halfway with soil.
Plant the seed inside, and after a short wait it sprouts a flower!
Friends
Use the clues you've seen to solve the remaining puzzle in the cupboard.
Matching up the August 16 diary entry with the wooden figures behind the door, you realize that the animals are listed in clockwise order starting from the torii: elephant, rabbit, tarsier, duck.
The enlarged parts of those animals are the nose, ears, eyes and mouth, which are associated with items in your inventory.
Place the flower, earpick, spectacles and lipstick in the holes clockwise from the top. This makes the middle compartment open up to reveal a block of cheese!
You don't get to bite into that tasty cheese, because it breaks into two halves to reveal a golden key in the middle.
Ending A
Use the golden key to unlock the door at the end of the train.
Eerie music plays you enter the corridor, which inexplicably has a sliding door panel in the middle of it. Walk up to the door and enter it.
There was a single door.
On the other side was a dazzling total darkness.
My eyelids gradually became heavier.
I heard words in my sleep, and then a beautiful tone.
The door led to the past.
Return to the start.
The credits roll, and then you're given the option to go to the "Escaper's Room?" (completer's forum), and then the option to replay the game.
Perhaps you're not satisfied with that ending. Well, strap in because it gets wilder.
Ending B
Play through the game again until you get the golden key. Instead of leaving through the exit, there's something else you can do first.
(This one is quite obscure, and there's a particular step above that you cannot skip in order for it to work.)
You need to literally go back to the start of your exploration. Examine the pencil sharpener on the desk, which starts talking.
"Ah, what a nice song you've played for me.
What are you startled by?
Think a talking sharpener is weird?
It's incredible that you can talk.
Heart written in a book really represents true feelings, heh heh.
By the way, don't push your finger in the hole.
You'll have a bad time! Be warned!"
That's oddly specific, so click the hole. The sharpener gasps and releases a green gem of courage which has a seeping warmth to it.
After unlocking the east train door as before, you'll find that the exit in the corridor now refuses to open. Instead, you can use the courage gem to enter the left door.
It's a classroom which you may remember from the previous game, but this time all you can do is turn right to face the bookshelf.
The Heart book is still there (the brown book right next to the thick black one), but just as you pull it out you get a feeling that you forgot something.
Bring the gem to the station office, and use it on the door to the back room.
Inside, you find a pouch containing a colorful jeweled heart-shaped key.
With the key in hand, you can now pull out the Heart book from the shelf. It has a… keyhole?
Insert the heart key to end the game.
I woke up in my own room.
As I rubbed my sleepy eyes, I sat onto the chair.
I don't know if that was a dream but I felt like I got a warning from the heart.
Even if I forgot it, it doesn't matter.
However, please don't deny it.
Remember it from time to time,
if you don't want to be trapped…
The end.
Perhaps you're not satisfied with that ending either, and you don't care too much for vague warnings. What if…
Ending C
The presence of that lock on the bookshelf in the previous ending might have either confused you or inspired you. In the second game, that padlock was never unlocked, but you smashed it with a hammer. Could there be a way to repeat that destructive feat?
Playing through the game again, you find that it's totally optional to use the hammer on the wooden block. Just play through as normal but complete the last puzzle from memory.
(In fact, the hammer is the only item you can smuggle out, because even notes you haven't taken vanish immediately once they're no longer needed.)
Alas, the pencil sharpener will refuse to talk if you still have a hammer, so there's no way to enter the classroom with it.
Instead, bring the hammer through the corridor exit.
When I woke up, I was gripping something in my right hand.
As if alive, it bound to my hand and showed no sign of leaving.
My spine chilled like it was freezing over.
My head turned dull and I couldn't think.
And then I met my gaze in the mirror.
In an instant, I felt it take up a burning frenzy.
I don't remember anything after that.
... ... ...
END
Negative power of posting: I proofread the walkthrough in preview so many times and only spotted this minor typo after submitting:
In the diary, the duck has a big mouth.
Whoops.
Good heavens, @kktkkr, you deserve a plate of cookies for all that hard work! Thank you!
Thanks for the comment (and cookies)!
There is one more game in the series, much shorter, but with English version. English title is The Unexpected and can be played here: http://ww.doodoo.ru/games/5735-unexpected.html (one w is missing in the link)
Update