
 Wednesday is here! Welcome to the latest Weekday Escape!
It's becoming a tradition - again we are starting in Amajeto's living room, being locked of course, and surrounded by relaxing blues and purples. Abruptly, you find yourself wandering around Selfdefiant's magical forest with only wish - get away from here as soon as possible, the night approaches and shining eyes are closer and closer...but don't despair, there are ways if you try! Then tomoLaSiDo traps you and doesn't let you go unless you find six key parts, and at the end comes Gotmail (SpiceApp now) with the remake of their old game.
Have a good time and enjoy!
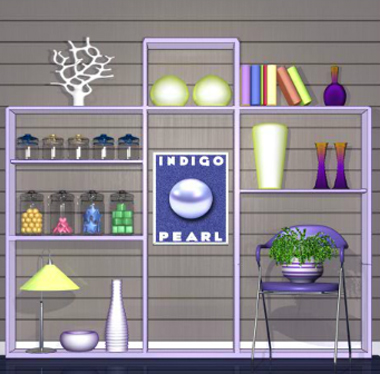
On your way through the rainbow you arrived to Amajeto's indigo room, where are nice puzzles, good view and one door which can't be opened. They won't let you into the bathroom this time. Otherwise good game as always!
The cursor is not changing, no save button, one ending.
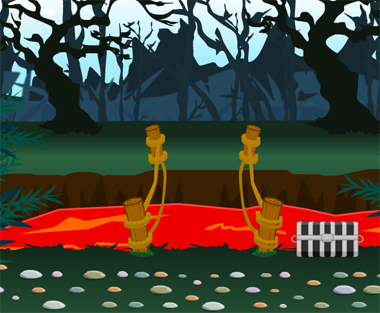
You wake up in Selfdefiant's magic forest and it's very strange indeed - cute mushrooms growing here are obviously unnatural and the pedestal must hide some secret! Other part of the forest lies behind a river, and to explore it, you need to figure out how to cross the stream. No way to wade through it, it's burning lava, so look around carefully and try to find some useful items! Will you escape?
The cursor is changing, autosave, one ending.
P.S. Well known specialist for magic atmosphere and forests specifically is Esklavos - you find his Magic Forest Escape 3 in WE-RE N°6 and Ancient Forest in WE N°44. Here are the predecessors, Magic Forest Escape and Magic Forest Escape 2.

It's colorful laces what you are looking for in tomoLaSiDo's most recent game. Nine laces, precisely, including the one you may use and which helps you to get those blue-and-white capsules with key parts. The room is quite plain, this time the creativity focuses on puzzles - yes, tricky again - and the choice of items for the sidequest, which is absolutely unpredictable.
The cursor is changing, no save button, one ending.
Gotmail, now SpiceApp, returned after a long pause and is very active recently - several games are out already so lets hope such an enthusiasm will persist! Their style has changed though - beautifully hand-drawn enviroments or 3D design are replaced by contemporary graphics, and quite reminds of highly polished Flash512's games, only without changing cursor. You need to explore the room very carefuly and click everywhere to find out which hotspots are active and which only seem so - can you escape?
The game is available for Android too.
P.S. This game is a remake - here's the original story: Lost Article (orig.) by Gotmail.
We love escape games, and our readers love talking about them and sharing hints! How about you? Let us know what you think, ask for clues, or help out other players in the comments below.


Thanks for fixing the links, but those for Lost Article's Android and original versions are still messed up.
I was easily able to get the original working on Chrome (only http in the url), so I might do that walkthrough too.
What's the deal with the pearl poster in Color Room: Indigo?
I can make it move up and down by clicking on the top and bottom, but it doesn't seem to reveal anything. I kept clicking until it went below the inventory boxes, and eventually it disappeared completely. I refreshed the game, and tried pushing it up. It kept going all the way until it completely disappeared into the ceiling.
I assume that it's a glitch, but is there a work-around? Or am I missing something?
Oh wow, that is quite an amazing glitch. (No need to refresh, the misplaced poster resets if you change screens.)
What you're supposed to do, in the usual escape game way, is
enter a code into the poster by clicking some parts of it in the correct order.
If that sounds vague, it's because
the poster has four spots to click, not two.
Walkthrough time!
Color Room: Indigo
Indigo matches the background colors on both Amajeto and JIG.
Exploration
The first screen this time has a folding chair occupied by a potted plant. A shallow shelf is built into the wall, and by clicking the objects you find that the tall jars have colorful decorations in them, and the smaller jars above have blue and yellow lids. The poster in the middle displays an indigo pearl, and it slides up and down when clicked.
Turn right to face a more comfortable armchair under some windows which look out onto a familiar cityscape. The square cabinet in the middle has a four-digit lock.
Turn right to face two locked doors, one with a doorknob and one with a handle. The picture in the middle is divided into a grid of tiles, with six of them missing.
Turn right to face a television screen over some locked cupboards with an unusual label. The cupboards on the left have locks with two colored buttons and four colored letter buttons, while those on the right have locks with four colored shape buttons and a grid of lit buttons. Finally, the digital clock seems to have stopped, but you can push its buttons to make it momentarily display a different time.
Vertical
Use the clue beneath the TV to unlock the sliding poster.
Hint: shouldn't the poster be tilty?
The letters in
lollipopappear on the ⌟⌝⌟⌟ ⌜⌞⌝ ⌞ corners of the poster, so click those corners to spell it out.The poster flips over to reveal a purplish square tile in front of a squarish clue with a blue letter U.
Two colors
Use the clue from the small jars to unlock the top-left cupboard door under the TV.
Push the blue, yellow, yellow, blue, blue buttons (RLLRR) and open it to find a square tile and clue that looks like the previous one.
Shaped
Use the clue from the tall jars to unlock the top-right cupboard door under the TV.
The decorations which are pink, blue, green, yellow are hearts, stars, cubes, balls.
So click the buttons 6, 0, 1, 2 times, then open the door to find a remote control, a square tile and a clue.
Screen
Use the remote control to turn on the TV, which shows a small grid of letters in squares.
Then use the remote on the TV again to switch the screen to some sort of sum.
Math
Use clues from the TV and clock to unlock the cabinet under the windows.
Add the numbers that appear on the clock:
AM+PM = 1034+1135 = 2169.
So enter 2169 into the cabinet and open it to find a square tile and another clue.
Four letters
Use all four letter clues to unlock the bottom-left cupboard door under the TV.
The green, yellow, blue, red letters spell out the word BLUE, so enter that in the door and open it to find a square tile.
Grids
Use all the grid clues you've seen to unlock the bottom-right cupboard door under the TV.
The first screen of the TV tells you how to assemble the smaller grids throughout the room. Notice that the grids labeled B and E have their top rows shaded black and the grids labeled U and L have their bottom rows shaded black.
So click every button on the top and bottom rows, then open it to find the square tile.
Complete
Place all six square tiles in the picture frame, making it show a randomized scrambled image of an indigo flower.
Click the tiles on the picture to rotate them until they fit, and a small compartment opens up to reveal a golden key.
There are two doors but only one key, and if you try them out you find that the key unlocks the right door and ends the game!
SD Magic Forest Escape
This forest has an endless supply of magical, red hot… music.
Exploration
Green eyes creepily appear across a vaguely familiar river of lava, and the bridge across it is missing some boards. There's also a locked chest with a four-letter lock.
Go right to find a large round pedestal between two smaller square ones, which have green and blue gazing balls that you can touch.
Pick up the piece of wood from the bottom-right corner of the screen.
Go left twice to find a row of brightly colored mushrooms. A wooden sign seems to point at them, but what is "soms"?
Go left. The pebble path ends at a moss-covered rock and a tree with a piece of wood sticking out from behind it.
Fungal
Use the clue from the mushrooms to do something with the gazing balls.
In the direction indicated by the sign (right to left), the mushrooms are GBBGBGBGB.
So click the balls on the LRRLRLRLR pedestals, which makes a sun stone appear.
Words
Use the clue from the sign to unlock the chest.
The arrow on the sign is also pointing you to the rock whose description emphasizes what you need.
Enter MOSS into the chest and open it to find an axe.
Planks
Use the axe to cut the sign down, giving you the third piece of wood.
Then place all three wood boards onto the bridge. Now you can cross!
Exploration 2
A slightly scary stone house has a locked door, two skulls on tall pillars, and some bushes in front.
Go right to find a more normal river of water, as well as a chest with six unusual symbol buttons.
Go left twice to find a leafless tree with some vines hanging from it. One of the vines is bright green.
Ray
Use the sun stone on something you saw earlier.
Specifically, use it on the mossy rock to clear out the moss, revealing six symbols joined with lines and arrows.
Then use that clue to unlock the second chest.
The path connects the symbols in the direction of the arrow.
Click the buttons 3, 1, 4, 0, 2, 3 times to display those symbols, then open the chest to find a sword.
Slash
Use the sword to cut the vine off the tree. As it falls to the ground, a key comes out of it.
Unlock
Use the key to unlock the door.
The room is dark and all you can see is an unlit fireplace and a stick on the floor.
Light
Dip the stick into the lava river and use it to light the fireplace.
This reveals several things in the room, but the changing cursor helps you ignore the distractions and focus on the scroll on the shelf and the four-digit chest.
Numeral
Use the clue from the scroll to unlock the chest.
The roman numerals have values 3, 9, 4, 7, so enter 3947 in the chest and open it to find a magic wand.
Magic
Use the wand on the river of water to freeze it.
Now you can walk across to end the game!
Escape Challenge 82: Room with Laces
They're fancy, they're useful, and they don't usually get lost. Has someone played a prank here?
Exploration
The room has a bay window this time (but the view is still plain), and a brightly colored radio has a shoelace hanging off it, a pair of rectangular buttons that change the frequency, an antenna you can raise, and a brown wire mysteriously leading away from it. Beside the semicircular glass table, you find a potted plant with another shoelace.
Turn right to find a small painting/photo on the wall. The wall panel at the bottom left has an opening with two loops, one on a box and one attached to the wall, as well as a knob that doesn't work yet. Checking the chest of drawers on the right, you find that the top one has three colored buttons, the middle one has three color-changing buttons but arranged vertically, and the bottom one has two identical round buttons.
Turn right to face the exit door. The wall clock has no hands and appears to be split in half by a jagged line, with blurry rectangles painted on it. Underneath that, a box on a small pedestal has a wheel and a button to spin it, but you have some trouble getting the red sector and red pointer to line up. Also, what's with that sequence of numbers?
Look under the box to find a capsule containing a key piece.
Turn right. There's a wall with a three-digit lock, an empty blue bin beneath it, and a small square table with an unusual device on it. It looks like there's a capsule stuck in the top of the device, but you can't seem to do anything with the two rows of circles running down the sides, some of which are drawn thicker than the others.
Look under the table to find another shoelace.
Enter the corridor leading to the toilet. Light shines in through some closed window shutters which have a string stuck dangling from them. As usual, you can sit down, look right, look up and look left to find a drawing of someone tying shoelaces.
Win
You still can't get the spinning wheel to land, which leaves one course of action: bang on it until a shoelace (item) falls out.
Tie
Use the shoelace on the device beside the toilet corridor, tying the circles together.
The capsule pops out and flies off the screen.
After a bit of searching you find the key piece resting on the wall box.
Crossed
Use the clue from the laced device to unlock the top drawer.
The dotted arrow tells you to consider the crosses from top to bottom.
Click the GYBYGB (RCLCRL) buttons, then open the drawer to find a shoelace and key piece.
Eyelet
Use the other clue from the lace device to unlock the middle drawer.
From top to bottom, the bold circles appear on the RRLLRRL sides, so click the corresponding buttons on the drawer and open it to find another shoelace and key piece.
Hitch
You can't reclaim the shoelace you've used, so get another one the same way you did the first.
Then use it on the wall panel to tie the cube to the top ring.
Clicking and holding the dial now makes the cube rise. This reveals that it's a cover over a capsule, but you don't have any free hands to grab it.
But you still get a clue that you can use to unlock the middle drawer.
The portion of the shoelace that appears in the narrow section is partially obscured, leaving just three stripes of different colors: blue, green, green.
So click the buttons 3, 2, 2 times. Unsurprisingly, this drawer also contains a shoelace and key piece.
Tuned
Use the clues from the wheel and wall clock to set the radio correctly.
The numbers 5, 1, 2, 11, 9 appear on the RRRLL halves of the clock.
So click those buttons on the radio, and a blue spot lights up there. The music doesn't change though.
Maybe you need to jiggle the antenna a bit…
Click it a few times, and the antenna comes off! Oh well, it must have been loose anyway.
Number
Enter the frequency from the radio (954) into the wall box to open it and get a shoelace.
Reach
Use the antenna to pull the string out of the toilet window.
Of course, the string is another shoelace! You need to pull on it a few times before it comes loose.
Prod
Use the antenna on the wall panel to brace it diagonally.
Since it's at a weird angle, turning the dial makes the cover bump into it and tilt sideways, rolling the key piece capsule within reach.
Finish
The six key pieces have combined to form the door key. Don't forget to claim another shoelace item from the wheel, and then click the door to leave!
Item list
6 key pieces:
Top left: in top drawer
Top middle: in middle drawer
Top right: in bottom drawer
Bottom left: under wheel box
Bottom middle: from lace device/on wall box
Bottom right: from wall panel
9 shoelaces:
(Usable) from wheel box
On radio
On potted plant
Under small table
In top drawer
In bottom drawer
In middle drawer
In wall box
From toilet window
Lost Article
Note that the new Gotmail games have official video walkthroughs on their pages, which they recommend you check out just in case the puzzles change. The walkthrough below will cover puzzles in a different order.
Exploration
('ll ignore most of the clutter in this room.)
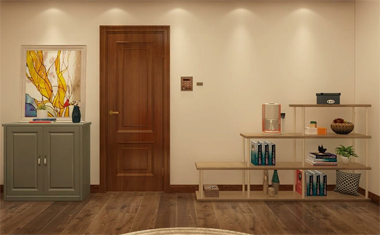
The keypad beside the locked door has ×2 printed on a metal plate beside. On the left, the cupboard beneath the painting has a pair of sneakers, one of them having blue dots printed on its sole, as well as a pair of boots. On the right, there are some shelves full of items, including a coffee maker that's currently empty, a black box with three shaped holes, and a wooden box with a compass rose printed on it that opens up to reveal a coffee cup (and saucer).
Turn right to face the windows, which are mostly covered by blinds. Looking closely, you find some colored shapes printed on the bottom end of the left blinds.
Turn right. A cross hangs on the wall, fastened with a screw. To the left of it, a desk has three drawers, the top one locked, the middle one containing a rather unusual star key, and the bottom one containing a box with a keypad and the word FOUR. Check the top of the desk to find a notebook with a lock and a mug which you can turn twice to reveal two letters and two colored shapes. To the right of the cross, there's a small orange refrigerator with a lock above its handle, as well as a small carved wooden box on the floor which has a locked white panel/box on its inside.
Check under the desk to find a four-digit clue.
Turn right. The middle of this wall has a wooden section that looks like a door without a handle, and a chest of drawers to its right, but you can't zoom in on either of them. On the left, a notice board has its glass case screwed shut, but you can faintly read the picture clue there.
Check the boots to find a yellow stick in them. That stick further separates into two to reveal a screwdriver tip.
Hidden
Use the clue from the bottom of the table to unlock the box in the bottom drawer.
The four-digit clue reads 6261.
Open the box to find a tiny heart key.
Unlock (heart)
Use the heart key to unlock the notebook, which only has drawings of a sun and moon on its left page.
Unlock (star)
Use the star key to unlock the box beside the fridge, which contains a yellow handle.
Plus
Attach the handle to the screwdriver tip. (As far as I know, this is entirely optional and you can just use the tip to unscrew stuff.)
Then use the completed screwdriver to unscrew the cross and detach it, then take the red stick from the wall compartment behind. This stick also separates into two parts to reveal a note with some numbers.
The cross ends up on the floor, and you can flip it over to see a smaller cross-shaped hole.
Also use the screwdriver to remove the noticeboard. There's a safe in the wall behind, and it needs a three-digit code.
The board also ends up on the ground, where you can flip it over to view another clue.
Minus
Use the clues from the removed noticeboard to unlock the safe that was behind it.
Using the numbering system shown on the picture, SW (southwest, halfway between S and W) would be 225° and NE would be 45°, so that the clue on the back works out to 225−45=180.
Enter 180 in the safe and open it to find a round key.
Unlock (round)
Use the round key to unlock the top drawer and find a green cup full of coffee beans.
Times
Use the number clue from the note to unlock the door.
The position of the
x's on the last number suggests that you might be able to work those two digits out from the other two.Indeed, the middle two digits of each number on the note form the product of the other two: in 8405, 40=8×5 and so on.
This means that the missing numbers are 4×8=32, so that the bottom row should read 4328.
That's not all! The keypad tells you to ×2, i.e. double your answer.
So enter 8656 to open the door.
Exploration 2
You're now out on a balcony, and there's another locked door on the left.
Turn left to face that door, then turn left again to face the doorway back.
Turn left once again to get a low-perspective view of a tall flower pot and green cabinet. Click the flower vase repeatedly to change the view and shift it aside to reveal another clue with colored shapes. As for the cabinet, it has a four-digit lock and you see a picture of a cup on its left door.
Look under the cabinet to find a moon key.
Unlock (moon)
Use the moon key to unlock the fridge, then open it and take the bottled water from inside.
Blend
Fill the coffee maker with water (from the side) and beans (from the top).
Since the only button on the coffee maker that works is the top round button on the front, push it to make some coffee.
Back out and zoom in again, and the coffee is ready to enjoy! Use the cup on the maker to fill it.
While examining the full cup, click to drink it.
Some colored shapes appear on the bottom!
Assortment
Use all five colored shape clues you've seen to unlock the green cabinet.
Each shape always appears with the same color and the cup drawing indicates that the four-digits of the code correspond to the colored shapes.
Reviewing the clues on the shoe, blinds, pen holder and balcony floor, you find that those four clues have a total of 5 blue circles, 3 yellow stars, 2 red triangles and 3 green squares.
So enter 5323 into the lock, and open the cabinet to find a blue stick on top of some stuff.
Fit
Place the red, yellow and blue sticks into the box on the top right of the shelf (they will only fit holes with the matching shape).
The box opens and you find a small wooden cross.
Place the small cross into the big cross on the ground. This opens up a small panel with a sun key.
Sky
You now have three keys that all don't fit in the remaining keyhole (on the balcony door).
Also, there's still one clue you haven't used: the drawings on the notebook.
(Make sure you've used the star key and read the notebook, or else the game won't let you do this.)
While the sun key has a circular handle, the moon and star keys only have semicircular ones.
So combine the moon and star keys to form a double key that opens the door!
Escape
You seem to be in an elevator lobby and the only way out is through the gate.
Thankfully, the sun key fits perfectly, getting you out! Congratulations!
(Clicking the new icon in your inventory returns you to the title screen.)
Lost Article (Original)
Your colleague's just dealt with a stalker but lost her grandmother's earrings. Find them before trouble finds you.
(After the intro cutscene, an ad fades in on the screen. At least, there would be if Gotmail was still running them. Click the small close button near the right edge of the game to get rid of it.)
Exploration
(Some objects can be acted on after you've read their descriptions, but some cannot. Try clicking multiple times on each one.)
After listening/clicking your way though the mysterious call, you can finally look around the room.
The locked door here has a keypad beside a plate reading x2, and the cabinet on the left has a pair of shoes with AAA printed on the sole of one of them, as well as a pair of boots. The shelves on the right hold a coffee maker without beans or water, a black box with three shaped holes, a red box with compass points indicated on it, and some rows of uninteresting books.
Check the left side of the cabinet to find a metal shoehorn.
Turn right to find two windows and a butterfly picture in between them. You can raise and lower the curtain on each window to enjoy a bit of city view, but clicking the bottom of the left curtain reveals a letter clue printed there.
Turn right to face a wall with a cross in the middle secured with a screw. The table on the left has three drawers. The top drawer is locked, the middle one contains a rainy photo of flowers, and the bottom one contains a box with a keypad and the word FOUR. Looking in the bin, you find a notebook and put it back on the desk, where you find that it's locked. Checking the top of the table, you also see a lamp and lion figure, as well as a pen holder that turns twice to reveal some letters. To the right of the cross, you see a red locked refrigerator and a small box on the floor beside it that has a locked white panel inside.
Click under the table to find a cryptic word clue.
While in the middle drawer, click the back of it to find a green cup that's stuck.
Turn right to face a wall divided into two by a wooden panel. On the left, a corkboard holds a picture of a constellation. On the right, there's a chest of drawers but both are empty.
Examine the boots and click them several times. They're mud-crusted and they rattle a bit, and that's because of the yellow stick that eventually falls out.
Now that you're looking at the stick, click it to split it into two, and take the mysterious note inside.
Reach
Use the shoehorn to retrieve the green can of coffee beans from the middle drawer.
Corners
Find somewhere you can use the clue from the mysterious note, probably something rectangular.
You can knock on the corners of the corkboard.
So follow the note and click the ↗↗↘↙↖↙ corners, and the corkboard comes loose onto the floor, revealing a safe with a lock you can type into.
Zoom in on the corkboard and turn it over to find an unusual picture, then click it to pop out a window with a closer view of that picture.
Oddly enough, somebody has printed out your entire story onto the corkboard, together with the logo of the game. And as you stare at it, something unusual happens.
Divide
Use the clues from the corkboard to unlock the wall safe where it was.
The text that shows up after a while in the popup reads "(NE+SW)×(NE+SE)÷E".
The required bearings are indicated by the picture on the front, and substituting them gives (45+225)×(45+135)÷90=540.
So type 540 into the safe and open it to find a silver key.
Silver
Use the silver key to unlock the top desk drawer. Inside, there's a "long and narrow" wooden box with a password lock.
Fall
Check the bottom of the wooden box you just picked up to find a darkened umbrella mark, which is a hint for how to open it.
Hint: the password for this box is also a number.
The description of the photo in the drawer references a rainy day, and you know exactly what day that is from the date printed in its corner.
Enter 11723 into the box to unlock it, and open the box to find a star key.
Stellar
Use the star key to unlock the box beside the fridge, and take a screwdriver from inside.
Unscrew
Use the screwdriver to remove the cross on the wall, and then take the red stick from inside.
Just like the yellow one, this stick splits into two parts, revealing another mysterious note.
XX
Use the clue from the second mysterious note to unlock the room door.
As the note tells you, the code for the door changes regularly over four periods, and is now on the last of them. Unfortunately, that means you need the last one and it's partially redacted!
Let's just hope they chose weak passwords according to a pattern.
The middle two digits of each number are the product of the other two digits, which means that you can work the last code out from 4×8=32 as 4328.
But the keypad reminds you to apply a ×2 to the answer.
So enter 8656 into the keypad to open the door.
Exploration 2
You get a different view of the balcony according to which side of the door you click.
Start on the left side, where there's a wall planter full of cosmos flowers. Looking closely at the soil, you spot a bar magnet. There's also a locked door at the left, through which you can see yet another gate.
On the right side, there's a locked green cabinet with a password lock and the shape of a coffee cup carved into its left door. You see a large plant pot on the left and can slide it aside to reveal some text on the floor.
Look under the cabinet to find something shiny that you can't reach.
Reach 2
The shoehorn is just enough to reach whatever's under the green cabinet, but not enough to pull it over.
But you can attach the magnet to the shoehorn for extra gripping power, which lets you get the moon key.
Lunar
Use the moon key to unlock the fridge, and take the mineral water bottle from it.
Polar
Seeing the bar magnet reminds you of something you saw earlier. Where is it?
(Retrieve the magnet so you can reuse it.)
The compass on the red box has four points, but only north and south are labeled.
So place the magnet on it and click a few times to make it spin around. The lid comes off and you find a red coffee cup on its saucer.
Brew
Now you can operate the coffee machine. Zoom in on the top and pour the beans in, and also pull the water tank out and fill it with water.
Once you've decided how you want your coffee, push that button, back out and turn around a bit, and the coffee maker should now be full.
Use the cup on the pot to fill it, then click it to drink. It's certainly delicious enough to make you want another, maybe even try a different grind.
Once you brew a cup of fine ("narrow") ground coffee and drink it, some letters appear on the bottom of the cup.
Printed
Use the letter clues you've seen throughout the game to unlock the green cabinet.
The cup marking on the cabinet indicates that you need to use the clue from the coffee cup to interpret the other four clues.
The clues on the shoe, curtain, pen holder and balcony floor are a mess, so all you can do is count the letters. The fourteen letters among those clues consist of 6 As, 3 Ms, 3 Os and 2 Ys.
This means that AOYAMA corresponds to the digits 632636. Type that into the cabinet lock and open it to find a blue stick on top of some stuff.
Sticks
Place all three sticks where they fit in the black box on the shelf, and open it to find a silver cross.
The Number
There's one clue you haven't used yet: the text engraved into the bottom of the table, which can only be a clue for the bottom drawer box.
Hints:
1. There are no other clues that match this, so it's just a matter of finding the hidden message.
2. There are four digits, so each string of letters indicates one digit.
3. Each digit is spelled in English.
4. How is FOUR a hint?
Each "word" only has enough letters to spell out exactly one of the ten digits. Without the letters H, U, V or Z, you can't spell 0, 3, 4, 5, 7 or 8.
It should now be easy to see that the first word has SIX hidden in it, the second has ONE and so on. Also, looking closely at which letters are "hidden" reveals that they are spaced regularly.
So take the first letter of every four, and the weird words get reduced down to the code 6121. Enter that into the box and open it to find a heart key.
Love
Use the heart key to unlock the notebook (that you moved onto the table). It has some romantic commentary about the moon, sun and God, and then a mention of red fruit turned black.
Since you've already completed the fruit part by making coffee, you just have to interpret the other pages.
Examine the cross on the ground, and flip it over to find a cross-shaped hole on the bottom.
Place the antique cross in that hole, and open the hidden panel next to it to find the sun key.
Pair
As the book suggests, you need to add something else to the moon key. Unlike what the book says, the star key fits onto the moon key perfectly. (And if for some reason you did this step first, you can just take them apart later.)
Use the combined star-and-moon key to unlock the balcony door. You're now in an elevator lobby, but the elevator doesn't work. And the stairs are blocked off by a locked gate. And the game insists on calling the bin a mail box for some reason.
Thankfully, the sun key fits perfectly to unlock the gate, but are you forgetting something?
Look behind the "mail box" to find the earrings.
Now you can click the stairs to end the game!
problem on Lost Article
the code after looking at all 4 spots says the answer is 5323. i typed it in the green cabinet in the 2nd room, but it won't open. not sure what this is about.
Hope someone can help.
I noticed the Official Video Walkthru for Lost Article has a typo
On the paper clue with 4xx8 on the bottom, it has
3328 x 2 = 8656 as the answer, rather than 4328.
Update